#SSO
gatein.sso.enabled=true
gatein.sso.callback.enabled=${gatein.sso.enabled}
gatein.sso.login.module.enabled=${gatein.sso.enabled}
gatein.sso.login.module.class=org.gatein.sso.agent.login.SSOLoginModule
gatein.sso.josso.agent.config.file=sso/josso/1.8/josso-agent-config.xml
gatein.sso.josso.properties.file=file:${jboss.home.dir}/standalone/configuration/gatein/configuration.properties
gatein.sso.josso.host=localhost:8888
gatein.sso.josso.base.url=http://${gatein.sso.josso.host}/josso/signon
gatein.sso.server.url=${gatein.sso.josso.base.url}/login.do
gatein.sso.portal.url=http://localhost:8080
gatein.sso.filter.logout.class=org.gatein.sso.agent.filter.JOSSOLogoutFilter
gatein.sso.filter.logout.url=${gatein.sso.josso.base.url}/logout.do
gatein.sso.filter.login.sso.url=${gatein.sso.server.url}?josso_back_to=${gatein.sso.portal.url}/@@portal.container.name@@/initiatessologin
This Single-Sign-On plugin enables the seamless integration between GateIn Portal and the JOSSO Single-Sign-On Framework. Details about JOSSO can be found here.
Setting up this integration consists of two steps: installing/configuring a JOSSO server, and setting up the portal to use the JOSSO server.
We are supporting JOSSO versions 1.8 and 2.2. Integration steps are slightly different among these 2 versions. So we will separately describe integration for JOSSO 1.8 and for JOSSO 2.2.
Login workflow
Login workflow for JOSSO si quite similar like for CAS, so you can look Central Authentication Service (CAS)#Login workflow for more details. Basically after click to Sign in is user redirected to JOSSO login screen where he provides his credentials and then he is redirected back to GateIn Portal. InitiateLoginFilter will then delegate validation of JOSSO ticket, which is in request parameter josso_assertion_id to JOSSOAgent component, which performs validation of ticket with JOSSO server via back channel. Actually there is communication via web services between JOSSO agent and JOSSO server. After successful validation is user identity successfully established and user is logged in GateIn Portal.
For logout part, there is also JOSSOLogoutFilter, which performs logout on both GateIn Portal and JOSSO server (similarly like for CAS).
For JOSSO authentication part, we again support authentication plugin, which is able to send REST request to GateIn Portal and then obtain response from GateIn Portal and authenticate user on JOSSO side based on it. However this authentication plugin is supported only for JOSSO 1.8 (not supported for JOSSO 2.2 at this moment)
Integration with JOSSO 1.8
In this sample setup, we will assume again that GateIn Portal will be running on JBoss AS7 and on localhost:8080 and JOSSO server will be running on Tomcat on localhost:8888 .
There are also differences between various JOSSO minor versions (especially betweeen JOSSO versions 1.8.1 and 1.8.2) so instructions will be slightly different between various versions. This will be pointed in text in more details.
JOSSO server
This section describes how to set up the JOSSO server to authenticate against the GateIn Portal with usage of REST authentication plugin.
In this example, the JOSSO server will be installed on Tomcat.
Obtaining JOSSO
JOSSO can be downloaded from http://sourceforge.net/projects/josso/files/. Use the package that embeds Apache Tomcat.
Once downloaded, extract the package into what will be called JOSSO_HOME in this example.
Modifying the JOSSO server
-
For using SSO authentication plugin with JOSSO (not-mandatory but recommended. See Login workflow for details)
-
If you have JOSSO 1.8.1, then copy the files from GATEIN_SSO_HOME/josso/josso-181/plugin into the Tomcat directory (JOSSO_HOME). (GATEIN_SSO_HOME points to directory with GateIn Portal as mentioned in Single-Sign-On (SSO) )
-
If you have JOSSO 1.8.2 or newer, then copy the files from GATEIN_SSO_HOME/josso/josso-182/plugin into the Tomcat directory (JOSSO_HOME).
This action should replace or add some JAR files to the JOSSO_HOME/webapps/josso/WEB-INF/lib directory and also the files:
JOSSO_HOME/lib/josso-gateway-config.xml
JOSSO_HOME/lib/josso-gateway-gatein-stores.xml
JOSSO_HOME/webapps/josso/WEB-INF/classes/gatein.properties - This file may need to be reconfigured according to your GateIn Portal environment (you need to use host and port where your GateIn Portal is running as this will be used by Authentication plugin to send REST request over HTTP)
-
-
Edit TOMCAT_HOME/conf/server.xml and replace the 8080 port to 8888 to change the default Tomcat port and avoid a conflict with the default GateIn Portal port (for testing purposes).
Port ConflictsIf GateIn Portal is running on the same machine as Tomcat, other ports need to be changed in addition to 8080 to avoid port conflicts. They can be changed to any free port. For example, you can change the admin port from 8005 to 8805, and AJP port from 8009 to 8809.
-
Start Tomcat now that allows access to http://localhost:8888/josso/signon/login.do. However, if you are using SSO Authentication plugin, the login will not be available at this stage as your GateIn Portal is not set yet
Setup the JOSSO client
-
You need to configure couple of configuration properties in file GATEIN_HOME/standalone/configuration/gatein/configuration.properties . Find SSO section in this file and change/add properties so that it looks like this:
Most of the properties were already described in Central Authentication Service (CAS)#Configuration properties details . For JOSSO some of the properties are different, especially URL for redirection to login/logout to JOSSO server and Logout filter class is now org.gatein.sso.agent.filter.JOSSOLogoutFilter . Important property is gatein.sso.josso.host, which points to location of JOSSO server. Also gatein.sso.portal.url needs to be changed if you expect GateIn Portal to be accessed on different URL than localhost:8080.
Property gatein.sso.josso.agent.config.file points to location of Agent configuration file, which is relative to classpath. So the agent file location is actually in GATEIN_HOME/gatein/gatein.ear/portal.war/WEB-INF/classes/sso/josso/1.8/josso-agent-config.xml but normally you won't need to change anything here. -
Update SSO module. JOSSO has some specific dependencies, which differ between various JOSSO versions. So for JOSSO setup, we are replacing original org.gatein.sso AS7 module with specific module for proper JOSSO version, which can be found in SSO packaging. You need to:
-
Delete directory GATEIN_HOME/modules/org/gatein/sso
-
If you have JOSSO 1.8.1 or older, then copy directory GATEIN_SSO_HOME/josso/gatein-josso-181/modules/org/gatein/sso into GATEIN_HOME/modules/org/gatein/
-
If you have JOSSO 1.8.2 or newer, then copy directory GATEIN_SSO_HOME/josso/gatein-josso-182/modules/org/gatein/sso into GATEIN_HOME/modules/org/gatein/
So actually original org.gatein.sso module is replaced with the new one specific for JOSSO.
-
From now on, all links redirecting to the user authentication pages will redirect to the JOSSO centralized authentication form. If you set Authentication plugin for JOSSO, you can login with GateIn Portal credentials (like john/gtn) on JOSSO side.
Integration with JOSSO 2.2
JOSSO 2.2 has different approach than JOSSO 1.8. The idea is that even non-technical people are able to create their own SSO environment by model it in flash web application called atricore-console. But now it's much harder to plug our own Authentication plugin as it's not easily possible to configure existing JOSSO 2.2 environment via Spring XML files similarly like it was with JOSSO 1.8.
So actually we don't support plugging our own AuthenticationPlugin into JOSSO 2.2 similarly like for other SSO solutions. Important is that we still support agent part, so nothing is changed from portal perspective.
JOSSO 2.2 server setup
You can downloaded JOSSO 2.2.0 from JOSSO site and follow the instructions from JOSSO 2 quickstart in http://www.josso.org/confluence/display/JOSSO1/JOSSO2+Quick+start . I expect that after unzip and running the JOSSO, you can access atricore console on http://server.local.network:8081/atricore-console (server.local.network is my virtual host defined in /etc/hosts )
Then follow other instructions from quickstart in flash console together with instructions here:
-
Login as admin/admin
-
Create new empty Identity appliance:
Name: MYFIRSTIA
Realm name: com.mycompany.myrealm
Appliance location: http://server.local.network:8081 -
Create new Identity provider named AcmeIDP (let all options default)

Identity Provider configuration -
Create Identity vault IDPUsers and connect it with AcmeIDP via Identity lookup connection
-
Create Service provider called SP1 but let the hosts to be on server.local.network:8081

Service Provider configuration -
Create Identity vault SP1Users and wire it with SP1 via Identity lookup connection
-
Create empty temporary directory /tmp/tomcat7 on your filesystem and then in atricore console create new Execution environment of type Tomcat with params:
Name: SP1EE
Version: 7.0.x
Target host: Local
Install home: /tmp/tomcat7 (Directory /tmp/tomcat7 must exists, but it could be empty directory without any tomcat presented as we don't overwrite existing setup or install demo apps)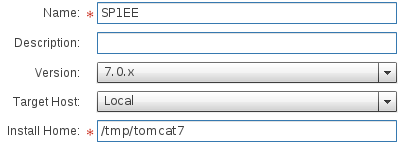
SP Execution Environment configuration -
Wire SP1 and SP1EE via connection of type Activation. All parameters of this new connection can have default values except for parameter Partner application location, which needs to be changed to http://localhost:8080/portal .
-
Wire SP1 and AcmeIDP via connection of type Federated connection
-
Click Save and save this model
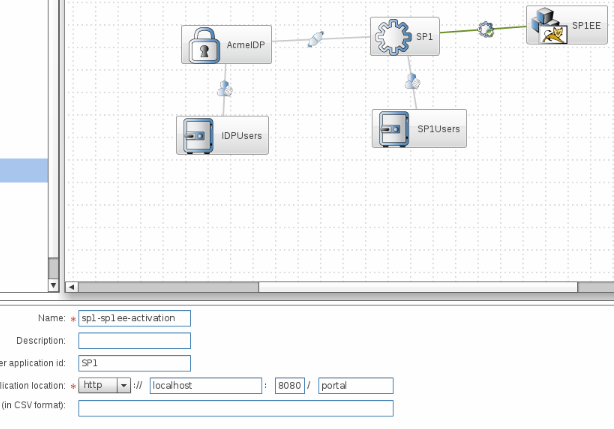
Whole picture overview with SP connection detail -
Go to tab Identity appliance lifecycle management and go through lifecycle of Identity appliance (Saved => Staged => Deployed => Started) as suggested in quickstart
-
Go to tab Account & Entitlement management and create some users. We need to add users this way, because REST callbacks to GateIn Portal are not supported at this moment. So let's create users:
"john" with password "password"
"root" with password "password"
"demo" with password "password"
JOSSO client setup
-
Assuming again that you have GateIn Portal on JBoss AS7, you need to change properties in GATEIN_HOME/standalone/configuration/gatein/configuration.properties in SSO sections. Let's ssume that JOSSO 2.2 is running on server.local.network:8081, name of JOSSO Identity appliance is MYFIRSTIA, name of created service provider is SP1 and name of execution environment is SP1EE. Everything was described in JOSSO 2.2 server setup . Note that gatein.sso.filter.logout.url is empty now as logout URL will be obtained from JOSSO agent configuration in file GATEIN_HOME/gatein/gatein.ear/portal.war/WEB-INF/classes/sso/josso/2.2/josso-agent-config.xml
# SSO gatein.sso.enabled=true gatein.sso.callback.enabled=${gatein.sso.enabled} gatein.sso.login.module.enabled=${gatein.sso.enabled} gatein.sso.login.module.class=org.gatein.sso.agent.login.SSOLoginModule gatein.sso.filter.initiatelogin.enabled=false gatein.sso.filter.initiatelogin.josso2.enabled=true gatein.sso.josso.agent.config.file=sso/josso/2.2/josso-agent-config.xml gatein.sso.josso.properties.file=file:${jboss.home.dir}/standalone/configuration/gatein/configuration.properties gatein.sso.portal.url=http://localhost:8080 gatein.sso.filter.logout.class=org.gatein.sso.agent.filter.JOSSOLogoutFilter gatein.sso.filter.logout.url= gatein.sso.josso.host=server.local.network:8081 gatein.sso.server.url=http://${gatein.sso.josso.host} gatein.sso.josso.identityApplianceId=MYFIRSTIA gatein.sso.josso.partnerAppId=SP1 gatein.sso.josso.partnerAppPoint=SP1EE gatein.sso.filter.login.sso.url=${gatein.sso.server.url}/IDBUS/${gatein.sso.josso.identityApplianceId}/${gatein.sso.josso.partnerAppPoint}/JOSSO/SSO/REDIR?josso_back_to=${gatein.sso.portal.url}/@@portal.container.name@@/josso_security_check&josso_partnerapp_id=${gatein.sso.josso.partnerAppId} -
Update SSO module in AS7 similarly like for JOSSO 1.8.2. So you need to:
-
Delete directory GATEIN_HOME/modules/org/gatein/sso
-
Copy directory GATEIN_SSO_HOME/josso/gatein-josso-182/modules/org/gatein/sso into GATEIN_HOME/modules/org/gatein/
-
-
Start GateIn Portal, then access http://localhost:8080/portal/ and click Sign in. Now you will be redirected to JOSSO, but you will need to login with username/password created via JOSSO console (aka. john/password) as REST callbacks are not supported. After successful login to JOSSO, you will be redirected to GateIn Portal as john.
Setup with portal on Tomcat
If you have GateIn Portal on Tomcat 7 and you want to configure it for SSO against JOSSO, you additionally need to add ServletAccessValve into server.xml similarly like for CAS setup. See Central Authentication Service (CAS)#Setup with portal on Tomcat for more details.
Also you need to copy the jars for proper JOSSO version from GATEIN_SSO_HOME/josso/gatein-josso-18X/modules/org/gatein/sso/main into GATEIN_HOME/lib/ . Instead of gatein-josso-18X use:
-
gatein-josso-181 if you are on JOSSO 1.8.1 or older
-
gatein-josso-182 if you are on JOSSO 1.8.2 or newer or on JOSSO 2.2