<samlp:AuthnRequest AssertionConsumerServiceURL="http://localhost:8080/portal/dologin" ID="ID_101dcb5e-f432-4f45-87cb-47daff92edef" IssueInstant="2012-04-12T17:53:27.294+01:00" ProtocolBinding="urn:oasis:names:tc:SAML:2.0:bindings:HTTP-POST" Version="2.0">
   <saml:Issuer>http://localhost:8080/portal/dologin</saml:Issuer>
   <samlp:NameIDPolicy AllowCreate="true" Format="urn:oasis:names:tc:SAML:2.0:nameid-format:transient"/>
</samlp:AuthnRequest>
SAML (Security Assertion Markup Language) is Oasis standard for exchanging authentication and authorization data between security domains. SAML 2.0 is an XML-based protocol that uses security tokens containing assertions to pass information about a principal (usually an end user) between an identity provider and a web service. SAML 2.0 enables web-based authentication and authorization scenarios including single sign-on (SSO).
SAML2 standard is described in set of specifications, which provides exact format of XML messages and context how these messages are exchanged between Identity Provider (IDP, Web application, which acts as SSO provider and users are authenticated against it) and Service Provider (SP, Web application, which is used by client who wants to authenticate). See http://docs.oasis-open.org/security/saml/v2.0/ for more information about specifications.
The SAML2-based authentication is provided in GateIn Portal SSO component. We support scenarios with GateIn Portal acting as Service Provider (SP) or Identity Provider (IDP).
SAML2 Overview and authentication workflow
For GateIn Portal and SAML2 integration, we are using JBoss project Picketlink Federation, which provides solution for most important parts of SAML2 specification. Especially it supports SSO authentication with SAML2 HTTP Redirect Binding and SAML2 HTTP Post Binding and it supports SAML2 Single Logout feature.
SSO authentication is based on circle of trust between SP and IDP.
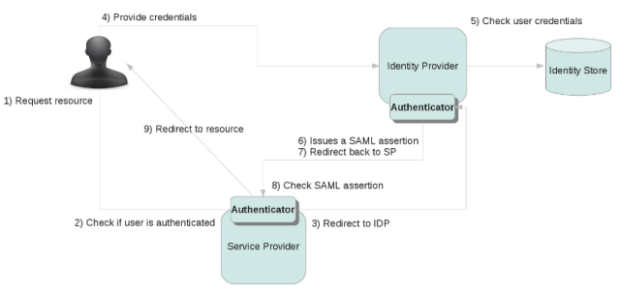
The authentication works as follows (flow with GateIn Portal as SAML2 SP):
-
User sends request to secured resource like http://localhost:8080/portal/dologin
-
GateIn Portal will check if user is already authenticated and if yes, grant access to resource. Otherwise continue with flow below.
-
There is special Tomcat valve, which needs to be configured for portal context. This Valve will create SAML Request, which is basically XML message. Example of message:
Valve will encapsulate SAML request into HttpResponse and it redirects it to IDP. Picketlink Federation supports SAML Redirect Binding, which basically means that SAML XML Request message is Base64 encoded and URL encoded and it is appended as URL parameter to GET request, which will be send to IDP. PL Fed also supports SAML POST Binding where is message encoded into Base64 and sent in the body of POST request.
-
IDP parses XML with SAML request and it sends login screen back to client. Now client (user) needs to authenticate himself. SAML specification does not mandate how exactly should be authentication of client on IDP side performed.
-
User fills his credentials into IDP FORM and submits request for JAAS authentication. GateIn Portal SSO component provides login module SAML2IdpLoginModule, which will authenticate user by sending callback request via REST API back to GateIn Portal. This is similar approach like authentication with other SSO providers like CAS, which are also leveraging this REST service.
Portal administrators are free to use their own login module stack instead of our REST callback based login module. However they need to make sure that authenticated users also need to exist in GateIn Portal database. Otherwise their users may have authorization errors with 403 response when they try to access portal.
-
So after successful authentication, IDP will create SAML assertion ticket and it creates SAML Response message with this ticket. Message can looks like this:
<samlp:Response ID="ID_5291c49e-5450-4b3b-9f99-f76606db9929" Version="2.0" IssueInstant="2012-04-12T17:53:59.237+01:00" Destination="http://localhost:8080/portal/dologin" InResponseTo="ID_101dcb5e-f432-4f45-87cb-47daff92edef"> <saml:Issuer>http://localhost:8080/idp/</saml:Issuer> <samlp:Status> <samlp:StatusCode Value="urn:oasis:names:tc:SAML:2.0:status:Success"/> </samlp:Status> <saml:Assertion ID="ID_ebe89398-1e27-4257-9413-c3c17c40c9df" Version="2.0" IssueInstant="2012-04-12T17:53:59.236+01:00"> <saml:Issuer Format="urn:oasis:names:tc:SAML:2.0:nameid-format:persistent">root</saml:Issuer> <saml:Subject> <saml:NameID Format="urn:oasis:names:tc:SAML:2.0:nameid-format:persistent">root</saml:NameID> <saml:SubjectConfirmation Method="urn:oasis:names:tc:SAML:2.0:cm:bearer"> <saml:SubjectConfirmationData InResponseTo="ID_101dcb5e-f432-4f45-87cb-47daff92edef" NotBefore="2012-04-12T17:53:59.236+01:00" NotOnOrAfter="2012-04-12T17:54:06.236+01:00" Recipient="http://localhost:8080/portal/dologin"/> </saml:SubjectConfirmation> </saml:Subject> <saml:Conditions NotBefore="2012-04-12T17:53:57.236+01:00" NotOnOrAfter="2012-04-12T17:54:06.236+01:00"/> <saml:AuthnStatement AuthnInstant="2012-04-12T17:53:59.237+01:00"> <saml:AuthnContext> <saml:AuthnContextClassRef>urn:oasis:names:tc:SAML:2.0:ac:classes:Password</saml:AuthnContextClassRef> </saml:AuthnContext> </saml:AuthnStatement> <saml:AttributeStatement> <saml:Attribute Name="Role"> <saml:AttributeValue xsi:type="xs:string">users</saml:AttributeValue> </saml:Attribute> <saml:Attribute Name="Role"> <saml:AttributeValue xsi:type="xs:string">administrators</saml:AttributeValue> </saml:Attribute> </saml:AttributeStatement> </saml:Assertion> </samlp:Response> -
Message is then encapsulated into HttpResponse and redirected back to SP (GateIn Portal).
-
On GateIn Portal side is SAML response message decoded again by the Tomcat Valve and if assertion from response is valid, then username and his roles are added into ThreadLocal context variable. Valve then triggers JAAS authentication. GateIn Portal component will provide login module SAML2IntegrationLoginModule, which will parse authenticated username and it will perform GateIn Portal specific operations, like creating Identity object and registering it into IdentityRegistry. Now user is successfully authenticated.
-
User is redirected back to the secure resource http://localhost:8080/portal/dologin, which in next turn will redirect him to GateIn Portal as authenticated user. If the user wants to authenticate against different SP application within same browser session (GateIn Portal on different host or completely different web application), then he does not need to provide credentials again on IDP side because he has been already authenticated against IDP. So he has automatic authentication thanks to SSO.
Previous scenario covered the case with GateIn Portal as SAML2 SP and different web application acting as SAML2 IDP. Scenario with GateIn Portal as SAML2 IDP is little different (for example there is no usage of SAML2IdpLoginModule). Both cases will be covered by example below.
In next sections, we will go through various scenarios, which describes how you can leverage SAML2 in GateIn Portal and there is description of all needed configuration changes.
Portal as SAML2 SP and SAML2 IDP
In this scenario we will use GateIn Portal as SAML2 SP and another instance of GateIn Portal as SAML2 IDP. SP will be executed on virtual host www.sp.com and IDP will be on virtual host www.idp.com . Both GateIn Portal instances will be on JBoss AS7. The idea is that users, who want to authenticate against GateIn Portal on www.sp.com will be redirected to www.idp.com where they need to authenticate and after successful authentication on IDP the SAMLResponse will be send back to www.sp.com and user will be redirected back.
You can look at video http://vimeo.com/45841256, which is showing GateIn Portal and SAML2 in practice
Configuration
-
We assume that you have two virtual hosts running on single physical machine. So you will need to add virtual hosts to the /etc/hosts file. On Linux, it can be done by adding some entries like those (use real IP addresses according to your environment):
192.168.2.7 www.sp.com
10.11.11.141 www.idp.com
-
We assume that GateIn Portal, which will act as SAML2 SP is in directory GATEIN_SP_HOME. You need to configure properties in SSO section of file GATEIN_SP_HOME/standalone/configuration/gatein/configuration.properties like this:
# SSO
gatein.sso.enabled=true
gatein.sso.callback.enabled=${gatein.sso.enabled}
gatein.sso.login.module.enabled=${gatein.sso.enabled}
gatein.sso.login.module.class=org.gatein.sso.agent.login.SAML2IntegrationLoginModule
gatein.sso.filter.login.sso.url=/@@portal.container.name@@/dologin
gatein.sso.filter.logout.enabled=true
gatein.sso.filter.logout.class=org.gatein.sso.agent.filter.SAML2LogoutFilter
gatein.sso.filter.initiatelogin.enabled=false
gatein.sso.valve.enabled=true
gatein.sso.valve.class=org.picketlink.identity.federation.bindings.tomcat.sp.ServiceProviderAuthenticator
gatein.sso.saml.config.file=/WEB-INF/conf/sso/saml/picketlink-sp.xml
gatein.sso.idp.host=www.idp.com
gatein.sso.idp.url=http://${gatein.sso.idp.host}:8080/portal/dologin
gatein.sso.sp.url=http://www.sp.com:8080/portal/dologin
# WARNING: This bundled keystore is only for testing purposes. You should generate and use your own keystore!
gatein.sso.picketlink.keystore=/sso/saml/jbid_test_keystore.jks
Most of the properties were already described in Central Authentication Service (CAS)#Configuration properties details or in SPNEGO#Portal configuration . The ones, which are specific/different for SAML2 SP are:
-
gatein.sso.login.module.class - For GateIn Portal integration as SAML2 SP, we need to use login module class org.gatein.sso.agent.login.SAML2IntegrationLoginModule, which will act as JAAS delegate from SSODelegateLoginModule
-
gatein.sso.filter.logout.class - Specific filter class org.gatein.sso.agent.filter.SAML2LogoutFilter is needed to enable support for SAML2 single logout. SAML2 Single logout is special SAML profile, which support logout from all SAML2 SP applications and from SAML2 IDP application at once. Currently it means that when you are logged in GateIn Portal and you click "Sign out", you will be redirected by SAML2LogoutFilter to your SAML2 IDP application where you will be logged out and also IDP will take care of logout from all other SP applications. Finally you will be redirected back to GateIn Portal and logged out here. See Disable SAML2 Single logout if you don't want SAML2 Single logout enabled.
-
gatein.sso.valve.class - There is special valve org.picketlink.identity.federation.bindings.tomcat.sp.ServiceProviderAuthenticator provided by Picketlink federation library. This valve will take care of create and parse SAMLRequest and SAMLResponse messages, so it's one of the most important part for successful SAML2 integration.
-
gatein.sso.saml.config.file - This points to location of SAML2 SP configuration file. Path is relative to portal WAR application, so real location of file is GATEIN_SP_HOME/gatein/gatein.ear/portal.war/WEB-INF/conf/sso/saml/picketlink-sp.xml . For this simple scenario, you won't need to change anything in this file. But in production environment, you will likely need to generate and use your own keystore and in this case, you need to configure it in this file picketlink-sp.xml. More details in Generate and configure your own keystore .
-
gatein.sso.idp.host - This points to host with SAML2 IDP.
-
gatein.sso.idp.url - This points to URL of IDP application. We assume that you will use another instance of GateIn Portal as SAML2 IDP, so request path will be /portal/dologin in this case.
-
gatein.sso.sp.url - This points to URL of this GateIn Portal, which will be used as SAML2 SP.
-
gatein.sso.picketlink.keystore - This points to location of keystore file. It's relative to classpath of portal WAR application, so real location is GATEIN_SP_HOME/gatein/gatein.ear/portal.war/WEB-INF/classes/sso/saml/jbid_test_keystore.jks
This bundled keystore jbid_test_keystore.jks is intended to be used only for testing purposes. In production environment, you should generate and configure your own keystore. See Generate and configure your own keystore for details.
-
-
We assume that GateIn Portal, which will act as SAML2 IDP is in directory GATEIN_IDP_HOME. You need to configure properties in SSO section of file GATEIN_IDP_HOME/standalone/configuration/gatein/configuration.properties like this:
# SSO
gatein.sso.enabled=false
gatein.sso.valve.enabled=true
gatein.sso.valve.class=org.gatein.sso.saml.plugin.valve.PortalIDPWebBrowserSSOValve
gatein.sso.saml.config.file=/WEB-INF/conf/sso/saml/picketlink-idp.xml
gatein.sso.idp.url=http://www.idp.com:8080/portal/dologin
gatein.sso.idp.listener.enabled=true
gatein.sso.sp.domains=sp.com
gatein.sso.sp.host=www.sp.com
# WARNING: This bundled keystore is only for testing purposes. You should generate and use your own keystore in production!
gatein.sso.picketlink.keystore=/sso/saml/jbid_test_keystore.jks
Details about properties:
-
gatein.sso.enabled - You can see that it's false now. It's because GateIn Portal IDP won't use any external SSO provider, but now it will act itself as SSO provider (accurately SAML2 Identity Provider) for GateIn Portal SP.
-
gatein.sso.valve.class - For IDP we need to use org.gatein.sso.saml.plugin.valve.PortalIDPWebBrowserSSOValve valve, which is able to handle SAML request/response messages from SP applications and react on them.
-
gatein.sso.saml.config.file - Location of configuration file is again relative to portal WAR, so it's GATEIN_IDP_HOME/gatein/gatein.ear/portal.war/WEB-INF/conf/sso/saml/picketlink-idp.xml. For this simple scenario, you won't need to change anything in this file. But in production environment, you will likely need to generate and use your own keystore and in this case, you need to configure it in this file. More details Generate and configure your own keystore . You will also to manually add validating aliases in keystore section if you have more different SP applications on different hosts.
-
gatein.sso.idp.url - URL of this GateIn Portal, which will act as SAML2 IDP
-
gatein.sso.idp.listener.enabled - This will enable special session listener for cleanup records about SAML tickets of expired hosts
-
gatein.sso.sp.domains - Comma separated list of all SP domains, which will be trusted by this IDP
-
gatein.sso.sp.host - Host of application with GateIn Portal SP. If you want more SP applications, you will need to manually edit picketlink-idp.xml file and add ValidatingAlias element for each of them.
-
gatein.sso.picketlink.keystore - Keystore in GATEIN_IDP_HOME/gatein/gatein.ear/portal.war/WEB-INF/classes/sso/saml/jbid_test_keystore.jks
This bundled keystore jbid_test_keystore.jks is intended to be used only for testing purposes. In production environment, you should generate and configure your own keystore. See Generate and configure your own keystore for details.
-
-
Start SP with:
cd GATEIN_SP_HOME/bin
./standalone.sh -b www.sp.com
-
Start IDP with:
cd GATEIN_IDP_HOME/bin
./standalone.sh -b www.idp.com
-
Test it - You can go to URL http://www.sp.com:8080/portal/classic and click to Sign in. At this moment, SAML request will be sent to www.idp.com and you will be redirected to login screen of GateIn Portal IDP on http://www.idp.com:8080/portal/dologin . After successful login, SAML response will be sent back to www.sp.com and you will be redirected to GateIn Portal on www.sp.com as logged user. Now you can go to www.idp.com:8080/portal and you will see that you are logged due to SSO because you already logged in this host.
Now let's go back to www.sp.com:8080/portal and click to Sign out . Now SAML2 single logout will take place and will logged you from both GateIn Portal on IDP and SP. You can check that you are logged out from both www.sp.com:8080/portal and www.idp.com:8080/portal
Disable SAML2 Single logout
SAML2 Single logout is very powerful feature of SAML2 protocol, because trigger logout from any SP application will enforce "global" logout also from IDP and all other SP applications. It makes sense that you may not want this feature to be enabled, so trigger logout from GateIn Portal (click to Sign out link) will logout user only from GateIn Portal on www.sp.com, but user will be still logged on GateIn Portal IDP on www.idp.com and on all other SP applications.
Disable this feature is as easy as switch option in file GATEIN_SP_HOME/standalone/configuration/gatein/configuration.properties :
gatein.sso.filter.logout.enabled=false
Now when you click Sign out in www.sp.com, you will be still logged on GateIn Portal on www.idp.com . There won't be any SAML communication between SP and IDP during logout from www.sp.com .
Generate and configure your own keystore
In this procedure, you will generate and use your own Keystores. This will add more safety into trusted communication between GateIn Portal and IDP because default packaging is using prepackaged keystore jbid_test_keystore.jks. For secure and trusted communication, you will need your own keystores with your own keys. Default jbid_test_keystore is useful only for testing purpose, but it really can't be used in production!!!
-
Go to GATEIN_SP_HOME/gatein/gatein.ear/portal.war/WEB-INF/classes/sso/saml directory and run command:
keytool -genkey -alias secure-key -keyalg RSA -keystore secure-keystore.jks
You need to choose keystore password and private key password. Other values doesn't matter. Let's assume that your keystore password is keystorepass and a private key password is keypass .
-
For simplification purposes, we will use same keystore for SP and IDP. So copy the generated keystore file also to IDP to directory GATEIN_IDP_HOME/gatein/gatein.ear/portal.war/WEB-INF/classes/sso/saml .
-
Configure your new keystore in file GATEIN_SP_HOME/gatein/gatein.ear/portal.war/WEB-INF/conf/sso/saml/picketlink-sp.xml and replace existing KeyProvider definition with:
<KeyProvider ClassName="org.picketlink.identity.federation.core.impl.KeyStoreKeyManager"> <Auth Key="KeyStoreURL" Value="/sso/saml/secure-keystore.jks"/> <Auth Key="KeyStorePass" Value="keystorepass"/> <Auth Key="SigningKeyPass" Value="keypass"/> <Auth Key="SigningKeyAlias" Value="secure-key"/> <ValidatingAlias Key="${gatein.sso.idp.host}" Value="secure-key"/> </KeyProvider> -
Similarly configure keystore in IDP file GATEIN_IDP_HOME/gatein/gatein.ear/portal.war/WEB-INF/conf/sso/saml/picketlink-idp.xml:
<KeyProvider ClassName="org.picketlink.identity.federation.core.impl.KeyStoreKeyManager"> <Auth Key="KeyStoreURL" Value="/sso/saml/secure-keystore.jks"/> <Auth Key="KeyStorePass" Value="keystorepass"/> <Auth Key="SigningKeyPass" Value="keypass"/> <Auth Key="SigningKeyAlias" Value="secure-key"/> <ValidatingAlias Key="${gatein.sso.sp.host}" Value="secure-key"/> </KeyProvider> -
Restart both SP and IDP. Now it will use your new keystore instead of default jbid_test_keystore.jks
It may be slightly better to use certificates signed by certification authority. But for our purpose, it is fine to use self-signed certificates. For more information, you can check additional sources like http://docs.oracle.com/javase/tutorial/security/sigcert/index.html.
Setup with external IDP using REST callback
In previous section, you saw how to configure GateIn Portal to act as SAML2 SP or as SAML2 IDP. Note that you can use GateIn Portal IDP with any other SP web applications. And on the opposite site, you can configure your GateIn Portal SP to authenticate against some external IDP application. You can consult documentation of Picketlink Federation for more details about setup.
But in addition we provide modified version of idp-sig quickstart application from Picketlink Federation. Our modified version is again using REST callback to authenticate against existing GateIn Portal instance. So it's similar like for other SSO scenarios and details are in Central Authentication Service (CAS)#Login workflow . In this case, we need to configure special login module SAML2IdpLoginModule, which is able to connect to GateIn Portal via REST and verify against portal database if provided credentials are valid.
So we assume that you have instance of JBoss AS7 where we deploy our idp-sig.war application. This server will run again on www.idp.com. GateIn Portal will be configured as SP on www.sp.com and it will use this IDP from www.idp.com to authenticate.
-
GateIn Portal SP setup - You need to configure properties in SSO section of file GATEIN_SP_HOME/standalone/configuration/gatein/configuration.properties like this:
gatein.sso.enabled=true
gatein.sso.callback.enabled=${gatein.sso.enabled}
gatein.sso.login.module.enabled=${gatein.sso.enabled}
gatein.sso.login.module.class=org.gatein.sso.agent.login.SAML2IntegrationLoginModule
gatein.sso.filter.login.sso.url=/@@portal.container.name@@/dologin
gatein.sso.filter.logout.enabled=true
gatein.sso.filter.logout.class=org.gatein.sso.agent.filter.SAML2LogoutFilter
gatein.sso.filter.initiatelogin.enabled=false
gatein.sso.valve.enabled=true
gatein.sso.valve.class=org.picketlink.identity.federation.bindings.tomcat.sp.ServiceProviderAuthenticator
gatein.sso.saml.config.file=/WEB-INF/conf/sso/saml/picketlink-sp.xml
gatein.sso.idp.host=www.idp.com
gatein.sso.idp.url=http://${gatein.sso.idp.host}:8080/idp-sig/
gatein.sso.sp.url=http://www.sp.com:8080/portal/dologin
# WARNING: This bundled keystore is only for testing purposes. You should generate and use your own keystore!
gatein.sso.picketlink.keystore=/sso/saml/jbid_test_keystore.jks
There are some differences from previous setup. Now gatein.sso.callback.enabled is true because idp-sig.war application need to handle REST callback requests from idp-sig application. Also gatein.sso.idp.url is changed as idp will run on URI /idp-sig/ .
-
Start SP with:
cd GATEIN_SP_HOME/bin
./standalone.sh -b www.sp.com
-
IDP setup:
-
Take another instance of GateIn Portal , which will be used for IDP setup. The directory with this instance will be referred as AS7_IDP_HOME.
We won't use GateIn Portal itself for IDP setup, but we will use independent web application idp-sig . So theoretically you can use plain AS7 without GateIn Portal deployed. But note that AS7 instance with GateIn Portal contains some additional modules, which are needed for our idp-sig.war application. So it's still recommended to use GateIn Portal instead of plain AS7.
-
Copy GATEIN_SSO_HOME/saml/idp-sig.war into AS7_IDP_HOME/standalone/deployments . GATEIN_SSO_HOME points to directory with SSO packaging. See Single-Sign-On (SSO) for more details.
-
Create empty file AS7_IDP_HOME/standalone/deployments/idp-sig.war.dodeploy (It's needed because idp-sig.war is exploded archive right now)
-
New IDP security domain needs to be added to AS7_IDP_HOME/standalone/configuration/standalone.xml
<security-domain name="idp" cache-type="default">
   <authentication>
      <login-module code="org.gatein.sso.saml.plugin.SAML2IdpLoginModule" flag="required">
         <module-option name="rolesProcessing" value="STATIC"/>
         <module-option name="staticRolesList" value="manager,employee,sales"/>
         <module-option name="gateInURL" value="http://www.sp.com:8080/portal"/>
         <module-option name="httpMethod" value="POST"/>
      </login-module>
   </authentication>
</security-domain>
Note especially option gateInURL, which contains base URL for sending authentication callback to GateIn Portal, so this needs to point to URL where your portal is running.
-
Run IDP with:
cd AS7_IDP_HOME/bin
./standalone.sh -b www.idp.com -Dsp.host=www.sp.com -Dsp.domains=sp.com -Dpicketlink.keystore=/jbid_test_keystore.jks
All these properties are used in picketlink configuration file of idp-sig.war application in AS7_IDP_HOME/standalone/deployments/idp-sig.war/WEB-INF/picketlink.xml
-
-
Test - you can go to http://www.sp.com:8080/portal and click Sign in. You will be redirected to idp-sig application on http://www.idp.com:8080/idp-sig/. Now you can login with GateIn Portal credentials like "john"/"gtn" because REST callback will be sent to portal on www.sp.com and it will take care of user authentication. After authentication you will be redirected to portal on www.sp.com and logged as john.
Make sure that in production environment, you also need to use your own keystore for this second scenario instead of the prebundled jbid_test_keystore.jks, which is in idp-sig application in WEB-INF/classes/
Integration with Salesforce and Google Apps
GateIn Portal SSO component contains the support for Salesforce and Google Apps integration for SAML2 based SSO. Supported scenarios are:
-
GateIn Portal as SAML Identity Provider, Salesforce as SAML Service Provider
-
GateIn Portal as Identity Provider, Google Apps as SAML Service Provider
-
GateIn Portal as SAML Service Provider, Salesforce as SAML Identity Provider
In next sections, you can see detailed description of all scenarios with needed configuration changes.
You can look at video http://vimeo.com/45895919, which is showing how the integration with Salesforce and Google Apps works in practice.
Portal as SAML IDP, Salesforce as SAML SP
-
Base configuration of GateIn Portal as IDP - first you need to configure GateIn Portal as SAML IDP as described in Portal as SAML2 SP and SAML2 IDP .
-
Common steps for Salesforce integration are described in Picketlink documentation and they are quite similar for GateIn Portal like for another web application. Here we describe only steps different for GateIn Portal, which can be divided into configuration on Salesforce side and configuration on GateIn Portal side:
Salesforce configuration
-
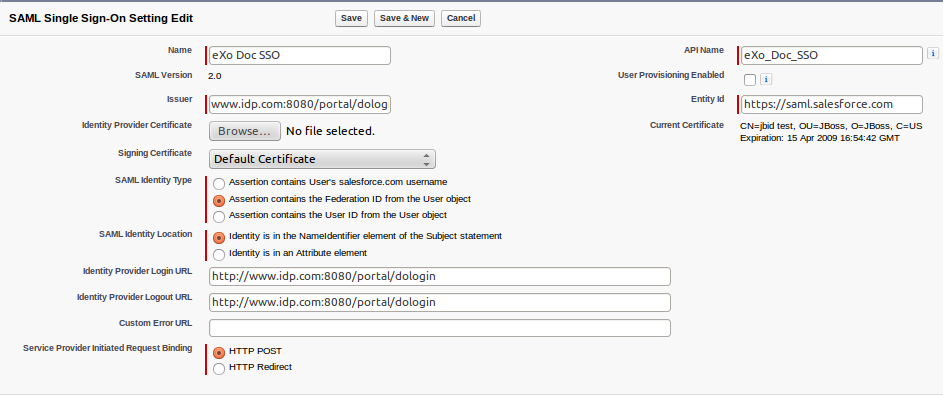
In Salesforce setup in SSO configuration, you need to configure Issuer, Identity Provider Login URL and Identity Provider Logout URL to value http://www.idp.com:8080/portal/dologin (Assuming that you are using virtual host www.idp.com as described in Portal as SAML2 SP and SAML2 IDP )
-
Certificate - you need to import correct certificate into Salesforce. It needs to be certificate, which is used for signing of SAML messages from GateIn Portal. You can export certificate from directory GATEIN_IDP_HOME/gatein/gatein.ear/portal.war/WEB-INF/classes/sso/saml with command:
keytool -export -file portal-idp.crt -keystore secure-keystore.jks -alias secure-key
This certificate then needs to be imported into Salesforce as described in Picketlink documentation . We assumed that you followed steps in Generate and configure your own keystore and your certificate is in file secure-keystore.jks with alias name secure-key . Otherwise change command according to name of your keystore and signing key aliases.
-
Create some users in your Salesforce domain, which are available in GateIn Portal as well. You can use inverse approach as well and create users in GateIn Portal, which are present in Salesforce. Important is mapping - username in portal is mapped to Federation ID in Salesforce. So for example GateIn Portal user mary is mapped to Salesforce user in your domain, which has Federation ID mary .
-
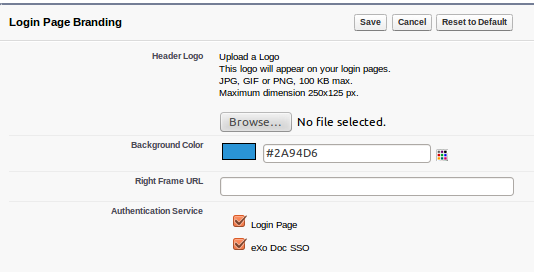
Back to My Domain screen and edit Login Page Branding section. You will see your SSO Setting item as an Authentication Service there. Check it.
Portal configuration
-
Make sure you import Salesforce client certificate into your GateIn Portal keystore. Command for doing it can looks like:
keytool -import -keystore secure-keystore.jks -file /tmp/proxy-salesforce-com.123 -alias salesforce-cert
-
Configure ValidatingAlias and Metadata similarly like for base Picketlink tutorial . Note that main Picketlink configuration file where you need to do changes is GATEIN_IDP_HOME/gatein/gatein.ear/portal.war/WEB-INF/conf/sso/saml/picketlink-idp.xml and assumption is that you will add your metadata into GATEIN_IDP_HOME/gatein/gatein.ear/portal.war/WEB-INF/sp-metadata.xml
-
Modify the WEB-INF/conf/sso/saml/picketlink-idp.xml look like:
<PicketLinkIDP ...>
  ...
  <MetaDataProvider ClassName="org.picketlink.identity.federation.core.saml.md.providers.FileBasedEntitiesMetadataProvider">
  <Option Key="FileName" Value="/WEB-INF/conf/sso/saml/sp-metadata.xml"/>
  </MetaDataProvider>
</PicketLinkIDP>
-
And then create new file at WEB-INF/conf/sso/saml/sp-metadata.xml with content look like
<?xml version="1.0" encoding="UTF-8"?>
<md:EntitiesDescriptor xmlns:md="urn:oasis:names:tc:SAML:2.0:metadata">
  <md:EntityDescriptor xmlns:md="urn:oasis:names:tc:SAML:2.0:metadata" entityID="https://saml.salesforce.com" validUntil="2022-06-13T21:46:02.496Z">
    <md:SPSSODescriptor AuthnRequestsSigned="false" WantAssertionsSigned="true" protocolSupportEnumeration="urn:oasis:names:tc:SAML:2.0:protocol" />
  </md:EntityDescriptor>
</md:EntitiesDescriptor>
-
-
Trusted domain are configured through configuration.properties . So property gatein.sso.sp.domains in file GATEIN_IDP_HOME/standalone/configuration/gatein/configuration.properties should look like this:
gatein.sso.sp.host=saml.salesforce.com
gatein.sso.sp.domains=sp.com,idp.com,salesforce.com
Test the integration - After configure both IDP and SP, you can test that after accessing URL of your Salesforce domain like https://yourdomain.my.salesforce.com , SAML Request will be sent to GateIn Portal and you will be redirected to your virtual host to GateIn Portal login screen on http://www.idp.com:8080/portal/dologin . You can login with some GateIn Portal user (like mary) and you should be redirected back to Salesforce and automatically logged here as user mary thanks to SAML SSO.
Note that SAML2 Single logout initiated by Salesforce is not supported. When you click "Sign out" in Salesforce, Salesforce won't send any SAML2 LogoutRequest to IDP, so you will be still logged on GateIn Portal IDP. Actually Salesforce just supports handling of SAML2 LogoutRequests sent from IDP.
For example: If you have deployment with one instance of GateIn Portal as SP, Salesforce as SP and one instance of GateIn Portal as IDP, then trigger logout from GateIn Portal SP will logout you from all 3 applications (in this case Salesforce is not initiator of Single logout but it handles LogoutRequest sent from IDP).
Portal as SAML IDP, Google Apps as SAML SP
Again, we assume that you followed generic instructions for portal as IDP in Portal as SAML2 SP and SAML2 IDP .
The common steps for Google Apps integration with classic web application are again described in Picketlink guide, so we will pay attention only to steps specific for GateIn Portal.
Google configuration
-
Create some users in Google Apps, which are available in GateIn Portal as well (or vice-versa). Username from portal is mapped to nick in Google Apps. For example GateIn Portal user mary is standardly mapped to Google Apps user mary@yourgoogledomain.com , which normally has nick mary .
-
In SSO configuration of Google Apps domain, you need to change all Sign-In and Sign-Out URL to value http://www.idp.com:8080/portal/dologin instead of http://localhost:8080/idp-sig/ , which is used in Picketlink guide (Assuming that you are using virtual host www.idp.com as described in Portal as SAML2 SP and SAML2 IDP )
-
You again need to export certificate from your GateIn Portal keystore into some file (for example portal-idp.crt as described in Portal as SAML2 SP and SAML2 IDP) and then import it from this file into Google Apps through Google Apps UI.
Portal configuration
-
Metadata configuration - you need to configure metadata in similar way like in Picketlink tutorial . Assumption is that metadata are in file GATEIN_IDP_HOME/gatein/gatein.ear/portal.war/WEB-INF/sp-metadata.xml .
-
Trusted domains are configured through configuration.properties . You need to add google.com domain like described in Picketlink tutorial. So property gatein.sso.sp.domains in file GATEIN_IDP_HOME/standalone/configuration/gatein/configuration.properties should look like this:
gatein.sso.sp.host=google.com
gatein.sso.sp.domains=sp.com,idp.com,salesforce.com,google.com
Test the integration - when you access your Google Apps domain, SAML Request will be sent to GateIn Portal on your host like http://www.idp.com:8080/portal/dologin and after login with portal username, you will be again redirected to Google Apps with SAML Response and you should be automatically logged to Google Apps thanks to SAML SSO.
Portal as SAML SP, Salesforce as SAML IDP
Again, we assume that you followed generic instructions for portal as SP in Portal as SAML2 SP and SAML2 IDP and you configured GateIn Portal on www.sp.com to act as SAML2 SP. Also the common steps for Salesforce integration with classic web application are again described in Picketlink guide, so here we will pay attention especially on steps specific to GateIn Portal.
Salesforce configuration
-
Disable SSO in Salesforce - Like in generic Picketlink guide, you need to disable SSO in Salesforce, because now we don't want Salesforce to act as SP but as IDP.
-
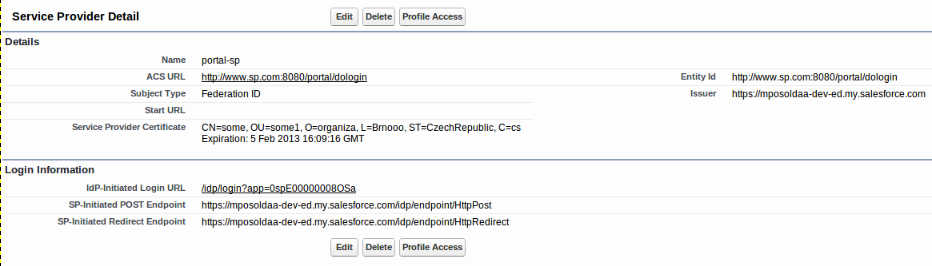
Create Service Provider - It is also necessary to add GateIn Portal Service Provider in configuration of Identity Provider in Salesforce. In Picketlink guide is described how to do it. Configuration for GateIn Portal SP can look similarly like this (Assuming that portal SP will be executed on virtual host www.sp.com ):
-
After create a new app as Service Provider in Salesforce, go to Manage App > Connected App, find your app and click to view it. There is the section Profiles where you can manage the Profiles that have permission to access to your app. Only Salesforce-user has selected-profile in app can login to Gatein via sso. For example, when you check only in profile Standard Platform User, only Salesforce-user has Standard Platform User profile can login to GateIn via sso.
-
As certificate, you may need to export certificate from your GateIn Portal keystore file in GATEIN_SP_HOME/gatein/gatein.ear/portal.war/WEB-INF/classes/saml/sso/secure-keystore.jks (you can simply use certificate portal-idp.crt if you went through previous sections of this tutorial and you're using same certificate for SP like for IDP. See sections Generate and configure your own keystore and Portal as SAML IDP, Salesforce as SAML SP for more details).
Portal configuration
-
Certificate - Similarly like in Picketlink tutorial, we need to import certificate created by Salesforce into GateIn Portal keystore in file GATEIN_SP_HOME/gatein/gatein.ear/portal.war/WEB-INF/classes/saml/sso/secure-keystore.jks. You can use command like this (assuming certificate downloaded from Salesforce is in /tmp/salesforce_idp_cert.cer):
keytool -import -file /tmp/salesforce_idp_cert.cer -keystore secure-keystore.jks -alias salesforce-idp
-
URL configuration - In GATEIN_SP_HOME/standalone/configuration/gatein/configuration.properties you need to change URLs to values corresponding to Salesforce:
gatein.sso.idp.url=https://yourdomain.my.salesforce.com/idp/endpoint/HttpPost
gatein.sso.sp.url=http://www.sp.com:8080/portal/dologin
-
Single logout - Single logout feature is currently not supported when Salesforce acts as SAML2 IDP. So you may need to disable Single logout on SP (portal side). To do this, you may need to disable logout filter in GATEIN_SP_HOME/standalone/configuration/gatein/configuration.properties, which means that click to "SignOut" in GateIn Portal just logout user without sending SAML LogoutRequest to Salesforce. This also means that after logout from GateIn Portal will be user still logged in Salesforce.
gatein.sso.filter.logout.enabled=false
-
ValidatingAlias needs to be added to file In GATEIN_SP_HOME/gatein/gatein.ear/portal.war/WEB-INF/conf/sso/saml/picketlink-sp.xml (assuming that you imported salesforce certificate into your keystore under alias salesforce-idp ):
<ValidatingAlias Key="yourdomain.my.salesforce.com" Value="salesforce-idp" />
-
For roles-mapping, you don't need to configure nothing on GateIn Portal because GateIn Portal SP is configured by default to obtain roles from Picketlink IDM database and not from IDP SAML Response. So no changes needed.
-
Test the integration - after startup of GateIn Portal on your host (assuming virtual host www.sp.com), you can go to http://www.sp.com:8080/portal and click Sign in link. Then GateIn Portal will send SAML Request to Salesforce and you will be redirected to Salesforce login screen. After login into Salesforce, you will be redirected to your GateIn Portal and logged as the user which you logged in Salesforce . Again, username from GateIn Portal is mapped to Federation ID in Salesforce, so GateIn Portal user john is mapped to Salesforce user with Federation ID john )
Tips & Tricks
-
Videos - You can follow some videos on GateIn Portal vimeo channel, where you can see SAML2 integration in action. The videos are:
-
http://vimeo.com/45841256 - Video with basic usecases showing GateIn Portal as SAML2 SP and as SAML2 IDP.
-
http://vimeo.com/45895919 - Video showing integration with Salesforce and Google Apps
-
-
SAML tracer is cool plugin to Firefox browser, which allows you to monitor HTTP requests and see wrapped SAML messages in XML format. It could be useful especially for troubleshooting. You can download plugin here
-
Logging - Like for other SSO solutions, it may be good to enable trace logging for org.gatein.sso etc but in case of SAML, it's good also to enable logging for org.picketlink.identity.federation, which is base package for picketlink federation library. You can add these categories to GATEIN_HOME/standalone/configuration/standalone.xml :
<logger category="org.gatein.sso">
  <level name="TRACE"/>
</logger>
<logger category="org.picketlink.identity.federation">
  <level name="TRACE"/>
</logger>
<logger category="org.jboss.security">
  <level name="TRACE"/>
</logger>
<logger category="org.picketbox">
  <level name="TRACE"/>
</logger>
<logger category="org.exoplatform.services.security">
  <level name="TRACE"/>
</logger>