Overview
The "inventory" is the term for the central repository that houses items RHQ manages and monitors. Before an item can take advantage of the feature set that RHQ provides, it must first be imported into the inventory (also called "committing to inventory").
Concepts
Resource Types
A resource type is defined on a per-plugin basis, but a single plugin may define multiple resource types. A resource type is a fairly generic concept that tries to identify and delineate a construct, whether that be an entire operating system, a program running in some operation system, or a tiny little service running inside that program. All resources have exactly one resource type, usually just referred to as its type.
Resource Category
As hinted above, there are three major categories that any resource type falls into: an operating system, a program, or a service. The vocabulary RHQ uses for these three groups is platform, server, and service, respectively. Each of these resource categories is discussed in more detail below in the context of how they are arranged hierarchically.
Resource Hierarchies
The resource hierarchy attempts to mimic, as closely as possible, how programs and processes are physically and/or programmatically structured on a platform. Below are the supported ways resources can be related by category.
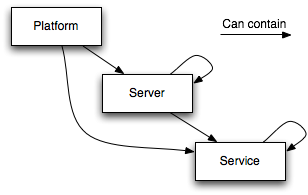
Although a picture is worth a thousand words, below is a full text description for those that want to know precisely what this one says:
-
A server can be a child of a platform (e.g. JBoss AS on Linux)
-
A platform can have many children servers
-
-
A service can be a child of a server or a platform (e.g. JMS Queue on JBoss AS)
-
A platform can have many children services
-
A server can have many children services
-
-
A server can be a child of another server (e.g. Tomcat embedded in JBoss AS)
-
A server can have many children servers
-
-
A service can be a child of another service (e.g. Table inside a Database)
-
A service can have many children services
-
It's worth mentioning that a resource can only have one parent. Thus, the resource hierarchy we're dealing with in RHQ actually takes the form of a directed, acyclic graph (DAG). The graph's root is its platform, and the servers and services beneath it help to form a shallow, yet relatively wide tree.
Resources
Each resource is a concrete instance of one of the plugin-defined resource types. Thus, each resource will have exactly one resource type. Resources are the actual instances of the platforms, servers, and services that are installed on the boxes where the RHQ Agents reside.
Inventory Status
Resources can be in one of the following states, called an "inventory status", within RHQ:
NEW
-
When an RHQ Agent automatically discovers resources, those resources will be set to the NEW inventory status.
-
The Discovery Queue page (as well as the Dscovery Portlet on the dashboard, which is simply a portlet that views the Discovery Queue), will show discovered resources that are in the NEW inventory status, that is, those resources that have not yet been either ignored or imported (aka committed).
-
When a previous committed resource was ignored, but later unignored, it will enter back into this NEW status.
IGNORED
-
This state is used to "hide" one or more discovered resources from the Discovery Queue. Those resources that are not yet imported can, instead of being imported into inventory, be "ignored" and thus hidden from view.
-
This feature is useful if the discovery process found servers that you're not interested in managing / monitoring at this time.
-
To see resources that have previously been ignored from the Discovery Queue, select "New and Ignored" from the "Show" drop down menu of the Discovery Queue. While viewing ignored resources here, you can also unignore them via the "Unignore" button.
-
-
You may also ignore resources that have already been imported into inventory. From any resource search view, select the resources you wish to ignore and press the "Ignore" button. This moves the resource to the IGNORED status thus hiding the resource from view.
-
This is useful if you want to manage a parent resource but do not want to manage some (or all) of its children resources.
-
To see all resources that have been ignored, you can navigate to the Inventory>Ignored Resources view. From here, you have the option to unignore selected resources via the "Unignore" button.
-
-
Unignoring a resource will put it back into the NEW status
-
A resource must be unignored before it can be imported into inventory.
-
If you unignore a resource that was previously committed, it will enter into the NEW status, not COMMITTED. This means you must re-import it into inventory in order to manage it again. If the resource was a child of a top-level server, it will eventually be auto-imported into inventory.
-
It is currently not possible to ignore a resource until the platform has at least one committed resource beneath it (thus implicitly commits the platform itself). You also cannot ignore a platform. It doesn't make sense to ignore the platform, because then the question must be asked - what was the point of installing an agent on that box in the first place? If you were to ignore the platform, then you are, in effect, ignoring all of the child servers and services beneath it as well. So you might as well just not install the agent on that box at all. Thus, for each new agent in the system, you must import at least one resource; then you can ignore any and all other resources under that platform.
COMMITTED
-
Resources that have been imported successfully are marked as committed
-
Note: importing a resource will implicitly perform an automatic import (aka commit) of all of its children resources recursively.
-
-
When viewing most of the pages in the user interface, only committed resources will be shown.
Availability Status
While not specifically related to inventory statuses, a word should be given regarding Availability Statuses. Aside from the typical availability status of UNKNOWN, UP and DOWN, there is one other additional availability status that might be confused with IGNORED and COMMITTED inventory statuses. That availability status is DISABLED.
DISABLED
A resource typically enters the DISABLED availability status when a user explicitly marks the resource as "disabled." A user might want to mark a resource as disable for any number of reasons, such as:
-
During maintenance windows when a user knows the resource will be out of commission
-
When discovered resources are expected to be DOWN, such as unused network adapters. This is useful to hide them from the Down Resource Portlet.
-
For resources reporting UP but not actually servicing requests due to reasons unknown to the resource itself.
When disabling a resource, it still shows up in the user interface and is still considered a managed resource. This is unlike the IGNORED inventory status. Resources that are IGNORED are hidden from view and are not being actively managed.
When re-enabling a disabled resource, it remains in its original COMMITTED inventory status, but its availability will checked by the RHQ Agent and will eventually be marked as either UP or DOWN as any other normal resource in inventory.
Controlling Inventory
Discovery Queue
As soon as you connect a new RHQ Agent to the RHQ Server, it will send information about the platform and servers it discovers (usually via a process table scan). This scan is performed when the RHQ Agent first starts up, and then is done periodically to discover newly added resources in the system. The discovered resources are put into the Discovery Queue with the NEW inventory status.
The usual way of importing resources into inventory is by using the Inventory > Discovery Queue page or from the Discovery Queue Portlet that can be added to your Dashboard.
In the Inventory view, the Discovery Queue is useful when dealing with larger inventories, as the portlet doesn't wield very much screen real estate on the dashboard.

Here you can import any resources (also known as "committing to inventory"), as well as ignoring and unignoring them.
For each platform or server committed, another type of scan is triggered on the agent which will search recursively for all nested servers and services under the committed resource.
The time it takes to find all of the nested resources beneath a parent resource may vary; it largely depends on the number of resources there are to be discovered. Each server or service scanned in this way will be automatically committed beneath its respective parent resource.
Discovery Queue Portlet
The discovered resources can also be shown in the Discovery Queue Portlet on the Dashboard:

Manual discovery
If for some reason it is not possible to auto-discover some resource in your enterprise, you may still have the option of manually adding it to inventory. This is determined by whether it is a type of resource that includes support for being manually added.
To add a new resource, use the resource browser to find what should be its logical parent resource. Remember, since the resource browser only shows committed resources, you must first import the parent in order to manually add a child resource to the inventory.
Click over to the inventory tab of this parent resource. Under the "Child Resources" section, the drop-down button "Import" is the first step towards bringing a resource into inventory manually; select the type of resource you want to add.
The next page will display all properties that the plugin requires (each resource type in the system has a different set of required properties) in order to be able to uniquely identify and successfully connect to this new resource.
After submitting the form, the resource will start in the committed state, and thus be available for viewing in the resource browser.
It is illegal to manually discover a resource unless the plugin can successfully connect to the resource given the properties that you were asked to specify, so the resource should have a green availability icon next to it (meaning that it's UP).
Now the resource is ready to be monitored and managed like any other auto discovered resource.
Browsing inventory
In the Inventory area, use the Resource box or Group box on the left to find a resource. Select the resource you want.
Resource details
On the resource page, there is an arrow which you can toggle to see the resources details:

Clicking on name, description and location fields lets you edit the values.
Child Resources
This section shows the children of current resource with their availability.

Import
If a resource supports it, you can manually import child resources. When supported, you will see a "Import" menu button that provides you with the list of available children resource types that can be manually discovered. Refer to the Manual discovery section. This function allows you to manually add child resources in case the agent was unable to automatically discover them for some reason.

The drop down will contain all resource types that can be manually added for this parent.
Selecting a type and clicking "OK" will lead to a template selection page:
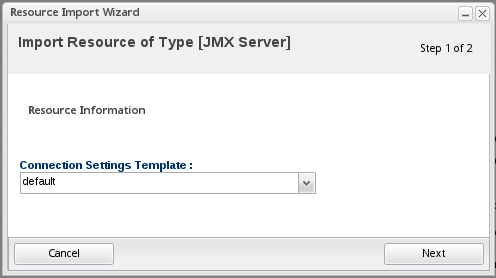
Here you can select a template that fills in some default values. After that you are forwarded to a page where you can fill in the remaining values.
Create new child resources
Some resources also allow to create new children. This means that the new child resource will be created on the target resource as a new child. This way you can, for example, create a new JMS destination directly from your RHQ console. If the managed resource allows the creation of child resources, you will also see a "Create Child" button:
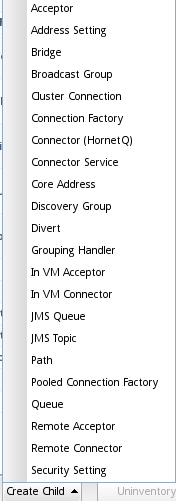
As with manually adding a child resource, you will be forwarded to pages that are specific to the respective resource type.
Note, it may take as long as a few minutes for the newly added child Resource to show up in your inventory.
Deleting resources
It is possible for some resource types to be physically deleted through RHQ. This is defined in the plugin descriptor of the plugin handling the resource.

When you press the delete button, you will be presented with a warning where you can cancel the action:

If you click on Yes, a few things will happen:
-
the resource will be removed from inventory (along with any metric history, operational history, etc)
-
all of its child resource will also be removed from inventory (along with all history too)
-
the resource and its children will be removed from any resource groups they are in
-
-
the agent will delete the physical entity on the managed box
Groups Containing this Resource
This section shows the list of groups that this resource is part of.
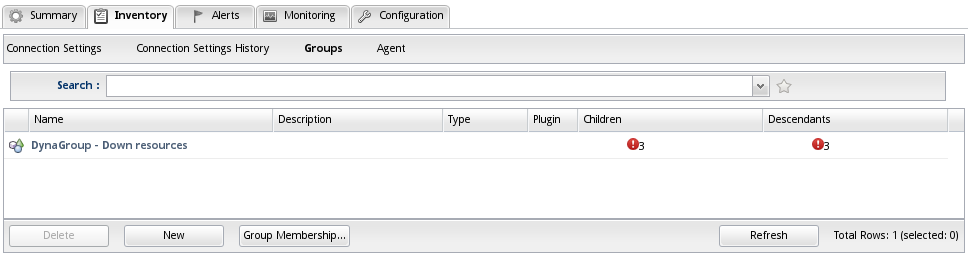
In the example it is a DynaGroup group named "Down resources" with 3 members. The group availability is down (i.e. all members are down).
Clicking on the group name will lead you to a page where you see the group members and more group-specific things. See Groups for more information.
Connection Settings
The Connection Settings subtab allows you to edit the Resource's connection properties. Connection properties tell Agent plugin associated with the Resource how to connect to the underlying managed resource. For example, here is the Connection subtab for a JBoss AS 7 Standalone Server Resource: 
The Hostname and Port are the informations the JBoss AS 7 plugin will use to connect to AS7 http management interface.
Most of the properties are editable. The Home Directory, ...etc are not editable, because those properties are read-only; their values were automatically set by the Agent plugin associated with the Resource at the time the Resource was first discovered. Click the Save button to save the connection properties. Note, the Agent associated with the Resource must be running in order to successfully save the connection properties.
To view the history of revisions made to the Resource's connection properties, go to the conne

To view a particular revision, click the version number link in that revision's Version column.
To delete a revision from the history, select the revision line then click the Delete button.
Agent
The Agent subtab shows information about the Agent that is managing this Resource. This will help you debug cases where you, for example, set up everything correctly, but you aren't receiving any metric data for the Resource.

The section lists the IP address of the Agent along with the port the Agent is listening on for commands from the Server.