--internet(1.3.6.1)
  +--private(4)
  |  +--enterprises(1)
  |     +--jboss(18016)
  |        +--rhq(2)
  |           +--alert(1)
  |           |  +-- r-n DisplayString alertName(1)
  |           |  +-- r-n DisplayString alertResourceName(2)
  |           |  +-- r-n DisplayString alertPlatformName(3)
  |           |  +-- r-n DisplayString alertCondition(4)
  |           |  +-- r-n DisplayString alertSeverity(5)
  |           |  +-- r-n DisplayString alertUrl(6)
  |           |  +-- r-n DisplayString alertHierarchy(7)
  |           +--alertNotifications(2)
  |           |  +--alertNotifPrefix(0)
  |           |     +--alertNotification(1) [alertName,alertResourceName,alertPlatformName,alertCondition,alertSeverity,alertUrl,alertHierarchy]
  |           +--rhqServer(3)
  +--snmpV2(6)
     +--snmpModules(3)
        +--rhqMIB(1)
           +--rhqTraps(3)
              +--rhqTrapPrefix(0)
An alert definition can optionally be configured to send SNMP traps when the alert's conditions are satisfied. This page discusses how to configure SNMP alert trap notifications and how to test that they are working.
Configuring SNMP Trap Notifications
Global SNMP Configuration
Before configuring any alerts to send SNMP trap notifications, you must first set some global SNMP properties in the RHQ Administration section. This is a one time step. Go to the Administration item on the menu bar and then select Server Plugins. In the list of the
plugins select the Alert:SNMP one. At the bottom of this page, you must specify general information common to all SNMP traps which will be emitted by RHQ (click on the Plugin configuration bar to see the options).
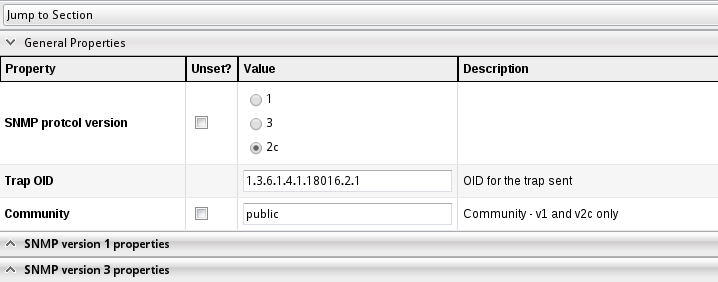
At the top you see global options for all traps and then below options for the specific SNMP protocol versions. Note that only one
SNMP protocol version can currently be used inside RHQ at a time; it is not possible to e.g. send some traps with version 1 and others with version 3.
Changes to these Server level settings do not require the RHQ Server to be restarted. Regardless of whether we're using SNMP protocol version 1 or 2c, you should usually set the 'community' property to 'public' (without the quotes) in order to simplify configuration of trap listeners. This page focuses on generating traps for SNMP protocol version 1 and 2c. However, it's also possible to generate SNMP v3 traps.
-
SNMP protocol version: select the protocol version
-
Default trap target host: the host where a trap receiver is listening. Can be overridden on a per alert basis
-
Default trap target port: the port where the trap receiver is listening. Default is 162. Can be overridden on a per alert basis
-
Transport: the transport protocol to be used with SNMP: Default is UDP
-
Trap OID: The specific id of the trap definition. The default is taken from the RHQ mib
SNMP v1 properties
These settings only apply to SNMP v1
-
Generic ID: the id of the trap. The SNMP standards defines numbers from 0-6, with 6 meaning "enterprise specific" (default)
-
Enterprise OID: The oid of the RHQ server itself. The default value is taken from the RHQ mib as SMIv2.enterprise.jboss.rhq.rhqServer
-
Specific OID: (can be empty)
-
Agent address: the IP-Address of the alert sender (= the RHQ server)
SNMP v2c properties
There are no special options for SNMP v2c available
SNMP v3 properties
-
Auth protocol: the protocol to be used for authentication. Note that if the Auth Passphrase is not given, this must be set to 'none'.
-
Privacy protocol: Protocol used to encrypt messages
-
Engine Id:
-
Target Context name:
-
Auth passphrase:
-
Privacy passphrase:
-
Security name: The name is a part of the "login" for the trap receiver
Alert-specific SNMP Configuration
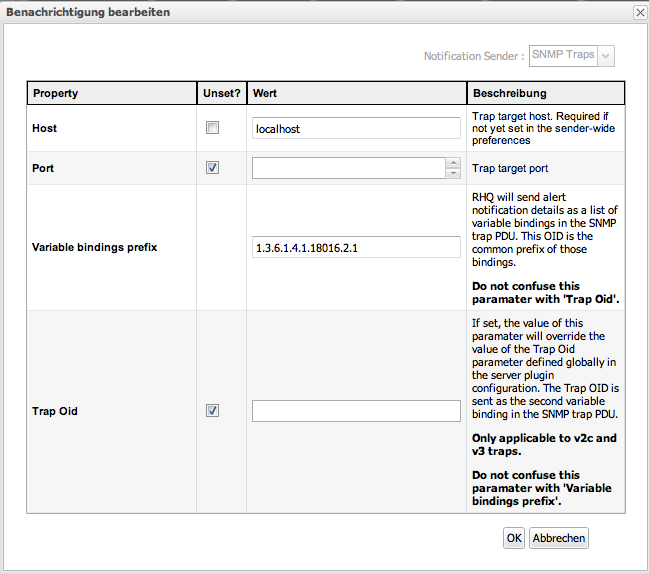
When you create an Alert on a particular Resource or compatible group, or an Alert Template on a particular Resource type, after you have specified the alert definition, you can choose the SNMP Traps notification sender and specify details about the specific trap you want emitted.
-
Host: target host for the trap. If not provided the default from the global settings is taken
-
Port: target port for the trap. If not provided the default from the global settings is taken
-
Variable binding prefix: OID-prefix of the individual variables in the trap sent. The default is taken from the RHQ mib and is SMIv2.enterprise.jboss.rhq.alert
-
Trap OID: The specific id of the trap definition. If no value if provided, the default from the global settings is taken.
The suggested way to try out SNMP trap alert notifications is to define an alert whose condition is always true and which fires at a regular interval. For example, you could create an alert on a JBoss AS Server Resource that fires when the Active Thread Count metric is > 1 (i.e. all the time), and then add an SNMP trap notification to the alert. You could then go to the Resource's Monitor > Schedule tab and set the metric collection interval on the Active Thread Count metric to be 1 minute. This will cause the alert to be fired every minute, and thereby cause the associated SNMP trap to also be generated every minute.
Sample Configurations
Here are some sample configurations you can use to try out SNMP trap notifications.
SNMP v1 Generic Trap
The below settings will generate a generic Link Down trap:
Server Configuration
-
Agent Address: 127.0.0.1
-
Agent Port: 1621
-
SNMP Transport: UDP
-
SNMP Protocol Version: 1
-
Community: public
-
Generic ID: 2 (i.e. SNMPv2-SMI::zeroDotZero Link Down Trap)
Alert Configuration
-
OID: 1.3.6.1.4.1.8072.4.0.1 (i.e. NET-SNMP-AGENT-MIB::nsNotifyStart)
-
Alert Name: testSNMPTrap2
SNMP v1 Enterprise-Specific Trap
The below settings will generate a Notify Start trap:
Server Configuration
-
Agent Address: 127.0.0.1
-
Agent Port: 1621
-
SNMP Transport: UDP
-
SNMP Protocol Version: 1
-
Community: public
-
Generic ID: 6 (i.e. enterprise-specific trap)
-
Enterprise OID: 1.3.6.1.4.1.8072.4.0 (i.e. NET-SNMP-MIB::netSnmpNotifications)
-
Specific ID: 1 (when combined with Enterprise OID, gives 1.3.6.1.4.1.8072.4.0.1 ( i.e. NET-SNMP-AGENT-MIB::nsNotifyStart))
Alert Configuration
-
OID: 1.3.6.1.4.1.8072.4.0.1 (i.e. NET-SNMP-AGENT-MIB::nsNotifyStart)
-
Alert Name: testSNMPTrap2
SNMP v2c Trap
With SNMP v2c, there is really no distinction between Generic traps and Enterprise specific ones, you just specify the OID of the trap you want, in this case Link Down.
The below settings will generate a generic Link Down trap:
Server Configuration
-
Agent Address: 127.0.0.1
-
Agent Port: 1621
-
SNMP Transport: UDP
-
SNMP Protocol Version: 2c
-
Community: public
-
Trap OID: 1.3.6.1.6.3.1.1.5.3 (i.e. IF-MIB::linkDown)
Alert Configuration
-
OID: 1.3.6.1.4.1.8072.4.0.1 (i.e. NET-SNMP-AGENT-MIB::nsNotifyStart)
-
Alert Name: testSNMPTrap2
RHQ mib
RHQ defines a part of the MIB tree that you can load into the SNMP tools of your choice.
The following is a dump of the mib:
Installing an SNMP Trap Listener
In order to make sure RHQ is really generating SNMP traps when an alert fires, you need to install a program capable of receiving and parsing such traps. One such program is 'snmptrapd' which is included in the open-source Net-SNMP tool set. snmptrapd can be used to test SNMP trap notifications as follows:
-
Go to http://www.net-snmp.org/ and download the current version of Net-SNMP for the operating system that is running on the JON Server machine.
-
Install Net-SNMP on the same machine as the RHQ Server. If you are using the GUI installer for Windows, the only components you need to select are the Base Components and the Net-SNMP Trap Service.
-
Once the installation is complete, open a command terminal and type:
snmptrapd -h
You should see a lot of command line options fly past.
-
The final step is to configure snmptrapd to allow connections from our RHQ Server. To do this create a file called snmptrapd.conf in <Net-SNMP_HOME>/usr/etc/snmp/ and add the following line:
authcommunity log public
-
To start listening for SNMP traps, open a command terminal and type:
snmptrapd -Lo 127.0.0.1:1621
The -Lo just tells it to output all traps received to stdout. 127.0.0.1 says we should listen on the loopback network interface and 1621 says use UDP port 1621. The default for snmptrapd is to try to listen on UDP port 162, but other programs, e.g. Skype and the Remote Procedure Call (RPC) service, are often already using that port, so it's easier just to pick a different one.
It is possible to pass the location of the MIB file to the snmptrapd to see the translated OIDs
just like this:
snmptrapd -m RHQ-MIB -M/opt/local/share/mibs/ietf ## -m file -M mib-directory
The output for an alert on a platform called 'snert' could then look like this:
Jul  8 15:13:31 snert snmptrapd[42372]: 127.0.0.1: Enterprise Specific Trap (.0) Uptime: 0:00:00.00, RHQ-MIB::alertName = STRING: test, RHQ-MIB::alertResourceName = STRING: snert, RHQ-MIB::alertPlatformName = STRING: snert, RHQ-MIB::alertCondition = STRING:
	- Bedingung 1: Free Memory < 1.024,0MB
	- Datum/Uhrzeit: 2013/07/08 15:13:05 MESZ
	  - Details: 12,9MB
	, RHQ-MIB::alertSeverity = STRING: medium, RHQ-MIB::alertUrl = STRING: http://localhost:7080/coregui/CoreGUI.html#Resource/10001/Alerts/History/12204, RHQ-MIB::alertHierarchy = STRING: snert
If you are using tcpdump, the output may look like this:
22:06:19.043208 IP localhost.56445 > localhost.snmptrap: Trap(352) E:18016.2.3 0.0.0.0 enterpriseSpecific s=0 0 E:18016.2.1.1="test" E:18016.2.1.2="snert" E:18016.2.1.3="snert" E:18016.2.1.4="^J- Bedingung 1: Free Memory < 4,0GB^J- Datum/Uhrzeit: 2013/07/10 22:06:01 MESZ^J - Details: 179,2MB^J" E:18016.2.1.5="medium" E:18016.2.1.6="http://localhost:7080/coregui/CoreGUI.html#Resource/10001/Alerts/History/10038" E:18016.2.1.7="snert"