<dependencies>
    ...
    <dependency>
        <groupId>org.picketbox</groupId>
        <artifactId>picketbox-cdi</artifactId>
        <version>${picketbox.version}</version>
    </dependency>
    ...
</dependencies>
Introduction
This example shows you how to configure the Aerogear HTML5 + REST TODO Application with CDI and PicketBox.
What this example is about ?
Basically, we'll use PicketBox to provide the following features:
-
Support different authentication mechanisms using JAX-RS Endpoints (OTP, Username/Password, Social - Facebook, Google and Twitter)
-
Use a database to store users, credentials, roles and groups
-
Self-registration service for new users
-
Token-based Authentication using PicketBox Session Management cababilities
-
Authorization for JAX-RS Endpoints
-
Automatic user provisioning when using any of the social authentication mechanisms
-
Handle specific security events
More advanced concepts and features will be provided after the basic functionality is properly discussed and agreed.
Before you start
Before you start, is recommended that you take a look at:
PicketBox Configuration
Before continuing we recommend you take a look at the Configuration API documentation.
To enable PicketBox you only need a few steps, as follows:
-
Configure PicketBox maven dependencies
-
Configure PicketBox by creating a @Producer method that produces a ConfigurationBuilder instance.
Maven Dependencies
If you are using Maven, please configure your pom.xml with the following dependencies:
Configuring PicketBox
@ApplicationScoped
public class PicketBoxConfigurer {

    /**
     * <p>
     * As we are  using a database identity store, we need to inject and configure the JPATemplate to integrate with your JPA configuration.
     * </p>
     */
    @Inject
    private DefaultJPATemplate jpaTemplate;

    /**
     * <p>Inject a custom authentication mechanism used to authenticate users with Facebook.</p>
     */
    @Inject
    private FacebookAuthenticationMechanism fbAuthenticationMechanism;

    /**
     * <p>Inject a custom authentication mechanism used to authenticate users with OpenID.</p>
     */
    @Inject
    private OpenIDAuthenticationMechanism openidAuthenticationMechanism;

    /**
     * <p>Inject a custom authentication mechanism used to authenticate users with Twitter.</p>
     */
    @Inject
    private TwitterAuthenticationMechanism twitterAuthenticationMechanism;

    /**
     * <p>
     * Produces the {@link ConfigurationBuilder}.
     * </p>
     *
     * @return
     */
    @Produces
    public ConfigurationBuilder produceConfiguration() {
        ConfigurationBuilder builder = new ConfigurationBuilder();

        // configure the social authentication mechanisms
        builder
            .authentication()
                .mechanism(this.fbAuthenticationMechanism)
                .mechanism(this.openidAuthenticationMechanism)
                .mechanism(this.twitterAuthenticationMechanism);

        // configure the identity manager using a JPA-based identity store.
        builder
            .identityManager()
                .jpaStore().template(this.jpaTemplate);

        // session management configuration
        builder
            .sessionManager()
                .inMemorySessionStore();

        return builder;
    }
}
Custom Authentication Mechanisms
We have configured some custom authentication mechanisms that allow users to authenticate using Facebook, Google (OpenID) and Twitter.
// configure the social authentication mechanisms
builder
    .authentication()
        .mechanism(this.fbAuthenticationMechanism)
        .mechanism(this.openidAuthenticationMechanism)
        .mechanism(this.twitterAuthenticationMechanism);
By default, PicketBox provides some built-in authentication mechanisms such as Username/Password, One-Time Password, Certificate and Trusted Username. That means you don't need to provide any additional configuration to start using them.
See the Authentication Mechanisms documentation for more information.
Identity Management Configuration
The Identity Management configuration is done by choosing a JPA-based Identity Store to store users, credentials, roles and groups. That means we are using a database to store those information.
// configure the identity manager using a JPA-based identity store.
builder
    .identityManager()
        .jpaStore()
            .template(this.jpaTemplate);
When using a JPA-based Identity Store we need to configure how EntityManager instances should be retrieved and used by PicketBox when invoking identity management operations. This is done by providing a JPATemplate instance.
PicketBox CDI already provides a built-in JPATemplate implementation that gets the current EntityManager instance. If you need more fine-grained control about how the EntityManager is used you can always provide your own implementation.
For more information about how to configure your application's META-INF/persistence.xml, check this documentation.
Session Management Configuration
This example uses the PicketBox Session Management capabilities to control users sessions and to provide a simple token-based authentication.
// session management configuration
builder
    .sessionManager()
        .inMemorySessionStore();
The configuration above enables the session management capabilities using a In-Memory Session Store. When an user is authenticated a session will be created and associated with the user. Each session has a unique identifier that will be used as a token to identity a specific user between requests.
CDI Configuration
WEB-INF/beans.xml
<beans
	xmlns="http://java.sun.com/xml/ns/javaee"
	xmlns:xsi="http://www.w3.org/2001/XMLSchema-instance"
	xsi:schemaLocation="
        http://java.sun.com/xml/ns/javaee
        http://java.sun.com/xml/ns/javaee/beans_1_0.xsd">
	<interceptors>
		<class>org.apache.deltaspike.security.impl.extension.SecurityInterceptor</class>
	</interceptors>
</beans>
Authentication
The image bellow shows how the login page looks like:
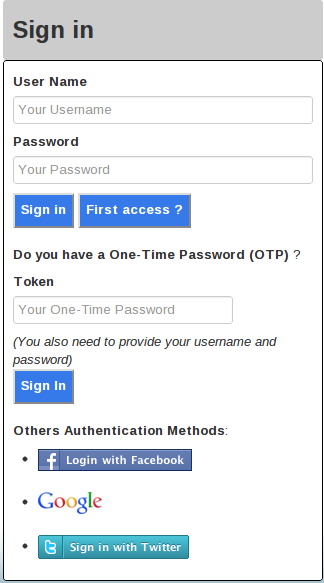
As you can see, the user can be authenticated in different ways:
-
Username and Password
-
Username and Password + One-Time Password
-
Facebook
-
Google
-
Twitter
Each authentication method maps to a specific JAX-RS Endpoint. The table bellow lists those endpoints and which authentication method they support:
|
JAX-RS Endpoint |
Authentication Method |
|
org.aerogear.todo.server.security.authc.SignInEndpoint |
Username and Password |
|
org.aerogear.todo.server.security.authc.otp.OTPSignInEndpoint |
One-Time Password |
|
org.aerogear.todo.server.security.authc.social.fb.FacebookSignInEndpoint |
Facebook oAuth2 |
|
org.aerogear.todo.server.security.authc.social.openid.OpenIDSignInEndpoint |
Google (OpenID) |
|
org.aerogear.todo.server.security.authc.social.twitter.TwitterSignInEndpoint |
Twitter oAuth2 |
Facebook Authentication Configuration
To use the Facebook authentication you need to define some system properties firtst, as follows:
<system-properties>
    <property name="CLIENT_ID" value="CLIENT_ID"/>
    <property name="FB_CLIENT_ID" value="FB_CLIENT_ID"/>
    <property name="FB_CLIENT_SECRET" value="FB_CLIENT_SECRET"/>
    <property name="FB_RETURN_URL" value="http://localhost:8080/todo-server/facebook"/>
</system-properties>
You can get the application client id and secret key from Facebook: https://developers.facebook.com/apps.
Token-based Authentication
The TODO JAX-RS Endpoints can also be used by mobile clients. That said, we need to provide ways to check if a specific request was done by a previously authenticated user.
When an user is authenticated a PicketBox Session is created and associated with him. Sessions have a unique identifier that can be used to identify authenticated users.
All JAX-RS Endpoints are protected by a JAX-RS Interceptor. This interceptor tries to extract the token from the request headers and check if it maps to a valid user session. If the token is valid, the user's security context is restored and he can proceed with the request.
@ApplicationScoped
@ServerInterceptor
public class SecurityInterceptor implements PreProcessInterceptor {

    private static final String AUTH_TOKEN_HEADER_NAME = "Auth-Token";

    @Inject
    private PicketBoxIdentity identity;

    @Override
    public ServerResponse preProcess(HttpRequest request, ResourceMethod method) throws Failure, WebApplicationException {
        ServerResponse response = null;

        if (requiresAuthentication(method) && !this.identity.isLoggedIn()) {
            boolean isLoggedIn = false;
            String token = getToken(request);

            if (token != null) {
                try {
                    isLoggedIn = identity.restoreSession(token);
                } catch (AuthenticationException e) {

                }
            }

            if (!isLoggedIn) {
                AuthenticationResponse authcResponse = new AuthenticationResponse();

                authcResponse.setLoggedIn(false);

                response = new ServerResponse();
                response.setEntity(authcResponse);
                response.setStatus(HttpStatus.SC_FORBIDDEN);
            }
        }

        return response;
    }

    /**
     * <p>Retrieve the token from the request, if present.</p>
     *
     * @param request
     * @return
     */
    private String getToken(HttpRequest request) {
        List<String> tokenHeader = request.getHttpHeaders().getRequestHeader(AUTH_TOKEN_HEADER_NAME);
        String token = null;

        if (tokenHeader != null && !tokenHeader.isEmpty()) {
            token = tokenHeader.get(0);
        }

        return token;
    }


}
Authorization
PicketBox CDI provides some useful annotations that can be used to put authorization constraints in methods and classes. Are they:
-
@RolesAllowed: Only allows invocations made by users with the specified roles
-
@UserLoggedIn: Only allows invocations made by authenticated user
For example, only users with the "admin" role can create projects:
@Stateless
@Path("/projects")
@TransactionAttribute
public class ProjectEndpoint {

    @PersistenceContext
    private EntityManager em;

    @POST
    @Consumes(MediaType.APPLICATION_JSON)
    @Produces(MediaType.APPLICATION_JSON)
    @RolesAllowed ({"admin"})
    public Project create(Project entity) {
        em.joinTransaction();
        em.persist(entity);
        return entity;
    }


    ...


}
Self-Registration Service
The TODO application provides a self-registration service that allows users to register themselves. This is done by using the PicketBox Identity Management support, that allows you to inject a IdentityManager instance in any CDI bean and use it to perform IDM operations.
@Stateless
@Path("/register")
public class RegistrationEndpoint {

    @Inject
    private IdentityManager identityManager;

    /**
     * <p>
     * Creates a new user using the information provided by the {@link RegistrationRequest} instance.
     * </p>
     *
     * @param request
     * @return
     */
    @POST
    @Consumes(MediaType.APPLICATION_JSON)
    @Produces(MediaType.APPLICATION_JSON)
    public RegistrationResponse register(final RegistrationRequest request) {
        RegistrationResponse response = new RegistrationResponse();

        if (!validateUserInformation(request)) {
            response.setStatus("All fields are required.");
            return response;
        }

        if (isUsernameAlreadyInUse(request)) {
            User user = new SimpleUser(request.getUserName());

            user.setFirstName(request.getFirstName());
            user.setEmail(request.getEmail());
            user.setLastName(request.getLastName());

            this.identityManager.add(user);
            this.identityManager.updateCredential(user, new PlainTextPassword(request.getPassword()));

            Role roleGuest = new SimpleRole("guest");

            this.identityManager.add(roleGuest);

            this.identityManager.grantRole(user, roleGuest);

            response.setStatus("Success");
        } else {
            response.setStatus("This username is already in use. Choose another one.");
        }

        return response;
    }


    ...


}
Automatic User Provisioning
When an user chooses to authenticate using Facebook, for example, the information retrieved from the Facebook API can be used store the user locally by using the Identity Managament support.
Check the org.aerogear.todo.server.security.authc.social.fb.FacebookSignInEndpoint class to see how this is done.