@RunWith(SwitchYardRunner.class)
@SwitchYardTestCaseConfig(mixins = CDIMixIn.class, config = SwitchYardTestCaseConfig.SWITCHYARD_XML)
public class SomeServiceTest {

    private SwitchYardTestKit testKit;
    private CDIMixIn cdiMixIn;
    @ServiceOperation("ExampleService")
    private Invoker service;

    @Test
    public void testSomeInOnlyOperation() throws Exception {
        // TODO Auto-generated method stub
        // initialize your test message
        Object message = null;
        service.operation("someInOnlyOperation").sendInOnly(message);

        // validate the results
        Assert.assertTrue("Implement me", false);
    }

    @Test
    public void testSomeInOutOperation() throws Exception {
        // TODO Auto-generated method stub
        // initialize your test message
        Object message = null;
        String result = service.operation("someInOutOperation")
                .sendInOut(message).getContent(String.class);

        // validate the results
        Assert.assertTrue("Implement me", false);
    }

}
Eclipse
Installation
Please refer to Installing Eclipse Tooling for details on installing the SwitchYard Eclipse tooling.
Features
The SwitchYard Eclipse tooling provides the following features:
-
Creation of SwitchYard projects.
-
Adding SwitchYard capabilities to existing Maven based Eclipse projects.
-
Configuration of SwitchYard capabilities (i.e. runtime component dependencies; e.g. SOAP, BPM, Camel, etc.).
-
A graphical editor for editing SwitchYard application configuration (i.e. switchyard.xml), which provides the following features:
-
Creation and configuration of components, services and references.
-
Component service/reference promotion and configuration of gateway bindings.
-
Creation of implementation skeletons for new service components (e.g. bean classes, BPMN2 files, DRL files, etc.).
-
Creation of unit test skeletons for services.
-
Configuration of message transformers, including creation of implementation skeletons for message transformers (e.g. XSL, Java, etc.).
-
Creation of Artifact references.
-
-
Java2WSDL
-
WSDL2Java
-
XML catalog entries for SwitchYard configuration schema.
-
m2eclipse integration supporting the SwitchYard Maven plugin (org.switchyard:switchyard-plugin).
-
Support for workspace deployment of SwitchYard projects.
Tutorial
A basic tutorial can be found on the Tutorial page.
SwitchYard Projects
A SwitchYard project is a Maven based project with the following characteristics:
-
a switchyard.xml file in the project's META-INF folder
-
one or more SwitchYard runtime dependencies declared in the pom.xml file
-
org.switchyard:switchyard-plugin mojo configured in the pom.xml file
A SwitchYard project may also contain a variety of other resources used to implement the application, for example: Java, BPMN2, DRL, BPEL, WSDL, XSD, and XML files.
The Eclipse tooling supports the creation of new SwitchYard projects. The tooling also allows users to add SwitchYard capabilities to existing Maven projects.
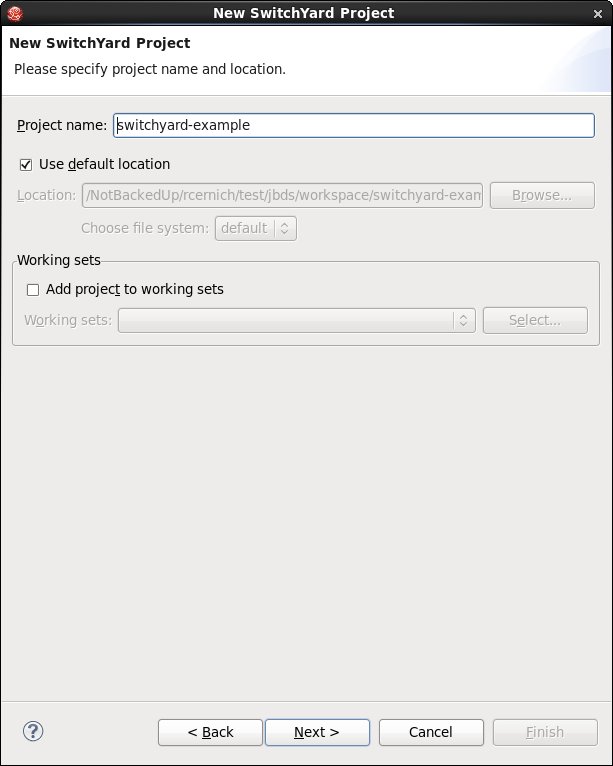
Creating a New SwitchYard Project
Use the New SwitchYard Project wizard to create new SwitchYard project in your workspace. The wizard produces a new project with the following structure:
-
a switchyard.xml file in src/main/resources/META-INF/
-
a pom.xml file declaring SwitchYard runtime dependencies and configuration for the switchyard-plugin mojo
-
a beans.xml file in src/main/resources/META-INF/
-
a beans.xml file src/test/resources/META-INF/
-
a folder hierarchy for the specified Java package
The newly created project's switchyard.xml file will be opened in the SwitchYard editor after the wizard finishes.
Initiate the wizard by selecting SwitchYard Project from the SwitchYard category in the File→New→Project... wizard.
The first page asks for the name and location for the new project:
The second page asks for basic project details, including:
-
the Maven groupId for the project
-
the targetNamespace for the SwitchYard application
-
the default Java package name for the project
-
the SwitchYard configuration version
-
the SwitchYard library version
-
the SwitchYard runtime components (e.g. BPM, Camel, SOAP, etc. support) required for the project
The library version can be specified directly using the Library Version field or indirectly by selecting a Target Runtime. Selecting a target runtime will set the library version to match the version provided by the target runtime.
It is not necessary to select any components when creating the project. The tooling will automatically configure components on the project as necessary.
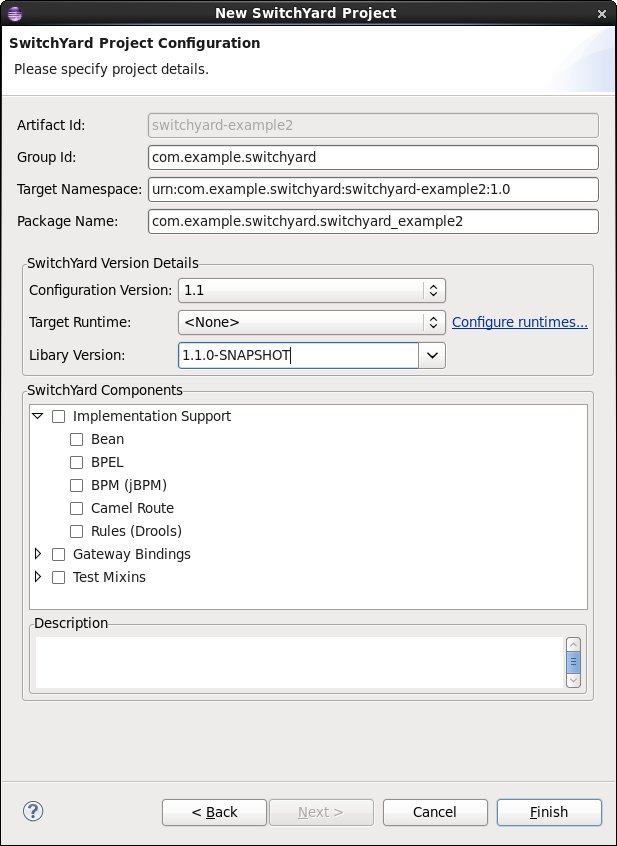
Press Finish to create the new project.
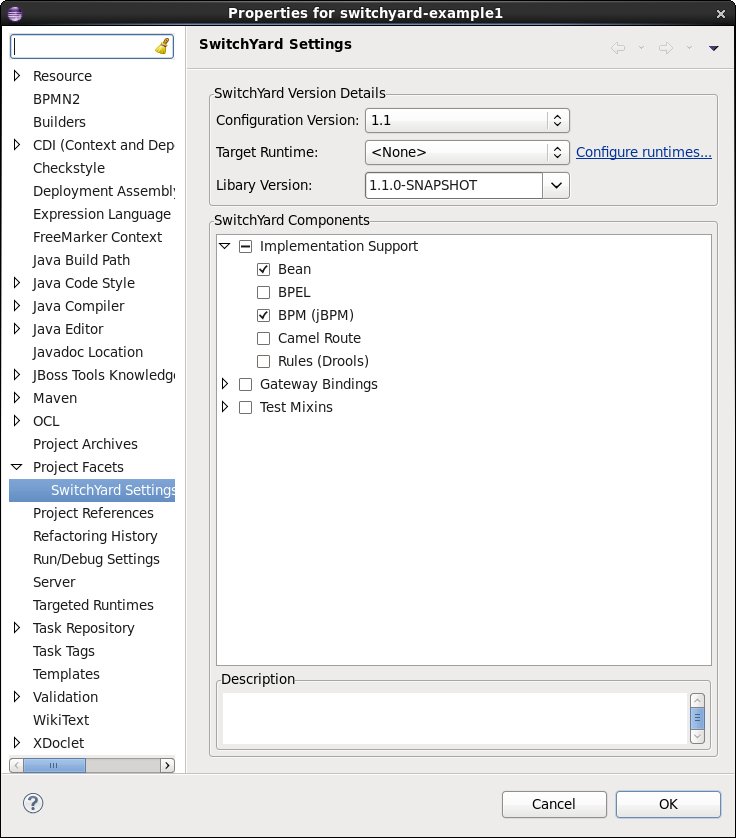
Adding SwitchYard Capabilities to Existing Projects
SwitchYard capabilities may be added to existing projects in the workspace. The following additions are made to the project:
-
a switchyard.xml file is added to src/main/resources/META-INF/
-
a beans.xml file is added to src/main/resources/META-INF/
-
a beans.xml file is added to src/test/resources/META-INF/
-
declarations for SwitchYard runtime dependencies are added to the pom.xml file
-
org.switchyard:switchyard-plugin mojo configuration is added the pom.xml file
SwitchYard capabilities can only be added to Maven projects.
If the project is not already a Faceted Project, a prompt asks if you wish to convert the project to a faceted project.
Changing the configuration version updates the SwitchYard namespace URIs declared in the switchyard.xml, e.g. from urn:switchyard-config:switchyard:1.0 to urn:switchyard-config:switchyard:1.1.
Right-click the project and select, Configure -> SwitchYard Capabilities... to add (or modify) SwitchYard capabilities. A property dialog is displayed allowing configuration of SwitchYard settings for project. Changes are reflected in the project's pom.xml and switchyard.xml files.
Unit Testing
The SwitchYard tooling provides support for stubbing out test classes for services.
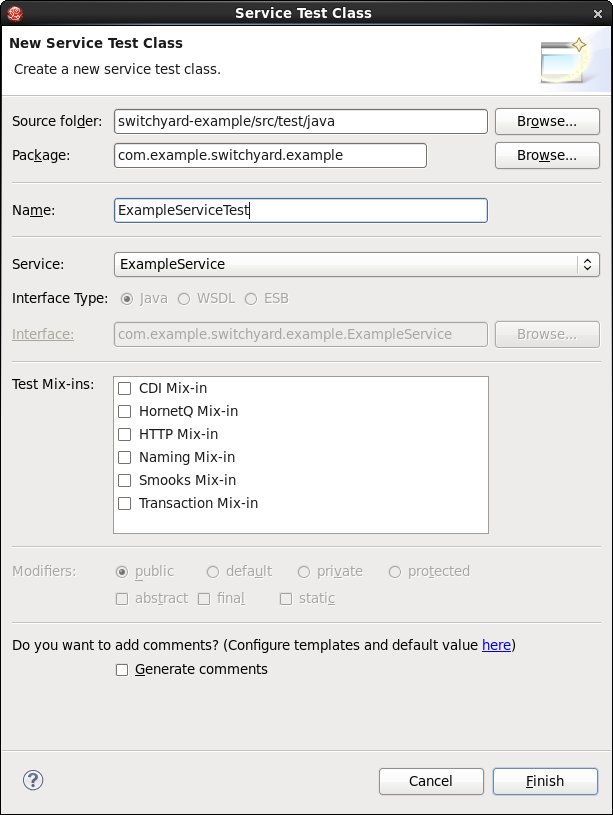
New Service Test Wizard
This wizard creates a new service test class. The class is created with references to any mix-ins specified and a method stub for each operation in the selected service interface. The method stubs include code for passing a message to the operation and processing the result. The user needs to initialize the message data and validate the results. The following illustrates the stubs that are created by the wizard:
SomeServiceTest
Runtime Support
TBD: document SwitchYard runtime support
Workspace Deployment
All SwitchYard projects are configured as some type of JEE module by the tooling. This allows the user to deploy the project to any JEE server defined in the workspace.
SwitchYard projects packaged as JAR are configured as JEE Utility Modules.
SwitchYard capabilities may be added to any existing JEE project. See Adding SwitchYard Capabilities to Existing Projects for more details.
The user is responsible for ensuring the target server has a compatible SwitchYard runtime installed.
Forge
SwitchYard integrates with JBoss Forge to provide a set of rapid application development tools for service-oriented applications. Please consult the Getting Started guide for information on how to install Forge and the SwitchYard extensions to Forge.
Creating a Project
The first thing you'll want to do with Forge is create a new project. This can be done inside the Forge shell using the new-project command.
switchyard$ forge
    _____
   |  ___|__  _ __ __ _  ___
   | |_ / _ \| `__/ _` |/ _ \  \\
   |  _| (_) | | | (_| |  __/  //
   |_|  \___/|_|  \__, |\___|
                   |___/

[no project] switchyard $ new-project --named syApp --topLevelPackage org.switchyard.examples.forge
 ? Use [/private/tmp/switchyard/syApp] as project directory? [Y/n]
***SUCCESS*** Created project [syApp] in new working directory [/private/tmp/switchyard/syApp]
At this point, you have an empty application with a few Maven facets installed. What's a facet you ask? Read on ....
Facets
Facets add capabilities to an application and to the forge environment itself. This allows SwitchYard to add dependencies to your application's pom based on the functionality you will be using, instead of sticking every possible SwitchYard dependency in the application by default. Facets are also used to add commands specific to SwitchYard itself and components which you will be using in your application. The following facets are currently available:
-
switchyard - core set of commands and dependencies for the SwitchYard runtime
-
switchyard.bean - commands and dependencies for Bean component services
-
switchyard.bpm - commands and dependencies for BPM component services
-
switchyard.rules - commands and dependencies for Rules component services
-
switchyard.soap - commands and dependencies for SOAP gateway bindings
-
switchyard.camel - commands and dependencies for Camel services and gateway bindings
-
switchyard.rest - commands and dependencies for RESTEasy gateway bindings
-
switchyard.http - commands and dependencies for HTTP gateway bindings
Installing a facet can be done directly in the shell using the install-facet command.
[syapp] syapp $ project install-facet switchyard.soap
***SUCCESS*** Installed [switchyard.soap] successfully.
Wrote /tmp/syapp/pom.xml
Commands
The following SwitchYard commands are available in Forge (grouped by facet).
switchyard
-
switchyard show-config : displays the current state of your application's configuration, including services, references, and bindings.
-
switchyard promote-service : promotes an internal application-scoped service to be visible to other applications.
-
switchyard promote-reference : promotes an internal application-scoped reference so that it can be mapped to services provided in other applications.
-
switchyard create-service-test : create a new unit test for a service.
-
switchyard get-version : returns the version of SwitchYard used by the application.
-
switchyard trace-messages : enables message tracing at runtime - all messages will be logged.
-
switchyard import-artifacts : add a dependency on a service artifact module to the application's configuration
-
switchyard add-reference : adds a reference to a service implementation; particularly useful for service types which do not autogenerate references (Camel, BPM, BPEL).
switchyard.bean
-
bean-service create : creates a new CDI Bean service, consisting of a service interface and implementation class.
switchyard.bpm
-
bpm-service create : creates a new BPM service, consisting of a service interface and implementation class.
switchyard.rules
-
rules-service create : creates a new Rules service, consisting of a service interface and implementation class.
switchyard.camel
-
camel-service create : creates a new XML or Java DSL Camel route.
-
camel-binding bind-service : binds a service using a Camel endpoint URI.
-
camel-binding bind-reference : binds a reference using a Camel endpoint URI.
switchyard.soap
-
soap-binding bind-service : binds a service to a SOAP endpoint.
-
soap-binding bind-reference : binds a reference to a SOAP endpoint.
switchyard.rest
-
rest-binding bind-service : binds a service to a RESTEasy endpoint.
-
rest-binding bind-reference : binds a reference to a RESTEasy endpoint.
switchyard.http
-
http-binding bind-service : binds a service to a HTTP endpoint.
-
http-binding bind-reference : binds a reference to a HTTP endpoint.
Administration Console
Overview
The SwitchYard management console is integrated with the standard JBoss AS management console and provides the following:
-
A view of the applications and services deployed on the server.
-
A view of various execution metrics.
-
A view of the SwitchYard subsystem configuration.
SwitchYard contributes views to the standard JBoss AS management console's Runtime and Profile pages.
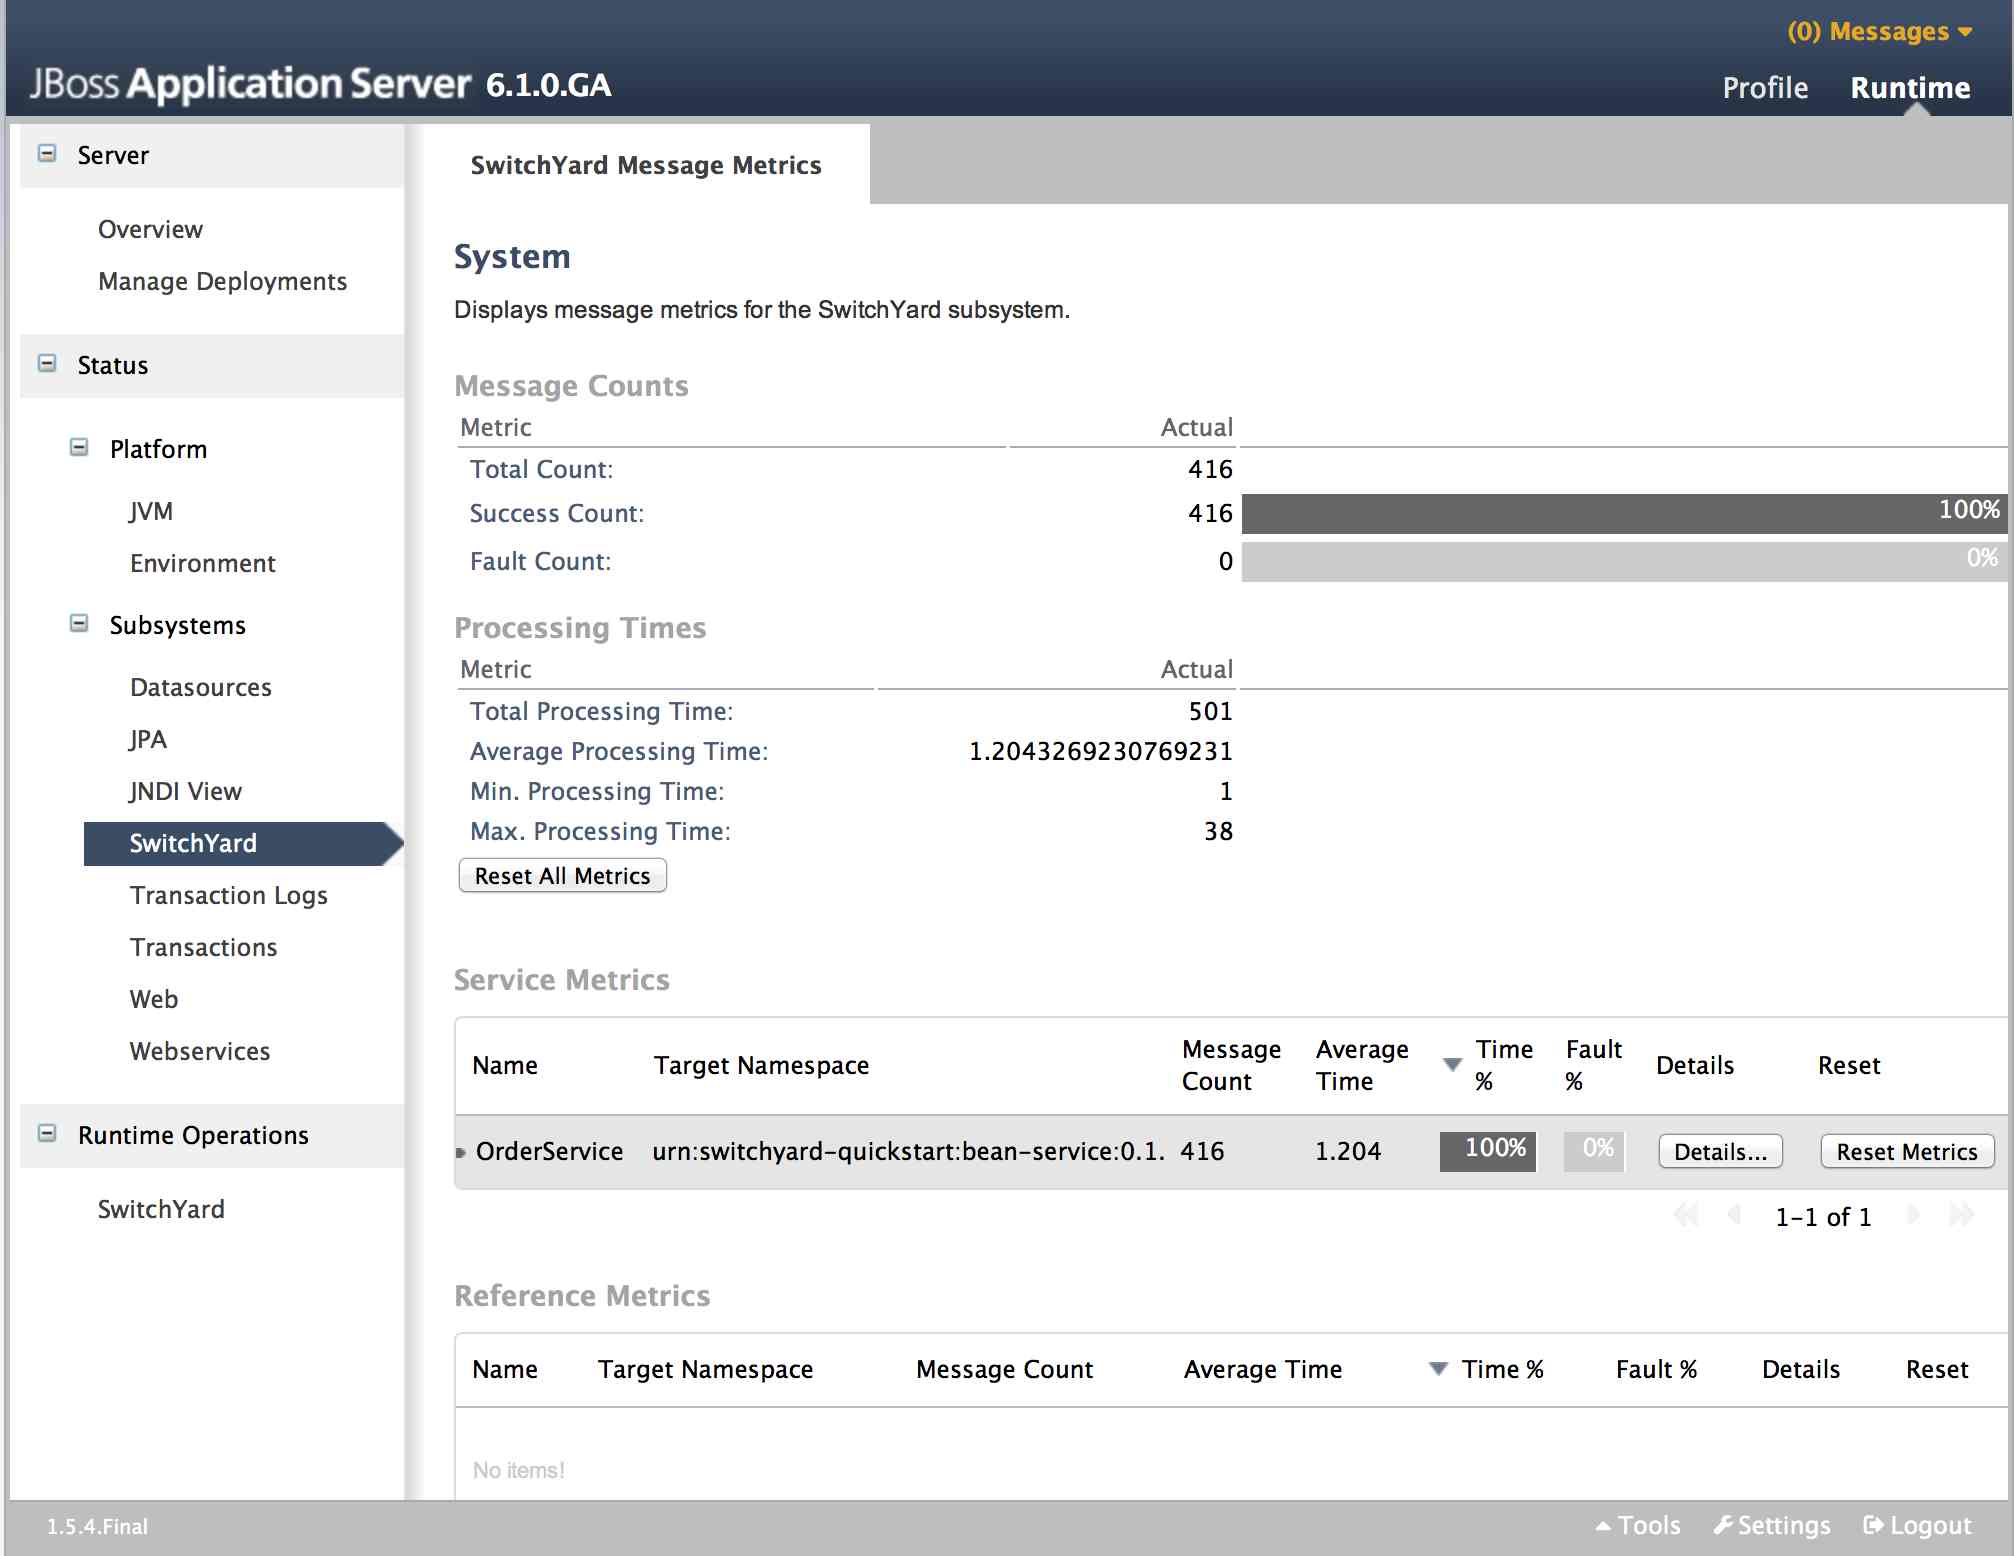
Metrics Views
SwitchYard Message Metrics can be accessed on the Runtime page of the AS console under Status -> Subsystems -> SwitchYard. This page provides a view of a comprehensive set of metrics aggregated at various levels within the system.
The following types of metrics are available:
-
Message count: total, success, failed
-
Processing time: total, min., avg., max.
Collected metrics can be viewed at the following levels:
-
System : metrics for the entire SwitchYard runtime (all deployed applications)
-
Service : metrics for a composite service in an application. Additional metric details are provided for the following:
-
Gateway: metrics for each binding on the service (e.g. FTP metrics for service "ABC")
-
Operation: metrics for each operation on the service
-
Service Reference : metrics for references invoked by the service
-
-
Reference : metrics for a composite reference in an application. Additional metric details are provided for the following
-
Gateway : metrics for each binding on the reference (e.g. FTP metrics for reference "ABC")
-
Operation : metrics for each operation on the reference
-
This page also provides the user with the ability to reset metrics at various levels.
Application Views
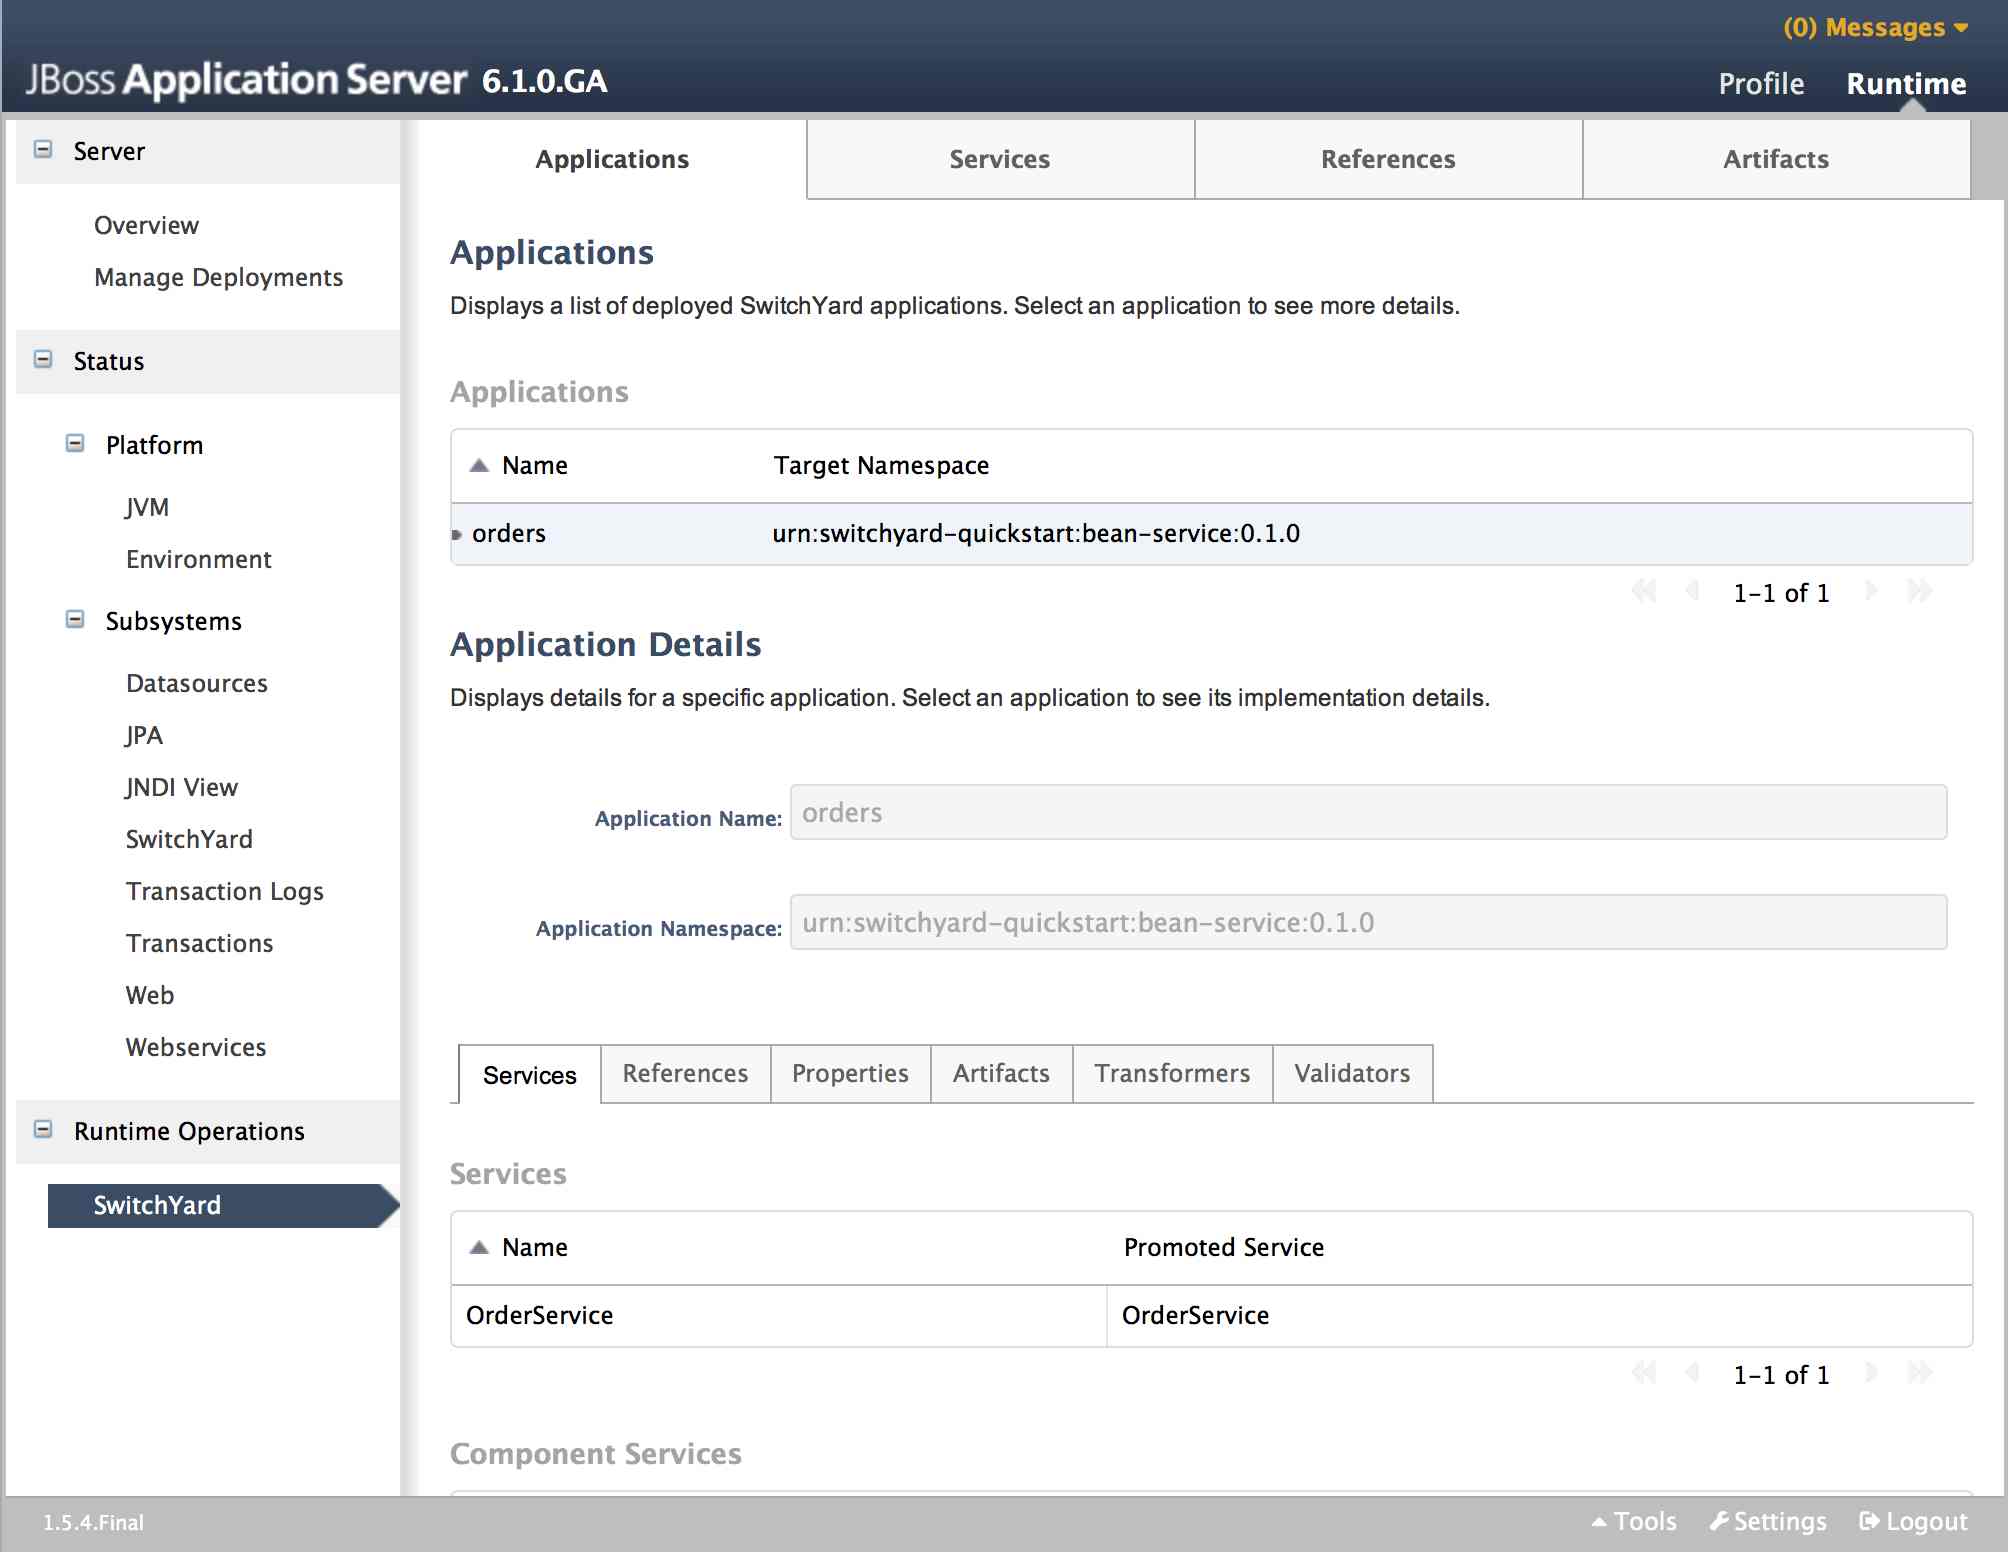
SwitchYard contributes a page to the Runtime Operations section which provides views detailing various aspects of SwitchYard applications running on the system. These views may be accessed on the Runtime page of the AS console by selecting Runtime Operations -> SwitchYard. The following views are provided:
-
Applications: lists all SwitchYard applications deployed on the server
-
Services: lists all Services provided by the applications deployed on the server
-
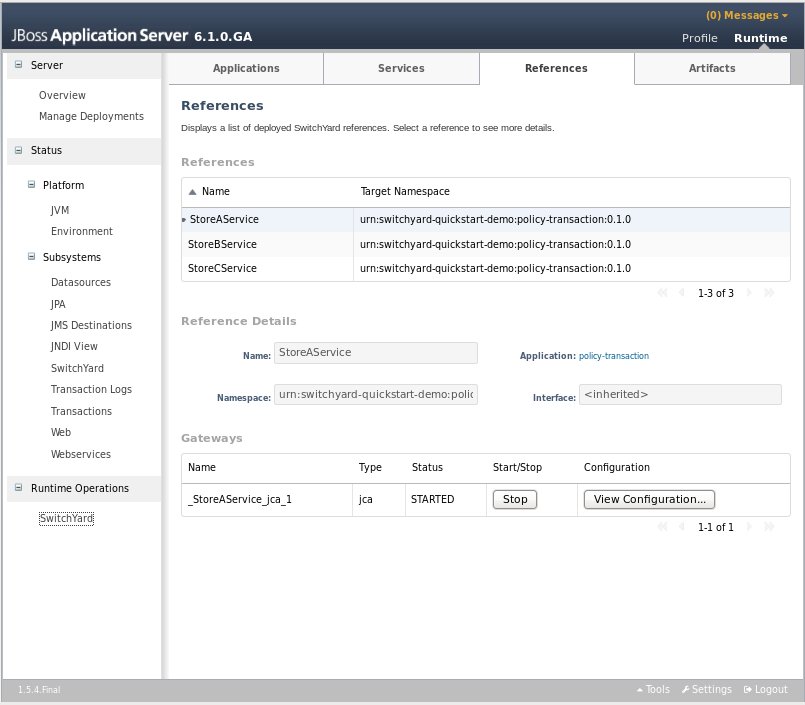
References: lists all service References used by applications deployed on the server
-
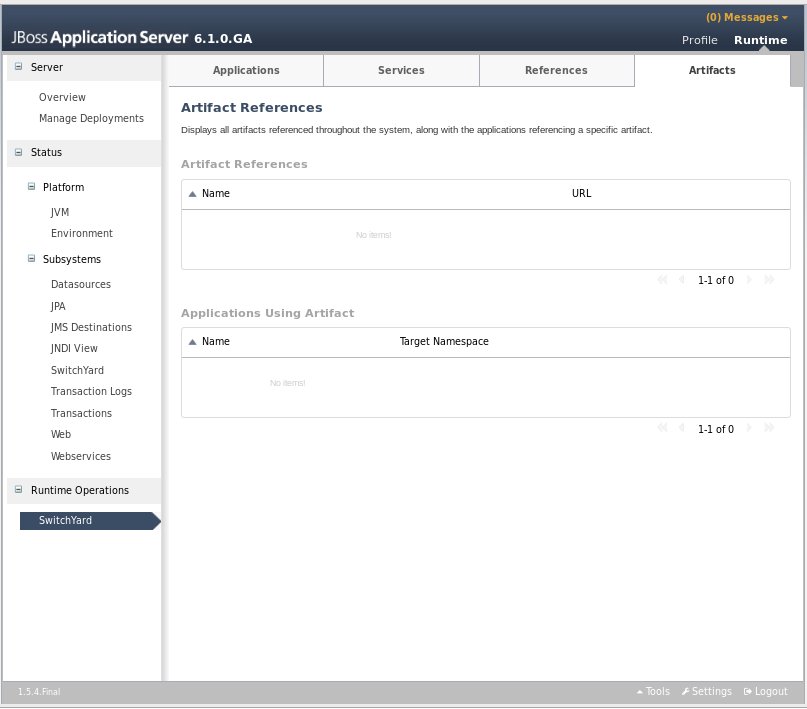
Artifacts: lists all artifacts referenced by applications deployed on the server
Applications
The main Applications tab displays all the applications deployed on the server. Selecting a particular application in the list will populate the Application Details section below the list. The following details are provided:
-
Services: services provided by the application. Selecting a service will open the main Services tab, displaying details for the service.
-
References: services used by the application. Selecting a reference will open the main References tab, displaying details for the reference.
-
Properties: properties defined in the application. The properties may also be edited within this view.
-
Artifacts: artifacts referenced by the application. Selecting an artifact will open the main Artifacts tab, displaying details for the artifact.
-
Transformers: transformers configured in the application.
-
Validators: validators configured in the application.
Services Tab
The Services tab displays information about the services provided by the application. This information includes the services provided by the application and the component services used to implement the services.
The Services table displays the services provided by the application. The table provides the following details:
-
Name: the name of the service.
-
Promoted Service: the name of the component service providing the implementation for the service.
Clicking on an item in the Name column will load the open the main Services page displaying details for that service. Clicking on an item in the Promoted Service column will highlight the corresponding item in the Component Services table below.
The Component Services table displays the component services defined in the application. This table provides the following details:
-
Name: the name of the component service
-
Interface: the interface implemented by the component
-
Implementation: provides a link for viewing the implementation details of the component
Clicking on an item in the Implementation column will open a dialog detailing the component's implementation.
The Implementation dialog provides the following information:
-
The technology used to implement the component (e.g. Camel).
-
A list of references required by the component.
-
The raw configuration for the implementation.

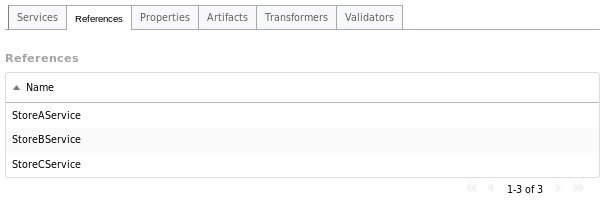
References Tab
The References tab lists all the composite references used by the application.
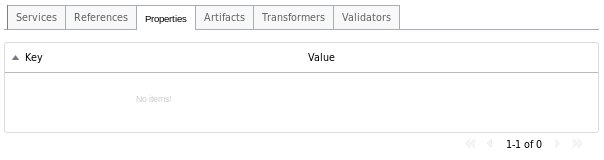
Properties Tab
The Properties tab provides a list of properties defined in the application. In addition to viewing the properties, this page may be used to update the values for individual properties.
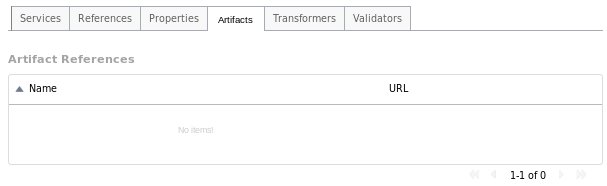
Artifacts Tab
The Artifacts tab provides information about the artifacts referenced by the application and is comprised of a table providing the following details:
-
Name: the name of the referenced artifact
-
URL: the location of the artifact
Clicking on an item in the table will navigate to the main Artifacts page.
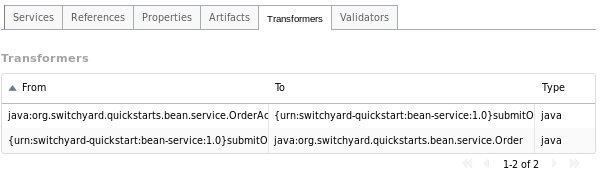
Transformers Tab
The Transformers tab provides details about the transformers deployed by the application, providing the following details:
-
From: the from type supported by the transformer.
-
To: the to type supported by the transformer.
-
Type: the implementation technology used by the transformer (e.g. Java, XSLT, etc.).
Validators Tab
The Validators tab provides details about the validators deployed by the application, providing the following details:
-
Name: the name of the validator.
-
Type: the type of the validator.

Services
The main Services tab displays all services provided by the deployed applications. Selecting a specific service will populate the Service Details section below the list. Details displayed include:
-
Name: the service name
-
Namespace: the namespace within which the service is defined
-
Application: the application providing the service (this links to the main Applications tab)
-
Interface: the interface provided by the service.
-
Promoted Service: the component service implementing the service.
-
Gateways: lists the gateways providing access to the service.
-
Throttling: throttling configuration for the service

Gateways Tab
The Gateways tab in the details section provides the following information for each of the gateways provided for the service:
-
Name: the name of the gateway
-
Type: the type of the gateway (e.g. SOAP, HornetQ, etc.)
-
Status: the status of the gateway (e.g. started, stopped)
-
Start/Stop: starts or stops the gateway
-
Configuration: opens a dialog displaying the raw configuration for the gateway

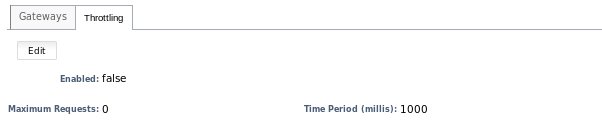
Throttling Tab
The Throttling tab in the details section allows the user to view throttling details for the service.
-
Edit: switch to edit mode, allowing the user to change the throttling configuration.
-
Enable: enable/disable throttling for the service
-
Maximum Requests: the maximum number of requests per period before throttling occurs
-
Time Period: the time period over which requests are counted (cannot be edited)
References
The main References tab displays all service references used by the deployed applications. Selecting a specific reference will populate the Reference Details section below the list. Details displayed include:
-
Name: the name of the reference
-
Namespace: the namespace within which the reference is defined
-
Application: the application containing the reference (this links to the main Applications tab)
-
Interface: the interface provided by the reference.
-
Gateways: lists the gateways through which the reference is accessed.
The Gateways section provides the following information for each of the gateways configured for the reference:
-
Name: the name of the gateway
-
Type: the type of the gateway (e.g. SOAP, HornetQ, etc.)
-
Status: the status of the gateway (e.g. started, stopped)
-
Start/Stop: starts or stops the gateway
-
Configuration: opens a dialog displaying the raw configuration for the gateway
Artifacts
The main Artifacts tab displays all artifacts referenced by applications deployed to the system. Selecting a specific artifact reference will populate the Applications Using Artifact table below. Selecting an application in the applications table will navigate to the main Applications tab.
Subsystem Configuration View
SwitchYard contributes an additional view to the standard JBoss AS management console's Profile page, which can be accessed by selecting the Subsystems -> SwitchYard -> Runtime Details node. This page displays details about to the SwitchYard subsystem configured in the AS configuration profile.
This page displays the version of the SwitchYard runtime, along with a list of installed components. Selecting a component will populate the Component Details section below, which displays:
-
Name: the component name, e.g. SOAP, Camel.
-
Type: the component type, e.g. soap, camel. (The type is the suffix used within switchyard.xml identifying component specific elements, e.g. binding.soap, implementation.camel.)
-
A section providing component specific details. For most components, this section lists any configurable properties and their current settings.

BPEL Console
The BPEL console can be deployed to SwitchYard through its installer since SwitchYard-0.4 version.
Overview
This section provides an overview of the BPEL Console. The console provides the ability to view:
-
The process definitions deployed to the BPEL engine
-
The process instances executing in the BPEL engine
-
The execution history of a process
-
The history instances query
Installation
The easiest way to install the BPEL console is to download the SwitchYard installer and then run :
ant install-bpel-console
You will then be prompted for the location of your EAP installation, and the Installer will place the necessary WAR files in EAP.HOME/standalone/deployments.
Alternatively, you can just simply copy the switchyard-bpel-console.war folder and switchyard-bpel-console-server.war from the Tools distribution into the EAP_HOME/standalone/deployments folder. Remember that you will need to add a marker file named "switchyard-bpel-console.war.dodeploy" in the deployments folder as well to trigger the deployment.
Because of this issue (https://issues.jboss.org/browse/RIFTSAW-391), we used the exploded war of the switchyard-bpel-console as the workaround.
Logging in
The BPEL console can be located using the URL: http://localhost:8080/bpel-console.
It is recommended that you only open one bpel-console window within your browser, otherwise, you may see blank window once you logged in, or couldn't log in from your second window. For detail please see RIFTSAW-400.
The first screen that is presented is the login screen:
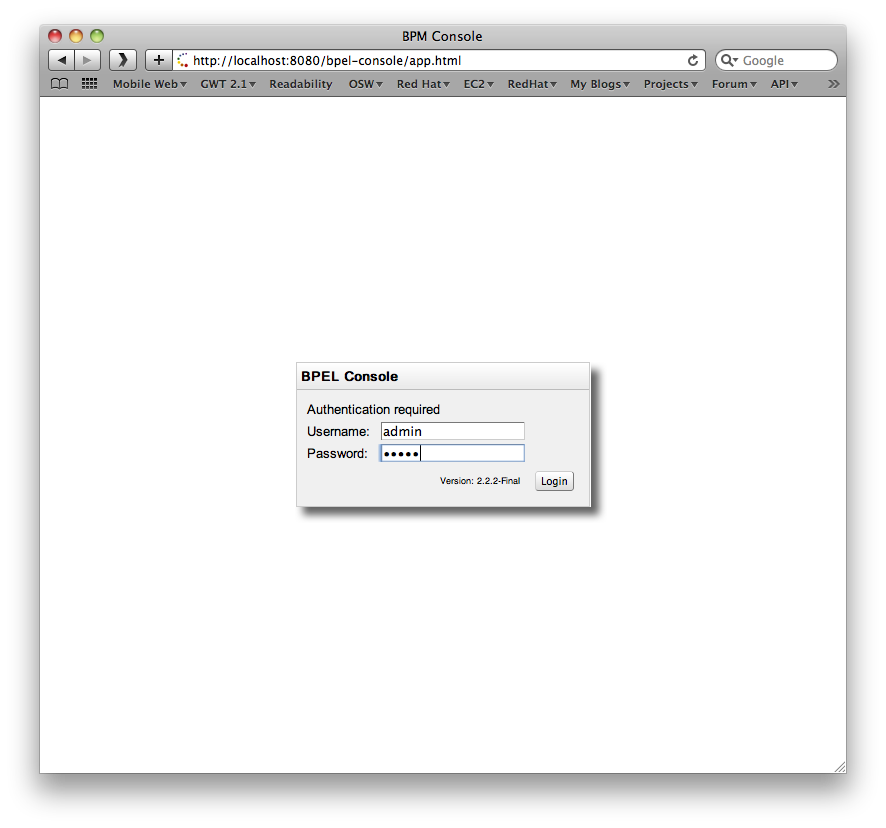
The default username is admin with password admin.
The Access Control mechanism used by the admin console is configured in the $deployFolder/bpel-console/bpel-identity.sar/META-INF/jboss-service.xml. The JAAS login module is initially set to use a property file based access mechanism, but can be replaced to use any appropriate alternative implementation.
The users for the default mechanism are configured in the property file $deployFolder/bpel-console/bpel-identity.sar/bpel-users.properties. The entries in this file represent username=password.
The user roles for the default mechanism are configured in the property file $deployFolder/bpel-console/bpel-identity.sar/bpel-roles.properties. The entries in this file represent username=role. The only role of interest currently is administrator.
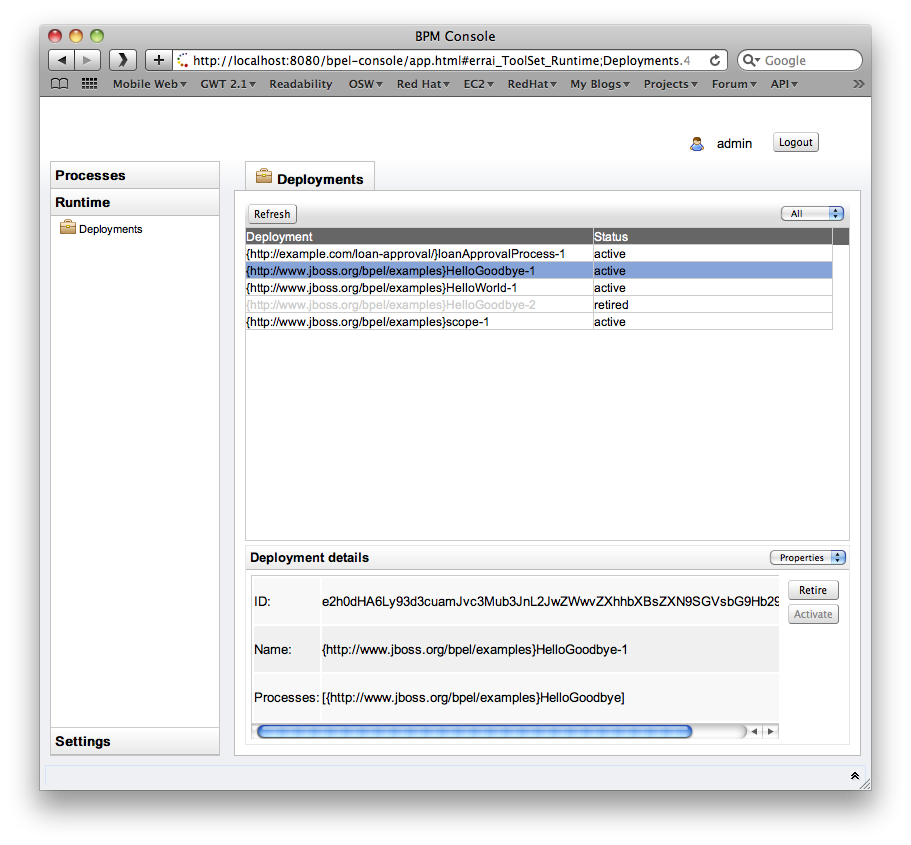
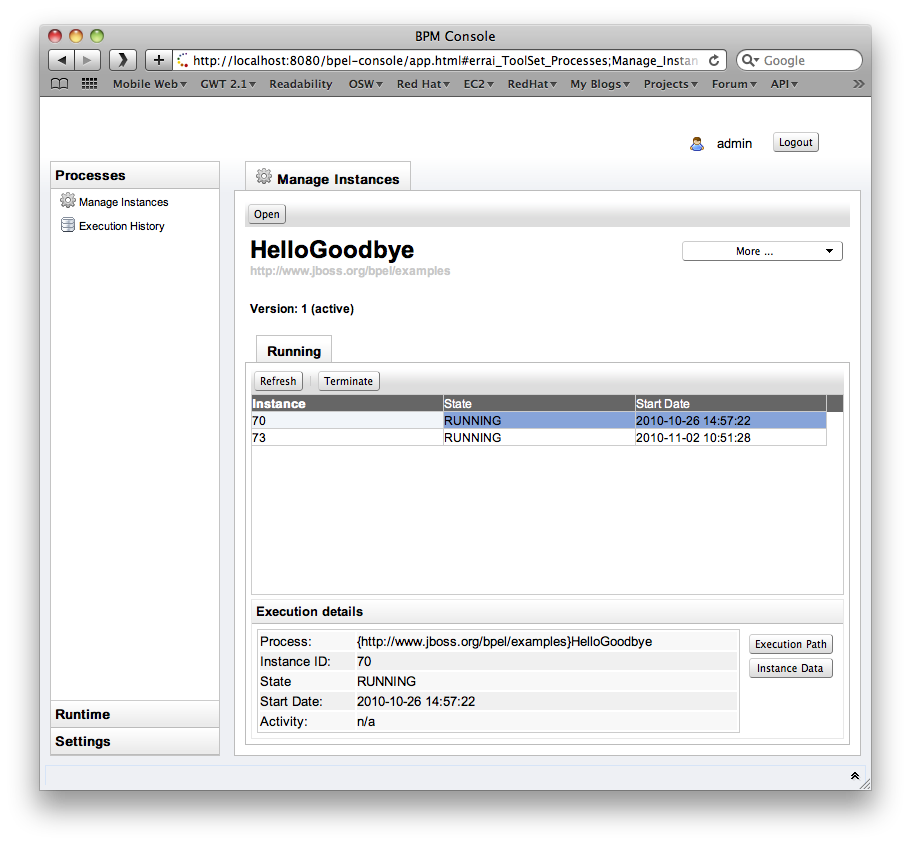
Deployed Process Definitions
Once logged in, the 'Manage Instances' tab shows the currently deployed BPEL processes and their versions.
Process Instances
When a process definition is selected (Open), the list of active process instances for that process definition (and version) will be displayed in the bottom panel.
Process Versions
There is only one active version at a time. If you open a process definition the active version will be chosen by default. Sometimes you need to manage instances of a retired version (i.e. to terminate running instances). In that case the button More - Change Version allows you to select a different version of that process.

Execution History
The Execution History allows you to inspect the BPAF history data associated with a process. You can specify a timespan and whether or not you'd like to see failed/terminated instances included in the chart.
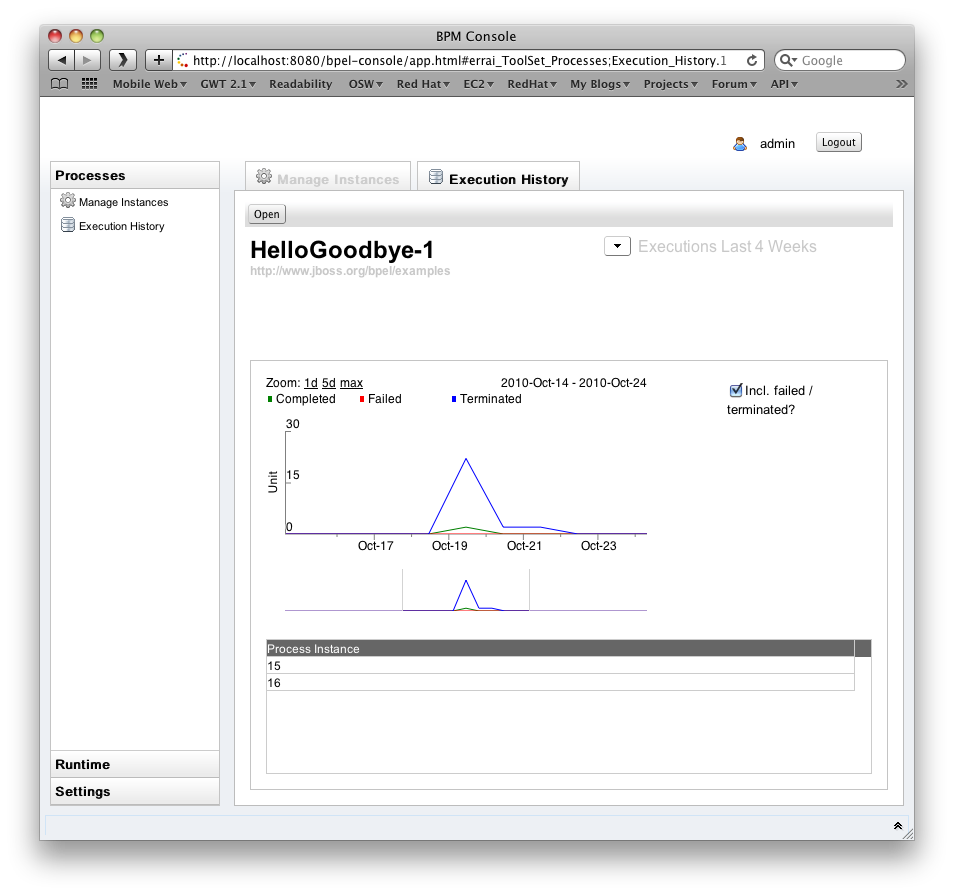
The chart has various keyboard bindings to browse through the displayed execution data:
|
Key |
Action |
|
Up Arrow |
Zoom In |
|
Down Arrow |
Zoom Out |
|
Left Arrow |
Half-Page Left |
|
Right Arrow |
Half-Page Right |
|
Page-Up |
Page Left |
|
Page-Down |
Page Right |
|
TAB |
Next Focus |
|
Shift-TAB |
Previous Focus |
|
HOME |
Max Zoom Out |
|
ENTER |
Max Zoom In to Focus |
|
Mouse Drag |
Scroll Chart |
|
Shift Mouse Drag |
Drag Select/Zoom |
|
Mouse Wheel Up/Z |
Zoom In |
|
Mouse Wheel Down/X |
Zoom Out |
|
Backspace/Back Button |
Back |
|
Right Mouse Button |
Context Menu |
|
Left Click |
Set Focus |
|
Double Click |
Max Zoom In to Focus |
Logging configuration options
You need to explicitly enable history logging for a particular process through the 'deploy.xml' file and for the BPEL engine in general through the 'bpel.properties' file. In order to record history data, set the 'process-events' option for a particular process and make sure the 'org.jboss.soa.bpel.console.bpaf.BPAFLogAdapter' is enabled.
Process configuration example (deploy.xml):
<deploy xmlns="http://www.apache.org/ode/schemas/dd/2007/03"
	xmlns:bpl="http://www.jboss.org/bpel/examples"
	xmlns:intf="http://www.jboss.org/bpel/examples/wsdl">

	<process name="bpl:HelloGoodbye">
		<active>true</active>
        <process-events generate="all"/>
		<provide partnerLink="helloGoodbyePartnerLink">
			<service name="intf:HelloGoodbyeService" port="HelloGoodbyePort"/>
		</provide>
	</process>
</deploy>
Instance Data and Execution Path
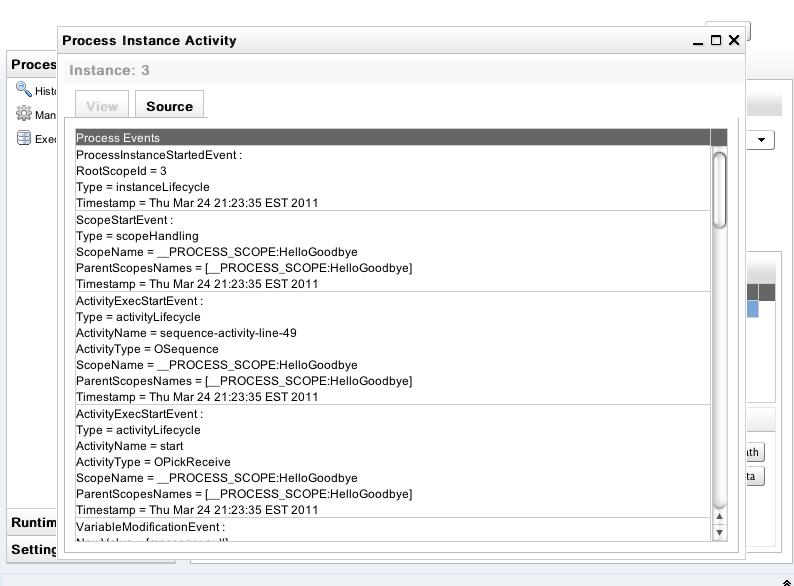
When a process instance is selected, its details will be displayed in the Execution Details panel. The Instance Data button will also become enabled, allowing further detail about the process to be displayed. Likewise the Execution Path button opens the related instance execution graph.

The View tab shows the instance execution graph, while the Source tab below shows all activity events
History Instance Query
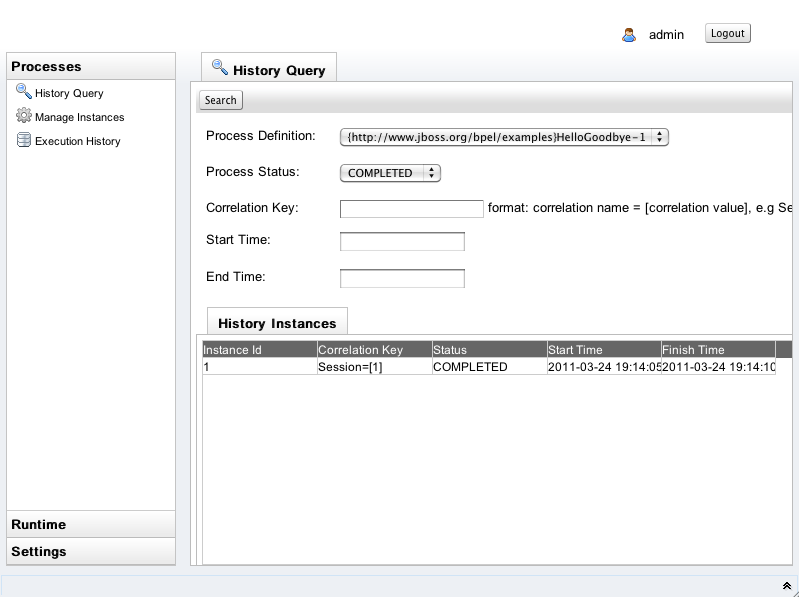
Once a process instance is finished, could be 'COMPLETED', 'FAILD' or 'TERMINATED', you could search it through the History Query tab window as following:

You need to choose the Process Definition and the Process Status from the list box. You could also input the correlation key, start time and end time as criteria to search the history instances. Below is the search result.
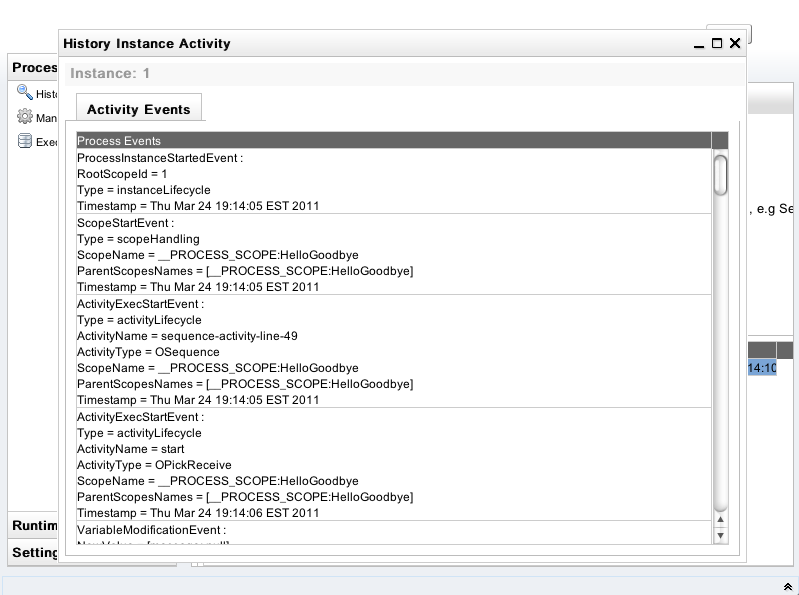
On the History Instances List, when you double click a specific row, it will pop up a window that shows all of execution events that happened during this process instance execution.
Please be noted that you have to explicitly enable the history logging in order to use the History Query functionality.
Retiring and Reactivating Process Definitions
When a process definition is initially deployed (i.e. the first version of the process), it automatically becomes the active process definition. If that BPEL process definition is subsequently change and redeployed, then the previous version is retired, and the new version becomes the active version.
The only difference between an active and retired process definition is that a retired process definition can no longer create new process instances. However if there are current process instances associated with the retired process definition version, then these will continue to execute.
On some occasions, the administrator may wish to change which version of a process definition is considered the <emphasis>active</emphasis> version. Or they may simply want to retire the currently active process definition, so that no more process instances can be created, only allowing the already running process instances to continue until completed.
To change the status of a process definition, the administrator should select the Runtime tab from the lefthand panel, and then select the Deployments option. This will show the process definitions, their versions and their current status (active or retired).