- 5.1. Toolbar
- 5.2. User Management
- 5.2.1. Manage Users
- 5.2.2. Search a user
- 5.2.3. Edit a user
- 5.2.4. Delete a user
- 5.2.5. Manage Groups
- 5.2.6. Add a new group
- 5.2.7. Edit a group
- 5.2.8. Add a new user to the group
- 5.2.9. Edit the User Membership in a Group
- 5.2.10. Delete a group
- 5.2.11. Manage Memberships
- 5.2.12. Add a new Membership type
- 5.2.13. Edit a Membership type
- 5.2.14. Delete a Membership type.
- 5.3. Manage Permission
- 5.4. Change Portal Skins
- 5.5. Manage Page Navigation
- 5.5.1. Overview
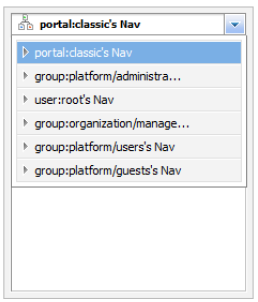
- 5.5.2. Portal's page navigation
- 5.5.3. Creating a portal's navigation
- 5.5.4. Editing a portal's navigation
- 5.5.5. Deleting a portal's navigation
- 5.5.6. Group's page navigation
- 5.5.7. Editing a group's navigation
- 5.5.8. User's page navigation
- 5.5.9. Creating a user's navigation
- 5.5.10. Editing a user's navigation
- 5.5.11. Deleting a user's navigation
- 5.6. Manage Navigation Nodes
- 5.7. Change Node Order
- 5.8. Manage Pages
- 5.9. Page Creation Wizard
- 5.10. Drag and Drop the Page Body
- 5.11. Create a New Portal
- 5.12. Manage Portals
- 5.13. Switching between Portals
The convenient Toolbar helps users and administrators to manipulate all actions quickly.
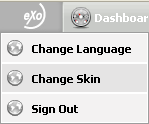
You can change language, change skin and sign out from GateIn Portal.

It shows all different sites available in GateIn Portal allows users to directly edit the navigation tree.
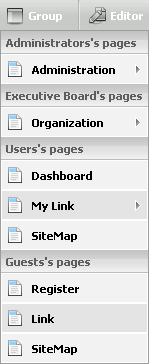
Users can easily see and access pages in GateIn Portal.
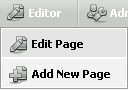
You easily edit a page or add a new page
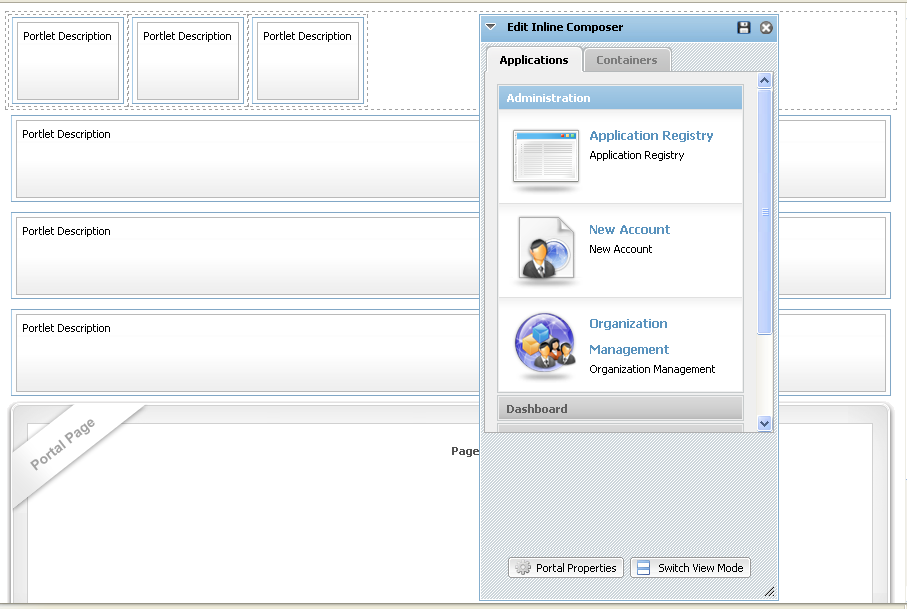
With the Edit Inline Composer popup that consists of two tabs: Applications and Containers, it is convenient for a user to select the component that he wants and to drag and drop it to the page.
You also quickly edit, delete portlets in a page, change portal's properties or switch the view mode.
It is so difficult to manage and set permissions for a great number of registered users in a system. To solve this problem, GateIn Portal helps Administrators manage users, groups and memberships easily as well as effectively.
Go to Administration / Community Management (or Organization/Management). The Organization form appears:
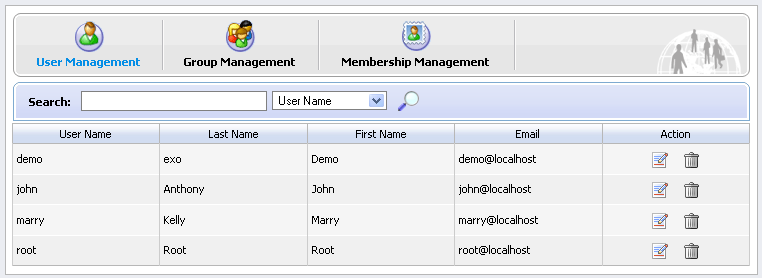
Select the User Management tab in the Organization form. By default, it will show all existing registered users. With User Management , you can see all existing registered users, and also search, edit, delete them. For each user, you can see his groups and his memberships (roles) in these groups. You can not add users to a group but you can remove them from the group.
The Administrator can search users by user name, first name, last name or email address.
1. Type the search term related to the user that you want to search. You do not need to enter an exact term.
2. Select the field in which you would like to search
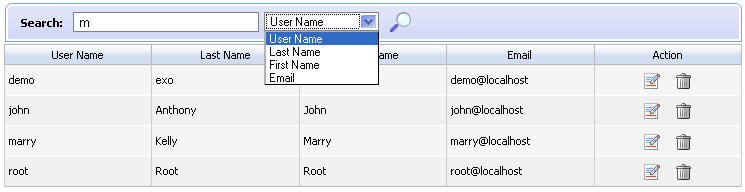
3. Click the magnifying glass icon!images/SearchIcon.png! to perform searching. It will return a searching result in form.
1. Click the edit icon!images/EditIcon.png! corresponding to the user that you want to edit.
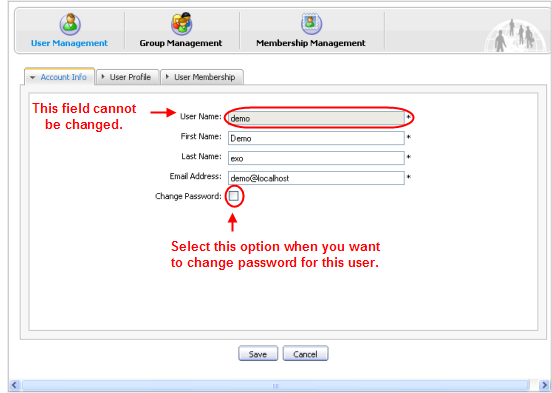
2. Select the Account Info tab to view and change the essential user information .
- The User Name field can not be changed, other fields First Name , Last Name , Email Address can be changed.
- The Change Password option allows making a new password for this user when he/she forgets his/her password. When the Change Password option is unchecked, New Password and Confirm Password are hidden. Passwords must contain at least 6 characters (letters, numbers and punctuation marks).
3. Select the User Profile tab to view and change profile information. The Language field is used to set the display language of that user.
4. Select the User Membership tab to see user's information in groups.
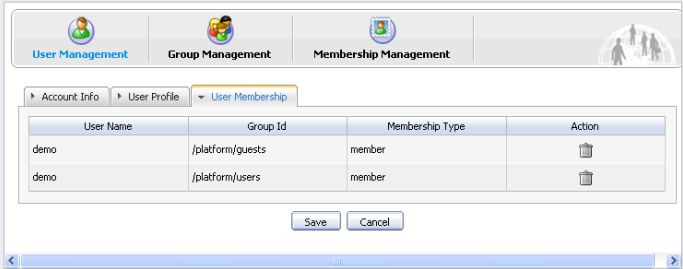
- The User Membership tab indicates to which group the selected user belongs. In the above figure, the user "demo" is a member of two groups: "guests" and "users". The parent group of both is "platform".
- To remove the user from a group, click the trash can icon!images/DeleteIcon.png! on the row you want.
5. Click the Save button to accept changes.
1. In the User Management form: Click the trash can icon !images/DeleteIcon.png! corresponding to the user that you want to delete.
2. Click the OK button in the confirmation message to confirm or the Cancel button to quit without deleting anything.
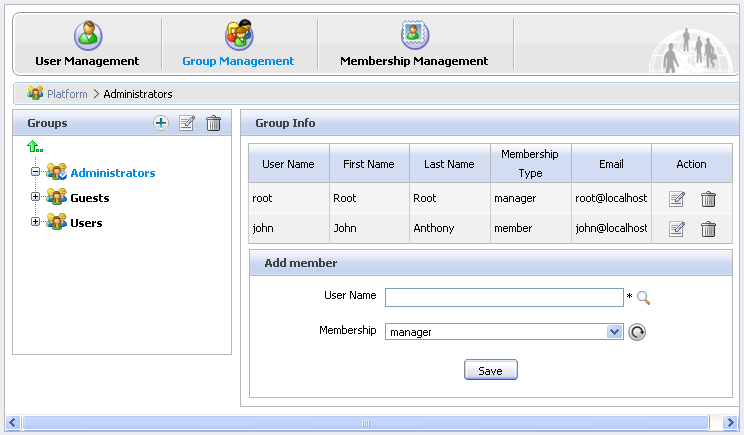
Select the Group Management tab in the Organization form.
By default, all existing groups will be displayed on the left pane. This tab is used to add new, edit or delete a group. The right pane shows information about the selected group including information about the members in the specific group and a small form to add a new user to a group.
1. Choose the path to create a new group by selecting the groups from list on the left pane or clicking the arrow icon !images/ArrowIcon.png! if you want to create a group in a higher level. The selected path is displayed in the path bar.
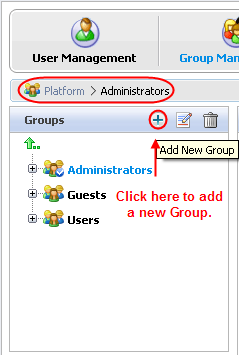
2. Click the Add New Group icon. The Add New Group form will be displayed on the right pane:
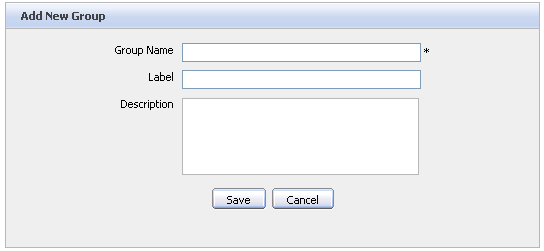
| Name | Description |
| Group Name | The name of the new group. This field is required and any length from 3 to 30 characters is allowed. |
| Label | The display name of the group. Any length from 3 to 30 characters is allowed. |
| Description | The description about the group. Any length from 3 to 30 characters is allowed. |
3. Fill in the required fields. Only alpha, digit and underscore characters are allowed for the Group Name field and it must be unique.
4. Click the Save button to accept entered values or the Cancel button to quit.
1. Select the path to the group you want to edit by selecting the groups from list on the left pane.
2. Click the edit icon!images/EditIcon1.png! to show the Edit Group form of the selected group. This form is identical with the New Group form.
3. You can not change the Group Name. Make changes for a Label or a Description field and then click the Save button to accept changes or the Cancel button to cancel changes and return to the Group Info form.
1. Select the path to the group you want to edit by selecting the groups from the list on the left pane. The Group's information is displayed including the user list and a form which allows to add a new user.
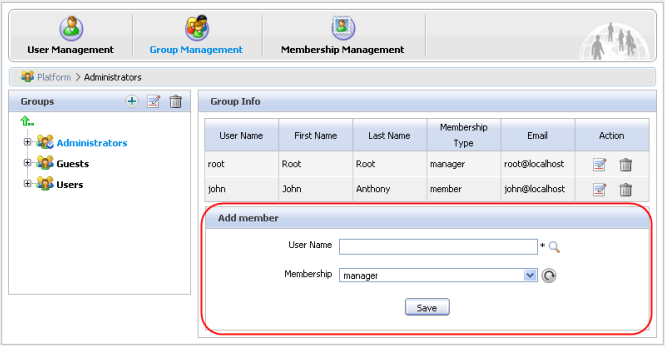
2. Enter the exact user name of the user that you want to add to the selected group or you can enter some characters if you are not sure about the exact spelling.
- Click the magnifying glass icon!images/MagnifyIcon.png! to select users.
- After clicking the magnifying icon!images/MagnifyIcon.png! , there will be a list of all existing users :
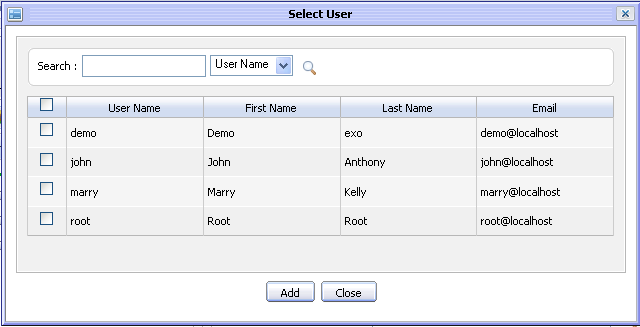
- Select the check box of the user (s) that you would like to add to the group.
- After clicking the Add button you will see the complete user name(s) in the Add member form.
3. Select the membership for the user in a group from memberships list. The refresh icon!images/RefreshIcon.png! can be used to update the memberships list in case there are any changes.
4. Click the Save button to accept adding the selected user to a specific group with the selected membership type.
1. Click the edit icon!images/EditIcon.png! corresponding to a specific user with a membership in the Group Info table to open the Edit Membership form :
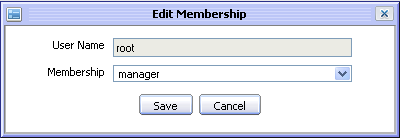
2. Change the membership of the selected user by selecting another value in the Membership field.
3. Complete editing the selected user by clicking the Save button.
1. Select the path to the group you want to delete by selecting the groups from list on the left pane.
2.Click the trash can !images/DeleteIcon.png! icon in order to delete.
3.Click the OK button on the confirmation message to accept or the Cancel button to quit without deleting.
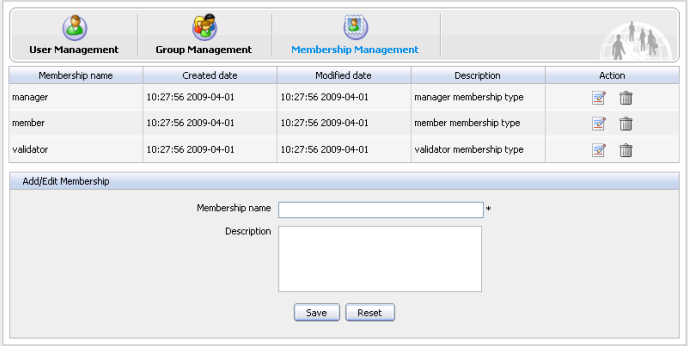
The roles of an user in the specific group are managed in Membership Management form. Currently there are three membership types: Manager, Member and Validator. By default, Manager has the highest rights in a group. You can add new, edit or delete a membership type. Select the Membership Management tab in the Organization portlet. There will be a membership type list and a form to add new/edit:
1. In the Add/Edit Membership form at the bottom, the input value for the membership name field (required) and the description field (optional). Only letters, digits, dots, dashes and underscores are allowed for the membership name.
2.Click the Save button to accept adding the new membership or click Reset button to clear the entered values.
1. Click the edit icon!images/EditIcon.png! in the row of the membership type you want to edit. The selected Membership type information is displayed in the Add/Edit Membership form.
2. Make changes in this form.
3. Click Save to accept changes.
1. Click the trash can icon in the row of the membership type that you want to delete.
2. Click the OK button in the confirmation message to accept the deletion.
Permissions play an important part in accessing and performing actions in the Portal. Depending on permissions assigned by an administrator, users can either access or edit portals, pages and portlets. GateIn Portal have applied several permission levels:
- Portal : The portal includes all pages, pages only can be accessed if the user has also access the Portal.
- Page : You can restrict the access to single pages. Users can change page information (properties, layout) if they have the edit right.
- Portlet : When users create a page, they need to drag and drop portlets into a page to create the page content. Some portlets are only used for administrators, some are used for individual needs of a group thus you have to set the appropriate access permission.
The three above permission levels helps users assign access and edit permissions clearly and flexibly.
You have to set permission for new portals as well as existing portals:
For new portals: on the Toolbar select Site then click on the Add New Portal button, select the Permission Setting tab then the Access Permission Setting sub tab.
For existing portals: on the Toolbar click Site Editor then Edit Page . Click on View Page properties then select the Permission Setting tab.
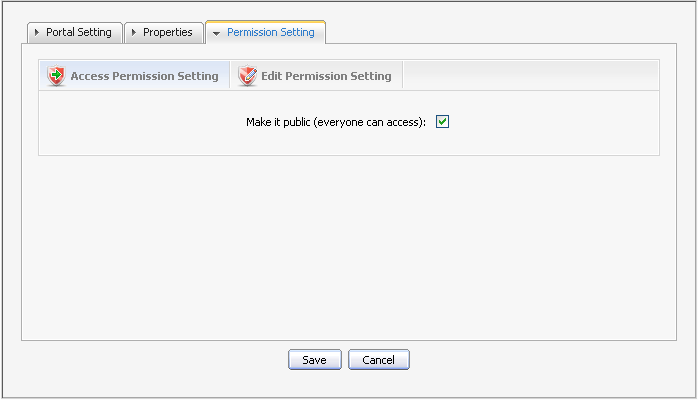
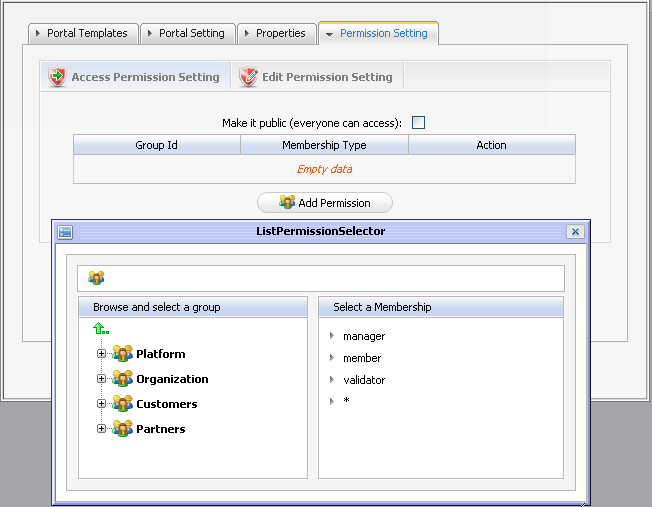
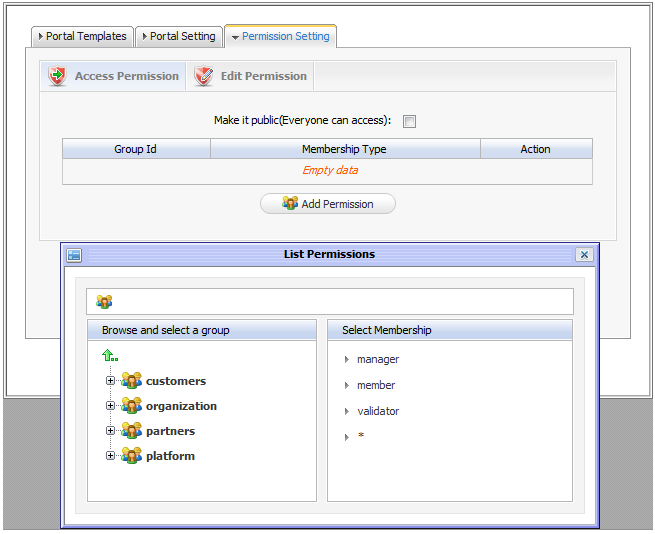
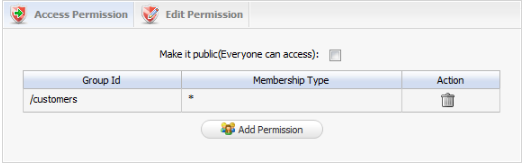
If you do not want everyone to access the Portal, do not select the Make it public check box and you have to select group by group. Do as follows:
Click the Add Permission button.
- Select the group you want to add on the left and then select a membership type on the right. In the membership types list, means allowing any membership type.
After selecting a membership type, the selected permission is displayed in the access permission list. Each time, you only can select one group with one membership type. If you want to add more, click Add Permission and select again.
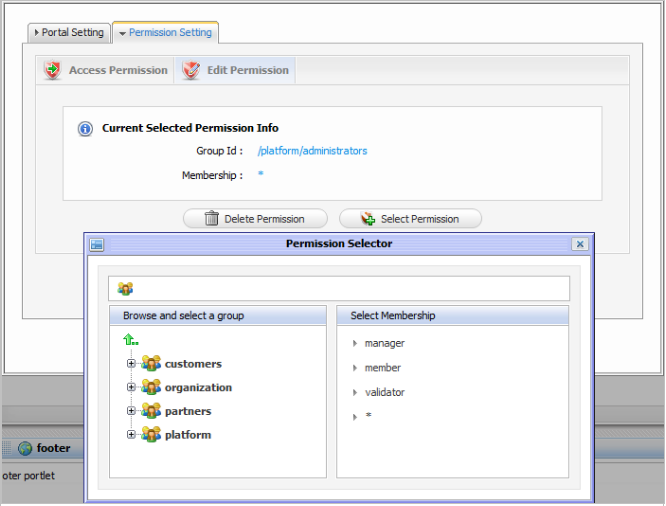
Only users who are in the portal editor group can edit that portal. Access rights can be given to several groups but edit rights can only be given to a group with a membership type (or every membership type by select ). To assign an edit permission to a user, you must add him to the editor group of the respective portal.
Use one of these following paths to assign permissions on a portal:
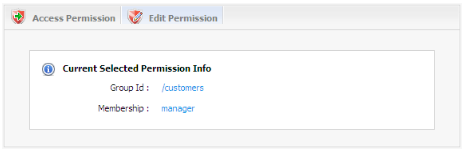
- On the Toolbar select Site -> Add New Portal -> Permission Setting tab --> Edit Permission Setting sub tab.
- On the Toolbar click Site Editor -> Edit Page -> View Page properties -> Permission Setting tab --> Edit Permission Setting sub tab.
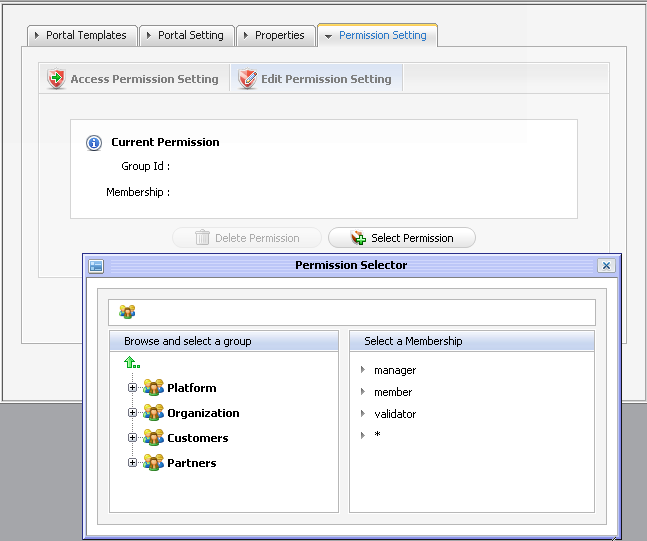
Click Select Permission to choose a group.
Select a group and a membership type (select if you want to assign all membership types for the selected group). After selecting the membership from the right, the selected information is displayed.
4. Click on the Save button to accept.
In some cases, permissions on a page are initialized and users who have the edit permission can change the page.
- If the owner type of a page is "user", you don't have to set permissions, no one except the creator has access and edit permissions.
- If the Owner type of a page is "group", initial permissions on page are:
- Access permission: everyone in that group.
- Edit permission: the manager of that group.
- If the Owner type of a page is portal, initial permissions are:
- Access permission: users who can access that portal.
- Edit permission: users who can edit that portal.
When you have access permission on a specific page, you can access that page which other users can't access it because they are not given that permission.
These following path help you quickly set access permission for a page:
- Select Site Editor on the Toolbar -> Edit Page -> View Page Properties tab -> Access Permission Setting (default) sub tab.
To be able to access a page (read the page content or take an action on the page), users have to be in one of the groups that have access permission to that page. There may be several groups that have access right to a page.
If you allow anyone to access the page tick on Make it public , otherwise, you have to select the groups one by one.
- Click the Add Permission button
- Select a group you want to add on the left and then select a membership type on the right. In a membership types list, means allowing any membership type.
- After selecting a membership type, the selected permission is displayed in the access right list. Each time, you can only select one group with one membership type. If you want to add more, click the Add Permission button and select again.
Only users who are in the page's editor group can edit it. The access right can be set for several groups but the edit right only can be set for one single group. To give a user the edit permission, you must add him to the editors group of that page.
- Select Site Editor on the Toolbar -> Edit Page -> View Page Properties tab -> Edit Permission Setting sub tab.
- Or, select Group on the Toolbar -> Administration -> Page Management -> Edit Page icon -> View Page Properties tab -> Edit Permission Setting sub tab.
Click the Select Permission button to set new or change another group.
Select a group with a membership type (select if you want all membership types in a selected group)
After selecting a specific membership from the right, the selected information is displayed.
Click the Save button to accept.
Follow these below steps to set access permission on a portlet:
Select Group --> Administration --> Application Registry on the navigation bar
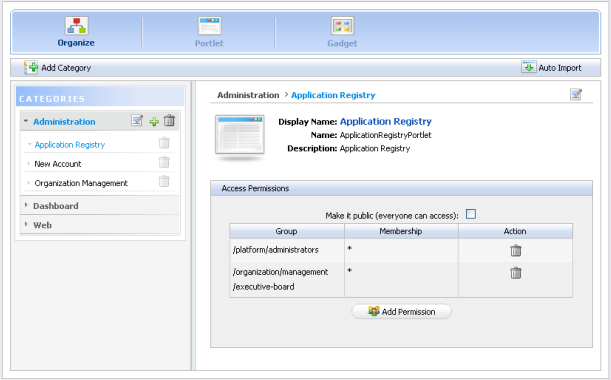
Select a category on the left pane that includes the portlet you want to set right. Then all portlets of the selected category are listed immediately and detail information of each portlet is displayed on the right pane.
To set permissions for a portlet:
- Click the Add Permission button to add access permissions to more groups .
- Or select the Make it public check box to allow everyone to access.
GateIn Portal skins are graphic styles that help users display an attractive user interface. Each skin has its own characteristics with different backgrounds, icons, etc. In order to be user-friendly and flexible in use, users are allowed to change their skins without having edit rights on the portal.
- skin switch that takes only effect on the user's current session until he signs out. You can change the skin permanently or temporarily.
1. Go to GateIn Start -> Administration -> Advanced --> Edit Current portal
2. Click the edit icon!images/EditIcon.png! to edit portal properties.
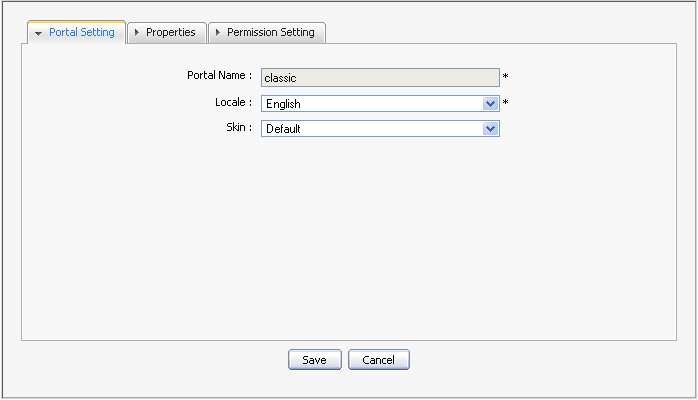
3. In the Portal Setting tab: select one skin type in the Skin list field to change and display a skin.
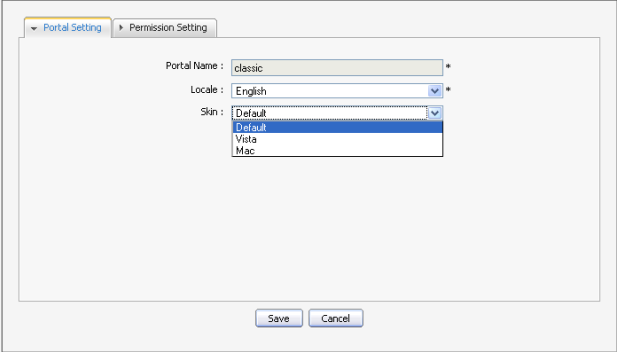
4. Click Save and Finish icon !images/Finish1.png! so that the modification can take effect.
1. Click Edit Inline on the Toolbar. The Edit Inline Composer will appear.
2. Click Portal Properties to edit portal's properties.
3. In the Portal Setting tab: select one skin type in the Skin list field to change and display a skin.
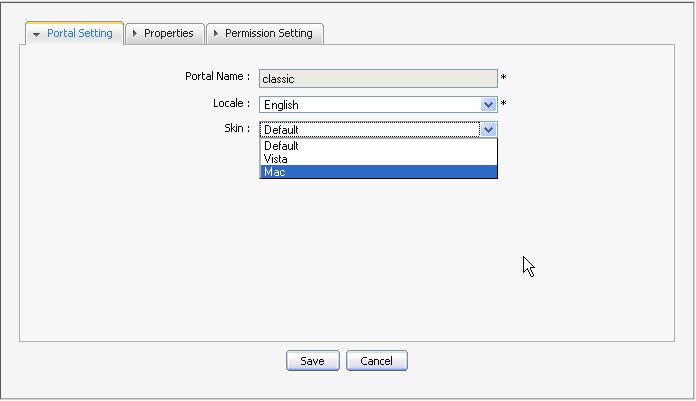
4. Click Save and the !images/DiskIcon.png! icon so that the modification can take effect.
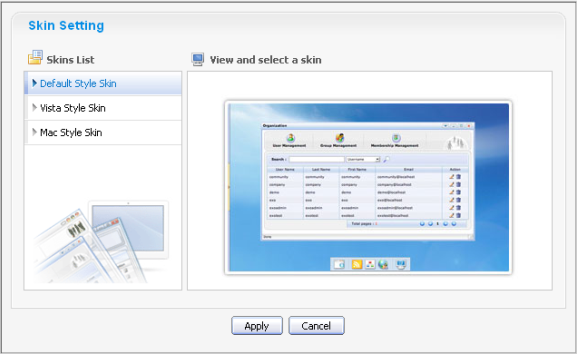
1. Go to GateIn Start -> Administration -> Skin Settings.
1. Go to GateIn on the Toolbar --> click Change Skin.
The Skin Setting form is displayed with a list of all supported skins. The left pane contains the skin list and the right pane is used to display the template of the selected skin.
2. Select one by clicking on the skin's name.
3. Click the Apply button and wait for few seconds to take effect.
In order to understand clearly about what the navigation is and navigation types that GateIn Portal supports, please refer the Navigation concept page.
The page navigation of a portal is created automatically when a portal is created.
Only users who have the edit right on a portal can perform this action.
Follows these below guides to edit a portal 's navigation:
1. Go to GateIn Start-> Administration -> Advanced--> Edit Page and Navigation.
2. Select Portal navigation in list on the left pane (eg: portal: classic's Nav).
3. Right click the blank space on the left pane and select Edit Navigation in the menu:
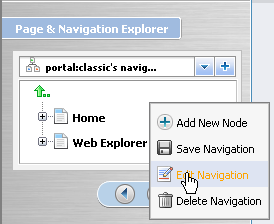
The form for editing the portal navigation will be opened:
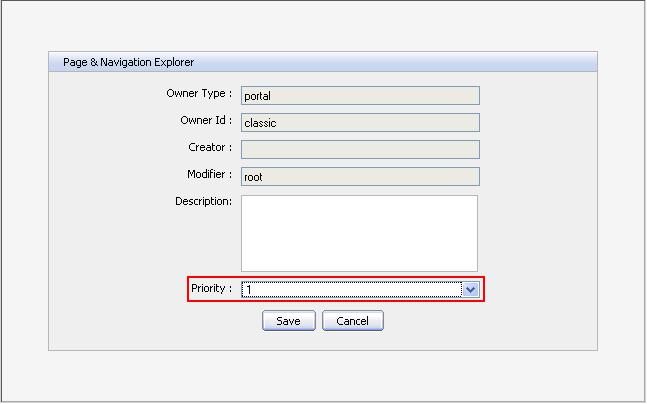
Notice: The number that users select in the Priority field is the priority of a page navigation on the Navigation bar.
4. Make changes to fields in this form: Description, Priority.
5. Click the Save button to accept changes.
6. Click the!images/OKIcon.png! to take effect of new changes.
Or click the Cancel button to quit without saving any change.
No one can create the portal's page navigation so no one can delete it. A navigation is deleted automatically after you delete its portal.
Each group has only one page navigation. Only users of that group have the "manager" membership can create/edit/delete navigation for that group
1. Go to GateIn Start -> Administration -> Advanced --> Edit Page and Navigation.
2. Select a Group navigation in the list on the left pane (eg: group:platform/administrator's Nav). All pages of this group will be listed underneath.
3. Right click the blank space on the left pane and select Edit Navigation in the context menu:
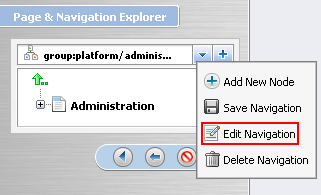
The form for editing the group navigation will be opened:
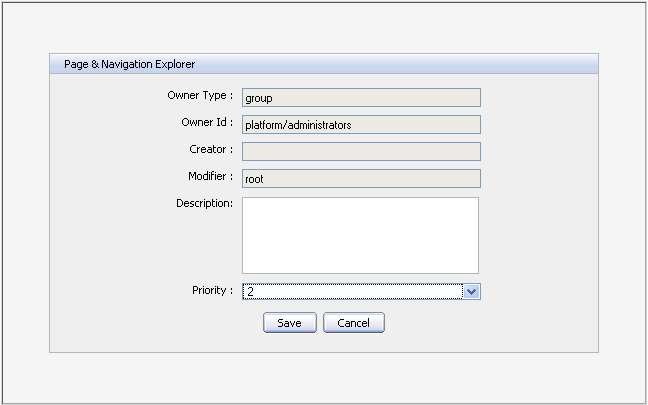
4. Make changes for two fields: Description and Priority.
Notice: The number that users select in the Priority field is the priority of a page navigation on the Navigation bar.
5. Click the Save button to accept any changes.
6. Click the!images/OKIcon.png! to take effect new changes on the Navigation bar.
Or click the Cancel button to quit without saving any change.
The page navigation of a user is created automatically when a user is created (registered). So an administrator don't have to create it.
Only the user who is the owner of the user page navigation can edit it.
No one can create user's page navigation so that no one can delete it. A user's navigation is deleted automatically when its user is deleted.
If you are allowed to access GateIn Start in the User Workspace, you can take all actions related to a node such as : add a new node, edit, copy, cut, delete and clone node.
1. Go to GateIn Start -> Administration -> Advanced --> Edit Page and Navigation
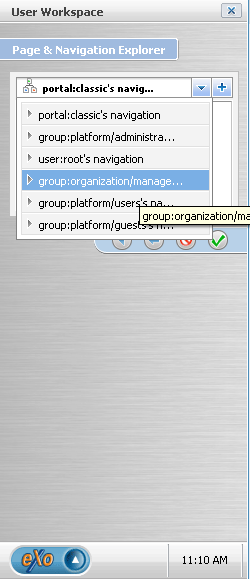
2. Select a navigation from the navigation list.
3. Select a node from list (to create a new node like sub-node of the selected node) or click the icon!images/UpIcon.png! to create a new node on root
4. Right-click on the selected navigation or node and select Add new Node option. Add new node form appears:
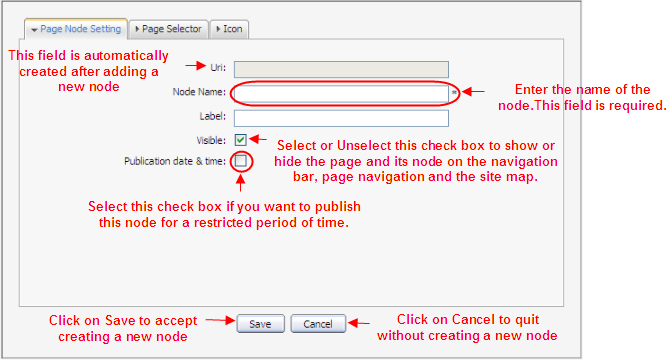
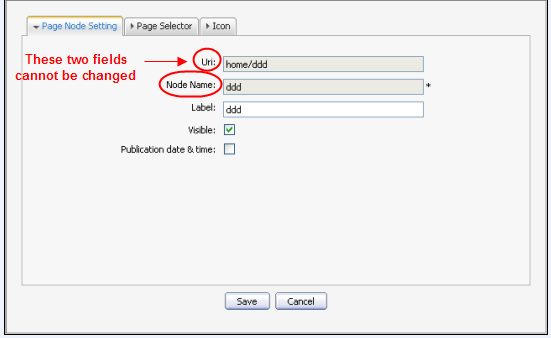
The Page Node Setting tab includes:
| Name | Description |
| Uri | An identification of the node. The Uri is automatically created after adding a new node |
| Node name | The name of the node. This field is required and must be unique. Only alpha, digit and underscore characters are allowed for this field and it must have at least 3 characters. |
| Label | The display name of the node on the screen. This field is not required and may be changed. This field must have a length between 3 and 120 characters. |
| Visible | This check box allow to hide (and show) the page and its node at the navigation bar, the page navigation and the site map |
| Publication date & time | This option allows publishing this node for a period of time. *Start Publication Date* and *End Publication Date* only appear when this option is selected. |
| Start Publication Date | The start date and time to publish the node. |
| End Publication Date | The end date and time to publish the node. |
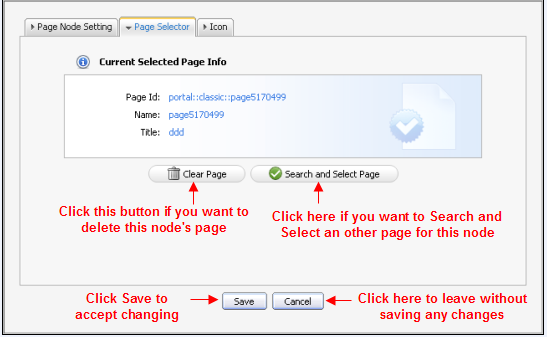
In the Page Selector tab, you can select a page or not for this node.
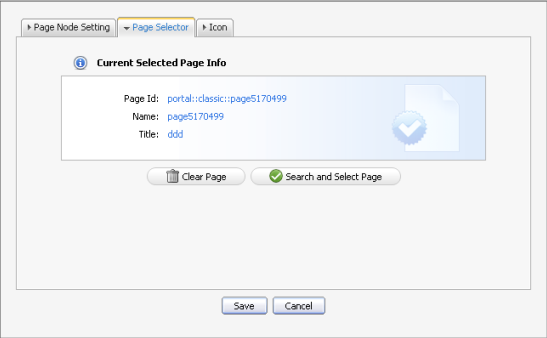
| Name | Description |
| Page Id | The identification string of the page. |
| Name | The selected page's name. |
| Title | The selected page's title. |
You do not have to input values in these fields. It is automatically displayed after selecting an existing page by clicking the Search and Select Page button. The Select a page form appears like:
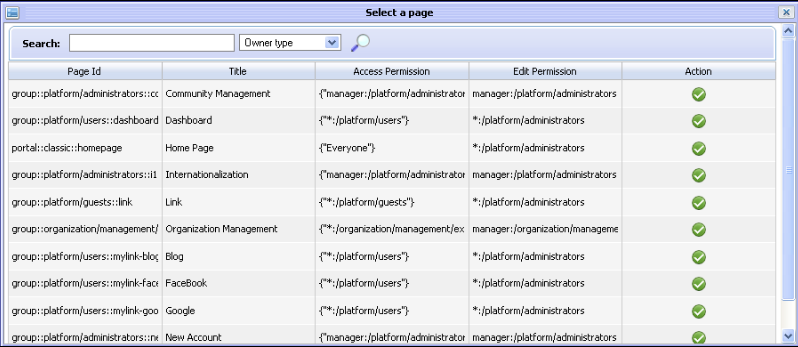
- list of all existing pages is displayed with basic information. You can follow these guides to select a page for creating a node:
- Select a page from list or search a specific page :
- Enter a search term related to the page which you want to search:

- Choose the field you wish to search in:

- Click the magnifying glass!images/NewGlassIcon.png! icon to perform searching. All pages matching with search term will be listed.
- Click the OK!images/NewOkIcon.png! icon on the row of the page to select.
- After selecting a page, the details of this page will be displayed in the Page Selector form.
After configuring the page node settings, the page selector and the node's icon, click the Save button to accept or the Cancel button to quit without creating a new node.
1. Go to GateIn Start -> Administration -> Advanced --> Edit Page and Navigation
2. Select a navigation from the navigation list.
3. Right-click on the selected node and select Edit this Node option.
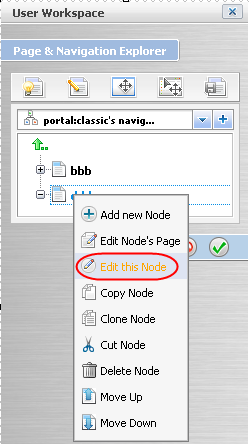
It will displays a form to edit this node:
In the Page Node Setting tab: you can change the value of these fields: Label, Visible and Publication Date & time. After finish changing, click the Save button to accept changing or Cancel button to refuse it.
In the Page Selector tab : you also search and select another page for this node by clicking the Search and Select Page button. You can see more details on how to select a page for a node on the above Add a new node section. After finish changing another page for this node, click the Save button to accept changing or Cancel button to leave without saving any changes.
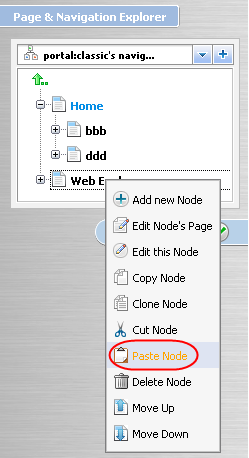
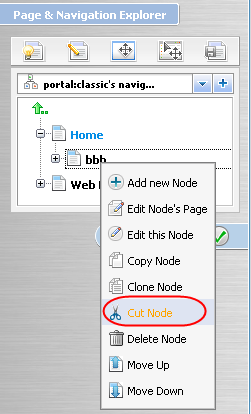
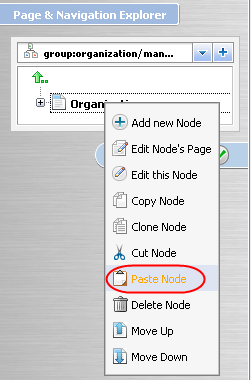
You also easily copy a node by following these steps:
1. Go to GateIn Start -> Administration -> Advanced --> Edit Page and Navigation
2. Select a navigation from the navigation list.
3. Right-click on the selected node and select Copy node option.
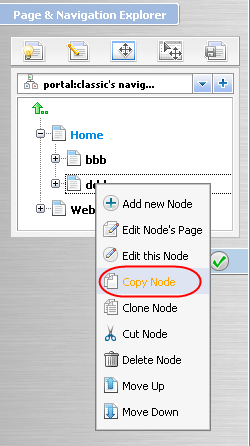
4. Select the position that you want to paste this node and select Paste Node option. Click the!images/MarkIcon.png! icon to Save.
- Clone nodefunction allows you to copy the node. However, the differences betweencopy nodeandclone nodeis that the clone node has its own page and this page has the same content as the selected node, so there will be a new page that has the same name with the selected node's page, is shown in the page list when you accessManage Pages.
1. Go to GateIn Start -> Administration -> Advanced --> Edit Page and Navigation
2. Select a navigation from the navigation list.
3. Right-click on selected node and select Clone node option.
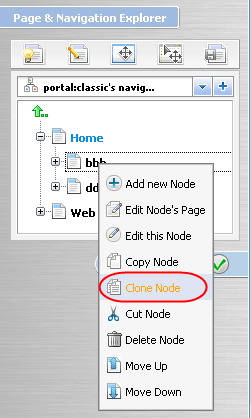
4. Select the position that you want to paste this node and select Paste Node option. Click the!images/MarkIcon.png! icon to Save.
In Manage Pages you will see:
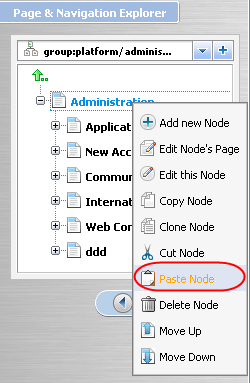
1. Go to GateIn Start -> Administration -> Advanced --> Edit Page and Navigation
2. Select a navigation from the navigation list.
3. Right-click on the selected node and select Cut node option.
4. Select the position that you want to paste this node and select Paste Node option. Click the!images/MarkIcon.png! icon to Save.
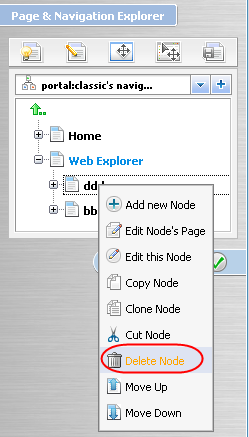
1. Go to GateIn Start -> Administration -> Advanced --> Edit Page and Navigation
2. Select a navigation from the navigation list.
3. Right-click on the selected node and select Delete node option.
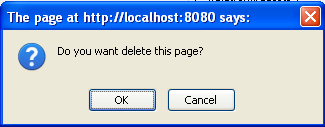
It will display an alert message, click the OK button to accept deleting or Cancel button to quit without deleting a node.
You can easily change the position of node on the navigation bar on their own convenient order by following these steps:
1. Go to GateIn Start -> Administration -> Advanced --> Edit Page and Navigation.
2. Select a navigation from the navigation list.
3. Select the node that you want to move. Right click on the selected node and then click on Move up or Move down
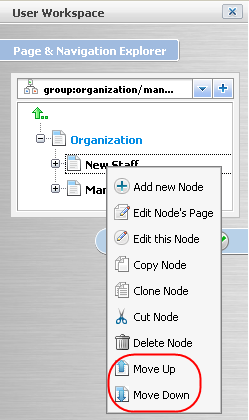
The selected node will be moved up/down.
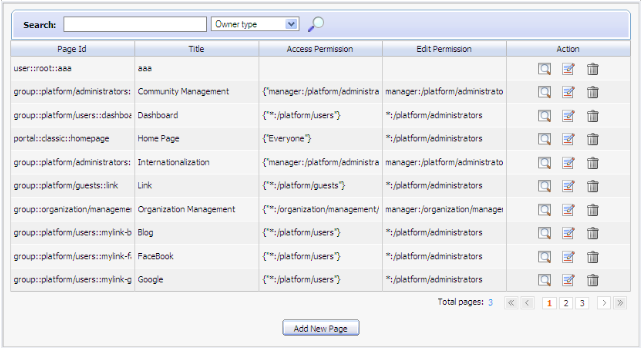
Only by using one page list can users add, edit, delete and view quickly and easily which pages you like to. Following these guides to manage pages:
You easily add a new page by following these simple steps:
1. Go to GateIn ->Administration -> Advanced --> Manage Pages
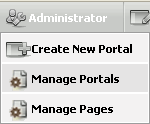
1. Go to Administrator on the Toolbar --> Manage Pages
Details
| Button | Description |
| Add New Page | allows you to add a new page. |
| Back | allows you to return to home page. |
2. Click the Add New Page button.
3. Enter values for fields in the Page Setting tab
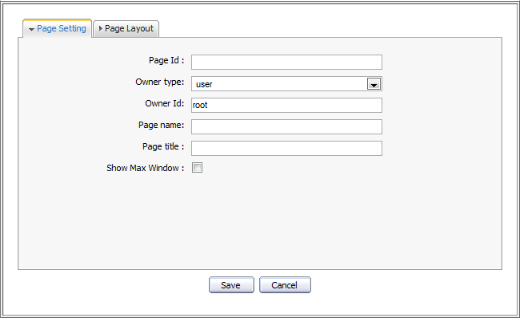
| Name | Description |
| Page Id | The string to identify the page. It is automatically generated when you will finish creating page. |
| Owner type | The owner type of the the page (portal, group or user). The "User" type is displayed by default. You can change the owner type by clicking on the icon. |
| Owner Id | The identification name of page owner. When the owner type is "group", there will be a list of groups of which you have to select one. |
| Page Name | The name of the page. This is a required field and must be unique. Only alpha, digit and underscore characters are allowed to be used for this field and it must have a length between 3 and 30 characters |
| Page title | The title of the the page. This field is not required and must have a length between 3 and 30 characters. |
| Show Max Window | The option allows to choose whether showing the page in maximum size or not. |
If the Owner type is "portal" or "group":
- Owner type is 'portal': it means you create a page for a portal. Thus only users who have edit permissions on the portal can create this page type.
- Owner type is 'group': it means you create a page for a group. Thus only users who are 'manager' of a group can create this page type.

- Permission Setting is initialized
- With Access Permission: The content of this tab is identical to the Owner type field in the Page Setting tab. Thus, all users have access rights of the page type selected in the Owner type field will appear in this tab. But you also can change the value of this tab as follows:
- Check the check box if you want to share access with everyone
- Or click the Add Permission button to assign permission on group level, then select a group and membership.
- Or click the trash can icon to remove a group from the list.
- With Edit Permission: The content of this tab depends on the value of the Owner type field in the Page Setting tab.
- If the Owner type is "group", edit permission is assigned to users who are "manager" of the group that is selected in Owner id. You only can change this value when editing the page.
- If the Owner type is "portal": The name of the current portal is automatically selected for Owner id so that the edit permissions are assigned to users who can edit the current portal. Users only can change this value when editing the page.
4. Click the Save button to accept creating a new page or the Cancel button to quit the form.
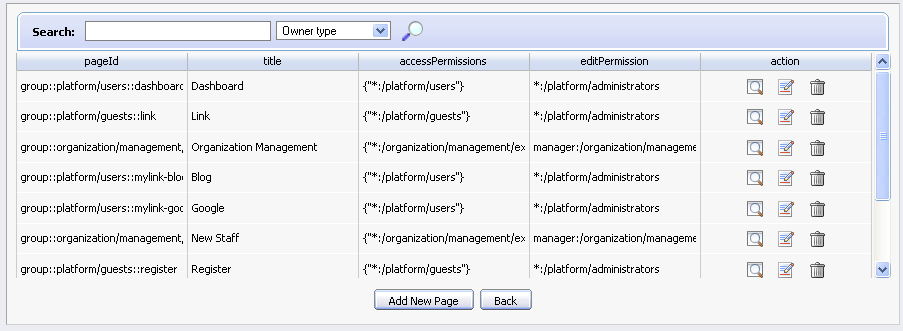
1. Go to GateIn Start -> Administration -> Advanced --> Manage Pages
2. In the existing pages list: click the edit icon on the row of page you want to edit.
| Indicator | Meaning |
| !images/PreviewPage.png! | Preview page: allows viewing node's page with preview mode in a Normal Page |
| !images/EditPage.png! | Edit page properties: allows editing node's page properties |
| !images/ShowContainer.png! | Show container: allows to list all existing containers that will be used to change the layout of a selected page |
| !images/ShowPortlet.png! | Show portlet: allows to list all existing portlets that will be used to re-arrange the content of selected page. |
| !images/SavePage.png! | Save page: allows saving changes of a page |
| !images/Back.png! | Back: allows returning to the page list without saving |
| !images/Finish.png! | Finish:allows saving and returning to the page list |
- Edit page properties Click the edit!images/EditPage.png! icon to show a form to edit page properties.
In the Page Setting tab:
| Name | Description |
| Page Id | The string to identify editing page. This string is generated automatically, user can not change. |
| Owner type | The type of editing page. User can not change. |
| Owner Id | The identification name of page's owner. User can not change. |
| Page name | The name of the page. User can not change. |
| Page title | The title of page. User can change and it must have length from 3 to 30 characters. |
| Show Max Window | The option allows whether showing page in maximum size or not. User should check this option for desktop page only. |
- Permission Setting: This form is supported for pages of a group or a portal. Because page of an user is private, no one else can access or edit user's page except the creator, so you do not have to set permission for it. Permission on each page is set in two levels: Access right and Edit right.
- Access right: Page Access right can be set to some user groups or set to everyone (also includes unregistered users). There is a list of current access permissions on page. You can click delete icon to remove permission or click the Add Permission button to add more or tick on Make it public option check box to allow all users to access.
- Edit right: It allows users to change information of page. Edit right only is set for a group of users. Edit right on a page can be set for one group with one specific membership type (or means every membership types in group). If you want to re-assign this right to another group, clickSelect Permission to choose another one.
- Editing page container layout
Click !images/ShowContainer.png! icon to show current container layout of selected page on your right and all the container layouts list on the left pane.
If you want to change current layout, select a layout type from the list on the left pane, then left click on the template you want and drag and drop it into the right pane. New container will be displayed on the right pane. You can change position of current container by left click and drag and drop it to another place on the right pane or remove current container by clicking delete icon on the right corner.
- Editing page portlet layout
Click !images/ShowPortlet.png! icon to show current portlet layout of page.
If you want to change current layout, select layout type from the list on the left pane, then left click on the template you want and drag and drop it into the right pane. New portlet will be added and displayed in the right pane. You can change position of current portlet by left click and drag and drop it to the place you want on the right pane or remove current portlet by clicking delete icon.
You easily view a page by clicking on the!images/View.png! icon on the row of the page you want to view in the existing pages list.
1. Go to GateIn Admin -> Administration -> Advanced --> Manage Pages
2. There is a list of all existing pages, click the trash can icon !images/DeleteIcon.png! on row of the page you want to delete. It will display the confirmation message.
3. Click the OK button to accept deleting or Cancel button to quit without deleting this page.
Only by following there simple steps can you create a page quickly by using a wizard and publish this page on the Navigation bar:
1. Go to GateIn Start ->Administration -> Basic --> Create page wizard. Welcome to Page Creation Wizard appears:
1. Go to Editor --> Add New Page on the Toolbar. Create page wizard: Welcome to Page Creation Wizard appears:
2. Click the Next button or number '1' of the wizard steps in order to go to step 1. This step allows users to set up page setting such as :the navigation path, the node name, the display name, etc.
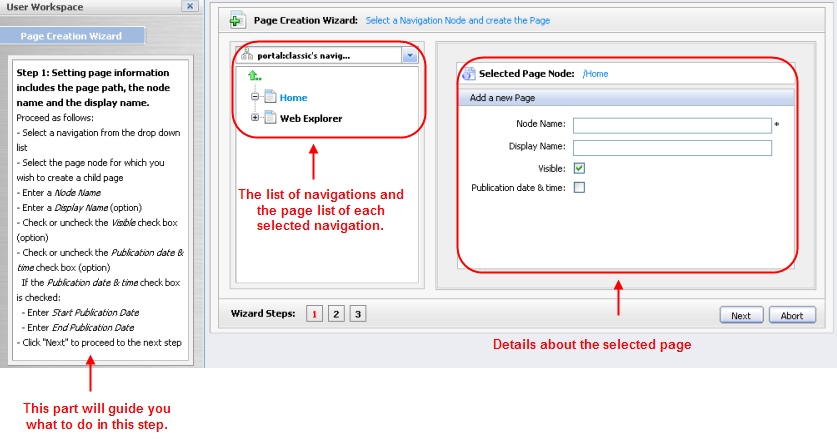
There are two parts: the left pane is used to show a small description that will guide you what to do in this step. And the main wizard includes two parts: the left pane contains a list of navigations and shows the page list of each selected navigation, the right pane displays main information of a page.
3. On the left of wizard: Click the combo box icon !images/ComboBox.png! to see the navigations list. Select a navigation from the list that you want to create page. The pages list of selected navigation are displayed.
4. Select a page from the above list or click on arrow up icon !images/ArrowIcon.png! to add a page at root.
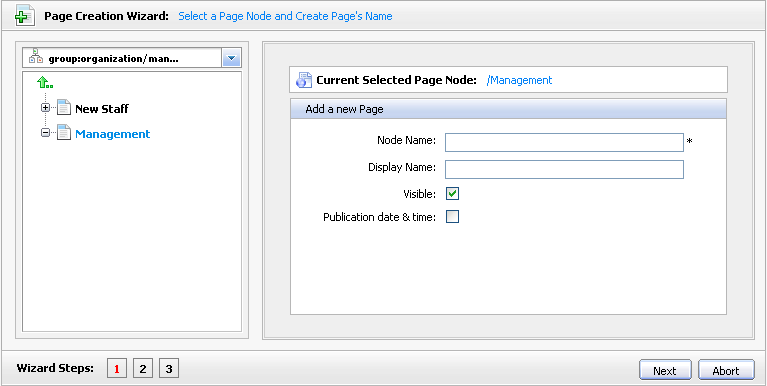
| Name | Description |
| Current Selected Page Node | The path of the selected node to add a new sub page |
| Node Name | The node name of the added page. It is required field. This field must start with a character and must have a length between 3 and 30 characters. |
| Display Name | The display name of the node which contains the added page and must have a length between 3 and 30 characters. |
| Visible | This check box allows to hide this page. If not checked the page is under no circumstances shown, even if the publication period is OK. If checked the page or the page node appears on on the navigation bar, the page navigation and the site map. If "visible" is checked the visibility can depend on the "publication date & time" option. |
| Publication date&time | This option allows publishing the page for a period of time. If this option is checked the visibility of the page depends on the publication period start and end date. |
| Start Publication Date | The start date and time to publish the page |
| End Publication Date | The end date and time to publish the page |
+Note:+You can set date and time by clicking the Start Publication Date field and End Publication Date field and select a date in the calendar pop up

5. Click Next or number '2' of the wizard steps to go to step 2.

6. Select Empty Layout or click the icon to see more templates to select.
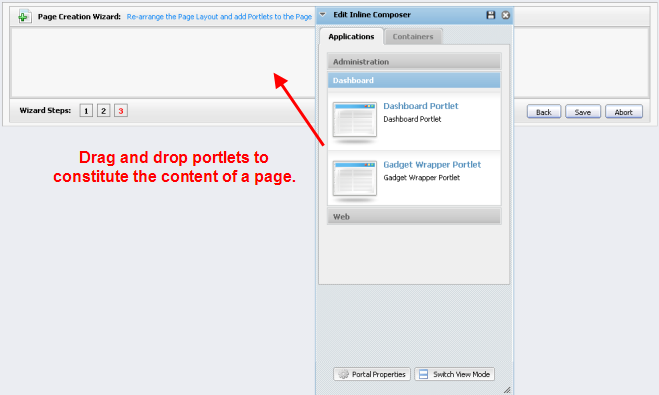
7. Click the Next button or number '3' of the wizard step to go to step 3. You can drag portlets on the left pane and drop it on the right pane to constitute the content of this page.

| Indicator | Meaning |
| !images/preview.png! | *Preview Page*: allows viewing a page in preview mode |
| !images/ShowContainer.png! | *Show Container*: allows listing all existing containers |
| !images/ShowPortlet.png! | *Show Portlets*: allows listing all existing portlets |
8. Click the Show Container icon !images/ShowContainer.png! if you want to see the existing containers and re-select the layout of the page. There will be a category list which contains specific containers when clicking the icon.
The step 2 of creating a page by wizard is the same as the above
In the step 3, you can drag portlets from the Edit Inline Composer popup and drag it to the constitute the content of this page
You can click on!images/Switch.png! to view the content of this page.
Click Save to accept creating a new page, the Back button to return the previous step or the Abort button to quit without creating a new page.
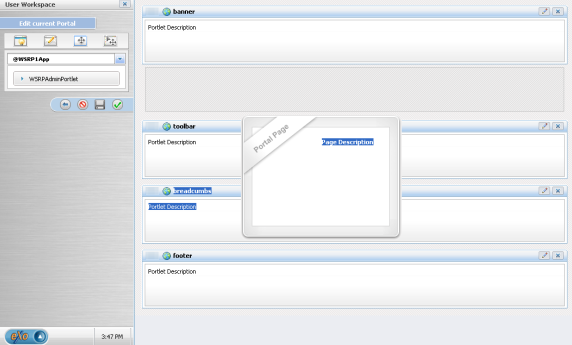
You can easily drag and drop page body to the specific place where you want to in the page by following guides:
1. Go to GateIn Start -> Administration -> Advanced --> Edit Current portal. It will display :
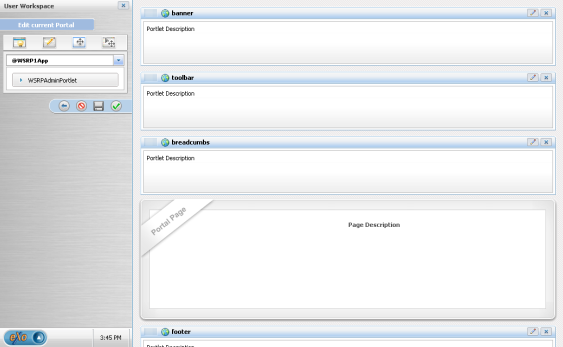
2. Click on the Portal Page, drag and drop to another reasonable places which you want to in this page.
Creating a new portal requires you to have a special permission that only an administrator can give you. You need follow these guides to create a new portal.
Click on Site in the toolbar.
Click the Add New Portal button. By default, the Create New Portal form is shown with the Portal Templates tab.
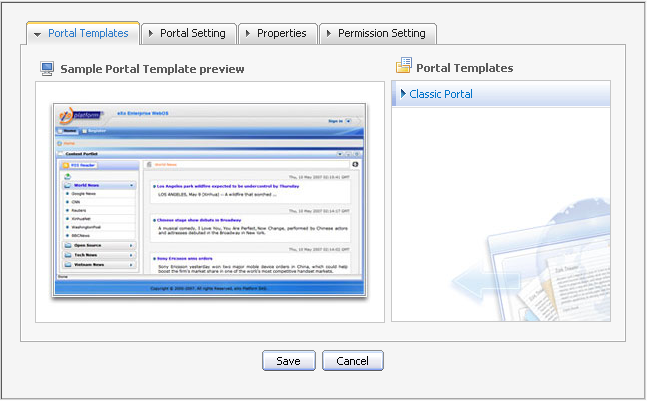
By default, Portal template is Classic. Select the Portal Setting tab.
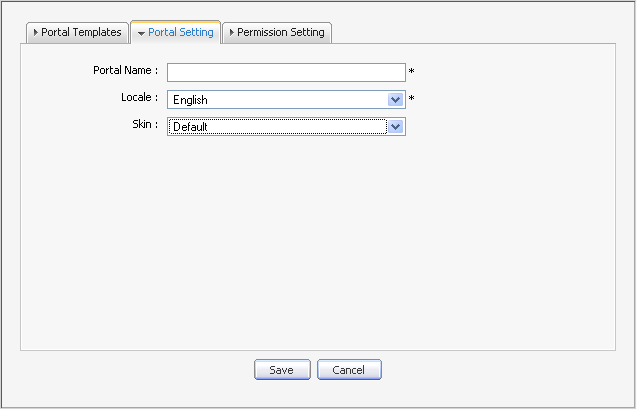
Enter a value for the Portal Name field. This field is required and must be unique. Only alpha, digit and underscore characters are allowed for this field and it must have at least 3 characters.
Select a display language for the portal by selecting a language from the list.
Select a skin for a portal by selecting one from the skin list.
Click on the Properties tab to fill in the Keep session alive property. Keeping the working session for a long time to avoid a time out. There are 3 options:
never : it never happens even if an application requests it
on-demand : it starts to be used as soon as an application requests it
always : it's always enabled (which has a cost but the administrator will be aware of that)
Click on the Permission Setting tab and set the permissions for the Portal.
By default the access permissions list for the portal is empty. You have to select at least one or tick on the Make it public check box to assign access permission to everyone.
Click on Save to accept creating a new portal.
You also can edit or delete a portal, see more details on Manage Portals
You can easily manage a portal by editing or deleting it.
You can change information of the current using portal such as properties or layout. However, you must have the edit right given by an Admininstrator. When you have edit right, follow these steps to edit the current portal:
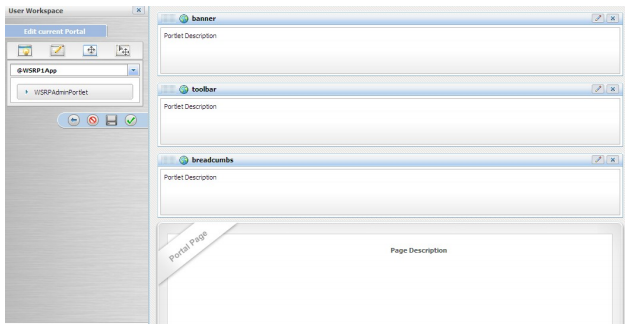
1. Go to GateIn Start -> Administration -> Advanced --> Edit Current Portal. A form to edit the current portal will appear:
| Indicator | Meaning |
| !images/preview.png! | *Preview page*: allows viewing node's page in preview mode. |
| !images/EditPage.png! | *Edit page properties*: allows editing node's page properties. |
| !images/ShowContainer.png! | *Show container*: allows listing all existing containers when editing node's page. |
| !images/ShowPortlet.png! | *Show portlet*: allows listing all existing portlets when editing node's page. |
| !images/Savepage.png! | *Save page*: allows saving changes of page when editing node's page. |
| !images/RollBack.png! | *Rollback*: allows canceling all changes that have not been saved. |
| !images/Abort.png! | *Abort*: allows canceling all changes that have not been saved and escaping Edit page and navigation form. |
| !images/Finish1.png! | *Finish*: allows saving all changes and escaping Edit page and navigation form. |
2. Click!images/EditPage.png! icon to edit portal properties.
3. Click!images/ShowContainer.png! icon to edit portal container layout.
4. Click!images/ShowPortlet.png! icon to edit portal portlet layout.
5. Click!images/Savepage.png! icon to save changes.
You must have the edit right to change information of the current using portal:
1. Go to Editor on the Toolbar ->click Edit Site Layout.
2. Click the!images/PortalProperties.png! button in the Edit Inline Composer. The edit Form of the portal will be shown:
3. Change the properties of the current portal.
4. Click the Propertites tab. Select an option for Keep session alive that means keeping the working session for a long time to avoid the working time out. There are 3 options:
- Never : it never happens even if an application requests it.
- On-demand : it starts to be used as soon as an application requests it.
- Always: it's always enabled (which has a cost but the administrator will be aware of that).
5. Set permissions for a portal:
To change any permission, click the Select Permission button and then select a group with the Membership type you want. Only one group can have the Edit Permission of the portal.
You can set the Edit Permission for the portal when you create or edit it.
6. Click the Save button to accept changes or the Cancel button to quit.
You can easily delete a portal by following these guides:
1. Go to GateIn Start -> Administration -> Advanced --> Manage Portals
+The 1^st^ way+:
1. Go to Administrator on the Toolbar --> Manage Portals. List of all portals will be shown.
2. Click the trash can !images/deleteIcon.png! icon in the row of the portal you want to delete in the portal list.
3. Click the OK button in the confirmation message to delete.
+The 2^nd^ way+:
1. Click on Site in the Toolbar --> click on!images/DeletePortal2.6.png! .The confirmation message will appear:
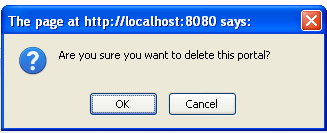
2. Click OK to accept deleting a portal or Cancel to quit without deleting it.
GateIn Portal allows users to switch between Portals simply and easily. You can use another portals such as gateway, starting site if you are given the appropriate permissions by the administrators.
Go to Site on the Toolbarm it will list all portals in which you have at least the access right

You easily switch between Portals by simply clicking on the portal that you want to choose and wait for few seconds to take effect.