- 8.1. Default Portal Configuration
- 8.2. Portal Navigation Configuration
- 8.3. Predefined User Configuration
- 8.4. User Workspace Configuration
- 8.5. Portal Default Permission Configuration
- 8.6. Database Configuration
- 8.7. Data Injector Configuration
- 8.8. Skin Configuration
- 8.8.1. Overview
- 8.8.2. Skin Switching
- 8.8.3. Skins in Page Markups
- 8.8.4. Types of Styles
- 8.8.5. Portlet Styles
- 8.8.6. How to Configure a Portal Skin
- 8.8.7. SkinService
- 8.8.8. SkinConfigListener
- 8.8.9. Some CSS techniques
- 8.8.10. Decorator pattern
- 8.8.11. Left margin left pattern
- 8.8.12. How to create a new skin
- 8.8.13. How to create new themes
- 8.9. Javascript Configuration
- 8.10. Dashboard configuration
- 8.11. Authentication Token Configuration
- 8.12. Varnish Configuration
- default portal will be accessed by default when user doesn't specify the portal. For example: http://hostname:port/portal/. And the default portal be used for checking at starting of tomcat to determine whether database is empty or not, too.
Configuration file path : "portal/WEB-INF/conf/portal/portal-configuration.xml"
  <component>
    <key>org.exoplatform.portal.config.UserPortalConfigService</key>
    <type>org.exoplatform.portal.config.UserPortalConfigService</type>
    <component-plugins>
	    <component-plugin>
	      <name>new.portal.config.user.listener</name>
	      <set-method>initListener</set-method>
	      <type>org.exoplatform.portal.config.NewPortalConfigListener</type>
	      <description>this listener init the portal configuration</description>
	      <init-params>
	        <value-param>
	          <name>default.portal</name>
	          <description>The default portal for checking db is empty or not</description>
	          <value>classic</value>
	        </value-param>
	        ..........
	      </init-params>
	    </component-plugin>
    </component-plugins>
  </component>
You can see in the configuration above, we defined the classic as a default portal. Notes that the definition should be as a initial parameter of the NewPortalConfigListener component-plugin
When a user logs in he sees three types of navigation tree:
- Portal Navigation
- Group Navigation
- User Navigation
they all are configured thanks to the usual XML configuration syntax in a file: "portal/WEB-INF/conf/portal/portal-configuration.xml"
  <component>
    <key>org.exoplatform.portal.config.UserPortalConfigService</key>
    <type>org.exoplatform.portal.config.UserPortalConfigService</type>
    <component-plugins>
	    <component-plugin>
	      <name>new.portal.config.user.listener</name>
	      <set-method>initListener</set-method>
	      <type>org.exoplatform.portal.config.NewPortalConfigListener</type>
	      <description>this listener init the portal configuration</description>
	      <init-params>
	        <value-param>
	          <name>default.portal</name>
	          <description>The default portal for checking db is empty or not</description>
	          <value>classic</value>
	        </value-param>
	        <object-param>
	          <name>portal.configuration</name>
	          <description>description</description>
	          <object type="org.exoplatform.portal.config.NewPortalConfig">
	            <field  name="predefinedOwner">
	              <collection type="java.util.HashSet">
	                <value><string>classic</string></value>
	                <value><string>webos</string></value>
	              </collection>
	            </field>
	            <field  name="ownerType"><string>portal</string></field>
	            <field  name="templateLocation"><string>war:/conf/portal</string></field>
	          </object>
	        </object-param>
	        <object-param>
	          <name>group.configuration</name>
	          <description>description</description>
	          <object type="org.exoplatform.portal.config.NewPortalConfig">
	            <field  name="predefinedOwner">
	              <collection type="java.util.HashSet">
	              	<value><string>platform/administrators</string></value>
	              	<value><string>platform/users</string></value>
	              	<value><string>platform/guests</string></value>
	              	<value><string>organization/management/executive-board</string></value>
	              </collection>
	            </field>
	            <field  name="ownerType"><string>group</string></field>
	            <field  name="templateLocation"><string>war:/conf/portal</string></field>
	          </object>
	        </object-param>
	        <object-param>
	          <name>user.configuration</name>
	          <description>description</description>
	          <object type="org.exoplatform.portal.config.NewPortalConfig">
	            <field  name="predefinedOwner">
	              <collection type="java.util.HashSet">
	                <value><string>root</string></value>
	                <value><string>john</string></value>
	                <value><string>marry</string></value>
	                <value><string>demo</string></value>
	              </collection>
	            </field>
	            <field  name="ownerType"><string>user</string></field>
	            <field  name="templateLocation"><string>war:/conf/portal</string></field>
	          </object>
	        </object-param>
	      </init-params>
	    </component-plugin>
  </component-plugins>
In the previous XML file we define, for the 3 navigation types, some sets of predefined portal, groups or users that will have some XML files inside the war. Those files will be used to create an initial navigation the first time the portal is launched. That information will then be stored in the JCR and hence only modifiable from the portal UI.
The portal navigation incorporates the pages that can be accessed even when the user is not logged in (if the permission allow a public access). Several portal navigations are used for example when a company has several trademarks and each trade would have its own website.
The configuration of a portal called "classic" is made by providing 4 XML files under the directory portal/WEBINF/conf/portal/portal/classic:
That file describes the layout and portlets that will be shown for all pages. Usually the layout contains the banner, footer, menu, breadcrumbs portlets. Indeed, in GateIn, every area is a portlet even the banner and footer which makes the platform extremely configurable.
<?xml version="1.0" encoding="ISO-8859-1"?>
<portal-config>
  <portal-name>classic</portal-name>
  <locale>en</locale>
  <factory-id>office</factory-id>
  <access-permissions>Everyone</access-permissions>
  <edit-permission>*:/platform/administrators</edit-permission>
  <creator>root</creator>

 	<portal-layout>
		<application>
	    <instance-id>portal#classic:/web/BannerPortlet/banner</instance-id>
	    <show-info-bar>false</show-info-bar>
	  </application>
	  <application>
	  	<instance-id>portal#classic:/web/NavigationPortlet/toolbar</instance-id>
	    <show-info-bar>false</show-info-bar>
	  </application>

	  <application>
	    <instance-id>portal#classic:/web/BreadcumbsPortlet/breadcumbs</instance-id>
	    <show-info-bar>false</show-info-bar>
	  </application>


	  <page-body> </page-body>

	  <application>
	    <instance-id>portal#classic:/web/FooterPortlet/footer</instance-id>
	    <show-info-bar>false</show-info-bar>
	  </application>
  </portal-layout>

</portal-config>
Even if not shown in the previous XML file, it is also possible to apply a nested container that can also contain portlets. Containers are then responsible of the layout of their children (row, column or tabs containers exist).
Each application references a portlet using the id portal#{portalName}:/{portletWarName}/{portletName}/{uniqueId}
In order to define at which location GateIn Portal shall render the current page use the page-body tag.
The defined classic portal is accessible to "Everyone" (that means it can be accessed through the URL /portal/public/classic) but only members of the group /platform/administrators can edit it.
This file defines all the navigation nodes the portal will have. The syntax is simple as we get nested node tags. Each node references a page that is defined in the next XML file.
If the label #{} is used then it means the i18n mechanism is activated and that the real label to render is taken from an associated properties file for the current locale.
<?xml version="1.0" encoding="UTF-8"?>
<node-navigation>
  <owner-type>portal</owner-type>
  <owner-id>classic</owner-id>
  <priority>1</priority>
  <page-nodes>
	  <node>
	    <uri>home</uri>
	    <name>home</name>
	    <label>#{portal.classic.home}</label>
	    <page-reference>portal::classic::homepage</page-reference>
	  </node>
	  <node>
	    <uri>webexplorer</uri>
	    <name>webexplorer</name>
	    <label>#{portal.classic.webexplorer}</label>
	    <page-reference>portal::classic::webexplorer</page-reference>
	  </node>
  </page-nodes>
</node-navigation>
This navigation tree can have multiple views inside portlets such as the breadcrumbs that render the current view node, the site map or the menu portlets.
+Warning+: For top nodes, the uri and the name of your navigation nodes must have the same value. For the other nodes the uri is composed like <uri>contentmanagement/fileexplorer</uri> where 'contentmanagement' is the name of the parent node and 'fileexplorer' the name of the node (<name>fileexplorer</name>).
This XML file structure is very similar to portal.xml and it can also contain container tags. Each application can decide if it wishes to render the portlet border, the window state icons or the mode.
<?xml version="1.0" encoding="ISO-8859-1"?>
<page-set>
  <page>
    <page-id>portal::classic::homepage</page-id>
    <owner-type>portal</owner-type>
    <owner-id>classic</owner-id>
    <name>homepage</name>
    <title>Home Page</title>
    <access-permissions>Everyone</access-permissions>
    <edit-permission>*:/platform/administrators</edit-permission>
    <application>
      <instance-id>portal#classic:/web/HomePagePortlet/homepageportlet</instance-id>
      <title>Home Page portlet</title>
      <show-info-bar>false</show-info-bar>
      <show-application-state>false</show-application-state>
      <show-application-mode>false</show-application-mode>
    </application>
  </page>

  <page>
    <page-id>portal::classic::webexplorer</page-id>
    <owner-type>portal</owner-type>
    <owner-id>classic</owner-id>
    <name>webexplorer</name>
    <title>Web Explorer</title>
    <access-permissions>*:/platform/users</access-permissions>
    <edit-permission>*:/platform/administrators</edit-permission>
    <application>
      <instance-id>group#platform/users:/web/BrowserPortlet/WebExplorer</instance-id>
      <title>Web Explorer</title>
      <show-info-bar>false</show-info-bar>
    </application>
  </page>
</page-set>
Porlet instances can be associated with portlet-preferences that override the one defined in the usual portlet.xml file of the portlet application WAR.
<?xml version="1.0" encoding="ISO-8859-1"?>
<portlet-preferences-set>
  <portlet-preferences>
    <owner-type>portal</owner-type>
    <owner-id>classic</owner-id>
    <window-id>portal#classic:/web/BannerPortlet/banner</window-id>
    <preference>
      <name>template</name>
      <value>par:/groovy/groovy/webui/component/UIBannerPortlet.gtmpl</value>
      <read-only>false</read-only>
    </preference>
  </portlet-preferences>
  <portlet-preferences>
    <owner-type>portal</owner-type>
    <owner-id>classic</owner-id>
    <window-id>portal#classic:/web/NavigationPortlet/toolbar</window-id>
    <preference>
      <name>useAJAX</name>
      <value>true</value>
      <read-only>false</read-only>
    </preference>
  </portlet-preferences>
  <portlet-preferences>
    <owner-type>portal</owner-type>
    <owner-id>classic</owner-id>
    <window-id>portal#classic:/web/FooterPortlet/footer</window-id>
    <preference>
      <name>template</name>
      <value>par:/groovy/groovy/webui/component/UIFooterPortlet.gtmpl</value>
      <read-only>false</read-only>
    </preference>
  </portlet-preferences>


  <portlet-preferences>
    <owner-type>portal</owner-type>
    <owner-id>classic</owner-id>
    <window-id>portal#classic:/web/GroovyPortlet/groovyportlet</window-id>
    <preference>
      <name>template</name>
      <value>par:/groovy/groovy/webui/component/UIGroovyPortlet.gtmpl</value>
      <read-only>false</read-only>
    </preference>
  </portlet-preferences>
</portlet-preferences-set>
Group navigations are dynamically added (mounted) to the user navigation when he logs in. This means that a user sees in his menu also all the pages that are assigned to the groups to which he belongs to.
Here only 3 XML files are necessary: navigation.xml, pages.xml and portlet-preferences.xml. The syntax is the same as for portal navigations.
The 3 files are located in the directory: "portal/WEB-INF/conf/portal/group/group-name-path/" like for example "portal/WEB-INF/conf/portal/group/platform/administrators/"
The user navigation is the set of nodes and pages that is owned by a user. You can see that part as the user dashboard. The files needed are navigation.xml, pages.xml, portlet-preferences.xml. You will also find gadgets.xml (formerly called widgets.xml) which defines the gadgets (widgets) that will be located in the user workspace. The user workspace is located at the left hand side, the access is restricted to some privileged users, see Portal:Predefined User Configuration.
Those files are located in the directory "portal/WEB-INF/conf/portal/users/{userName}"
<?xml version="1.0" encoding="ISO-8859-1"?>
<widgets>
  <owner-type>user</owner-type>
  <owner-id>root</owner-id>

  <container id="Information">
    <name>Information</name>
    <description>Information's Description</description>
    <application>
      <instance-id>user#root:/GateInWidgetWeb/WelcomeWidget/WelcomeWidget1</instance-id>
      <application-type>GateInWidget</application-type>
    </application>

    <application>
      <instance-id>user#root:/GateInWidgetWeb/StickerWidget/StickerWidget</instance-id>
      <application-type>GateInWidget</application-type>
    </application>

    <application>
      <instance-id>user#root:/GateInWidgetWeb/InfoWidget/InfoWidget1</instance-id>
      <application-type>GateInWidget</application-type>
    </application>
  </container>

  <container id="Calendar">
    <name>Calendar</name>
    <description>Calendar's Description</description>
    <application>
      <instance-id>user#root:/GateInWidgetWeb/CalendarWidget/CalendarWidget</instance-id>
      <application-type>GateInWidget</application-type>
    </application>
  </container>

</widgets>
Note that when you develop a portal, we advise you to use the XML instead of the User Interface as XML will allow you to provide a preconfigured package to your customer. But as each time you start the server the first time, the XML files are stored in the JCR, it will be necessary to remove the database (the jcr leverages a database). During the development phase using tomcat it simply means to delete the directory: exo-tomcat/temp
If you wish to add a link to a URL outside the portal you you first have to define a "page" which will not be used. Then add the URL to the navigation.
- pages.xml{code:xml}: <!- Community Documentation -> <page> <owner-type>portal</owner-type> <owner-id>website</owner-id> <name>documentation</name> <title>Documentation</title> <access-permissions>Everyone</access-permissions> <edit-permission>:/platform/administrators</edit-permission> </page> {code}
- naviguation.xml:
<node>
<uri>http://wiki.exoplatform.com/xwiki/bin/view/Main/WebHome</uri>
<name>documentation</name>
<label>#{portal.classic.documentation}</label>
<page-reference>portal::website::documentation</page-reference>
</node>
- Beware: Direct external links were not a design goal. Currently you cannot modify the URL using the portal interface, you must change it in the configuration files or modify the underlying database table.
To specify the initial Organization configuration, the content of
portal.war:WEB-INF/conf/organization/organization-configuration.xml
should be edited. This file complies with the XML GateIn configuration
schema. It lists several configuration plugins.
The plugin of type
org.exoplatform.services.organization.OrganizationDatabaseInitializer
specifies the list of users, groups and membership types to be
created. The initialization parameter named "checkDatabaseAlgorithm" determines how the creation is triggered. Thus, the value "entry" means that each user, group and membership listed in the configuration is checked each time GateIn is started. If not existing, it is created. The value "empty" means that the whole list of preconfigured users, groups and memberships is processed only if the database is empty.
The predefined membership types are specified in the "membershipType" field of the "OrganizationConfig" plugin parameter. {code} <field name="membershipType"> <collection type="java.util.ArrayList"> <value> <object type="org.exoplatform.services.organization.OrganizationConfig$MembershipType"> <field name="type"><string>member</string></field> <field name="description"><string>member membership type</string></field> </object> </value> <value> <object type="org.exoplatform.services.organization.OrganizationConfig$MembershipType"> <field name="type"><string>owner</string></field> <field name="description"><string>owner membership type</string></field> </object> </value> <value> <object type="org.exoplatform.services.organization.OrganizationConfig$MembershipType"> <field name="type"><string>validator</string></field> <field name="description"><string>validator membership type</string></field> </object> </value> </collection> </field> {code}
The predefined groups are specified in the "group" field of the "OrganizationConfig" plugin parameter. {code} <field name="group"> <collection type="java.util.ArrayList"> <value> <object type="org.exoplatform.services.organization.OrganizationConfig$Group"> <field name="name"><string>portal</string></field> <field name="parentId"><string></string></field> <field name="type"><string>hierachy</string></field> <field name="description"><string>the /portal group</string></field> </object> </value> <value> <object type="org.exoplatform.services.organization.OrganizationConfig$Group"> <field name="name"><string>community</string></field> <field name="parentId"><string>/portal</string></field> <field name="type"><string>hierachy</string></field> <field name="description"><string>the /portal/community group</string></field> </object> </value> ... </collection> </field> {code}
The predefined users are specified in the "membershipType" field of the "OrganizationConfig" plugin parameter.
  <field name="user">
    <collection type="java.util.ArrayList">
      <value>
        <object type="org.exoplatform.services.organization.OrganizationConfig$User">
          <field name="userName"><string>root</string></field>
          <field name="password"><string>exo</string></field>
          <field name="firstName"><string>root</string></field>
          <field name="lastName"><string>root</string></field>
          <field name="email"><string>exoadmin@localhost</string></field>
          <field name="groups"><string>member:/admin,member:/user,owner:/portal/admin</string></field>
        </object>
      </value>
      <value>
        <object type="org.exoplatform.services.organization.OrganizationConfig$User">
          <field name="userName"><string>exo</string></field>
          <field name="password"><string>exo</string></field>
          <field name="firstName"><string>site</string></field>
          <field name="lastName"><string>site</string></field>
          <field name="email"><string>exo@localhost</string></field>
          <field name="groups"><string>member:/user</string></field>
        </object>
      </value>
      ...
    </collection>
  </field>
The plugin of type org.exoplatform.services.organization.impl.NewUserEventListener specifies which groups should join all newly created users. It notably specifies the groups and memberships to be used. It also specifies a list of users that should be excepted.
    <component-plugin>
      <name>new.user.event.listener</name>
      <set-method>addListenerPlugin</set-method>
      <type>org.exoplatform.services.organization.impl.NewUserEventListener</type>
      <description>this listener assign group and membership to a new created user</description>
      <init-params>
        <object-param>
          <name>configuration</name>
          <description>description</description>
          <object type="org.exoplatform.services.organization.impl.NewUserConfig">
            <field  name="group">
              <collection type="java.util.ArrayList">
                <value>
                  <object type="org.exoplatform.services.organization.impl.NewUserConfig$JoinGroup">
                    <field name="groupId"><string>/user</string></field>
                    <field name="membership"><string>member</string></field>
                  </object>
                </value>
              </collection>
            </field>
            <field  name="ignoredUser">
              <collection type="java.util.HashSet">
                <value><string>exo</string></value>
                <value><string>root</string></value>
                <value><string>company</string></value>
                <value><string>community</string></value>
              </collection>
            </field>
          </object>
        </object-param>
      </init-params>
    </component-plugin>
The User Workspace is give privileged users access to administration actions. Please refer to the User Workspace Guide to know more details.
The default configuration defines two groups:
- <code>:/platform/administrators</code> and
- <code>:/platform/organization/management/executive-board</code>
anyone in these groups can access and use the User Workspace. The asterisk symbol stands for "any membership type".
- user that wants to access the User Workspace he or she a member of at least one of these groups with the appropriate membership.
If an administrator wants to allow someone to access the User Workspace, the admin can add the user to one of these groups or he or she modifies the workspace access configuration. This permission is set in the portal-configuration.xml file.
  <component>
    <key>org.exoplatform.portal.config.UserACL</key>
    <type>org.exoplatform.portal.config.UserACL</type>
    <init-params>
...
<value-param>
        <name>access.control.workspace</name>
        <description>groups with memberships that have the right to access the User Control Workspace</description>
        <value>*:/platform/administrators,*:/organization/management/executive-board</value>
</value-param>
Modify the content of the <code>value</code> tag depending on your needs. The configuration is taken into account after you restarted the application server.
- info(" Remember to specify the groups in <code>organization-configuration.xml</code>" )
Please refer to User Workspace Guide to see the user workspace.
The permission configuration for the portal is defined in the file portal/WEB-INF/conf/portal/portal-configuration.xml. The component UserACL is described there along with other portal component configurations.
It defines 5 permissions types:
- super.user : The super user has all the rights on the platform, by default this user is called root
- portal.creator.groups: This list defines all groups that will be able to manage the different portals, they also have the permission to create new portals. The format is "membership:/group/subgroup".
- navigation.creator.membership.type: Defines the membership type of the group managers. The group managers have the permission to create and edit group pages and they can modify the group navigation.
- guests.group: Contains the name of the group that is used as guest group. Any anonymous user becomes automatically member of this group when he enters the public pages.
- access.control.workspace: Defines the users that have access to the control workspace. In the demo version the control workspace is accessible only to 'root' and 'john'. They can expand/collapse the workspace at the left hand side. The format is "membership:/group/subgroup", An asterisk '' gives permission to all memberships.
 <component>
    <key>org.exoplatform.portal.config.UserACL</key>
    <type>org.exoplatform.portal.config.UserACL</type>
    <init-params>
      <value-param>
        <name>super.user</name>
        <description>administrator</description>
        <value>root</value>
      </value-param>

      <value-param>
        <name>portal.creator.groups</name>
        <description>groups with membership type have permission to manage portal</description>
        <value>*:/platform/administrators,*:/organization/management/executive-board</value>
      </value-param>

      <value-param>
        <name>navigation.creator.membership.type</name>
        <description>specific membership type have full permission with group navigation</description>
        <value>manager</value>
      </value-param>
      <value-param>
        <name>guests.group</name>
        <description>guests group</description>
        <value>/platform/guests</value>
      </value-param>
      <value-param>
        <name>access.control.workspace</name>
        <description>groups with memberships that have the right to access the User Control Workspace</description>
        <value>*:/platform/administrators,*:/organization/management/executive-board</value>
      </value-param>
    </init-params>
  </component>
1 Overwrite Portal Default Permissions In GateIn Portal 2.5 and later the UserACL component supports adding a PortalACLPlugin plugin that allows to overwrite portal default permissions.
  <external-component-plugins>
    <target-component>org.exoplatform.portal.config.UserACL</target-component>
    <component-plugin>
      <name>addPortalACLPlugin</name>
      <set-method>addPortalACLPlugin</set-method>
      <type>org.exoplatform.portal.config.PortalACLPlugin</type>
      <description>setting some permission for portal</description>
      <init-params>
        <values-param>
          <name>access.control.workspace.roles</name>
          <value>*:/platform/administrators</value>
          <value>*:/organization/management/executive-board</value>
        </values-param>
        <values-param>
          <name>portal.creation.roles</name>
          <value>*:/platform/administrators</value>
          <value>*:/organization/management/executive-board</value>
        </values-param>
      </init-params>
    </component-plugin>
  </external-component-plugins>
GateIn Portal has two different database dependencies. One is the Hibernate service configuration, which depends on the the Hibernate and c3p0 projects. The other database dependency is Java content repository (JCR) service, which depends on the native JDBC API and it can integrate with any existing datasource implementation.
When you change the database configuration for the first time, GateIn will automatically generate the proper schema (assuming that the database user has the appropriate permissions).
You can find the database configuration in the portal/WEB-INF/conf/database/database-configuration.xml file (located in your application server's web application directory).
<?xml version="1.0" encoding="ISO-8859-1"?>
<configuration>
  [...]
  <component>
    <key>org.exoplatform.services.database.HibernateService</key>
    <jmx-name>database:type=HibernateService</jmx-name>
    <type>org.exoplatform.services.database.impl.HibernateServiceImpl</type>
    <init-params>
      <properties-param>
        <name>hibernate.properties</name>
        <description>Default Hibernate Service</description>
        <property name="hibernate.show_sql" value="false"/>
        <property name="hibernate.cglib.use_reflection_optimizer" value="true"/>
        <property name="hibernate.connection.url" value="jdbc:hsqldb:file:../temp/data/exodb"/>
        <property name="hibernate.connection.driver_class" value="org.hsqldb.jdbcDriver"/>
        <property name="hibernate.connection.autocommit" value="true"/>
        <property name="hibernate.connection.username" value="sa"/>
        <property name="hibernate.connection.password" value=""/>
        <property name="hibernate.dialect" value="org.hibernate.dialect.HSQLDialect"/>
        <property name="hibernate.c3p0.min_size" value="5"/>
        <property name="hibernate.c3p0.max_size" value="20"/>
        <property name="hibernate.c3p0.timeout" value="1800"/>
        <property name="hibernate.c3p0.max_statements" value="50"/>
      </properties-param>
    </init-params>
  </component>
  <external-component-plugins>
    <target-component>org.exoplatform.services.naming.InitialContextInitializer</target-component>
    <component-plugin>
      <name>bind.datasource</name>
      <set-method>addPlugin</set-method>
      <type>org.exoplatform.services.naming.BindReferencePlugin</type>
      <init-params>
        <value-param>
          <name>bind-name</name>
          <value>jdbcexo</value>
        </value-param>
        <value-param>
          <name>class-name</name>
          <value>javax.sql.DataSource</value>
        </value-param>
        <value-param>
          <name>factory</name>
          <value>org.apache.commons.dbcp.BasicDataSourceFactory</value>
        </value-param>
        <properties-param>
          <name>ref-addresses</name>
          <description>ref-addresses</description>
          <property name="driverClassName" value="org.hsqldb.jdbcDriver"/>
          <property name="url" value="jdbc:hsqldb:file:../temp/data/exodb"/>
          <property name="username" value="sa"/>
          <property name="password" value=""/>
        </properties-param>
      </init-params>
    </component-plugin>
  </external-component-plugins>
  [...]
</configuration>
The first component configuration is for the Hibernate service. You can enter any additional properties in a hibernate.properties file, but GateIn will override hibernate.properties with values read in from this configuration file.
The second component configuration is for the JCR datasource. The InitialContextInitializer component will load the factory class, use the factory object to create a datasource, and bind that datasource in the JNDI tree with the value of the "bind-name" parameter. If you want to change the bind-name, for example "jdbcexo" to "myjdbc", you also need to change JCR repository configuration in order that the service picks up the right datasource.
There are two JCR configuration files that must be changed to support a different database. In both files, edit the dialect (and the data source name if necessary).
The first file is portal/WEB-INF/conf/jcr/jcr-configuration.xml:
[...]
 <component>
   <key>org.exoplatform.services.jcr.config.RepositoryServiceConfiguration</key>
   <type>org.exoplatform.services.jcr.impl.config.RepositoryServiceConfigurationImpl</type>
   <init-params>
     <value-param>
       <name>conf-path</name>
       <description>JCR configuration file</description>
       <value>war:/conf/jcr/repository-configuration.xml</value>
     </value-param>
     <properties-param>
       <name>working-conf</name>
       <description>working-conf</description>
       <property name="persisterClassName" value="org.exoplatform.services.jcr.impl.config.JDBCConfigurationPersister"/>
       <property name="sourceName" value="jdbcexo"/>
       <property name="dialect" value="hsqldb"/>
     </properties-param>
   </init-params>
 </component>
[...]
The second file is portal/WEB-INF/conf/jcr/repository-configuration.xml:
[...]
     <workspaces>
       <workspace name="system" auto-init-root-nodetype="nt:unstructured"
                  auto-init-permissions="*:/platform/administrators read;*:/platform/administrators add_node;*:/platform/administrators set_property;*:/platform/administrators remove" >
          <!-- for system storage -->
          <container class="org.exoplatform.services.jcr.impl.storage.jdbc.JDBCWorkspaceDataContainer">
            <properties>
              <property name="sourceName" value="jdbcexo"/>
              <property name="dialect" value="hsql"/>
              <!-- property name="db-type" value="mysql"/ -->
              <property name="multi-db" value="false"/>
              <property name="update-storage" value="true"/>
              <property name="max-buffer-size" value="204800"/>
              <property name="swap-directory" value="../temp/swap/system"/>
            </properties>
[...]
       </workspace>
       <workspace name="collaboration" auto-init-root-nodetype="nt:unstructured"
                  auto-init-permissions="any read;*:/platform/administrators read;*:/platform/administrators add_node;*:/platform/administrators set_property;*:/platform/administrators remove" >
          <!-- for system storage -->
          <container class="org.exoplatform.services.jcr.impl.storage.jdbc.JDBCWorkspaceDataContainer">
            <properties>
              <property name="sourceName" value="jdbcexo"/>
              <property name="dialect" value="hsqldb"/>
              <property name="multi-db" value="false"/>
              <property name="update-storage" value="true"/>
              <property name="max-buffer-size" value="204800"/>
              <property name="swap-directory" value="../temp/swap/collaboration"/>
            </properties>
[...]
       </workspace>
       <workspace name="backup" auto-init-root-nodetype="nt:unstructured"
                  auto-init-permissions="any read;*:/platform/administrators read;*:/platform/administrators add_node;*:/platform/administrators set_property;*:/platform/administrators remove" >
          <!-- for system storage -->
          <container class="org.exoplatform.services.jcr.impl.storage.jdbc.JDBCWorkspaceDataContainer">
            <properties>
              <property name="sourceName" value="jdbcexo"/>
              <property name="dialect" value="mysql"/>
              <!-- property name="db-type" value="mysql"/ -->
              <property name="multi-db" value="false"/>
              <property name="update-storage" value="true"/>
              <property name="max-buffer-size" value="204800"/>
              <property name="swap-directory" value="../temp/swap/backup"/>
            </properties>
       </workspace>
[...]
      </workspaces>
[...]
Data-injector is an utility to initialize enterprise data for Portal. It is packed in a .jar and deployed under $TOMCATHOME/lib. It is started automatically when Tomcat starts.
OrganizationInitializer is the service that allows creating a large organization with many groups and users. It also creates portal navigation and page(s) for each group, each user.
<configuration>
  <component>
	<key>org.exoplatform.portal.initializer.organization.OrganizationInitializer</key>
	<type>org.exoplatform.portal.initializer.organization.OrganizationInitializer</type>
     <init-params>
      	<value-param>
      		<name>auto.create.group.page.navigation</name>
      		<description>true or false</description>
      		<value>true</value>
      	</value-param>

      	<value-param>
      		<name>auto.create.user.page.navigation</name>
      		<description>number of pages per user</description>
      		<value>10</value>
      	</value-param>
      	<object-param>
      		<name>organization</name>
      		<description>description</description>
      		<object type="org.exoplatform.portal.initializer.organization.OrganizationConfig"> <field name="groups">
	      	<collection type="java.util.ArrayList">
              	 <value>
		  <object type="org.exoplatform.portal.initializer.organization.OrganizationConfig$GroupsConfig"> <field name="group">
		   <object type="org.exoplatform.services.organization.OrganizationConfig$Group">
			 <field  name="name"><string>province</string></field>
			 <field  name="parentId"><string>/africa/tanzania</string></field>
			 <field  name="description"><string>Tanzania's province</string></field>
			 <field  name="label"><string>Province</string></field>
		    </object>
			 </field>
		    	<field name="from"><string>1</string></field>
		       	<field name="to"><string>10</string></field>
	           </object>
              	  </value>
                </collection>
	      		</field>
      			<field name="users">
      			       <collection type="java.util.ArrayList">

      				<value>
      		                 <object type="org.exoplatform.portal.initializer.organization.OrganizationConfig$UsersConfig">
      				    <field name="user">
		                  <object type="org.exoplatform.services.organization.OrganizationConfig$User">
		                      <field  name="userName"><string>user</string></field>
		                      <field  name="password"><string>GateInPlatform</string></field>
		                      <field  name="firstName"><string>First-Name</string></field>
		                      <field  name="lastName"><string>Last-Name</string></field>
		                      <field  name="email"><string>exo@localhost</string></field>
		                      <field  name="groups"><string>member:/africa</string></field>
		                  </object>
      				    </field>
      				      <field name="from"><string>0</string></field>
      				      <field name="to"><string>9</string></field>
      				 </object>
      				 </value>
      				</collection>
      			 </field>
      		</object>
      	    </object-param>
          </init-params>
	</component>

</configuration>
- name: The name of group.
- parentId: The id of parent group. If the parent id is null, it means that the group is at the first level. If parent groups do not exist, it will be created automatically.
- description: The description of group.
- label: The label of group.
- from and to: This group can be cloned to may copies and each copy is marked a number from!images/number.png!images/ to!images/ number.png!.
- userName: The ID of user.
- password: The password of user.
- firstName: The first name of user.
- lastName: The last name of user.
- email: The email of user.
- groups: The list of groups that user join with membership type
- from and to: This user can be cloned to may copies and each copy is marked a number from!images/number.png!images/ to!images/ number.png!. With this configuration we can create a range of users and put them to various groups and other range to other groups.
The "auto.create.group.page.navigation" Parameter Value is true or false. If TRUE it automatically create portal navigation and page for each group. If FALSE it does not create portal navigation and page for each group.
The "auto.create.user.page.navigation" Parameter Value is number of pages that automatically created for each user.
GateIn provides support for skinning the entire portal User Interface (UI) including your own portlets. Skins are designed to help you pack and reuse common graphic resources.
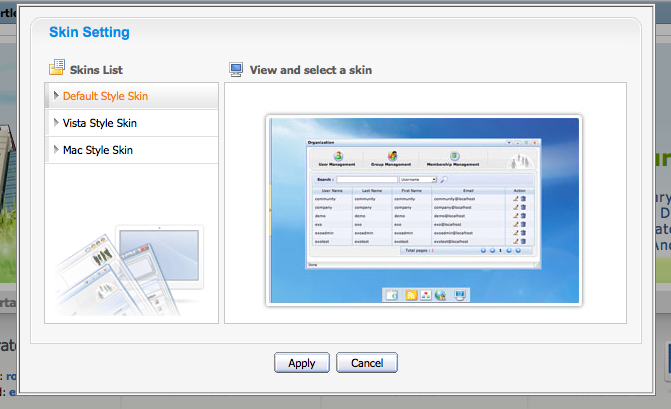
Skins can be switched dynamically at runtime by the Skin Settings action in User Workspace .
When you switch, the whole portal will be repainted and new styles will be applied to the UI.
An GateIn skin contains css styles for GateIn portal's components but
also shares components that may be reused in portlets. When GateIn
generates a portal page markup, it inserts stylesheet links in the
page's
head
tag.
<head>
...
<link id="CoreSkin" rel="stylesheet" type="text/css" href="/GateInResources/skin/Stylesheet.css" />
<link id="web_FooterPortlet" rel="stylesheet" type="text/css" href= "/web/skin/portal/webui/component/UIFooterPortlet/DefaultStylesheet.css" />
<link id="web_NavigationPortlet" rel="stylesheet" type="text/css" href= "/web/skin/portal/webui/component/UINavigationPortlet/DefaultStylesheet.css" />
<link id="web_HomePagePortlet" rel="stylesheet" type="text/css" href= "/portal/templates/skin/webui/component/UIHomePagePortlet/DefaultStylesheet.css" />
<link id="web_BannerPortlet" rel="stylesheet" type="text/css" href= "/web/skin/portal/webui/component/UIBannerPortlet/DefaultStylesheet.css" />
...
</head>
In the snipped code above, you can see two types of links :
- Portal skin stylesheet (
id="CoreSkin"). - Portlets skin stylesheets (all others) : each portlet within the page may contribute its own styles.
- portal skin is typically made of 3 types of styles:
- Portlet themes : decorations for portlet windows.
- Portal styles : default styles for html tags (ex div,th,td...) + the portal UI including the sidebar and portal admin screens.
- Shared styles : GateIn WebUI components styles are reused among different GateIn portlets.
This is revealed easily by the main portal skin stylesheets. For example /GateInVistaSkin/skin/Stylesheet.css {code} @import url(/GateInResources/skin/PortletThemes/Stylesheet.css) ; @import url(VistaSkin/portal/webui/component/UIPortalApplicationSkin.css) ; @import url(VistaSkin/webui/component/Stylesheet.css) ; {code}
Portlets often require additionnal styles that may not be defined by the portal skin. GateIn allows portlets to define additional stylesheets for each portlet and will append the corresponding link tags to the head.
The link ID will be of the form {portletAppName}{}$$PortletName. For example: ContentPortlet in content.war, will give id="contentContentPortlet"
The SkinService is an GateIn service that manages portal skin, portlet styles and portlet themes (windows borders). The code snippet below is an excerpt of the API offered by this service.
  /**
   * Register the stylesheet for a portal Skin.
   * @param module skin module identifier
   * @param skinName skin name
   * @param cssPath path uri to the css file. This is relative to the root context, use leading '/'
   * @param scontext the webapp's {@link ServletContext}
   */
  public void addPortalSkin(String module, String skinName, String cssPath, ServletContext scontext) {
    [...]
  }
  /**
   * Register a portlet stylesheet for a Skin.
   * @param module skin module. Typically of the form 'portletAppName/portletName' .
   * @param skinName Name of the skin
   * @param cssPath path uri to the css file. This is relative to the root context, use leading '/'
   * @param scontext the webapp's {@link ServletContext}
   */
  public void addSkin(String module, String skinName, String cssPath, ServletContext scontext) {
    [...]
  }
  /**
   * Get a skin configuration for a given Skin
   * @param module skin module such as registered in {@link #addSkin(String, String, String, ServletContext)}
   * @param skinName skin name
   * @return the skin configuration or, if not found try to find the default skin
   */
  public SkinConfig getSkin(String module, String skinName) {
    [...]
  }
  /**
   * Register multiple portlet themes
   * @param categoryName portlet theme category
   * @param themesName names of the themes
   */
  public void addTheme(String categoryName, List<String> themesName) {
    [...]
  }
Use the skin service to register your own portal skins, portlet styles and portlet themes.
GateIn provides a servlet listener that allows you to register your own skins and styles when your webapp starts up. Your first step is to add the listener to your portlet app web.xml.
  <web-app>
    [::]
    <listener>
      <listener-class>org.exoplatform.portal.webui.skin.SkinConfigListener</listener-class>
    </listener>
    [::]
  </web-app>
1.1 SkinConfigScript.groovy
The <tt>SkinListener</tt> looks for the groovy script file located in your war under :
- /WEB-INF/conf/script/groovy/SkinConfigScript.groovy
In this script, you have full access to the <tt>SkinService</tt> and <tt>ServletContext</tt> which are bound as scripting variables under the same name. As an example, take a look at the following script. It can be found in the <tt>GateInResources.war</tt> and is used by GateIn to register the <tt>Default</tt> portal skin and some portlet themes.
SkinService.addPortalSkin("CoreSkin","Default", "/GateInResources/skin/Stylesheet.css", ServletContext);
SkinService.addTheme("Simple", ["SimpleBlue","SimpleViolet","SimpleOrange","SimplePink","SimpleGreen"]);
SkinService.addTheme("RoundConer", ["RoundConerBlue","RoundConerViolet","RoundConerOrange","RoundConerPink","RoundConerGreen"]);
SkinService.addTheme("Shadow", ["ShadowBlue","ShadowViolet","ShadowOrange","ShadowPink","ShadowGreen"]);
SkinService.addTheme("MacStyle", ["MacTheme","MacGray","MacGreenSteel","MacBlack"]);
SkinService.addTheme("VistaStyle", ["VistaTheme","VistaBlue"]);
The syntax of addTheme() is: <tt>addTheme(String categoryName, List<String> themesName)</tt>
So, to provide your own skin you could use the following: {code} SkinService.addSkin("mywebapp/MyPortlet", "MyPortalSkin", "/mywebapp/skin/Stylesheet.css", ServletContext); {code}
This simple line would register a styleesheet for a portlet named <tt>MyPortlet</tt> in a portlet app named <tt>mywebapp</tt>. The stylesheet would be used when a skin named <tt>MyPortalSkin</tt> is selected in portal.
The syntax of addSkin() is: <tt>addSkin(String module, String skinName, String cssPath, ServletContext scontext, boolean overwrite)</tt>
- ~~overwrite~~ is optional, its default value is "false". If its value is true, the later call of addSkin() for the same skin key (combination of module + skinName) replaces the skin of the previous call.
Similarly, to configure a particular portal you can use the following : {code} SkinService.addSkin("myportalname", "skin", "/path/to/skin/Stylesheet.css", ServletContext); {code}
The syntax of addPortalSkin() is: <tt>addPortalSkin(String module, String skinName, String cssPath, ServletContext scontext, boolean overwrite)</tt>
1 Tips and Tricks
1.1 Easier css debugging
By default, CSS files are cached and their imports are merged, at the server side, into a single CSS file to reduce the number of HTTP requests from the browser to the server.
The <tt>ServletContext</tt> parameter is there to allow the direct access to the CSS files from the <tt>SkinService</tt>. The optimization code is quite simple as all the CSS files are parsed at the server startup time and all the @import and url(...) references are rewritten to support a single flat file. The result is stored in a cache directly used from the <tt>ResourceRequestFilter</tt>.
Although the optimization is useful for a production environments, you may find it easier to deactivate this optimization while debugging your stylesheets. For that, you simply need to set the java system property <tt>exo.product.developing</tt> to <tt>true</tt>.
For example, you can pass the property as a JVM parameter with the <tt>-D</tt> option in your <tt>GateIn.sh</tt> startup script: {code} EXO{code}
- warning("This is option may cause display bugs with certain browsers like Internet Explorer")
1.1 Change portlet icons
Each portlet is represented by an icon that you can see in the portlet registry, or the webos dock. You can change this icon by adding an image in the directory :
- $project/portlet/myportlets/src/main/webapp/skin/DefaultSkin/portletIcons/and by naming the icon after the portlet, eg:ExoPortlet.png
For example, in portal we have an account portlet named AccountPortlet, the icon is located in :
- portal/tags/2.1.1/portlet/exoadmin/src/main/webapp/skin/DefaultSkin/portletIcons/AccountPortlet.png
1.1 Set the default skin for Portal
When not configured, the default skin of portal is Default. If you want to change this value (to Mac skin, Vista skin, or your own), add a skin tag in the <tt>portal.xml</tt> that defines your portal:
<portal-config>
  <portal-name>classic</portal-name>
  <locale>en</locale>
  <factory-id>office</factory-id>
  <access-permissions>Everyone</access-permissions>
  <edit-permission>*:/platform/administrators</edit-permission>
  <skin>Mac</skin>
  <creator>root</creator>
...
GateIn relies heavily on CSS to create the layout and special effects for the UI. Below we explain some common techniques you may find often inside GateIn's markup. We explain them here to help you better understand GateIn generated markup, ease css issues fixing or get inspration for styling your own apps.
The decorator is a pattern to create a contour or a curve around an area. In order to achieve this effect you need to create 9 cells. The BODY is the central area that you want to decorate. The other 8 cells are distributed around the BODY cell. You can use the width, height and background image properties to achieve any decoration effect that you want.
~UWC_TOKEN_START~1255420331338~UWC_TOKEN_END~
|            |                                          |             |
| TopLeft    |               TopCenter                  |    TopRight |
|            |                                          |             |
----
|            |                                          |             |
|            |                                          |             |
| CenterLeft |                 BODY                     | CenterRight |
|            |                                          |             |
|            |                                          |             |
~UWC_TOKEN_START~1255420331340~UWC_TOKEN_END~
|            |                                          |             |
| BottomLeft |              BottomCenter                | BottomRight |
|            |                                          |             |
~UWC_TOKEN_START~1255420331341~UWC_TOKEN_END~
<div class="Parent">
  <div class="TopLeft">
    <div class="TopRight">
      <div class="TopCenter"><span></span></div>
    </div>
  </div>
  <div class="CenterLeft">
    <div class="CenterRight">
      <div class="CenterCenter">BODY</div>
    </div>
  </div>
  <div class="BottomLeft">
    <div class="BottomRight">
      <div class="BottomCenter"><span></span></div>
    </div>
  <div>
</div>
Left margin left pattern is a technique to create 2 blocks side by side. The left block will have a fixed size and the right block will take the rest of the available space. When the user resizes the browser the added or removed space will be taken from the right block.
~UWC_TOKEN_START~1255420331342~UWC_TOKEN_END~
|                         |                                                |
|                         |                                                |
| |<--- fixed width --->| |                   will expand to right ----> |
|                         |                                                |
|                         |                                                |
|                         |                                                |
----
<div class="Parent">
  <div style="float: left; width: 100px">
  </div>
  <div style="margin-left: 105px;">
  <div>
  <div style="clear: left"><span></span></div>
</div>
- new skin can be created by the configuration. Firstly, you have to definy the new skin in
WEB-INF/conf/script/groovy/SkinConfigScript.groovyin yourRessource(for example, in the project MyPortal, you can put it inGateInResourcesMyPortal).
SkinService.addPortalSkin("MyPortalSkin","MyPortal","/GateInResourcesMyPortal/skin/Stylesheet.css",ServletContext);
Secondly, you put all your new skin into folder skinyourSkin and create new file Stylesheet.css here. In this file, you will import all links to your CSS. For example in MyPortal project.
@import url(MyPortalSkin/portal/webui/component/UIPortalApplicationSkin.css) ;
@import url(MyPortalSkin/webui/component/Stylesheet.css) ;
Finally, you have to definy the name of new skin and the image preview for the Skin Settings action in User Workspace.
By default, if you don not set new name for skin, its name is <t>label></tt>. Looking in the file and add yout new name here.
#############################################################################
#                              Change Skin                                  #
#############################################################################

UIChangeSkin.action.save=Appliquer
UIChangeSkin.action.close=Fermer
UIChangeSkin.title.SkinSetting=Configuration des styles
UIChangeSkin.MyPortal.label=Style MyPortal
UIChangeSkin.Default.label=Style par d?faut
UIChangeSkin.Mac.label=Style Mac
UIChangeSkin.Vista.label=Style Vista
Skin.title=Liste des styles
Skin.left.title=Voir et s?lectionner un style
The image peeview can be set in file ressource/skin/DefaultSkin/portal/webui/component/customization/UIChangeSkinForm/Stylesheet.css of Portal.
.UIChangeSkinForm .UIItemSelector .TemplateContainer .MyPortalImage {
	margin: auto;
	width: 329px; height:204px;
	background: url('background/MyPortal.jpg') no-repeat top;
	cursor: pointer ;
}
And now, you copy your image MyPortal.jpg (that you definy above) to the folder ressource/skin/DefaultSkin/portal/webui/component/customization/UIChangeSkinForm/background and test your new skin.
Firstly, you have to definy the new theme in WEB-INF/conf/script/groovy/SkinConfigScript.groovy in your Ressource (for example, in the project MyPortal, you can put it in GateInResourcesCp060508).
SkinService.addTheme("MyPortal-MacTheme", ["MacGray","MacBlue","MacBlack"]);
Secondly, you put all your new theme into folder skinyourSkin and create new file Stylesheet.css here. In this file, you will import all links to your CSS. For example in MyPortal project.
@import url(MyPortalSkin/PortletThemes/Stylesheet.css) ;
You can see here, in the GateInResourcesCp060508/skin/MyPortalSkin/PortletThemes/Stylesheet.css, you put all your CSS of new theme.
/*---- MyPortalTheme ----*/
.MyPortalTheme .WindowBarCenter .WindowPortletInfo {
	margin-right: 80px; /* orientation=lt */
	margin-left: 80px; /* orientation=rt */
}
.MyPortalTheme .WindowBarCenter .ControlIcon {
	float: right;/* orientation=lt */
	float: left;/* orientation=rt */
	width: 24px;
	height: 17px;
	cursor: pointer;
	background-image: url('background/MyPortalTheme.png');
}
.MyPortalTheme .ArrowDownIcon {
	background-position: center 20px;
}
.MyPortalTheme .OverArrowDownIcon {
	background-position: center 116px;
}
.MyPortalTheme .MinimizedIcon {
	background-position: center 44px;
}
.MyPortalTheme .OverMinimizedIcon {
	background-position: center 140px;
}
.MyPortalTheme .MaximizedIcon {
	background-position: center 68px;
}
.MyPortalTheme .OverMaximizedIcon {
	background-position: center 164px;
}
.MyPortalTheme .RestoreIcon {
	background-position: center 92px;
}
.MyPortalTheme .OverRestoreIcon {
	background-position: center 188px;
}
.MyPortalTheme .NormalIcon {
	background-position: center 92px;
}
.MyPortalTheme .OverNormalIcon {
	background-position: center 188px;
}
.UIPageDesktop .MyPortalTheme .ResizeArea {
	float: right;/* orientation=lt */
	float: left;/* orientation=rt */
	width: 18px; height: 18px;
	cursor: nw-resize;
	background: url('background/ResizeArea18x18.gif') no-repeat left top; /* orientation=lt */
	background: url('background/ResizeArea18x18-rt.gif') no-repeat right top; /* orientation=rt */
}
.MyPortalTheme .Information {
	height: 18px; line-height: 18px;
	vertical-align: middle; font-size: 10px;
	padding-left: 5px;/* orientation=lt */
	padding-right: 5px;/* orientation=rt */
	margin-right: 18px;/* orientation=lt */
	margin-left: 18px;/* orientation=rt */
}
.MyPortalTheme .WindowBarCenter .WindowPortletIcon {
  background-position: left top; /* orientation=lt */
  background-position: right top; /* orientation=rt */
	padding-left: 20px; /* orientation=lt */
	padding-right: 20px; /* orientation=rt */
	height: 16px;
	line-height: 16px;
}
.MyPortalTheme .WindowBarCenter .PortletName {
	font-weight: bold;
	color: #333333;
	overflow: hidden;
	white-space: nowrap;
	width: 100%;
}
.MyPortalTheme .WindowBarLeft {
	padding-left: 12px;
	background-image: url('background/MyPortalTheme.png');
	background-repeat: no-repeat;
	background-position: left -148px;
}
.MyPortalTheme .WindowBarRight {
	padding-right: 11px;
	background-image: url('background/MyPortalTheme.png');
	background-repeat: no-repeat;
	background-position: right -119px;
}
.MyPortalTheme .WindowBarCenter {
	background-image: url('background/MyPortalTheme.png');
	background-repeat: repeat-x;
	background-position: left -90px;
}
.MyPortalTheme .WindowBarCenter .FixHeight {
	height: 21px;
	padding-top: 8px;
}
.MyPortalTheme .MiddleDecoratorLeft {
	padding-left: 12px;
	background: url('background/MMyPortalTheme.png') repeat-y left;
}
.MyPortalTheme .MiddleDecoratorRight {
	padding-right: 11px;
	background: url('background/MMyPortalTheme.png') repeat-y right;
}
.MyPortalTheme .MiddleDecoratorCenter {
	background: #ffffff;
}
.MyPortalTheme .BottomDecoratorLeft {
	padding-left: 12px;
	background-image: url('background/MyPortalTheme.png');
	background-repeat: no-repeat;
	background-position: left -60px;
}
.MyPortalTheme .BottomDecoratorRight {
	padding-right: 11px;
	background-image: url('background/MyPortalTheme.png');
	background-repeat: no-repeat;
	background-position: right -30px;
}
.MyPortalTheme .BottomDecoratorCenter {
	background-image: url('background/MyPortalTheme.png');
	background-repeat: repeat-x;
	background-position: left top;
}
.MyPortalTheme .BottomDecoratorCenter .FixHeight {
	height: 30px;
}
Manaing Javascript scripts in an application like GateIn Platform is a critical part of the configuration work if you want to get good response time.
Every portlet can have its own javscript code but in many cases it is more convenient to reuse some existing shared libraries. For that reason, GateIn has a mechanism to easily register the libraries that will be loaded when the first page will be rendered. To do so, every WAR deployed in GateIn can register the js files thanks to a groovy script "WEB-INF/conf/script/groovy/JavascriptScript.groovy". The next file is the one you can find in the GateInResources.war
JavascriptService.addJavascript("GateIn", "/javascript/GateIn.js", ServletContext);
/* Animation Javascripts */
JavascriptService.addJavascript("GateIn.animation.ImplodeExplode", "/javascript/GateIn/animation/ImplodeExplode.js", ServletContext);
/* Application descriptor */
JavascriptService.addJavascript("GateIn.application.ApplicationDescriptor", "/javascript/GateIn/application/ApplicationDescriptor.js", ServletContext);
/* CORE Javascripts */
JavascriptService.addJavascript("GateIn.core.Utils", "/javascript/GateIn/core/Util.js", ServletContext);
JavascriptService.addJavascript("GateIn.core.DOMUtil", "/javascript/GateIn/core/DOMUtil.js", ServletContext);
JavascriptService.addJavascript("GateIn.core.Browser", "/javascript/GateIn/core/Browser.js", ServletContext);
JavascriptService.addJavascript("GateIn.core.MouseEventManager", "/javascript/GateIn/core/MouseEventManager.js", ServletContext);
JavascriptService.addJavascript("GateIn.core.UIMaskLayer", "/javascript/GateIn/core/UIMaskLayer.js", ServletContext);
JavascriptService.addJavascript("GateIn.core.Skin", "/javascript/GateIn/core/Skin.js", ServletContext);
JavascriptService.addJavascript("GateIn.core.DragDrop", "/javascript/GateIn/core/DragDrop.js", ServletContext);
JavascriptService.addJavascript("GateIn.core.TemplateEngine", "/javascript/GateIn/core/TemplateEngine.js", ServletContext);
/* Widget Javascripts */
JavascriptService.addJavascript("GateIn.widget.UIWidget", "/javascript/GateIn/widget/UIWidget.js", ServletContext);
JavascriptService.addJavascript("GateIn.widget.UIAddWidget", "/javascript/GateIn/widget/UIAddWidget.js", ServletContext);
JavascriptService.addJavascript("GateIn.widget.UIExoWidget", "/javascript/GateIn/widget/UIExoWidget.js", ServletContext);
/* Desktop Javascripts */
JavascriptService.addJavascript("GateIn.desktop.UIDockbar", "/javascript/GateIn/desktop/UIDockbar.js", ServletContext);
JavascriptService.addJavascript("GateIn.desktop.UIDesktop", "/javascript/GateIn/desktop/UIDesktop.js", ServletContext);
/* WebUI Javascripts */
JavascriptService.addJavascript("GateIn.webui.UIItemSelector", "/javascript/GateIn/webui/UIItemSelector.js", ServletContext);
JavascriptService.addJavascript("GateIn.webui.UIForm", "/javascript/GateIn/webui/UIForm.js", ServletContext);
JavascriptService.addJavascript("GateIn.webui.UIPopup", "/javascript/GateIn/webui/UIPopup.js", ServletContext);
JavascriptService.addJavascript("GateIn.webui.UIPopupSelectCategory", "/javascript/GateIn/webui/UIPopupSelectCategory.js", ServletContext);
JavascriptService.addJavascript("GateIn.webui.UIPopupWindow", "/javascript/GateIn/webui/UIPopupWindow.js", ServletContext);
JavascriptService.addJavascript("GateIn.webui.UIVerticalScroller", "/javascript/GateIn/webui/UIVerticalScroller.js", ServletContext);
JavascriptService.addJavascript("GateIn.webui.UIHorizontalTabs", "/javascript/GateIn/webui/UIHorizontalTabs.js", ServletContext);
JavascriptService.addJavascript("GateIn.webui.UIPopupMenu", "/javascript/GateIn/webui/UIPopupMenu.js", ServletContext);
JavascriptService.addJavascript("GateIn.webui.UIDropDownControl", "/javascript/GateIn/webui/UIDropDownControl.js", ServletContext);
/* Portal Javascripts */
JavascriptService.addJavascript("GateIn.portal.PortalHttpRequest", "/javascript/GateIn/portal/PortalHttpRequest.js", ServletContext);
JavascriptService.addJavascript("GateIn.portal.UIPortal", "/javascript/GateIn/portal/UIPortal.js", ServletContext);
JavascriptService.addJavascript("GateIn.portal.UIWorkspace", "/javascript/GateIn/portal/UIWorkspace.js", ServletContext);
JavascriptService.addJavascript("GateIn.portal.UIPortalControl", "/javascript/GateIn/portal/UIPortalControl.js", ServletContext);
JavascriptService.addJavascript("GateIn.portal.PortalDragDrop", "/javascript/GateIn/portal/PortalDragDrop.js", ServletContext);
JavascriptService.addJavascript("GateIn.portal.UIPortalNavigation", "/javascript/GateIn/portal/UIPortalNavigation.js", ServletContext);
JavascriptService.addJavascript("GateIn.portal.UIMaskWorkspace", "/javascript/GateIn/portal/UIMaskWorkspace.js", ServletContext);
JavascriptService.addJavascript("GateIn.portal.UIExoStartMenu", "/javascript/GateIn/portal/UIExoStartMenu.js", ServletContext);
/* Desktop Javascripts 2 */
JavascriptService.addJavascript("GateIn.desktop.UIWindow", "/javascript/GateIn/desktop/UIWindow.js", ServletContext);
Note that even if the you register dedicated javascripts, they will be merged into a single merged.js file when the server will load in order to reduce the number of HTTP calls as seen in the home page source code:
<script type="text/javascript" src="/portal/javascript/merged.js"></script>
Although this optimization is useful for a production environment, you may find it easier to deactivate this optimization while debugging your javascript. For that, you simply need to set the java system property exo.product.developing to true. But if you want to see or use the merged file you have to set this property to false. You can pass the property as a JVM parameter with the -D option in your GateIn.sh or GateIn.bat startup script: {code} EXO{code}
Every javascript file is referenced with a module name of type "GateIn.core.DragDrop" which acts like a namespace. Inside the associated files, global javascript functions are used following the same namespace convention:
GateIn.core.DragDrop = new DragDrop() ;
It is also possible to use the GateIn.require() javascript method to lazy load and evaluate some javascript code. This is quite useful from the portlet or widget applications that will use this javascript only once. Otherwise, if the library is reusable in several places it is better to reference it in the groovy file.
- if empty, everyone share the same dashboard and can edit it
- if set to CURRENTUSER , every user has his own dashboard
- if set to a username, everyone will see the dashboard of this person
- if set to 1, only the owner of the dashboard can edit it
- if set to 0, everyone can edit it
In this article, you will learn:
- What token services are.
- Implement a token service for using in GateIn portal.
- Configure a token service with a token's life-time.
Token service is used in authentication.
Using token helps preventing information such as user name, password into user request so the system will become more secure.
Token service provides the way to manipulate tokens such as create, delete, retrieve, clean ... Token service also defines the life-time of token. After the life-time, token has no more effect. The life-time definition must be configured.
All token services used in GateIn portal's authentication must be a subclass of an abstract class AbstractTokenService . So they must have these following methods:
		public Token getToken(String id) throws PathNotFoundException,
		RepositoryException;
		public Token deleteToken(String id) throws PathNotFoundException,
		RepositoryException;
		public String[] getAllTokens();
		public long getNumberTokens() throws Exception;
		public String createToken(Credentials credentials) throws
		IllegalArgumentException,NullPointerException;
		public Credentials validateToken(String tokenKey, boolean remove) throws
		NullPointerException;
These methods show how the token-service manipulates its tokens.
Token services configuration is also known as specifying the life-time of token in the configuration file. The token service is configured as a portal component.
Examples:
<component>
    <key>org.exoplatform.web.security.security.CookieTokenService</key>
    <type>org.exoplatform.web.security.security.CookieTokenService</type>
    <init-params>
    	<values-param>
          <name>tokenTimeout</name>
          <value>jcr-token</value>
          <value>7</value>
          <value>DAY</value>
        </values-param>
    </init-params>
</component>
In this example, CookieTokenService is a subclass of AbstractTokenService so it has a property which specifies how long token can live.
Service will initiate this property by looking for an init-param named as "service.configuration". This property must have 3 values (service's name, amount of time, unit of time). In this case, we can see the service's name is "jcr-token", the token's expiration time is a week.
At this time, GateIn Portal supports four timing units: SECOND, MINUTE, HOUR and DAY.
This document is an overview of Varnish configuration for GateIn SEA Portal. It is organized as follows:
- Section one gives an introduction to Varnish software (version 1.1.2)
- Section two explains how to install it, we are using Linux kernel version 2.6.27.
- The third section gives a brief description of Varnish configuration files for GateIn Portal
- Whereas the last one discusses some of the practical issues encountered during the deployment of Varnish, the last section analyzes the speed gain by Varnish.
Varnish is a HTTP/web accelerator, it was written from the beginning to be a high-performance open source reverse proxy caching implementation. Varnish, like other caching reverse HTTP proxy implementations, is most frequently used to alleviate/reduce origin web servers of undue load, giving you the ability to handle a higher number of concurrent hits.
Nowadays, more and more web sites present dynamic web pages consisting of a number of different elements. Combining these elements is both time consuming and CPU intensive. The bad news is that the same process is repeated for every individual user, even when the content is identical. Fortunately in such a case a solution like Varnish can help to improve web server performance. How can Varnish accomplish this? Varnish temporarily stores the most frequently requested pages in its cache. It is more effective to present these pages from the Varnish cache. Therefore, users are offered an improved service, and Content/Document Management System server requirements are reduced.
- Why are we using Varnish? In contrast with other HTTP accelerators, many of which began life as client-side proxies or origin servers, Varnish was designed from the scratch as an accelerator for incoming traffic. In addition, Varnish via his DSL (Domain Specific Language) is very flexible. In fact, this way, it provides users not only with a means of modifying and rewriting client requests or in certain cases server responses. But Varnish also enable the user to load multiple configurations concurrently. So users can instantaneously switch from one VCL (Varnish Configuration Language) to another. It is not all, Varnish TTL (Time to Live) parameter enables users to decide how long an object should be cached.
Before building Varnish, make sure that the following tools are installed :
- GCC compiler
- A POSIX-compatible make
- GNU autotools (automake, autoconf, libtool, ncurses)
If you are using a system with a graphical user interface, installation of Varnish 1.1.2 is quite easy via synaptic package manager. If not, you can run in a terminal by the following command to install Varnish on your computer:
- sudo apt-get install varnish.
You can also install Varnish from source, see the following web site for more information:
http://varnish.projects.linpro.no.
Varnish uses Varnish Configuration Language (VCL). The VCL language is a small domain-specific language designed to be used to define request handling and document caching policies for the Varnish HTTP accelerator. When a new configuration is loaded, the varnished management process translates the VCL code to C and compiles it to a shared object which is then dynamically linked into the server process.
Installation of Varnish automatically create two files named default.vcl and varnish in the repositories /etc/varnish/ and /etc/default respectively. One is VCL and another one contains values that will be passed as parameters to varnished . We will not make use of the first one, that is default.vcl. Create a new file named vcl.conf in /etc/varnish with the following contents:
Backend declaration, here we need to specify the web server host name and the listening http port.
backend default {
		set backend.host = "127.0.0.1";
        set backend.port = "8080";
}
#
## Called when a client request is received
#
sub vcl_recv {
        if (req.url ~ "^/$") {
        set req.url = regsub(req.url,"^/$","/portal");
        set req.http.Accept-Language = "vi";
        }
        if (req.url ~ ".*vnwebsite.*"){
                set req.http.Accept-Language = "vi";
        } else {
                set req.http.Accept-Language = "en";
        }
        if (req.request!images/= "GET" && req.request!images/ = "HEAD") {
                pipe;
        }
        if (req.http.Expect) {
                pipe;
        }
        if (req.request == "GET" && req.url ~ "\.(jpg|jpeg|gif|ico|tiff|tif|svg|css|js|html)$") {
            set req.url = regsub(req.url, "\?.*", "");
             remove req.http.cookie;
	  remove req.http.authenticate;
             lookup;
        }
       if (req.http.Authenticate || req.http.Authorization) {
             pass;
        }
        if (req.http.Cache-Control ~ "no-cache") {
               set req.http.Cache-Control = regsub(req.http.Cache-Control, "no-cache", "set-cookie2");
        }
        # force lookup even when cookies are present
        if (req.request == "GET" && req.http.cookie) {
                lookup;
        }
        lookup;
}
In order to specify the default language for each web site, that is Vietnamese (vi) for vnwebsite and English (en) for enwebsite; the following statement set req.http.Accept-Language = "language code" is useful.
#
## Called when entering pipe mode
#
sub vcl_pipe {
        pipe;
}
#
## Called when entering pass mode
#
sub vcl_pass {
        pass;
}
#
## Called when the requested object was found in the cache
#
sub vcl_hit {
        if (req.url ~ ".*vnwebsite.*"){
                set req.http.Accept-Language = "vi";
        } else {
                set req.http.Accept-Language = "en";
        }
        deliver;
}
## Called when the requested object has been retrieved from the
## backend, or the request to the backend has failed
sub vcl_fetch {
        if (!obj.valid) {
                error;
        }
        if (req.url ~ ".*vnwebsite.*"){
                set req.http.Accept-Language = "vi";
        } else {
                set req.http.Accept-Language = "en";
        }
        if (req.http.Cache-Control ~ "no-cache") {
               set req.http.Cache-Control = regsub(req.http.Cache-Control, "no-cache", "set-cookie2");
        }
        if(obj.cacheable){
                remove req.http.Set-Cookie;
	     set obj.http.Cache-Control = "no-cache";
                remove obj.http.Etag;
                if(obj.ttl < 7d){
                        set obj.ttl = 7d;
                }
                insert;
        }
        insert;
}
If the cookie is intended for use by a single user, the Set-Cookie2 header should not be cached. A Set-Cookie2 header that is intended to be shared by multiple users may be cached.
- Remark:SinceEtag (entity tag) in an HTTP response header that may be returned by an HTTP/1.1 compliant web server is used by the user-agent to determine change in content at a given URL. It is removed in order to instruct the user-agent that there is no change in content of cacheable objects. In fact, when a new HTTP response contains the same ETag as an older HTTP response, the client can conclude that the content is the same without further downloading.
## Called before a cached object is delivered to the client
sub vcl_deliver {
        deliver;
}
## Called when an object nears its expiry time
sub vcl_timeout {
        discard;
}
## Called when an object is about to be discarded
sub vcl_discard {
    discard;
}
This configuration tells Varnish to always cache all cacheable objects and don't invalidate them for at least one week.
Then modify the file /etc/default/varnish and make yourself sure that its content is not too different to this one, particularly the DAEMONOPTS part. Note that we are using the advanced configuration, that is alternative 3.
# Configuration file for varnish
#
# /etc/init.d/varnish expects the variable $DAEMON_OPTS to be set from this
# shell script fragment.
#
# Maximum number of open files (for ulimit -n)
NFILES=131072
# Default varnish instance name is the local nodename.  Can be overridden with
# the -n switch, to have more instances on a single server.
INSTANCE=$(uname -n)
## Alternative 3, Advanced configuration
## We choose advance configuration
#
# See varnishd(1) for more information.
#
# # Main configuration file. You probably want to change it :)
VARNISH_VCL_CONF=/etc/varnish/default.vcl
#
# # Default address and port to bind to
# # Blank address means all IPv4 and IPv6 interfaces, otherwise specify
# # a host name, an IPv4 dotted quad, or an IPv6 address in brackets.
VARNISH_LISTEN_ADDRESS=0.0.0.0
VARNISH_LISTEN_PORT=80
#
# # Telnet admin interface listen address and port
VARNISH_ADMIN_LISTEN_ADDRESS=127.0.0.1
VARNISH_ADMIN_LISTEN_PORT=6082
#
# # The minimum number of worker threads to start
VARNISH_MIN_THREADS=1
#
# # The Maximum number of worker threads to start
VARNISH_MAX_THREADS=2048
#
# # Idle timeout for worker threads
VARNISH_THREAD_TIMEOUT=120
#
# # Cache file location
VARNISH_STORAGE_FILE=/var/lib/varnish/$INSTANCE/varnish_storage.bin
#
# # Cache file size: in bytes, optionally using k / M / G / T suffix,
# # or in percentage of available disk space using the % suffix.
VARNISH_STORAGE_SIZE=5G
#
# # Backend storage specification
VARNISH_STORAGE="file,${VARNISH_STORAGE_FILE},${VARNISH_STORAGE_SIZE}"
#
# # Default TTL used when the backend does not specify one
VARNISH_TTL=7d
#
# # DAEMON_OPTS is used by the init script.  If you add or remove options, make
# # sure you update this section, too.
DAEMON_OPTS="-a ${VARNISH_LISTEN_ADDRESS}:${VARNISH_LISTEN_PORT} \
              -f ${VARNISH_VCL_CONF} \
              -T ${VARNISH_ADMIN_LISTEN_ADDRESS}:${VARNISH_ADMIN_LISTEN_PORT} \
              -t ${VARNISH_TTL} \
	-w ${VARNISH_MIN_THREADS},${VARNISH_MAX_THREADS},${VARNISH_THREAD_TIMEOUT} \
              -s ${VARNISH_STORAGE}"
When using an HTTP accelerator, it is important to know whether our web server performance has improved or not. Thus, this section shows the performance gained by the use of Varnish.
Our Varnish testbed consists of a desktop PC acting as a web server (WS), and 10 PC-based Linux acting as clients stations. The system hardware configuration is summarized in the following table. All machines except the WS use a Linux 2.6.27 kernel. The user-agent used on client stations is wget
The following table is the testbed summary:
| Hardware | Processor | Frequency |
| One x (WS) | Intel(R) Pentium(R) 4 | 3.00GHz |
| Two x (PC) | Intel(R) Core(TM)2 Duo | 2.00GHz |
It is well known that performance of a software like varnish depends on part on the communication link between server host and client stations. So, without loss of generality, we assume that our wireless connection is fair.
In other to evaluate Vanish performance, we first access all pages of our web site through Varnish to ensure that all cacheable objects can be found in Varnish cache. It takes in average 6.9s. Then we simultaneously send 100 download requests from each of our 2 client stations to the web server using wget user-agent through Varnish. After this operation, we evaluate the average time required by each client station to perform a download request. The same process is done without using Varnish. We then compare the obtained results.
This part discuss about Varnish performance in term of time of response. That is the time that a given client should wait to get the requested object (or the server response). In this case the requested object is our entire web site. The collected measurements are summarized in the below table:
| Host | Average waiting time using Varnish as reverse proxy | Average waiting time without use of Varnish | Number of trials | Data size |
| First | 02. 791070 | 26.889563 | 100 | 104 files, 1.4M |
| Second | 02.708190 | 26. 378669 | 100 | 104 files, 1.4M |
- Remark: All times above are in second, these times include the time needed by the client to connect to the server.
Measurements listed above obviously shows that our web server performance are considerably improved by the use of Varnish software. In average per user request, we gain from Varnish 24 (twenty-four) seconds. That is using Varnish, user requests are at least 10 times faster than previously (without Varnish).