This chapter describes the portal lifecycle from the application server start to its stop as well as how requests are handled.
A GateIn Portal instance is simply a web application deployed as a WAR in an application server. Portlets are also part of an enhanced WAR that we call a portlet application.
GateIn doesn't require any particular setup for your portlet in most common scenario and the web.xml file can remain without any GateIn specific configuration. During deployment, GateIn will automatically and transparently inject a servlet into the portlet application to be able to interact with it. This feature is dependent on the underlying servlet container but will work out of the box on the proposed bundles.
The servlet is the main entry point for incoming requests, it
also includes some interesting init code when the portal is launched.
This servlet (org.gatein.wci.command.CommandServlet) is automatically
added during deployment and mapped to /tomcatgateinservlet.
In other words, this is equivalent to adding the following into web.xml (But this is for information only, the servlet is already configured)
<servlet>

  <servlet-name>TomcatGateInServlet</servlet-name>

  <servlet-class>org.gatein.wci.command.CommandServlet</servlet-class>

  <load-on-startup>0</load-on-startup>

</servlet>


<servlet-mapping>

  <servlet-name>TomcatGateInServlet</servlet-name>

  <url-pattern>/tomcatgateinservlet</url-pattern>

</servlet-mapping>
With this in mind it's possible to filter on the CommandServlet by filtering on the URL pattern used by the Servlet mapping. As an example below we will create a servlet filter that calculates the time of execution of a portlet request.
The filter class:
package org.example;


import java.io.IOException;


import javax.servlet.FilterChain;

import javax.servlet.FilterConfig;

import javax.servlet.ServletException;

import javax.servlet.ServletRequest;

import javax.servlet.ServletResponse;


public class MyFilter implements javax.servlet.Filter {


  public void doFilter(ServletRequest request, ServletResponse response,

      FilterChain chain) throws IOException, ServletException

  {

    long beforeTime = System.currentTimeMillis();

    chain.doFilter(request, response);

    long afterTime = System.currentTimeMillis();

    System.out.println("Time to execute the portlet request (in ms): " + (afterTime - beforeTime));

  }


  public void init(FilterConfig config) throws ServletException

  {

  }


  public void destroy()

  {

  }


}
The Java EE web application configuration file (web.xml) of the portlet on which we want to know the time to serve a portlet request. As mentioned above nothing specific to GateIn needs to be included, only the URL pattern to set has to be known.
<?xml version="1.0"?>

<web-app xmlns:xsi="http://www.w3.org/2001/XMLSchema-instance"

    xsi:schemaLocation="http://java.sun.com/xml/ns/j2ee http://java.sun.com/xml/ns/j2ee/web-app_2_4.xsd"

    version="2.5">


  <filter>

    <filter-name>MyFilter</filter-name>

    <filter-class>org.example.MyFilter</filter-class>

  </filter>


  <filter-mapping>

    <filter-name>MyFilter</filter-name>

    <url-pattern>/tomcatgateinservlet</url-pattern>

    <dispatcher>INCLUDE</dispatcher>

  </filter-mapping>


</web-app>
INCLUDE dispatcher
Here it's important to set INCLUDE as dispatcher as the portal will always hit the CommandServlet through a request dispatcher. Without this, the filter will not be triggered, unless direct access to a resource (such as an image).
The RTL framework (Right-To-Left framework) provides a set of tools that can be leveraged by the user interface components to handle directionality gracefully.
The orientation depends on the current locale and during a portal request the current orientation is made available by various means. The orientation is a Java 5 enum that provides a set of functionalities:
   LT, // Western Europe
   RT, // Middle East (Arabic, Hebrew)
   TL, // Japanese, Chinese, Korean
   TR; // Mongolian
   public boolean isLT() { ... }
   public boolean isRT() { ... }
   public boolean isTL() { ... }
   public boolean isTR() { ... }
The object defining the current Orientation for the current request is the UIPortalApplication. However it should be accessed at runtime using the RequestContext that delegates to the UIPortalApplication. In the case of a PortalRequestContext it is a direct delegate as the PortalRequestContext has a reference to the current UIPortalApplication. In case of a different context such as the PortletRequestContext, it delegates to the parent context given the fact that the root RequestContext is always a PortalRequestContext.
Orientation is obtained from implicit variables defined by the groovy binding context:
orientation : the current orientation as an Orientation
isLT : the value of orientation.isLT()
isRT : the value of orientation.isRT()
dir : the string 'ltr' if the orientation is LT or the string 'rtl' if the orientation is RT
The skin service handles stylesheet rewriting to accommodate the orientation. It works by appending -lt or -rt to the stylesheet name. For instance /web/skin/portal/webui/component/UIFooterPortlet/DefaultStylesheet-rt.css will return the same stylesheet as /web/skin/portal/webui/component/UIFooterPortlet/DefaultStylesheet.css but processed for the RT orientation. Obviously the -lt suffix is optional.
Stylesheet authors can annotate their stylesheet to create content that depends on the orientation.
In the example we need to use the orientation to modify the float attribute that will make the horizontal tabs either float on left or on right:
float: left; /* orientation=lt */
float: right; /* orientation=rt */
font-weight: bold;
text-align: center;
white-space: nowrap;
The LT produced output will be:
float: left; /* orientation=lt */
font-weight: bold;
text-align: center;
white-space: nowrap;
The RT produced output will be:
float: right; /* orientation=rt */
font-weight: bold;
text-align: center;
white-space: nowrap;
In this example we need to modify the padding according to the orientation:
color: white;
line-height: 24px;
padding: 0px 5px 0px 0px; /* orientation=lt */
padding: 0px 0px 0px 5px; /* >orientation=rt */
The LT produced output will be:
color: white;
line-height: 24px;
padding: 0px 5px 0px 0px; /* orientation=lt */
The RT produced output will be:
color: white;
line-height: 24px;
padding: 0px 0px 0px 5px; /* orientation=rt */
Sometimes it is necessary to create an RT version of an image that will be used from a template or from a stylesheet. However symmetric images can be automatically generated avoiding the necessity to create a mirrored version of an image and furthermore avoiding maintenance cost.
The web resource filter uses the same naming pattern than the skin service does. When an image ends with the -rt suffix the portal will attempt to locate the original image and create a mirror of it. For instance requesting the image /GateInResources/skin/DefaultSkin/webui/component/UITabSystem/UITabs/background/NormalTabStyle-rt.gif returns a mirror of the image /GateInResources/skin/DefaultSkin/webui/component/UITabSystem/UITabs/background/NormalTabStyle.gif and it works perfectly because the image is symmetric.
Here is an example combining stylesheet and images:
line-height: 24px;
background: url('background/NavigationTab.gif') no-repeat right top; /* orientation=lt */
background: url('background/NavigationTab-rt.gif') no-repeat left top; /* orientation=rt */
padding-right: 2px; /* orientation=lt */
padding-left: 2px; /* orientation=rt */
All aspects of internationalization in GateIn products are covered. You should have a general knowledge of Internationalization in Java products. Sun created a good internationalization tutorial .
All embedded applications contains property files for various languages. They are packaged with the portlets applications in a WEB-INF/classes/locale/ directory.
You should notice that
the files are located in the
classesfolder of your WEB-INF, this way they are loaded by the ClassLoader.all resource files are in a subfolder named
locale
For instance you will find the translations for the NavigationPortlet in web.war/WEB-INF/classes/locale/portlet/portal
NavigationPortlet_de.properties
NavigationPortlet_en.properties
NavigationPortlet_es.properties
NavigationPortlet_fr.properties
NavigationPortlet_nl.properties
NavigationPortlet_ru.properties
NavigationPortlet_uk.properties
NavigationPortlet_ar.xml
Inside those file we find typical key=value Java EE properties. For example the French one:
javax.portlet.title=Portlet Navigation
Furthermore there are properties files in the portal itself. They form together the portal resource bundle. From a portlet you can then access translations from the portlet itself or shared at the portal level, both are aggregated when you need them.
Translation in XML format
It is also possible to use a proprietary XML format to define translations. This is a more convenient way to translate a document for some languages such as Japanese, Arabic or Russian. Property files have te be ASCII encoded, while the XML file can define its encoding. As a result it's easier for a human being to read (and fix) a translation in XML instead of having to decode and encode the property file.
More information are available here: Section 5.4, “XML Resources Bundles”
Various languages are available in the shipped portal, one may want to add or remove languages. This configuration will define the list of languages in the "Change Language" section of the portal that the user can pick from.
In the 02portal.war:/WEB-INF/conf/common/common-configuration.xml file of your installation you can find the following section:
<component>

  <key>org.exoplatform.services.resources.LocaleConfigService</key>

  <type>org.exoplatform.services.resources.impl.LocaleConfigServiceImpl</type>

  <init-params>

    <value-param>

      <name>locale.config.file</name>

      <value>war:/conf/common/locales-config.xml</value>

    </value-param>

  </init-params>

</component>
The configuration points to the locale configuration file such as the following one located in 02portal.war:/WEB-INF/conf/common/locales-config.xml:
<?xml version="1.0" encoding="UTF-8"?>
<locales-config>
<locale-config>
<locale>en </locale>
<output-en
</locale>
<output-en coding>UTF-8</output-encoding>
<input-enc
coding>UTF-8</output-encoding>
<input-enc oding>UTF-8</input-encoding>
<descripti
oding>UTF-8</input-encoding>
<descripti on>Default configuration for english locale</description>
</locale-config>
<locale-config>
<locale>fr</locale>
<output-encoding>UTF-8</output-encoding>
<input-encoding>UTF-8</input-encoding>
<description>Default configuration for the french locale</description>
</locale-config>
<locale-config>
<locale>ar</locale>
<output-encoding>UTF-8</output-encoding>
<input-encoding>UTF-8</input-encoding>
<description>Default configuration for the arabic locale</description>
<orientati
on>Default configuration for english locale</description>
</locale-config>
<locale-config>
<locale>fr</locale>
<output-encoding>UTF-8</output-encoding>
<input-encoding>UTF-8</input-encoding>
<description>Default configuration for the french locale</description>
</locale-config>
<locale-config>
<locale>ar</locale>
<output-encoding>UTF-8</output-encoding>
<input-encoding>UTF-8</input-encoding>
<description>Default configuration for the arabic locale</description>
<orientati on>rt</orientation>
</locale-config>
</locales-config>
on>rt</orientation>
</locale-config>
</locales-config>
| locale The locale has to be defined such as defined here http://ftp.ics.uci.edu-pub-ietf-http-related-iso639.txt, in this example "ar" is Arabic. |
| output-encoding Encoding It's highly recommended to always use UTF-8. |
| input-encoding In the java implementation, the encoding parameters will be used for the request response stream. The input-encoding parameter will be used for request setCharacterEncoding(..). |
| description Description for the language |
| description The default orientation of text and images is Left-To-Right. GateIn supports Right-To-Left orientation. Therefore you can define the orientation to use as explained in Section 5.2, “RTL (Right To Left) Framework”. |
The resource bundle service is configured in: 02portal.war:/WEB-INF/conf/common/common-configuration.xml:
<component>
  <key>org.exoplatform.services.resources.ResourceBundleService</key>
  <type>org.exoplatform.services.resources.impl.SimpleResourceBundleService</type>
  <init-params>
    <values-param>
      <name>classpath.resources</name>
      <description>The resources  that start with the following package name should be load from file system</description>
      <value>locale.portlet</value>
    </values-param>
    <values-param>
      <name>init.resources</name>
      <description>Initiate the following resources during the first launch</description>
      <value>locale.portal.expression</value>
      <value>locale.portal.services</value>
      <value>locale.portal.webui</value>
      <value>locale.portal.custom</value>
      <value>locale.navigation.portal.classic</value>
      <value>locale.navigation.group.platform.administrators</value>
      <value>locale.navigation.group.platform.users</value>
      <value>locale.navigation.group.platform.guests</value>
      <value>locale.navigation.group.organization.management.executive-board</value>
    </values-param>
    <values-param>
      <name>portal.resource.names</name>
      <description>The properties files of  the portal ,  those file will be merged
        into one ResoruceBundle properties </description>
      <value>locale.portal.expression</value>
      <value>locale.portal.services</value>
      <value>locale.portal.webui</value>
      <value>locale.portal.custom</value>
    </values-param>
  </init-params>
</component> | classpath.resources We will talk later about classpath.resources |
| init.resources TODO |
| portal.resource.names Defines all resources that belong to the Portal Resource Bundle. This means that these resources are merged to a single resource bundle which is accessible from anywhere in GateIn products. As mentioned, all these keys are located in the same bundle, which is separated from the navigation resource bundles. |
There is a resource bundle for each navigation. A navigation can exist for user, groups, and portal. In the example above you see bundle definitions for the navigation of the classic portal and of four different groups. Each of these resource bundles lives in a different sphere, they are independent of each other and they do not belong to the portal.resource.names parameter (because they are not mentioned in portal.resource.names).
As you learned in the introduction you must put the properties for a group in the WEB-INF/classes/locale/navigation/group/ folder.
Such as: /WEB-INF/classes/locale/navigation/group/organization/management/executive-board_en.properties
The folder and file names must correspond to the group hierarchy. The group name "executive-board" is followed by the iso 639 code.
For each language you defined in the LocalesConfig you must provide a resource file.
If you ever change the name of a group you also need to change the name of the folder and/or files of the correspondent navigation
resource bundles.
Content of executive-board_en.properties:
organization.title=Organization
organization.newstaff=New Staff
organization.management=Management
This resource bundle is only accessible for the navigation of the organization.management.executive-board group.
classpath.resources
Portlets are independent application and they deliver their own resource files.
All shipped-in portlet resources are located in the locale/portlet subfolder. The ResourceBundleService parameter classpath.resources defines this subfolder.
Let's suppose you want to add a Spanish translation to the GadgetPortlet.
Create the file GadgetPortlet_es.properties in: WEB-INF/classes/locale/portlet/gadget/GadgetPortlet
In portlet.xml, add Spanish as a supported-locale ('es' is the 2 letters code for Spanish), the resource-bundle is already declared and is the same for all languages :
<supported-locale>en</supported-locale>

<supported-locale>es</supported-locale>

<resource-bundle>locale.portlet.gadget.GadgetPortlet</resource-bundle>
See the portlet specification for more details about portlet internationalization.
The portlet specifications defines three standard keys: Title, Short Title and Keywords. Keywords contain a comma-separated list of keywords.
 javax.portlet.title=Breadcrumbs Portlet
 javax.portlet.short-title=Breadcrumbs
 javax.portlet.keywords=Breadcrumbs, Breadcrumb
Whenever you want to display a property in the user language you use its key. Using the below access method the translation is returned in the preferred language for the connected user:
Groovy Template
TODO
Java
WebuiRequestContext context = WebuiRequestContext.getCurrentInstance() ;
ResourceBundle res = context.getApplicationResourceBundle() ;
String translatedString = res.getString(key);
When an application needs to be translated, it is never obvious to find out the right key for a given translated property. When the portal is executed in debug mode it is possible to select among the available languages a special language called Magic locale.
This feature translates a key to the same key value. For instance, the translated value for the key "organization.title" is simply the value "organization.title". Selecting that language allows to use the portal and its applications with all the keys visible and it is easy to find out the correct key for a given label in the portal page.
Usually resource bundles are stored in property files however as property files are plain files it raise issues with the encoding of the file. The XML resource bundle format has been developed to provide an alternative to property files.
The XML format declares the encoding of the file in the XML declaration which avoids to use the native2ascii program and mess with encoding.
Property files use the ISO 8859-1 which does not cover the full unicode charset and language such as Arabic would not be supported natively and require the use of escaping, leading the files to be barely maintainable.
Tooling support for XML files is better than the tooling for Java property files and usually the XML editor cope very well with the file encoding.
In order to be loaded by the portal at runtime (actually the resource bundle service), the name of the file must be the same as a property file but instead of ending with the .properties suffix, it ends with the .xml suffix. For instance AccountPortlet_ar.xml instead of AccountPortlet_ar.properties.
The XML format is very simple and has been developed based on the DRY (Don't Repeat Yourself) principle. Usually resource bundle keys are hierarchically defined and we can leverage the hierarchic nature of the XML for that purpose. Here is an example of turning a property file into an XML resource bundle file:
UIAccountForm.tab.label.AccountInputSet = ...
UIAccountForm.tab.label.UIUserProfileInputSet = ...
UIAccountForm.label.Profile = ...
UIAccountForm.label.HomeInfo= ...
UIAccountForm.label.BusinessInfo= ...
UIAccountForm.label.password= ...
UIAccountForm.label.Confirmpassword= ...
UIAccountForm.label.email= ...
UIAccountForm.action.Reset= ...
<?xml version="1.0" encoding="UTF-8"?>

<bundle>

  <UIAccountForm>

    <tab>

      <label>

        <AccountInputSet>...</AccountInputSet>

        <UIUserProfileInputSet>...</UIUserProfileInputSet>

      </label>

    </tab>

    <label>

      <Profile>...</Profile>

      <HomeInfo>...</HomeInfo>

      <BusinessInfo>...</BusinessInfo>

      <password>...</password>

      <Confirmpassword>...</Confirmpassword>

      <email>...</email>

    </label>

    <action>

      <Reset>...</Reset>

    </action>

  </UIAccountForm>

</bundle>
The traditional way of rendering a portal page is a static one where you need a template, usually a jsp page, for each layout (2 columns, 3 columns and so on). That makes you depend on the integrator or developers as for each new layout you will need to ask for a custom development.
GateIn has a dynamic way which creates a tree of nested UI containers that contain portlets as shown in the picture below. Each container is responsible for rendering its children. In the picture, the main container renders its children in several rows while the nested container displays them as columns.
Furthermore, by manipulating the tree using the WYSIWYG editor, it allows you to create new containers, define how they will render their children, add new portlets.
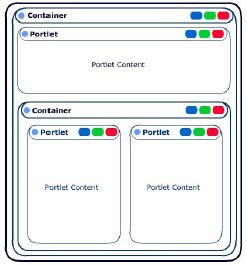
As most portal use the static layout mechanism, they can only drag portlets from one static location, let's say a column, to another one.
With GateIn Portal, it is possible to also drag the UI containers and the portlets and drop them in containers that are deeper or upper in the Portal component tree. This feature is unique and not just a tool!
This kind of communication is made to allow applications within a page to exchange data. This library is made for broadcasting messages on topic. This is basically based on 3 functions : subscribe, publish and unsubscribe.
When you subscribe to a topic, you receive all the subtopic message. for example, if I subscribe to "/eXo/application", and an application send a message on "/eXo/application/map", i will receive it, but if another application send a message on "/eXo", i will not receive it.
When a message is sent on this topic, a popup message appears on the top right of the screen.
The inter application communication library can be found in
01eXoResources.war:/javascript/eXo/core/Topic.js
/**
 * publish is used to publish an event to the other subscribers to the given channels
 * @param {Object} senderId is a string that identify the sender
 * @param {String} topic is the topic that the message will be published
 * @param {Object} message is the message that's going to be delivered to the subscribers to the topic
 */
Topic.prototype.publish = function(/*Object*/ senderId, /*String*/ topicName, /*Object*/ message ) { ... }

/**
 * isSubscribed is used to check if a function receive the events from a topic
 * @param {String} topic The topic.
 * @param {Function} func is the name of the function of obj to call when a message is received on the topic
 */
Topic.prototype.isSubscribed = function(/*String*/ topic, /*Function*/ func) { ... }

/**
 * subscribe is used to subscribe a callback to a topic
 * @param {String} topic is the topic that will be listened
 * @param {Function} func is the name of the function of obj to call when a message is received on the topic
 *
 * func is a function that take a Object in parameter. the event received have this format:
 * {senderId:senderId, message:message, topic: topic}
 *
 */
Topic.prototype.subscribe = function(/*String*/ topic, /*Function*/ func) { ... }

/**
 * unsubscribe is used to unsubscribe a callback to a topic
 * @param {String} topic is the topic
 * @param {Object} id is the id of the listener we want to unsubscribe
 */
Topic.prototype.unsubscribe = function(/*String*/ topic, /*Object*/ id) { ... }

Topic.prototype.initCometdBridge = function() { ... }subscribe is used to subscribe a callback to a topic.
Parameters:
topicis the topic that will be listenedfuncis the name of the function of obj to call when a message is received on the topic. It has to be a function that take an Object in parameter. the event received have this format:{ senderId:senderId, message:message, topic: topic }
publish is used to publish an event to the other subscribers to the given channels.
Parameters:
senderIdis a string that identify the sendertopicNameis the topic that the message will be publishedmessageis the message that's going to be delivered to the subscribers to the topic
unsubscribe is used to unsubscribe a callback to a topic
Parameters:
topicis the topic that will be unsubscribeidis the context object
<%@ taglib uri="http://java.sun.com/portlet" prefix="portlet" %>
<portlet:defineObjects/>
<div>
  <p>
    Received messages:
    <div id="received_<portlet:namespace/>">

    </div>
  </p>

  <p>
    Send message:
    <input type="text" id="msg_<portlet:namespace/>"/> <a href="#" onclick="send_<portlet:namespace/>();">send</a>
  </p>
</div>

<script type="text/javascript">

  Function.prototype.bind = function(object) {
    var method = this;
      return function() {
      method.apply(object, arguments);
    }
  }

  function send_<portlet:namespace/>() {
    var msg = document.getElementById("msg_<portlet:namespace/>").value;
    eXo.core.Topic.publish("<portlet:namespace/>", "/demo", msg);
  }

  function Listener_<portlet:namespace/>(){

  }

  Listener_<portlet:namespace/>.prototype.receiveMsg = function(event) {
    document.getElementById("received_<portlet:namespace/>").innerHTML =
      document.getElementById("received_<portlet:namespace/>").innerHTML + "<br />* " +
      event.senderId + ": " + event.message;
  }

  function init_<portlet:namespace/>() {
    var listener_<portlet:namespace/> = new Listener_<portlet:namespace/>();
    eXo.core.Topic.subscribe("/demo", listener_<portlet:namespace/>.receiveMsg.bind(listener_<portlet:namespace/>));
  }

  init_<portlet:namespace/>();
</script>In this article, you will learn how to :
configure the Upload service
add a default upload size limit
use the Upload component in your application, with a specific upload size limit
clean the service when the upload finishes
The service is defined by the class : org.exoplatform.upload.UploadService;
You can configure it with the following xml code :
<component>

   <type>org.exoplatform.upload.UploadService</type>

     <init-params>

       <value-param>

        <name>upload.limit.size</name>

        <description>Maximum size of the file to upload in MB</description>

        <value>10</value>

      </value-param>

    </init-params>

  </component>
As you can see, you can configure a default upload size limit for the service. The value unit is in MegaBytes. This limit will be used by default by all applications if no specific limit is set. You will see in the next chapter how to set a different limit for your application.
If you set the value at 0, the upload size will be unlimited.
To use the component, you must create an object of type org.exoplatform.webui.form.UIFormUploadInput, using one of the two available constructors :
public UIFormUploadInput(String name, String bindingExpression)
or:
public UIFormUploadInput(String name, String bindingExpression, int limit)
Here is an example using the second form :
PortletRequestContext pcontext = (PortletRequestContext)WebuiRequestContext.getCurrentInstance();

PortletPreferences portletPref = pcontext.getRequest().getPreferences();

int limitMB = Integer.parseInt(portletPref.getValue("uploadFileSizeLimitMB", "").trim());

UIFormUploadInput uiInput = new UIFormUploadInput("upload", "upload", limitMB);
To get the limit from the xml configuration, you can add this piece of code in the files portlet.xml or portlet-preferences.xml :
<preference>

  <name>uploadFileSizeLimitMB</name>

  <value>30</value>

  <read-only>false</read-only>

</preference>
Again, a 0 value means unlimited upload size, and the value unit is set in MegaBytes.
To get the uploaded data use the getUploadDataAsStream() method:
UIFormUploadInput input = (UIFormUploadInput)uiForm.getUIInput("upload");

InputStream inputStream = input.getUploadDataAsStream();

...

jcrData.setValue(inputStream);
Clean the uploaded file
The upload service stores a temporary file on the filesystem during the process. When the upload is finished, you must clean the service in order to :
delete the temporary file
delete the classes used for the upload
To do that, use theremoveUpload() method defined in the upload
service, like this :
UploadService uploadService = uiForm.getApplicationComponent(UploadService.class) ;

UIFormUploadInput uiChild = uiForm.getChild(UIFormUploadInput.class) ;

uploadService.removeUpload(uiChild.getUploadId()) ;
Be sure to get and save the file before you clean the service
In this article, you will learn:
Purpose of ajax-loading mask.
How to deactivate ajax-loading mask.
Synchronous / Asynchronous issue.
Loading mask layer is displayed after ajax-call for blocking GUI to prevent user's action until the the ajax-request is completed.
Sometimes portal needs to be ready for user instructions without waiting previous instructions completed. So mask layer may need to be deactivated.
To generate script to make an asynchronous ajax-call, we use uicomponent.doAsync() method instead of uicomponent.event() method.
Here is an example:
<a href="<%=uicomponent.doAsync(action, beanId, params)%>" alt="">Asynchronous</a>
Method doAsync() automatically adds a parameter into parameters list. Parameter async param = new Parameter(AJAX ASYNC,"true"); (AJAX ASYNC == "ajax async")
After all, its call method event() to generate script that make Ajax Request. This request is asynchronous and ajax-loading mask will not displayed.
Note
You still also make an asynchronous request by using method uicomponent.event(). Using this way, you must add asyncparam manually.
GUI is blocked so that user can do only one action at a time (Request seems to be synchronous). But in fact ajax request always be asynchronous. See Synchronous issue section.
Almost web browser such as (IE, Chrome, Safari .. ) support ajax requests in two modes: Synchronous / Asynchronous with boolean value of bAsyn parameter.
var bAsync = false; // Synchronous
request.open(instance.method, instance.url, bAsync);
But in Mozilla Firefox versions prior to 3.5 it wouldn't support synchronous request.
var bAsync = false; // Synchronous
request.open(instance.method, instance.url, bAsync); // Firefox will not execute
So bAsync is set to always be true (Ajax request to always be asynchronous).
// Asynchronous request
request.open(instance.method, instance.url, true);
As a consequence that Ajax Request will always be asynchronous.
To retrieve the logged in user you can do as follows :
// Alternative context: WebuiRequestContext context = WebuiRequestContext.getCurrentInstance() ;

PortalRequestContext context = PortalRequestContext.getCurrentInstance() ;

// Get the id of the user logged

String userId = context.getRemoteUser();

// Request the information from OrganizationService:

OrganizationService orgService = getApplicationComponent(OrganizationService.class) ;

if (userId != null)

  {

  User user = orgService.getUserHandler().findUserByName(userId) ;

  if (user != null)

  {

    String firstName = user.getFirstName();

    String lastName = user.getLastName();

    String email = user.getEmail();

  }

}
Alternatives for retrieving the Organization Service
OrganizationService service = (OrganizationService)

   ExoContainerContext.getCurrentContainer().getComponentInstanceOfType(OrganizationService.class);
OrganizationService service = (OrganizationService)
PortalContainer.getInstance().getComponentInstanceOfType(OrganizationService.class);