WebUI is the name of 's webframework.
Using a self-contained framework ensures that the portal's architecture does not interfere with other web technologies deployed by the portlets.
Using a particular technology raises potential difficulties for users with a differing version (either newer or older) of the same technology.
The WebUI framework is a component tree based framework. The key aspects of WebUI are :
Events based flow.
Components configuration by annotation
Section 6.3, “Groovy Templates” for rendering
Section 6.2, “AJAX Framework” support
Portlet API friendly.
Section 6.4, “Portlet Lifecycle”: portlets are built with WebUI
Section 6.4, “Portlet Lifecycle”: portal itself is a WebUI application
Section 6.6, “Create a WebUI Portlet”: Learn how to write your own app with WebUI
Ajax calls are easily managed in 's framework. Lines can be added to the relevant template file and java class. A simple Ajax update of a component does not require any JavaScript code to be written.
portlets can use specific ActionListeners to receive and process Ajax calls. To set a portlet up to recieve Ajax calls, follow this procedure:
Create an inner static class named with the following convention:
action namefollowed byActionListener.Example :
ParentClassis the class being wrtitten in.static public class SaveActionListener extends EventListener<ParentClass>
Declare this listener in the configuration of the portlet:
listeners = ParentClass.SaveActionListener.class
Add the correct annotation
ComponentConfig,EventConfig, etc.For example; the configuration below is for
UIAccountForm:...
@ComponentConfig(
lifecycle = UIFormLifecycle.class,
template = "system:/groovy/webui/form/UIFormTabPane.gtmpl",
initParams = {
@ParamConfig(
name = "AccountTemplateConfigOption",
value = "app:/WEB-INF/conf/uiconf/account/webui/component/model/AccountTemplateConfigOption.groovy"
),
@ParamConfig(
name = "help.UIAccountFormQuickHelp",
value = "app:/WEB-INF/conf/uiconf/account/webui/component/model/UIAccountFormQuickHelp.xhtml"
)
},
events = {
@EventConfig(listeners = UIAccountForm.SaveActionListener.class ),
@EventConfig(listeners = UIAccountForm.ResetActionListener.class, phase = Phase.DECODE),
@EventConfig(listeners = UIAccountForm.SearchUserActionListener.class, phase = Phase.DECODE)
}
)
...Create an
executemethod inside this class:public void execute(Event<ParentClass> event) throws Exception
This method is called every time the listener gets an event from the client. Hence you can process this event in it, using the even attribute. Use it to get parameters from a form in your client, to modify the status of your portlet, etc.,
Possible ways to use the event attribute :
String value = event.getRequestContext().getRequestParameter("name"); // to get a value from a form
ParentClass parent = event.getSource(); // to get the parent object (the portlet that threw and caugth the event)
UIMyComponent portal = parent.getAncestorOfType(UIMyComponent.class); // to get any node in the hierarchy of UIComponents
If your action has to update an element on your client's interface, you must call addUIComponentToUpdateByAjax() at the end of the
executemethod:event.getRequestContext().addUIComponentToUpdateByAjax(uicomponent);
The target component must be provided as parameter (the component that will be updated). We will come back on this later.
You must create one inner action listener class for each Ajax call you want to handle on this portlet. All these classes must be declared in the configuration annotations of the main class, otherwise you will get an error.
Done. Your portlet is ready to accept Ajax calls from your client.
Once the server is configured to receive Ajax calls, you must configure the client interface to make these calls.
Add the following code to the groovy template file associated with the appropriate portlet class (
ParentClasshere):uicomponent.event("YourOperation");YourOperationis the same as in theActionListenerclass (save in our example above).The event function will create an url starting with
javascript:. Make sure this code can be executed in the environment where the portal is running.If your operation must update the content of a component, make sure that the target component is well rendered. The following is recommended:
uicomponent.renderChild(UITargetComponent.class) ;
The
uicomponentmust be of theUITargetComponenttype as the component class;event.getRequestContext().addUIComponentToUpdateByAjax(uicomponent) ;
will be updated when
UITargetComponentis called.If this component is not rendered by default, set its
renderedattribute (in the constructor of the portlet) to false when the portlet loads:mycomponent.setRendered(false);
All javascript in is managed by the file 02eXoresources:javascript/eXo/portal/PortalHttpRequest.js.
In this class, there are four functions/classes:
PortletResponse
PortalResponse
AjaxRequest
HttpResponseHandler
and 6 functions:
- ajaxGet(url, callback)
This is the main entry method for every Ajax calls to the portal It is simply a dispatcher method that completes some
initfields before calling thedoRequest()method.- ajaxPost(formElement, callback)
This method is called instead of an
HTTP POSTwhen, in an AJAX case, some manipulations are needed. Once the content of the form is placed into a string object, the call is delegated to thedoRequest()method- doRequest(method, url, queryString, callback)
The
doRequest()method takes incoming request fromajaxGetandajaxPostcalls. The second argument is the URL to target on the server The third argument is the query string object which is created out of a form element, this value is null except when there is a POST request.An
AjaxRequestobject is instantiated. It holds the reference to the XHR method.An
HttpResponseHandlerobject is instantiated and its methods (ajaxResponse,ajaxLoading,ajaxTimeout) are associated with the one from theAjaxRequestand will be called by the XHR during the process method.
- ajaxAbort()
Cancels the current request.
- ajaxAsyncGetRequest(url, async)
Allows to create and execute a sync or async GET request.
- ajaxRedirect(url)
A simple javascript redirection with
window.location.hrefthat are the entry points of these classes. These functions need not be called explicitly, as the template file and the portlet class manage everything.
This class doesn't contain any methods. On creation, it retrieves the response elements from the xml returned by Ajax, and stores them in the corresponding attributes :
- portletId
The component ID.
- portletTitle
The component title.
- portletMode
The mode the component runs in. The options are: View, Edit, Help or Config.
- portletState
The processing state of the component. The options are: Decode, Render.
- portletData
The updated data to put in the component.
- script
The javascript code to update the component.
- blocksToUpdate
An array containing the containers to update with this script.
Attributes can be accessed by calling them from the PortletResponse instance.
This is an array of PortletResponses (portletResponses) and two other attributes:
- data
Data to update.
- script
Javascript code to update.
By far the most important class of this file. It makes the XMLHttpRequest object easier to use by wrapping it with functions and attributes. You can find further documentation on this class here.
This class provides methods to handle the Ajax response.
- executeScript
Used to execute javascript code.
- updateBlocks
Updates
htmlcomponents.- ajaxTimeout
This function is called when the timeout of the ajax call exceeds its set limit.
- ajaxResponse
This function creates a
PortalResponseobject from the data in the Ajax request.- ajaxLoading
This function shows the loading pop-up and mask layer.
Portal Ajax Response Data Structure:
{PortalResponse}
  |
  |--->{PortletResponse}
  |
  |--->{PortletResponse}
  |          |-->{portletId}
  |          |-->{portletTitle}
  |          |-->{portletMode}
  |          |-->{portletState}
  |          |
  |          |-->{Data}
  |          |      |
  |          |      |--->{BlockToUpdate}
  |          |      |         |-->{blockId}
  |          |      |         |-->{data}
  |          |      |
  |          |      |--->{BlockToUpdate}
  |          |--->{Script}
  |
  |--->{Data}
  |      |
  |      |--->{BlockToUpdate}
  |      |         |-->{blockId}
  |      |         |-->{data}
  |      |
  |      |--->{BlockToUpdate}
  |--->{Script}
If there are several actions that need to appear in a pop-up, the following technique can be used to manage the different pop-up windows:
Create a
UIPopupActionin the main portlet class:addChild(UIPopupAction.class, null, null);
Render this action in your template file:
uicomponent.renderChild(UIPopupAction.class) ;
(This creates an empty container (pop-up) that will receive the new content by Ajax)
Put this component in your action listener class and update its content:
UIPopupAction uiPopupAction = uiMainPortlet.getChild(UIPopupAction.class) ;
uiPopupAction.activate(UIReferencesList.class, 600) ;
UIReferenceListis the component that will appear in the pop-up. It does not have to declared in the main portlet class.The activate method creates the component and its rendering in the pop-up window.
Allow this component to be updated by Ajax:
event.getRequestContext().addUIComponentToUpdateByAjax(uiPopupAction) ;
Add an action listener class (and repeat the steps above with the appropriate component type) for each component required to appear in a pop-up window .
In addition to the content in this chapter, refer also to Section 6.2, “AJAX Framework” in order to better understand the communication between the Groovy Template and the portlet.
The structure of a template is quite simple. It consists of only two elements:
The HTML code and;
zero or more groovy language code blocks, enclosed by <% ... %> enclosures.
The HTML code in the template doesn't have to contain the html, or body tags. This allows groovy templates for one component to also be rendered in another component.
For example:
<!DOCTYPE html
    PUBLIC "-//W3C//DTD XHTML 1.0 Strict//EN"
           "http://www.w3.org/TR/xhtml1/DTD/xhtml1-strict.dtd">
<%
  import org.exoplatform.webui.core.UIComponent;
  def currentPage = uicomponent.getCurrentPage();
  ...
%>
  ...
  <div class="$uicomponent.skin" id="UIPortalApplication">
    <%uicomponent.renderChildren();%>
  </div>
Groovy is a scripting language for Java. Some usage examples are included in this section, however further information is available at http://groovy.codehaus.org/Documentation .
Some examples of Groovy
- Variables definition
int min = 1;
def totalPage = uicomponent.getAvailablePage();
String name = "uiPortlet";
categories = uicomponent.getItemCategories();
String columns = uicomponent.getColumns();
- Other expressions
for(category in categories) { ... }
for(i in min..max) { ... } // min and max are int variables
println "</div>" ;
println """
  <div class="Item">
    <div class="OverflowContainer">
""";
<%=uicomponent.getToolbarStyle();%> // <%= to avoid a call of println method
import org.exoplatform.portal.config.model.PageNode;
The configuration of a portlet is partly made with ComponentConfig annotations (others are ComponentConfigs, EventConfig, etc).
One of the parameters of this annotation is template. This is where the path to the template file associated with this portlet is defined.
To specify this parameter, add this statement to the configuration annotation.
For example, in src:/portlet/exoadmin/src/main/java/org/exoplatform/applicationregistry/webui/component/ is the UIApplicationForm.java file:
@ComponentConfig(
  lifecycle = UIFormLifecycle.class,
  template =  "system:/groovy/webui/form/UIFormWithTitle.gtmpl",
  events = {
    @EventConfig(listeners = UIApplicationForm.SaveActionListener.class),
    @EventConfig(phase = Phase.DECODE, listeners = UIApplicationForm.CancelActionListener.class)
  }
)
The path is in the "system" namespace. This is a reference to the portal webapp.
This webapp contains reusable groovy templates in the folder; src:/web/portal/src/main/webapp/groovy/webui/form/ .
Use the following steps to create a new template;
Create a groovy file in the appropriate webbapp and refer to it.
Use the namespace "app" for refering to the same webapp as the component.
stores the component templates in a folder that follows this placement convention: "
/webapp/groovy/".your_portlet_name/webui/componenttemplate = "app:/groovy/your_portlet_name/webui/component/your_component.gtmpl"
Edit the template file according to the information in the Section 6.3.3.2, “The template file”.
Component template files are composed in HTML code and groovy code blocks. There are a few things more that you need to know to fully link your portlet with your template.
To successfully link a portlet with a template, please ensure the following:
If the template defines the UI of a component, use the java object variable
uicomponentto access this component instance.This should be the case in most instances, but it is recommended that the java class inherits from
UIComponentare checked before this variable is used.Using the
uicomponentvariable, you can access all the attributes and functions of a component to use them in your template.Take, for example
UIPageIterator.gtmpl:<% def currentPage = uicomponent.getCurrentPage(); %> ... <a href="<%=uicomponent.event("ShowPage","$currentPage")%>" class="Icon LastTopPageIcon"> <span></span> </a>The following example shows how
uicomponentcan be used to make Ajax calls using theeventmethod. See Section 6.2, “AJAX Framework” for more details.Another variable available is
ctx. This variable gives access to the context in which the template is processed.Use this variable to retrieve elements such as; the request, the Javscript manager or the resource resolver (
ctx.appRes).Some usage examples are:
<%
  def rcontext = ctx.getRequestContext() ;
  context.getJavascriptManager().importJavascript('GateIn.webui.UIPopupWindow');
  ctx.appRes(popupId + ".title."+ title);
%>
If the template defines the user interface of a component that includes a form use an instance of
UIFormin a variable nameduiform.The
UIFormclass provides the methodsbegin()andend()which write the HTML tags of the form.The form class must inherit from
UIForm. In this class add the input elements (fields, checkboxes, lists) which are required in the form.Render the input elements in the groovy template using
uiform.renderField(field).
This chapter does not to refer to the Portlet API specification lifecycle but focuses on the UI framework.
This web framework has been developed specifically for and, while it is not necessary to use the native web framework to build portlets, all portlets packaged with are developed using this framework.
This consistency allows portlets to use several UI components that can be used in different abstracted contexts (such as the portal itself or some portlets).
Recommended Reading
This chapter is intended for advanced developers. It covers code implementation and logic. It is not a tutorial on how to write portlets.
Refer to Section 5.1, “Portal Lifecycle” for information on concepts that are similar and top hierarchy classes that are shared.
The main entry point for configuring a portlet is in the portlet.xml file located in the portlet application WAR.
Each portlet built using the web framework must reference the PortletApplicationController .
The portlet configuration (such as the root component) is defined in configuration.xml. The path to this file is defined in the init-param "webui.configuration" of portlet.xml.
<portlet>
  <description xml:lang="EN">Content Portlet</description>
  <portlet-name>ContentPortlet</portlet-name>
  <display-name xml:lang="EN">Content Portlet</display-name>
  <portlet-class>org.exoplatform.webui.application.portlet.PortletApplicationController</portlet-class>

  <init-param>
    <name>webui.configuration</name>
    <value>/WEB-INF/conf/portlet/content/ContentPortlet/webui/configuration.xml</value>
  </init-param>
</portlet>
The structure of the configuration.xml file is exactly the same as the webui-configuration.xml which was introduced in Section 5.1, “Portal Lifecycle”.
In the case of the content portlet it is formatted as:
<webui-configuration>
  <application>
    <ui-component-root>org.exoplatform.content.webui.component.UIContentPortlet</ui-component-root>
    <state-manager>org.exoplatform.webui.application.portlet.ParentAppStateManager</state-manager>
  </application>
</webui-configuration>
The PortletApplicationController class extends the GenericPortlet class defined in the Portlet API specification.
All methods (like processAction() or render()) are delegated to the PortletApplication. The creation and caching inside the WebController object is shown in the example below:
/**
 * try to obtain the PortletApplication from the WebAppController.
 *
 * If it does not exist a new PortletApplication object is created, init and cached in the
 * controller
 */
private PortletApplication getPortletApplication() throws Exception {
  PortalContainer container = PortalContainer.getInstance() ;
  WebAppController controller =
    (WebAppController)container.getComponentInstanceOfType(WebAppController.class) ;
  PortletApplication application = controller.getApplication(applicationId_) ;
  if(application == null) {
    application = new PortletApplication(getPortletConfig()) ;
    application.onInit() ;
    controller.addApplication(application) ;
  }
  return application ;
}
When a portlet using the native web framework is deployed in , all methods calls go through the PortletApplication object which extends the WebuiApplication.
The code of the method in PortletApplication is described below. The business logic is shown in the javadoc:
/**
 * The processAction() method is the one modelled according to the Portlet API specification
 *
 * The process is quite simple and here are te different steps done in the method:
 *
 * 1) The current instance of the WebuiRequestContext (stored in a ThreadLocal in the class) is referenced
 * 2) A new request context of type PortletRequestContext (which extends the class WebuiRequestContext) is
 *    created as a child of the current context instance
 * 3) The new context is place inside the ThreadLocal and hence overides its parent one there,
 *    only for the portlet request lifeciclye
 * 4) The method onStartRequest() is called in all the ApplicationLifecycle objects referenced in the webui
 *    configuration XML file
 * 5) The StateManager object (in case of portlet it is an object of type ParentAppStateManager) is used to get the RootComponent
 *    also referenced in the XML configuration file
 * 6) The methods processDecode(UIApplication, WebuiRequestContext) and processAction(UIApplication, WebuiRequestContext)
 *     are then called
 * 7) Finally, a flag, to tell that the processAction phase was done, in the context is set to true and the parent
 *    context is restored in the Threadlocal
 */
public void processAction(ActionRequest req, ActionResponse res) throws Exception {
  WebuiRequestContext parentAppRequestContext =  WebuiRequestContext.getCurrentInstance() ;
  PortletRequestContext context = createRequestContext(req, res, parentAppRequestContext)  ;
  WebuiRequestContext.setCurrentInstance(context) ;
  try {
    for(ApplicationLifecycle lifecycle : getApplicationLifecycle())  {
      lifecycle.onStartRequest(this, context) ;
    }
    UIApplication uiApp = getStateManager().restoreUIRootComponent(context) ;
    context.setUIApplication(uiApp) ;
    processDecode(uiApp, context) ;
    if(!images/context.isResponseComplete() &&!images/ context.getProcessRender()) {
      processAction(uiApp, context) ;
    }
  } finally {
    context.setProcessAction(true) ;
    WebuiRequestContext.setCurrentInstance(parentAppRequestContext) ;
  }
}
The PortletRequestContext extends the WebuiRequestContext class and acts as a wrapper on all the portlet request information:
/**
 * In this method we try to get the PortletRequestContext object from the attribute map of the parent
 * WebuiRequestContext.
 *
 * If it is not cached then we create a new instance, if it is cached then we init it with the correct
 * writer, request and response objects
 *
 * We finally cache it in the parent attribute map
 *
 */
private PortletRequestContext createRequestContext(PortletRequest req, PortletResponse res,
                                                  WebuiRequestContext parentAppRequestContext) throws IOException {
  String attributeName = getApplicationId() + "$PortletRequest" ;
  PortletRequestContext context =
    (PortletRequestContext) parentAppRequestContext.getAttribute(attributeName) ;
  Writer w  = null ;
  if(res instanceof  RenderResponse){
    RenderResponse renderRes = (RenderResponse)res;
    renderRes.setContentType("text/html; charset=UTF-8");
    w = renderRes.getWriter() ;
  }
  if(context!images/= null) {
    context.init(w, req, res) ;
  } else {
    context =  new PortletRequestContext(this, w, req, res) ;
    parentAppRequestContext.setAttribute(attributeName, context) ;
  }
  context.setParentAppRequestContext(parentAppRequestContext) ;
  return context;
}
In the PortletApplication, the line;
UIApplication uiApp = getStateManager().restoreUIRootComponent(context);
asks the StateManager defined for the portlet to get the UI root component. In the case of a portlet the root component must extend UIPortletApplication.
public class ParentAppStateManager extends StateManager {

  /**
   * This method simply delegate the call to the same method of the parent WebuiRequestContext
   */
  @SuppressWarnings("unchecked")
  public UIApplication restoreUIRootComponent(WebuiRequestContext context) throws Exception {
    WebuiRequestContext pcontext = (WebuiRequestContext)  context.getParentAppRequestContext() ;
    return pcontext.getStateManager().restoreUIRootComponent(context) ;
  }
Hence this is the PortalStateManager that will also handle the extraction of the root component.
public UIApplication restoreUIRootComponent(WebuiRequestContext context) throws Exception {
  context.setStateManager(this) ;
  WebuiApplication app  = (WebuiApplication)context.getApplication() ;

  /*
   * If the request context is of type PortletRequestContext, we extract the parent context which will
   * allow to get access to the PortalApplicationState object thanks to the session id used as the key for the
   * syncronised Map uiApplications
   */
  if(context instanceof PortletRequestContext) {
    WebuiRequestContext preqContext = (WebuiRequestContext) context.getParentAppRequestContext() ;
    PortalApplicationState state = uiApplications.get(preqContext.getSessionId()) ;
    PortletRequestContext pcontext = (PortletRequestContext) context ;
    String key =  pcontext.getApplication().getApplicationId() ;
    UIApplication uiApplication =  state.get(key) ;
    if(uiApplication!images/= null)  return uiApplication;
    synchronized(uiApplications) {
      ConfigurationManager cmanager = app.getConfigurationManager() ;
      String uirootClass = cmanager.getApplication().getUIRootComponent() ;
      Class type = Thread.currentThread().getContextClassLoader().loadClass(uirootClass) ;
      uiApplication = (UIApplication)app.createUIComponent(type, null, null, context) ;
      state.put(key, uiApplication) ;
    }
    return uiApplication ;
  }
}
The render method business logic is quite similar to processAction().
/**
 * The render method business logic is quite similar to the processAction() one.
 *
 * 1) A PortletRequestContext object is created (or extracted from the cache if it already exists)
 *    and initialized
 * 2) The PortletRequestContext replaces the parent one in the WebuiRequestContext ThreadLocal object
 * 3) If the portal has already called the portlet processAction() then the call to all onStartRequest of
 *    the ApplicationLifecycle has already been made, otherwise we call them
 * 4) The ParentStateManager is also used to get the UIApplication, as we have seen it delegates the call
 *    to the PortalStateManager which caches the UI component root associated with the current application
 * 5) the processRender() method of the UIPortletApplucaton is called
 * 6) Finally, the method onEndRequest() is called on every ApplicationLifecycle referenced in the portlet
 *    configuration XML file and the parent WebuiRequestContext is restored
 *
 */
public  void render(RenderRequest req,  RenderResponse res) throws Exception {
  WebuiRequestContext parentAppRequestContext =  WebuiRequestContext.getCurrentInstance() ;
  PortletRequestContext context = createRequestContext(req, res, parentAppRequestContext)  ;
  WebuiRequestContext.setCurrentInstance(context) ;
  try {
    if(!context.hasProcessAction()) {
      for(ApplicationLifecycle lifecycle : getApplicationLifecycle())  {
        lifecycle.onStartRequest(this, context) ;
      }
    }
    UIApplication uiApp =  getStateManager().restoreUIRootComponent(context) ;
    context.setUIApplication(uiApp) ;
    if(!context.isResponseComplete()) {
      UIPortletApplication uiPortletApp = (UIPortletApplication)uiApp;
      uiPortletApp.processRender(this, context) ;
    }
    uiApp.setLastAccessApplication(System.currentTimeMillis()) ;
  } finally {
    try {
      for(ApplicationLifecycle lifecycle :  getApplicationLifecycle()) {
        lifecycle.onEndRequest(this, context) ;
      }
    } catch (Exception exception){
  	log.error("Error while trying to call onEndRequest of the portlet ApplicationLifecycle",
  		exception);
    }
    WebuiRequestContext.setCurrentInstance(parentAppRequestContext) ;
  }
}
The following is the processRender() call made on the UIPortletApplication:
/**
 * The default processRender for an UIPortletApplication handles two cases:
 *
 *   A. Ajax is used
 *   ----
 *     If Ajax is used and that the entire portal should not be re rendered, then an AJAX fragment is
 *     generated with information such as the portlet id, the portlet title, the portlet modes, the window
 *     states as well as the HTML for the block to render
 *
 *   B. A full render is made
 *   ----
 *      a simple call to the method super.processRender(context) which will delegate the call to all the
 *      Lifecycle components
 *
 */
public void  processRender(WebuiApplication app, WebuiRequestContext context) throws Exception {
  WebuiRequestContext pContext = (WebuiRequestContext)context.getParentAppRequestContext();
  if(context.useAjax() &&!images/pContext.getFullRender()) {
    Writer w =  context.getWriter() ;

    Set<UIComponent> list = context.getUIComponentToUpdateByAjax() ;
    if(list!images/= null) {
      if(getUIPopupMessages().hasMessage()) context.addUIComponentToUpdateByAjax(getUIPopupMessages()) ;
      for(UIComponent uicomponent : list) {
        renderBlockToUpdate(uicomponent, context, w) ;
      }
      return ;
    }
  }
  super.processRender(context) ;
}
The Java Community Process (JCP) uses Java Specification Requests (JSRs) to define proposed specifications and technologies designed for the Java platform.
The Portlet Specifications aim at defining portlets that can be used by any JSR-168 (Portlet 1.0) or JSR-286 (Portlet 2.0) portlet container.
Most Java EE (Enterprise Edition) portals include at least one compliant portlet container, and is no exception. In fact, includes a container that supports both versions.
This chapter gives a brief overview of the Portlet Specifications but portlet developers are strongly encouraged to read the JSR-286 Portlet Specification .
is fully JSR-286 compliant. Any JSR-168 or JSR-286 portlet operates as it is mandated by the respective specifications inside the portal.
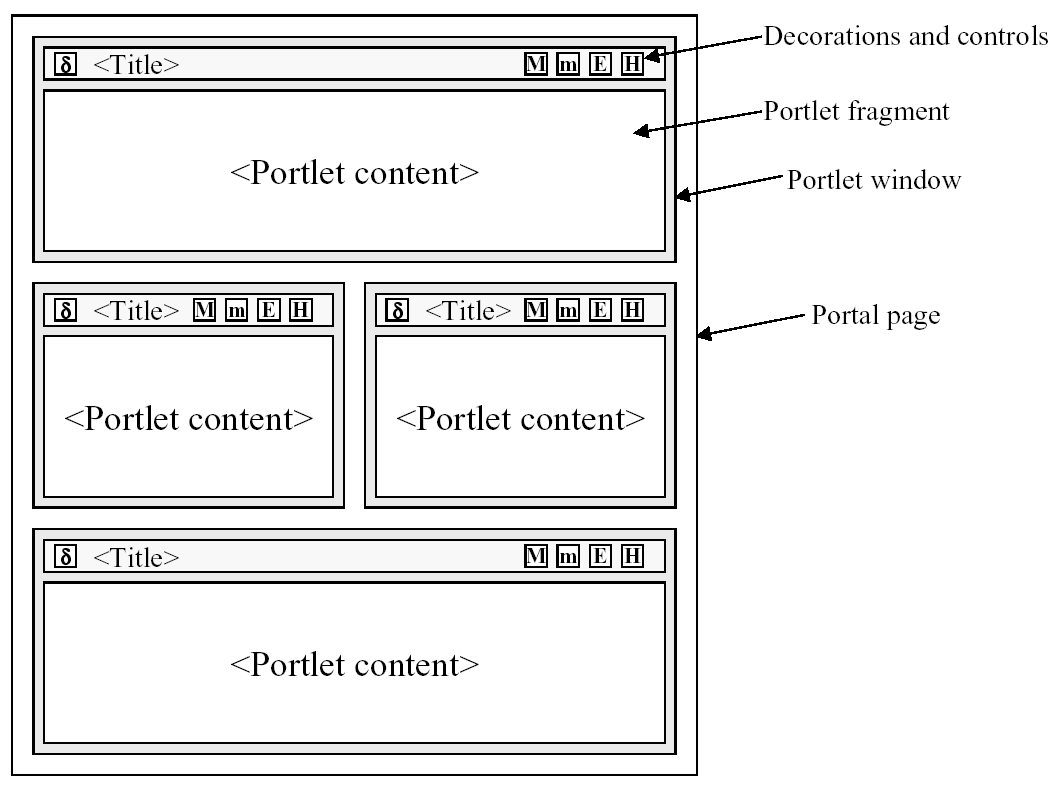
A portal can be considered as a series of web pages with different areas within them. Those areas contain different windows and each window contains portlet:
The diagram below visually represents this nesting:
A portlet can have different view modes. Three modes are defined by the JSR-286 specification:
- View
Generates markup reflecting the current state of the portlet.
- Edit
Allows a user to customize the behavior of the portlet.
- Help
Provides information to the user as to how to use the portlet.
Window states are an indicator of how much page space a portlet consumes on any given page. The three states defined by the JSR-168 specification are:
- Normal
A portlet shares this page with other portlets.
- Minimized
A portlet may show very little information, or none at all.
- Maximized
A portlet may be the only portlet displayed on this page.
The tutorials contained in this chapter are targeted toward portlet developers. It is also recommend that developers read and understand the JSR-286 Portlet Specification .
Maven
This example is using Maven to compile and build the web archive. Maven versions can be downloaded from maven.apache.org
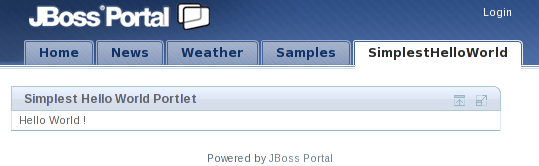
This section describes how to deploy a portlet in . A sample portlet called SimplestHelloWorld is located in the examples directory at the root of your binary package. This sample is used in the following examples.
To compile and package the application:
Navigate to the
SimplestHelloWorlddirectory and execute:mvn package
If the compile is successfully packaged the result will be available in:
SimplestHelloWorld/target/SimplestHelloWorld-0.0.1.war.Copy the package file into
JBOSS_HOME/server/default/deploy.Start JBoss Application Server (if it is not already running).
Create a new portal page and add the portlet to it.
Like other Java EE applications, portlets are packaged in WAR files. A typical portlet WAR file can include servlets, resource bundles, images, HTML, JavaServer Pages (JSP), and other static or dynamic files.
The following is an example of the directory structure of the SimplestHelloWorld portlet:
|-- SimplestHelloWorld-0.0.1.war | `-- WEB-INF | |-- classes | | `-- org | | `-- gatein | | `-- portal | | `-- examples | | `-- portlets | |`-- SimplestHelloWorldPortlet.class | |-- po
rtlet.xml | `-- we
b.xml
| The compiled Java class implementing javax.portlet.Portlet (through javax.portlet.GenericPortlet ) |
| This is the mandatory descriptor files for portlets. It is used during deployment.. |
| This is the mandatory descriptor for web applications. |
Below is the SimplestHelloWorldPortlet/src/main/java/org/gatein/portal/examples/portlets/SimplestHelloWorldPortlet.java Java source:
package org.gatein.portal.examples.portlets;
import java.io.IOException;
import java.io.PrintWriter;
import javax.portlet.GenericPortlet;
import javax.portlet.RenderRequest;
import javax.portlet.RenderResponse;
{
public void doView(RenderRequest request,
{writer.write("Hello World !");
writer.close();
}
}
|
All portlets must implement the
The
|
|
If only the |
| Use the RenderResponse to obtain a writer to be used to produce content. |
| Write the markup to display. |
| Closing the writer. |
Markup Fragments
Portlets are responsible for generating markup fragments, as they are included on a page and are surrounded by other portlets. This means that a portlet outputting HTML must not output any markup that cannot be found in a <body> element.
requires certain descriptors to be included in a portlet WAR file. These descriptors are defined by the Jave EE (web.xml) and Portlet Specification (portlet.xml).
Below is an example of the SimplestHelloWorldPortlet/WEB-INF/portlet.xml file. This file must adhere to its definition in the JSR-286 Portlet Specification. More than one portlet application may be defined in this file:
<portlet-app xmlns="http://java.sun.com/xml/ns/portlet/portlet-app_2_0.xsd"
   xmlns:xsi="http://www.w3.org/2001/XMLSchema-instance"
   xsi:schemaLocation="http://java.sun.com/xml/ns/portlet/portlet-app_2_0.xsd
                                         http://java.sun.com/xml/ns/portlet/portlet-app_2_0.xsd"
   version="2.0">
   <portlet>
      <portlet-name>SimplestHelloWorldPortlet</portlet-name>
      <portlet-class>
         org.gatein.portal.examples.portlets.SimplestHelloWorldPortlet
      </portlet-class>
      <supports>
        <mime-type>text/html</mime-type>
      </supports>
      <portlet-info>
          <title>Simplest Hello World Portlet</title>
      </portlet-info>
   </portlet>
</portlet-app>
| Define the portlet name. It does not have to be the class name. |
|
The Fully Qualified Name ( |
|
The The declared MIME types must match the capability of the portlet. It allows administrators to pair which modes and window states are supported for each markup type.
This does not have to be declared as all portlets must support the
Use the |
|
When rendered, the portlet's title is displayed as the header in the portlet window, unless it is overridden programmatically. In the example above the title would be |
This section discusses:
Adding more features to the previous example.
Using a JSP page to render the markup.
Using the portlet tag library to generate links to the portlet in different ways.
Using the other standard portlet modes.
The example used in this section can be found in the
JSPHelloUserdirectory.Execute
mvn packagein this directory.Copy
JSPHelloUser/target/JSPHelloUser-0.0.1.warto thedeploydirectory of JBoss Application Server.Select the new
JSPHelloUsertab in your portal.
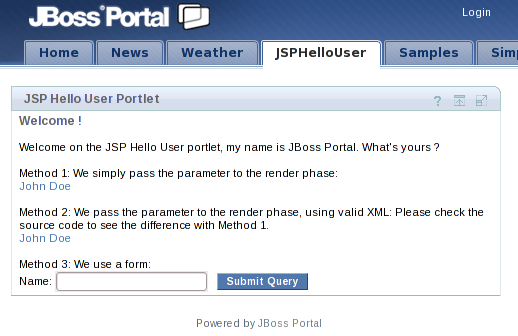
Note
The EDIT button only appears with logged-in users, which is not the case in the screenshot.
The package structure in this tutorial does not differ greatly from the previous example, with the exception of adding some JSP files detailed later.
The JSPHelloUser portlet contains the mandatory portlet application descriptors. The following is an example of the directory structure of the JSPHelloUser portlet:
JSPHelloUser-0.0.1.war
    |-- META-INF
    |   |-- MANIFEST.MF
    |-- WEB-INF
    |   |-- classes
    |   |   `-- org
    |   |       `-- gatein
    |   |           `-- portal
    |   |               `-- examples
    |   |                   `-- portlets
    |   |                       `-- JSPHelloUserPortlet.class
    |   |-- portlet.xml
    |   `-- web.xml
    `-- jsp
        |-- edit.jsp
        |-- hello.jsp
        |-- help.jsp
        `-- welcome.jsp
The code below is from the JSPHelloUser/src/main/java/org/gatein/portal/examples/portlets/JSPHelloUserPortlet.java Java source. It is split in different pieces.
package org.gatein.portal.examples.portlets;
import java.io.IOException;
import javax.portlet.ActionRequest;
import javax.portlet.ActionResponse;
import javax.portlet.GenericPortlet;
import javax.portlet.PortletException;
import javax.portlet.PortletRequestDispatcher;
import javax.portlet.RenderRequest;
import javax.portlet.RenderResponse;
import javax.portlet.UnavailableException;
public class JSPHelloUserPortlet extends GenericPortlet
{
public void doView(RenderRequest request, RenderResponse response)
{
String sYourName = (String) request.getParameter("yourname");
{
request.setAttribute("yourname", sYourName);
PortletRequestDispatcher prd =
}
else
{
PortletRequestDispatcher prd = getPortletContext().getRequestDispatcher("/jsp/welcome.jsp");
prd.include(request, response);
}
}
...
| Override the doView method (as in the first tutorial). |
|
This entry attempts to obtain the value of the render parameter named |
| Get a request dispatcher on a file located within the web archive. |
| Perform the inclusion of the markup obtained from the JSP. |
As well as the VIEW portlet mode, the specification defines two other modes; EDIT and HELP.
These modes need to be defined in the portlet.xml descriptor. This will enable the corresponding buttons on the portlet's window.
The generic portlet that is inherited dispatches the different views to the methods: doView , doHelp and doEdit.
...

   protected void doHelp(RenderRequest rRequest, RenderResponse rResponse) throws PortletException, IOException,

         UnavailableException

   {

      rResponse.setContentType("text/html");

      PortletRequestDispatcher prd = getPortletContext().getRequestDispatcher("/jsp/help.jsp");

      prd.include(rRequest, rResponse);

   }


   protected void doEdit(RenderRequest rRequest, RenderResponse rResponse) throws PortletException, IOException,

         UnavailableException

   {

      rResponse.setContentType("text/html");

      PortletRequestDispatcher prd = getPortletContext().getRequestDispatcher("/jsp/edit.jsp");

      prd.include(rRequest, rResponse);

   }

...
Portlet calls happen in one or two phases. One when the portlet is rendered and two when the portlet is actioned then rendered.
An action phase is a phase where some state changes. The render phase will have access to render parameters that will be passed each time the portlet is refreshed (with the exception of caching capabilities).
The code to be executed during an action has to be implemented in the processAction method of the portlet.
...
UnavailableException
{
}
...
|
|
| Here the parameter is retrieved through an action URL . |
|
The value of |
The help.jsp and edit.jsp files are very simple. Note that CSS styles are used as defined in the portlet specification. This ensures that the portlet will render well within the theme and across portal vendors.
<div class="portlet-section-header">Help mode</div>

<div class="portlet-section-body">This is the help mode, a convenient place to give the user some help information.</div>
<div class="portlet-section-header">Edit mode</div>

<div class="portlet-section-body">This is the edit mode, a convenient place to let the user change his portlet preferences.</div>
The landing page contains the links and form to call our portlet:
<%@ taglib uri<%= myActionURL %>" method="POST"> <span class="portlet-form-field-label">Name:</span> <input class="portlet-form-input-field" type="text" name="yourname"/> <input class="portlet-form-button" type="Submit"/> </form> </div>
| The portlet taglib, needs to be declared. |
|
The first method showed here is the simplest one. |
|
In this method the |
|
The variable |
| The third method mixes form submission and action request. Again, a temporary variable is used to put the created URL into. |
| The action URL is used in HTML form. |
In the third method the action phase is triggered first then the render phase is triggered, which outputs some content back to the web browser based on the available render parameters.

In order to write a portlet using JSF a 'bridge' is needed. This software allows developers to write a portlet application as if it was a JSF application. The bridge then negotiates the interactions between the two layers.
An example of the JBoss Portlet Bridge is available in examples/JSFHelloUser. The configuration is slightly different from a JSP application. This example can be used as a base to configure instead of creating a new application.
As in any JSF application, the file faces-config.xml is required. It must contain the following information:
<faces-config>

...

    <application>

      <view-handler>org.jboss.portletbridge.application.PortletViewHandler</view-handler>

      <state-manager>org.jboss.portletbridge.application.PortletStateManager</state-manager>

   </application>

...

</faces-config>
The portlet bridge libraries must be available and are usually bundled with the WEB-INF/lib directory of the web archive.
The other difference compare to a regular portlet application, can be found in the portlet descriptor. All details about it can be found in the JSR-301 specification that the JBoss Portlet Bridge implements.
<?xml version="1.0" encoding="UTF-8"?>
<portlet-app xmlns="http://java.sun.com/xml/ns/portlet/portlet-app_2_0.xsd"
   xmlns:xsi="http://www.w3.org/2001/XMLSchema-instance"
   xsi:schemaLocation="http://java.sun.com/xml/ns/portlet/portlet-app_2_0.xsd
                                         http://java.sun.com/xml/ns/portlet/portlet-app_2_0.xsd"
   version="2.0">
   <portlet>
      <portlet-name>JSFHelloUserPortlet</portlet-name>
      <portlet-class>javax.portlet.faces.GenericFacesPortlet</portlet-class>
      <supports>
         <mime-type>text/html</mime-type>
         <portlet-mode>view</portlet-mode>
         <portlet-mode>edit</portlet-mode>
         <portlet-mode>help</portlet-mode>
      </supports>
      <portlet-info>
         <title>JSF Hello User Portlet</title>
      </portlet-info>

      <init-param>
         <name>javax.portlet.faces.defaultViewId.view</name>
         <value>/jsf/welcome.jsp</value>
      </init-param>

      <init-param>
         <name>javax.portlet.faces.defaultViewId.edit</name>
         <value>/jsf/edit.jsp</value>
      </init-param>

      <init-param>
         <name>javax.portlet.faces.defaultViewId.help</name>
         <value>/jsf/help.jsp</value>
      </init-param>

   </portlet>
</portlet-app>
|
All JSF portlets define |
| This is a mandatory parameter to define what's the default page to display. |
| This parameter defines which page to display on the 'edit' mode. |
| This parameter defines which page to display on the 'help' mode. |
TODO
Create example (This one doesn't exist anymore). Overall this chapter need to be reviewed, any taker ? :)
This example is based on the testPortlet in portal/trunk/portlet/test.
On Eclipse (or any IDE), create a new Java Project, and create this folder tree :
src
 | main
 | |- java
 | |- resources
 | |- webapp
Create the pom.xml, at root level of the project, like this :
<project>

  <parent>

    <groupId>org.exoplatform.portal</groupId>

    <artifactId>config</artifactId>

    <version>trunk</version>

  </parent>

  <modelVersion>4.0.0</modelVersion>

  <artifactId>org.gatein.example.portlet.testRomain</artifactId>

  <packaging>war</packaging>

  <version>1.0.0</version>

  <name>gatein.portlets.testRomain</name>

  <description>Romain Test Portlet</description>

  <dependencies>

    <dependency>

      <groupId>org.exoplatform.portal</groupId>

      <artifactId>exo.portal.webui.portal</artifactId>

      <version>${org.exoplatform.portal.version}</version>

      <scope>provided</scope>

    </dependency>

    <dependency>

      <groupId>org.exoplatform.portal</groupId>

      <artifactId>exo.portal.webui.eXo</artifactId>

      <version>${org.exoplatform.portal.version}</version>

      <scope>provided</scope>

    </dependency>

  </dependencies>

  <build>

    <finalName>testRomain</finalName>

  </build>

</project>
In java/testRomain/portlet/component/, we will create the UITestRomainPortlet.java file for the portlet :
package org.gatein.example.portlet.testRomain;

import org.exoplatform.webui.config.annotation.ComponentConfig;

import org.exoplatform.webui.core.lifecycle.UIApplicationLifecycle;

import org.exoplatform.webui.core.UIPortletApplication;

//this part is configuration of the portlet, we set the path to the template groovy.

 @ComponentConfig(

    lifecycle = UIApplicationLifecycle.class,

    template = "app:/groovy/testRomain/portlet/UITestRomainPortlet.gtmpl"

  )

public class UITestRomainPortlet extends UIPortletApplication {


  public UITestRomainPortlet() throws Exception {

  }

}
In src/main/webapp, create the groovy template for the portlet. The path to this file must match the path you set in the java file, in our case : groovy/testRomain/portlet/UITestRomainPortlet.gtmpl
<div id="<%=uicomponent.getId();%>">
	HelloWorld
</div>
Create the folder skin in src/main/webapp. We don't fill it now, but in this folder, you can put css stylesheet and images.
Create the folder WEB-INF/classes/locale in src/main/webapp. We don't fill it now, but in this folder, you can put language properties files. See Section 5.3, “Internationalization Configuration”.
Create the file configuration.xml in WEB-INF/conf/portlet/testPortletRomain/. Content of tag <ui-component-root> must match your package organization.
<webui-configuration>

  <application>

    <ui-component-root>testRomain.portlet.component.UITestRomainPortlet</ui-component-root>

    <state-manager>org.exoplatform.webui.application.portlet.ParentAppStateManager</state-manager>

  </application>

</webui-configuration>
In WEB-INF, create file portlet.xml :
<?xml version="1.0" encoding="UTF-8"?>

<portlet-app version="1.0" xmlns="http://java.sun.com/xml/ns/portlet/portlet-app_1_0.xsd"

             xmlns:xsi="http://www.w3.org/2001/XMLSchema-instance"

             xsi:schemaLocation="http://java.sun.com/xml/ns/portlet/portlet-app_1_0.xsd http://java.sun.com/xml/ns/portlet/portlet-app_1_0.xsd">

  <portlet>

    <description xml:lang="EN">Test Portlet Romain</description>

    <portlet-name>TestRomain</portlet-name>

    <display-name xml:lang="EN">Test Portlet Romain</display-name>

    <portlet-class>org.exoplatform.webui.application.portlet.PortletApplicationController</portlet-class>

    <init-param>

      <name>webui.configuration</name>

      <!-- must match the path to configuration file -->

      <value>/WEB-INF/conf/portlet/testPortletRomain/configuration.xml</value>

    </init-param>

    <expiration-cache>0</expiration-cache>

    <supports>

      <mime-type>text/html</mime-type>

      <portlet-mode>help</portlet-mode>

    </supports>

    <supported-locale>en</supported-locale>

    <resource-bundle>locale.testRomainPortlet</resource-bundle>

    <portlet-info>

      <title>TestPortletRomain</title>

      <short-title>TestPortlet</short-title>

      <keywords>test</keywords>

    </portlet-info>

  </portlet>

</portlet-app>
In WEB-INF, create file web.xml :
<?xml version="1.0" encoding="ISO-8859-1"?>

<!DOCTYPE web-app PUBLIC "-//Sun Microsystems, Inc.//DTD Web Application 2.3//EN" "http://java.sun.com/dtd/web-app_2_3.dtd">

<web-app>

  <!-If define the Portlet Application name MUST end with .par->

  <display-name>test</display-name>

  <description> This application is a portlet. It can not be used outside a portal.

  This web.xml file is mandatory in each .par archive file. </description>

  <listener>

    <listener-class>org.exoplatform.services.portletcontainer.impl.servlet.PortletApplicationListener</listener-class>

  </listener>

  <servlet>

    <servlet-name>PortletWrapper</servlet-name>

    <servlet-class>org.exoplatform.services.portletcontainer.impl.servlet.ServletWrapper</servlet-class>

  </servlet>

  <servlet-mapping>

    <servlet-name>PortletWrapper</servlet-name>

    <url-pattern>/PortletWrapper</url-pattern>

  </servlet-mapping>

</web-app>
Compile your portlet, deploy it, and add it to the portal.
Now, we will add a button in the portlet. This button will open a popup with a message inside.
In the groovy template, add this code :
<div class="UIAction">
  <div class="ActionContainer">
    <div class="ActionButton">
      <div class="LightBlueStyle">
        <div class="ButtonLeft">
          <div class="ButtonRight">
            <div class="ButtonMiddle">
              <a href="<%=uicomponent.event("OpenPopup", "")%>">Open Popup</a>
            </div>
          </div>
        </div>
      </div>
    </div>
  </div>
</div>
In the java file, in @ComponentConfig, add this code :
events = {

    @EventConfig(listeners = UITestRomainPortlet.OpenPopupActionListener.class)

}
Remark : XXXActionLister.class XXX must match the name you set for the event in the groovy.
static public class OpenPopupActionListener extends EventListener<UITestRomainPortlet> {

    public void execute(Event<UITestRomainPortlet> event) throws Exception {

        System.out.println("HelloWorld");

    }

}
Now, we will add a popup which say "HelloWorld" when you click on the button.
First, create the groovy template of the popup : in webapp/groovy/testRomain/portlet, create UIHelloWorldPopupContent.gtmpl :
<div id="<%=uicomponent.getId();%>">
	HelloWorld in a popup
</div>
In java/testRomain/portlet/component, create the java file for the popup look like : {code} package testRomain.portlet.component;
package testRomain.portlet.component;

import org.exoplatform.webui.config.annotation.ComponentConfig;

import org.exoplatform.webui.core.UIComponent;

import org.exoplatform.webui.core.lifecycle.UIApplicationLifecycle;


@ComponentConfig(

   lifecycle = UIApplicationLifecycle.class,

   template = "app:/groovy/testRomain/portlet/UIHelloWorldPopupContent.gtmpl"

  )

public class UIHelloWorldPopupContent extends UIComponent {


  public UIHelloWorldPopupContent() throws Exception {

  }


}
In UITestRomainPortlet.java, we will create the popup at the portlet creation (in the constructor) :
public UITestRomainPortlet() throws Exception {

  UIPopupWindow popup = addChild(UIPopupWindow.class, null, null);

  popup.setWindowSize(400, 300);


  UIHelloWorldPopupContent popupContent = createUIComponent(UIHelloWorldPopupContent.class, null, null);

  popup.setUIComponent(popupContent);

  popup.setRendered(false);
At the beginning, we set the popup not visible. As you see, we add a children to the Portlet. So, if we want to see the content of it, we must add this in UITestPortletRomain.gtmpl :
<% uicomponent.renderChildren(); %>
This makes the portlet generate the content of all child components.
Change the treatment of the event, replace the println by :
public static class OpenPopupActionListener extends EventListener<UITestRomainPortlet> {

  public void execute(Event<UITestRomainPortlet> event) throws Exception {

    UITestRomainPortlet portlet = event.getSource();

    UIPopupWindow popup = portlet.getChild(UIPopupWindow.class);

    popup.setRendered(true);

    popup.setShow(true);

  }

}
When user clicks on the button, the popup is shown.
Redeploy the portlet and click on the button. You will see "HelloWorld in a popup" in a popup. If you don't change in the portlet, try to redeploy and reboot the tomcat server.