Authentication in GateIn 3.2 is based on JAAS and by default it's standard J2EE FORM based authentication. However authentication workflow is not so easy and straightforward, because we support many different authentication use cases, so that we can leverage authentication process according to our needs.
In GateIn 3.2 we support these kinds of authentication:
J2EE FORM based authentication
RememberMe authentication (user checks Remember my login checkbox in login form)
SSO servers integration (CAS, JOSSO, OpenSSO) - more informations in Section 6.8, “Single-Sign-On (SSO)”
SPNEGO authentication with Kerberos ticket - more informations in Section 6.8.6, “SPNEGO”
Cluster authentication with loadbalancer or with JBoss SSO valve. See ???
Authentication workflow consists of more HTTP requests and redirects with couple of handshakes in it. Source code related to authentication is partially in WCI module, because authentication process is little different on Servlet 2.5 containers and Servlet 3.0 containers.
First you can see in deploy/gatein.ear/02portal.war/WEB-INF/web.xml that authentication is triggered by accessing some of secured URL:
    <security-constraint>

        <web-resource-collection>

            <web-resource-name>user authentication</web-resource-name>

            <url-pattern>/dologin</url-pattern>

            <url-pattern>/private/*</url-pattern>

            <url-pattern>/g/*</url-pattern>

            <url-pattern>/u/*</url-pattern>

        </web-resource-collection>

        <auth-constraint>

            <role-name>users</role-name>

        </auth-constraint>

        <user-data-constraint>

            <transport-guarantee>NONE</transport-guarantee>

        </user-data-constraint>

    </security-constraint>
This means that access to some of these URL like http://localhost:8080/portal/dologin will directly trigger J2EE authentication in case that user is not logged. Access to this URL also means that user needs to be in JAAS group users, otherwise he can authenticate but he will have HTTP error like 403 Forbidden.
In next part of the file we can see that authentication is FORM based and it starts by redirection to /initiatelogin URL, which is actually mapped to InitiateLoginServlet .
    <login-config>

        <auth-method>FORM</auth-method>

        <realm-name>gatein-domain</realm-name>

        <form-login-config>

            <form-login-page>/initiatelogin</form-login-page>

            <form-error-page>/errorlogin</form-error-page>

        </form-login-config>

    </login-config>
InitiateLoginServlet simply redirects user to login page placed in deploy/gatein.ear/02portal.war/login/jsp/login.jsp .
So if you want to change somehow the look and feel of this login page, you can do it in this JSP file. You can also change image or CSS placed in deploy/gatein.ear/login/skin .
After user submit his login form, he is redirected to login URL, which looks like http://localhost:8080/portal/login?username=root&password=gtn&initialURI=/portal/private/classic. This URL is mapped to PortalLoginController servlet, which stores credentials and redirects again to InitiateLoginServlet, which performs WCI login. WCI layer can recognize current servlet container and so that it can decide if it's old container with Servlet API 2.5 (JBoss 5, Tomcat 6) or newer with Servlet API 3.0 (JBoss 6, JBoss 7, Tomcat 7).
Servlet 3.0 case - New servlet API supports programmatic authentication by calling method HttpServletRequest.login(String username, String password). This will directly call JAAS authentication without need to perform any more redirects.
Servlet 2.5 case - There is not standard support for programmatic authentication and so we need another redirection to special URL like http://localhost:8080/portal/j_security_check?j_username=root&j_password=wci-ticket-1385113882&initialURI=/portal/private/classic/ which will trigger JAAS authentication. You can notice that in this case, JAAS authentication is not triggered with real password of user but with WCI ticket. WCI ticket is created by InitiateLoginServlet during WCI login and it's saved into WCI TicketService. The purpose of WCI ticket is to avoid using of real password in URL during redirection.
So finally we are redirected to JAAS authentication. GateIn is using it's own security domain gatein-domain with set of predefined login modules. Login module configuration for gatein-domain is in file deploy/gatein.ear/META-INF/gatein-jboss-beans.xml in JBoss and in file GATEIN_HOME/conf/jaas.conf in Tomcat. By default we can see this login modules stack:
      <login-module code="org.gatein.wci.security.WCILoginModule" flag="optional">

        <module-option name="portalContainerName">portal</module-option>

        <module-option name="realmName">gatein-domain</module-option>

      </login-module>

      <login-module code="org.exoplatform.web.security.PortalLoginModule" flag="required">

        <module-option name="portalContainerName">portal</module-option>

        <module-option name="realmName">gatein-domain</module-option>

      </login-module>

      <login-module code="org.exoplatform.services.security.jaas.SharedStateLoginModule" flag="required">

        <module-option name="portalContainerName">portal</module-option>

        <module-option name="realmName">gatein-domain</module-option>

      </login-module>


      <!-- Uncomment this part to check on each login if user is member of "/platform/users" group and if not

           create such membership -->

      <!--

      <login-module code="org.exoplatform.services.organization.idm.CustomMembershipLoginModule" flag="required">

        <module-option name="portalContainerName">portal</module-option>

        <module-option name="realmName">gatein-domain</module-option>

        <module-option name="membershipType">member</module-option>

        <module-option name="groupId">/platform/users</module-option>

      </login-module>

      -->


      <login-module code="org.exoplatform.services.security.j2ee.JbossLoginModule" flag="required">

        <module-option name="portalContainerName">portal</module-option>

        <module-option name="realmName">gatein-domain</module-option>

      </login-module>
You are free to add some new login modules or completely replace existing login modules with some of your own. Few points to mention:
It's possible to login user through existing login modules with his real password (credentials like username: root/ password: gtn), but also with WCI ticket (credentials like username: root/password: wci-ticket-458791). Login modules stack supports both of these kinds of authentication.
Authentication through WCI ticket is used for FORM based authentication in Servlet 2.5 containers (JBoss 5 or Tomcat 6). Majority of other cases (Servlet 3.0 login, JBoss SSO valve login, login through Crash, BASIC authentication etc) are using the case with real password.
Authentication starts with invoke of method login on each login module. After all login methods are invoked, then authentication continue by invoke of method commit on each login module. Both methods login or commit can throw LoginException. If it happens, then whole authentication ends unsuccessfully, which in next turn invokes method abort on each login module. By returning "false" from method login, you can ensure that login module is ignored. This is not specific to EPP but it's generic to JAAS and more info about login modules in general can be found here.
Here is some brief description of existing login modules:
WCILoginModule - This login module is useful when authentication is performed with JAAS password like WCI ticket. It simply validates if WCI ticket is valid and then it finds real username and password of user from WCI TicketService and save it into sharedState map. Username is saved under key javax.security.auth.login.name and Password (real password like "gtn") is saved under key javax.security.auth.login.password.
Note
If you trigger JAAS authentication with username/password like "root"/"gtn" and not with password like WCI ticket, then WCILoginModule is useless and it throws LoginException. But you can notice that WCILoginModule is declared as "optional" which means that login failure in WCILoginModule is not a problem for whole login process.PortalLoginModule - This login module is actually used mainly for login in cluster environment. Assumption is working session replication between two cluster nodes. After successful authentication on cluster node1 will method commit add flag (attribute AUTHENTICATED_CREDENTIALS) to HTTP session and this flag can then be used to reauthentication on node2 when it executes method login. More info in section Section 6.1.3.3, “Cluster login”.
SharedStateLoginModule - This login module is actually the one, which triggers real authentication of user with usage of Authenticator interface. It takes the username and password from sharedState map from attributes javax.security.auth.login.name and javax.security.auth.login.password. Then it calls Authenticator.validateUser(Credential[] credentials), which performs real authentication of username and password against OrganizationService and portal identity database. Result of successful authentication is object Identity, which is saved to sharedState map under key exo.security.identity. More info in Section 6.1.2.3, “Authenticator and RolesExtractor”.
SharedStateLoginModule assumes that mentioned attributes for username and password are already placed in sharedState map, which was actually done by WCILoginModule. If attributes are not in sharedState map, SharedStateLoginModule is simply ignored (method "login" returns false).
JbossLoginModule - previous login modules (like WCILoginModule and SharedStateLoginModule) are useful for authentication flow with WCI ticket. DefaultLoginModule (superclass of JbossLoginModule) is used for second case (authentication with real password instead of WCI ticket). First it checks if Identity object has been already created and saved into sharedState map by SharedStateLoginModule. If not, then it means that WCI ticket authentication was not successful and so it tries to login with real password of user. It also uses Authentication.validateUser(Credential[] credentials) for authentication check.
In method JbossLoginModule.commit, we need to assign our Identity object to IdentityRegistry, which will be used later for authorization. We also need to create JAAS principals (UserPrincipal and RolesPrincipal) and assign them to our authenticated Subject. This is needed for JBoss AS server, so that it can properly recognize name of logged user and his roles on JBoss AS level.
CustomMembershipLoginModule - special login module, which is disabled (commented) by default. It can be used to add user to some existing group during successful login of this user. Name of group is configurable and by default it's /platform/users group. Login module is commented because in normal environment, users are already in /platform/users group. It's useful only for some special setups like read-only LDAP, where groups of ldap user are taken from ldap tree and so that users may not be in /platform/users group, which is needed for successful authorization.
Some modules are specific for portal, but some are used also by eXo JCR and so they are part of eXo core module.
PortalLoginModule - is located in GateIn 3.2 sources in http://anonsvn.jboss.org/repos/gatein/portal/trunk/component/web/security/
SharedStateLoginModule, JbossLoginModule - these are located in eXo core sources in http://anonsvn.jboss.org/repos/exo-jcr/core/trunk/exo.core.component.security.core/
CustomMembershipLoginModule - located in GateIn 3.2 sources in module for identity integration - http://anonsvn.jboss.org/repos/gatein/portal/trunk/component/identity/
Before creating your own login module, it's recommended to study source code of existing login modules to better understand whole JAAS authentication process. You need to have good knowledge so that you can properly decide where your login module should be placed and if you need to replace some existing login modules or simply attach your own module to existing chain.
We have actually two levels of authentication and overall result of JAAS authentication should properly handle both these cases:
Authentication on application server level
Authentication on GateIn level
Application server needs to properly recognize that user is successfuly logged and it has assigned his JAAS roles. Unfortunately this part is not standardized and is specific for each AS. For example in JBoss AS, you need to ensure that JAAS Subject has assigned principal with username (UserPrincipal) and also RolesPrincipal, which has name "Roles" and it contains list of JAAS roles. This part is actually done in JbossLoginModule.commit(). In Tomcat, this flow is little different, which means Tomcat has it's own TomcatLoginModule.
After successful authentication, user needs to be at least in JAAS role "users" because this role is declared in web.xml as you saw above. JAAS roles are extracted by special algorithm from GateIn 3.2 memberships. See below in section with RolesExtractor.
Login process needs to create special object org.exoplatform.services.security.Identity and register this object into GateIn 3.2 component IdentityRegistry. This Identity object should encapsulate username of authenticated user, Memberships of this user and also JAAS roles. Identity object can be easily created with interface Authenticator as can be seen below.
So have this in mind, if you will extend or replace existing login modules.
Authenticator is important component in authentication process. Actually interface org.exoplatform.services.security.Authenticator looks like this:
public interface Authenticator
{

   /**
    * Authenticate user and return userId.
    *
    * @param credentials - list of users credentials (such as name/password, X509
    *          certificate etc)
    * @return userId
    */
   String validateUser(Credential[] credentials) throws LoginException, Exception;

   /**
    * @param userId.
    * @return Identity
    */
   Identity createIdentity(String userId) throws Exception;

}
Method validateUser is used to check whether given credentials (username and password) are really valid. So it performs real authentication. It returns back username if credentials are correct. Otherwise LoginException is thrown.
Method createIdentity is used to create instance of object org.exoplatform.services.security.Identity, which encapsulates all important informations about single user like:
username
set of Memberships (MembershipEntry objects) which user belongs to. Membership is object, which contains informations about membershipType (manager, member, validator, ... ) and about group (/platform/users, /platform/administrators, /partners, /organization/management/executiveBoard, ... ).
set of Strings with JAAS roles of given user. JAAS roles are simple Strings, which are mapped from MembershipEntry objects. There is another special component org.exoplatform.services.security.RolesExtractor, which is used to map JAAS roles from MembershipEntry objects. RolesExtractor interface looks like this:
public interface RolesExtractor
{

   /**
    * Extracts J2EE roles from userId and|or groups the user belongs to both
    * parameters may be null
    *
    * @param userId
    * @param memberships
    */
   Set<String> extractRoles(String userId, Set<MembershipEntry> memberships);
}
Default implementation DefaultRolesExtractorImpl is based on special algorithm, which uses name of role from the root of the group (for example for role "/organization/management/something" we have JAAS role "organization"). Only exception is group "platform" where we use 2nd level as name of group. For example from group "/platform/users" we have JAAS role "users".
Example: We have user root, which has memberships member:/platform/users, manager:/platform/administrators, validator:/platform/managers, member:/partners, member:/customers/acme, member:/organization/management/board. In this case we will have JAAS roles: users, administrators, managers, partners, customers, organization.
Default implementation of Authenticator is OrganizationAuthenticatorImpl, which is implementation based on OrganizationService. See Section 6.6, “Organization API” .
You can override default implementation of mentioned interfaces Authenticator and RolesExtractor if default behaviour is not suitable for your needs. Consult documentation of eXo kernel for more info.
In default login dialog, you can notice that there is "Remember my login" checkbox, which users can use to persist their login on his workstation. Default validity period of RememberMe cookie is 1 day (it is configurable), and so user can be logged for whole day before he need to reauthenticate again with his credentials.
User checks the checkbox "Remember my login" on login screen of GateIn 3.2 . Then he submit the form.
HTTP request like http://localhost:8080/portal/login?initialURI=/portal/classic&username=root&password=gtn&rememberme=true is send to server
Request is processed by PortalLoginController servlet. Servlet obtains instance of RemindPasswordTokenService and save user credentials into JCR. It generates and returns special token (key) for later use. Then it creates cookie called rememberme and use returned token as value of cookie.
After some time, user wants to reauthenticate. Let's assume that his HTTP Session is already expired but his RememberMe cookie is still active.
User send HTTP request to some portal page (ie. http://localhost:8080/portal/classic ).
There is special HTTP Filter RememberMeFilter configured in web.xml, which checks rememberme cookie and then it retrieves credentials of user from RemindPasswordTokenService. Now filter redirects request to PortalLoginController and authentication process goes in same way as for normal FORM based authentication.
This is special service used during RememberMe authentication workflow. It's configurable in file deploy/gatein.ear/02portal.war/WEB-INF/conf/common/remindpwd-configuration.xml . For more info, look at section Section 6.4, “Authentication Token Configuration”
Another thing is that you can encrypt passwords before store them into JCR. More info is in section Section 6.2, “Password Encryption”.
GateIn 3.2 is using FORM based authentication by default but it's not a problem with switch to different authentication type like BASIC. Only needed thing is to configure it properly in deploy/gatein.ear/02portal.war/WEB-INF/web.xml like this:
<!--

   <login-config>

      <auth-method>FORM</auth-method>

      <realm-name>gatein-domain</realm-name>

      <form-login-config>

         <form-login-page>/initiatelogin</form-login-page>

         <form-error-page>/errorlogin</form-error-page>

      </form-login-config>

   </login-config>

-->

   <login-config>

      <auth-method>BASIC</auth-method>

      <realm-name>gatein-domain</realm-name>

   </login-config
In this case user will see login dialog from browser instead of GateIn login.jsp page. JAAS authentication will be performed with real credentials of user (ie. root/gtn). WCI ticket is not used with BASIC authentication.
GateIn 3.2 supports automatic login propagation in cluster environment. Cluster login relies on HTTP session replication. It's useful for situations like this:
You have Apache loadbalancer and two portal nodes node1 and node2
User will send request to loadbalancer and he will be redirected to node1. All his requests will be then processed on node1 (sticky session).
User login on loadbalancer (which is redirected to node1)
node1 is killed
User will send another HTTP request. He will now be redirected to node2 because node1 is killed. Now user will be automatically logged on node2 as well thanks to session replication, because he still has same HTTP session, which was replicated from node1 to node2. So end user shouldn't recognize any change even if his work is now done on different node of cluster.
This login workflow works thanks to PortalLoginModule, which is able to save special attribute into HTTP session as flag that user is already logged. Then reauthentication on node2 is working thanks to servlet filter ClusteredSSOFilter, which is able to automatically trigger programmatic authentication.
Note
ClusteredSSOFilter is using proprietary JBossWeb API for trigger programmatic authentication and so it's working only on JBoss AS. It is not working on other servers like Tomcat or Jetty.There is also possibility for integration with JBoss clustered SSO valve (See ???).
GateIn 3.2 also supports integration with couple of well-known SSO frameworks (CAS, JOSSO, OpenSSO). When user wants login, he is not redirected to portal login form but to SSO server login form. After successful login with SSO server, he gains ticket represented by special cookie (name of cookie differs for each SSO server). Then user is redirected back to GateIn 3.2, where we need to perform agent validation of SSO ticket against SSO server. We still need to create Identity object and bind it to IdentityRegistry (this is same as in default authentication), which is done thanks to Authenticator component.
In other words, you need to ensure that users, which are logged successfuly through SSO, needs to be also in GateIn 3.2 identity database because SSO server is used only for authentication, but authorization is handled completely by GateIn 3.2, which assumes that user exists in portal DB. If users are not in DB, Identity object won't be created and you will have 403 Forbidden errors even if you authenticate successfuly. For details about SSO integration, see Section 6.8, “Single-Sign-On (SSO)”.
Same applies for SPNEGO authentication (See Section 6.8.6, “SPNEGO”). In this case, you need to ensure that your Kerberos users are also created in GateIn 3.2 database.
In previous section, we learned about JAAS authentication and about login modules. So we know that result of authentication are:
JAAS Subject with principals for username (UserPrincipal) and for JAAS roles (RolesPrincipal).
Identity object, which encapsulates username, all memberships and all JAAS roles. This Identity object is bound to IdentityRegistry component.
Authorization in GateIn 3.2 actually happens on two levels:
First round of authorization is servlet container authorization based on secured URL from web.xml. We saw above in web.xml snippet that secured URL are accessible only for users from role users:
   <auth-constraint>

      <role-name>users</role-name>

   </auth-constraint>
This actually means that our user needs to be in GateIn 3.2 role /platform/users (For details see Section 6.1.2.3, “Authenticator and RolesExtractor”). In other words, if we successfuly authenticate but our user is not in group /platform/users, then it means that he is not in JAAS role users, which in next turn means that he will have authorization error 403 Forbidden thrown by servlet container.
You can change the behaviour and possibly add some more auth-constraint elements into web.xml. However this protection of resources based on web.xml is not standard GateIn 3.2 way and it's mentioned here mainly for illustration purposes.
Second round of authorization is based on component UserACL (See Section 3.4, “Portal Default Permission Configuration”). We can declare access and edit permissions for portals, pages and/or portlets. UserACL is then used to check if our user has particular permissions to access or edit specified resource. Important object with informations about roles of our user is mentioned Identity object created during JAAS authentication.
Authorization on portal level looks like this:
user send HTTP request to some URL in portal
HTTP request is processed through SetCurrentIdentityFilter, which is declared in deploy/gatein.ear/02portal.war/WEB-INF/web.xml.
SetCurrentIdentityFilter reads username of current user from HttpServletRequest.getRemoteUser(). Then it looks for Identity of this user in IdentityRegistry, where Identity has been saved during authentication. Found Identity is then encapsulated into ConversationState object and bound into ThreadLocal variable.
UserACL is able to obtain Identity of current user from method UserACL.getIdentity(), which simply calls ConversationState.getCurrent().getIdentity() for find current Identity bound to ThreadLocal. Now UserACL has identity of user and so that it can performs any security checks.
Username and passwords stored in clear text
The Remember Me feature of JBoss Enterprise Portal Platform uses a token mechanism to be able to authenticate returning users without requiring an explicit login. However, to be able to authenticate these users, the token needs to store the username and password in clear text in the JCR.
Administrators have two options available to ameliorate this risk:
The Remember Me feature can be disabled by removing the corresponding checkbox in:
<JBOSS_HOME>/server/<PROFILE>/deploy/gatein.ear/02portal.war/login/jsp/login.jsp<JBOSS_HOME>/server/<PROFILE>/deploy/gatein.ear/02portal.war/groovy/portal/webui/UILoginForm.gtmplPasswords can be encoded prior to being saved to the JCR. This option requires administrators to provide a custom subclass of
org.exoplatform.web.security.security.AbstractCodecand set up a codec implementation withCookieTokenService:Procedure 6.1. Encrypt Password in JCR
Create a javaclass similar to:
package org.example.codec;

import org.exoplatform.container.xml.InitParams;
import org.exoplatform.web.security.security.AbstractCodec;
import org.exoplatform.web.security.security.CookieTokenService;
import org.picocontainer.Startable;

public class ExampleCodec extends AbstractCodec implements Startable
{
   private String simpleParam;
   private CookieTokenService cookieTokenService;

   public ExampleCodec(InitParams params, CookieTokenService cookieTokenService)
   {
      simpleParam = params.getValueParam("encodingParam").getValue();
      this.cookieTokenService = cookieTokenService;
   }

   public void start()
   {
      cookieTokenService.setupCodec(this);
   }

   public void stop()
   {
   }

   /**
    * Very simple encoding algorithm used only for demonstration purposes.
    * You should use stronger algorithm in real production environment.
    */
   public String encode(String plainInput)
   {
      return plainInput + simpleParam;
   }

   public String decode(String encodedInput)
   {
      return encodedInput.substring(0, encodedInput.length() - simpleParam.length());
   }

}
Compile the class and package it into a jar file. For this example we will call the jar file
codec-example.jar.Create a
conf/portal/configuration.xmlfile within thecodec-example.jarsimilar to the example below. This allows the portal kernel to find and use the new codec implementation.
<?xml version="1.0" encoding="ISO-8859-1"?>


<configuration xmlns:xsi="http://www.w3.org/2001/XMLSchema-instance"

xsi:schemaLocation="http://www.exoplaform.org/xml/ns/kernel_1_2.xsd http://www.exoplaform.org/xml/ns/kernel_1_2.xsd"

xmlns="http://www.exoplaform.org/xml/ns/kernel_1_2.xsd">


<component>

   <key>org.example.codec.ExampleCodec</key>

   <type>org.example.codec.ExampleCodec</type>

   <init-params>

      <value-param>

         <name>encodingParam</name>

         <value>aaa</value>

      </value-param>

   </init-params>

</component>


</configuration>
Deploy the
codec-example.jarinto your<JBOSS_HOME>/server/<PROFILE>/deploy/gatein.ear/lib/Start (or restart) your JBoss Enterprise Portal Platform.
Any passwords written to the JCR will now be encoded and not plain text.
To specify the initial Organization configuration, the content of 02portal.war:/WEB-INF/conf/organization/organization-configuration.xml should be edited. This file uses the portal XML configuration schema. It lists several configuration plugins.
The plugin of type org.exoplatform.services.organization.OrganizationDatabaseInitializer is used to specify a list of membership types, a list of groups, and a list of users to be created.
The checkDatabaseAlgorithm initialization parameter determines how the database update is performed.
If its value is set to entry it means that each user, group and membership listed in the configuration is checked each time GateIn 3.2 is started. If the entry doesn't yet exist in the database, it is created. If checkDatabaseAlgorithm parameter value is set to empty, the configuration data will be updated to the database only if the database is empty.
The predefined membership types are specified in the membershipType field of the OrganizationConfig plugin parameter.
Note
See 02portal.war:/WEB-INF/conf/organization/organization-configuration.xml for the full content.
<field name="membershipType">

  <collection type="java.util.ArrayList">

    <value>

      <object type="org.exoplatform.services.organization.OrganizationConfig$MembershipType">

        <field name="type">

          <string>member</string>

        </field>

        <field name="description">

          <string>member membership type</string>

        </field>

      </object>

    </value>

    <value>

      <object type="org.exoplatform.services.organization.OrganizationConfig$MembershipType">

        <field name="type">

          <string>owner</string>

        </field>

        <field name="description">

          <string>owner membership type</string>

        </field>

      </object>

     </value>

     <value>

       <object type="org.exoplatform.services.organization.OrganizationConfig$MembershipType">

         <field name="type">

           <string>validator</string>

         </field>

         <field name="description">

           <string>validator membership type</string>

         </field>

       </object>

     </value>

   </collection>

</field>
The predefined groups are specified in the group field of the OrganizationConfig plugin parameter.
<field name="group">

  <collection type="java.util.ArrayList">

    <value>

      <object type="org.exoplatform.services.organization.OrganizationConfig$Group">

        <field name="name">

          <string>portal</string>

        </field>

        <field name="parentId">

          <string></string>

        </field>

        <field name="type">

          <string>hierachy</string>

        </field>

        <field name="description">

          <string>the /portal group</string>

        </field>

      </object>

    </value>

    <value>

      <object type="org.exoplatform.services.organization.OrganizationConfig$Group">

        <field name="name">

          <string>community</string>

        </field>

        <field name="parentId">

          <string>/portal</string>

        </field>

        <field name="type">

          <string>hierachy</string>

        </field>

        <field name="description">

          <string>the /portal/community group</string>

        </field>

      </object>

    </value>

    ...

  </collection>

</field>
The predefined users are specified in the membershipType field of the OrganizationConfig plugin parameter.
<field name="user">

  <collection type="java.util.ArrayList">

    <value>

      <object type="org.exoplatform.services.organization.OrganizationConfig$User">

        <field name="userName"><string>root</string></field>

        <field name="password"><string>exo</string></field>

        <field name="firstName"><string>root</string></field>

        <field name="lastName"><string>root</string></field>

        <field name="email"><string>exoadmin@localhost</string></field>

        <field name="groups"><string>member:/admin,member:/user,owner:/portal/admin</string></field>

      </object>

    </value>

    <value>

      <object type="org.exoplatform.services.organization.OrganizationConfig$User">

        <field name="userName"><string>exo</string></field>

        <field name="password"><string>exo</string></field>

        <field name="firstName"><string>site</string></field>

        <field name="lastName"><string>site</string></field>

        <field name="email"><string>exo@localhost</string></field>

        <field name="groups"><string>member:/user</string></field>

      </object>

    </value>

    ...

  </collection>

</field>
The plugin of type org.exoplatform.services.organization.impl.NewUserEventListener specifies
which groups all the newly created users should become members of. It specifies the groups and the memberships to use
(while group is just a set of users, a membership type represents a user's role within a group).
It also specifies a list of users that should not be processed (i.e. administrative users like 'root').
Note
The terms 'membership' and 'membership type' refer to the same thing, and are used interchangeably.
<component-plugin>

  <name>new.user.event.listener</name>

  <set-method>addListenerPlugin</set-method>

  <type>org.exoplatform.services.organization.impl.NewUserEventListener</type>

  <description>this listener assign group and membership to a new created user</description>

  <init-params>

    <object-param>

      <name>configuration</name>

      <description>description</description>

      <object type="org.exoplatform.services.organization.impl.NewUserConfig">

        <field  name="group">

          <collection type="java.util.ArrayList">

            <value>

              <object type="org.exoplatform.services.organization.impl.NewUserConfig$JoinGroup">

                <field name="groupId"><string>/user</string></field>

                <field name="membership"><string>member</string></field>

              </object>

            </value>

          </collection>

        </field>

        <field  name="ignoredUser">

          <collection type="java.util.HashSet">

            <value><string>exo</string></value>

            <value><string>root</string></value>

            <value><string>company</string></value>

            <value><string>community</string></value>

          </collection>

        </field>

      </object>

    </object-param>

  </init-params>

</component-plugin>
Token Service is used in authentication.
The token system prevents user account information being sent in clear text mode within inbound requests. This increases authentication security.
Token service allows administrators to create, delete, retrieve and clean tokens as required. The service also defines a validity period of any given token. The token becomes invalid once this period expires.
All token services used in GateIn 3.2 authentication must be implemented by subclassing an AbstractTokenService abstract class. The following AbstractTokenService methods represent the contract between authentication runtime, and a token service implementation.
        public Token getToken(String id) throws PathNotFoundException, RepositoryException;

        public Token deleteToken(String id) throws PathNotFoundException, RepositoryException;

        public String[] getAllTokens();

        public long getNumberTokens() throws Exception;

        public String createToken(Credentials credentials) throws IllegalArgumentException,NullPointerException;

        public Credentials validateToken(String tokenKey, boolean remove) throws NullPointerException;
Token services configuration includes specifying the token validity period. The token service is configured as a portal component (in portal scope, as opposed to root scope - more about that in Foundations chapter).
In the example below, CookieTokenService is a subclass of AbstractTokenService so it has a property which specifies the validity period of the token.
The token service will initialize this validity property by looking for an init-param named service.configuration.
This property must have three values.
<component>
<key>org.exoplatform.web.security.security.CookieTokenService</key>
<type>org.exoplatform.web.security.security.CookieTokenService</type>
<init-params>
<values-param>
<name>service.configuration</name>
<value>j cr-token</value>
<value>7
cr-token</value>
<value>7 </value>
<value>D
</value>
<value>D AY</value>
</values-param>
</init-params>
</component>
AY</value>
</values-param>
</init-params>
</component>
| Service name |
| Amount of time |
| Unit of time |
In this case, the service name is jcr-token and the token expiration time is one week.
GateIn 3.2 supports four time units:
SECONDMINUTEHOURDAY
GateIn 3.2 uses PicketLink IDM component to keep the necessary identity information (users, groups, memberships, etc.). While legacy interfaces are still used (org.exoplatform.services.organization) for identity management, there is a wrapper implementation that delegates to PicketLink IDM framework.
This section doesn't provide information about PicketLink IDM and its configuration. Please, refer to the appropriate project documentation (http://jboss.org/picketlink/IDM.html) for further information.
Note
It is important to fully understand the concepts behind this framework design before changing the default configuration.
The identity model represented in 'org.exoplatform.services.organization' interfaces and the one used in PicketLink IDM have some major differences.
TODO: tell more about org.exoplatform.services.organization
For example: PicketLink IDM provides greater abstraction. It is possible for groups in IDM framework to form memberships with many parents (which requires recursive ID translation), while GateIn model allows only pure tree-like membership structures.
Additionally, GateIn membership concept needs to be translated into the IDM Role concept. Therefore PicketLink IDM model is used in a limited way. All these translations are applied by the integration layer.
The main configuration file is idm-configuration.xml:
<configuration xmlns:xsi="http://www.w3.org/2001/XMLSchema-instance"
               xsi:schemaLocation="http://www.exoplaform.org/xml/ns/kernel_1_2.xsd http://www.exoplaform.org/xml/ns/kernel_1_2.xsd"
               xmlns="http://www.exoplaform.org/xml/ns/kernel_1_2.xsd">

   <component>
        <key>org.exoplatform.services.organization.idm.PicketLinkIDMService</key>
      <type>org.exoplatform.services.organization.idm.PicketLinkIDMServiceImpl</type>
      <init-params>
         <value-param>
            <name>config</name>
            <value>war:/conf/organization/idm-config.xml</value>
         </value-param>
         <value-param>
            <name>portalRealm</name>
            <value>realm${container.name.suffix}</value>
         </value-param>
       </init-params>
   </component>


   <component>
      <key>org.exoplatform.services.organization.OrganizationService</key>
      <type>org.exoplatform.services.organization.idm.PicketLinkIDMOrganizationServiceImpl</type>
      <init-params>
      <object-param>
        <name>configuration</name>
        <object type="org.exoplatform.services.organization.idm.Config">
          <field name="useParentIdAsGroupType">
            <boolean>true</boolean>
          </field>

          <field name="forceMembershipOfMappedTypes">
            <boolean>true</boolean>
          </field>

          <field name="pathSeparator">
            <string>.</string>
          </field>

          <field name="rootGroupName">
            <string>GTN_ROOT_GROUP</string>
          </field>

          <field name="groupTypeMappings">
            <map type="java.util.HashMap">
              <entry>
                <key><string>/</string></key>
                <value><string>root_type</string></value>
              </entry>

              <!-- Sample mapping -->
              <!--
              <entry>
                <key><string>/platform/*</string></key>
                <value><string>platform_type</string></value>
              </entry>
              <entry>
                <key><string>/organization/*</string></key>
                <value><string>organization_type</string></value>
              </entry>
              -->

            </map>
          </field>

          <field name="associationMembershipType">
            <string>member</string>
          </field>

          <field name="ignoreMappedMembershipType">
            <boolean>false</boolean>
          </field>
        </object>
      </object-param>
    </init-params>


   </component>

</configuration>
| The org.exoplatform.services.organization.idm.PicketLinkIDMServiceImpl service has the following options:
|
| The org.exoplatform.services.organization.idm.PicketLinkIDMOrganizationServiceImpl key is a main entrypoint implementing org.exoplatform.services.organization.OrganizationService and is dependant on org.exoplatform.services.organization.idm.PicketLinkIDMService org.exoplatform.services.organization.idm.PicketLinkIDMOrganizationServiceImpl service has the following options defined as fields of object-param of type org.exoplatform.services.organization.idm.Config:
Additionally, JBossIDMOrganizationServiceImpl uses those defaults to perform identity management operations
|
A sample PicketLink IDM configuration file is shown below. To understand all the options it contains, please refer to the PicketLink IDM Reference Guide
<jboss-identity xmlns="urn:jboss:identity:idm:config:v1_0_beta"

                xmlns:xsi="http://www.w3.org/2001/XMLSchema-instance"

                xsi:schemaLocation="urn:jboss:identity:idm:config:v1_0_alpha identity-config.xsd">

    <realms>

        <realm>

            <id>PortalRealm</id>

            <repository-id-ref>PortalRepository</repository-id-ref>

            <identity-type-mappings>

                <user-mapping>USER</user-mapping>

            </identity-type-mappings>

        </realm>

    </realms>

    <repositories>

        <repository>

            <id>PortalRepository</id>

            <class>org.jboss.identity.idm.impl.repository.WrapperIdentityStoreRepository</class>

            <external-config/>

            <default-identity-store-id>HibernateStore</default-identity-store-id>

            <default-attribute-store-id>HibernateStore</default-attribute-store-id>

        </repository>

    </repositories>

    <stores>

        <attribute-stores/>

        <identity-stores>

            <identity-store>

                <id>HibernateStore</id>

                <class>org.jboss.identity.idm.impl.store.hibernate.HibernateIdentityStoreImpl</class>

                <external-config/>

                <supported-relationship-types>

                    <relationship-type>JBOSS_IDENTITY_MEMBERSHIP</relationship-type>

                    <relationship-type>JBOSS_IDENTITY_ROLE</relationship-type>

                </supported-relationship-types>

                <supported-identity-object-types>

                    <identity-object-type>

                        <name>USER</name>

                        <relationships/>

                        <credentials>

                            <credential-type>PASSWORD</credential-type>

                        </credentials>

                        <attributes/>

                        <options/>

                    </identity-object-type>

                </supported-identity-object-types>

                <options>

                    <option>

                        <name>hibernateSessionFactoryRegistryName</name>

                        <value>hibernateSessionFactory</value>

                    </option>

                    <option>

                        <name>allowNotDefinedIdentityObjectTypes</name>

                        <value>true</value>

                    </option>

                    <option>

                        <name>populateRelationshipTypes</name>

                        <value>true</value>

                    </option>

                    <option>

                        <name>populateIdentityObjectTypes</name>

                        <value>true</value>

                    </option>

                    <option>

                        <name>allowNotDefinedAttributes</name>

                        <value>true</value>

                    </option>

                    <option>

                        <name>isRealmAware</name>

                        <value>true</value>

                    </option>

                </options>

            </identity-store>

        </identity-stores>

    </stores>

</jboss-identity>
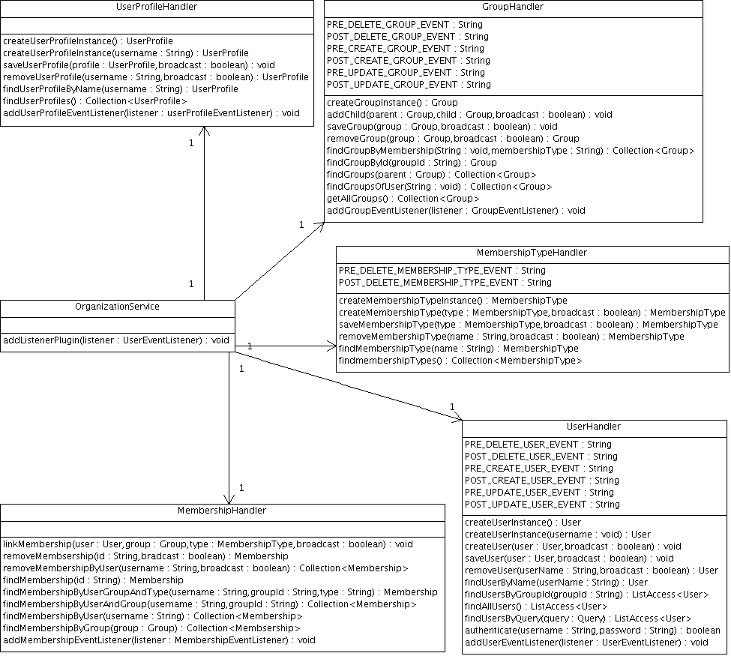
The
exo.platform.services.organization
package has five main components: user, user profile, group,
membership type and membership.
There is an additional component that serves as an entry point into
Organization API -
OrganizationService
component,
that provides handling functionality for the five components.
The
User
component contains basic information about a user - such as
username, password, first name, last name, and email. The
User Profile
component contains extra information about a user, such as user's
personal information, and business information.
You can also add additional information about a user if your application
requires it.
The
Group
component contains a group graph. The
Membership Type
component
contains a list of predefined membership types.
Finally, the
Membership
component connects a User, a Group and a Membership Type.
A user can have one or more memberships within a group, for example: user A can have the 'member' and 'admin' memberships in group /user. A user belongs to a group if he has at least one membership in that group.
Exposing the Organization API to developers the OrganizationService component provides developers with access to handler objects for managing each of the five components - UserHandler, UserProfileHandler, GroupHandler, MembershipTypeHandler, and MembershipHandler.
The five central API components are really designed like persistent entities, and handlers are really specified like data access objects (DAO).
Organization API simply describes a contract, meaning it is not a concrete implementation. The described components are interfaces, allowing for different concrete implementations. In practial terms that means, you can replace the existing implementation with a different one.
The following code retrieves the details for a logged-in user:
// Alternative context: WebuiRequestContext context = WebuiRequestContext.getCurrentInstance() ;

PortalRequestContext context = PortalRequestContext.getCurrentInstance() ;

// Get the id of the user logged

String userId = context.getRemoteUser();

// Request the information from OrganizationService:

OrganizationService orgService = getApplicationComponent(OrganizationService.class) ;

if (userId != null)

  {

  User user = orgService.getUserHandler().findUserByName(userId) ;

  if (user != null)

  {

    String firstName = user.getFirstName();

    String lastName = user.getLastName();

    String email = user.getEmail();

  }

}
Below are two alternatives for retrieving the Organization Service:
OrganizationService service = (OrganizationService)

   ExoContainerContext.getCurrentContainer().getComponentInstanceOfType(OrganizationService.class);
OrganizationService service = (OrganizationService)
PortalContainer.getInstance().getComponentInstanceOfType(OrganizationService.class);
GateIn 3.2 provides some form of Single Sign On (SSO) as an integration and aggregation platform.
When logging into the portal users gain access to many systems through portlets using a single identity. In many cases, however, the portal infrastructure must be integrated with other SSO enabled systems. There are many different Identity Management solutions available. In most cases each SSO framework provides a unique way to plug into a Java EE application.
In this tutorial, the SSO server is installed in a Tomcat installation. Tomcat can be obtained from http://tomcat.apache.org.
All the packages required for setup can be found in a latest zip file located under this directory. At this moment, latest version is here. In this document, $GATEIN_SSO_HOME is called as the directory where the file is extracted.
Users are advised to not run any portal extensions that could override the data when manipulating the gatein.ear file directly.
The JBoss SSO valve is useful to authenticate a user on one GateIn 3.2 node in a cluster and have that authentication automatically carry across to other nodes in the cluster.
This authentication can also be used in any other web applications which may require authentication, provided that these applications use same roles as the main portal instance. Attempting to use an SSO authentication in an application that uses different roles may create authorization errors (403 errors, for example).
Note
This behaviour is coming from the fact that same JAAS principal is added by SSO valve to all HTTP requests, even to other web applications. So the same roles are required because of it. There is alternative that you can configure SSO valve with parameter requireReauthentication=true , which will force SSO valve to perform reauthentication with saved credentials in each HTTP request against security domain of particular web application where the request is coming. This will enforce that new principal for that web application will be created with updated roles for that web application. In other words, when requireReauthentication is false (default state), you need to have same roles among web applications. When requireReauthentication is true you need to have same username and passwords.
More info about the JBoss SSO valve can be found at http://community.jboss.org/wiki/JBossWebSingleSignOn.
To successfully implement SSO integration, do the following:
Procedure 6.2. SSO Integration
Open the
/file and uncomment one of the two<JBOSS_HOME>/server/<PROFILE>/deploy/jbossweb.sar/server.xmlValveentries:For a non-clustered implementation, uncomment:
<Valve className="org.apache.catalina.authenticator.SingleSignOn" />
For a clustered implementation, uncomment:
<Valve className="org.jboss.web.tomcat.service.sso.ClusteredSingleSignOn" />
For integration of SSO valve among different nodes of cluster, you need to ensure that all these nodes share the same domain (for example node1.yourdomain.com and node2.yourdomain.com). This domain needs to be configured with parameter cookieDomain of SSO valve. Thing is that SSO valve is adding cookie JSESSIONIDSSO, which is by default bound only to host where the request is coming. When used cookieDomain parameter, cookie is bound to domain (like yourdomain.com), which will ensure that it is shared among both hosts node1.yourdomain.com and node2.yourdomain.com. So in this case, valve configuration can look like this:
<Valve className="org.jboss.web.tomcat.service.sso.ClusteredSingleSignOn"

   cookieDomain="yourdomain.com" />
Another important thing is that both cluster nodes needs to be on same cluster (using same parameter -g and same parameter -u and also using parameter -Dexo.profiles=cluster). It's also needed for them to share the same NFS directory and same database and apply all the configuration needed for GateIn 3.2 cluster.
Testing SSO in a physical cluster
In this example, we will try to simulate testing on more physical machines by simply using virtual hosts on single machine.
If you are on Linux, you can configure file /etc/hosts to contain these lines:
127.0.1.1 machine1.yourdomain.com
127.0.1.2 machine2.yourdomain.com
Open the
<JBOSS_HOME>/server/all/deploy/jbossweb.sar/server.xmlUncomment the line:
<!--

<Valve className="org.jboss.web.tomcat.service.sso.ClusteredSingleSignOn" />

-->
And edit it to match the following:
<Valve className="org.jboss.web.tomcat.service.sso.ClusteredSingleSignOn"

   cookieDomain="yourdomain.com" />
This will ensure the
JSESSIONIDSSOcookie is used in the correct domain, allowing the SSO authentication to occur.Copy server configuration all and create another two configurations node1 and node2 from it.
Start both cluster nodes with commands:
./run.sh -c node1 -b machine1.yourdomain.com -Dexo.profiles=cluster -Djboss.messaging.ServerPeerID=0 &
./run.sh -c node2 -b machine2.yourdomain.com -Dexo.profiles=cluster -Djboss.messaging.ServerPeerID=1 &
Let's go to http://machine1.yourdomain.com:8080/portal and login as some user.
Access some private url on second host like http://machine2.yourdomain.com:8080/portal/dologin. Now you should be logged directly into machine2 thanks to SSO valve.
Logout from SSO initiating machine1.yourdomain.com should also logged you out from other cluster nodes. So you should be logout directly from machine2 as well.
Enabling SSO with Other Web Applications
As mentioned earlier, in order to use SSO authentication between JBoss Enterprise Portal Platform instances and other web applications, the roles defined in the web application must match those used in the portal instance (unless you have requireReauthentication=true as mentioned above).
As an example, to use the SSO Valve to authenticate a user in both a portal instance and the JMX Console, the following actions would be required:
Procedure 6.3.
Open the
<JBOSS_HOME>/server/node1/deploy/jmx-console.war/WEB-INF/web.xmlChange the
<role-name>entry in the<auth-constraint>element (line110) fromJBossAdmintousers:<auth-constraint>
<!--<role-name>JBossAdmin</role-name>-->
<role-name>users</role-name>
</auth-constraint>
Change the
<role-name>entry in the<security-role>element (line120) fromJBossAdmintousers<security-role>
<!--<role-name>JBossAdmin</role-name>-->
<role-name>users</role-name>
</security-role>
Testing SSO With Other Web Applications
To test that SSO authentication is enabled from portal instances to other web applications (in this case, the JMX Console), do the following:
Procedure 6.4. Test SSO Between Portal and JMX Console
Start a portal instance on one node:
./run.sh -c node1 -b machine1.yourdomain.com -Dexo.profiles=cluster -Djboss.messaging.ServerPeerID=0 &
Navigate to http://machine1.yourdomain.com:8080/portal/private/classic and authenticate with the pre-configured user account "
root" (password "gtn").Navigate to http://machine1.yourdomain.com:8080/jmx-console. You should be automatically authenticated into the JMX Console.
Using SSO to Authenticate From the Public Page
The previous configuration changes in this section are useful if a user is using a secured URL ( http://localhost:8080/portal/private/classic, for example) to log in to the portal instance.
Further changes are needed however, if SSO authentication is required to work with the Sign In button on the front page of the portal ( http://localhost:8080/portal/classic ).
To enable this functionality, the Sign In link must redirect to some secured URL, which will ensure that JAAS authentication will be enforced directly without showing login dialog.
Procedure 6.5. Redirect to Use SSO Valve Authentication
Open the
<JBOSS_HOME>/server/<PROFILE>/deploy/gatein.ear/web.war/groovy/groovy/webui/component/UIBannerPortlet.gtml<a class="Login" onclick="$signInAction"><%=_ctx.appRes("UILoginForm.label.Signin")%></a>To read:
<a class="Login"
   href="/portal/private/classic"><%=_ctx.appRes("UILoginForm.label.Signin")%></a>
Open the
<JBOSS_HOME>/server/<PROFILE>/deploy/gatein.ear/web.war/groovy/portal/webui/component/UILogoPortlet.gtmpl<a onclick="$signInAction"><%=_ctx.appRes("UILogoPortlet.action.signin")%></a>To read:
<a href="/portal/private/classic"><%=_ctx.appRes("UILogoPortlet.action.signin")%></a>
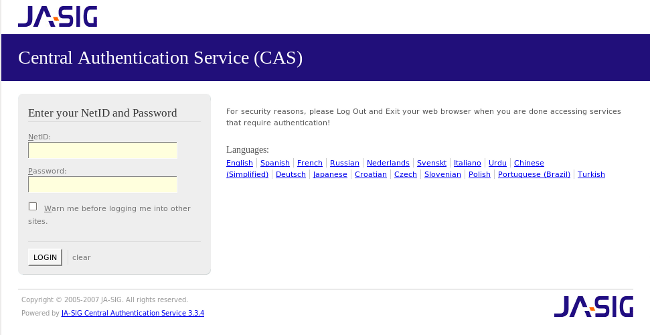
This Single Sign On plugin enables seamless integration between GateIn 3.2 and the CAS Single Sign On Framework. Details about CAS can be found here.
The integration consists of two parts; the first part consists of installing or configuring a CAS server, the second part consists of setting up the portal to use the CAS server.
First, set up the server to authenticate against the portal login module. In this example, the CAS server is installed on Tomcat.
CAS can be downloaded from http://www.jasig.org/cas/download. Tested version, which should work with these instructions is CAS 3.3.5, however other versions can also work without problems.
Extract the downloaded file into a suitable location. This location will be referred to as $CAS_HOME in the following instructions.
To configure the web archive as desired, the simplest way is to make the necessary changes directly in the CAS codebase.
Note
To complete these instructions, and perform the final build step, you will need the Apache Maven 2. You can get it here.
First, change the default authentication handler with the one provided by GateIn 3.2.
The CAS Server Plugin makes secure authentication callbacks to a RESTful service installed on the remote GateIn 3.2 server to authenticate a user.
In order for the plugin to function correctly, it needs to be properly configured to connect to this service. This configuration is done via the cas.war/WEB-INF/deployerConfigContext.xml file.
Open
CAS_HOME/cas-server-webapp/src/main/webapp/WEB-INF/deployerConfigContext.xmlReplace:
 <!--
  | Whereas CredentialsToPrincipalResolvers identify who it is some Credentials might authenticate,
  | AuthenticationHandlers actually authenticate credentials.  Here e declare the AuthenticationHandlers that
  | authenticate the Principals that the CredentialsToPrincipalResolvers identified.  CAS will try these handlers in turn
  | until it finds one that both supports the Credentials presented and succeeds in authenticating.
  +-->
 <property name="authenticationHandlers">
   <list>
     <!--
      | This is the authentication handler that authenticates services by means of callback via SSL, thereby validating
      | a server side SSL certificate.
      +-->
     <bean class="org.jasig.cas.authentication.handler.support.HttpBasedServiceCredentialsAuthenticationHandler"
           p:httpClient-ref="httpClient" />
     <!--
      | This is the authentication handler declaration that every CAS deployer will need to change before deploying CAS
      | into production.  The default SimpleTestUsernamePasswordAuthenticationHandler authenticates UsernamePasswordCredentials
      | where the username equals the password.  You will need to replace this with an AuthenticationHandler that implements your
      | local authentication strategy.  You might accomplish this by coding a new such handler and declaring
      | edu.someschool.its.cas.MySpecialHandler here, or you might use one of the handlers provided in the adaptors modules.
      +-->
     <bean
        class="org.jasig.cas.authentication.handler.support.SimpleTestUsernamePasswordAuthenticationHandler" />
   </list>
 </property>
With the following (Make sure to set the host, port and context with the values corresponding to your portal). Also available in
GATEIN_SSO_HOME/cas/plugin/WEB-INF/deployerConfigContext.xml.<!-- | Whereas CredentialsToPrincipalResolvers identify who it is some Credentials might authenticate, | AuthenticationHandlers actually authenticate credentials. Here we declare the AuthenticationHandlers that | authenticate the Principals that the CredentialsToPrincipalResolvers identified. CAS will try these handlers in turn | until it finds one that both supports the Credentials presented and succeeds in authenticating. +--> <property name="authenticationHandlers"> <list> <!-- | This is the authentication handler that authenticates services by means of callback via SSL, thereby validating | a server side SSL certificate. +--> <bean class="org.jasig.cas.authentication.handler.support.HttpBasedServiceCredentialsAuthenticationHandler" p:httpClient-ref="httpClient" /> <!-- | This is the authentication handler declaration that every CAS deployer will need to change before deploying CAS | into production. The default SimpleTestUsernamePasswordAuthenticationHandler authenticates UsernamePasswordCredentials | where the username equals the password. You will need to replace this with an AuthenticationHandler that implements your | local authentication strategy. You might accomplish this by coding a new such handler and declaring | edu.someschool.its.cas.MySpecialHandler here, or you might use one of the handlers provided in the adaptors modules. +--> <!-- Integrates with the Gatein Authentication Service to perform authentication --> <!-- | Note: Modify the Plugin Configuration based on the actual information of a GateIn instance. | The instance can be anywhere on the internet...Not necessarily on localhost where CAS is running +--> <bean class="org.gatein.sso.cas.plugin.AuthenticationPlugin"> <property name="gateInHost"><value>localhost</value></property> <property name="gateInPort"><value>8080</value></property> <property name="gateInContext"><value>portal</value></property> </bean> </list> </property>Copy
GATEIN_SSO_HOME/cas/plugin/WEB-INF/lib/sso-cas-plugin-<VERSION>.jarandGATEIN_SSO_HOME/cas/plugin/WEB-INF/lib/commons-httpclient-<VERSION>.jarinto theCAS_HOME/cas-server-webapp/src/main/webapp/WEB-INF/libcreated directory.Get an installation of Tomcat and extract it into a suitable location (which will be called
TOMCAT_HOMEfor these instructions).Change the default port to avoid a conflict with the default GateIn 3.2 (for testing purposes). Edit
TOMCAT_HOME/conf/server.xmland replace the 8080 port to 8888.Note
If GateIn 3.2 is running on the same machine as Tomcat, other ports need to be changed in addition to 8080 to avoid port conflicts. They can be changed to any free port. For example, you can change admin port from 8005 to 8805, and AJP port from 8009 to 8809.
Go to
CAS_HOME/cas-server-webappand execute the command:mvn install
Copy
CAS_HOME/cas-server-webapp/target/cas.warintoTOMCAT_HOME/webapps.Tomcat should start and be accessible at http://localhost:8888/cas. Note that at this stage login won't be available.
Note
By default on logout the CAS server will display the CAS logout page with a link to return to the portal. To make the CAS server redirect to the portal page after a logout, modify the
cas.war/WEB-INF/cas-servlet.xml to include the follow line :
        <bean id="logoutController" class="org.jasig.cas.web.LogoutController"
                  p:centralAuthenticationService-ref="centralAuthenticationService"
                  p:logoutView="casLogoutView"
                  p:warnCookieGenerator-ref="warnCookieGenerator"
                  p:ticketGrantingTicketCookieGenerator-ref="ticketGrantingTicketCookieGenerator"
                p:followServiceRedirects="true"/>
Copy all libraries from
GATEIN_SSO_HOME/cas/gatein.ear/libintoJBOSS_HOME/server/default/deploy/gatein.ear/lib(Or in Tomcat, into $GATEIN_HOME/lib)In JBoss AS, edit
gatein.ear/META-INF/gatein-jboss-beans.xmland uncomment on this section:<authentication> <login-module code="org.gatein.sso.agent.login.SSOLoginModule" flag="required"> <module-option name="portalContainerName">portal</module-option> <module-option name="realmName">gatein-domain</module-option> </login-module> <login-module code="org.exoplatform.services.security.j2ee.JbossLoginModule" flag="required"> <module-option name="portalContainerName">portal</module-option> <module-option name="realmName">gatein-domain</module-option> </login-module> </authentication>In Tomcat, edit
GATEIN_HOME/conf/jaas.conf, uncomment on this section and comment other parts:org.gatein.sso.agent.login.SSOLoginModule required; org.exoplatform.services.security.j2ee.TomcatLoginModule required portalContainerName=portal realmName=gatein-domain;
In Tomcat, edit
GATEIN_HOME/webapps/portal.war/META-INF/context.xmland addServletAccessValveinto configuration as first sub-element ofContext:<Context path='/portal' docBase='portal' ... > <Valve className='org.gatein.sso.agent.tomcat.ServletAccessValve' /> ... </Context>The installation can be tested at this point:
Start (or restart) GateIn 3.2, and (assuming the CAS server on Tomcat is running) direct your browser to http://localhost:8888/cas.
Login with the username
rootand the passwordgtn(or any account created through the portal).
To utilize the Central Authentication Service, GateIn 3.2 needs to redirect all user authentication to the CAS server.
Information about where the CAS is hosted must be properly configured within the GateIn 3.2 instance. The required configuration is done by modifying three files:
In the
gatein.ear/web.war/groovy/groovy/webui/component/UIBannerPortlet.gtmlfile modify the 'Sign In' link as follows:<!-- <a class="Login" onclick="$signInAction"><%=_ctx.appRes("UILoginForm.label.Signin")%></a> --> <a class="Login" href="/portal/sso"><%=_ctx.appRes("UILoginForm.label.Signin")%></a>In the
gatein.ear/web.war/groovy/portal/webui/component/UILogoPortlet.gtmplfile, modify the 'Sign In' link as follows:<!-- <a onclick="$signInAction"><%=_ctx.appRes("UILogoPortlet.action.signin")%></a> --> <a href="/portal/sso"><%=_ctx.appRes("UILogoPortlet.action.signin")%></a>Replace the entire contents of
gatein.ear/02portal.war/login/jsp/login.jspwith:<html> <head> <script type="text/javascript"> window.location = '/portal/sso'; </script> </head> <body> </body> </html>Add the following Filters at the top of the filter chain in
gatein.ear/02portal.war/WEB-INF/web.xml:<filter> <filter-name>LoginRedirectFilter</filter-name> <filter-class>org.gatein.sso.agent.filter.LoginRedirectFilter</filter-class> <init-param> <!-- This should point to your SSO authentication server --> <param-name>LOGIN_URL</param-name> <!-- If casRenewTicket param value of InitiateLoginServlet is: not specified or false --> <param-value>http://localhost:8888/cas/login?service=http://localhost:8080/portal/initiatessologin</param-value> <!-- If casRenewTicket param value of InitiateLoginServlet is : true --> <!-- <param-value>http://localhost:8888/cas/login?service=http://localhost:8080/portal/initiatessologin&renew=true</param-value> --> </init-param> </filter> <filter> <filter-name>CASLogoutFilter</filter-name> <filter-class>org.gatein.sso.agent.filter.CASLogoutFilter</filter-class> <init-param> <!-- This should point to your JOSSO authentication server --> <param-name>LOGOUT_URL</param-name> <param-value>http://localhost:8888/cas/logout</param-value> </init-param> </filter> <filter> <filter-name>InitiateLoginFilter</filter-name> <filter-class>org.gatein.sso.agent.filter.InitiateLoginFilter</filter-class> <init-param> <param-name>ssoServerUrl</param-name> <param-value>http://localhost:8888/cas</param-value> </init-param> <init-param> <param-name>casRenewTicket</param-name> <param-value>false</param-value> </init-param> <init-param> <param-name>casServiceUrl</param-name> <param-value>http://localhost:8080/portal/initiatessologin</param-value> </init-param> <init-param> <param-name>loginUrl</param-name> <param-value>http://localhost:8080/portal/dologin</param-value> </init-param> </filter> <!-- Mapping the filters at the very top of the filter chain --> <filter-mapping> <filter-name>LoginRedirectFilter</filter-name> <url-pattern>/*</url-pattern> </filter-mapping> <filter-mapping> <filter-name>CASLogoutFilter</filter-name> <url-pattern>/*</url-pattern> </filter-mapping> <filter-mapping> <filter-name>InitiateLoginFilter</filter-name> <url-pattern>/initiatessologin</url-pattern> </filter-mapping>
Once these changes have been made, all links to the user authentication pages will redirect to the CAS centralized authentication form.
This Single-Sign-On plugin enables the seamless integration between GateIn 3.2 and the JOSSO Single-Sign-On Framework. Details about JOSSO can be found here.
Setting up this integration consists of two steps: installing/configuring a JOSSO server, and setting up the portal to use the JOSSO server.
This section describes how to set up the JOSSO server to authenticate against the GateIn 3.2 login module.
In this example, the JOSSO server will be installed on Tomcat.
JOSSO can be downloaded from http://sourceforge.net/projects/josso/files/. Use the package that embeds Apache Tomcat.
Once downloaded, extract the package into what will be called JOSSO_HOME in this example.
Warning
The steps described later are only correct in case of JOSSO v.1.8
If you have JOSSO 1.8.1, then copy the files from
GATEIN_SSO_HOME/josso/josso-181/plugininto the Tomcat directory (JOSSO_HOME).If you have JOSSO 1.8.2 or newer, then copy the files from
GATEIN_SSO_HOME/josso/josso-182/plugininto the Tomcat directory (JOSSO_HOME).This action should replace or add the following files to the
JOSSO_HOME/webapps/josso/WEB-INF/libdirectory:JOSSO_HOME/lib/josso-gateway-config.xmlJOSSO_HOME/lib/josso-gateway-gatein-stores.xml
and
JOSSO_HOME/webapps/josso/WEB-INF/classes/gatein.properties
Edit
TOMCAT_HOME/conf/server.xmland replace the 8080 port to 8888 to change the default Tomcat port and avoid a conflict with the default GateIn 3.2 port (for testing purposes).Port Conflicts
If GateIn 3.2 is running on the same machine as Tomcat, other ports need to be changed in addition to 8080 to avoid port conflicts. They can be changed to any free port. For example, you can change the admin port from 8005 to 8805, and AJP port from 8009 to 8809.
Tomcat should now start and allow access to http://localhost:8888/josso/signon/login.do but at this stage login will not be available.

Note
There are some changes in JOSSO agent api among versions 1.8.1 and 1.8.2, which means that we need to use different modules for different JOSSO versions. In next section, we will use directory with key josso-18X, which will be directory josso-181 if you have JOSSO 1.8.1 and josso-182 if you have JOSSO 1.8.2 or newer.Copy the library files from
GATEIN_SSO_HOME/josso/josso-18X/gatein.ear/libintogatein.ear/lib(or intoGATEIN_HOME/libif GateIn 3.2 is running in Tomcat)Copy the file
GATEIN_SSO_HOME/josso/josso-18X/gatein.ear/portal.war/WEB-INF/classes/josso-agent-config.xmlintogatein.ear/02portal.war/WEB-INF/classes(or intoGATEIN_HOME/webapps/portal.war/WEB-INF/classes, orGATEIN_HOME/confif GateIn 3.2 is running in Tomcat)In JBoss AS, edit
gatein.ear/META-INF/gatein-jboss-beans.xmland uncomment this section:<authentication> <login-module code="org.gatein.sso.agent.login.SSOLoginModule" flag="required"> <module-option name="portalContainerName">portal</module-option> <module-option name="realmName">gatein-domain</module-option> </login-module> <login-module code="org.exoplatform.services.security.j2ee.JbossLoginModule" flag="required"> <module-option name="portalContainerName">portal</module-option> <module-option name="realmName">gatein-domain</module-option> </login-module> </authentication>In Tomcat, edit
GATEIN_HOME/conf/jaas.confand uncomment this section:org.gatein.sso.agent.login.SSOLoginModule required; org.exoplatform.services.security.j2ee.TomcatLoginModule required portalContainerName=portal realmName=gatein-domain;
In Tomcat, edit
GATEIN_HOME/webapps/portal.war/META-INF/context.xmland addServletAccessValveinto configuration as first sub-element ofContext:<Context path='/portal' docBase='portal' ... > <Valve className='org.gatein.sso.agent.tomcat.ServletAccessValve' /> ... </Context>The installation can be tested at this point.
Start (or restart) GateIn 3.2, and (assuming the JOSSO server on Tomcat is running) direct your browser to http://localhost:8888/josso/signon/login.do.
Login with the username
rootand the passwordgtnor any account created through the portal.
The next part of the process is to redirect all user authentication to the JOSSO server.
Information about where the JOSSO server is hosted must be properly configured within the GateIn 3.2 instance. The required configuration is done by modifying four files:
In the
gatein.ear/web.war/groovy/groovy/webui/component/UIBannerPortlet.gtmlfile modify the 'Sign In' link as follows:<!-- <a class="Login" onclick="$signInAction"><%=_ctx.appRes("UILoginForm.label.Signin")%></a> --> <a class="Login" href="/portal/sso"><%=_ctx.appRes("UILoginForm.label.Signin")%></a>In the
gatein.ear/web.war/groovy/portal/webui/component/UILogoPortlet.gtmplfile modify the 'Sign In' link as follows:<!-- <a onclick="$signInAction"><%=_ctx.appRes("UILogoPortlet.action.signin")%></a> --> <a href="/portal/sso"><%=_ctx.appRes("UILogoPortlet.action.signin")%></a>Replace the entire contents of
gatein.ear/02portal.war/login/jsp/login.jspwith:<html> <head> <script type="text/javascript"> window.location = '/portal/sso'; </script> </head> <body> </body> </html>Add the following Filters at the top of the filter chain in
gatein.ear/02portal.war/WEB-INF/web.xml:<filter> <filter-name>LoginRedirectFilter</filter-name> <filter-class>org.gatein.sso.agent.filter.LoginRedirectFilter</filter-class> <init-param> <!-- This should point to your SSO authentication server --> <param-name>LOGIN_URL</param-name> <param-value>http://localhost:8888/josso/signon/login.do?josso_back_to=http://localhost:8080/portal/initiatessologin</param-value> </init-param> </filter> <filter> <filter-name>JOSSOLogoutFilter</filter-name> <filter-class>org.gatein.sso.agent.filter.JOSSOLogoutFilter</filter-class> <init-param> <!-- This should point to your JOSSO authentication server --> <param-name>LOGOUT_URL</param-name> <param-value>http://localhost:8888/josso/signon/logout.do</param-value> </init-param> </filter> <filter> <filter-name>InitiateLoginFilter</filter-name> <filter-class>org.gatein.sso.agent.filter.InitiateLoginFilter</filter-class> <init-param> <param-name>ssoServerUrl</param-name> <param-value>http://localhost:8888/josso/signon/login.do</param-value> </init-param> <init-param> <param-name>loginUrl</param-name> <param-value>http://localhost:8080/portal/dologin</param-value> </init-param> </filter> <!-- Mapping the filters at the very top of the filter chain --> <filter-mapping> <filter-name>LoginRedirectFilter</filter-name> <url-pattern>/*</url-pattern> </filter-mapping> <filter-mapping> <filter-name>JOSSOLogoutFilter</filter-name> <url-pattern>/*</url-pattern> </filter-mapping> <filter-mapping> <filter-name>InitiateLoginFilter</filter-name> <url-pattern>/initiatessologin</url-pattern> </filter-mapping>
From now on, all links redirecting to the user authentication pages will redirect to the JOSSO centralized authentication form.
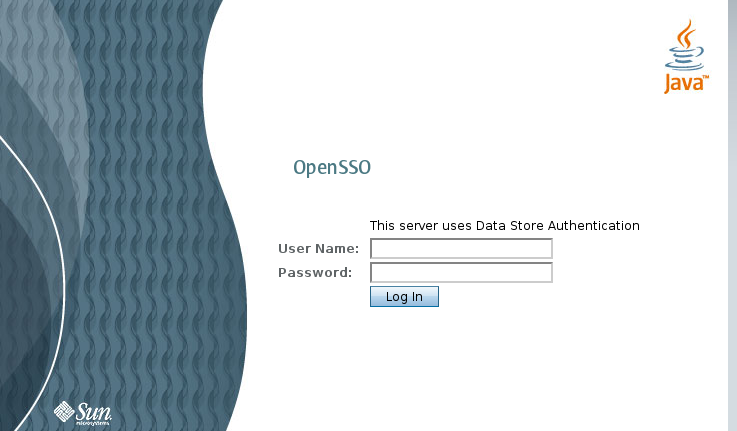
Setting up this integration involves two steps. The first step is to install or configure an OpenSSO server, and the second is to set up the portal to use the OpenSSO server.
This section details the setting up of OpenSSO server to authenticate against the GateIn 3.2 login module.
In this example the OpenSSO server will be installed on Tomcat.
OpenSSO must be purchased from Oracle.
For testing purpose, we will use OpenSSO_80U2 can be downloaded from Oracle.
Once downloaded, extract the package into a suitable location. This location will be referred to as OPENSSO_HOME in this example.
Note
There is also possibility to use OpenAM instead of OpenSSO server. OpenAM is free and integration steps with GateIn 3.2 and OpenAM are very similar as with OpenSSO. More info is here .
To configure the web server as desired, it is simpler to directly modify the sources.
The first step is to add the GateIn 3.2 Authentication Plugin:
The plugin makes secure authentication callbacks to a RESTful service installed on the remote GateIn 3.2 server to authenticate a user.
In order for the plugin to function correctly, it needs to be properly configured to connect to this service. This configuration is done via the opensso.war/config/auth/default/AuthenticationPlugin.xml file.
Obtain a copy of Tomcat and extract it into a suitable location (this location will be referred to as
TOMCAT_HOMEin this example).Change the default port to avoid a conflict with the default GateIn 3.2 port (for testing purposes) by editing
TOMCAT_HOME/conf/server.xmland replacing the 8080 port with 8888.Note
If GateIn 3.2 is running on the same machine as Tomcat, other ports need to be changed in addition to 8080 to avoid port conflicts. They can be changed to any free port. For example, you can change the admin port from 8005 to 8805, and AJP port from 8009 to 8809.
Ensure the
TOMCAT_HOME/webapps/opensso/config/auth/default/AuthenticationPlugin.xmlfile looks like this:<?xml version='1.0' encoding="UTF-8"?> <!DOCTYPE ModuleProperties PUBLIC "=//iPlanet//Authentication Module Properties XML Interface 1.0 DTD//EN" "jar://com/sun/identity/authentication/Auth_Module_Properties.dtd"> <ModuleProperties moduleName="AuthenticationPlugin" version="1.0" > <Callbacks length="2" order="1" timeout="60" header="GateIn OpenSSO Login" > <NameCallback> <Prompt> Username </Prompt> </NameCallback> <PasswordCallback echoPassword="false" > <Prompt> Password </Prompt> </PasswordCallback> </Callbacks> </ModuleProperties>Copy
GATEIN_SSO_HOME/opensso/plugin/WEB-INF/lib/sso-opensso-plugin-<VERSION>.jar,GATEIN_SSO_HOME/opensso/plugin/WEB-INF/lib/commons-httpclient-<VERSION>.jar, andGATEIN_SSO_HOME/opensso/plugin/WEB-INF/lib/commons-logging-<VERSION>.jarinto the Tomcat directory atTOMCAT_HOME/webapps/opensso/WEB-INF/lib.Copy
GATEIN_SSO_HOME/opensso/plugin/WEB-INF/classes/gatein.propertiesintoTOMCAT_HOME/webapps/opensso/WEB-INF/classesTomcat should start and be able to access http://localhost:8888/opensso/UI/Login?realm=gatein. Login will not be available at this point.
Configure "gatein" realm:
Direct your browser to http://localhost:8888/opensso
Create default configuration
Login as
amadminand then go to tab Configuration -> tab Authentication -> link Core -> add new value and fill in the class name org.gatein.sso.opensso.plugin.AuthenticationPlugin. This step is really important. Without it AuthenticationPlugin is not available among other OpenSSO authentication modules.Go to tab Access control and create new realm called gatein.
Go to "gatein" realm and click on Authentication tab. At the bottom in the section Authentication chaining click on ldapService. Here change the selection from "Datastore", which is the default module in the authentication chain, to AuthenticationPlugin. This enables authentication of "gatein" realm by using GateIn REST service instead of the OpenSSO LDAP server.
Go to Advanced properties and change UserProfile from "Required" to Dynamic. This step is needed because GateIn 3.2 users are not in OpenSSO Datastore (LDAP server), so their profiles can't be obtained if "Required" is active. By using "Dynamic" all new users are automatically created in OpenSSO datastore after successful authentication.
Increase the user privileges to allow REST access. Go to Access control -> Top level realm -> Privileges tab -> All authenticated users, and check the last two checkboxes:
Read and write access only for policy properties
Read and write access to all realm and policy properties
Repeat previous step with increasing privileges for gatein realm as well.
Copy all libraries from
GATEIN_SSO_HOME/opensso/gatein.ear/libintoJBOSS_HOME/server/default/deploy/gatein.ear/lib(Or, in Tomcat, intoGATEIN_HOME/lib)In JBoss AS, edit
gatein.ear/META-INF/gatein-jboss-beans.xmland uncomment this section<authentication> <login-module code="org.gatein.sso.agent.login.SSOLoginModule" flag="required"> <module-option name="portalContainerName">portal</module-option> <module-option name="realmName">gatein-domain</module-option> </login-module> <login-module code="org.exoplatform.services.security.j2ee.JbossLoginModule" flag="required"> <module-option name="portalContainerName">portal</module-option> <module-option name="realmName">gatein-domain</module-option> </login-module> </authentication>If you are running GateIn 3.2 in Tomcat, edit
GATEIN_HOME/conf/jaas.conf, uncomment on this section and comment other parts:org.gatein.sso.agent.login.SSOLoginModule required; org.exoplatform.services.security.j2ee.TomcatLoginModule required portalContainerName=portal realmName=gatein-domain;
In Tomcat, edit
GATEIN_HOME/webapps/portal.war/META-INF/context.xmland addServletAccessValveinto configuration as first sub-element ofContext:<Context path='/portal' docBase='portal' ... > <Valve className='org.gatein.sso.agent.tomcat.ServletAccessValve' /> ... </Context>At this point the installation can be tested:
Access GateIn 3.2 by going to http://localhost:8888/opensso/UI/Login?realm=gatein (assuming that the OpenSSO server using Tomcat is still running).
Login with the username
rootand the passwordgtnor any account created through the portal.
The next part of the process is to redirect all user authentication to the OpenSSO server.
Information about where the OpenSSO server is hosted must be properly configured within the Enterprise Portal Platform instance. The required configuration is done by modifying three files:
In the
gatein.ear/web.war/groovy/groovy/webui/component/UIBannerPortlet.gtmlfile modify the 'Sign In' link as follows:<!-- <a class="Login" onclick="$signInAction"><%=_ctx.appRes("UILoginForm.label.Signin")%></a> --> <a class="Login" href="/portal/sso"><%=_ctx.appRes("UILoginForm.label.Signin")%></a>In the
gatein.ear/web.war/groovy/portal/webui/component/UILogoPortlet.gtmplfile modify the 'Sign In' link as follows:<!-- <a onclick="$signInAction"><%=_ctx.appRes("UILogoPortlet.action.signin")%></a> --> <a href="/portal/sso"><%=_ctx.appRes("UILogoPortlet.action.signin")%></a>Replace the entire contents of
gatein.ear/02portal.war/login/jsp/login.jspwith:<html> <head> <script type="text/javascript"> window.location = '/portal/sso'; </script> </head> <body> </body> </html>Add the following Filters at the top of the filter chain in
gatein.ear/02portal.war/WEB-INF/web.xml:<filter> <filter-name>LoginRedirectFilter</filter-name> <filter-class>org.gatein.sso.agent.filter.LoginRedirectFilter</filter-class> <init-param> <!-- This should point to your SSO authentication server --> <param-name>LOGIN_URL</param-name> <param-value>http://localhost:8888/opensso/UI/Login?realm=gatein&goto=http://localhost:8080/portal/initiatessologin</param-value> </init-param> </filter> <filter> <filter-name>OpenSSOLogoutFilter</filter-name> <filter-class>org.gatein.sso.agent.filter.OpenSSOLogoutFilter</filter-class> <init-param> <!-- This should point to your SSO authentication server --> <param-name>LOGOUT_URL</param-name> <param-value>http://localhost:8888/opensso/UI/Logout</param-value> </init-param> </filter> <filter> <filter-name>InitiateLoginFilter</filter-name> <filter-class>org.gatein.sso.agent.filter.InitiateLoginFilter</filter-class> <init-param> <param-name>ssoServerUrl</param-name> <param-value>http://localhost:8888/opensso</param-value> </init-param> <init-param> <param-name>loginUrl</param-name> <param-value>http://localhost:8080/portal/dologin</param-value> </init-param> <init-param> <param-name>ssoCookieName</param-name> <param-value>iPlanetDirectoryPro</param-value> </init-param> </filter> <!-- Mapping the filters at the very top of the filter chain --> <filter-mapping> <filter-name>LoginRedirectFilter</filter-name> <url-pattern>/*</url-pattern> </filter-mapping> <filter-mapping> <filter-name>OpenSSOLogoutFilter</filter-name> <url-pattern>/*</url-pattern> </filter-mapping> <filter-mapping> <filter-name>InitiateLoginFilter</filter-name> <url-pattern>/initiatessologin</url-pattern> </filter-mapping>
From now on, all links redirecting to the user authentication pages will redirect to the OpenSSO centralized authentication form.
Authentication scenario described in previous parts assumes that GateIn 3.2 and OpenSSO are deployed on same server or in same DNS domain (like OpenSSO on opensso.shareddomain.com and GateIn 3.2 on portal.shareddomain.com).
After successful authentication in OpenSSO console, OpenSSO will add special cookie iPlanetDirectoryPro for DNS domain shareddomain.com and then it redirects to portal agent. Portal OpenSSO agent can read SSO token from this cookie because cookie is in same DNS domain, so it can perform validation of token. In other words, exchange of secret token between OpenSSO and GateIn 3.2 is done through this shared cookie.
This approach can't work in situations, when GateIn 3.2 server and OpenSSO server are in different domains and can't share cookie. For this scenario, OpenSSO provides special servlet CDCServlet. Authenticated user can send request to this servlet and servlet will send him encoded SAML message with SSO token and other informations. Portal agent is then able to parse and validate this message, obtain SSO token and establish iPlanetDirectoryPro cookie for server where portal is deployed. Once OpenSSO agent on portal side has token, it can perform other validations of this token and successfuly finish authentication of user.
You can follow this link for more technical informations about CDCServlet or this link for more info about whole OpenSSO Cross-Domain workflow with possible troubleshooting tips.
Let's assume that your OpenSSO server is deployed on opensso.mydomain.com and GateIn 3.2 on portal.yourdomain.com. If you are on single machine, you can simply simulate this scenario by using virtual hosts. On linux you can simply edit /etc/hosts file and add those records:
                         opensso.mydomain.com 127.0.0.1
                         portal.yourdomain.com 127.0.1.1
Now you can follow steps in previous sections about GateIn 3.2 and OpenSSO integration. Assumption is that OpenSSO will be deployed on Tomcat server on opensso.mydomain.com:8888 and GateIn 3.2 will be deployed on portal.yourdomain.com:8080. Configuration of LoginRedirectFilter on GateIn 3.2 side in file gatein.ear/02portal.war/WEB-INF/web.xml will be different. We will use different class for filter and different parameters, because now we don't redirect user directly to OpenSSO console but we need to redirect him to CDCServlet. Configuration will look as follows:
<filter>
  <filter-name>LoginRedirectFilter</filter-name>
  <filter-class>org.gatein.sso.agent.filter.OpenSSOCDLoginRedirectFilter</filter-class>
  <init-param>
    <!-- This should point to URL of CDCServlet on your OpenSSO authentication server -->
    <param-name>LOGIN_URL</param-name>
    <param-value>http://opensso.mydomain.com:8888/opensso/cdcservlet</param-value>
  </init-param>
  <init-param>
    <!-- This is name of GateIn authentication realm in your OpenSSO server -->
    <param-name>OpenSSORealm</param-name>
    <param-value>gatein</param-value>
  </init-param>
  <init-param>
    <!-- This is URL of agent on GateIn server side. Normally it should point to location,
         which is mapped to InitiateLoginFilter
    -->
    <param-name>AgentUrl</param-name>
    <param-value>http://portal.yourdomain.com:8080/portal/initiatessologin</param-value>
  </init-param>
</filter>
Configuration of OpenSSOLogoutFilter and InitiateLoginFilter will be quite similar like in previous scenario. Only difference are different host names:
<filter>
  <filter-name>OpenSSOLogoutFilter</filter-name>
  <filter-class>org.gatein.sso.agent.filter.OpenSSOLogoutFilter</filter-class>
  <init-param>
    <!-- This should point to your OpenSSO authentication server -->
    <param-name>LOGOUT_URL</param-name>
    <param-value>http://opensso.mydomain.com:8888/opensso/UI/Logout</param-value>
  </init-param>
</filter>
<filter>
  <filter-name>InitiateLoginFilter</filter-name>
  <filter-class>org.gatein.sso.agent.filter.InitiateLoginFilter</filter-class>
  <init-param>
    <param-name>ssoServerUrl</param-name>
    <param-value>http://opensso.mydomain.com:8888/opensso</param-value>
  </init-param>
  <init-param>
    <param-name>loginUrl</param-name>
    <param-value>http://portal.yourdomain.com:8080/portal/dologin</param-value>
  </init-param>
  <init-param>
    <param-name>ssoCookieName</param-name>
    <param-value>iPlanetDirectoryPro</param-value>
  </init-param>
</filter>
In case that you are on OpenAM instead of OpenSSO, it's mandatory to create agent for GateIn 3.2 server. This agent is required by CDCServlet to work properly. You can create agent in OpenAM UI by performing these steps:
Go to http://opensso.mydomain.com:8888/opensso and login as amadmin
Go to Access Control --> Realm "gatein" --> Agents --> Web
Create new web agent through the wizard. You can use these properties:
Name: GateInAgent
Password: Whatever you want...
Configuration: Centralized
Server URL: http://opensso.mydomain.com:8888/opensso
Agent URL: http://portal.yourdomain.com:8080
If you have more portal servers on different hosts, you may want to create agent for each of them. Please look at OpenAM administration guide for more details.
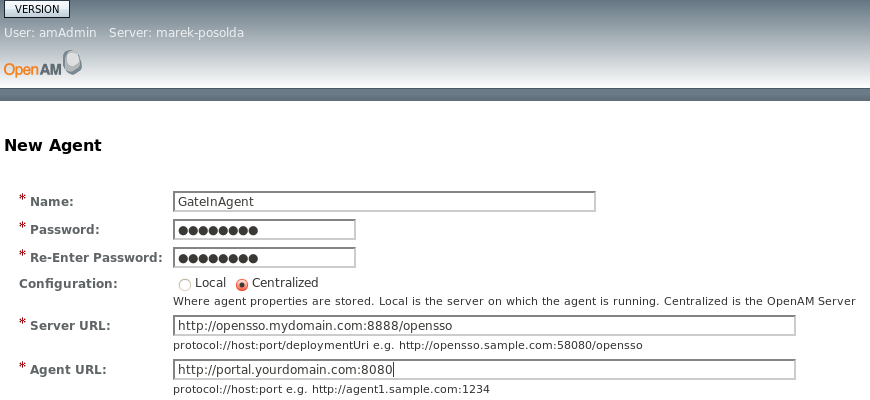
Note
Support for Cross-Domain scenario has been tested with GateIn 3.2 and with OpenSSO of version 8.0-Update1 and OpenAM of version 9.5.2 as SSO servers.SPNEGO (Simple and Protected GSSAPI Negotiation Mechanism) is used to authenticate transparently through the web browser after the user has been authenticated when logging-in his session.
A typical use case is the following:
User logs into his desktop (Such as a Windows machine).
The desktop login is governed by Active Directory domain.
User then uses his browser (IE/Firefox) to access a web application (that uses JBoss Negotiation) hosted on JBoss EPP.
The Browser transfers the desktop sign on information to the web application.
JBoss EAP/AS uses background GSS messages with the Active Directory (or any Kerberos Server) to validate the Kerberos ticket from user.
The User has seamless SSO into the web application.
In this section, we will describe some necessary steps for setup Kerberos server on Linux. This server will then be used for SPNEGO authentication against GateIn 3.2
Note
If you don't have Linux but you are using Windows and Active Directory domain, then these informations are not important for you and you may jump to the Section 6.8.6.3, “GateIn 3.2 Configuration” to see how to integrate SPNEGO with GateIn 3.2. Please note that Kerberos setup is also dependent on your Linux distribution and so steps can be slightly different in your environment.
Correct the setup of network on the machine. For example, if you are using the "server.local.network" domain as your machine where Kerberos and GateIn 3.2 are located, add the line containing the machine's IP address to the /etc/hosts file.
192.168.1.88 server.local.networkNote
It is not recommended to use loopback addresses.
Install Kerberos with these packages: krb5-admin-server, krb5-kdc, krb5-config, krb5-user, krb5-clients, and krb5-rsh-server.
Edit the Kerberos configuration file at /etc/krb5.config, including:
Uncomment on these lines:
default_tgs_enctypes = des3-hmac-sha1
default_tkt_enctypes = des3-hmac-sha1
permitted_enctypes = des3-hmac-sha1
Add local.network as a default realm and it is also added to the list of realms and remove the remains of realms. The content looks like:
[libdefaults]
    default_realm = LOCAL.NETWORK

# The following krb5.conf variables are only for MIT Kerberos.
    krb4_config = /etc/krb.conf
    krb4_realms = /etc/krb.realms
    kdc_timesync = 1
    ccache_type = 4
    forwardable = true
    proxiable = true

# The following encryption type specification will be used by MIT Kerberos
# if uncommented.  In general, the defaults in the MIT Kerberos code are
# correct and overriding these specifications only serves to disable new
# encryption types as they are added, creating interoperability problems.
#
# Thie only time when you might need to uncomment these lines and change
# the enctypes is if you have local software that will break on ticket
# caches containing ticket encryption types it doesn't know about (such as
# old versions of Sun Java).

    default_tgs_enctypes = des3-hmac-sha1
    default_tkt_enctypes = des3-hmac-sha1
    permitted_enctypes = des3-hmac-sha1

# The following libdefaults parameters are only for Heimdal Kerberos.
    v4_instance_resolve = false
    v4_name_convert = {
        host = {
            rcmd = host
            ftp = ftp
        }
        plain = {
            something = something-else
        }
    }
    fcc-mit-ticketflags = true

[realms]
    LOCAL.NETWORK = {
        kdc = server.local.network
        admin_server = server.local.network
    }

[domain_realm]
    .local.network = LOCAL.NETWORK
    local.network = LOCAL.NETWORK

[login]
    krb4_convert = true
    krb4_get_tickets = false
Edit the KDC configuraton file at /etc/krb5kdc/kdc.conf that looks like.
[kdcdefaults]
    kdc_ports = 750,88

[realms]
    LOCAL.NETWORK = {
        database_name = /home/gatein/krb5kdc/principal
        admin_keytab = FILE:/home/gatein/krb5kdc/kadm5.keytab
        acl_file = /home/gatein/krb5kdc/kadm5.acl
        key_stash_file = /home/gatein/krb5kdc/stash
        kdc_ports = 750,88
        max_life = 10h 0m 0s
        max_renewable_life = 7d 0h 0m 0s
        master_key_type = des3-hmac-sha1
        supported_enctypes = aes256-cts:normal arcfour-hmac:normal des3-hmac-sha1:normal des-cbc-crc:normal des:normal des:v4 des:norealm des:onlyrealm des:afs3
        default_principal_flags = +preauth
    }

[logging]
        kdc = FILE:/home/gatein/krb5logs/kdc.log
        admin_server = FILE:/home/gatein/krb5logs/kadmin.log
Create krb5kdc and krb5logs directory for Kerberos database as shown in the configuration file above.
Next, create a KDC database using the following command.
sudo krb5_newrealm
Start the KDC and Kerberos admin servers using these commands:
sudo /etc/init.d/krb5-kdc restart
sudo /etc/init.d/krb-admin-server restart
Add Principals and create Keys.
Start an interactive 'kadmin' session and create the necessary Principals.
sudo kadmin.local
Add the GateIn 3.2 machine and keytab file that need to be authenticated.
addprinc -randkey HTTP/server.local.network@LOCAL.NETWORK
ktadd HTTP/server.local.network@LOCAL.NETWORK
Add the default GateIn 3.2 user accounts and enter the password for each created user that will be authenticated.
addprinc john
addprinc demo
addprinc root
Test your changed setup by using the command.
kinit -A demo
If the setup works well, you are required to enter the password created for this user in Step 5. Without the -A, the kerberos ticket validation involved reverse DNS lookups, which can get very cumbersome to debug if your network's DNS setup is not great. This is a production level security feature, which is not necessary in this development setup. In production environment, it will be better to avoid -A option.
After successful login to Kerberos, you can see your Kerberos ticket when using this command.
klist
If you want to logout and destroy your ticket, use this command.
kdestroy
After performing all configurations above, you need to enable the Negotiate authentication of Firefox in client machines so that clients could be authenticated by GateIn 3.2 as follows:
Start Firefox, then enter the command: about:config into the address field.
Enter network.negotiate-auth and set the value as below:
network.negotiate-auth.allow-proxies = true
network.negotiate-auth.delegation-uris = .local.network
network.negotiate-auth.gsslib (no-value)
network.negotiate-auth.trusted-uris = .local.network
network.negotiate-auth.using-native-gsslib = true
Note
Consult documentation of your OS or web browser if using different browser than Firefox.
GateIn 3.2 uses JBoss Negotiation to enable SPNEGO-based desktop SSO for the portal. Here are the steps to integrate SPNEGO with GateIn 3.2.
Activate the Host authentication under the JBOSS_HOME/server/default/conf/login-config.xml file by adding the following host login module:
<!-- SPNEGO domain -->
<application-policy name="host">
  <authentication>
    <login-module code="com.sun.security.auth.module.Krb5LoginModule" flag="required">
      <module-option name="storeKey">true</module-option>
      <module-option name="useKeyTab">true</module-option>
      <module-option name="principal">HTTP/server.local.network@LOCAL.NETWORK</module-option>
      <module-option name="keyTab">/etc/krb5.keytab</module-option>
      <module-option name="doNotPrompt">true</module-option>
      <module-option name="debug">true</module-option>
    </login-module>
  </authentication>
 </application-policy>
The 'keyTab' value should point to the keytab file that was generated by the kadmin kerberos tool. When using Kerberos on Linux, it should be value of parameter admin_keytab from kdc.conf file. See the Section 6.8.6.1, “SPNEGO Server Configuration” section for more details.
Extend the core authentication mechanisms to support SPNEGO under JBOSS_HOME/server/default/deployers/jbossweb.deployer/META-INF/war-deployers-jboss-beans.xml by adding the 'SPNEGO' authenticators property.
<deployment xmlns="urn:jboss:bean-deployer:2.0">
<property name="authenticators">
  <map class="java.util.Properties" keyClass="java.lang.String" valueClass="java.lang.String">
     <entry>
        <key>BASIC</key>
        <value>org.apache.catalina.authenticator.BasicAuthenticator</value>
     </entry>
     <entry>
        <key>CLIENT-CERT</key>
        <value>org.apache.catalina.authenticator.SSLAuthenticator</value>
     </entry>
     <entry>
       <key>DIGEST</key>
       <value>org.apache.catalina.authenticator.DigestAuthenticator</value>
     </entry>
     <entry>
        <key>FORM</key>
        <value>org.apache.catalina.authenticator.FormAuthenticator</value>
     </entry>
     <entry>
        <key>NONE</key>
        <value>org.apache.catalina.authenticator.NonLoginAuthenticator</value>
     </entry>

     <!-- Add this entry -->
     <entry>
        <key>SPNEGO</key>
        <value>org.gatein.sso.spnego.GateInNegotiationAuthenticator</value>
     </entry>
  </map>
</property>
Add the GateIn SSO module binaries by copying GATEIN_SSO_HOME/spnego/gatein.ear/lib/sso-agent-VERSION.jar to the JBOSS_HOME/server/default/deploy/gatein.ear/lib directory. File GATEIN_SSO_HOME/spnego/gatein.ear/lib/spnego-VERSION.jar needs to be copied to the JBOSS_HOME/server/default/lib directory.
Download library
jboss-negotiation-2.0.4.GAfrom location https://repository.jboss.org/nexus/content/groups/public/org/jboss/security/jboss-negotiation/2.0.4.GA/jboss-negotiation-2.0.4.GA.jar and copy this file toJBOSS_HOME/server/default/libdirectory as well.Modify the JBOSS_HOME/server/defaut/deploy/gatein.ear/META-INF/gatein-jboss-beans.xml file as below:
<deployment xmlns="urn:jboss:bean-deployer:2.0">

  <application-policy xmlns="urn:jboss:security-beans:1.0" name="gatein-form-auth-domain">
    <authentication>
      <login-module code="org.gatein.wci.security.WCILoginModule" flag="optional">
        <module-option name="portalContainerName">portal</module-option>
        <module-option name="realmName">gatein-domain</module-option>
      </login-module>
      <login-module code="org.exoplatform.services.security.jaas.SharedStateLoginModule" flag="required">
        <module-option name="portalContainerName">portal</module-option>
        <module-option name="realmName">gatein-domain</module-option>
      </login-module>

      <!-- Uncomment this part to check on each login if user is member of "/platform/users" group and if not
           create such membership -->
      <!--
      <login-module code="org.exoplatform.services.organization.idm.CustomMembershipLoginModule" flag="required">
        <module-option name="portalContainerName">portal</module-option>
        <module-option name="realmName">gatein-domain</module-option>
        <module-option name="membershipType">member</module-option>
        <module-option name="groupId">/platform/users</module-option>
      </login-module>
      -->

      <login-module code="org.exoplatform.services.security.j2ee.JbossLoginModule" flag="required">
        <module-option name="portalContainerName">portal</module-option>
<!-- logout needs to be performed from 'gatein-domain' as it is used for JaasSecurityManager. -->
        <module-option name="realmName">gatein-domain</module-option>
      </login-module>
    </authentication>
  </application-policy>


  <application-policy xmlns="urn:jboss:security-beans:1.0" name="gatein-domain">
    <authentication>
     <login-module
         code="org.gatein.sso.spnego.SPNEGOLoginModule"
         flag="requisite">
         <module-option name="password-stacking">useFirstPass</module-option>
         <module-option name="serverSecurityDomain">host</module-option>
	 <module-option name="removeRealmFromPrincipal">true</module-option>
	 <module-option name="usernamePasswordDomain">gatein-form-auth-domain</module-option>
      </login-module>
      <login-module
         code="org.gatein.sso.agent.login.SPNEGORolesModule"
         flag="required">
      <module-option name="password-stacking">useFirstPass</module-option>
      <module-option name="portalContainerName">portal</module-option>
      <module-option name="realmName">gatein-domain</module-option>
      </login-module>
   </authentication>
  </application-policy>

</deployment>
This activates SPNEGO LoginModules with fallback to FORM authentication. When SPNEGO is not available and it needs to fallback to FORM, it will use gatein-form-auth-domain security domain. More details below.
Modify JBOSS_HOME/server/default/deploy/gatein.ear/02portal.war/WEB-INF/web.xml as below.
<!--	<login-config>
	  <auth-method>FORM</auth-method>
	  <realm-name>gatein-domain</realm-name>
		<form-login-config>
		  <form-login-page>/initiatelogin</form-login-page>
			<form-error-page>/errorlogin</form-error-page>
	  </form-login-config>
	</login-config>
-->
    <login-config>
      <auth-method>SPNEGO</auth-method>
      <realm-name>SPNEGO</realm-name>
      <form-login-config>
	     <form-login-page>/initiatelogin</form-login-page>
	     <form-error-page>/errorlogin</form-error-page>
     </form-login-config>
    </login-config>
This integrates SPNEGO support into the Portal web archive by switching the authentication mechanism from the default "FORM"-based to "SPNEGO"-based authentication. You can notice that SPNEGO part also contains element form-login-config, which is needed if you want to enable fallback to FORM based authentication. In this case, portal will try to authenticate user with his Kerberos ticket through SPNEGO. If user don't have Kerberos ticket, he will be redirected to FORM (GateIn 3.2 login screen). So first attempt is for login with SPNEGO and next attempt is for login with FORM, which is used only if login through SPNEGO is not successful (For example user don't have valid Kerberos ticket or his browser doesn't support SPNEGO with our Kerberos server).
If you don't want fallback to FORM, you can disable form-login-config part and have only:
    <login-config>
      <auth-method>SPNEGO</auth-method>
      <realm-name>SPNEGO</realm-name>
<!--      <form-login-config>
	     <form-login-page>/initiatelogin</form-login-page>
	     <form-error-page>/errorlogin</form-error-page>
     </form-login-config>
-->
    </login-config>
In this case user needs to authenticate through SPNEGO and if that fails, FORM is not shown but user has authentication error with HTTP code 401.
Integrate the request pre-processing needed for SPNEGO via filters by adding the following filters to the JBOSS_HOME/server/default/deploy/gatein.ear/02portal.war/WEB-INF/web.xml at the top of the Filter chain.
<filter>
  <filter-name>LoginRedirectFilter</filter-name>
  <filter-class>org.gatein.sso.agent.filter.LoginRedirectFilter</filter-class>
  <init-param>
    <!-- This should point to your SSO authentication server -->
    <param-name>LOGIN_URL</param-name>
    <param-value>/portal/private/classic</param-value>
  </init-param>
</filter>

<filter>
 <filter-name>SPNEGOFilter</filter-name>
 <filter-class>org.gatein.sso.agent.filter.SPNEGOFilter</filter-class>
</filter>

<filter-mapping>
  <filter-name>LoginRedirectFilter</filter-name>
  <url-pattern>/*</url-pattern>
</filter-mapping>

<filter-mapping>
  <filter-name>SPNEGOFilter</filter-name>
  <url-pattern>/login</url-pattern>
</filter-mapping>
In
JBOSS_HOME/server/default/deploy/gatein.ear/web.war/groovy/groovy/webui/component/UIBannerPortlet.gtmlfile modify the 'Sign In' link as follows:<!-- <a class="Login" onclick="$signInAction"><%=_ctx.appRes("UILoginForm.label.Signin")%></a> --> <a class="Login" href="/portal/sso"><%=_ctx.appRes("UILoginForm.label.Signin")%></a>Start the GateIn 3.2 portal using the command below.
sudo ./run.sh -Djava.security.krb5.realm=LOCAL.NETWORK -Djava.security.krb5.kdc=server.local.network -c default -b server.local.network
Login to Kerberos with the command.
kinit -A demo
You should be able to click the 'Sign In' link on the GateIn 3.2 portal and the 'demo' user from the GateIn 3.2 portal should be automatically logged in.
Let's try to destroy kerberos ticket with command
kdestroy
Then try to login again. You will now be placed to login screen of GateIn 3.2 because you don't have active Kerberos ticket. You can login with predefined account and password "demo"/"gtn" .
SAML (Security Assertion Markup Language) is Oasis standard for exchanging authentication and authorization data between security domains. SAML 2.0 is an XML-based protocol that uses security tokens containing assertions to pass information about a principal (usually an end user) between an identity provider and a web service. SAML 2.0 enables web-based authentication and authorization scenarios including single sign-on (SSO).
SAML2 standard is described in set of specifications, which provides exact format of XML messages and context how these messages are exchanged between Identity Provider (IDP, Web application, which acts as SSO provider and users are authenticated against it) and Service Provider (SP, Web application, which is used by client who wants to authenticate). More info about specifications in document http://docs.oasis-open.org/security/saml/v2.0/ .
SAML2 based authentication is provided in GateIn 3.2 SSO component. We support scenarios with GateIn 3.2 acting as Service Provider (SP) or Identity Provider (IDP).
For GateIn 3.2 and SAML2 integration, we are using JBoss project Picketlink Federation, which provides solution for most important parts of SAML2 specification. Especially it supports SSO authentication with SAML2 HTTP Redirect Binding and SAML2 HTTP Post Binding and it supports SAML2 Global Logout feature.
SSO authentication is based on circle of trust between SP and IDP.
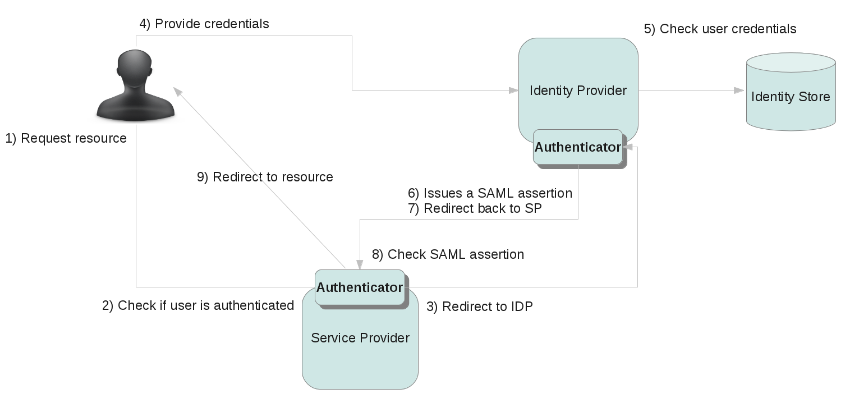
Authentication works as follows (flow with GateIn 3.2 as SAML2 SP):
- User sends request to secured resource like http://localhost:8080/portal/dologin
- GateIn 3.2 will check if user is already authenticated and if yes, grant access to resource. Otherwise continue with flow below.
-
There is special Tomcat valve, which needs to be configured for portal context. This Valve will create SAML Request, which is basically XML message. Example of message:
<samlp:AuthnRequest AssertionConsumerServiceURL="http://localhost:8080/portal/dologin" ID="ID_101dcb5e-f432-4f45-87cb-47daff92edef" IssueInstant="2012-04-12T17:53:27.294+01:00" ProtocolBinding="urn:oasis:names:tc:SAML:2.0:bindings:HTTP-POST" Version="2.0">
   <saml:Issuer>http://localhost:8080/portal/dologin</saml:Issuer>
   <samlp:NameIDPolicy AllowCreate="true" Format="urn:oasis:names:tc:SAML:2.0:nameid-format:transient"/>
</samlp:AuthnRequest>
Valve will encapsulate SAML request into HttpResponse and it redirects it to IDP. Picketlink Federation supports SAML Redirect Binding, which basically means that SAML XML Request message is Base64 encoded and URL encoded and it is appended as URL parameter to GET request, which will be send to IDP. PL Fed also supports SAML POST Binding where is message encoded into Base64 and sent in the body of POST request. - IDP parses XML with SAML request and it sends login screen back to client. Now client (user) needs to authenticate himself. SAML specification does not mandate how exactly should be authentication of client on IDP side performed.
-
User fills his credentials into IDP FORM and submits request for JAAS authentication. GateIn 3.2 SSO component
provides login module
SAML2IdpLoginModule, which will authenticate user by sending callback request via REST API back to GateIn 3.2. This is similar approach like authentication with other SSO providers like CAS, which are also leveraging this REST service.Note
Portal administrators are free to use their own login module stack instead of our REST callback based login module. However they need to make sure that authenticated users also need to exist in GateIn 3.2 database. Otherwise their users may have authorization errors with 403 response when they try to access portal. -
So after successful authentication will IDP create SAML assertion ticket and it creates SAML Response message with this ticket. Message can looks like this:
<samlp:Response ID="ID_5291c49e-5450-4b3b-9f99-f76606db9929" Version="2.0" IssueInstant="2012-04-12T17:53:59.237+01:00" Destination="http://localhost:8080/portal/dologin" InResponseTo="ID_101dcb5e-f432-4f45-87cb-47daff92edef"> <saml:Issuer>http://localhost:8080/idp/</saml:Issuer> <samlp:Status> <samlp:StatusCode Value="urn:oasis:names:tc:SAML:2.0:status:Success"/> </samlp:Status> <saml:Assertion ID="ID_ebe89398-1e27-4257-9413-c3c17c40c9df" Version="2.0" IssueInstant="2012-04-12T17:53:59.236+01:00"> <saml:Issuer Format="urn:oasis:names:tc:SAML:2.0:nameid-format:persistent">root</saml:Issuer> <saml:Subject> <saml:NameID Format="urn:oasis:names:tc:SAML:2.0:nameid-format:persistent">root</saml:NameID> <saml:SubjectConfirmation Method="urn:oasis:names:tc:SAML:2.0:cm:bearer"> <saml:SubjectConfirmationData InResponseTo="ID_101dcb5e-f432-4f45-87cb-47daff92edef" NotBefore="2012-04-12T17:53:59.236+01:00" NotOnOrAfter="2012-04-12T17:54:06.236+01:00" Recipient="http://localhost:8080/portal/dologin"/> </saml:SubjectConfirmation> </saml:Subject> <saml:Conditions NotBefore="2012-04-12T17:53:57.236+01:00" NotOnOrAfter="2012-04-12T17:54:06.236+01:00"/> <saml:AuthnStatement AuthnInstant="2012-04-12T17:53:59.237+01:00"> <saml:AuthnContext> <saml:AuthnContextClassRef>urn:oasis:names:tc:SAML:2.0:ac:classes:Password</saml:AuthnContextClassRef> </saml:AuthnContext> </saml:AuthnStatement> <saml:AttributeStatement> <saml:Attribute Name="Role"> <saml:AttributeValue xsi:type="xs:string">users</saml:AttributeValue> </saml:Attribute> <saml:Attribute Name="Role"> <saml:AttributeValue xsi:type="xs:string">administrators</saml:AttributeValue> </saml:Attribute> </saml:AttributeStatement> </saml:Assertion> </samlp:Response> - Message is then encapsulated into HttpResponse and redirected back to SP (GateIn 3.2).
-
On GateIn 3.2 side is SAML response message decoded again by the Tomcat Valve and if assertion from response
is valid, then username and his roles are added into ThreadLocal context variable. Valve then triggers JAAS
authentication. GateIn 3.2 SSO component will provide login module
SAML2IntegrationLoginModule, which will parse authenticated username and it will perform GateIn 3.2 specific operations, like creating Identity object and registering it into IdentityRegistry. Now user is successfully authenticated. - User is redirected back to secure resource http://localhost:8080/portal/dologin , which in next turn will redirect him to GateIn 3.2 as authenticated user.
If user wants to authenticate against different SP application within same browser session (GateIn 3.2 on different host or completely different web application), then he does not need to provide credentials again on IDP side because he has been already authenticated against IDP. So he has automatic authentication thanks to SSO.
In next sections, we will go through various scenarios, which describes how you can leverage SAML2 in GateIn 3.2 and there is description of all needed configuration changes.
This scenario is good starting point for other use cases. GateIn 3.2 will act as SAML2 SP. We will have GateIn 3.2 and SAML2 IDP on same host and we will use JBoss 5 as target server. So assumption is that you have GateIn 3.2 bundle for JBoss 5. Directory with GateIn 3.2 will be referred to as JBOSS_HOME. Directory with unpacked SSO packaging zip will be referred to as GATEIN_SSO_HOME similarly like in previous sections.
- Download idp-sig application. It's sample quickstart application for Picketlink Federation and it's preconfigured to act as SAML2 IDP, which uses signed SAML messages. It can be downloaded from https://repository.jboss.org/nexus/index.html#nexus-search;quick~picketlink-quickstarts . You will need version for JBoss AS5.
-
Deploy downloaded
idp-sig-VERSION.warinto directoryJBOSS_HOME/server/default/deploy/. -
Copy all JAR files from
GATEIN_SSO_HOME/saml/gatein.ear/lib/*intoJBOSS_HOME/server/default/deploy/gatein.ear/lib/ -
Copy main configuration file for Picketlink Federation from location
GATEIN_SSO_HOME/saml/gatein.ear/02portal.war/WEB-INF/picketlink.xmlto locationJBOSS_HOME/server/default/deploy/gatein.ear/02portal.war/WEB-INF/ -
Copy example keystore file for picketlink federation from
GATEIN_SSO_HOME/saml/gatein.ear/02portal.war/WEB-INF/classes/jbid_test_keystore.jkstoJBOSS_HOME/server/default/deploy/gatein.ear/02portal.war/WEB-INF/classes/. This is example keystore file, which uses same keys on both GateIn 3.2 and IDP side. Since it's prebundled keystore, it should not be used for production environment (more details in Section 6.8.7.3, “Using your own keystores”). -
Copy file
gatein-jboss-beansfromGATEIN_SSO_HOME/saml/gatein.ear/META-INF/gatein-jboss-beans.xmltoJBOSS_HOME/server/default/deploy/gatein.ear/META-INF/gatein-jboss-beans.xml. This will replace original file with new configuration, which contains JAAS login modules needed for SAML integration. There are 2 login modules by default: SAML2IntegrationLoginModule and JbossLoginModule. -
Add and configure new Valve in
JBOSS_HOME/server/default/deploy/gatein.ear/02portal.war/WEB-INF/context.xml. Configuration of new valve should be like this:<Valve className="org.picketlink.identity.federation.bindings.tomcat.sp.ServiceProviderAuthenticator" logOutPage="/" /> -
Add new filter and filter-mapping for this filter into
JBOSS_HOME/server/default/deploy/gatein.ear/02portal.war/WEB-INF/web.xml.Filter configuration should look like this:
<filter>
   <filter-name>SAML2LogoutFilter</filter-name>
   <filter-class>org.gatein.sso.agent.filter.SAML2LogoutFilter</filter-class>
</filter>
And filter-mapping for this filter as first filter in filter-mapping section:
<filter-mapping>
   <filter-name>SAML2LogoutFilter</filter-name>
   <url-pattern>/*</url-pattern>
</filter-mapping>
Note
Filter is needed for "Single Logout" (Global logout) feature of SAML2 specification. Actually it means that when you are logged in more SP applications, you will be logged out automatically from all of them by initiating global logout. You can skip this filter if you don't want global logout and you want to be logged out only from GateIn 3.2 when pressing Sign out. -
In file
JBOSS_HOME/server/default/conf/login-config.xmlyou need to add one new application-policy. It is needed by IDP authentication, so that IDP won't use UsersPasswordLoginModule, but it will use login module for REST callback to GateIn 3.2. It means that you will be able to login in SAML IDP screen with same username and passwords as to GateIn 3.2 (root/gtn, john/gtn etc.). New policy needs to look like this:<application-policy xmlns="urn:jboss:security-beans:1.0" name="idp"> <authentication> <login-module code="org.gatein.sso.saml.plugin.SAML2IdpLoginModule" flag="required"> <module-option name="rolesProcessing">STATIC</module-option> <module-option name="staticRolesList">manager,employee,sales</module-option> <module-option name="gateInURL">${portal.callback.url:http://localhost:8080/portal}</module-option> </login-module> </authentication> </application-policy> -
Copy file
GATEIN_SSO_HOME/saml/idp-lib/sso-saml-plugin-VERSION.jarinto fileJBOSS_HOME/server/default/lib/. This JAR file is needed by IDP for supporting REST callbacks described in previous step. -
In the
JBOSS_HOME/server/default/deploy/gatein.ear/web.war/groovy/groovy/webui/component/UIBannerPortlet.gtmlfile modify the 'Sign In' link as follows:<!-- <a class="Login" onclick="$signInAction"><%=_ctx.appRes("UILoginForm.label.Signin")%></a> --> <a class="Login" href="/portal/dologin"><%=_ctx.appRes("UILoginForm.label.Signin")%></a> - Test it. You can restart server and go to http://localhost:8080/portal and click to "Sign in". You will be redirected to IDP console where you can fill standard GateIn 3.2 username/password for authentication (like john/gtn for instance). After correct login, you will be redirected to GateIn 3.2 as logged user.
In this procedure, you will generate and use your own Keystores. This will add more safety into trusted communication between GateIn 3.2 and IDP because default packaging is using prepackaged keystore "jbid_test_keystore.jks". For secure and trusted communication, you will need your own keystores with your own keys. Default keystore is useful only for testing purpose, but should not be used in production. We will use separate keys for GateIn 3.2 and for IDP in this scenario.
Note
Scenario below can be simplified by using single keystore file for both GateIn 3.2 and IDP. It depends on your needs if you use same keystore for both or separate keystores for each.-
Create new keystore for IDP and generate new pair of public/private keys. In directory
JBOSS_HOME/server/default/deploy/idp-sig.war/WEB-INF/classes(Assumption is exploded WAR archive idp-sig.war) you can do it with command like:keytool -genkey -alias idp-key -keyalg RSA -keystore idp-keystore.jks
You need to choose keystore password and private key password. Let's assume that your keystore password is "keystorepass" a private key password is "keypass" . -
Export IDP cerificate and public key into file
idp.crtkeytool -export -alias idp-key -file idp.crt -keystore idp-keystore.jks
-
Create new keystore for GateIn 3.2 (SP) and generate new pair of public/private keys. In directory
JBOSS_HOME/server/default/deploy/gatein.ear/02portal.war/WEB-INF/classes, you can use command like:keytool -genkey -alias sp-key -keyalg RSA -keystore sp-keystore.jks
You need to choose keystore password and private key password. Let's assume that your keystore password is "spkeystorepass" a private key password is "spkeypass". -
Export GateIn 3.2 cerificate and public key into file sp.crt
keytool -export -alias sp-key -file sp.crt -keystore sp-keystore.jks
-
Import IDP certificate and public key to SP keystore. This will ensure that SP will trust public key from IDP.
You can use commands:
mv $JBOSS_HOME/server/default/deploy/idp-sig.war/WEB-INF/classes/idp.crt $JBOSS_HOME/server/default/deploy/gatein.ear/02portal.war/WEB-INF/classes/idp.crt
keytool -printcert -v -file idp.crt # Command only for debugging purposes. You can check certificate with it.
keytool -import -trustcacerts -alias idp-cert -file idp.crt -keystore sp-keystore.jks
rm idp.crt
-
Import GateIn 3.2 certificate and public key to IDP keystore. This will ensure that IDP will trust public
key from SP. In directory
JBOSS_HOME/server/default/deploy/idp-sig.war/WEB-INF/classes/, you can use commands:mv $JBOSS_HOME/server/default/deploy/gatein.ear/02portal.war/WEB-INF/classes/sp.crt $JBOSS_HOME/server/default/deploy/idp-sig.war/WEB-INF/classes/sp.crt keytool -printcert -v -file sp.crt # Command only for debugging purposes. You can check certificate with it. keytool -import -trustcacerts -alias sp-cert -file sp.crt -keystore idp-keystore.jks rm sp.crt
-
Configuration of KeyProvider in file
JBOSS_HOME/server/default/deploy/idp-sig.war/WEB-INF/picketlink.xmlcan look like this:<KeyProvider ClassName="org.picketlink.identity.federation.core.impl.KeyStoreKeyManager"> <Auth Key="KeyStoreURL" Value="/idp-keystore.jks" /> <Auth Key="KeyStorePass" Value="keystorepass" /> <Auth Key="SigningKeyPass" Value="keypass" /> <Auth Key="SigningKeyAlias" Value="idp-key" /> <ValidatingAlias Key="${portal.sp.host::localhost}" Value="sp-cert"/> </KeyProvider> -
Configuration of KeyProvider in file
JBOSS_HOME/server/default/deploy/gatein.ear/02portal.war/WEB-INF/picketlink.xmlcan look like this:<KeyProvider ClassName="org.picketlink.identity.federation.core.impl.KeyStoreKeyManager"> <Auth Key="KeyStoreURL" Value="/sp-keystore.jks" /> <Auth Key="KeyStorePass" Value="spkeystorepass" /> <Auth Key="SigningKeyPass" Value="spkeypass" /> <Auth Key="SigningKeyAlias" Value="sp-key" /> <ValidatingAlias Key="${idp.host::localhost}" Value="idp-cert"/> </KeyProvider>
Note
It may be slightly better to use certificates signed by certification authority. But for our purpose it's fine to use self-signed certificates. For more info, you can check additional sources like http://docs.oracle.com/javase/tutorial/security/sigcert/index.html .
In this section, we will show the scenario closed to production environment. We will have 2 hosts with GateIn 3.2,
first on host www.node1.com and second on www.node2.com. Both will
use same Identity provider from host www.node3.com. So 3 hosts in total.
-
You will need to add virtual hosts to file
/etc/hostsif you want to test this scenario on single physical machine. On linux, it can be done by adding those entries:127.0.1.1 www.node1.com 127.0.1.2 www.node2.com 127.0.1.3 www.node3.com
-
Copy
JBOSS_HOME/server/defaultinto more separate configurations:cd $JBOSS_HOME/server cp -r default node1 cp -r default node2 cp -r default node3
-
In file
JBOSS_HOME/server/node3/deploy/idp-sig.war/WEB-INF/picketlink.xmlyou will need to change trusted domains list to ensure that IDP will trust your domains.<Trust> <Domains>node1.com,node2.com,node3.com</Domains> </Trust>
IDP will also serves requests from bothwww.node1.comandwww.node2.com. So in KeyProvider configuration, you need to have two "ValidatingAlias" instead of default one. They should look like:<ValidatingAlias Key="www.node1.com" Value="sp-cert"/> <ValidatingAlias Key="www.node2.com" Value="sp-cert"/>
-
Start node1 with command:
./run.sh -c node1 -b www.node1.com
-Didp-sig.url=http://www.node3.com:8080/idp-sig/
-Didp.url=http://www.node3.com:8080/idp-sig/
-Dportal.sp.url=http://www.node1.com:8080/portal/dologin
-Didp.host=www.node3.com
 -Dportal.sp.host=www.node1.com
This will start the portal and set all the system properties, which are replaced in filespicketlink.xmlandlogin-config.xml. -
Start node3 (IDP host) with command:
./run.sh -c node3 -b www.node3.com
-Didp-sig.url=http://www.node3.com:8080/idp-sig/
-Dportal.callback.url=http://www.node1.com:8080/portal
- After start the server, you can test that you can access http://www.node1.com:8080/portal and when trying to login, you will be redirected to IDP on http://www.node3.com:8080/idp-sig where you can login with credentials like john/gtn .
-
Start second host node2. We will use again "www.node3.com" as IDP so startup commands can look like:
./run.sh -c node2 -b www.node2.com
-Didp-sig.url=http://www.node3.com:8080/idp-sig/
-Didp.url=http://www.node3.com:8080/idp-sig/
-Dportal.sp.url=http://www.node2.com:8080/portal/dologin
-Didp.host=www.node3.com -Dportal.sp.host=www.node2.com
-
Now you can go to http://www.node2.com:8080/portal
and after click to "Sign in", you will be logged automatically thanks to SSO. When click to "Sign out", you will then be automatically logged out
from both GateIn 3.2 hosts and also IDP host thanks to SAML2 Global logout. If you don't want global logout,
you can skip it by commenting of SAML2LogoutFilter in
web.xml(more info about this filter is in first scenario Section 6.8.7.2, “Single host scenario” ).
In next scenario, we will use first GateIn 3.2 host as SAML Identity Provider (IDP) and second host as SAML Service Provider (SP).
- Copy configuration portal-idp, which will be used for GateIn 3.2 as IDP
cp -r node1 portal-idp
-
In file
JBOSS_HOME/server/portal-idp/deploy/gatein.ear/02portal.war/WEB-INF/web.xmlwe need to add one special listener to cleaning expired SAML tokens:<listener> <listener-class>org.picketlink.identity.federation.web.listeners.IDPHttpSessionListener</listener-class> </listener>
Note
FilterSAML2LogoutFiltershould be commented in this file as it's used only for SP scenario. -
In
JBOSS_HOME/server/portal-idp/deploy/gatein.ear/02portal.war/WEB-INF/context.xmlwe need to add valve org.gatein.sso.saml.plugin.valve.PortalIDPWebBrowserSSOValve:<Valve className="org.gatein.sso.saml.plugin.valve.PortalIDPWebBrowserSSOValve" ignoreIncomingSignatures="false" signOutgoingMessages="true" validatingAliasToTokenIssuer="true" />
Note
Previous valveServiceProviderAuthenticatorshould be commented as it's used only for SP scenario. -
File
JBOSS_HOME/server/portal-idp/deploy/gatein.ear/02portal.war/WEB-INF/picketlink.xmlneeds to be configured as Identity provider. It can look like this:<PicketLink xmlns="urn:picketlink:identity-federation:config:2.1"> <PicketLinkIDP xmlns="urn:picketlink:identity-federation:config:1.0"> <IdentityURL>${idp-sig.url::http://localhost:8080/portal/dologin}</IdentityURL> <Trust> <Domains>node1.com,node2.com</Domains> </Trust> <KeyProvider ClassName="org.picketlink.identity.federation.core.impl.KeyStoreKeyManager"> <Auth Key="KeyStoreURL" Value="/idp-keystore.jks" /> <Auth Key="KeyStorePass" Value="keystorepass" /> <Auth Key="SigningKeyPass" Value="keypass" /> <Auth Key="SigningKeyAlias" Value="idp-key" /> <ValidatingAlias Key="www.node2.com" Value="sp-cert"/> </KeyProvider> </PicketLinkIDP> <Handlers xmlns="urn:picketlink:identity-federation:handler:config:2.1"> <Handler class="org.picketlink.identity.federation.web.handlers.saml2.SAML2IssuerTrustHandler" /> <Handler class="org.picketlink.identity.federation.web.handlers.saml2.SAML2LogOutHandler" /> <Handler class="org.picketlink.identity.federation.web.handlers.saml2.SAML2AuthenticationHandler" /> <Handler class="org.picketlink.identity.federation.web.handlers.saml2.RolesGenerationHandler" /> <Handler class="org.picketlink.identity.federation.web.handlers.saml2.SAML2SignatureGenerationHandler" /> <Handler class="org.picketlink.identity.federation.web.handlers.saml2.SAML2SignatureValidationHandler" /> </Handlers> </PicketLink> -
File
JBOSS_HOME/server/portal-idp/deploy/gatein.ear/META-INF/gatein-jboss-beans.xmlneeds to have all login modules configured as normally, because we will use GateIn 3.2 as SAML IDP now.<application-policy xmlns="urn:jboss:security-beans:1.0" name="gatein-domain"> <authentication> <login-module code="org.gatein.wci.security.WCILoginModule" flag="optional"> <module-option name="portalContainerName">portal</module-option> <module-option name="realmName">gatein-domain</module-option> </login-module> <login-module code="org.exoplatform.web.security.PortalLoginModule" flag="required"> <module-option name="portalContainerName">portal</module-option> <module-option name="realmName">gatein-domain</module-option> </login-module> <login-module code="org.exoplatform.services.security.jaas.SharedStateLoginModule" flag="required"> <module-option name="portalContainerName">portal</module-option> <module-option name="realmName">gatein-domain</module-option> </login-module> <login-module code="org.exoplatform.services.security.j2ee.JbossLoginModule" flag="required"> <module-option name="portalContainerName">portal</module-option> <module-option name="realmName">gatein-domain</module-option> </login-module> </authentication> </application-policy> -
You need to copy keystore "idp-keystore.jks" created in previous tutorials into
JBOSS_HOME/server/portal-idp/deploy/gatein.ear/02portal.war/WEB-INF/classes/ -
Start GateIn 3.2 as IDP with:
./run.sh -c portal-idp -b www.node1.com -Didp-sig.url=http://www.node1.com:8080/idp-sig/
Note that we use configuration portal-idp but we will bind it to www.node1.com . - Start second node, which will act as SP
./run.sh -c node2 -b www.node2.com
-Didp.url=http://www.node1.com:8080/portal/dologin
-Dportal.sp.url=http://www.node2.com:8080/portal/dologin
-Didp.host=www.node1.com -Dportal.sp.host=www.node2.com
You can test by going to http://www.node2.com:8080/portal and when click to "Sign in", you will be redirected to login screen on node1. After successful login, you will be redirected back to node2.
You can also try other SP applications (like picketlink quickstarts examples from https://repository.jboss.org/nexus/index.html#nexus-search;quick~picketlink-quickstarts ) and configure them for login against GateIn 3.2 IDP, so you will be able to login into example application on behalf of GateIn 3.2 SAML2 IDP.