Note
You can only export the calendar which contains at least one event or task. Besides, for shared and group calendars, you can only export/import them if you have the Edit permission.
This function allows you to export a calendar and its events/tasks into a separate file on your device.
1. Hover your cursor over the calendar which you want to export, then click ![]() that appears.
that appears.
2. Click Export from the drop-down menu to open the Export Calendars form.
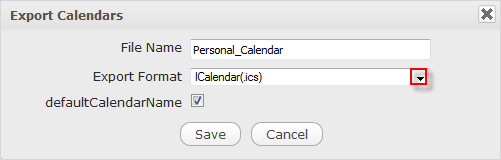
3. Enter the exported file name in the File Name field and select its format from the Export Format drop-down menu. At present, only the ICalendar(.ics) format is supported.
Note
Your selected calendar cannot be exported if you untick the checkbox next to its display name.
4. Click Save to finish your export.
Note
You can only open the exported file if you have an application installed on your device that supports its format.
This function allows you to import one or more calendars stored in a file from your device to a selected calendar in the Calendar application.
1. Open the Calendar form via one of the following ways.
The first way
Click ![]() at the right top of the calendars list, then select Import from the drop-down menu.
at the right top of the calendars list, then select Import from the drop-down menu.
The second way
i. Hover your cursor over the calendar which you want to export, then click ![]() that appears.
that appears.
ii. Click Import from the drop-down menu.
Note
This way is only activated for calendar groups under the Personal Calendars category.
The third way
i. Hover your cursor over the calendar which you want to import, then click ![]() that appears.
that appears.
ii. Click Import from the drop-down menu.
The Calendar form will appear differently, depending on your selected way.
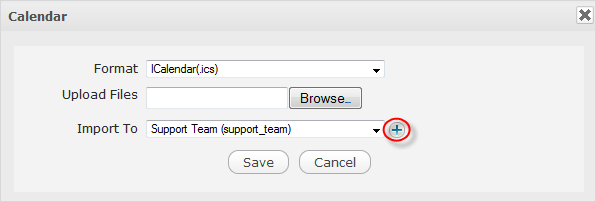
2. Select a format type from the Format drop-down menu. At present, the Calendar application only supports the .ics and .csv formats.
3. Click Browse... or click directly the Upload Files field to open the File Upload form.
4. Select a file from your device, then click Open to upload your selected file.
Click
 next to the name of your uploaded file if you want to remove it and upload again.
5. Click ![]() next to the Import To field, then select the calendar to which you want to import your uploaded file from the drop-down list.
next to the Import To field, then select the calendar to which you want to import your uploaded file from the drop-down list.
Also, you can create a totally new calendar to which your uploaded file will be imported by clicking
 . The Calendar form now turns into the below form.
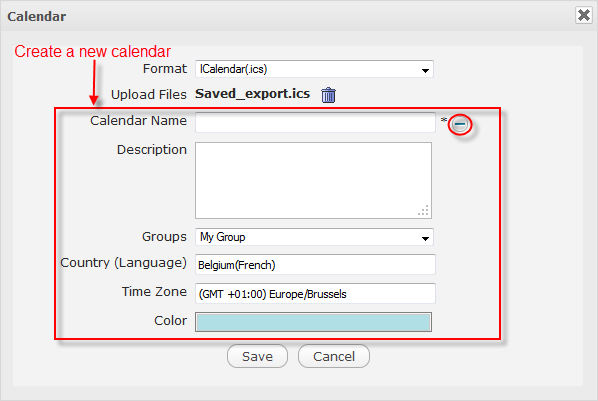
i. Create the new calendar by following similar steps as stated in the Create a personal calendar section.
If you select another calendar of the Group Calendar type, the Edit Permission field will appear right under the Groups field. For more details, see here.
ii. Click ![]() to narrow the form which allows you to import your uploaded file to either of existing calendars.
to narrow the form which allows you to import your uploaded file to either of existing calendars.
6. Click Save to complete.