In this section we will show you how the web interface is defined using JSF pages. We will also see how the data model is mapped to the web form using JSF EL. Using the #{...} notation to reference Java objects is called JSF EL (JSF Expression Language). Lets take a look at the pages used in our application:
-
index.xhtml : This page displays two options: 1. Create New Todo 2. Show all Todos. When you click on the Submit button the corresponding action is invoked.
<h:form>
<ul>
  <li><h:commandLink type="submit" value="Create New Todo" action="create"/></li>
  <li><h:commandLink type="submit" value="Show All Todos" action="todos"/></li>
</ul>
</h:form>
-
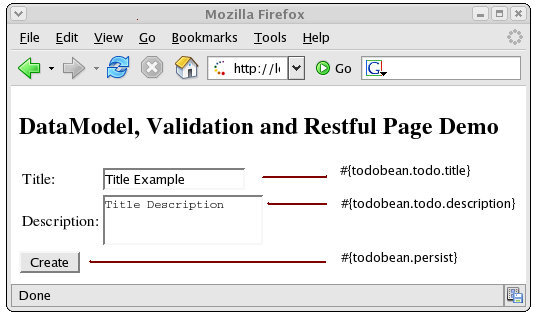
create.xhtml : When you try to create a new task, this JSF page captures the input data. We use the
todoBeanto back the form input text fields. The #{todoBean.todo.title} symbol refers to the "title" property of the "todo" object in the "TodoBean" class. The #{todoBean.todo.description} symbol refers to the "description" property of the "todo" object in the "TodoBean" class. The #{todoBean.persist} symbol refers to the "persist" method in the "TodoBean" class. This method creates the "Todo" instance with the input data (title and description) and persists the data.<h:form id="create"> <table> <tr> <td>Title:</td> <td> <h:inputText id="title" value="#{todoBean.todo.title}" size="15"> <f:validateLength minimum="2"/> </h:inputText> </td> </tr> <tr> <td>Description:</td> <td> <h:inputTextarea id="description" value="#{todoBean.todo.description}"> <f:validateLength minimum="2" maximum="250"/> </h:inputTextarea> </td> </tr> </table> <h:commandButton type="submit" id="create" value="Create" action="#{todoBean.persist}"/> </h:form>Figure 11.1, “The "Create Todo" web page ” shows the "Create Todo" web page with the input fields mapped to the data model.
-
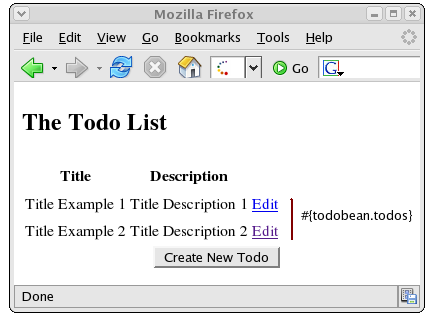
todos.xhtml : This page displays the list of all "todos" created. There is also an option to choose a "todo" item for 'edit' or 'delete'.
The list of all 'todos' is fetched by #{todoBean.todos} symbol referring to the 'getTodos()' property in the 'TodoBean' class. The JSF
dataTableiterates through the list and displays eachTodoobject in a row. The 'Edit' option is available across each row. The #{todo.id} symbol represents the "id" property of the "todo" object.<h:form> <h:dataTable value="#{todoBean.todos}" var="todo"> <h:column> <f:facet name="header">Title</f:facet> #{todo.title} </h:column> <h:column> <f:facet name="header">Description</f:facet> #{todo.description} </h:column> <h:column> <a href="edit.faces?tid=#{todo.id}">Edit</a> </h:column> </h:dataTable> <center> <h:commandButton action="create" value="Create New Todo" type="submit"/> </center> </h:form>Figure 11.2, “The "Show All Todos" web page ” shows the "Show All Todos" web page with the data fields mapped to the data model.
-
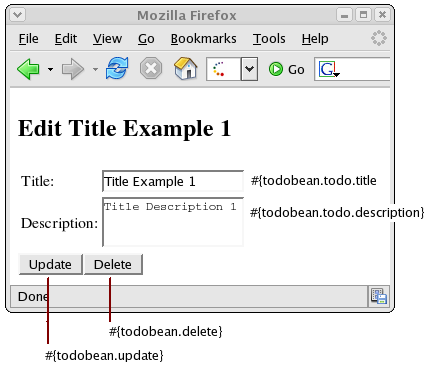
edit.xhtml : This page allows you to edit the "todo" item's 'title' and 'description' properties. The #{todoBean.update} and #{todoBean.delete} symbols represent the "update" and "delete" methods in the "TodoBean" class.
<h2>Edit #{todoBean.todo.title}</h2>
<h:form id="edit">
<input type="hidden" name="tid" value="#{todoBean.todo.id}"/>
<table>
  <tr>
    <td>Title:</td>
    <td>
      <h:inputText id="title" value="#{todoBean.todo.title}" size="15">
        <f:validateLength minimum="2"/>
      </h:inputText>
    </td>
  </tr>
  <tr>
    <td>Description:</td>
    <td>
      <h:inputTextarea id="description" value="#{todoBean.todo.description}">
        <f:validateLength minimum="2" maximum="250"/>
      </h:inputTextarea>
    </td>
  </tr>
</table>
<h:commandButton type="submit" id="update" value="Update"
                 action="#{todoBean.update}"/>
<h:commandButton type="submit" id="delete" value="Delete"
                 action="#{todoBean.delete}"/>
</h:form>
Figure 11.3, “The "Edit Todo" web page ” shows the "Edit Todo" web page with the mapping to the data model.
Note
We have used XHTML pages in the sample applications because we recommend using Facelets instead of JSP to render JSF view pages.