Context menus in a view are generated from an array of places. The first place is the view itself, and what menu actions it wants to provide to its user. The second and third places are object contributions and viewer contributions, which are how other plug-ins can contribute to a view's context menu.
When looking at the package explorer view, the view is displaying some underlying model. For this specific view, it is trying to keep track of resources, and using JDT to provide further data other than that this is simply a file. The view chooses how to present and display its data through content providers and label providers, and we'll look into those more in later chapters. This is why if you expand the tree for a .java file, you'll see its constructors, its methods, and its inner classes. You won't see things such as that in the Resource View.
When you right click on an item in the Package Explorer view, you are generating the context menu for some object that is being modeled by the view, exactly how it is modeled by the view. You may select a .java file and expect it to give you an IFile back, but this assumption would be incorrect. It is entirely dependent on how that view models its data, and for the package explorer view, it would try to give you that object as a JDT element, such as ICompilationUnit. Selecting a package would not give you a directory object, but rather an IPackageFragment object. It is completely dependent on the view as to how they would like to present, model, and display their data.
The goal for this example is to add two different types of context menus. One menu will be added to a specific view via a viewerContribution. The other will be added when certain types of objects inside a view are selected, via an objectContribution.
Select File-> new->other... and Plug-in Project. Name this project Example2ContextMenus. We won't use any template for this example, though the basic plugin class will still be generated for you.
Next, create a new package by right-clicking on the src directory and selecting New->Package. Name this package example2ContextMenus.actions.
Create a new class by right-clicking on that package and selecting New->Class. Name this class ContextAction1.java and complete it as follows:
package example2ContextMenus.actions;

/* assorted import statements removed for brevity */

public class ContextAction1 implements IViewActionDelegate {

	public void run(IAction action) {
		MessageDialog.openInformation(
			new Shell(),
			"Example2 Action 1",
			"Hello, Eclipse world Action 1");
	}

	public void selectionChanged(IAction action, ISelection selection) {
	}

	public void dispose() {
	}

	public void init(IViewPart view) {
		// Used for viewerContributions, not for objectContributions
	}
}
The IActionDelegate interface provides a method selectionChanged, which allows the action to know what is selected, or, in other words, what object this action is acting upon. Since we are just popping up a dialog box, the selection does not matter at all, however if you were implementing an action that would delete some item from an underlying model, you would need to keep a reference to that selection.
The next step is to add this information to a context menu somewhere, so that the action can actually be invoked. This is done through the plugin.xml file or its gui editor. We will want our new menu to appear when right-clicking on a file in any view, such as the resource view or the package explorer view. The class for this is IFile, and is located in the org.eclipse.core.resources plug-in.
So, first go to the extensions tab for the gui editor to the plugin.xml file. Next, click add, and select org.eclipse.ui.popupMenus from the list. We will NOT use template provided. Click finish.
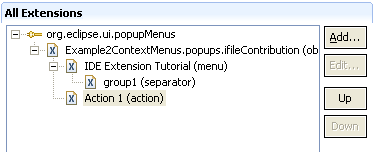
In the gui editor, right click on the new extension and select new->objectContribution. On the right, set the id field to Example2ContextMenus.popups.ifileContribution and the objectClass field to org.eclipse.core.resources.IFile.
Under that, we'll make a menu and an action. To create the menu, right click on our objectContribution and select new->menu set the id to Example2ContextMenus.menu1 and the label to IDE Extension Tutorial. Right click on the new menu and select new->separator to create a separator in our menu. Set the name of this separator to group1.
Set the values as follows: id = Example2ContextMenus.action1, label = Action 1, menubarPath = Example2ContextMenus.menu1/group1, class = example2ContextMenus.actions.ContextAction1
As you can see, the class is the same one we created earlier, and the menubarPath matches the separator we made just a few seconds ago. When done, save the file. The extension tree should now look like this. |  |
The first thing is to run the application much as you did in the last example. This menu won't appear until you right-click on a file inside the runtime environment, though, so once the workbench is running, we'll need to create a project and some files. First I created a simple text file (file-<new-<File). I also created a Test.java file and added a few dummy methods via the following code:
public class Test {
	private int myInt;
	public Test() {
		this.myInt = 1;
	}
	public int someInt() {
		return myInt;
	}
	public static String someString() {
		return "HelloWorld";
	}
}
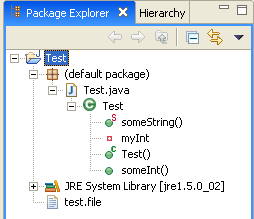
Once this code is added, your expanded package explorer view in the runtime environment should look like the one to the right. |  |
Now, if we right click on Test.java, on someString(), myInt,Test(), or someInt() in the package explorer, our menu will not be present. If we wanted our menus to appear there, our objectContribution would have needed to have an objectClass of IResource for the Test.java element, IMember for a method or field, IField for just a field, IMethod for just a method, etc. If you HAD used one of these class types for our object contribution, our menu element would appear when right-clicking on an element of that type in ANY view. So if we had used IField, it would appear both in the package explorer and the outline views, when a member field is selected and its context-menu requested.. If we instead right-click on test.file in the package explorer view, our menu addition DOES appear.
If we then load up the Navigator view (window->show view->Navigator), clicking on either test.file OR test.java will result in our menu being shown. The reason for this is how that view keeps track of the objects in their model. Navigator represents everything as IFiles, whereas the package explorer and the outline views represent elements as members of JDT when possible (IMethod, IField, IType), and IFiles when JDT simply does not apply.
Right-click on our popupMenus extension and select new->viewerContribution. Set the id to Example2ContextMenus.viewerContribution2 and the targetID to org.eclipse.ui.views.TaskList
.This targetID designates the id of the extension point that our extension matches. For this example, our menu will appear in the task list, another view which keeps track of all of the TODO's in your java code.
To the viewerContribution, add a menu with an id of Example2ContextMenus.menu2, and a label of IDE Extension viewerContrib. Give the menu, add a separator named group2.
To our viewer contribution, add an action. Give the action an id of Example2ContextMenus.action3, a label of Viewer Contrib Action, a class of example2ContextMenus.actions.ContextAction1 (which is the same action as in the objectContribution), and a menubarPath of Example2ContextMenus.menu2/group2.
Then save the file.
Run the program the same way as before, by right-clicking on the project and selecting Run As->Eclipse Application. Once the runtime environment has loaded, open the Task List view by selecting Window->Show View->Tasks. Then try right-clicking inside the view. The menu option should appear, as shown below.

Object contributions to popup menus are easy to implement, but they require knowing how the plugin you're adding a menu item to stores its data. As we saw earlier, the Navigator view stores a file as an IFile, whereas the Package Explorer will try to convert a java file into a JDT-style model.
Viewer contributions, on the other hand, require you to know the id name of the viewer where you want your menu to appear. This could involve digging through the code of that plug-in to discover the id of the viewer. You can also find this id in the target plug-in's plugin.xml
One thing we did not do with the menus was visibility, which can be added to either an objectcontribution or a viewercontribution. Visibility allows you to use some basic parameters (such as object class, object state, plugin state, or system property) and some simple boolean conjunctions, to more finely tune which elements will show your menu and which will not. I encourage you to play around with sub-elements to the popupMenu extension point.