This chapter intends to describe in a simple ways all the steps required to create a process with human tasks, generate and modify the forms for these tasks and execute them. It will provide initial guidance to perform all initial steps, but it will not provide a full description of all available features.
Given that forms are going to be used in tasks, it's possible to generate forms automatically from process variables and task definitions. These forms can be later be modified by using the form editor. In runtime, forms will receive data from process variables, display it to the user and capture his input, and then finally updating process variables again with the new values.
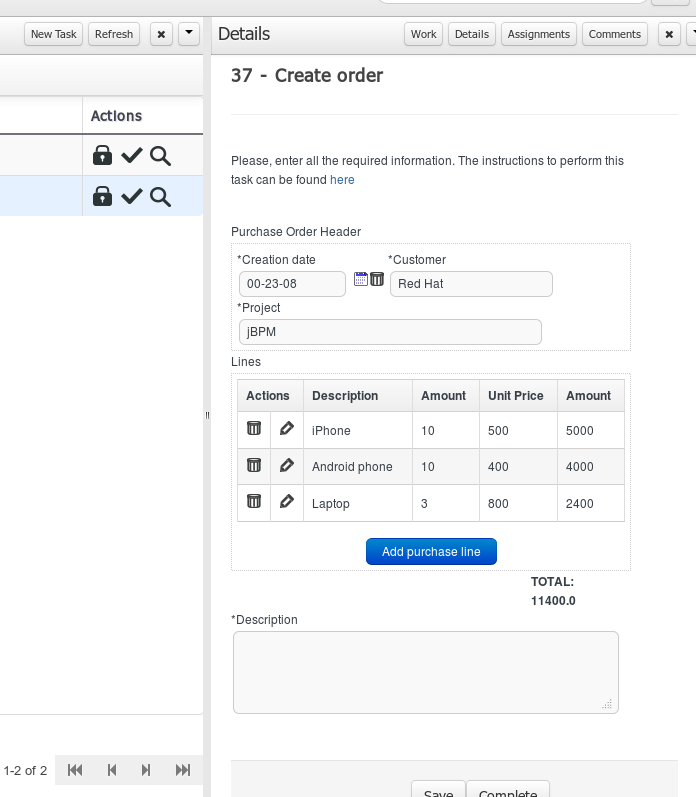
The following example will show all the steps to follow to create a form for the 'Create order' task in the process below.
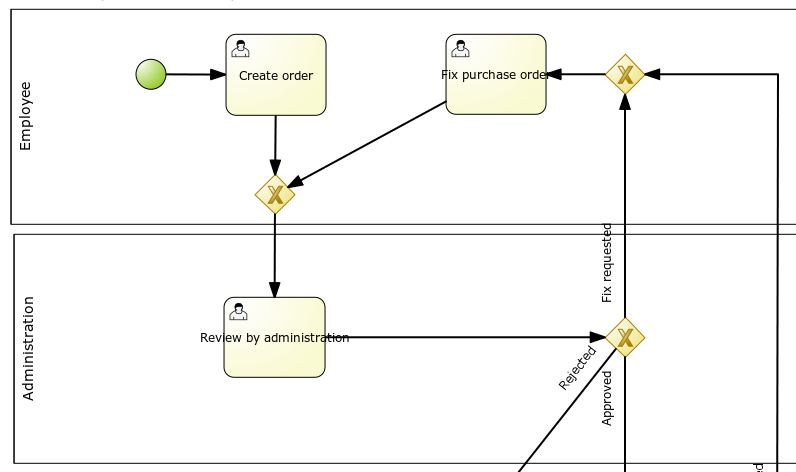
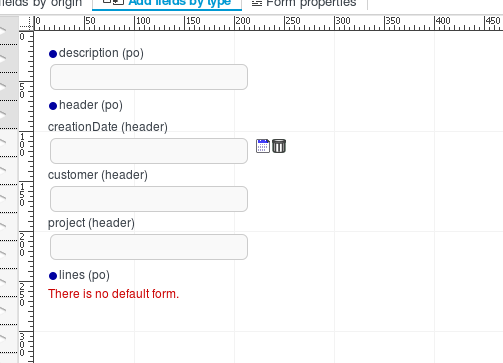
This form must look like the following in execution:
To hold values capture by forms, process variables can be created. These variables can be of a simple type like 'String' or a complex type. These complex types can be defined by using the Data Modeler tool, or be just regular POJOs (Plain Java Objects) created with any Java IDE.
In this example, we define a variable 'po' of type 'org.jbpm.examples.purchases.PurchaseOrder', defined with the Data Modeler tool.
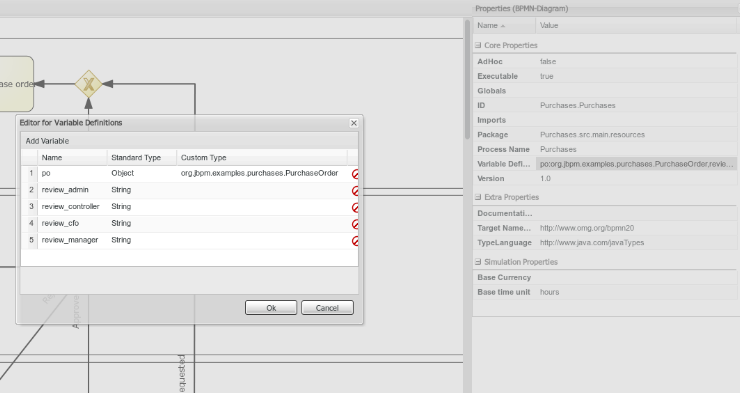
This variable is declared in the 'variables definition' property for the process.
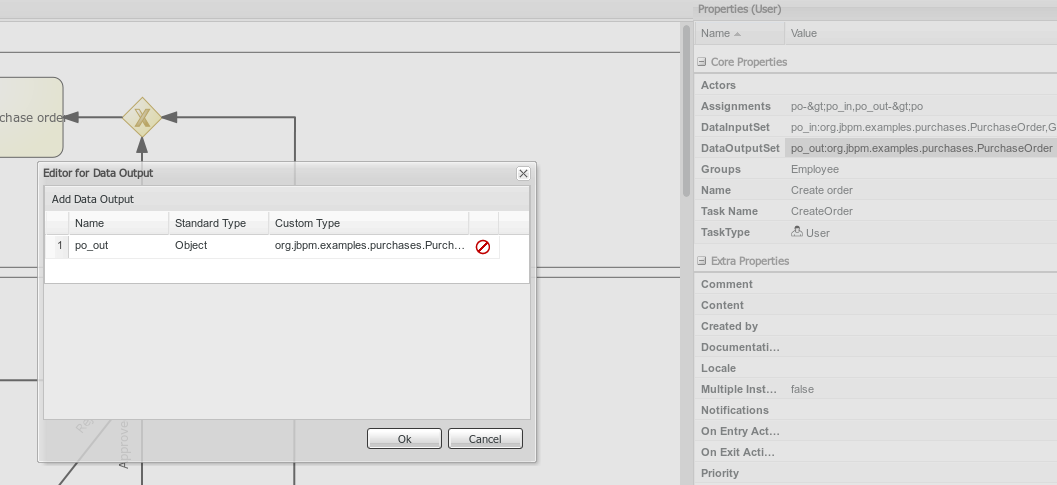
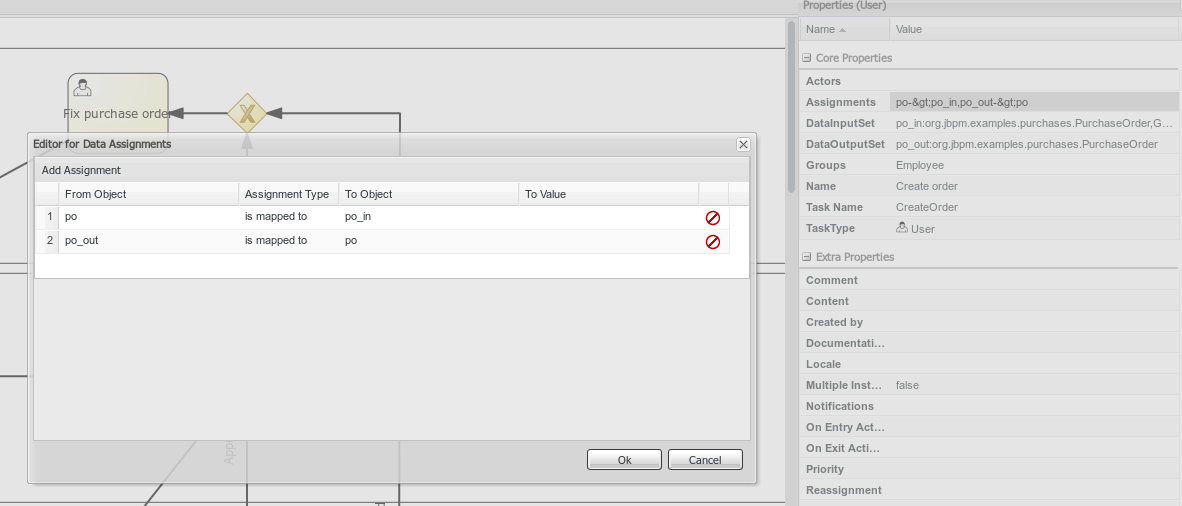
After that, we must configure which variables are set as input parameters to the task, which ones will receive the response back from the form and establish the mappings. This is done by setting the 'DataInputSet', 'DataOutputSet' and 'Assignments' properties for any human task. See screenshots below for details.

The Process Designer module provides some functionality to generate the forms automatically from task and variable definitions, as well as easily open the right form from the modeler.
This is done with the following menu option.
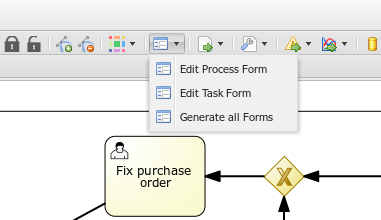
You can also click on the icon on top of task to open the form directly.

Forms are related to tasks by following a naming convention. If a form with a name formName-taskform is defined in the same package as the process, then this form is used by the human task engine to display and capture information from user.
Also, if a form named ProcessId-task form is created, it will be used as the initial form when starting this process.
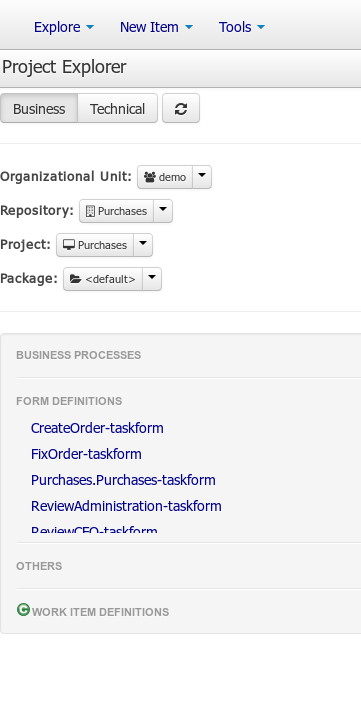
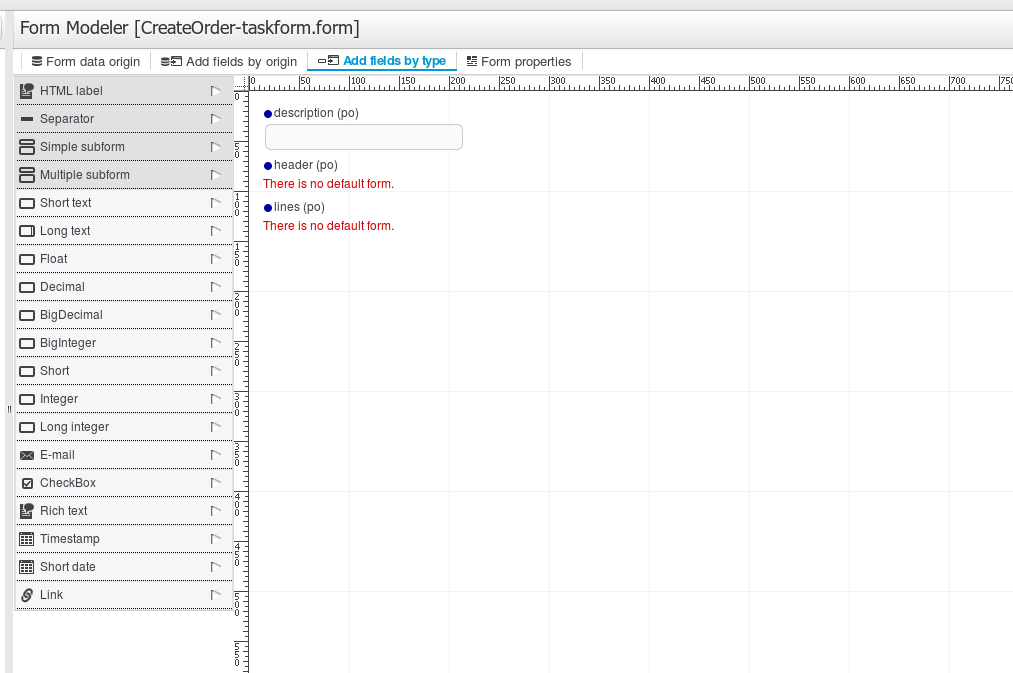
For example, for our process the following forms would be generated.
Once the forms have been generated, you can start editing them. There are several artifacts that are generated in the previous process, but also can be created manually.
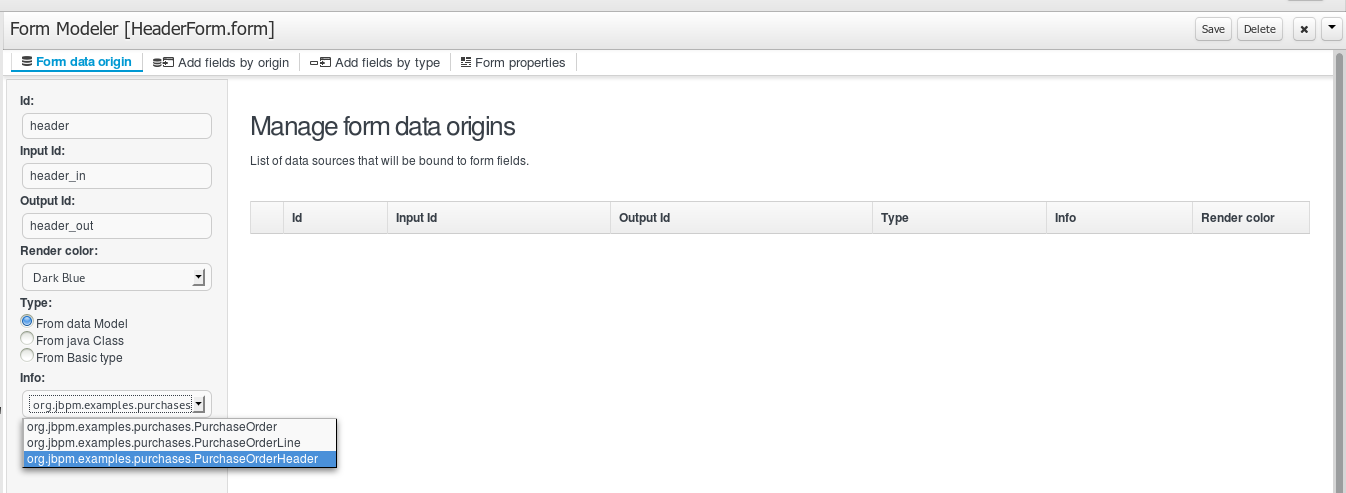
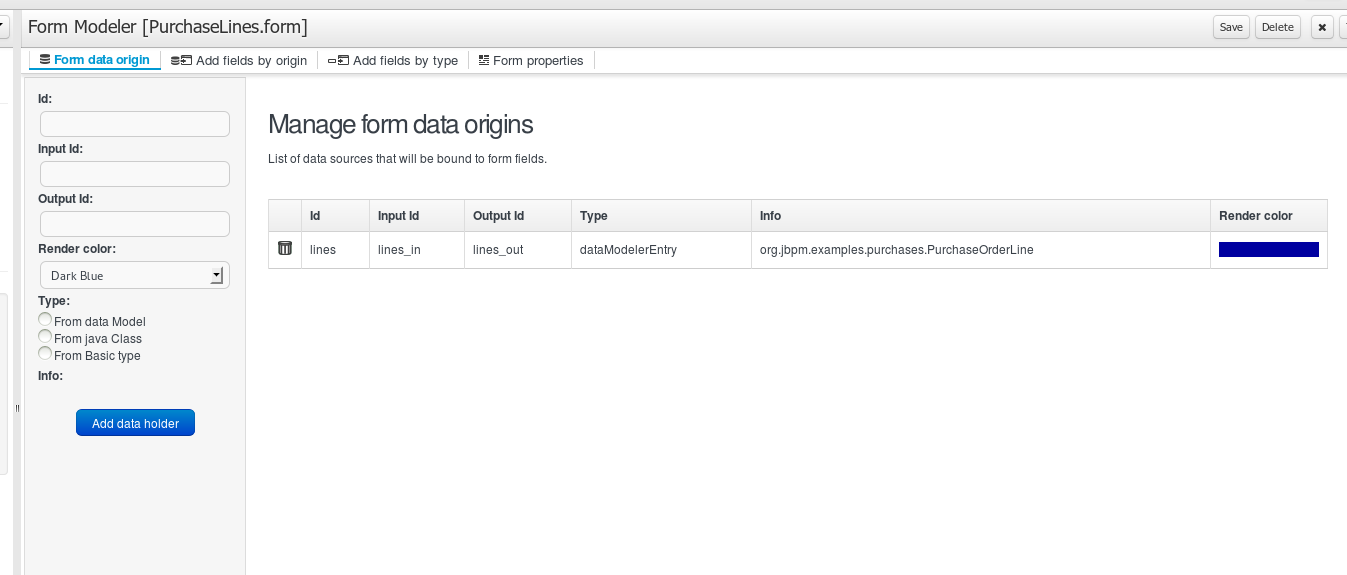
When the form has been generated automatically, this tab contain the process variables as data origins. This allow bind form fields with them, this relation it’s linked creating data bindings.
A data binding define how task inputs will be mapped to form variables, and when the form is validated and submitted, how the values will update the task outputs.
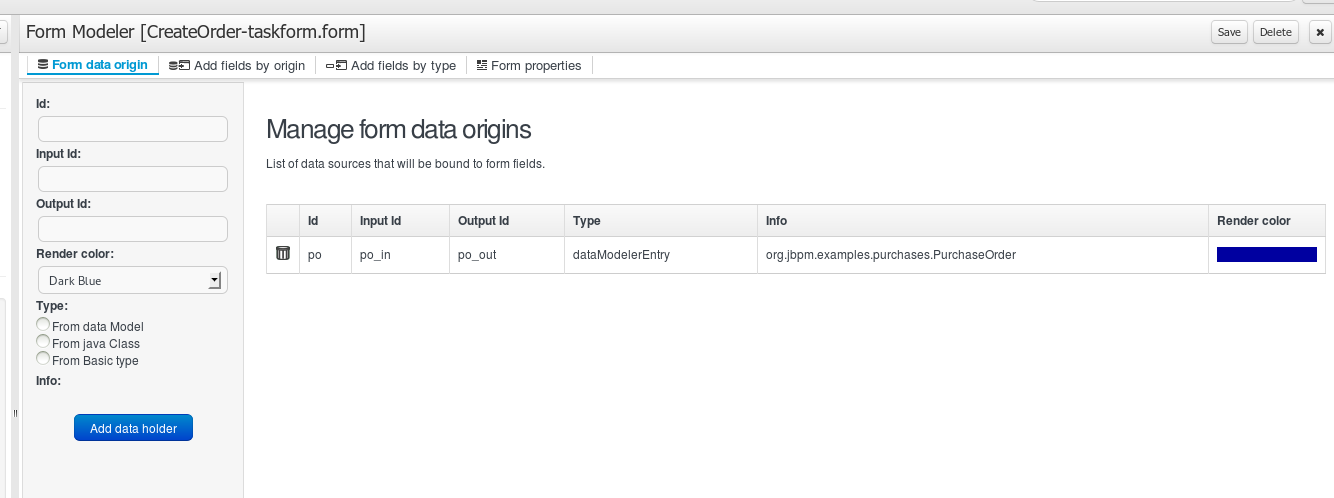
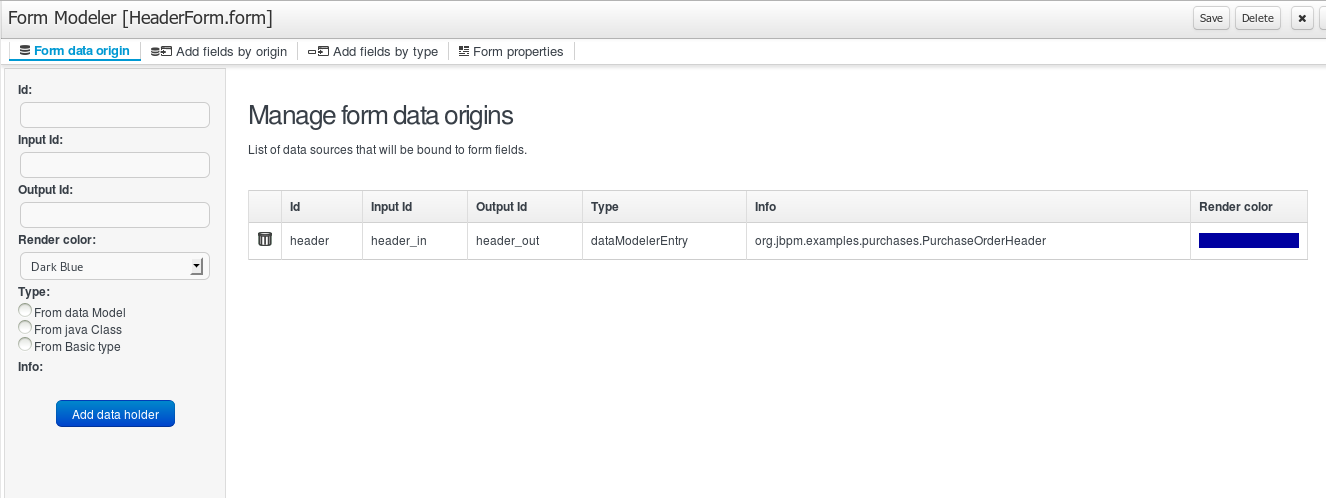
For example, for this process, the following bindings are generated. Notice that the identifiers are automatically generated. You can have as many data origins as required, and can use a different colour to identify it.
In automatic form generation, a data origin is created for each process variable. The generated form have a field for each data origin bindable item (view FieldTypes) and this automatic fields have the binding defined too.
When these fields are displayed in editor the color of the data origin is shown over the field to make easy view if the field is correctly bound and the data origin implied.
We can change the way the form is displayed to the user in the task list. Next, we will show different levels of customization that will allow change it
The fields may be placed in different regions of the form. To move a field the user can access the contextual menu of the field and select 'Move field'.

This will display the different regions of the form where you can place it.
A field can be moved to the first or the last region with the contextual icons for that purpose.
You can add fields to forms either by its origin or by selecting one type of form field.
Let's see what has been created automatically for this purchase order form.
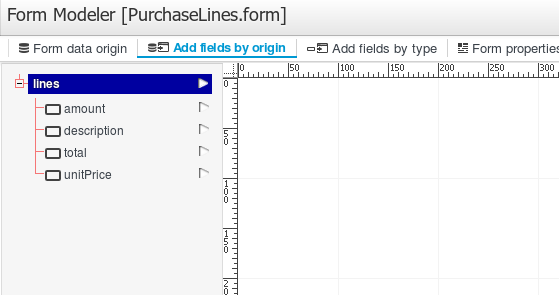
Add fields by origin: this tab allows you to add fields to the form based on the data origins defined. These fields will have the correct configuration on the "Input binding expression" and "Output binding expression" properties, so when the form is submitted, the fields values will be stored in the corresponding Data Origin.
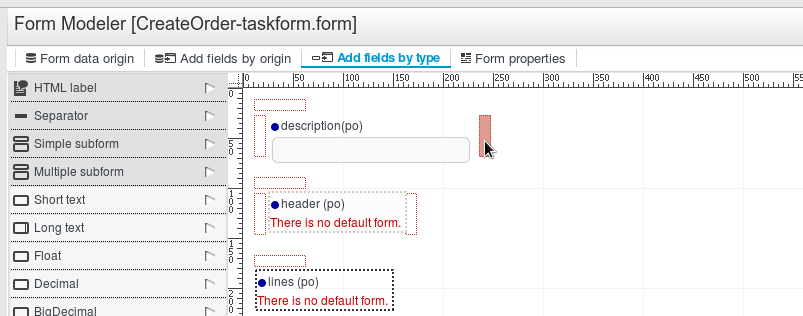
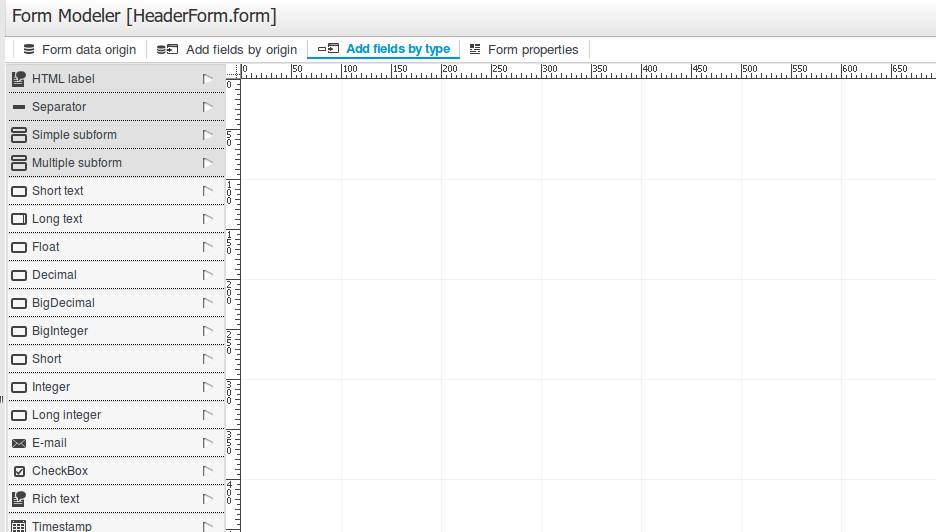
Add fields by type: this tab allows you to freely add fields to the form from the Field Types palette on the Form Modeler. These fields won't be storing their values on any Data Origin until they have a correct configuration on the "Input binding expression" and "Output binding expression" properties.
To see a complete list of the available field types go to Field types section.
Notice the data model 'po' of type 'org.jbpm.examples.purchases.PurchaseOrder' is composed of three properties.
Simple: property of type text (description). We will adjust the view settings.
Complex: property of type object (header).
Complex: property of type array of objects (lines)
Now all these properties had to be configured.
Each field can be configured to enhance performance in the form. There are a group of common properties, that we call ‘Generic field properties’ and a group of specific properties that depends on the field type.
There are a group of properties that are common to all field types. We will detail them below:
Table 13.1.
| Field type | Can change the field type to other compatible field types |
| Field Name | Will be used as identifier in formulas calculation |
| Label | The text that will be shown as field label |
| Error message | When something goes wrong with the field, like validations,.. this message will be displayed |
| Label ccs class | Allows enter a class css to apply in label visualization |
| Label css style | to enter directly the style to apply to the label. |
| Help text | The text introduced is displayed as alt attribute to help to the user in data introduction |
| Style class | Allows enter a class css to apply in field visualization |
| Css style | to enter directly the style to apply to the label. |
| Read Only | When this check is on, the field will be used only for read |
| Input binding expression | This expression defines the link between field and process task input variable. It will be used in runtime to set the field value with that task input variable data. |
| Output binding expression | This expression defines the link between field and process task output variable. It will be used in runtime to set that task output variable. |
Let's explain the specific properties of each field type:
Short Text (java.lang.String)
Compatible field type: Long text, E-mail, Rich text
Specific properties
Size: input text length.
MaxLength: Maximum number of characters allowed.
Required: Indicates if it’s mandatory to fill this field.
Show HTML: indicates whether the contents of the field is interpreted as HTML in show mode.
Formula. to enter expressions that will be evaluated to set the field value. These expressions are described in Formula & expression section .
Range value. A range formula allows you to let you specify the values that the user can select from an specific field. These expressions are described in Formula & expression section
Pattern. Allow introduce an expression to specify the validation of the field. In case that the field value introduced hasn’t match the expression, and error is thrown and the error message has to be shown.
Default Value formula. Expression to set the field default value.
Long Text (java.lang.String)
Compatible field type: Long text, E-mail, Rich text
Specific properties
Size: input text length.
MaxLength: Maximum number of characters allowed.
Required: Indicates if it’s mandatory to fill this field.
Height: The number or rows to show at text area.
Formula. to enter expressions that will be evaluated to set the field value. These expressions are described in Formula & expression section .
Range value. A range formula allows you to let you specify the values that the user can select from an specific field. These expressions are described in Formula & expression section
Pattern. Allow introduce an expression to specify the validation of the field. In case that the field value introduced hasn’t match the expression, and error is thrown and the error message has to be shown.
Default Value formula. Expression to set the field default value.
Float (java.lang.Float)
Specific properties
Size: input text length.
MaxLength: Maximum number of characters allowed.
Required: Indicates if it’s mandatory to fill this field.
Formula. to enter expressions that will be evaluated to set the field value. These expressions are described in Formula & expression section .
Range value. A range formula allows you to let you specify the values that the user can select from an specific field. These expressions are described in Formula & expression section
Pattern. Allow introduce an expression to specify how the Float value has to be displayed. The pattern allowed is show in section pattern in http://docs.oracle.com/javase/6/docs/api/java/text/DecimalFormat.html
Default Value formula. Expression to set the field default value.
Decimal (java.lang.Double)
Specific properties
Size: input text length.
MaxLength: Maximum number of characters allowed.
Required: Indicates if it’s mandatory to fill this field.
Formula. Used to enter expressions that will be evaluated to set the field value. These expressions are described in Formula & expression section.
Range value. A range formula allows you to let you specify the values that the user can select from an specific field. These expressions are described in Formula & expression section .
Pattern. Allow introduce an expression to specify how the Double value has to be displayed. The pattern allowed is show in section pattern in http://docs.oracle.com/javase/6/docs/api/java/text/DecimalFormat.html
Default Value formula. Expression to set the field default value.
BigDecimal (java.math.BigDecimal)
Specific properties
Size: input text length.
MaxLength: Maximum number of characters allowed.
Required: Indicates if it’s mandatory to fill this field.
Formula. Used to enter expressions that will be evaluated to set the field value. These expressions are described in Formula & expression section.
Range value. A range formula allows you to let you specify the values that the user can select from an specific field. These expressions are described in Formula & expression section .
Pattern. Allow introduce an expression to specify how the BigDecimal value has to be displayed. The pattern allowed is show in section pattern in http://docs.oracle.com/javase/6/docs/api/java/text/DecimalFormat.html
Default Value formula. Expression to set the field default value.
Big integer (java.math.BigInteger)
Specific properties
Size: input text length.
MaxLength: Maximum number of characters allowed.
Required: Indicates if it’s mandatory to fill this field.
Formula. Used to enter expressions that will be evaluated to set the field value. These expressions are described in Formula & expression section.
Range value. A range formula allows you to let you specify the values that the user can select from an specific field. These expressions are described in Formula & expression section .
Default Value formula. Expression to set the field default value.
Short (java.lang.Short)
Specific properties
Size: input text length.
MaxLength: Maximum number of characters allowed.
Required: Indicates if it’s mandatory to fill this field.
Formula. Used to enter expressions that will be evaluated to set the field value. These expressions are described in Formula & expression section.
Range value. A range formula allows you to let you specify the values that the user can select from an specific field. These expressions are described in Formula & expression section .
Default Value formula. Expression to set the field default value.
Integer (java.lang.Integer)
Specific properties
Size: input text length.
MaxLength: Maximum number of characters allowed.
Required: Indicates if it’s mandatory to fill this field.
Formula. Used to enter expressions that will be evaluated to set the field value. These expressions are described in Formula & expression section.
Range value. A range formula allows you to let you specify the values that the user can select from an specific field. These expressions are described in Formula & expression section .
Default Value formula. Expression to set the field default value.
Long Integer (java.lang.Long)
Specific properties
Size: input text length.
MaxLength: Maximum number of characters allowed.
Required: Indicates if it’s mandatory to fill this field.
Formula. Used to enter expressions that will be evaluated to set the field value. These expressions are described in Formula & expression section.
Range value. A range formula allows you to let you specify the values that the user can select from an specific field. These expressions are described in Formula & expression section .
Default Value formula. Expression to set the field default value.
E-mail (java.lang.String)
Compatible field type: Short text, Long text, Rich text
Specific properties
Size: input text length.
MaxLength: Maximum number of characters allowed.
Required: Indicates if it’s mandatory to fill this field.
Default Value formula. Expression to set the field default value.
Checkbox (java.lang.Boolean)
Specific properties
Required: Indicates if it’s mandatory to fill this field.
Default Value formula. Expression to set the field default value.
Rich text: (java.lang.String)
Compatible field type: Short text, Long text, E-mail
Specific properties
Size: input text length.
MaxLength: Maximum number of characters allowed.
Required: Indicates if it’s mandatory to fill this field.
Height: The number or rows to show at text area.
Default Value formula. Expression to set the field default value.
Timestamp (java.util.Date)
Compatible field type: Short date
Specific properties
Size: input text length.
Required: Indicates if it’s mandatory to fill this field.
Formula. to enter expressions that will be evaluated to set the field value. These expressions are described in Formula & expression section .
Default Value formula. Expression to set the field default value.
Short date (java.util.Date)
Compatible field type: Timestamp
Specific properties
Size: input text length.
Required: Indicates if it’s mandatory to fill this field.
Formula. to enter expressions that will be evaluated to set the field value. These expressions are described in Formula & expression section .
Default Value formula. Expression to set the field default value.
Document (org.jbpm.document.Document)
Specific properties
Required: Indicates if it’s mandatory to fill this field.
Simple subform (Object)
For more details see sectionSimple Object (Subform field Type).
Specific properties
Default form. Show the list of available forms to select what one will be displayed to show the object.
Multiple subform (Multiple Object)
For more details see sectionArrays of objects.( Multiple subform field Type).
Specific properties
Default form. Show the list of available forms to select what one will be displayed to show the object when no other form is configured with an specific purpose.
Preview form. If a form is specified, it will be used to show the item details
Table form. If a form is specified, it will be used to show the table columns when the item list is showed
New item text. Text to show at New Item button
Add item text. Text to show at Add Item button
Cancel text. Text to show at Cancel button
Allow remove Items. If this check is selected, the form allow remove items in table view.
Allow edit items. If this check is selected, the form allow edit items in table view.
Allow preview items. If this check is selected, the form allow preview items in table view.
Hide creation button. Check to not show the creation button
Expanded. If is checked, when a new item is being added, the field display the table with the existing items and the creation form at same time
Allow data enter in table mode. Allow modify data in table view directly.
There are two types of complex fields: fields representing an object, and fields representing an object array.
Once the field is added to the form, either automatically or manually, it must be configured so that the form had to know how to display the objects that will contain in execution time.
Next we describe how can be the configuration process:
The first thing to do is define how the contained object will be displayed. This is done creating a form that represents the object.
In case of the object array, you can define a form to show in preview(edition), or to show when table is shown
Once the form to represent the object, the parent form has to be configured to use them in the parent Subform or Multiple subform.
Below we will describe how the setup would be:
One possible way of setting the value for an object property is by using an existing form, and embedding this form into the parent. This is called subform.
In this example, the Purchase Order header data is held in an object. Therefore, we must create a form to enter all the purchase order header data and link it from the parent task form.
We will follow the steps:
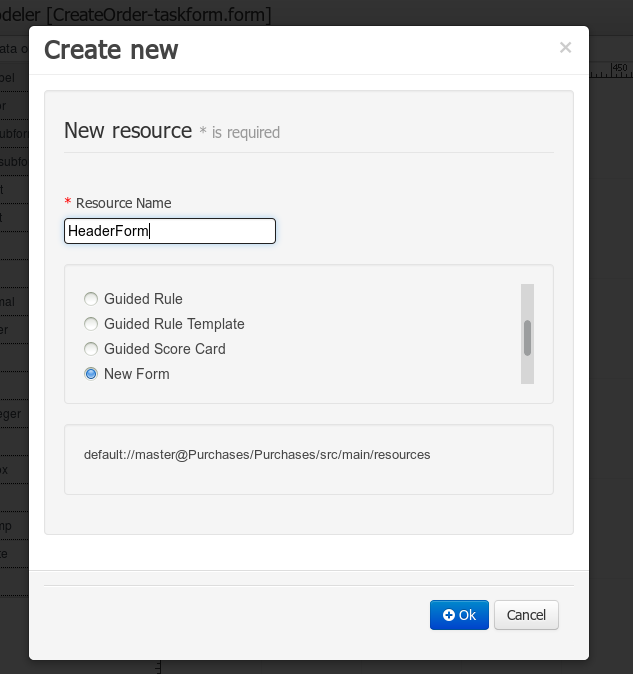
Create new form.
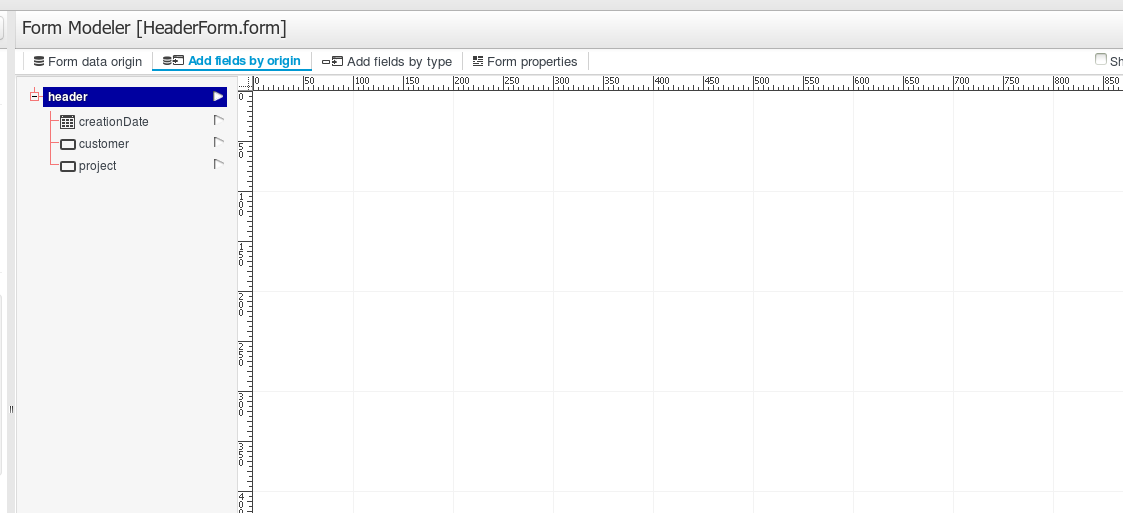
Create new data origin, selecting the type of the purchase order header.
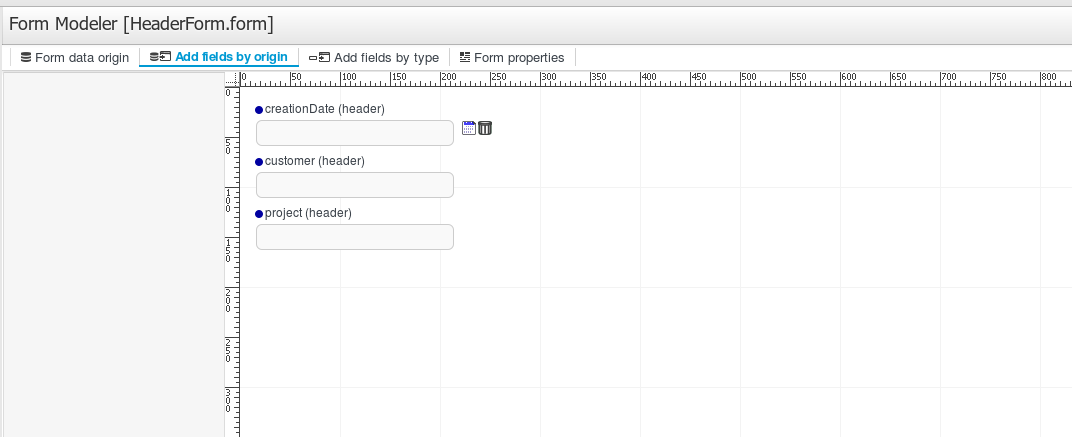
Add fields by origin. All the properties are shown, and can be added to the form, either one by one or all of them at once.
All the properties have been added to the form, and now we can edit each of them and move them around.
Configure the fields and customize form.
Once the form has been saved, open the initial parent form and set the field property 'Default form'.
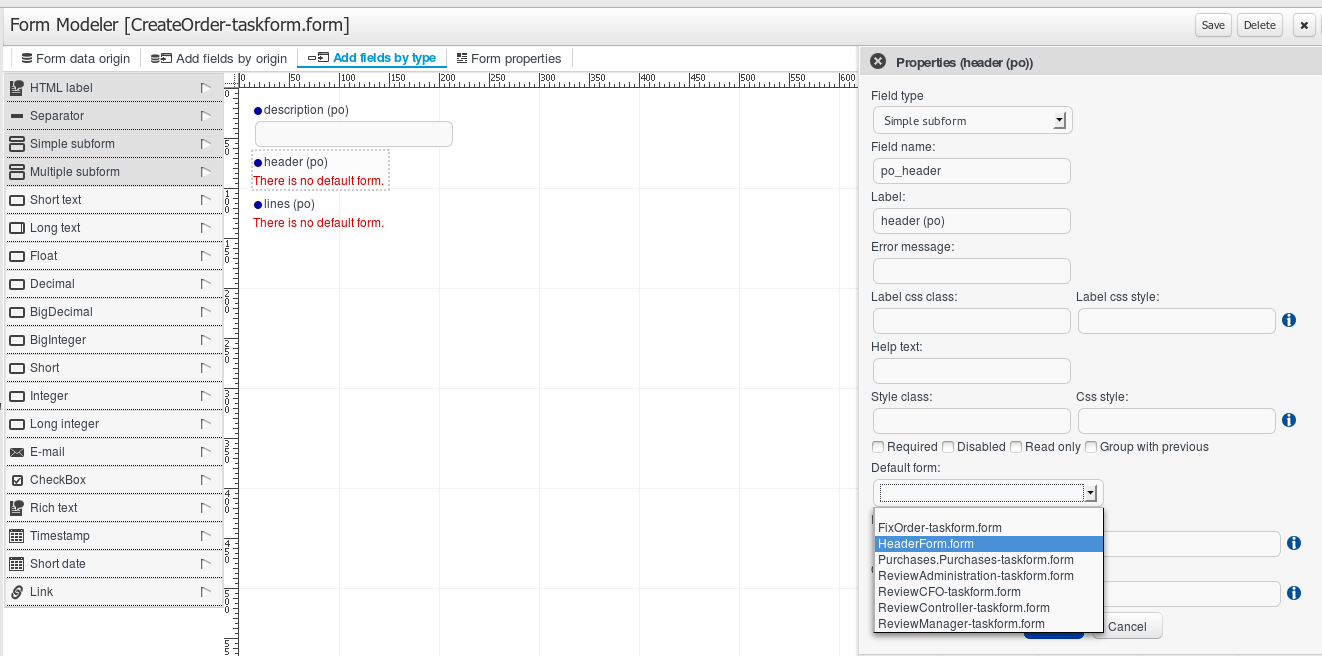
This will insert the subform inside the parent form, and will be shown as below:
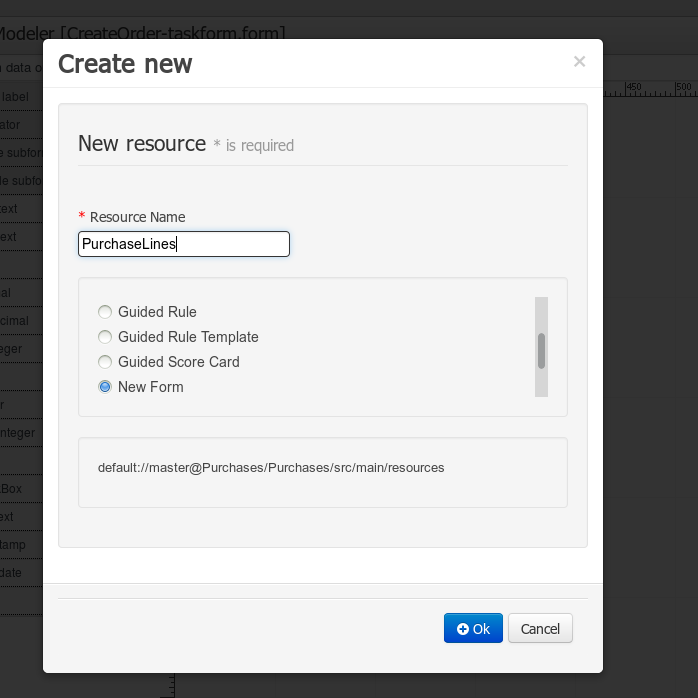
Now, we want to be able to create, edit and remove purchase order lines, by displaying a table with all the values and being able to capture information through a form. This will be done as follows:
Create a form that will hold and capture the information for each line's value (description, amount, unitPrice and total), following the same steps as above. This will be done as follows:
Create new form.
Create new data origin.
Add fields by origin. All the properties are shown, and can be added to the form, either one by one or all of them at once.
Customize form. Change display options to improve the form visualization
Configure the fields. After creating the basic form structure, we can use a formula to calculate automatically the total field. This formulas and expressions are described in Formula & expression section.
Finally, we save the lines form and go back to the parent form and configure all the lines properties.
Form Modeler provides a Formula Engine that you can use to automatically calculate field values. That Formula engine supports Java and XPATH expressions to access the form fields values. Let’s see some examples.
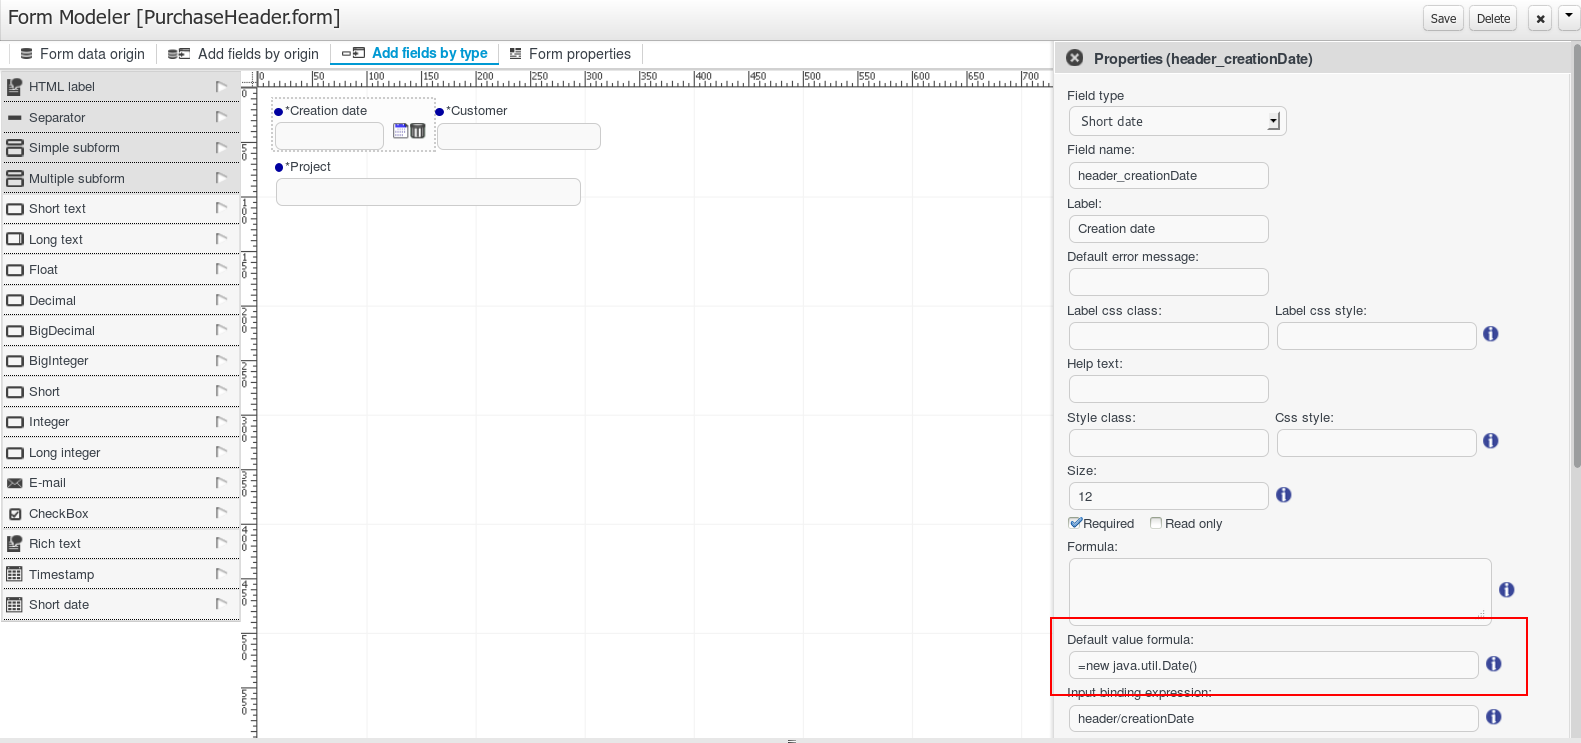
Setting a Default value formula
Imagine that you have a form that contains a date field “Creation date” that has to be set by default with the current date. To do that you should edit the field properties and set a Default value formula like:
=new java.util.Date();
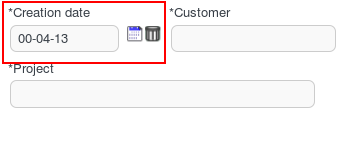
After setting a Default formula value on a field properties, when the form is rendered by the first time the field will have the specified value.
As you can see, you can use a default formula any expression that return a value supported for the field.
Setting a Formula
The formula engine allows you to calculate formulas that depend on other Field values using XPATH expressions to refer to fields values like {a_field_nane}, standard operators (+, -, *, /, %...) to operate with them or calls to Java Functions for more complex operations.
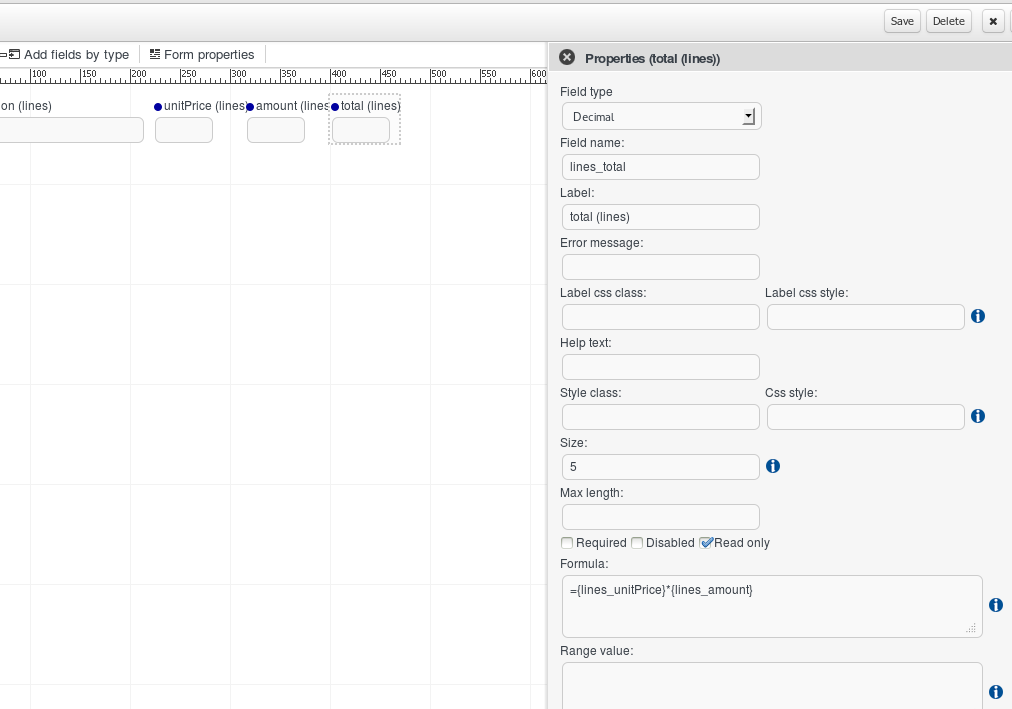
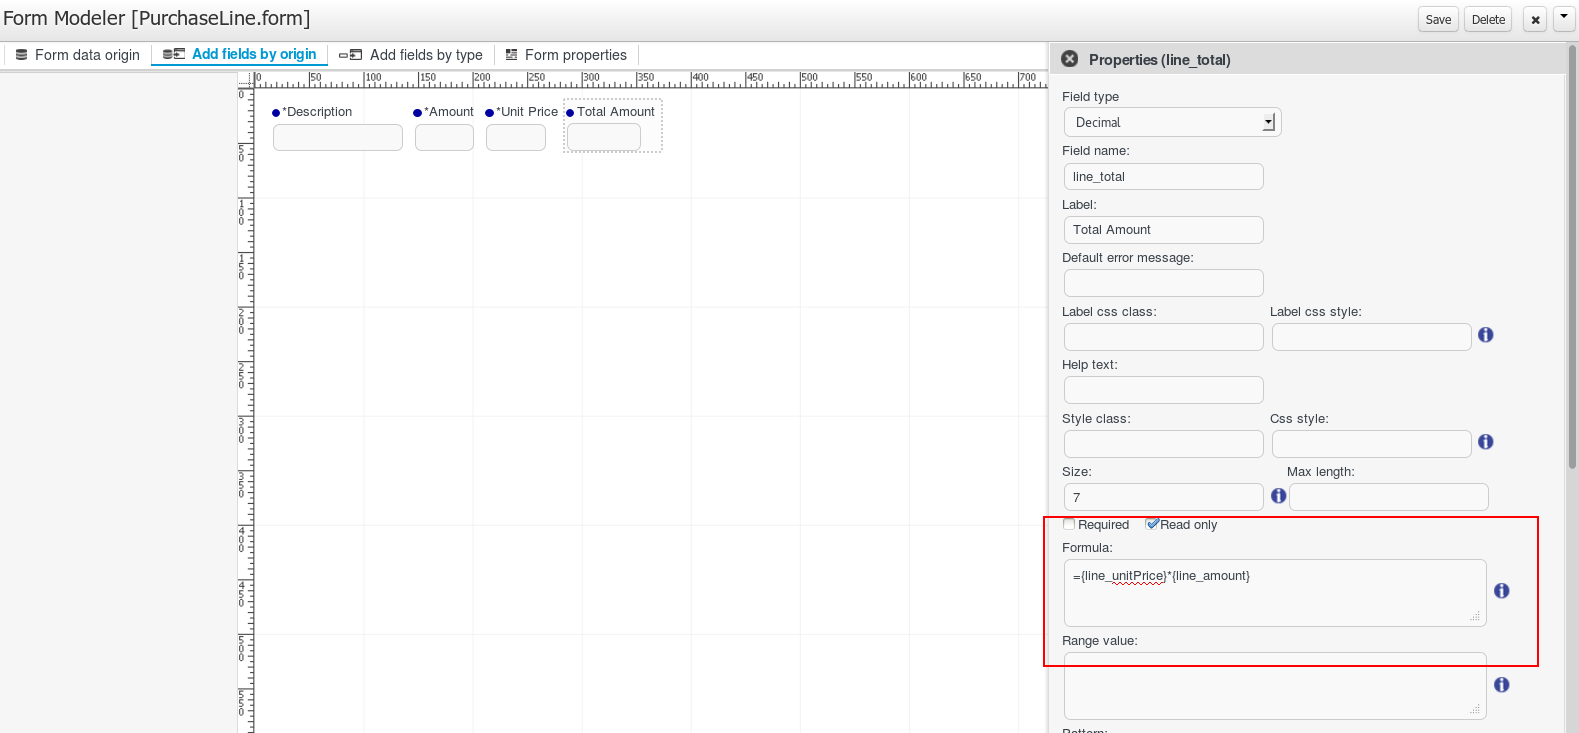
To start let’s see how you can create a formula to calculate the line_total of a Purchase Order Line. Look at the image below and look at the formula on the line_total properties.
With this expression:
={line_unitPrice}*{line_amount}we’re forcing the Total of the line value to be the result of the the Unit price multiplied by the Amount, so when the user fills the Amount and Unit Price fields automatically the Total Amount field value is going to be calculated and filled with the operation result:
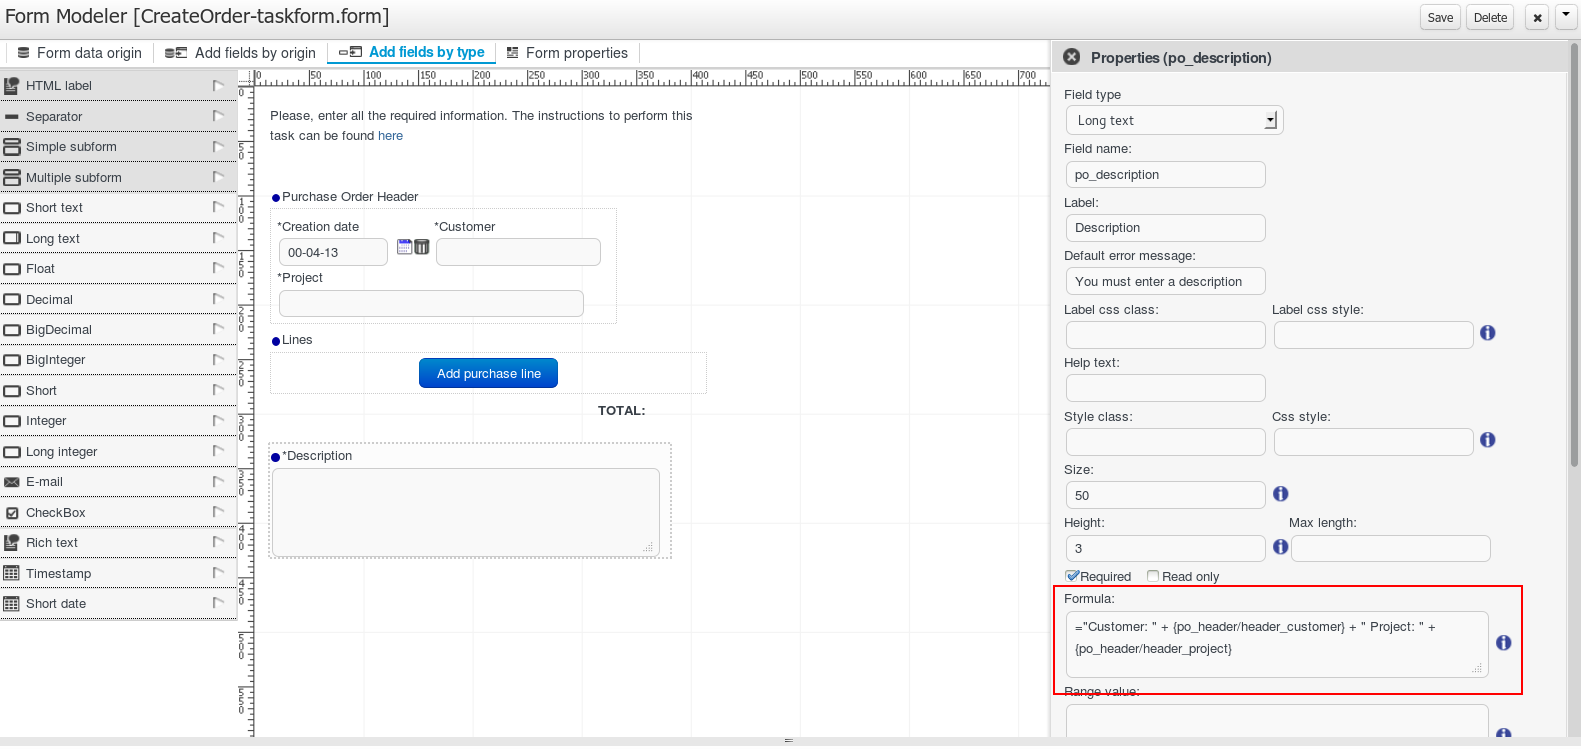
Is possible to create formulas to operate with values stored in subforms using expressions like
={a_field/a_subform_field}Look at the next image to see how it works:
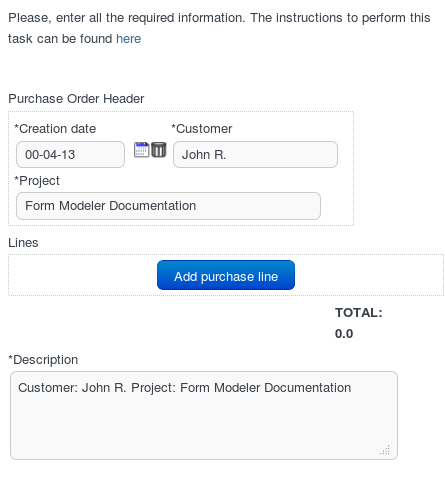
This form has a subform field called po_header that is showing a form with the fields header_creationDate, header_customer and header_project. We want the Description field on our parent form to show some information from the header. Look at the Description field properties formula.
="Customer: " + {po_header/header_customer} + " Project: " + {po_header/header_project}This formula returns a text when the fields header_customer and header_projects are filled on the child form, so from now the parent form will be filled like this:
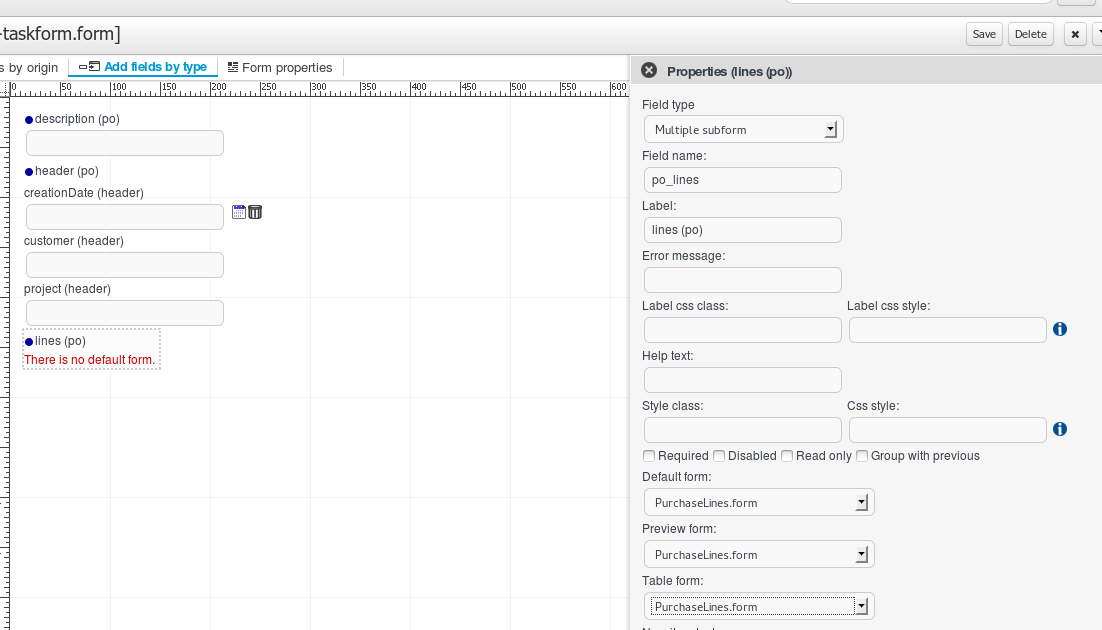
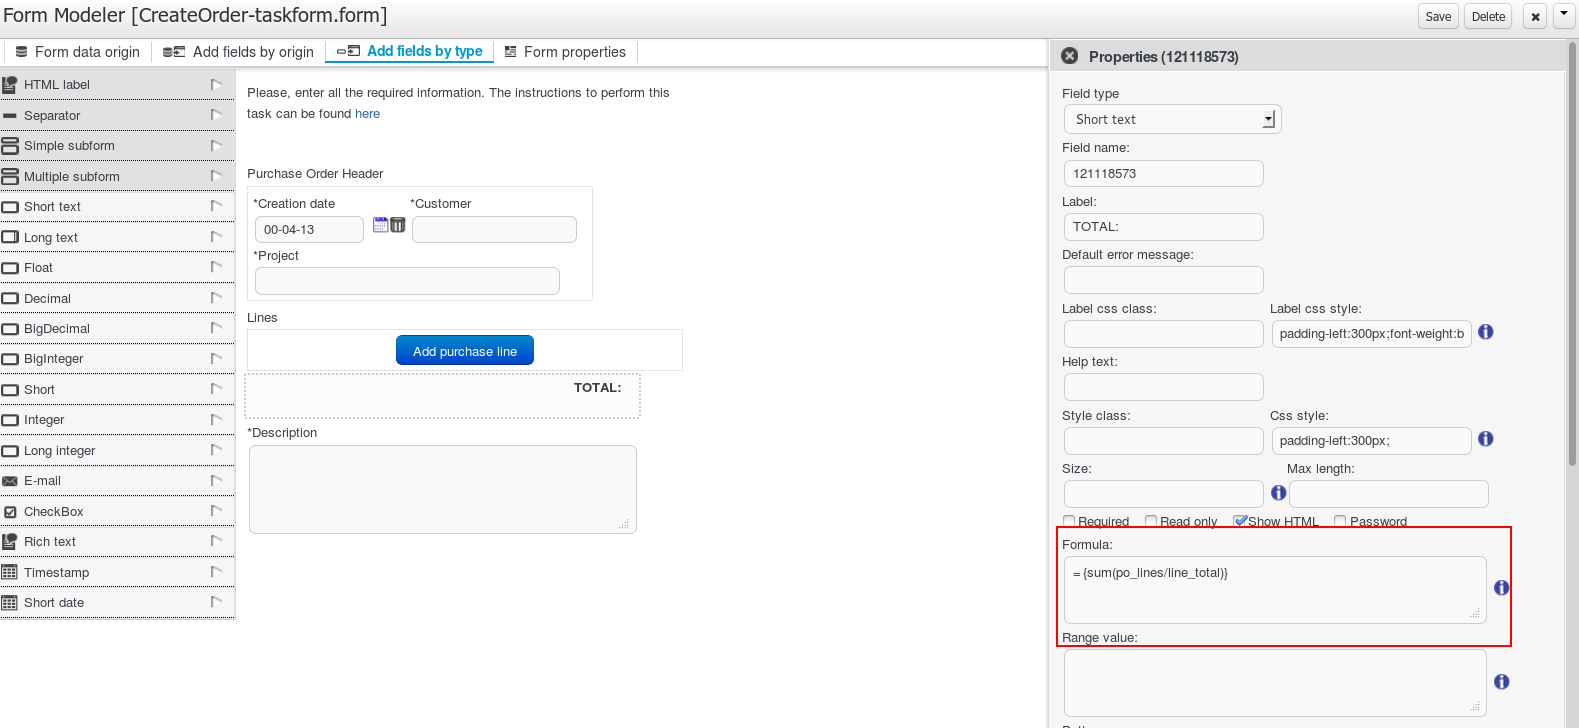
Ok, you’ve seen how to create formulas that access to a subform fields values, now we are going to see how to work with values stored in Multiple Subforms. Imagine that we have a Purchase Order Line form that contains a multiple subform of Purchase Order Lines, and we want to calculate the total amount of the lines created. Look at the image below and how the TOTAL field is configured.
On the formula expression:
={sum(po_lines/line_total)}we are using the XPATH function sum() that is going to summarize the totals of all the lines. So after creating some Lines the form will look like this:Note that the line_total child field corresponds with the field line_total field on then form selected as a Default Form selected on the Lines field configuration.
On this sample we are using the sum() XPATH function to calculate the total of the Purchase Order, but XPATH provides a lot of possibilities to select values from a set of children and also a lot functions to summarize values (sum, count, avg...). For more information about XPATH you can take a look at http://www.w3schools.com/xpath/
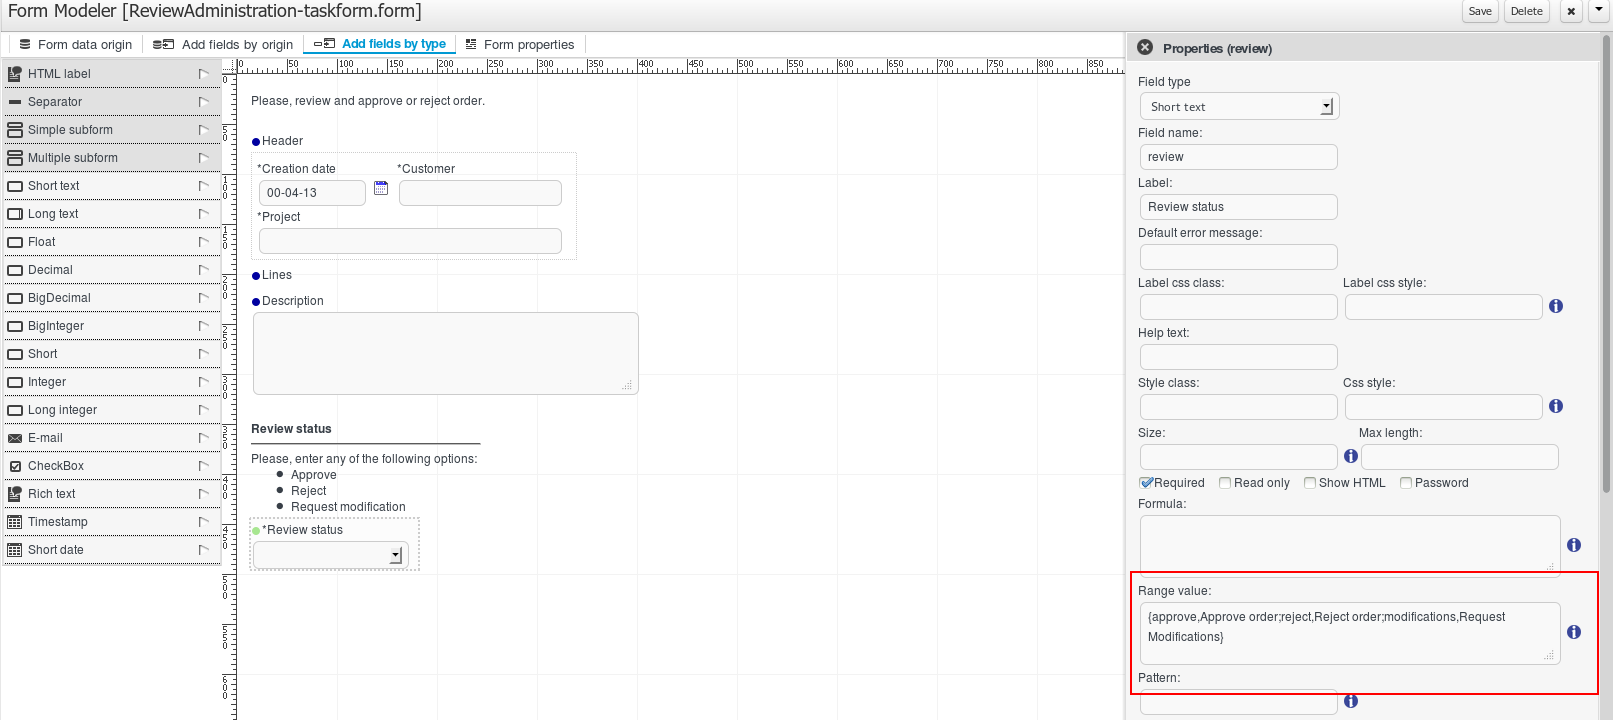
Setting a Range Formula
A range formula allows you to let you specify the values that the user can select from an specific field, showing it like a select box. It can be used on all simple types except Dates and Checkboxes.
To see how it works look the next image and look at the Review Status field configuration.
As you can see that field is being shown as a select box and it has a range formula that specifies the values like this:
{approve,Approve order;reject,Reject order;modifications,Request Modifications}This expression is defining 3 duos of value/”text to show” separated with the character ‘,’ and each of this duos is separated from each other other with the ‘;’ character. So due this formula the resulting select box will show:
Table 13.2.
Value stored in input Text shown on Select Box approve Approve order reject Reject order modifications Request Modifications


When you need an extra customization level and have more control over the HTML that is displayed. The form modeler provides the ability to edit the HTML directly.
To use this functionality, the user have to specify that in the ‘Form properties’ tab, 'Custom form layout' option and save.
Now the form is displayed with the custom HTML. To access this HTML editing, we click on the icon 'Edit'
The HTML editor is displayed; the HTML code will define how the form has to be shown. In this editor the user can directly create the HTML i locate the fields and labels with the syntax described below:
$field{fieldName} for field identified fieldName
$label{fieldName} for field identified fieldName label
These expressions will be replaced by the field or label rendering when the form will be shown.
Form modeler also provides two ways to help in the form HTML creation.
'Insert form elements'
Two select: one for the fields and another for the labels. Clicking on that, the field or label text is added to HTML. These selects only show the form fields haven’t been added yet.
'Generate template based on'
This functionality generates the HTML using all fields (default, alignment fields or Not aligned) depending on the selected value and overwrite the HTML.
There are three types of field types that you can use to model your form:
Simple types
These field types are used to represent simple properties like texts, numeric, dates, etc. The supported Field types are:
Table 13.3. Field types
Name Description Java Type Default on generated forms Short Text Simple input to enter short texts. java.lang.String yes Long Text Text area to enter long text. java.lang.String no Rich Text HTMLEditor to enter formatted texts . java.lang.String no Email Simple input to enter short text with email pattern. java.lang.String no Float Input to enter short decimals. java.lang.Float yes Decimal Input to enter number with decimals. java.lang.Double yes BigDecimal Input to enter big decimal numbers. java.math.BigDecimal yes BigInteger Input to enter big integers. java.math.BigInteger yes Short Input to enter short integers java.lang.Short yes Integer Input to enter integers. java.lang.Integer yes Long Integer Input to enter long integers java.lang.Long yes Checkbox Checkbox to enter true/false values java.lang.Boolean yes Timestamp Input to enter date & time values java.util.Date yes Short Date Input to enter date values. java.util.Date no Document File input to upload documents. org.jbpm.document.Document yes
Complex types
These field types are made to deal with properties that are Java Objects instead of basic types. These field types need extra forms to be created in order to show and write values onto the specified Java Object/s
Table 13.4. Complex types
Name Description Java Type Default on generated forms Simple subform Renders the a form, it is used to deal with 1:1 relationships. java.lang.Object yes Multiple subform This field type is used to deal with 1:N relationships. It allows to create, edit and delete a set child Objects.Text area to enter long text. java.util.List yes
Decorators
Decorators are a type of field types that don’t store data in the Object shown on the form. They can be used with aesthetic purpose
Table 13.5. Decorators
Name Description HTML label Allows the user to create HTML code that will be rendered in the form Separator Renders an HTML separator
Is possible to extend the platform to add Custom Field Types that make a specific field (of any type) on the form to look and behave totally different than the standard platform fields. On this section we will take a look on how to create them and how to configure them.
Basically a Custom Field Type is a Java class that implements the org.jbpm.formModeler.core.fieldTypes.CustomFieldType interface and is packaged inside inside a JAR file that is placed on the Application Server classpath or inside the application WAR.
Lets take a look atorg.jbpm.formModeler.core.fieldTypes.CustomFieldType:
package org.jbpm.formModeler.core.fieldTypes;


import java.util.Locale;

import java.util.Map;


/**

* Definition interface for custom fields

*/

public interface CustomFieldType {

    /**

    * This method returns a text definition for the custom type. This text will be shown

    * on the UI to identify the CustomFieldType

    * @param locale The current user locale

    * @return A String that describes the field type on the specified locale.

    */

    public String getDescription(Locale locale);


    /**

    * This method returns a string that contains the HTML code that will be used to show

    * the field value on screen

    * @param value The current field value

    * @param fieldName The field name

    * @param namespace The unique id for the rendered form, it should be used to generate

    * identifiers inside the HTML code.

    * @param required Determines if the field is required or not

    * @param readonly Determines if the field must be shown on read only mode

    * @param params A list of configuration params that can be set on the field

    * configuration screen

    * @return The HTML that will be used to show the field value

    */

    public String getShowHTML(Object value, String fieldName, String namespace,

              boolean required, boolean readonly, String... params);


    /**

    * This method returns a String that contains the HTML code that will show the input

    * view of the field. That will be used to set the field value.

    * @param value The current field value

    * @param fieldName The field name

    * @param namespace The unique id for the rendered form, it should be used to

    * generate identifiers inside the HTML code.

    * @param required Determines if the field is required or not

    * @param readonly Determines if the field must be shown on read only mode

    * @param params A list of configuration params that can be set on the field

    * configuration screen

    * @return The HTML code that will be used to show the input view of the field.

    */

    public String getInputHTML(Object value, String fieldName, String namespace,

              boolean required, boolean readonly, String... params);


    /**

    * This method is used to obtain the field value from the submitted values.

    * @param requestParameters A Map containing the request parameters for the

    * submitted form

    * @param requestFiles A Map containing the java.io.Files uploaded on the request

    * @param fieldName The field name

    * @param namespace The unique id for the rendered form, it should be used to generate

    * identifiers inside the HTML code.

    * @param previousValue The previous value of the current field

    * @param required Determines if the field is required or not

    * @param readonly Determines if the field must be shown on read only mode

    * @param params A list of configuration params that can be set on the field

    * configuration screen

    * @return The value of the field based on the submitted form values.

    */

    public Object getValue(Map requestParameters, Map requestFiles, String fieldName,

              String namespace, Object previousValue, boolean required, boolean readonly,

              String... params);

}
As you can see this Interface defines the methods that determines how the field has to be shown on the screen for when the form is shown on insert(getInputHTML(...)) or readonly (getShowHTML(...)) mode. It also provides the method (getValue(...)) that reads the needed parameters from the request and to obtain the correct field value. Te returned value type must match with the type of the field added on the form.
Now let's see how to use and configure and use a Custom Field type. Following the example on the previous chapter, we have created a File Input type and we have it already installed on our application. So now we are going to create a new form and add a Short Text property and turn it into a File Input and edit the field properties changing the Field Type from Short text toCustom field.
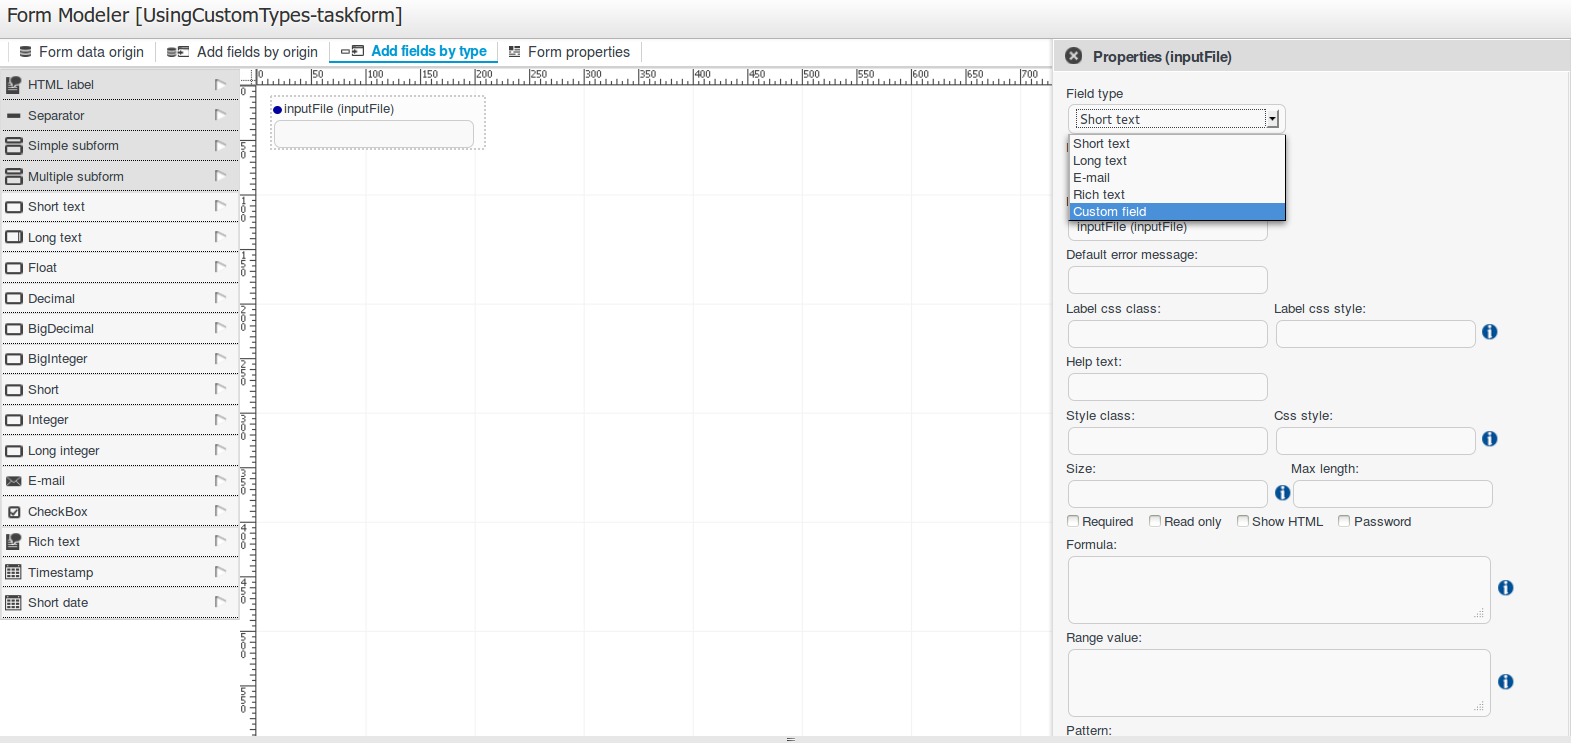
After changing the field type a new set of properties will appear:
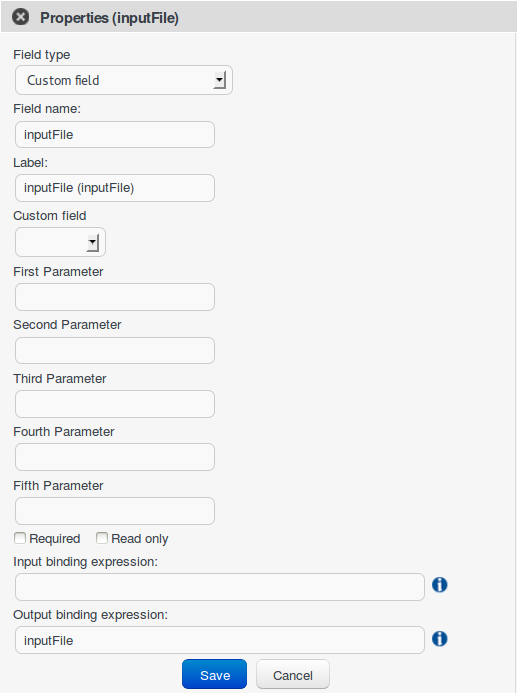
Table 13.6. Custom field properties
| Property | Description |
|---|---|
| Field type | Can change the field type to other compatible field types |
| Field Name | Will be used as identifier in formulas calculation |
| Label | The text that will be shown as field label |
| Custom field | A list containing all the Custom Field Types available on the platform |
| First parameter | A String parameter that can be user to pass custom configuration needed by the Custom Field Type implementation |
| Second parameter | A String parameter that can be user to pass custom configuration needed by the Custom Field Type implementation |
| Third parameter | A String parameter that can be user to pass custom configuration needed by the Custom Field Type implementation |
| Fourth parameter | A String parameter that can be user to pass custom configuration needed by the Custom Field Type implementation |
| Fifth parameter | A String parameter that can be user to pass custom configuration needed by the Custom Field Type implementation |
| Required | Indicates if it’s mandatory to fill this field. |
| Read Only | When this check is on, the field will be used only for read |
| Input binding expression | This expression defines the link between field and process task input variable. It will be used in runtime to set the field value with that task input variable data. |
| Output binding expression | This expression defines the link between field and process task output variable. It will be used in runtime to set that task output variable. |
So opening the Custom field select box we'll be able to select the File Input from the available custom types:

After selecting the File Input type on the list and saving the field properties the form will look like:
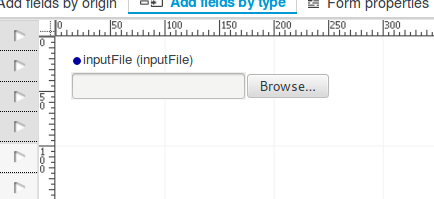
If we build a simple process and configure a Short text to be shown as the sampleFile Input, if we build the project on runtime the field will behave uploading the chosen files to the server and allowing the user to download it like this:
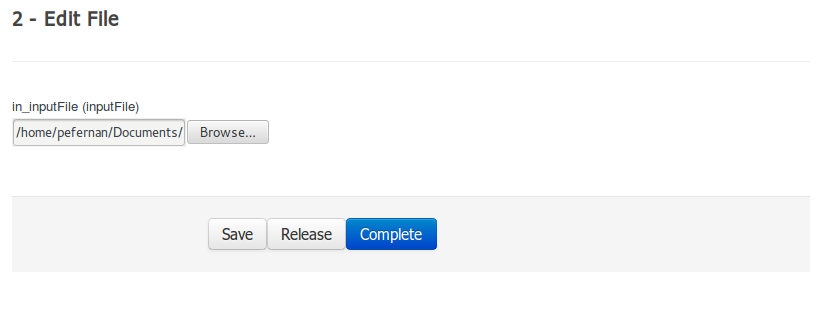
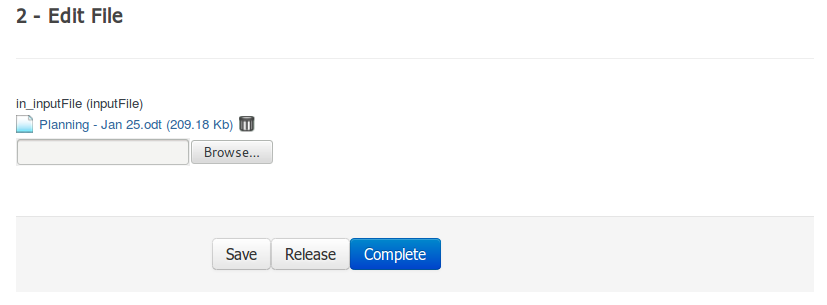
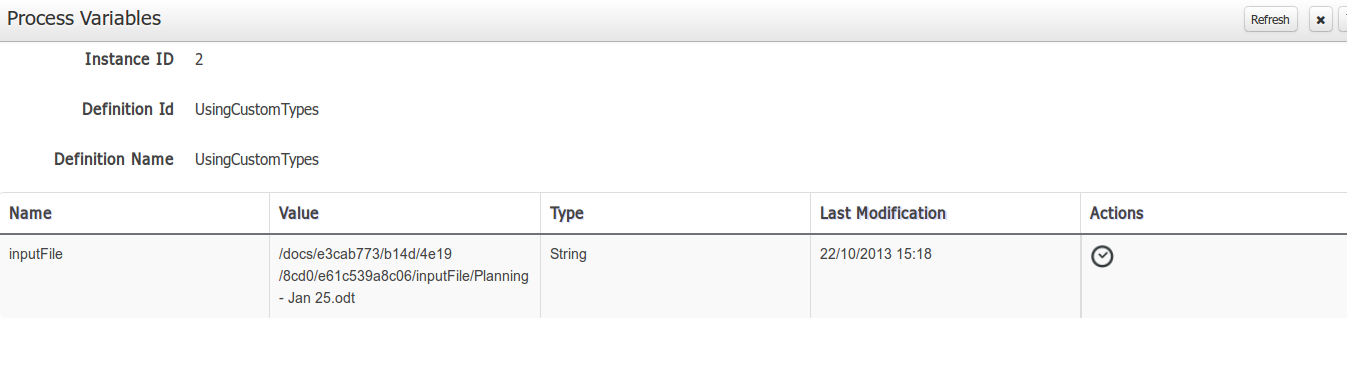
If we take a look at what's the process variable value, we'll see that is storing a String with the file path stored in server.
On this section we are going to describe step by step how to attach documents to your process variables from your forms and how you can configure to store the uploaded documents anywhere (File System, Data Base, Alfresco...) using the Pluggable Variable Persistence.
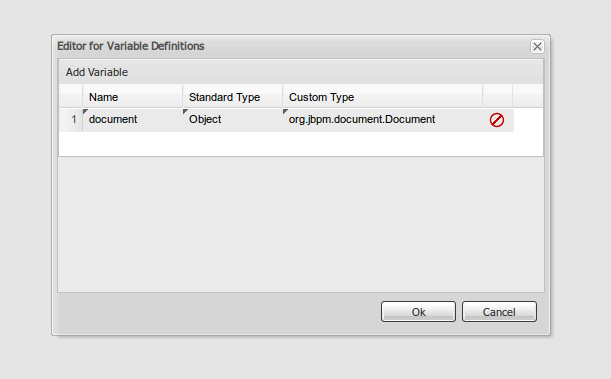
To make your process manage documents you have to define your process variables as usual using
the Custom Type org.jbpm.document.Document. Each variable defined as Document
will be shown on the form as a FILE input.
When the process forms are genereated and a org.jbpm.document.Document variable si found
a File input will be placed on the form.
Each time a document is uploaded using a form the Form Engine will generate an instance of
org.jbpm.document.Document to be stored on the process variable.
In order to store the document using the Pluggable Variable Persistence you'll have to define your Marshalling Strategy to manage the uploaded Documents. To start create a Maven project with your favourite IDE and add the following dependencies:
<dependency>

  <groupId>org.kie</groupId>

  <artifactId>kie-api</artifactId>

  <version>{version}</version>

</dependency>

<dependency>

  <groupId>org.jbpm</groupId>

  <artifactId>jbpm-document</artifactId>

  <version>{version}</version>

</dependency>
Once you did that is time to create your Document Marshalling Strategy, to do so you just have to create a class that extends:
package org.jbpm.document.marshalling;


public abstract class AbstractDocumentMarshallingStrategy implements ObjectMarshallingStrategy {


  public abstract Document buildDocument( String name, long size, Date lastModified, Map<String, String> params );


  public void write( ObjectOutputStream os, Object object )

        throws IOException;


  public Object read( ObjectInputStream os )

        throws IOException, ClassNotFoundException;


  public byte[] marshal( Context context, ObjectOutputStream os, Object object )

        throws IOException;


  public Object unmarshal( Context context, ObjectInputStream is, byte[] object,

        ClassLoader classloader ) throws IOException, ClassNotFoundException;


  public Context createContext();

}
The methods to implement are:
Document buildDocument( String name, long size, Date lastModified, Map<String, String> params ):Creates a valid Document instance with the data received. This method is called when a document is uploaded to create the Document instancebeforemarshalling the document content.byte[] marshal( Context context, ObjectOutputStream os, Object object ):Marshals the given object and returns the marshalled object as byte[]Object unmarshal( Context context, ObjectInputStream is, byte[] object, ClassLoader classloader ):Reads the object received as byte[] and returns the unmarshalled objectvoid write(ObjectOutputStream os, Object object):Implement for backguards compatibility, it should do the same functionallity thanbyte[] marshal( Context context, ObjectOutputStream os, Object object )Object read(ObjectInputStream os):Implement for backguards compatibility, it should do the same functionallity thanObject unmarshal( Context context, ObjectInputStream is, byte[] object, ClassLoader classloader )
You can see how the default DocumentMarshallingStrategy is implemented looking at this link.
After creating your Document Marshalling Strategy and add it to your server classpath the only thing
remaining is to configure your project deployment descriptor add it to the marshalling strategies list.
To do it you just have to open the Kie-Workbench on your browser, open your project on the Authoring view and
edit the kie-deployment-descriptor.xml file located on <yourproject>/src/main/resources/META-INF
and add your Document Marshalling Strategy to the <marshalling-strategies> list
like this:
<?xml version="1.0" encoding="UTF-8" standalone="yes"?>

<deployment-descriptor

    xsi:schemaLocation="http://www.jboss.org/jbpm deployment-descriptor.xsd"

    xmlns:xsi="http://www.w3.org/2001/XMLSchema-instance">

  <persistence-unit>org.jbpm.domain</persistence-unit>

  <audit-persistence-unit>org.jbpm.domain</audit-persistence-unit>

  <audit-mode>JPA</audit-mode>

  <persistence-mode>JPA</persistence-mode>

  <runtime-strategy>SINGLETON</runtime-strategy>

  <marshalling-strategies>

    <marshalling-strategy>

      <resolver>reflection</resolver>

      <identifier>

        org.jbpm.document.marshalling.DocumentMarshallingStrategy

      </identifier>

    </marshalling-strategy>

  </marshalling-strategies>

  <event-listeners/>

  <task-event-listeners/>

  <globals/>

  <work-item-handlers/>

  <environment-entries/>

  <configurations/>

  <required-roles/>

</deployment-descriptor>
Since this is done you're able to build your project and upload your documents on your process.


Note
On this example we are configuring the default DocumentMarshallingStrategy, please use it for test and
demo purposes.
This chapter intends to describe how you can embed process forms and interact with them on another webapp including the new Javascript API provided by the platform.
You can find the library inside the kie-wb-*.war on the js file located on
js/jbpm-forms-rest-integration.js.
This JavaScript API tries to be a simple mechanism to use forms on remote applications allowing to load the forms from different KIE Workbench instances, submit them, launch processes/tasks and execute callback functions when the actions are done.
The basic methods are:
showStartProcessForm(hostUrl, deploymentId, processId, divId, onsuccessCallback, onerrorCallback):Makes a call to the REST endpoint to obtain the form URL and if it gets a valid response will embed the process start form on the given div. The parameteres needed are:hostURL: the URL of the KIE Workbench instance that holds the deployments.
deploymentId: the deployment identifier that contains the process to run.
processId: the identifier of the process to run.
divId: the identifier of the div that has to contain the form.
onsuccessCallback (optional): a javascript function that will be executed if the form is going to be rendered. This function will receive the server response as a parameter
onerrorCallback (optional): a javascript function that will be executed if any error occurs and it is impossible to render the form. This function will receive the server response as a parameter
startProcess(divId, onsuccessCallback, onerrorCallback):Submits the form loaded on the given div and starts the process. The parameteres needed are:divId: the identifier of the div that to contains the form.
onsuccessCallback (optional): a javascript function that will be executed after the process is started. This function will receive the server response as a parameter
onerrorCallback (optional): a javascript function that will be executed if any error occurs and it is impossible to start the process. This function will receive the server response as a parameter
showTaskForm(hostUrl, taskId, divId, onsuccessCallback, onerrorCallback):Makes a call to the REST endpoint to obtain the form URL and if it gets a valid response will embed the task form on the given div. The parameteres needed are:hostURL: the URL of the KIE Workbench instance that holds the deployments.
taskId: the identifier of the task to show the form.
divId: the identifier of the div that has to contain the form.
onsuccessCallback (optional): a javascript function that will be executed if the form is going to be rendered. This function will receive the server response as a parameter
onerrorCallback (optional): a javascript function that will be executed if any error occurs and it is impossible to render the form. This function will receive the server response as a parameter
claimTask(divId, onsuccessCallback, onerrorCallback):Claims the task whose form is being rendereddivId: the identifier of the div that contains the form.
onsuccessCallback (optional): a javascript function that will be executed after the task is claimed. This function will receive the server response as a parameter
onerrorCallback (optional): a javascript function that will be executed if any error occurs and it is impossible to claim the task. This function will receive the server response as a parameter
startTask(divId, onsuccessCallback, onerrorCallback):Starts the task whose form is being rendereddivId: the identifier of the div that contains the form.
onsuccessCallback (optional): a javascript function that will be executed after the task is started. This function will receive the server response as a parameter
onerrorCallback (optional): a javascript function that will be executed if any error occurs and it is impossible to start the task. This function will receive the server response as a parameter
releaseTask(divId, onsuccessCallback, onerrorCallback):Releases the task whose form is being rendereddivId: the identifier of the div that contains the form.
onsuccessCallback (optional): a javascript function that will be executed after the task is released. This function will receive the server response as a parameter
onerrorCallback (optional): a javascript function that will be executed if any error occurs and it is impossible to release the task. This function will receive the server response as a parameter
saveTask(divId, onsuccessCallback, onerrorCallback):Submits the form and saves the state of the task whose form is being rendereddivId: the identifier of the div that contains the form.
onsuccessCallback (optional): a javascript function that will be executed after the task is saved. This function will receive the server response as a parameter
onerrorCallback (optional): a javascript function that will be executed if any error occurs and it is impossible to save the task. This function will receive the server response as a parameter
completeTask(divId, onsuccessCallback, onerrorCallback):Submits the form and completes task whose form is being rendereddivId: the identifier of the div that contains the form.
onsuccessCallback (optional): a javascript function that will be executed after the task is completed. This function will receive the server response as a parameter
onerrorCallback (optional): a javascript function that will be executed if any error occurs and it is impossible to complete the task. This function will receive the server response as a parameter
clearContainer(divId):Cleans the div content and the related data stored on the component.divId: the identifier of the div that contains the form.
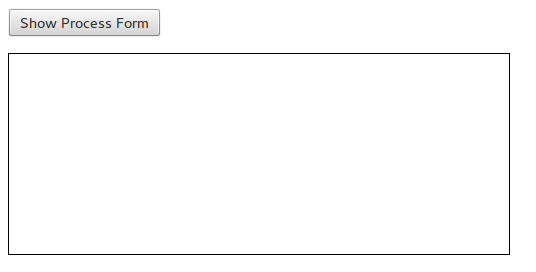
Now let's see an example how you can use the library to load the HR process form and start a new process instance. We are going to define a HTML page that will contain very simple components:
"Show Process Form" BUTTON: The button that is going to make a call to a showProcessForm() function to embedd the process form.
"myform" DIV: the div that will containt the form
"Start Process" BUTTON: the button that will call the startProcess() function that submits the form and start a new process instance. At the begining it will be hidden and only will be displayed when the form is going to be rendered.
First we are look at the HTML code:
<head>

  <script src="js/jbpm-forms-rest-integration.js"></script>

  <script>

      var formsAPI = new jBPMFormsAPI();

  </script>

</head>

<body>

  <input type="button" id="showformButton"

      value="Show Process Form" onclick="showProcessForm()">

  <p/>

  <div id="myform" style="border: solid black 1px; width: 500px; height: 200px;">

  </div>

  <p/>

  <input type="button" id="startprocessButton"

      style="display: none;" value="Start Process" onclick="startProcess()">

</body>
Notice that in first place we have added the js library and created an instance of the jBPMFormsAPI object that will manage the form rendering.
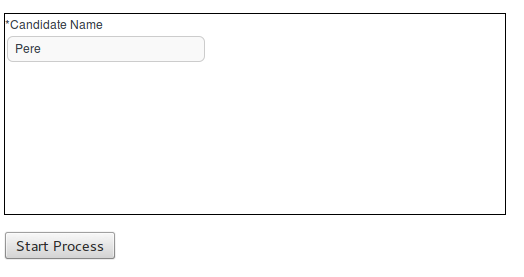
Now let's see how the showProcessForm() function looks like:
function showProcessForm() {
  var onsuccessCallback = function(response) {
    document.getElementById("showformButton").style.display = "none";
    document.getElementById("startprocessButton").style.display = "block";
  }

  var onerrorCallback = function(errorMessage) {
    alert("Unable to load the form, something wrong happened: " + errorMessage);
    formsAPI.clearContainer("myform");
  }
  formsAPI.showStartProcessForm("http://localhost:8080/kie-wb/", "org.jbpm:HR:1.0", "hiring", "myform", onsuccessCallback, onerrorCallback);
}
As you can see, first we are defining the callback functions:
onsuccessCallback:This function is going to be called when the call to the REST endpoint and the form is going to be rendered. On this example we simply hide the "Show Process Form" button and show the "Start Process" button in order to allow to submit the form and start the process. This function takes as a parameter the response of the REST call to inform the user that everything gone well.onerrorCallback:This function is going to be called if any error occurs (e.g. any communication error with the REST endpoint or unexpected js errors) On this example we simply show an alert showing the error message received and clear the "myform" DIV status.
Once we defined the callback function we proceed to call the formsAPI.showStartProcessForm(...) that is going
make the REST call and embedd the form inside the specified div. Notice that we are providing a bunch of information
in order to load the form, the URL where the KIE-Workbench is running (in this example "http://localhost:8080/kie-wb/"),
the deployment where the process is located ("org.jbpm:HR:1.0"), the process id ("hiring"), the DIV id that is
going to contain the form ("myform") and the callback functions (onsuccessCallback and onerrorCallback).
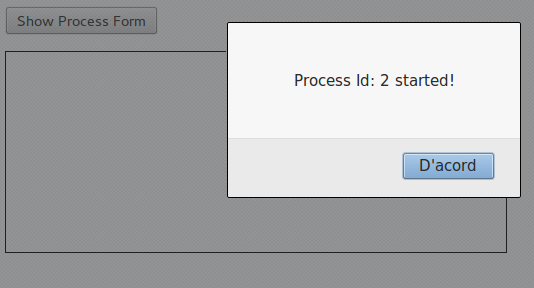
Now let's take a look at the startProcess() that is the one that is going to submit the form and start the process:
function startProcess() {
  var onsuccessCallback = function(response) {
    document.getElementById("showformButton").style.display = "block";
    document.getElementById("startprocessButton").style.display = "none";
    formsAPI.clearContainer("myform");
    alert(response);
  }

  var onerrorCallback = function(response) {
    document.getElementById("showformButton").style.display = "block";
    document.getElementById("startprocessButton").style.display = "none";
    formsAPI.clearContainer("myform");
    alert("Unable to start the process, something wrong happened: " + response);
  }
  formsAPI.startProcess("myform", onsuccessCallback, onerrorCallback);
}
As showProcessForm(), first we are defining the callback functions. Both are doing basically the
same:
Show the "Show Process Form" button and hide the "Start Process" button to allow start another process instance.
Clear the "myform" DIV status
Show an alert with the response notifying that the process has started well or if an error occured
Once that is done we just do the call to the formsAPI.startProcess(...) that will send a message
to the component that renders the form inside the "myform" DIV and will exectue the callback
functions when the action is done.
Notice that we don't need the provide any other information than the DIV that contains the form and optionally the
callback functions.
With a simple code like this you'll be able to run process/task forms that are located on different Kie-Workbench instances from any other application.