The JSR-168 specification aims at defining porlets that can be used by any JSR-168 portlet container also called portals. There are different portals out there with commercial and non-commercial licences. In this chapter we will briefly describe such portlets but for more details you should read the specifications available on the web.
Note
This section is a brief overview of the JSR-168 Portlet Specification , and it does not cover the topics in great detail. We strongly encourage portlet developers to read the Specification that can be found here .
As of today, JBoss portal is fully JSR-168 compliant, that means that any JSR-168 portlet will behave as it should inside the portal.
A portal can be seen as pages with different areas and inside areas, different windows and each window having one portlet.
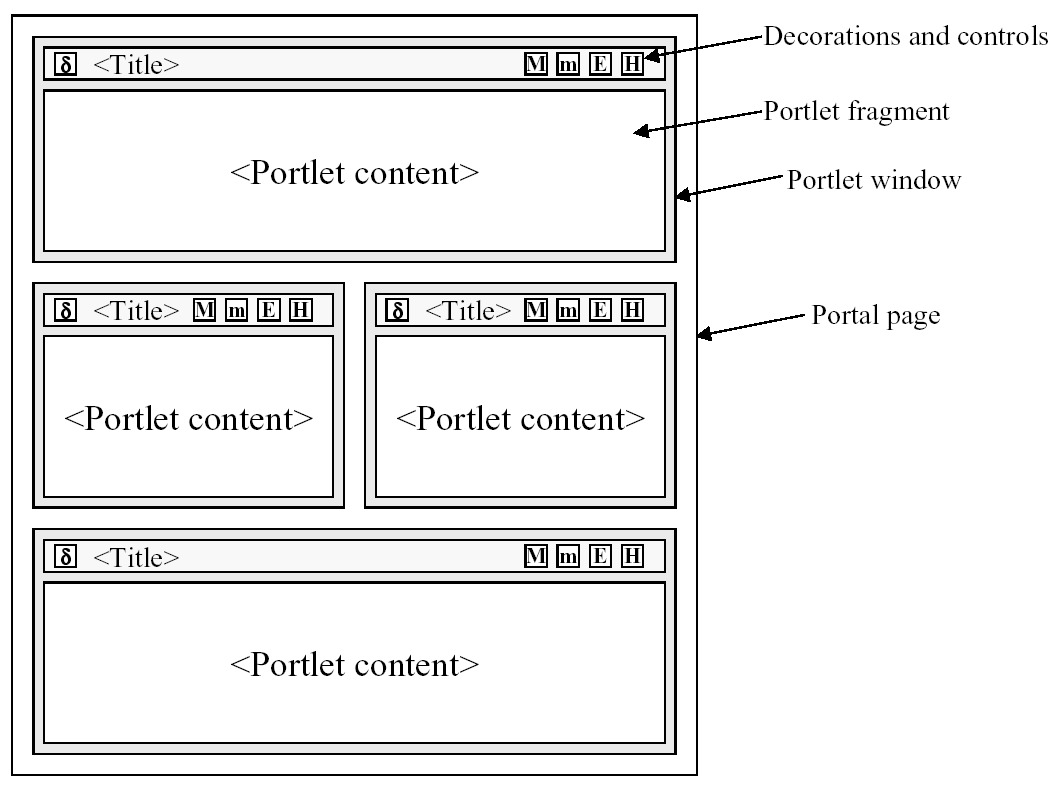 |
A porlet can have different view modes, three modes are defined by the specification but a portal can extend those modes. The 3 modes are:
- VIEW - Generates markup reflecting the current state of the portlet.
- EDIT - Should allow a user to customize the behaviour of the portlet.
- HELP - Should provide some information to the user as to how to use the portlet.
Window states are an indicator of how much page real-estate a portlet should consume on any given page. There are 3 states defined by the specification:
- NORMAL - A portlet shares this page with other portlets.
- MINIMIZED - A portlet may show very little information or none at all.
- MAXIMIZED - A portlet may be the only portlet displayed on this page.
The tutorials contained in this chapter are targetted toward portlet developers. Although they are a good starting and reference point, we do heavily recommend that portlet developers read and understand the Portlet Specification (JSR-168). We also recommend using our JBoss Portal User Forums for user-to-user help, when needed.
This section will introduce the reader to deploying his first portlet in JBoss Portal. It requires you download the HelloWorldPortlet from PortletSwap.com, using this link.
Portlets are packaged in WAR files, just like other JEE applications. A typical portlet WAR file can also include servlets, resource bundles, images, HTML, JSPs, and other static or dynamic files you would commonly include.
 |
Included in the download bundle you should have one java source file: HelloWorldPortlet\src\main\org\jboss\portlet\hello\HelloWorldPortlet.java, and it should contain the following:
package org.jboss.portlet.hello;

import javax.portlet.GenericPortlet;
import javax.portlet.PortletException;
import javax.portlet.RenderRequest;
import javax.portlet.RenderResponse;
import javax.portlet.UnavailableException;
import java.io.IOException;
import java.io.PrintWriter;

public class HelloWorldPortlet extends GenericPortlet
{
   protected void doView(RenderRequest rRequest, RenderResponse rResponse)
                     throws PortletException, IOException, UnavailableException
   {
      rResponse.setContentType("text/html");
      PrintWriter writer = rResponse.getWriter();
      writer.write("Hello World!");
      writer.close();
   }
}
Now let's dissect our simplest of portlets:
public class HelloWorldPortlet extends GenericPortlet
All Portlets MUST implement the javax.portlet.Portlet interface. The Portlet API also provides a convenience implementation of this interface in the form of the javax.portlet.GenericPortlet class which, among other things, implements the Portlet render method to dispatch to abstract mode-specific methods to make it easier to support the standard portlet modes. It also provides a default implementation for processAction, init and destory methods. It is recommended to extend GenericPortlet for most cases.
protected void doView(RenderRequest rRequest, RenderResponse rResponse) throws
                           PortletException, IOException, UnavailableException
As we extend from GenericPortlet and we are only interested in supported the VIEW mode, we only need to implement the doView method, and GenericPortlet's render implementation will call our implementation when the VIEW mode is requested.
rResponse.setContentType("text/html");Just like in the servlet-world, you must declare what content-type the portlet will be responding in. You need to do this before starting to write content or the portlet will throw an exception.
PrintWriter writer = rResponse.getWriter();
writer.write("Hello World!");
writer.close();
Here we output the text Hello World! in our portlet window.
Note
Portlets are responsible for generating markup fragments, as they are included on a page and surrounded by other portlets. In particular, this means that a portlet outputting HTML MUST not output any markup that cannot be found in a body element.
JBoss Portal requires certain descriptors be included in your portlet WAR, for different reasons. Some of these descriptors are defined by the Portlet Specification, some are specific to JBoss Portal.
|
Now let's explain what each of these does:
portlet.xml
<?xml version="1.0" encoding="UTF-8"?>
<portlet-app xmlns="http://java.sun.com/xml/ns/portlet/portlet-app_1_0.xsd"
             xmlns:xsi="http://www.w3.org/2001/XMLSchema-instance"
             xsi:schemaLocation="http://java.sun.com/xml/ns/portlet/portlet-app_1_0.xsd
                                 http://java.sun.com/xml/ns/portlet/portlet-app_1_0.xsd"
             version="1.0">
   <portlet>
      <portlet-name>HelloWorldPortlet</portlet-name>
      <portlet-class>org.jboss.portlet.hello.HelloWorldPortlet</portlet-class>
      <supports>
         <mime-type>text/html</mime-type>
         <portlet-mode>VIEW</portlet-mode>
      </supports>
      <portlet-info>
         <title>HelloWorld Portlet</title>
      </portlet-info>
   </portlet>
</portlet-app>
This file must adhere to its definition in the Portlet Specification. You may define more than one portlet application in this file.
<portlet-name>HelloWorldPortlet</portlet-name>
Define your portlet name. It does not have to be the Class name.
<portlet-class>org.jboss.portlet.hello.HelloWorldPortlet</portlet-class>
The Fully Qualified Name (FQN) of your portlet class must be declared here.
<supports>
   <mime-type>text/html</mime-type>
   <portlet-mode>VIEW</portlet-mode>
</supports>
The supports element allows you to declare all the markup types your portlet supports in the render method. This is accomplish via the mime-type element, which is required for every portlet. Of course, the declared MIME types must match the capability of the portlet. It also allows you to pair which modes and window states are supported for each markup type. In out case, as all portlets must support the VIEW portlet mode, we didn't have to declare it. We did need to declare that our portlet supports the text/html markup type. Hence, we are letting the portal know that it will be outputting text/html and only support a VIEW mode.
<portlet-info>
   <title>HelloWorld Portlet</title>
</portlet-info>
The portlet's title will be displayed as the header in the portlet window, when rendered, unless it is overridden programatically.
portlet-instances.xml
<?xml version="1.0" standalone="yes"?>
<!DOCTYPE deployments PUBLIC
   "-//JBoss Portal//DTD Portlet Instances 2.6//EN"
   "http://www.jboss.org/portal/dtd/portlet-instances_2_6.dtd">
<deployments>
   <deployment>
      <instance>
         <instance-id>HelloWorldPortletInstance</instance-id>
         <portlet-ref>HelloWorldPortlet</portlet-ref>
      </instance>
   </deployment>
</deployments>
This is a JBoss Portal specific descriptor that allows you create an instance of a portlet. The portlet-ref value must match the portlet-name value given in the packaged portlet.xml. The instance-id value can be named anything, but it must match the instance-ref value given in the *-object.xml file we will explore below.
helloworld-object.xml
<?xml version="1.0" encoding="UTF-8"?>
<!DOCTYPE deployments PUBLIC
   "-//JBoss Portal//DTD Portal Object 2.6//EN"
   "http://www.jboss.org/portal/dtd/portal-object_2_6.dtd">
<deployments>
   <deployment>
      <parent-ref>default.default</parent-ref>
      <if-exists>overwrite</if-exists>
      <window>
         <window-name>HelloWorldPortletWindow</window-name>
         <instance-ref>HelloWorldPortletInstance</instance-ref>
         <region>center</region>
         <height>1</height>
      </window>
   </deployment>
</deployments>
*-object.xml files are JBoss Portal specific descriptors and allow users to define the structure of their portal instances as well as create/configure thier windows and pages. In our example, we create a portlet window, specify that it will display the markup generated by the HelloWorldPortletInstance portlet instance, assign it to the default.default page, and specify where it should appear on that page.
<parent-ref>default.default</parent-ref>
Tells the portal where this portlet should appear. In this case, default.default specifies that this portlet should appear in the portal instance named default and the page named default.
<if-exists>overwrite</if-exists>
Instructs the portal to overwrite or keep this object if it already exists. Possible values are overwrite or keep. overwrite will destroy the existing object and create a new one based on the content of the deployment. keep will maintain the existing object deployment or create a new one if it does not yet exist.
<window-name>HelloWorldPortletWindow</window-name>
Can be named anything.
<instance-ref>HelloWorldPortletInstance</instance-ref>
The value of instance-ref must match the value of instance-id found in the portlet-instances.xml.
<region>center</region>
<height>1</height>
Specify the layout region and order this window will be found on the portal page.
To illustrate the relationship between the descriptors, we have provided this simple diagram
 |
Portal 2.6 introduces the notion of content type, which is a generic mechanism to specify which content will be displayed by a given portlet window. The window section of the previous example can be re-written to take advantage of the new content framework, resulting in the following deployment descriptor:
<?xml version="1.0" encoding="UTF-8"?>
<!DOCTYPE deployments PUBLIC
   "-//JBoss Portal//DTD Portal Object 2.6//EN"
   "http://www.jboss.org/portal/dtd/portal-object_2_6.dtd">
<deployments>
   <deployment>
      <parent-ref>default.default</parent-ref>
      <if-exists>overwrite</if-exists>
      <window>
         <window-name>HelloWorldPortletWindow</window-name>
         <content>
            <content-type>portlet</content-type>
            <content-uri>HelloWorldPortletInstance</content-uri>
         </content>
         <region>center</region>
         <height>1</height>
      </window>
   </deployment>
</deployments>
This declaration is equivalent to the previous example. We specify that the content being displayed by the HelloWorldPortletWindow is a portlet content. The content URI identifies which content to be displayed, in this case, the HelloWorldPortletInstance. It is possible to declare windows with a cms content type and use directly the path to the file in the CMS to make the window show the content of the associated file. That behavior is pluggable and it is possible to plug virtually any kind of content.
If you have downloaded the sample, you can execute the build.xml with ant or inside your IDE. Executing the deploy target will compile all the source files and produce a helloworldportlet.war file under HelloWorldPortlet\helloworldportlet.war.
 |
If you want to create an expanded WAR directory, after executing the above deploy target, you should execute the explode target.
 |
The above target will produce the following:
 |
This will deflate helloworldportlet.war, and allow you to deploy it as an expanded directory. It will work just the same but is easier to work with during development as you can easily modify the XML descriptors, resources files, JSF/JSP pages. A simple touch operation (or equivalent) on the web.xml file will let any live JBoss Application Server instance know that it needs to hot-redeploy your web application.
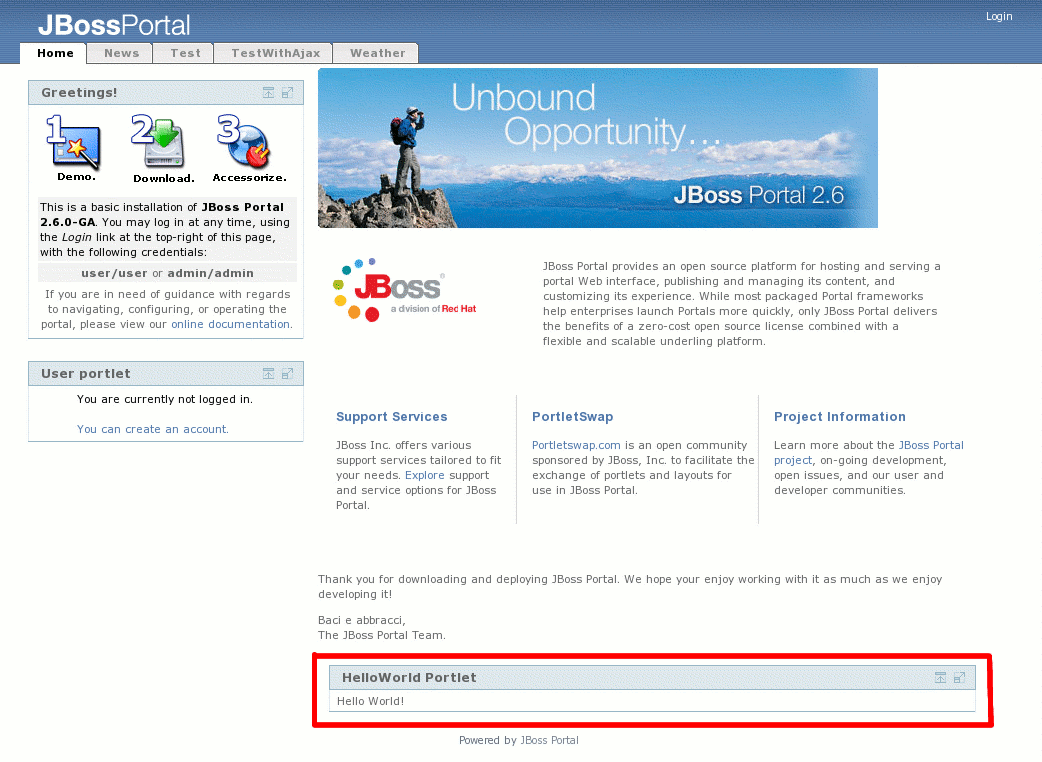
Deploying a portlet is as simple as copying/moving helloworldportlet.war to your server deploy directory. Doing this on a running instance of JBoss Portal and application server, will trigger a hot-deploy of your portlet:
18:25:56,366 INFO  [Server] JBoss (MX MicroKernel) [4.0.5.GA (build:
             CVSTag=JBoss_4_0_5_GA date=2006000000)] Started in 1m:3s:688ms
18:26:21,147 INFO  [TomcatDeployer] deploy, ctxPath=/helloworldportlet,
             warUrl=.../tmp/deploy/tmp35219helloworldportlet-exp.war/
Pointing your browser to http://localhost:8080/portal/, should yield a view of our HelloWorldPortlet, added to the default page of Portal:
 |
This section will introduce the reader to deploying a simple JSP portlet in JBoss Portal. It requires you download the HelloWorldJSPPortlet from PortletSwap.com, using this link.
This portlet will introduce you to using JSPs for view rendering and the portlet taglib for generating links.
The application descriptors for this portlet are similar to the ones we saw in Section 5.2.1.4, “Application Descriptors”. See the Section 6.2, “Portlet Descriptors” chapter on descriptors for more details.
 |
As you can see in the figure above, the package content is what you'd expect from a traditional web application augmented with the portlet- and JBoss Portal-specific application descriptors.
Included in the download bundle you should have one java source file: HelloWorldJSPPortlet\src\main\org\jboss\portlet\hello\HelloWorldJSPPortlet.java, containing the following:
package org.jboss.portlet.hello;

import javax.portlet.ActionRequest;
import javax.portlet.ActionResponse;
import javax.portlet.GenericPortlet;
import javax.portlet.PortletException;
import javax.portlet.PortletRequestDispatcher;
import javax.portlet.RenderRequest;
import javax.portlet.RenderResponse;
import javax.portlet.UnavailableException;
import java.io.IOException;

public class HelloWorldJSPPortlet extends GenericPortlet
{
   protected void doView(RenderRequest rRequest, RenderResponse rResponse)
                     throws PortletException, IOException, UnavailableException
   {
      rResponse.setContentType("text/html");

      String sYourName = (String) rRequest.getParameter("yourname");

      if(sYourName != null)
      {
         rRequest.setAttribute("yourname", sYourName);
         PortletRequestDispatcher prd = getPortletContext()
            .getRequestDispatcher("/WEB-INF/jsp/view2.jsp");
         prd.include(rRequest, rResponse);
      }
      else
      {
         PortletRequestDispatcher prd = getPortletContext()
            .getRequestDispatcher("/WEB-INF/jsp/view.jsp");
         prd.include(rRequest, rResponse);
      }
   }

   public void processAction(ActionRequest aRequest, ActionResponse aResponse)
                  throws PortletException, IOException, UnavailableException
   {
      String sYourname = (String) aRequest.getParameter("yourname");

      // do something

      aResponse.setRenderParameter("yourname", sYourname);
   }

   protected void doHelp(RenderRequest rRequest, RenderResponse rResponse)
                     throws PortletException, IOException, UnavailableException
   {
      rResponse.setContentType("text/html");
      PortletRequestDispatcher prd = getPortletContext()
         .getRequestDispatcher("/WEB-INF/jsp/help.jsp");
      prd.include(rRequest, rResponse);
   }

   protected void doEdit(RenderRequest rRequest, RenderResponse rResponse)
                     throws PortletException, IOException, UnavailableException
   {
      rResponse.setContentType("text/html");
      PortletRequestDispatcher prd = getPortletContext()
         .getRequestDispatcher("/WEB-INF/jsp/edit.jsp");
      prd.include(rRequest, rResponse);
   }
}
Now let's look at some of our methods:
protected void doHelp(RenderRequest rRequest, RenderResponse rResponse) { ... }

// And

protected void doEdit(RenderRequest rRequest, RenderResponse rResponse) { ... }
Support for these Modes must be declared in the portlet.xml. They will be triggered when a user clicks on the respective icons in the portlet window titlebar, or through generated links within the portlet.
public void processAction(ActionRequest aRequest, ActionResponse aResponse)
               throws PortletException, IOException, UnavailableException
{
   String sYourname = (String) aRequest.getParameter("yourname");

   // do something

   aResponse.setRenderParameter("yourname", sYourname);
}
This method will be triggered upon clicking on an ActionURL from our view.jsp. It will retrieve yourname from the HTML form, and pass it along as a renderParameter to the doView() method.
rResponse.setContentType("text/html");Just like in the servlet world, you must declare which kind of MIME type of the content the portlet will be generating.
protected void doView(RenderRequest rRequest, RenderResponse rResponse)
                  throws PortletException, IOException, UnavailableException
In this case, our doView implementation is responsible for dispatching to the appropriate JSP view.jsp or view2.jsp, depending on the existence of the yourname parameter passed in from processAction.
Of importance in this tutorial are the two view JSPs. The first, view.jsp, allows the user to input his name, which is then posted to the processAction method in our portlet class, set as a renderParameter, then the render method is invoked (in our case, doView, which then dispatches to our view2.jsp).
 |
Now let's have a look at our view.jsp:
<%@ taglib uri="http://java.sun.com/portlet" prefix="portlet" %>

<portlet:defineObjects/>

<div align="center">
   This is a simple HelloWorld JSP Portlet. Type in a name and it will dispatch
   to the view2.jsp to print out your name.
   <br/>

   <form action="<portlet:actionURL><portlet:param name="page" value="mainview"/>
         </portlet:actionURL>" method="POST">
      Name:<br/>
      <input type="text" name="yourname"/>
   </form>
   <br/>
   You can also link to other pages, using a renderURL, like <a
      href="<portlet:renderURL><portlet:param name="yourname" value="Roy Russo">
            </portlet:param></portlet:renderURL>">this</a>.
</div>
<%@ taglib uri="http://java.sun.com/portlet" prefix="portlet" %>
Define the portlet taglib. You do NOT need to bundle the portlet taglib, JBoss Portal will handle that for you.
<portlet:defineObjects/>
Calling defineObjects makes available implicit objects, such as renderRequest, actionRequest, portletConfig, in this JSP.
<form action="<portlet:actionURL><portlet:param name="page" value="mainview"/>
      </portlet:actionURL>" method="POST">
We create an HTML form, but generate the URL it will post to using the portlet tag library. In this case, notice how we are creating an actionURL, which will activate our processAction method, passing in any input parameters in the form.
<a href="<portlet:renderURL><portlet:param name="yourname" value="Roy Russo">
</portlet:param></portlet:renderURL>">
Likewise, we are able to create a link to our doView method, by simply creating it with a renderURL, that passes in our yourname parameter.
If you have downloaded the sample, you can execute the build.xml with ant or inside your IDE. Executing the deploy target will compile all source files and produce a helloworldjspportlet.war file in a way similar to what we saw in Section 5.2.1.5, “Building your portlet”.
The explode target will produce the following:
 |
Deploying the portlet is as easy as copying/moving the helloworldjspportlet.war file to the server deploy directory. We can then see our portlet on the Portal default page (http://localhost:8080/portal/):
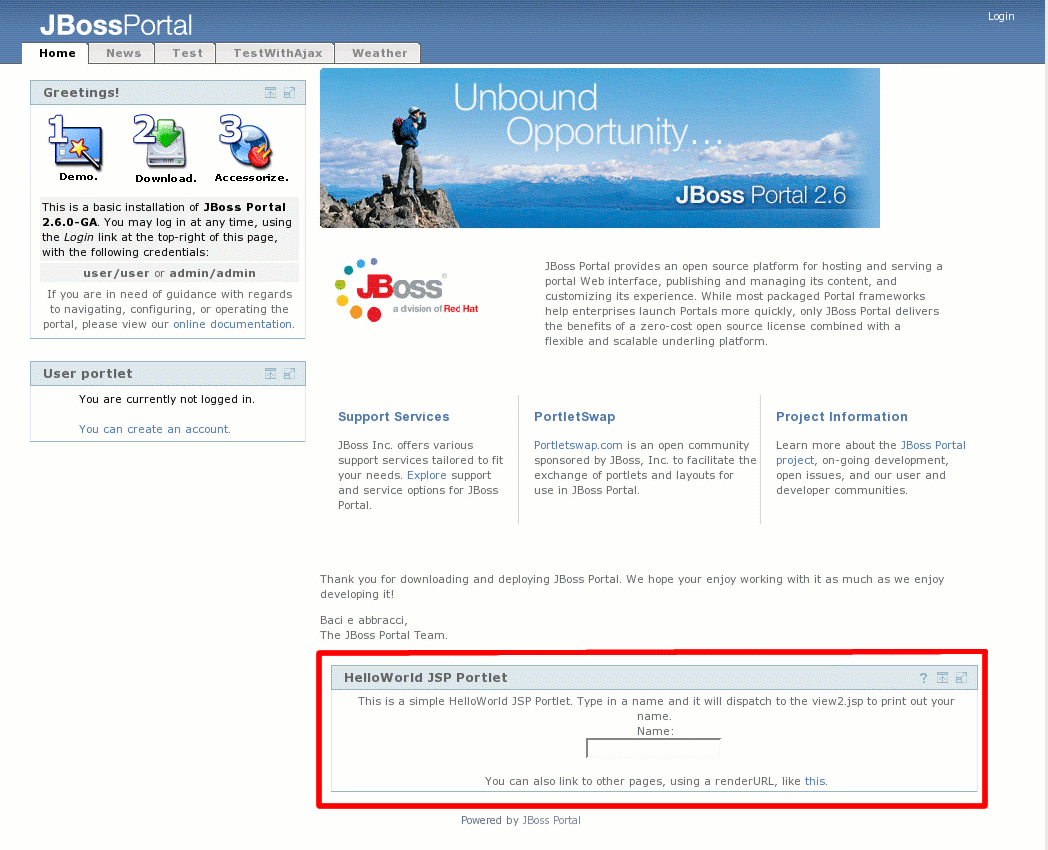 |
This section will introduce the reader to deploying a simple JSF portlet in JBoss Portal, using Apache's MyFaces JSF implementation on JBoss AS 4.2.x. It requires you download the HelloWorldJSFSunRIPortlet from PortletSwap.com, using this link: http://anonsvn.jboss.org/repos/portletswap/portlets/2_6/bundles/HelloWorldJSFSunRIPortlet.zip.
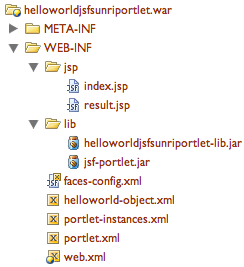 |
Like a typical JSF application, we also package our faces-config.xml that defines our managed-beans, converters, validators, navigation rules, etc...
Note
JBoss Application Server version 4.2.x bundles Sun's JSF Reference Implementation (RI) in JBOSS_HOME/server/default/deploy/jboss-web.deployer/jsf-libs/. As a result, you do not need to package Sun RI's libraries with your portlet application.
For the sake of brevity, we only discuss the portlet.xml and faces-config.xml descriptors here. For discussion on the other descriptors, please view Section 5.2.1.4, “Application Descriptors” or the chapter on descriptors: Section 6.2, “Portlet Descriptors”.
|
portlet.xml
<?xml version="1.0" encoding="UTF-8"?>
<portlet-app xmlns="http://java.sun.com/xml/ns/portlet/portlet-app_1_0.xsd"
             xmlns:xsi="http://www.w3.org/2001/XMLSchema-instance"
             xsi:schemaLocation="http://java.sun.com/xml/ns/portlet/portlet-app_1_0.xsd
                                 http://java.sun.com/xml/ns/portlet/portlet-app_1_0.xsd"
             version="1.0">
   <portlet>
      <portlet-name>HelloWorldJSFPortlet</portlet-name>
      <portlet-class>com.sun.faces.portlet.FacesPortlet</portlet-class>
      <init-param>
         <name>com.sun.faces.portlet.INIT_VIEW</name>
         <value>/WEB-INF/jsp/index.jsp</value>
      </init-param>
      <supports>
         <mime-type>text/html</mime-type>
         <portlet-mode>VIEW</portlet-mode>
      </supports>
      <portlet-info>
         <title>HelloWorld JSF Portlet</title>
      </portlet-info>
   </portlet>
</portlet-app>
This file must adhere to its definition in the Portlet Specification. You may define more than one portlet application in this file. Now let's look at the portions that deal with our use of JSF:
<portlet-class>com.sun.faces.portlet.FacesPortlet</portlet-class>
Here we specify that com.sun.faces.portlet.FacesPortlet will handle all requests/responses from our users. This class is part of jsf-portlet.jar as explained later.
We need to initialize the portlet with a default view page for it to render, much like a welcome page:
<init-param>
   <name>com.sun.faces.portlet.INIT_VIEW</name>
   <value>/WEB-INF/jsp/index.jsp</value>
</init-param>
faces-config.xml
<?xml version="1.0"?>
<!DOCTYPE faces-config PUBLIC
   "-//Sun Microsystems, Inc.//DTD JavaServer Faces Config 1.0//EN"
   "http://java.sun.com/dtd/web-facesconfig_1_0.dtd">
<faces-config>
   <managed-bean>
      <description>Basic UserBean</description>
      <managed-bean-name>user</managed-bean-name>
      <managed-bean-class>org.jboss.portlet.hello.bean.User</managed-bean-class>
      <managed-bean-scope>session</managed-bean-scope>
   </managed-bean>
   <navigation-rule>
      <navigation-case>
         <from-outcome>done</from-outcome>
         <to-view-id>/WEB-INF/jsp/result.jsp</to-view-id>
      </navigation-case>
   </navigation-rule>
</faces-config>
There is nothing special about the faces-config.xml file included here. This application would work just as well outside of a portlet as it would inside a portlet container. In the above lines, we define a basic User Bean and a navigation rule to handle the submittal of the original form on index.jsp.
web.xml
<?xml version="1.0"?>
<!DOCTYPE web-app PUBLIC
   "-//Sun Microsystems, Inc.//DTD Web Application 2.3//EN"
   "http://java.sun.com/dtd/web-app_2_3.dtd">
<web-app>

    <!-- Faces Servlet -->
    <servlet>
        <servlet-name>Faces Servlet</servlet-name>
        <servlet-class>javax.faces.webapp.FacesServlet</servlet-class>
        <load-on-startup>1</load-on-startup>
    </servlet>


    <!-- Faces Servlet Mapping -->
    <servlet-mapping>
        <servlet-name>Faces Servlet</servlet-name>
        <url-pattern>*.jsf</url-pattern>
    </servlet-mapping>

</web-app>
For the Sun RI, this definition is mandatory to associate jsf extension with the faces servlet.
jsf-portlet.jar This library that can be downloaded here: https://jsfportletbridge.dev.java.net/servlets/ProjectDocumentList contains the classes for the JSF-Portlet bridge. Since they are not included with the JSF implementation (unlike myfaces) neither in JBoss AS, it is required to have this library available in the package.
If you have downloaded the sample, you can execute the build.xml with ant or inside your IDE. Executing ant will compile all source files and produce a helloworldjspportlet.war file in a way similar to what we saw in Section 5.2.1.5, “Building your portlet”.
Deploying the portlet is as easy as copying/moving the helloworldjspportlet.war file to the server deploy directory. We can then see our portlet on the Portal default page (http://localhost:8080/portal/):
 |
This section will introduce the reader to deploying a simple JSF portlet in JBoss Portal, using Apache's MyFaces JSF implementation on JBoss AS 4.0.5+. It requires you download the HelloWorldJSFMyFacesPortlet from PortletSwap.com, using this link: http://anonsvn.jboss.org/repos/portletswap/portlets/2_6/bundles/HelloWorldJSFMyFacesPortlet.zip.
 |
Like a typical JSF application, we also package our faces-config.xml that defines our managed-beans, converters, validators, navigation rules, etc...
Note
JBoss Application Server version 4.0.x bundles Apache's MyFaces JSF implementation in JBOSS_HOME/server/default/deploy/jbossweb-tomcat55.sar/jsf-libs/. As a result, you do not need to package MyFaces' libraries with your portlet application.
For the sake of brevity, we only discuss the portlet.xml and faces-config.xml descriptors here. For discussion on the other descriptors, please view Section 5.2.1.4, “Application Descriptors” or the chapter on descriptors: Section 6.2, “Portlet Descriptors”.
|
portlet.xml
<?xml version="1.0" encoding="UTF-8"?>
<portlet-app xmlns="http://java.sun.com/xml/ns/portlet/portlet-app_1_0.xsd"
             xmlns:xsi="http://www.w3.org/2001/XMLSchema-instance"
             xsi:schemaLocation="http://java.sun.com/xml/ns/portlet/portlet-app_1_0.xsd
                                 http://java.sun.com/xml/ns/portlet/portlet-app_1_0.xsd"
             version="1.0">
   <portlet>
      <portlet-name>HelloWorldJSFPortlet</portlet-name>
      <portlet-class>org.apache.myfaces.portlet.MyFacesGenericPortlet</portlet-class>
      <init-param>
         <name>default-view</name>
         <value>/WEB-INF/jsp/index.jsp</value>
      </init-param>
      <supports>
         <mime-type>text/html</mime-type>
         <portlet-mode>VIEW</portlet-mode>
      </supports>
      <portlet-info>
         <title>HelloWorld JSF Portlet</title>
      </portlet-info>
   </portlet>
</portlet-app>
This file must adhere to its definition in the Portlet Specification. You may define more than one portlet application in this file. Now let's look at the portions that deal with our use of JSF:
<portlet-class>org.apache.myfaces.portlet.MyFacesGenericPortlet</portlet-class>
Here we specify that MyFacesGenericPortlet will handle all requests/responses from our users. There is therefore no need to develop a specific portlet class, MyFaces providing a generic implementation bridging the JSF and portlet worlds.
Note
If you wanted to add more functionality to your JSF portlet, not included in the MyFacesGenericPortlet, you could sublass it and create your own Class.We need to initialize the portlet with a default view page for it to render, much like a welcome page:
<init-param>
   <name>default-view</name>
   <value>/WEB-INF/jsp/index.jsp</value>
</init-param>
faces-config.xml
<?xml version="1.0"?>
<!DOCTYPE faces-config PUBLIC
   "-//Sun Microsystems, Inc.//DTD JavaServer Faces Config 1.0//EN"
   "http://java.sun.com/dtd/web-facesconfig_1_0.dtd">
<faces-config>
   <managed-bean>
      <description>Basic UserBean</description>
      <managed-bean-name>user</managed-bean-name>
      <managed-bean-class>org.jboss.portlet.hello.bean.User</managed-bean-class>
      <managed-bean-scope>session</managed-bean-scope>
   </managed-bean>
   <navigation-rule>
      <navigation-case>
         <from-outcome>done</from-outcome>
         <to-view-id>/WEB-INF/jsp/result.jsp</to-view-id>
      </navigation-case>
   </navigation-rule>
</faces-config>
There is nothing special about the faces-config.xml file included here. This application would work just as well outside of a portlet as it would inside a portlet container. In the above lines, we define a basic User Bean and a navigation rule to handle the submittal of the original form on index.jsp.
If you have downloaded the sample, you can execute the build.xml with ant or inside your IDE. Executing ant will compile all source files and produce a helloworldjsfportlet.war file in a way similar to what we saw in Section 5.2.1.5, “Building your portlet”.
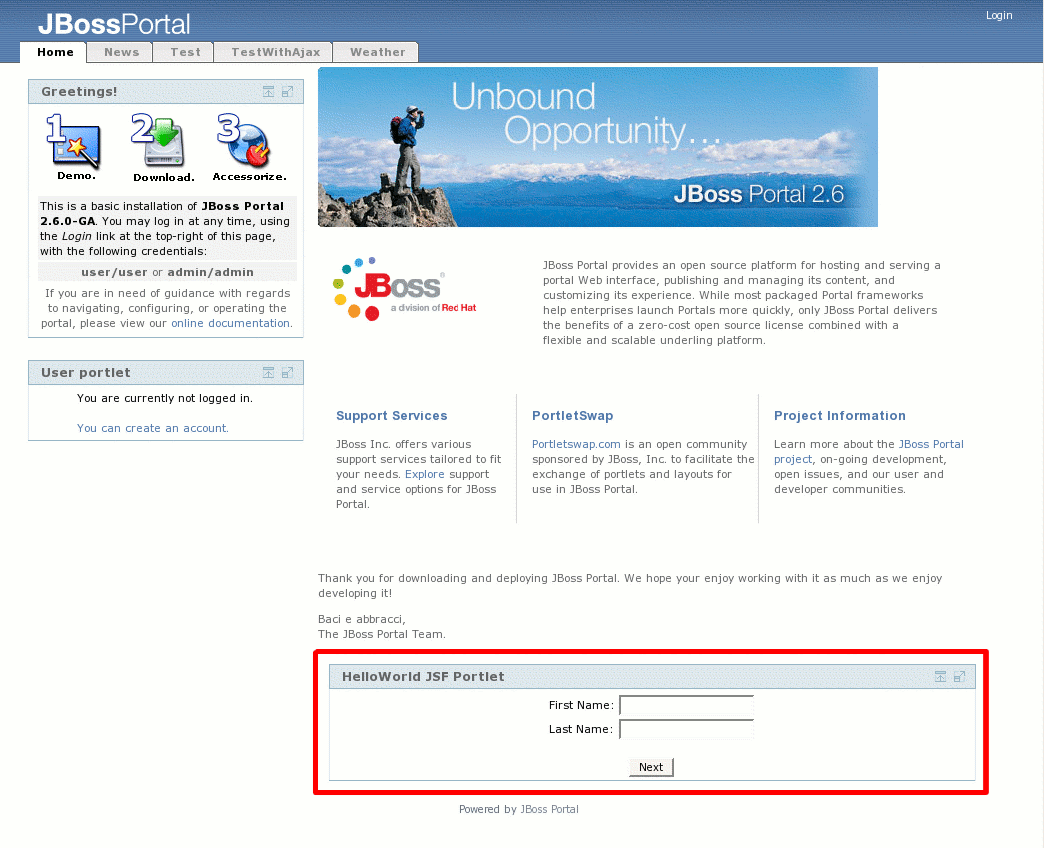
Deploying the portlet is as easy as copying/moving the helloworldjspportlet.war file to the server deploy directory. We can then see our portlet on the Portal default page (http://localhost:8080/portal/):
|
We saw in Section 5.2.4, “A simple MyFaces JSF Portlet on JBoss AS 4.0.5+” how to create a JSF-based portlet using Apache's MyFaces JSF implementation on JBoss Application Server 4.0.x. Starting with version 4.2.0 of JBoss Application Server, the default bundled JSF implementation is Sun's Reference Implementation (RI). We thus need to adapt our MyFaces portlet sightly so that it works in this new environment.
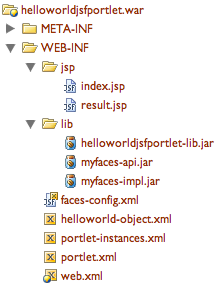
The first step is to provide access to MyFaces as it's not bundled anymore in JBoss AS. This is accomplished by adding myfaces-api.jar and myfaces-impl.jar in our portlet WEB-INF/lib directory. This can be done automatically via a modification of the ant script and is left as an exercise to the reader.
We also need to need to tell JBoss AS not to use its bundled JSF implementation for our portlet. This is accomplished by adding the following to our portlet's web.xml:
<context-param>
   <param-name>org.jboss.jbossfaces.WAR_BUNDLES_JSF_IMPL</param-name>
   <param-value>true</param-value>
</context-param>
More details on this procedure can be found at http://wiki.jboss.org/wiki/Wiki.jsp?page=JBossFaces.
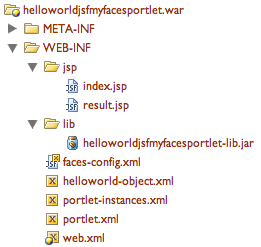
We should get the following package content for our portlet:
 |