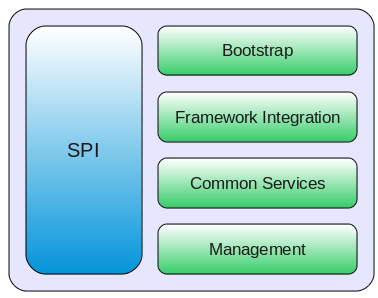
The JBoss OSGi Service Provider Interface (SPI) is the integration point for:
- Supported OSGi Frameworks
- Supported Target Containers
- Administration, Provisioning and Management
- Various Provided Services
The latest version of the JBoss OSGi SPI.
- org.jboss.osgi.spi - Common classes and interfaces.
- org.jboss.osgi.spi.capability - Capabilities that can be installed in the OSGi framework.
- org.jboss.osgi.spi.framework - Framework integration and bootstrap.
- org.jboss.osgi.spi.service - A collection of SPI provided services.
- org.jboss.osgi.spi.util - A collection of SPI provided utilities.
- org.jboss.osgi.testing - Test support classes and interfaces.
The OSGiBootstrap provides an OSGiFramework through a OSGiBootstrapProvider.
A OSGiBootstrapProvider is discovered in two stages
- Read the bootstrap provider class name from a system property
- Read the bootstrap provider class name from a resource file
In both cases the key is the fully qalified name of the org.jboss.osgi.spi.framework.OSGiBootstrapProvider interface.
The following code shows how to get the default OSGiFramework from the OSGiBootstrapProvider.
    OSGiBootstrapProvider bootProvider = OSGiBootstrap.getBootstrapProvider();

    OSGiFramework framework = bootProvider.getFramework();

    Bundle bundle = framework.getSystemBundle();
The OSGiBootstrapProvider can also be configured explicitly. The OSGiFramework is a named
object from the configuration.
    OSGiBootstrapProvider bootProvider = OSGiBootstrap.getBootstrapProvider();

    bootProvider.configure(configURL);


    OSGiFramework framework = bootProvider.getFramework();

    Bundle bundle = framework.getSystemBundle();
The JBoss OSGi SPI comes with a default bootstrap provider:
OSGiBootstrapProvider implementations that read their configurtation from some other source are possible, but currently not part of the JBoss OSGi SPI.
Using the SPI from within JBossAS deployed components
If you need access to the OSGi Framework from within an JBossAS deployed component (e.g. servlet, ejb, mbean) you would not bootstrap JBoss OSGi through the SPI. Instead, you would inject the already bootstrapped OSGi Framework instance into your component.
JBoss OSGi provides standard org.osgi.jmx management. Additional to that we provide an MBeanServer service and a few other extensions through the org.jboss.osgi.jmx API
Accessing the Management ObjectsIf you work with the JBoss OSGi runtime abstraction you get access to these managed objects through OSGiRuntime.
If you install JBoss OSGi in an already existing JBossAS instance you also get access to the Managed Objects through the JBoss provided JMX Console (http://localhost:8080/jmx-console).
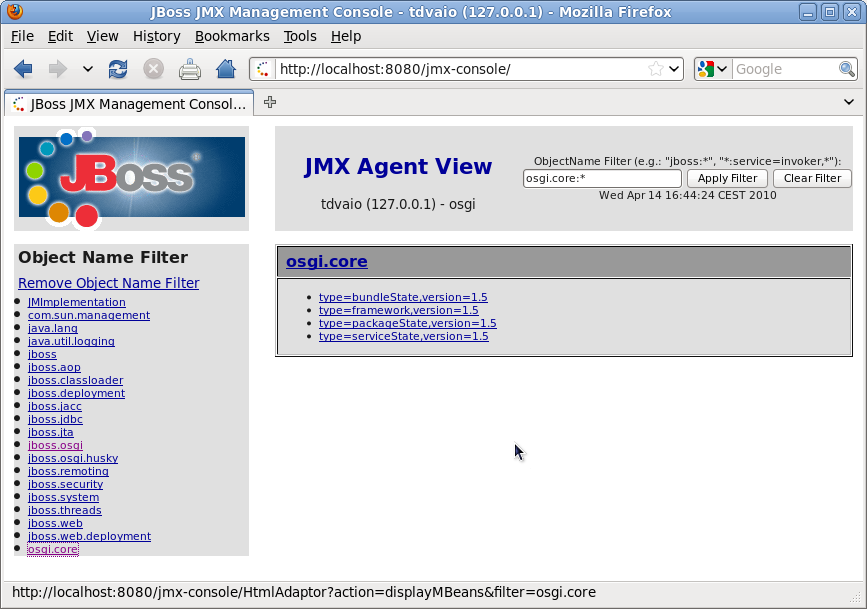
Note
The JMX Console is not part of the JBoss OSGi Runtime.
JBoss OSGi comes with JUnit test support as part of the SPI provided org.jboss.osgi.testing package. There are two distinct test scenarios that we support:
- Embedded OSGi Framework
- Remote OSGi Framework
The remote scenario can actually be separated again in:
- Standalone JBoss OSGi Runtime
- JBoss OSGi Runtime running in JBossAS
A test case that takes advantage of the OSGi runtime abstration that transparently handles the various remote scenarios.
The test case bootstraps the OSGi Runtime, installes/starts the bundle, asserts the bundle state and finally shuts down the runtime again. Please note, this is a plain JUnit4 test case that transparently handles embedded/remote nature of the runtime.
public class SimpleTestCase extends OSGiTest

{

   @Test

   public void testSimpleBundle() throws Exception

   {

      // Get the default runtime

      OSGiRuntime runtime = getDefaultRuntime();


      try

      {

         // Install the bundle

         OSGiBundle bundle = runtime.installBundle("example-simple.jar");


         // Start the bundle

         bundle.start();

         assertBundleState(Bundle.ACTIVE, bundle.getState());


         // Uninstall the bundle

         bundle.uninstall();

      }

      finally

      {

         // Shutdown the runtime

         runtime.shutdown();

      }

   }

}
To run the test in embedded mode (which is the default) you would execute your test runner like this
      [tdiesler@tddell example]$ mvn -Dtest=SimpleTestCase test

      ...

      Running org.jboss.test.osgi.example.simple.SimpleTestCase

      Tests run: 1, Failures: 0, Errors: 0, Skipped: 0, Time elapsed: 1.361 sec
To run the test against the remote JBoss OSGi Runtime you would execute your test runner like this
      [tdiesler@tddell example]$ mvn -Dtarget.container=runtime -Dtest=SimpleTestCase test

      ...

      Running org.jboss.test.osgi.example.simple.SimpleTestCase

      Tests run: 1, Failures: 0, Errors: 0, Skipped: 0, Time elapsed: 1.303 sec
In the runtime console you should see
      12:44:30,960 INFO  [jboss-osgi-common] Installed: example-simple [8]

      12:44:31,081 INFO  [example-simple] Start: example-simple [8]

      12:44:31,089 INFO  [example-simple] Stop: example-simple [8]

      12:44:31,095 INFO  [jboss-osgi-common] Uninstalled: example-simple [8]
Due to classloading restrictions it is not possible to interact with the services that get registered in the OSGi Framework directly. Instead, there must be some means for the bundle under test to communicate with the test case that lives outside the Framework. The approach of OSGi testing based on remote log messages is covered in Non intrusive OSGi Bundle Testing.
The next section explains how to write a plain JUnit test that is then executed within the OSGi Runtime.
The test case does everthing identical to SimpleTestCase, but only executes the code in the test method when Husky injected the BundleContext.
public class SimpleHuskyTestCase

{

   @ProvideContext

   public BundleContext context;

   ...

   @Test

   public void testSimpleBundle() throws Exception

   {

      // Tell Husky to run this test method within the OSGi Runtime

      if (context == null)

         BridgeFactory.getBridge().run();


      // Stop here if the context is not injected

      assumeNotNull(context);


      // Get the SimpleService reference

      ServiceReference sref = context.getServiceReference(SimpleService.class.getName());

      assertNotNull("SimpleService Not Null", sref);


      // Access the SimpleService

      SimpleService service = (SimpleService)context.getService(sref);

      assertEquals("hello", service.echo("hello"));

   }

}
Running this test is also no different from SimpleTestCase.
In the runtime console you should see
      13:29:15,924 INFO  [jboss-osgi-common] Installed: example-simple-husky [16]

      13:29:15,972 INFO  [example-simple-husky] Start: example-simple-husky [16]

      13:29:15,981 INFO  [jboss-osgi-husky] Test-Package [org.jboss.test.osgi.example.simple] in bundle: example-simple-husky [16]

      13:29:16,160 INFO  [example-simple-husky] echo: hello

      13:29:16,191 INFO  [example-simple-husky] Stop: example-simple-husky [16]

      13:29:16,196 INFO  [jboss-osgi-common] Uninstalled: example-simple-husky [16]
To learn more about the magic of the BridgeFactory have a look at Husky Test Framework which comes next.
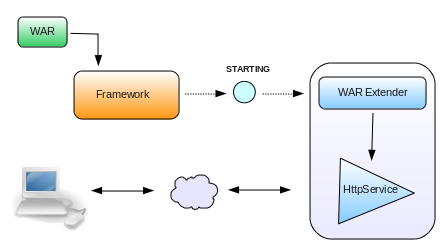
A common pattern in OSGi is that a bundle contains some piece of meta data that gets processed by some other infrastructure bundle that is installed in the OSGi Framework. In such cases the well known Extender Pattern is often being used. JBoss OSGi offeres a differnet approach to address this problem which is covered by the Extender Pattern vs. Lifecycle Interceptor post in the JBoss OSGi Diary.
Extending an OSGi Bundle- Extender registers itself as BundleListener
- Bundle gets installed/started
- Framework fires a BundleEvent
- Extender picks up the BundleEvent (e.g. STARTING)
- Extender reads metadata from the Bundle and does its work
There is no extender specific API. It is a pattern rather than a piece of functionality provided by the Framework. Typical examples of extenders are the Blueprint or Web Application Extender.
Client code that installs, starts and uses the registered endpoint could look like this.
// Install and start the Web Application bundle

Bundle bundle = context.installBundle("mywebapp.war");

bundle.start();


// Access the Web Application

String response = getHttpResponse("http://localhost:8090/mywebapp/foo");

assertEquals("ok", response);
This seemingly trivial code snippet has a number of issues that are probably worth looking into in more detail
- The WAR might have missing or invalid web metadata (i.e. an invalid WEB-INF/web.xml descriptor)
- The WAR Extender might not be present in the system
- There might be multiple WAR Extenders present in the system
- Code assumes that the endpoint is available on return of bundle.start()
Most Blueprint or WebApp bundles are not useful if their Blueprint/Web metadata is not processed. Even if they are processed but in the "wrong" order a user might see unexpected results (i.e. the webapp processes the first request before the underlying Blueprint app is wired together).
As a consequence the extender pattern is useful in some cases but not all. It is mainly useful if a bundle can optionally be extended in the true sense of the word.
Intercepting the Bundle LifecycleIf the use case requires the notion of "interceptor" the extender pattern is less useful. The use case might be such that you would want to intercept the bundle lifecycle at various phases to do mandatory metadata processing.
An interceptor could be used for annotation processing, byte code weaving, and other non-optional/optional metadata processing steps. Typically interceptors have a relative order, can communicate with each other, veto progress, etc.
Lets look at how multiple interceptors can be used to create Web metadata and publish endpoints on the HttpService based on that metadata.
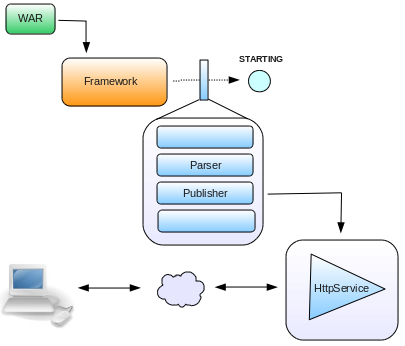
Here is how it works
- The Wep Application processor registers two LifecycleInterceptors with the LifecycleInterceptorService
- The Parser interceptor declares no required input and WebApp metadata as produced output
- The Publisher interceptor declares WebApp metadata as required input
- The LifecycleInterceptorService reorders all registered interceptors according to their input/output requirements and relative order
- The WAR Bundle gets installed and started
- The Framework calls the LifecycleInterceptorService prior to the actual state change
- The LifecycleInterceptorService calls each interceptor in the chain
- The Parser interceptor processes WEB-INF/web.xml in the invoke(int state, InvocationContext context) method and attaches WebApp metadata to the InvocationContext
- The Publisher interceptor is only called when the InvocationContext has WebApp metadata attached. If so, it publishes the endpoint from the WebApp metadata
- If no interceptor throws an Exception the Framework changes the Bundle state and fires the BundleEvent.
Client code is identical to above.
// Install and start the Web Application bundle

Bundle bundle = context.installBundle("mywebapp.war");

bundle.start();


// Access the Web Application

String response = getHttpResponse("http://localhost:8090/mywebapp/foo");

assertEquals("ok", response);
The behaviour of that code however, is not only different but also provides a more natural user experience.
- Bundle.start() fails if WEB-INF/web.xml is invalid
- An interceptor could fail if web.xml is not present
- The Publisher interceptor could fail if the HttpService is not present
- Multiple Parser interceptors would work mutually exclusiv on the presents of attached WebApp metadata
- The endpoint is guaranteed to be available when Bundle.start() returns
The general idea is that each interceptor takes care of a particular aspect of processing during state changes. In the example above WebApp metadata might get provided by an interceptor that scans annotations or by another one that generates the metadata in memory. The Publisher interceptor would not know nor care who attached the WebApp metadata object, its task is to consume the WebApp metadata and publish endpoints from it.
For details on howto provide and register liefecycle interceptors have a look at the Lifecycle Interceptor Example.