- 3.1. Overview
- 3.2. Identity Model
- 3.3. Configuration
- 3.3.1. Architectural Overview
- 3.3.2. Programmatic Configuration
- 3.3.3. Security Context Configuration
- 3.3.4. Identity Store Feature Set
- 3.3.5. Identity Store Configurations
- 3.3.6. JPAIdentityStoreConfiguration
- 3.3.7. LDAPIdentityStoreConfiguration
- 3.3.8. FileIdentityStoreConfiguration
- 3.3.9. Providing a Custom IdentityStore
- 3.4. Java EE Environments
- 3.5. Using the IdentityManager
- 3.6. Managing Users, Groups and Roles
- 3.7. Managing Relationships
- 3.8. Authentication
- 3.9. Managing Credentials
- 3.10. Credential Handlers
- 3.11. Built-in Credential Handlers
- 3.12. Advanced Topics
PicketLink's Identity Management (IDM) features provide a rich and extensible API for managing the users, groups and roles of
your applications and services. The org.picketlink.idm.IdentityManager interface declares all the methods required to
create, update and delete Identity objects and create relationships between them such as group and role memberships.
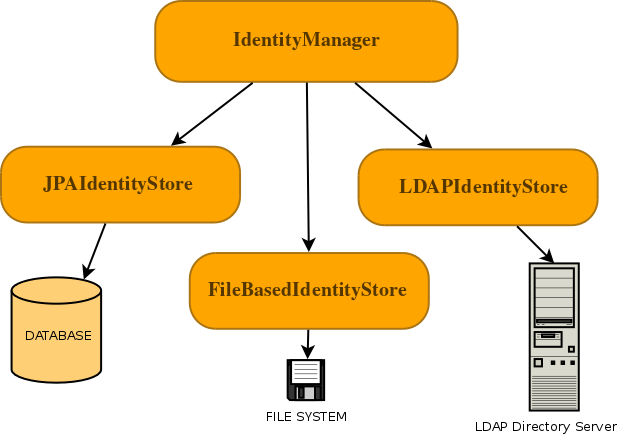
Interaction with the backend store that provides the persistent identity state is performed by configuring one or more
IdentityStores. PicketLink provides a few built-in IdentityStore implementations for storing
identity state in a database, file system or LDAP directory server, and it is possible to provide your own custom
implementation to support storing your application's identity data in other backends, or extend the built-in implementations
to override their default behaviour.
Before PicketLink IDM can be used, it must first be configured. See the configuration section below for details on how to configure IDM for both Java EE and Java SE environments.
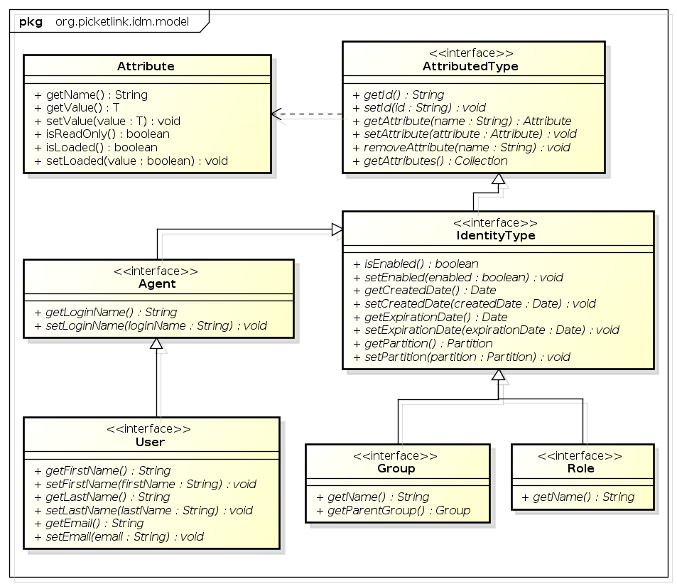
PicketLink's identity model consists of a number of core interfaces that define the fundamental identity types
upon which much of the Identity Management API is based. The following class diagram shows the classes and interfaces
in the org.picketlink.idm.model package that form the base identity model.
-
AttributedTypeis the base interface for the identity model. It declares a number of methods for managing a set of attribute values, plusgetId()andsetId()methods for setting a unique UUID value. -
Attributeis used to represent an attribute value. An attribute has a name and a (generically typed) value, and may be marked as read-only. Attribute values that are expensive to load (such as large binary data) may be lazy-loaded; theisLoaded()method may be used to determine whether the Attribute has been loaded or not. -
IdentityTypeis the base interface for Identity objects. It declares properties that indicate whether the identity object is enabled or not, optional created and expiry dates, plus methods to read and set the owningPartition. -
Agentrepresents a unique entity that may access the services secured by PicketLink. In contrast to a user which represents a human,Agentis intended to represent a third party non-human (i.e. machine to machine) process that may authenticate and interact with your application or services. It declares methods for reading and setting theAgent's login name. -
Userrepresents a human user that accesses your application and services. In addition to the login name property defined by its parent interfaceAgent, theUserinterface declares a number of other methods for managing the user's first name, last name and e-mail address. -
Groupis used to manage collections of identity types. EachGrouphas a name and an optional parent group. -
Roleis used in various relationship types to designate authority to another identity type to perform various operations within an application. For example, a forum application may define a role called moderator which may be assigned to one or moreUsers orGroups to indicate that they are authorized to perform moderator functions.
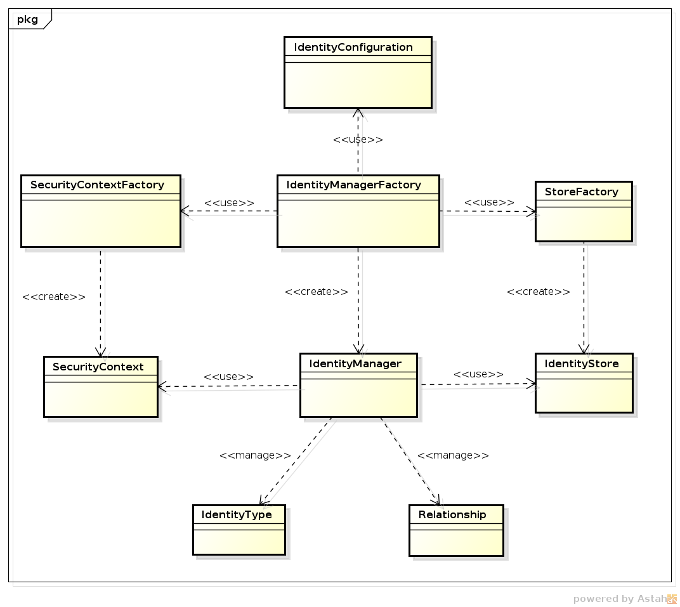
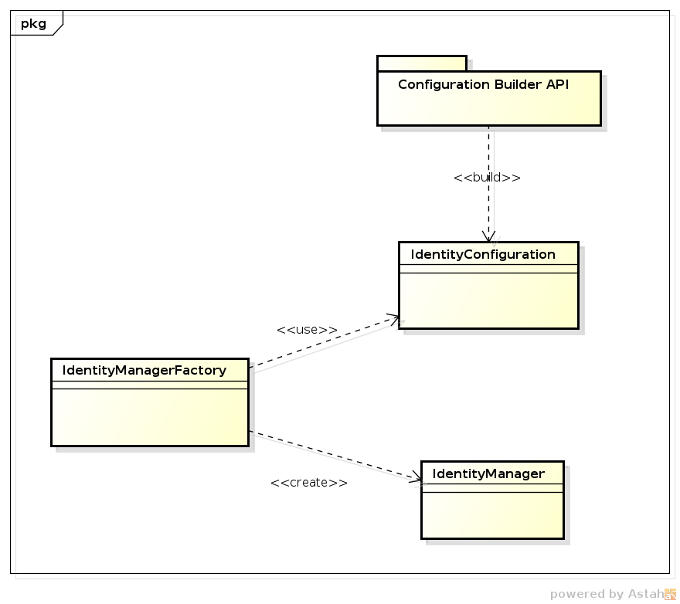
The following diagram shows the main components that realize PicketLink Identity Management:
-
IdentityConfigurationis the the class responsible for holding all PicketLink configuration options. This class is usually built using the Configuration Builder API, which we'll cover in the next sections. Once created and populated with the configuration options, an instance is used to create aIdentityManagerFactory. -
IdentityManagerFactoryis the class from whichIdentityManagerinstances are created for a specific realm, considering all configurations provided by aIdentityConfigurationinstance. -
SecurityContextFactoryis an interface that provides methods for creatingSecurityContextinstances. This component knows how to properly create and prepare the context that will be propagated during identity management operations. -
SecurityContextis the class that holds context data that will be used during the execution of identity management operations. Once created, the context is used to createIdentityStoreinstances and to invoke their methods.This component allows to share data between the
IdentityManagerandIdentityStoreinstances. And also provides direct access for some IDM subsystems such as: event handling, caching and so on.Beyond that, this component is critical when access to external resources are required, such as the current
EntityManagerwhen using a JPA-based store.Each
IdentityManagerinstance is associated with a singleSecurityContext. -
StoreFactoryis an interface that provides methods for creatingIdentityStoreinstances. Instances are created considering the Feature Set supported by each identity store and also the currentSecurityContextinstance. -
IdentityStoreis an interface that provides a contract for implementations that store data using a specific repository such as: LDAP, databases, file system, etc.It is a critical component as it provides all the necessary logic about how to store data.
-
IdentityManageris an interface that provides a simple access for all identity management operations using one or more of the configured identity stores.All functionality provided by PicketLink is available from this interface, from where applications will interact most of the time.
For most use cases, users will only work with the IdentityManagerFactory and IdentityManager classes.
Only advanced use cases may require a deep knowledge about other components in order to customize the default behaviour/implementation to suit a specific requirement.
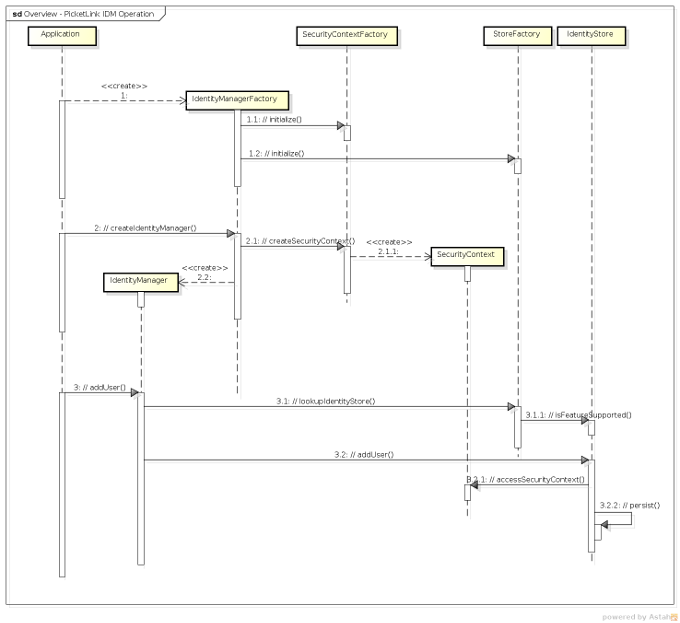
The diagram below shows an overview about how a specific identity management operation is realized:
-
1 - The Application creates an
IdentityManagerFactoryinstance from a previously createdIdentityConfiguration. At this point, the factory reads the configuration and bootstraps the identity management ecosystem. -
1.1 - The
IdentityManagerFactoryinitializes theSecurityContextFactory. -
1.2 - The
IdentityManagerFactoryinitializes theStoreFactory. -
2 - With a fully initialized
IdentityManagerFactoryinstance, the Application is able to createIdentityManagerinstances and execute operations.IdentityManagerinstances are created for a specific realm, in this specific case we're creating an instance using the default realm. -
2.1 and 2.1.1 - An
IdentityManagerinstance is always associated with aSecurityContext. TheSecurityContextis created and set into theIdentityManagerinstance. The same security context is used during the entire lifecycle of theIdentityManager, it will be used to share state with the underlying identity stores and provide access to external resources (if necessary) in order to execute operations.At this time, the
IdentityManageris also configured to hold a reference to theStoreFactoryin order to execute the operations against the underlying/configuredIdentityStoreinstances. -
3 - Now the application holds a reference to the
IdentityManagerinstance and it is ready to perform identity management operations (eg.: add an user, queries, validate credentials, etc). -
3.1 and 3.1.1 - But before executing the operations, the
IdentityManagerneeds to obtain from theStoreFactorytheIdentityStoreinstance that should be used to execute a specific operation. Identity stores are selected by examining the configuration to see which store configuration supports a specific operation or feature. -
3.2 - Now that the
IdentityManagerhave selected whichIdentityStoreinstance should be used, this last is invoked in order to process the operation. -
3.2.1 - Usually, during the execution of an operation, the
IdentityStoreuses the currentSecurityContext. TheSecurityContextcan hold some state that may be useful during the execution (eg.: the JPA store uses the security context to gain access to the currentEntityManagerinstance) and also provide access for some IDM internal services like event handling, caching, etc. -
3.2.2 - Finally, the
IdentityStoreexecutes the operation and persist or retrieve identity data from the underlying repository.
PicketLink IDM design is quite flexible and allows you to configure or even customize most of the behaviours described above. As stated earlier, most use cases require minimal knowledge about these details and the default implementation should be enough to satisfy the majority of requirements.
Configuration in PicketLink is in essence quite simple; an IdentityConfiguration object must first
be created to hold the PicketLink configuration options. Once all configuration options have been set, you just create a
IdentityManagerFactory instance passing the previously created configuration.
The IdentityManagerFactory can then be used to create IdentityManager instances
via the createIdentityManager() method.
The IdentityConfiguration is usually created using a Configuration Builder API, which provides a rich and fluent API for every single aspect of PicketLink configuration.
Note
For now, all configuration is set programmatically using the Configuration Builder API only. Later versions will also support a declarative configuration in a form of XML documents.
Each IdentityManager instance has its own security context, represented by
the SecurityContext class. The security context contains temporary state which is maintained
for one or more identity management operations within the scope of a single realm or tier. The
IdentityManager (and its associated SecurityContext) is typically modelled as a
request-scoped object (for environments which support such a paradigm, such as a servlet container), or alternatively
as an actor within the scope of a transaction. In the latter case, the underlying resources being
utilised by the configured identity stores (such as a JPA EntityManager) would participate in
the active transaction, and changes made as a result of any identity management operations would either be
committed or rolled back as appropriate for the logic of the encapsulating business method.
The following sections describe various ways that configuration may be performed in different environments.
Configuration for Identity Management can be defined programmatically using the Configuration Builder API. The aim of this API is to make it easier to chain coding of configuration options in order to speed up the coding itself and make the configuration more readable.
Let's assume that you want to quick start with PicketLink Identity Management features using a file-based Identity Store.
First, a fresh instance of IdentityConfiguration is created using the IdentityConfigurationBuilder helper object,
where we choose which identity store we want to use (in this case a file-based store) and any other configuration option, if necessary.
Finally, we use the configuration to create a IdentityManagerFactory from where we can create IdentityManager instances and start to perform Identity Management operations:
IdentityConfigurationBuilder builder = new IdentityConfigurationBuilder();


builder

  .stores()

  .file()

  .supportAllFeatures();


IdentityConfiguration configuration = builder.build();


IdentityManagerFactory identityManagerFactory = new IdentityManagerFactory(configuration);


IdentityManager identityManager = identityManagerFactory.createIdentityManager();


User user = new SimpleUser("john");


identityManager.add(user);
The IdentityConfigurationBuilder is the entry point for PicketLink configuration.
It is a very simple class with some meaningful methods for all supported configuration options.
IdentityConfigurationBuilder builder = new IdentityConfigurationBuilder();


builder

  .stores() // supported identity stores configuration

    .file()

      // file-based identity store configuration

    .jpa()

      // JPA-based identity store configuration

    .ldap()

      // LDAP-based identity store configuration

  .contextFactory(...); // for custom SecurityContextFactory implementations
In the next sections we'll cover each supported Identity Store and their specific configuration.
The SecurityContext plays an important role in the PicketLink IDM achitecture. As discussed in the Architectural Overview,
it is strongly used during the execution of operations. It carries very sensitive and contextual information for a specific operation and provides access for some of the
IDM underlying services such as caching, event handling, UUID generator for IdentityTpe and Relationship instances, among others.
Operations are always executed by a specific IdentityStore in order to persist or store identity data using a specific repository (eg.: LDAP, databases, filesystem, etc).
When executing a operation the identity store must be able to:
-
Access the current
Partition. All operations are executed for a specificRealmorTier -
Access the current
IdentityManagerinstance, from which the operation was executed. -
Access the Event Handling API in order to fire events such as when an user is created, updated, etc.
-
Access the Caching API in order to cache identity data and increase performance.
-
Access the Credential Handler API in order to be able to update and validate credentials.
-
Access to external resources, provided before the operation is executed and initialized by a
ContextInitializer.
Sometimes you may need to provide additional configuration or even references for external resources before the operation is executed by an identity store.
An example is how you tell to theJPAIdentityStore which EntityManager instance should be used.
When executing an operation, the JPAIdentityStore must be able to access the current EntityManager to persist or retrieve data from the database.
You need someway to populate the SecurityContext with such information. When you're configuring an identity store, there is a configuration option
that allows you to provide a ContextInitializer implementation.
public interface ContextInitializer {

    void initContextForStore(SecurityContext context, IdentityStore<?> store);

}
The method initContextForStore will be invoked for every single operation and before its execution by the identity store.
It can be implemented to provide all the necessary logic to initialize and populate the SecurityContext for a specific IdentityStore.
The configuration is also very simple, you just need to provide the following configuration:
IdentityConfigurationBuilder builder = new IdentityConfigurationBuilder();


builder

  .stores()

    .file()

      .addContextInitializer(new MySecurityContextInitializer());

}
You can provide multiple initializers.
Note
Remember that initializers are executed for every single operation. Also, the same instance is used between operations which means your implementation should be “stateless”. You should be careful about the implementation in order to not impact performance, concurrency or introduce unexpected behaviors.
SecurityContext instances are created by the SecurityContextFactory. If for some reason you need to change how SecurityContext instances are created,
you can provide an implementation of this interface and configure it as follows:
IdentityConfigurationBuilder builder = new IdentityConfigurationBuilder();


builder

  .stores()

    .contextFactory(mew MySecurityContextFactory());

}
When configuring identity stores you must tell which features and operations should be executed by them. Features and operations are a key concept if you want to mix stores in order to execute operations against different repositories.
PicketLink provides a Java enum, called FeatureGroup, in which are defined all supported features. The table bellow summarize them:
Table 3.1. Identity class fields
| Feature | |
|---|---|
FeatureGroup.agent | |
FeatureGroup.user | |
FeatureGroup.role | |
FeatureGroup.group | |
FeatureGroup.relationship | |
FeatureGroup.credential | |
FeatureGroup.realm | |
FeatureGroup.tier |
The features are a determinant factor when choosing an identity store to execute a specific operation. For example, if an identity store is configured with FeatureGroup.user we're saying
that all User operations should be executed by this identity store. The same goes for FeatureGroup.credential, we're just saying that credentials can also be updated and validated using
the identity store.
Beside that, provide only the feature is not enough. We must also tell the identity store which operations are supported by a feature. For example, we can configure a identity store to support only
read operations for users, which is very common when using the LDAP identity store against a read-only tree. Operations are also defined by an enum, called FeatureOperation, as follows:
Table 3.2. Identity class fields
| Operation | |
|---|---|
Featureoperation.create | |
Featureoperation.read | |
Featureoperation.update | |
Featureoperation.delete | |
Featureoperation.validate |
During the configuration you can provide which features and operations should be supported using the Configuration API. You don't need to be forced to specify them individually, if you want to support all features and operations for a particular identity store you can use:
IdentityConfigurationBuilder builder = new IdentityConfigurationBuilder();


builder

  .stores()

    .file()

      .supportAllFeatures();

}
For a more granular configuration you can also use:
IdentityConfigurationBuilder builder = new IdentityConfigurationBuilder();


builder

  .stores()

    .file()

      .supportFeature(

        FeatureGroup.agent,

        FeatureGroup.user,

        FeatureGroup.role,

        FeatureGroup.group)

}
The configuration above defines the features individually. In this case the configured features are also supporting all operations. If you want to specify which operation should be supported by a feature you can use:
IdentityConfigurationBuilder builder = new IdentityConfigurationBuilder();


builder

  .stores()

    .file()

      .supportFeature(FeatureGroup.agent, FeatureOperation.read)

      .supportFeature(FeatureGroup.user, FeatureOperation.read))

      .supportFeature(FeatureGroup.role, FeatureOperation.create))

      .supportFeature(FeatureGroup.role, FeatureOperation.read))

      .supportFeature(FeatureGroup.role, FeatureOperation.update))

      .supportFeature(FeatureGroup.role, FeatureOperation.delete))

      .supportFeature(FeatureGroup.group, FeatureOperation.create))

      .supportFeature(FeatureGroup.group, FeatureOperation.read))

      .supportFeature(FeatureGroup.group, FeatureOperation.update))

      .supportFeature(FeatureGroup.group, FeatureOperation.delete))

}
For a more complex configuration evolving multiple identity stores with a different feature set, look at the example bellow:
IdentityConfigurationBuilder builder = new IdentityConfigurationBuilder();


builder

  .stores()

    .ldap()

      .supportFeature(FeatureGroup.agent)

      .supportFeature(FeatureGroup.user)

      .supportFeature(FeatureGroup.credential)

    .jpa()

      .supportFeature(FeatureGroup.role)

      .supportFeature(FeatureGroup.group)

      .supportFeature(FeatureGroup.relationship)

}
The configuration above shows how to use LDAP to store only agents, users and credentials and database for roles, groups and relationships.
Note
Remember that identity stores must have their features and operations configured. If you don't provide them you won't be able to build the configuration.
For each of the built-in IdentityStore implementations there is a corresponding
IdentityStoreConfiguration implementation - the following sections describe each of these in more detail.
The JPA identity store uses a relational database to store identity state. The configuration for this identity store
provides control over which entity beans are used to store identity data, and how their fields should be used to store
various identity-related state. The entity beans that store the identity data must be configured using the
annotations found in the org.picketlink.jpa.annotations package. All identity configuration annotations
listed in the tables below are from this package.
The following schema diagram is an example of a suitable database structure for storing IDM-related data:
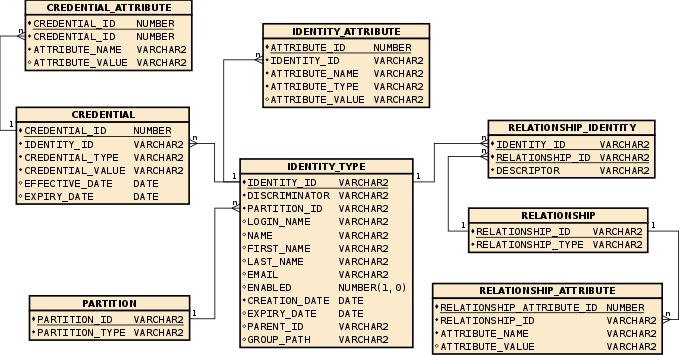
Please note that the data types shown in the above diagram might not be available in your RDBMS; if that is the case please adjust the data types to suit.
If you do not wish to provide your own JPA entities for storing IDM-related state, you may use the default schema
provided by PicketLink in the picketlink-idm-schema module. This module contains a collection
of entity beans suitable for use with JPAIdentityStore. To use this module, add the following dependency
to your Maven project's pom.xml file:
<dependency>

    <groupId>org.picketlink</groupId>

    <artifactId>picketlink-idm-schema</artifactId>

    <version>${picketlink.version}</version>

</dependency>
In addition to including the above dependency, the default schema entity beans must be configured in your application's
persistence.xml file. Add the following entries within the persistence-unit
section:
<class>org.picketlink.idm.jpa.schema.IdentityObject</class>

<class>org.picketlink.idm.jpa.schema.PartitionObject</class>

<class>org.picketlink.idm.jpa.schema.RelationshipObject</class>

<class>org.picketlink.idm.jpa.schema.RelationshipIdentityObject</class>

<class>org.picketlink.idm.jpa.schema.RelationshipObjectAttribute</class>

<class>org.picketlink.idm.jpa.schema.IdentityObjectAttribute</class>

<class>org.picketlink.idm.jpa.schema.CredentialObject</class>

<class>org.picketlink.idm.jpa.schema.CredentialObjectAttribute</class>
Before the JPA identity store can be used, it must be provided with an EntityManager so that it can
connect to a database. In Java EE this can be done by providing a producer method within your application that
specifies the @org.picketlink.annotations.PicketLink qualifier, for example like so:
@Produces

@PicketLink

@PersistenceContext(unitName = "picketlink")

private EntityManager picketLinkEntityManager;
The Identity class is the entity bean that is used to store the record for users, roles and groups. It should
be annotated with @IdentityType and declare the following field values:
Table 3.3. Identity class fields
| Property | Annotation | Description |
|---|---|---|
| ID | @Identifier | The unique identifier value for the identity (can also double as the primary key value) |
| Discriminator | @Discriminator | Indicates the identity type (i.e. user, agent, group or role) of the identity. |
| Partition | @IdentityPartition | The partition (realm or tier) that the identity belongs to |
| Login name | @LoginName | The login name for agent and user identities (for other identity types this will be null) |
| Name | @IdentityName | The name for group and role identities (for other identity types this will be null) |
| First Name | @FirstName | The first name of a user identity |
| Last Name | @LastName | The last name of a user identity |
@Email | The primary e-mail address of a user identity | |
| Enabled | @Enabled | Indicates whether the identity is enabled |
| Creation date | @CreationDate | The creation date of the identity |
| Expiry date | @ExpiryDate | The expiry date of the identity |
| Group parent | @Parent | The parent group (only used for Group identity types, for other types will be null) |
| Group path | @GroupPath | Represents the full group path (for Group identity types only) |
The following code shows an example of an entity class configured to store Identity instances:
Example 3.1. Example Identity class
@IdentityType
@Entity
public class IdentityObject implements Serializable {
@Discriminator
private String discriminator;
@ManyToOne
@IdentityPartition
private PartitionObject partition;
@Identifier
@Id
private String id;
@LoginName
private String loginName;
@IdentityName
private String name;
@FirstName
private String firstName;
@LastName
private String lastName;
private String email;
@Enabled
private boolean enabled;
@CreationDate
@Temporal(TemporalType.TIMESTAMP)
private Date creationDate;
@ExpiryDate
@Temporal(TemporalType.TIMESTAMP)
private Date expiryDate;
@ManyToOne
@Parent
private IdentityObject parent;
@GroupPath
private String groupPath;
// getters and setters
}
The Attribute class is used to store Identity attributes, and should be annotated with
@IdentityAttribute
Table 3.4. Attribute class fields
| Property | Annotation | Description |
|---|---|---|
| Identity | @Parent | The parent identity object to which the attribute value belongs |
| Name | @AttributeName | The name of the attribute |
| Value | @AttributeValue | The value of the attribute |
| Type | @AttributeType | The fully qualified classname of the attribute value class |
Example 3.2. Example Attribute class
@Entity

@IdentityAttribute

public class IdentityAttribute implements Serializable {

    @Id @GeneratedValue private Long id;


    @ManyToOne @JoinColumn

    @Parent

    private IdentityObject identityObject;


    @AttributeName

    private String name;


    @AttributeValue

    private String value;


    @AttributeType

    private String type;


    // getters and setters

}
The credential entity is used to store user credentials such as passwords and certificates, and should be annotated
with @IdentityCredential.
Table 3.5. Credential class fields
| Property | Annotation | Description |
|---|---|---|
| Type | @CredentialType | The fully qualified classname of the credential type |
| Value | @CredentialValue | The value of the credential |
| Effective Date | @EffectiveDate | The effective date of the credential |
| Expiry Date | @ExpiryDate | The expiry date of the credential |
| Identity | @Parent | The parent identity to which the credential belongs |
Example 3.3. Example Credential class
@Entity

@IdentityCredential

public class IdentityCredential implements Serializable {

    @Id @GeneratedValue private Long id;


    @CredentialType

    private String type;


    @CredentialValue

    private String credential;


    @EffectiveDate

    @Temporal (TemporalType.TIMESTAMP)

    private Date effectiveDate;


    @ExpiryDate

    @Temporal (TemporalType.TIMESTAMP)

    private Date expiryDate;


    @Parent

    @ManyToOne

    private IdentityObject identityType;


    // getters and setters

}
The Credential Attribute class is used to store arbitrary attribute values relating to the credential. It
should be annotated with @CredentialAttribute.
Table 3.6. Credential Attribute class fields
| Property | Annotation | Description |
|---|---|---|
| Credential Object | @Parent | The parent credential to which this attribute belongs |
| Attribute Name | @AttributeName | The name of the attribute |
| Attribute Value | @AttributeValue | The value of the attribute |
Example 3.4. Example Credential Attribute class
@Entity

@CredentialAttribute

public class IdentityCredentialAttribute implements Serializable {

    @Id @GeneratedValue private Long id;


    @ManyToOne @JoinColumn

    @Parent

    private IdentityCredential credential;


    @AttributeName

    private String name;


    @AttributeValue

    private String value;


    // getters and setters

}
Relationships are used to define typed associations between two or more identities. The Relationship class should
be annotated with @Relationship.
Table 3.7. Relationship class fields
| Property | Annotation | Description |
|---|---|---|
| Identifier | @Identifier | Unique identifier that represents the specific relationship (can also double as the primary key) |
| Relationship Class | @RelationshipClass | The fully qualified class name of the relationship type |
Example 3.5. Example Relationship class
@Relationship

@Entity

public class Relationship implements Serializable {

    @Id

    @Identifier

    private String id;


    @RelationshipClass

    private String type;


    // getters and setters

}
The Relationship Identity class is used to store the specific identities that participate in a relationship. It
should be annotated with @RelationshipIdentity.
Table 3.8. Relationship Identity class fields
| Property | Annotation | Description |
|---|---|---|
| Relationship Descriptor | @Discriminator | Denotes the role of the identity in the relationship |
| Relationship Identity | @Identity | The identity that is participating in the relationship |
| Relationship | @Parent | The parent relationship object to which the relationship identity belongs |
Example 3.6. Example Relationship Identity class
@RelationshipIdentity

@Entity

public class RelationshipIdentityObject implements Serializable {

    @Id @GeneratedValue private Long id;


    @Discriminator

    private String descriptor;


    @RelationshipIdentity

    @ManyToOne

    private IdentityObject identityObject;


    @Parent

    @ManyToOne

    private RelationshipObject relationshipObject;


    // getters and setters

}
The Relationship Attribute class is used to store arbitrary attribute values that relate to a specific relationship.
It should be annotated with @RelationshipAttribute.
Table 3.9. Relationship Attribute class fields
| Property | Annotation | Description |
|---|---|---|
| Relationship | @Parent | The parent relationship object to which the attribute belongs |
| Attribute Name | @AttributeName | The name of the attribute |
| Attribute value | @AttributeValue | The value of the attribute |
Example 3.7. Example Relationship Attribute class
@Entity

@RelationshipAttribute

public class RelationshipObjectAttribute implements Serializable {

    @Id @GeneratedValue private Long id;


    @ManyToOne @JoinColumn

    @Parent

    private Relationship relationship;


    @AttributeName

    private String name;


    @RelationshipValue

    private String value;


    // getters and setters

}
The Partition class is used to store information about partitions, i.e. Realms and Tiers. It should be
annotated with @Partition.
Table 3.10. Partition class fields
| Property | Annotation | Description |
|---|---|---|
| ID | @Identifier | The unique identifier value for the partition |
| Type | @Discriminator | The type of partition, either Realm or Tier |
| Parent | @Parent | The parent partition (only used for Tiers) |
Example 3.8. Example Partition class
@Entity

@Partition

public class PartitionObject implements Serializable {

    @Id @Identifier

    private String id;


    @Discriminator

    private String type;


    @ManyToOne

    @Parent

    private PartitionObject parent;


    // getters and setters

}
Sometimes you may need to configure how the EntityManager is provided to the JPAIdentityStore, like when your application is using CDI and you must run the operations
in the scope of the current transaction by using a injected EntityManager instance.
In cases like that, you need to initialize the SecurityContext by providing a ContextInitializer implementation, as discussed in Security Context Configuration.
The JPAContextInitializer is provided by PicketLink and can be used to initialize the security context with a specific EntityManager instance.
You can always extend this class and provide your own way to obtain the EntityManager from your application's environment.
IdentityConfigurationBuilder builder = new IdentityConfigurationBuilder();


builder

  .stores()

    .file()

      .addContextInitializer(new JPAContextInitializer(emf) {

        @Override

        public EntityManager getEntityManager() {

          // logic goes here

        }

      });

}
By default, the JPAContextInitializer creates a EntityManager from the EntityManagerFacatory provided when creating a new instance.
The LDAP identity store allows an LDAP directory server to be used to provide identity state. You can use this store in read-only or write-read mode, depending on your permissions on the server.
The LDAP identity store can be configured by providing the following configuration:
IdentityConfigurationBuilder builder = new IdentityConfigurationBuilder();


builder

  .stores()

    .ldap()

      .baseDN("dc=jboss,dc=org")

      .bindDN("uid=admin,ou=system")

      .bindCredential("secret")

      .url("ldap://localhost:10389")

      .userDNSuffix("ou=People,dc=jboss,dc=org")

      .roleDNSuffix("ou=Roles,dc=jboss,dc=org")

      .groupDNSuffix("ou=Groups,dc=jboss,dc=org")

      .supportAllFeatures();
The following table describes all configuration options:
Table 3.11. LDAP Configuration Options
| Option | Description | Required |
|---|---|---|
baseDN | Sets the fixed DN of the context from where identity types are stored. | Yes |
bindDN | Sets the the DN used to bind against the ldap server. If you want to perform write operations the DN must have permissions on the agent,user,role and group contexts. | Yes |
bindCredential | Sets the password for the bindDN. | Yes |
url | Sets the url that should be used to connect to the server. Eg.: ldap://<<server>>:389. | Yes |
userDNSuffix | Sets the fixed DN of the context where users should be read/stored from. | Yes |
agentDNSuffix | Sets the fixed DN of the context where agents should be read/stored from. If not provided, will be used the context provided by the setUserDNSuffix | No |
roleDNSuffix | Sets the fixed DN of the context where roles should be read/stored from. | Yes |
groupDNSuffix | Sets the fixed DN of the context where groups should be read/stored from. | Yes |
Sometimes may be useful to map a specific group to a specific context or DN. By default, all groups are stored and read from the DN provided by the setGroupDNSuffix method, which means that you can not have groups with the same name.
The following configuration maps the group with path /QA Group to ou=QA,dc=jboss,dc=org
LDAPIdentityStoreConfiguration ldapStoreConfig = new LDAPIdentityStoreConfiguration();


ldapStoreConfig

  .addGroupMapping("/QA Group", "ou=QA,dc=jboss,dc=org");
With this configuration you can have groups with the same name, but with different paths.
IdentityManager identityManager = getIdentityManager();

Group managers = new SimpleGroup("managers");


identityManager.add(managers); // group's path is /manager


Group qaGroup = identityManager.getGroup("QA Group");

Group managersQA = new SimpleGroup("managers", qaGroup);


// the QA Group is mapped to a different DN.

Group qaManagerGroup = identityManager.add(managersQA); // group's path is /QA Group/managers
This identity store uses the file system to persist identity state. The configuration for this identity store provides control over where to store identity data and if the state should be preserved between initializatons.
Identity data is stored using the Java Serialization API.
Identity data is stored in the filesystem using the following structure:
${WORKING_DIR}/

pl-idm-partitions.db

pl-idm-relationships.db

  <<partition_name_directory>>

    pl-idm.agents.db

    pl-idm.roles.db

    pl-idm.groups.db

    pl-idm.credentials.db

  <<another_partition_directory>>

    ...
By default, files are stored in the ${java.io.tmpdir}/pl-idm directory. For each partition there is a corresponding directory where agents, roles groups and credentials are stored in specific files.
The file identity store can be easily configured by providing the following configuration:
IdentityConfigurationBuilder builder = new IdentityConfigurationBuilder();


builder

  .stores()

  .file()

  .preserveState(false)

  .addRealm(Realm.DEFAULT_REALM, "Testing")

  .addTier("Application")

  .supportAllFeatures()

  .supportRelationshipType(CustomRelationship.class, Authorization.class);
By default, during the initialization, the working directory is re-created. If you want to preserve state between initializations you should use the following configuration:
builder

.stores()

  .file()

  .preserveState(true) // preserve data

  .supportAllFeatures();
In Java EE 6.0 and higher environments, basic configuration is performed automatically with a set of sensible defaults.
During application deployment, PicketLink will scan all deployed entity beans for any beans annotated with
@IDMEntity, and if found will use a configuration based on the JPAIdentityStore.
If no entity beans have been configured for identity management and no other configuration is provided,
a file-based identity store will be automatically configured to provide basic identity management features
backed by the file system.
The org.picketlink.idm.IdentityManager interface provides access to the bulk of the IDM features supported by PicketLink.
To get access to the IdentityManager depends on which environment you are using. The following two
sections describe how to access the IdentityManager in both Java EE and Java SE environments.
In a Java EE environment, PicketLink provides a producer method for IdentityManager,
so getting a reference to it is as simply as injecting it into your beans:
@Inject IdentityManager identityManager;
By default, an IdentityManager for the default realm will be injected. If the application
should use a realm other than the default, then this must be configured via a producer method with the @PicketLink
qualifier. The following code shows an example of a configuration bean that sets the application realm to acme:
@ApplicationScoped

public class RealmConfiguration {

    private Realm applicationRealm;


    @Inject IdentityManagerFactory factory;


    @Init

    public void init() {

        applicationRealm = factory.getRealm("acme");

    }


    @Produces

    @PicketLink

    public Realm getApplicationRealm() {

      return applicationRealm;

    }

}
PicketLink IDM provides a number of basic implementations of the identity model interfaces for convenience, in the
org.picketlink.idm.model package. The following sections provide examples that show these
implementations in action.
The following code example demonstrates how to create a new user with the following properties:
- Login name - jsmith
- First name - John
- Last name - Smith
- E-mail - jsmith@acme.com
  User user = new SimpleUser("jsmith");

  user.setFirstName("John");

  user.setLastName("Smith");

  user.setEmail("jsmith@acme.com");

  identityManager.add(user);
Once the User is created, it's possible to look it up using its login name:
User user = identityManager.getUser("jsmith");
User properties can also be modified after the User has already been created. The following example demonstrates how to change the e-mail address of the user we created above:
  User user = identityManager.getUser("jsmith");

  user.setEmail("john@smith.com");

  identityManager.update(user);
Users may also be deleted. The following example demonstrates how to delete the user previously created:
  User user = identityManager.getUser("jsmith");

  identityManager.remove("jsmith");
The following example demonstrates how to create a new group called employees:
Group employees = new SimpleGroup("employees");
It is also possible to assign a parent group when creating a group. The following example demonstrates how to create a new group called managers, using the employees group created in the previous example as the parent group:
Group managers = new SimpleGroup("managers", employees);
To lookup an existing Group, the getGroup() method may be used. If the group name
is unique, it can be passed as a single parameter:
Group employees = identityManager.getGroup("employees");
If the group name is not unique, the parent group must be passed as the second parameter (although it can still be provided if the group name is unique):
Group managers = identityManager.getGroup("managers", employees);
It is also possible to modify a Group's name and other properties (besides its parent) after it has
been created. The following example demonstrates how to disable the "employees" group we created above:
  Group employees = identityManager.getGroup("employees");

  employees.setEnabled(false);

  identityManager.update(employees);
To remove an existing group, we can use the remove() method:
  Group employees = identityManager.getGroup("employees");

  identityManager.remove(employees);
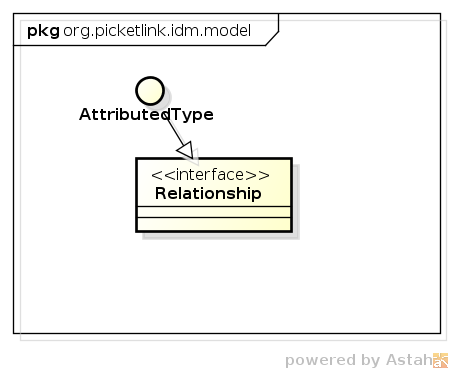
Relationships are used to model typed associations between two or more identities. All
concrete relationship types must implement the marker interface org.picketlink.idm.model.Relationship:
The IdentityManager interface provides three standard methods for managing relationships:
  void add(Relationship relationship);

  void update(Relationship relationship);

  void remove(Relationship relationship);
-
The
add()method is used to create a new relationship. -
The
update()method is used to update an existing relationship.Note
Please note that the identities that participate in a relationship cannot be updated themselves, however the attribute values of the relationship can be updated. If you absolutely need to modify the identities of a relationship, then delete the relationship and create it again.
-
The
remove()method is used to remove an existing relationship.
Note
To search for existing relationships between identity objects, use the Relationship Query API described later in this chapter.
Besides the above methods, IdentityManager also provides a number of convenience methods for
managing many of the built-in relationship types. See the next section for more details.
PicketLink provides a number of built-in relationship types, designed to address the most common requirements
of a typical application. The following sections describe the built-in relationships and how they are intended
to be used. Every built-in relationship type extends the AbstractAttributedType abstract class,
which provides the basic methods for setting a unique identifier value and managing a set of attribute values:
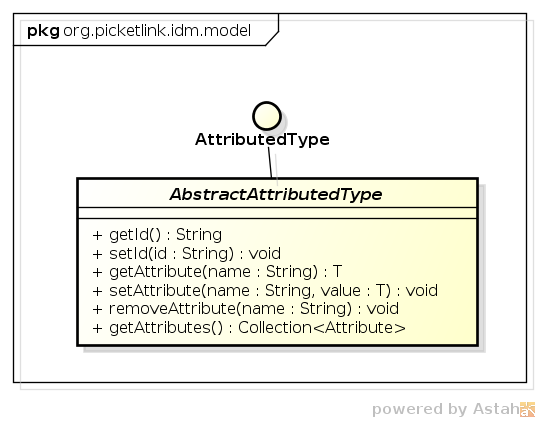
What this means in practical terms, is that every single relationship is assigned and can be identified by, a unique identifier value. Also, arbitrary attribute values may be set for all relationship types, which is useful if you require additional metadata or any other type of information to be stored with a relationship.
Application roles are represented by the Grant relationship, which is used to assign application-wide
privileges to a User or Agent.
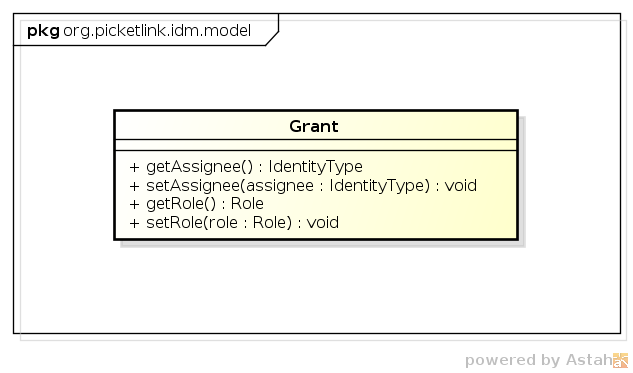
The IdentityManager interface provides methods for directly granting a role. Here's a simple example:
  User bob = identityManager.getUser("bob");

  Role superuser = identityManager.getRole("superuser");

  identityManager.grantRole(bob, superuser);
The above code is equivalent to the following:
  User bob = identityManager.getUser("bob");

  Role superuser = identityManager.getRole("superuser");

  Grant grant = new Grant(bob, superuser);

  identityManager.add(grant);
A granted role can also be revoked using the revokeRole() method:
  User bob = identityManager.getUser("bob");

  Role superuser = identityManager.getRole("superuser");

  identityManager.revokeRole(bob, superuser);
To check whether an identity has a specific role granted to them, we can use the hasRole() method:
  User bob = identityManager.getUser("bob");

  Role superuser = identityManager.getRole("superuser");

  boolean isBobASuperUser = identityManager.hasRole(bob, superuser);
The GroupMembership and GroupRole relationships are used to represent a user's membership
within a Group, and a user's role for a group, respectively.
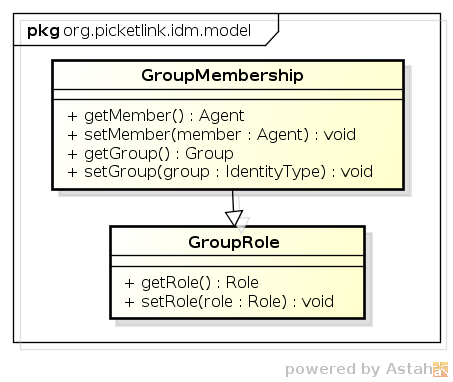
Note
While the GroupRole relationship type extends GroupMembership, it does
not mean that a member of a GroupRole automatically receives
GroupMembership membership also - these are two distinct relationship types with
different semantics.
A Group is typically used to form logical collections of users. Within an organisation, groups are
often used to mirror the organisation's structure. For example, a corporate structure might consist of a sales
department, administration, management, etc. This structure can be modelled in PicketLink by creating corresponding
groups such as sales, administration, and so forth. Users (who would represent
the employees in a corporate structure) may then be assigned group memberships corresponding to their place within
the company's organisational structure. For example, an employee who works in the sales department
may be assigned to the sales group.
Specific application privileges can then be blanket assigned to the sales group, and anyone who
is a member of the group is free to access the application's features that require those privileges.
The GroupRole relationship type should be used when it is intended for an identity to perform a specific
role for a group, but not be an actual member of the group itself. For example, an administrator of a group of doctors
may not be a doctor themselves, but have an administrative role to perform for that group. If the intent is for
an individual identity to both be a member of a group and have an assigned role in that group
also, then the identity should have both GroupRole and GroupMembership relationships for
that group.
Let's start by looking at a simple example - we'll begin by making the assumption that our organization is structured in the following way:
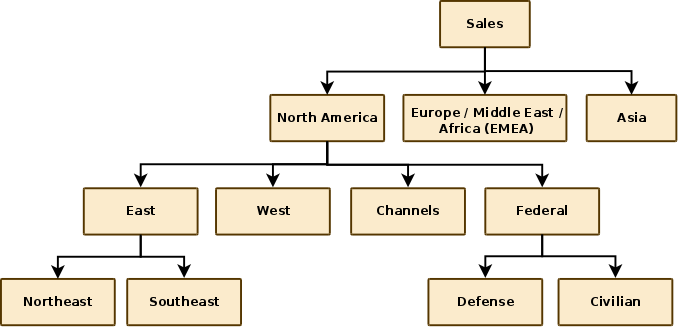
The following code demonstrates how we would create the hypothetical Sales group which is displayed at the head of the above organisational chart:
  Group sales = new SimpleGroup("Sales");

  identityManager.add(sales);
We can then proceed to create its subgroups:
identityManager.add(new SimpleGroup("North America", sales);

identityManager.add(new SimpleGroup("EMEA", sales);

identityManager.add(new SimpleGroup("Asia", sales);

// and so forth
The second parameter of the SimpleGroup() constructor is used to specify the group's parent group.
This allows us to create a hierarchical group structure, which can be used to mirror either a simple or complex
personnel structure of an organisation. Let's now take a look at how we assign users to these groups.
The following code demonstrates how to assign an administrator group role for the Northeast sales group to user jsmith. The administrator group role may be used to grant certain users the privilege to modify permissions and roles for that group:
Role admin = identityManager.getRole("administrator");

User user = identityManager.getUser("jsmith");

Group group = identityManager.getGroup("Northeast");

identityManager.grantGroupRole(user, admin, group);
A group role can be revoked using the revokeGroupRole() method:
identityManager.revokeGroupRole(user, admin, group);
To test whether a user has a particular group role, you can use the hasGroupRole() method:
boolean isUserAGroupAdmin = identityManager.hasGroupRole(user, admin, group);
Next, let's look at some examples of how to work with simple group memberships. The following code demonstrates how we assign sales staff rbrown to the Northeast sales group:
User user = identityManager.getUser("rbrown");

Group group = identityManager.getGroup("Northeast");

identityManager.addToGroup(user, group);
A User may also be a member of more than one Group; there are no built-in limitations on
the number of groups that a User may be a member of.
We can use the removeFromGroup() method to remove the same user from the group:
identityManager.removeFromGroup(user, group);
To check whether a user is the member of a group we can use the isMember() method:
boolean isUserAMember = identityManager.isMember(user, group);
Relationships can also be created via the add() method. The following code is equivalent
to assigning a group role via the grantGroupRole() method shown above:
Role admin = identityManager.getRole("administrator");

User user = identityManager.getUser("jsmith");

Group group = identityManager.getGroup("Northeast");

GroupRole groupRole = new GroupRole(user, group, admin);

identityManager.add(groupRole);
One of the strengths of PicketLink is its ability to support custom relationship types. This extensibility allows you, the developer to create specific relationship types between two or more identities to address the domain-specific requirements of your own application.
Note
Please note that custom relationship types are not supported by all IdentityStore implementations -
see the Identity Store section above for more information.
To create a custom relationship type, we start by creating a new class that implements the Relationship interface.
To save time, we also extend the AbstractAttributedType abstract class which takes care of the identifier and
attribute management methods for us:
  public class Authorization extends AbstractAttributedType implements Relationship {


  }
The next step is to define which identities participate in the relationship. Once we create our identity property methods,
we also need to annotate them with the org.picketlink.idm.model.annotation.RelationshipIdentity annotation.
This is done by creating a property for each identity type.
  private User user;

  private Agent application;


  @RelationshipIdentity

  public User getUser() {

    return user;

  }


  public void setUser(User user) {

    this.user = user;

  }


  @RelationshipIdentity

  public Agent getApplication() {

    return application;

  }


  public void setApplication(Agent application) {

    this.application = application;

  }
We can also define some attribute properties, using the @RelationshipAttribute annotation:
  private String accessToken;


  @RelationshipAttribute

  public String getAccessToken() {

    return accessToken;

  }


  public void setAccessToken(String accessToken) {

    this.accessToken = accessToken;

  }
Note
While the IDM module of PicketLink provides authentication features, for common use cases involving standard username and password based authentication in a Java EE environment, PicketLink provides a more streamlined method of authentication. Please refer to the authentication chapter of this documentation for more information.
PicketLink IDM provides an authentication subsystem that allows user credentials to be validated thereby confirming
that an authenticating user is who they claim to be. The IdentityManager interface provides a single
method for performing credential validation, as follows:
void validateCredentials(Credentials credentials);
The validateCredentials() method accepts a single Credentials parameter, which should
contain all of the state required to determine who is attempting to authenticate, and the credential (such as a
password, certificate, etc) that they are authenticating with. Let's take a look at the Credentials
interface:
public interface Credentials {

    public enum Status {

        UNVALIDATED, IN_PROGRESS, INVALID, VALID, EXPIRED

    };


   Agent getValidatedAgent();


   Status getStatus();


   void invalidate();

}
-
The
Statusenum defines the following values, which reflect the various credential states:-
UNVALIDATED- The credential is yet to be validated. -
IN_PROGRESS- The credential is in the process of being validated. -
INVALID- The credential has been validated unsuccessfully -
VALID- The credential has been validated successfully -
EXPIRED- The credential has expired
-
-
getValidatedAgent()- If the credential was successfully validated, this method returns theAgentobject representing the validated user. -
getStatus()- Returns the current status of the credential, i.e. one of the above enum values. -
invalidate()- Invalidate the credential. Implementations ofCredentialshould use this method to clean up internal credential state.
Let's take a look at a concrete example - UsernamePasswordCredentials is a Credentials
implementation that supports traditional username/password-based authentication:
public class UsernamePasswordCredentials extends AbstractBaseCredentials {


    private String username;


    private Password password;


    public UsernamePasswordCredentials() { }


    public UsernamePasswordCredentials(String userName, Password password) {

        this.username = userName;

        this.password = password;

    }


    public String getUsername() {

        return username;

    }


    public UsernamePasswordCredentials setUsername(String username) {

        this.username = username;

        return this;

    }


    public Password getPassword() {

        return password;

    }


    public UsernamePasswordCredentials setPassword(Password password) {

        this.password = password;

        return this;

    }


    @Override

    public void invalidate() {

        setStatus(Status.INVALID);

        password.clear();

    }

}
The first thing we may notice about the above code is that the UsernamePasswordCredentials class extends
AbstractBaseCredentials. This abstract base class implements the basic functionality required by the
Credentials interface. Next, we can see that two fields are defined; username and password.
These fields are used to hold the username and password state, and can be set either via the constructor,
or by their associated setter methods. Finally, we can also see that the invalidate() method sets the status to
INVALID, and also clears the password value.
Let's take a look at an example of the above classes in action. The following code demonstrates how we would authenticate a user with a username of "john" and a password of "abcde":
Credentials creds = new UsernamePasswordCredentials("john",

    new Password("abcde"));

identityManager.validate(creds);

if (Status.VALID.equals(creds.getStatus())) {

  // authentication was successful

}
We can also test if the credentials that were provided have expired (if an expiry date was set). In this case we might redirect the user to a form where they can enter a new password.
Credentials creds = new UsernamePasswordCredentials("john",

    new Password("abcde"));

identityManager.validate(creds);

if (Status.EXPIRED.equals(creds.getStatus())) {

  // password has expired, redirect the user to a password change screen

}
Updating user credentials is even easier than validating them. The IdentityManager interface provides the following
two methods for updating credentials:
void updateCredential(Agent agent, Object credential);

void updateCredential(Agent agent, Object credential, Date effectiveDate, Date expiryDate);
Both of these methods essentially do the same thing; they update a credential value for a specified Agent
(or User). The second overloaded method however also accepts effectiveDate and expiryDate
parameters, which allow some temporal control over when the credential will be valid. Use cases for this feature
include implementing a strict password expiry policy (by providing an expiry date), or creating a new account that might not
become active until a date in the future (by providing an effective date). Invoking the first overloaded method will
store the credential with an effective date of the current date and time, and no expiry date.
Note
One important point to note is that the credential parameter is of type java.lang.Object. Since
credentials can come in all shapes and sizes (and may even be defined by third party libraries), there is no common base
interface for credential implementations to extend. To support this type of flexibility in an extensible way, PicketLink
provides an SPI that allows custom credential handlers to be configured that override or extend the default credential
handling logic. Please see the next section for more information on how this SPI may be used.
PicketLink provides built-in support for the following credential types:
Warning
Not all built-in IdentityStore implementations support all credential types. For example, since the
LDAPIdentityStore is backed by an LDAP directory server, only password credentials are supported. The
following table lists the built-in IdentityStore implementations that support each credential type.
Table 3.12. Built-in credential types
| Credential type | Description | Supported by |
|---|---|---|
org.picketlink.idm.credential.Digest | Used for digest-based authentication |
JPAIdentityStore
FileBasedIdentityStore
|
org.picketlink.idm.credential.Password | A standard text-based password |
JPAIdentityStore
FileBasedIdentityStore
LDAPIdentityStore
|
java.security.cert.X509Certificate | Used for X509 certificate based authentication |
JPAIdentityStore
FileBasedIdentityStore
|
Let's take a look at a couple of examples. Here's some code demonstrating how a password can be assigned to user "jsmith":
User user = identityManager.getUser("jsmith");

identityManager.updateCredential(user, new Password("abcd1234"));
This example creates a digest and assigns it to user "jdoe":
User user = identityManager.getUser("jdoe");

Digest digest = new Digest();

digest.setRealm("default");

digest.setUsername(user.getLoginName());

digest.setPassword("abcd1234");

identityManager.updateCredential(user, digest);
For IdentityStore implementations that support multiple credential types, PicketLink provides
an optional SPI to allow the default credential handling logic to be easily customized and extended. To get
a better picture of the overall workings of the Credential Handler SPI, let's take a look at the sequence
of events during the credential validation process when validating a username and password against
JPAIdentityStore:
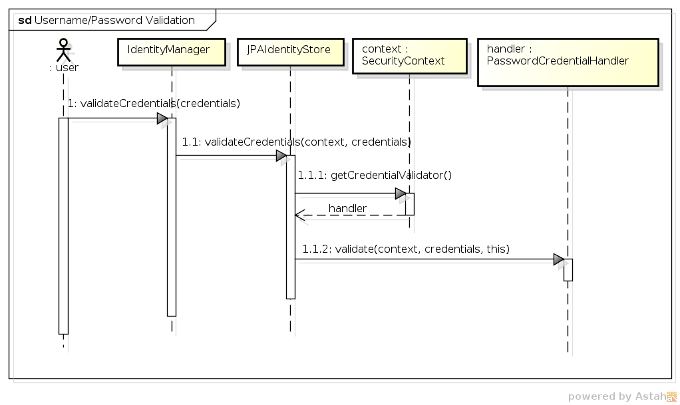
-
1 - The user (or some other code) first invokes the
validateCredentials()method onIdentityManager, passing in theCredentialsinstance to validate. -
1.1 - After looking up the correct
IdentityStore(i.e. the one that has been configured to validate credentials) theIdentityManagerinvokes the store'svalidateCredentials()method, passing in theSecurityContextand the credentials to validate. -
1.1.1 - In
JPAIdentityStore's implementation of thevalidateCredentials()method, theSecurityContextis used to look up theCredentialHandlerimplementation that has been configured to process validation requests for usernames and passwords, which is then stored in a local variable calledhandler. -
1.1.2 - The
validate()method is invoked on theCredentialHandler, passing in the security context, the credentials value and a reference back to the identity store. The reference to the identity store is important as the credential handler may require it to invoke certain methods upon the store to validate the credentials.
The CredentialHandler interface declares three methods, as follows:
public interface CredentialHandler {

    void setup(IdentityStore<?> identityStore);


    void validate(SecurityContext context, Credentials credentials,

                  IdentityStore<?> identityStore);


    void update(SecurityContext context, Agent agent, Object credential,

                IdentityStore<?> identityStore, Date effectiveDate, Date expiryDate);


}
The setup() method is called once, when the CredentialHandler instance is first created.
Credential handler instantiation is controlled by the CredentialHandlerFactory, which creates a single
instance of each CredentialHandler implementation to service all credential requests for that handler.
Each CredentialHandler implementation must declare the types of credentials that it is capable of supporting,
which is done by annotating the implementation class with the @SupportsCredentials annotation like so:
@SupportsCredentials({ UsernamePasswordCredentials.class, Password.class })

public class PasswordCredentialHandler implements CredentialHandler {
Since the validate() and update() methods receive different parameter types (validate()
takes a Credentials parameter value while update() takes an Object that represents
a single credential value), the @SupportsCredentials annotation must contain a complete list of all types supported
by that handler.
Similarly, if the IdentityStore implementation makes use of the credential handler SPI then it also must declare
which credential handlers support that identity store. This is done using the @CredentialHandlers annotation;
for example, the following code shows how JPAIdentityStore is configured to be capable of handling credential
requests for usernames and passwords, X509 certificates and digest-based authentication:
@CredentialHandlers({ PasswordCredentialHandler.class,

          X509CertificateCredentialHandler.class, DigestCredentialHandler.class })

public class JPAIdentityStore implements IdentityStore<JPAIdentityStoreConfiguration>,

                                         CredentialStore {
For IdentityStore implementations that support multiple credential types (such as JPAIdentityStore
and FileBasedIdentityStore), the implementation may choose to also implement the CredentialStore
interface to simplify the interaction between the CredentialHandler and the IdentityStore. The
CredentialStore interface declares methods for storing and retrieving credential values within an identity
store, as follows:
public interface CredentialStore {

   void storeCredential(SecurityContext context, Agent agent,

                        CredentialStorage storage);

   <T extends CredentialStorage> T retrieveCurrentCredential(SecurityContext context,

                                                 Agent agent, Class<T> storageClass);

   <T extends CredentialStorage> List<T> retrieveCredentials(SecurityContext context,

                                                 Agent agent, Class<T> storageClass);

}
The CredentialStorage interface is quite simple and only declares two methods, getEffectiveDate()
and getExpiryDate():
public interface CredentialStorage {

   @Stored Date getEffectiveDate();

   @Stored Date getExpiryDate();

}
The most important thing to note above is the usage of the @Stored annotation. This annotation is used to
mark the properties of the CredentialStorage implementation that should be persisted. The only requirement
for any property values that are marked as @Stored is that they are serializable (i.e. they implement the
java.io.Serializable interface). The @Stored annotation may be placed on either the getter
method or the field variable itself. Here's an example of one of a CredentialStorage implementation that
is built into PicketLink - EncodedPasswordStorage is used to store a password hash and salt value:
public class EncodedPasswordStorage implements CredentialStorage {


    private Date effectiveDate;

    private Date expiryDate;

    private String encodedHash;

    private String salt;


    @Override @Stored

    public Date getEffectiveDate() {

        return effectiveDate;

    }


    public void setEffectiveDate(Date effectiveDate) {

        this.effectiveDate = effectiveDate;

    }


    @Override @Stored

    public Date getExpiryDate() {

        return expiryDate;

    }


    public void setExpiryDate(Date expiryDate) {

        this.expiryDate = expiryDate;

    }


    @Stored

    public String getEncodedHash() {

        return encodedHash;

    }


    public void setEncodedHash(String encodedHash) {

        this.encodedHash = encodedHash;

    }


    @Stored

    public String getSalt() {

        return this.salt;

    }


    public void setSalt(String salt) {

        this.salt = salt;

    }


}
This section describes each of the built-in credential handlers, and any configuration parameters that may be set for them.
Specific credential handler options can be set when creating a new IdentityConfiguration. Configured options
are always specific to a particular identity store configuration, allowing different options to be specified between two or
more identity stores. The IdentityStoreConfiguration interface provides a method called
getCredentialHandlersConfig() that provides access to a Map which allows configuration options
to be set for the identity store's credential handlers:
public interface IdentityStoreConfiguration {

    Map<String, Object> getCredentialHandlerProperties();

}
To gain access to the IdentityStoreConfiguration object before PicketLink is initialized, there are a couple of
options. The first option is to provide an IdentityConfiguration object itself via a producer method.
PicketLink has been designed from the ground up to support a system of partitioning, allowing the users, groups and roles of an application to be divided into Realms and Tiers.
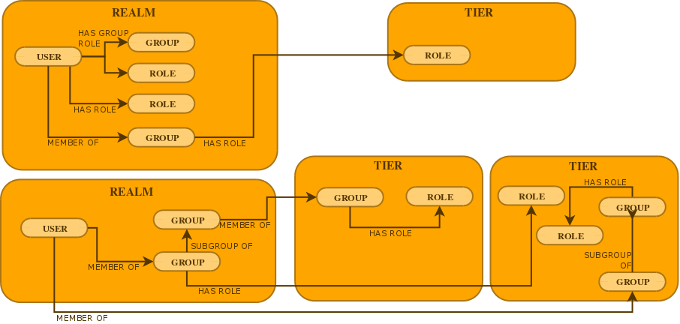
A Realm is used to define a discrete set of users, groups and roles. A typical use case for realms is the segregation of corporate user accounts within a multi-tenant application, although it is not limited this use case only. As all identity management operations must be performed within the context of an active partition, PicketLink defines the concept of a default realm which becomes the active partition if no other partition has been specified.
A Tier is a more restrictive type of partition than a realm, as it only allows groups and roles to be defined (but not users). A Tier may be used to define a set of application-specific groups and roles, which may then be assigned to groups within the same Tier, or to users and groups within a separate Realm.
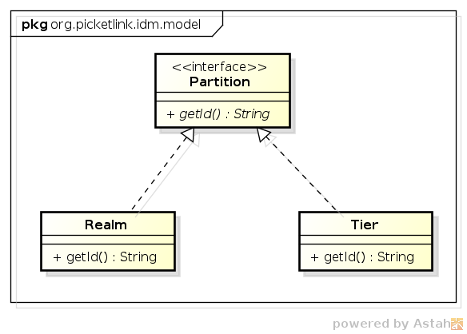
In terms of API, both the Realm and Tier classes implement the Partition interface,
as shown in the following class diagram:
Selecting the specific partition that the identity management operations are performed in is controlled by specifying
the partition when creating the IdentityManager via the IdentityManagerFactory's overloaded
createIdentityManager() methods:
  IdentityManager createIdentityManager();

    IdentityManager createIdentityManager(Partition partition);
The first method (without parameters) will create an IdentityManager instance for the default realm. The
second parameter allows a Partition object to be specified. Once the IdentityManager has been
created, any identity management methods invoked on it will be performed within the selected partition. To look up the
partition object, the IdentityManagerFactory provides two additional methods:
  Realm getRealm(String id);

    Tier getTier(String id);
Here's an example demonstrating how a new user called "bob" is created in a realm called acme:
  Realm acme = identityManagerFactory.getRealm("acme");

    IdentityManager im = identityManagerFactory.createIdentityManager(acme);

    im.add(new SimpleUser("bob"));