- 4.1. Overview
- 4.2. SAML SSO
- 4.3. SAML Web Browser Profile
- 4.4. PicketLink SAML Specification Support
- 4.5. SAML v2.0
- 4.5.1. Which Profiles are supported ?
- 4.5.2. Which Bindings are supported ?
- 4.5.3. PicketLink Identity Provider (PIDP)
- 4.5.4. PicketLink Service Provider (PSP)
- 4.5.5. SAML Authenticators (Tomcat,JBossAS)
- 4.5.6. Digital Signatures in SAML Assertions
- 4.5.7. SAML2 Handlers
- 4.5.8. Single Logout
- 4.5.9. SAML2 Configuration Providers
- 4.5.10. Metadata Support
- 4.5.11. Token Registry
- 4.5.12. Standalone vs JBossAS Distribution
- 4.5.13. Standalone Web Applications(All Servlet Containers)
- 4.6. SAML v1.1
- 4.7. Trust
- 4.8. Extensions
- 4.9. PicketLink API
- 4.10. 3rd party integration
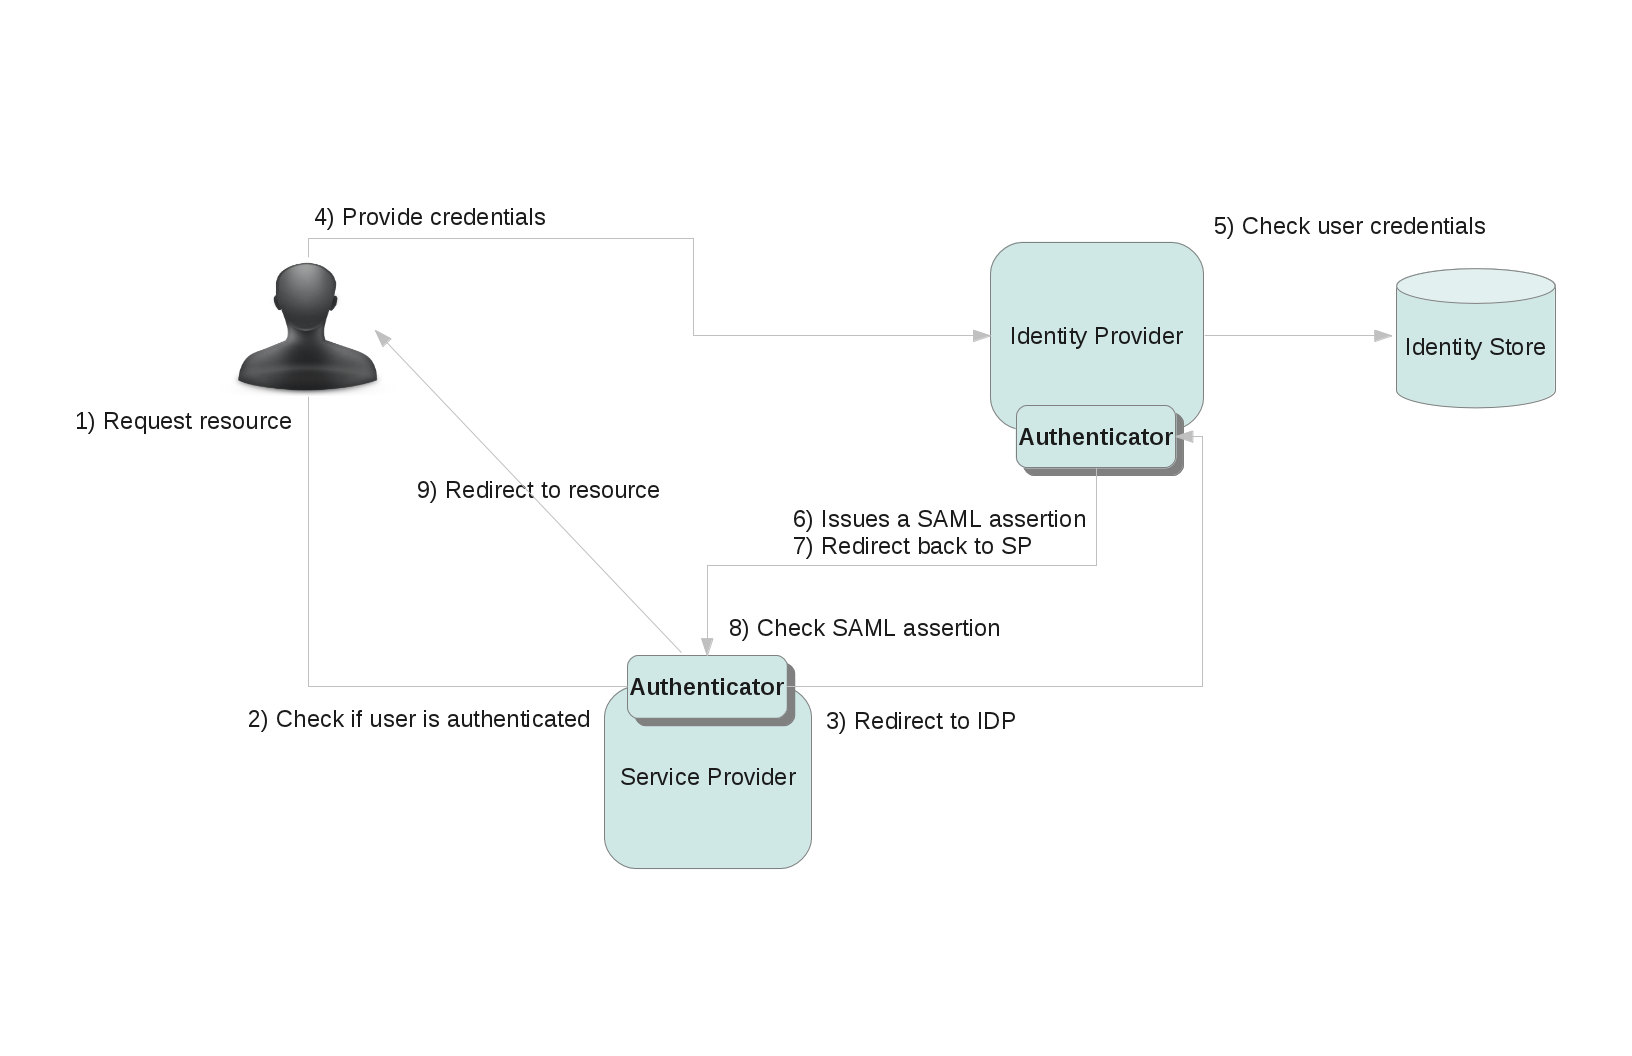
In this chapter, we look at PicketLink single sign on (SSO) and trust features. We describe
SAML SSO in detail.
SAML is an OASIS Standards Consortium standard for single sign on. PicketLink suppors
SAML v2.0 and SAML v1.1.
PicketLink contains support for the following profiles of SAML specification.
-
SAML Web Browser SSO Profile.
-
SAML Global Logout Profile.
PicketLink supports the following standard bindings:
-
SAML HTTP Redirect Binding
-
SAML HTTP POST Binding
PicketLink aims to provide support for both SAML v1.1 and v2.0 specifications. The emphasis is on SAMLv2.0 as v1.1 is deprecated.
-
SAML2 Web Browser Profile
-
SAML2 Metadata Profile
-
SAML2 Logout Profile
The SAML v2 specification defines the concept of SAML protocol bindings (or just bindings). These bindings defines how SAML request-response messages are exchanged onto standard messaging or communication protocols. Currently, PicketLink support the following bindings:
-
SAML HTTP Redirect Binding
-
SAML HTTP POST Binding
The Identity Provider is the authoritative entity responsible for authenticating an end user and asserting an identity for that user in a trusted fashion to trusted partners.
Tip
Please look at the PicketLink Quickstarts for the PicketLink Identity Provider web application. The quickstarts are useful resources where you can get configuration files.
The best way to create your own Identity Provider implementation is using one of the examples provided by the PicketLink Quickstarts.
You should also take a look at the following documentations:
The PicketLink Identity Provider Authenticator is a component responsible for the authentication of users and for issue and validate SAML assertions.
The PicketLink Authenticator is basically a Tomcat Valve (org.apache.catalina.authenticator.FormAuthenticator). The only thing you need to do is change the valves configuration for your application.
This configuration changes for each supported binding.
In JBoss Application Server v7 the valves configuration are located inside the WEB-INF/jboss-web.xml file. Bellow is a example of how this file looks like:
<?xml version="1.0" encoding="UTF-8"?>
<jboss-web>
	<security-domain>idp</security-domain>
	<context-root>idp</context-root>
	<valve>
	    <class-name>org.picketlink.identity.federation.bindings.tomcat.idp.IDPWebBrowserSSOValve</class-name>
	</valve>
</jboss-web>
The valve configuration is done using the <valve> element.
In JBoss Application Server v5 or v6, the valves configuration are located inside the WEB-INF/context.xml file. Bellow is a example of how this file looks like:
<?xml version="1.0" encoding="UTF-8"?>
<Context>
<Valve className="org.picketlink.identity.federation.bindings.tomcat.idp.IDPWebBrowserSSOValve" />
</Context>
The valve configuration is done using the <Valve> element.
In Apache Tomcat 6 the valves configuration are located inside the META-INF/context.xml file. Bellow is a example of how this file looks like:
<?xml version="1.0" encoding="UTF-8"?>
<Context>
<Valve className="org.picketlink.identity.federation.bindings.tomcat.idp.IDPWebBrowserSSOValve" />
</Context>
The valve configuration is done using the <Valve> element.
PicketLink provides default implementations for Service Provider Authenticators. The list bellow shows all the available implementations:
|
Name |
Description |
|---|---|
|
org.picketlink. identity.federation. bindings.tomcat. idp.IDPWebBrowserSSOValve |
Default implementation for an Identity Provider Authenticator. |
IDPWebBrowserSSOValve from PicketLink provides the core IDP functionality on JBoss Application Server or Apache Tomcat.
|
# |
Name |
Type |
Objective |
Since version |
|---|---|---|---|---|
|
1 |
attributeList |
String |
a comma separated list of attribute keys IDP interested in |
2.0 |
|
2 |
configProvider |
String |
an optional implementation of the SAMLConfigurationProvider interface. Provide the fully qualified name. |
2.0 |
|
3 |
ignoreIncomingSignatures |
boolean |
if the IDP should ignore the signatures on the incoming messages Default: false |
2.0 Deprecated since 2.1.2. |
|
4 |
ignoreAttributesGeneration |
boolean |
if the IDP should not generate attribute statements in response to Service Providers |
2.0 |
|
5 |
signOutgoingMessages |
boolean |
Should the IDP sign the outgoing messages? Default: true |
2.0 Deprecated since 2.1.2. |
|
6 |
roleGenerator |
String |
optional fqn of a role generator Default: org.picketlink.identity. federation.bindings. tomcat.TomcatRoleGenerator |
2.0 Deprecated since 2.1.2. |
|
7 |
samlHandlerChainClass |
String |
fqn of a custom SAMLHandlerChain implementation |
2.0 Deprecated since 2.1.2. |
|
8 |
identityParticipantStack |
String |
fqn of a custom IdentityParticipantStack |
2.0 Deprecated since 2.1.2. |
|
|
|
|
|
|
To configure an application as a PicketLink Identity Provider you need to follow this steps:
-
Configure the web.xml.
-
Configure an Authenticator .
-
Configure a Security Domain for your application.
-
Configure PicketLink JBoss Module as a dependency.
-
Create and configure a file named WEB-INF/picketlink.xml .
Before configuring your application as an Identity Provider you need to add some configurations to your web.xml.
Let's start by defining a security-constraint element to restrict access to resources from unauthenticated users:
<security-constraint>
    <web-resource-collection>
        <web-resource-name>Manager command</web-resource-name>
        <url-pattern>/*</url-pattern>
    </web-resource-collection>
    <auth-constraint>
        <role-name>manager</role-name>
    </auth-constraint>
</security-constraint>


<security-role>
    <description>
      The role that is required to log in to IDP Application
    </description>
    <role-name>manager</role-name>
</security-role>
As you can see above, we define that only users with a role named manager are allowed to access the protected resources. Make sure to give your users the same role you defined here, otherwise they will get a 403 HTTP status code.
The next step is define your FORM login configuration using the login-config element:
<login-config>
    <auth-method>FORM</auth-method>
    <realm-name>PicketLink IDP Application</realm-name>
    <form-login-config>
        <form-login-page>/jsp/login.jsp</form-login-page>
        <form-error-page>/jsp/login-error.jsp</form-error-page>
    </form-login-config>
</login-config>
Make sure you have inside your application the pages defined in the elements form-login-page and form-error-page .
Important
Please, make sure you have a welcome file page in your application. You can define it in your web.xml or simply create an index.jsp at the root directory of your application.
All the configuration for an especific Identity Provider goes at the WEB-INF/picketlink.xml file. This file is responsible to define the behaviour of the Authenticator. During the identity provider startup, the authenticator parses this file and configures itself.
Bellow is how the picketlink.xml file should looks like:
<PicketLink xmlns="urn:picketlink:identity-federation:config:2.1">


    <PicketLinkIDP xmlns="urn:picketlink:identity-federation:config:2.1">

        <IdentityURL>http://localhost:8080/idp/ </IdentityURL>


        <Trust>
            <Domains>locahost,mycompany.com</Domains>
        </Trust>

        <KeyProvider ClassName="org.picketlink.identity.federation.core.impl.KeyStoreKeyManager">

            <Auth Key="KeyStoreURL" Value="/jbid_test_keystore.jks" />
            <Auth Key="KeyStorePass" Value="store123" />
            <Auth Key="SigningKeyPass" Value="test123" />
            <Auth Key="SigningKeyAlias" Value="servercert" />

            <ValidatingAlias Key="localhost" Value="servercert" />
            <ValidatingAlias Key="127.0.0.1" Value="servercert" />

        </KeyProvider>

    </PicketLinkIDP>

    <PicketLinkSTS xmlns="urn:picketlink:identity-federation:config:1.0" TokenTimeout="1000" ClockSkew="1000">
        <TokenProviders>
            <TokenProvider ProviderClass="org.picketlink.identity.federation.core.saml.v2.providers.SAML20AssertionTokenProvider"
                TokenType="urn:oasis:names:tc:SAML:2.0:assertion" TokenElement="Assertion"
                TokenElementNS="urn:oasis:names:tc:SAML:2.0:assertion" />
        </TokenProviders>
    </PicketLinkSTS>

    <Handlers xmlns="urn:picketlink:identity-federation:handler:config:2.1">

        <Handler class="org.picketlink.identity.federation.web.handlers.saml2.SAML2IssuerTrustHandler" />
        <Handler class="org.picketlink.identity.federation.web.handlers.saml2.SAML2LogOutHandler" />
        <Handler class="org.picketlink.identity.federation.web.handlers.saml2.SAML2AuthenticationHandler" />
        <Handler class="org.picketlink.identity.federation.web.handlers.saml2.RolesGenerationHandler" />

     </Handlers>

</PicketLink>
Important
The schema for the picketlink.xml file is available here: https://github.com/picketlink/federation/blob/master/picketlink-core/src/main/resources/schema/config/picketlink_v2.1.xsd .
This element defines the basic configuration for the identity provider. The table bellow provides more information about the attributes supported by this element:
|
Name |
Description |
Value |
|---|---|---|
|
AssertionValidity |
Defines the timeout for the SAML assertion validity, in miliseconds. |
Defaults to 300000 . Deprecated. Use the PicketLinkSTS element, instead. |
|
RoleGenerator |
Defines the name of the org.picketlink. identity.federation. core.interfaces. RoleGenerator subclass to be used to obtain user roles. |
Defaults to org.picketlink.identity. federation.core. impl.EmptyRoleGenerator . |
|
AttributeManager |
Defines the name of the org.picketlink. identity.federation. core.interfaces. AttributeManager subclass to be used to obtain the SAML assertion attributes. |
Defautls to org.picketlink. identity.federation. core.impl. EmptyAttributeManager . |
|
StrictPostBinding |
SAML Web Browser SSO Profile has a requirement that the IDP does not respond back in Redirect Binding. Set this to false if you want to force the IDP to respond to SPs using the Redirect Binding. |
Values: true|false . Defaults to true, the IDP always respond via POST Binding. |
|
SupportsSignatures |
Indicates if digital signature/verification of SAML assertions are enabled. If this attribute is marked to true the Service Providers must support signatures too, otherwise the SAML messages will be considered as invalid. |
Values: true|false. Defaults to false. |
|
Encrypt |
Indicates if SAML Assertions should be encrypted. If this attribute is marked to true the Service Providers must support signatures too, otherwise the SAML messages will be considered as invalid. |
Values: true|false. Defaults to false |
|
IdentityParticipantStack |
Defines the name of the org.picketlink. identity.federation. web.core. IdentityParticipantStack subclass to be used to register and deregister participants in the identity federation. |
Defaults to org.picketlink. identity.federation. web.core. IdentityServer.STACK. |
This element value refers to the URL of the Identity Provider.
The Trust and Domains elements defines the hosts trusted by this Identity Provider. You just need to inform a list of comma separated domain names.
To enable digital signatures for the SAML assertions you need to configure:
-
Set the SupportsSignature attribute to true;
-
Add the Section 4.5.7.11, “SAML2SignatureGenerationHandler” and the Section 4.5.7.12, “SAML2SignatureValidationHandler” in the handlers chain (Handler Element).
-
Configure a KeyProvider * *element.
To enable encryption for SAML assertions you need to configure:
-
Set the Encrypt attribute to true;
-
Add the Section 4.5.7.8, “SAML2EncryptionHandler” and the Section 4.5.7.12, “SAML2SignatureValidationHandler” in the handlers chain (Handler Element).
-
Configure a KeyProvider * *element.
PicketLink provides some built-in Handlers to help the Identity Provider Authenticator processing the SAML requests and responses.
The handlers are configured through the Handlers element.
Important
When configuring the IDP, you do not need to specify the PicketLinkSTS element in the configuration. If it is ommited PicketLink will load the default configurations from a file named core-sts inside the picketlink-core-VERSION.jar.
Override this configuration only if you need to. Eg.: change the token timeout or specify a custom Security Token Provider for SAML assertions.
See the documentation at Section 4.5.3.6, “Security Token Service Configuration” .
The Identity Provider needs a Identity Store to retrieve users information. These informations will be used during the authentication and authorization process. Identity Stores can be any type of repository: a database, LDAP, properties file, etc.
The PicketLink Identity Provider uses JAAS to connect to an Identity Store. This configuration is usually made at the container side using any LoginModule implementation.
If you are using the JBoss Application Server you can use one of the existing LoginModules or you can create your custom implementation:
In order to authenticate users, the Identity Provider needs to be configured with the properly security domain configuration. The security domain is responsible for authenticating the user in a specific Identity Store.
This is done by defining a <security-domain> element in jboss-web.xml.
<?xml version="1.0" encoding="UTF-8"?>
<jboss-web>
    <security-domain>idp</security-domain>
    <valve>
  <class-name>org.picketlink.identity.federation.bindings.tomcat.idp.IDPWebBrowserSSOValve</class-name>
    </valve>
</jboss-web>
In order to use the security domain above, you need to configure it in your server. For JBoss AS7 you just need to add the following configuration to standalone.xml:
<subsystem xmlns="urn:jboss:domain:security:1.1">
    <security-domains>
        <security-domain name="idp" cache-type="default">
            <authentication>
                <login-module code="UsersRoles" flag="required">
                    <module-option name="usersProperties" value="users.properties"/>
                    <module-option name="rolesProperties" value="roles.properties"/>
                </login-module>
            </authentication>
    </security-domain>

    ...

</subsystem>
The example above uses a JAAS LoginModule that uses two properties files to authenticate users and retrieve their roles. These properties files needs to be located at WEB-INF/classes folder.
To issue/renew/cancel/validate SAML tokens, the IDP relies on the PicketLink STS API and configuration. This configurations define how the tokens should be used by the IDP.
This PicketLinkSTS element defines the basic configuration for the Security Token Service. The table bellow provides more information about the attributes supported by this element:
|
Name |
Description |
Value |
|---|---|---|
|
STSName |
Name for this STS configuration. |
Name for this Security Token Service. |
|
TokenTimeout |
Defines the token timeout in miliseconds. |
Defaults to 3600 miliseconds. |
|
ClockSkew |
Defines the clock skew, or timing skew, for the token timeout. |
Defaults to 2000 miliseconds. |
|
SignToken |
Indicates if the tokens should be signed. |
Values: true|false . Defaults to false . |
|
EncryptToken |
Indicates if the tokens should be encrypted. |
Values: true|false . Defaults to false . |
|
CanonicalizationMethod |
Sets the canonicalization method. |
Defaults to http://www.w3.org/2001/10/xml-exc-c14n#WithComments |
The PicketLink STS defines the concept of Security Token Providers. This tokens providers are implementations of the interface org.picketlink.identity.federation.core.interfaces.SecurityTokenProvider .
The purpose of providers is to plug any implementation for a specific token type. PicketLink provides default implementations for the following token type:
-
SAML v2.0 : org.picketlink.identity.federation.core.saml.v2.providers.SAML20AssertionTokenProvider
-
WS-Trust _ : org.picketlink.identity.federation.core.wstrust.plugins.saml.SAML20TokenProvider_
Each provider is linked to a specific TokenType and TokenElementNS, both attributes of the TokenProvider element.
You can always provide your own implementation for a specific TokenType or customize the behaviour for one of the built-in providers.
The PicketLink Service Provider relies on the PicketLink Identity Provider to assert information about a user via an electronic user credential, leaving the service provider to manage access control and dissemination based on a trusted set of user credential assertions.
Tip
Please have a look at the PicketLink Quickstarts to obtain service provider applications. The quickstarts are useful resources where you can get configuration files.
The best way to create your own Service Provider implementation is using one of the examples provided by the PicketLink Quickstarts.
You should also take a look at the following documentations:
To configure an application as a PicketLink Service Provider you need to follow this steps:
-
Configuring the web.xml.
-
Configure an Authenticator .
-
Configure a Security Domain for your application.
-
Configure PicketLink JBoss Module as a dependency.
-
Create and configure a file named WEB-INF/picketlink.xml .
Before configuring your application as an Service Provider you need to add some configurations to your web.xml.
Let's start by defining a security-constraint element to restrict access to resources from unauthenticated users:
<security-constraint>
    <web-resource-collection>
        <web-resource-name>Manager command</web-resource-name>
        <url-pattern>/*</url-pattern>
    </web-resource-collection>
    <auth-constraint>
        <role-name>manager</role-name>
    </auth-constraint>
</security-constraint>

<security-role>
    <description>
      The role that is required to log in to the Manager Application
    </description>
    <role-name>manager</role-name>
</security-role>
As you can see above, we define that only users with a role named manager are allowed to access the protected resources. Make sure to give your users the same role you defined here, otherwise they will get a 403 HTTP status code.
During the logout process, PicketLink will try to redirect the user to a logout.jsp page located at the root directory of your application. Please, make sure to create it.
Important
Please, make sure you have a welcome file page in your application. You can define it in your web.xml or simply create an index.jsp at the root directory of your application.
All the configuration for an especific Service Providers goes at the WEB-INF/picketlink.xml file. This file is responsible to define the behaviour of the Authenticator. During the service provider startup, the authenticator parses this file and configures itself.
Bellow is how the picketlink.xml file should looks like:
<PicketLink xmlns="urn:picketlink:identity-federation:config:2.1">


    <PicketLinkSP xmlns="urn:picketlink:identity-federation:config:2.1"
        BindingType="REDIRECT"
        RelayState="someURL"
        ErrorPage="/someerror.jsp"
        LogOutPage="/customLogout.jsp"
        IDPUsesPostBinding="true"
        SupportsSignatures="true">

        <IdentityURL>http://localhost:8080/idp/ </IdentityURL>
        <ServiceURL>http://localhost:8080/employee/ </ServiceURL>

        <KeyProvider ClassName="org.picketlink.identity.federation.core.impl.KeyStoreKeyManager">

            <Auth Key="KeyStoreURL" Value="/jbid_test_keystore.jks" />
            <Auth Key="KeyStorePass" Value="store123" />
            <Auth Key="SigningKeyPass" Value="test123" />
            <Auth Key="SigningKeyAlias" Value="servercert" />

            <ValidatingAlias Key="localhost" Value="servercert" />
            <ValidatingAlias Key="127.0.0.1" Value="servercert" />

        </KeyProvider>

    </PicketLinkSP>

    <Handlers xmlns="urn:picketlink:identity-federation:handler:config:2.1">

        <Handler class="org.picketlink.identity.federation.web.handlers.saml2.SAML2IssuerTrustHandler" />
        <Handler class="org.picketlink.identity.federation.web.handlers.saml2.SAML2LogOutHandler" />
        <Handler class="org.picketlink.identity.federation.web.handlers.saml2.SAML2AuthenticationHandler" />
        <Handler class="org.picketlink.identity.federation.web.handlers.saml2.RolesGenerationHandler" />

     </Handlers>

</PicketLink>
Important
The schema for the picketlink.xml file is available here: https://github.com/picketlink/federation/blob/master/picketlink-core/src/main/resources/schema/config/picketlink_v2.1.xsd .
This element defines the basic configuration for the service provider. The table bellow provides more information about the attributes supported by this element:
|
Name |
Description |
Value |
|---|---|---|
|
BindingType |
Defines which SAML binding should be used: SAML HTTP POST or Redirect bindings. |
POST|REDIRECT. Defaults to REDIRECT if no specified. |
|
ErrorPage |
Defines a custom error page to be displayed when some error occurs during the request processing. |
Defaults to /error.jsp. |
|
LogOutPage |
Defines a custom logout page to be displayed after the logout. |
Defaults to /logout.jsp. |
|
IDPUsesPostBinding |
Indicates if the Identity Provider configured for this Service Provider is always using POST for SAML responses. |
true|false. Defaults to true if no specified. |
|
SupportsSignature |
Indicates if digital signature/verification of SAML assertions are enabled. If this attribute is marked to true the Identity Provider configured for this Service Provider must support signatures too, otherwise the SAML messages will be considered as invalid. |
true|false. Defaults to false if no specified. |
This element value refers to the URL of the Identity Provider used by this Service Provider.
This element value refers to the URL of the Service Provider.
To enable digital signatures for the SAML assertions you need to configure:
-
Set the SupportsSignature attribute to true;
-
Add the Section 4.5.7.11, “SAML2SignatureGenerationHandler” and the Section 4.5.7.12, “SAML2SignatureValidationHandler” in the handlers chain (Handler Element).
-
Configure a KeyProvider * *element.
PicketLink provides some built-in Handlers to help the Service Provider Authenticator processing the SAML requests and responses.
The handlers are configured through the Handlers element.
PicketLink Service Providers Authenticators are important components responsible for the authentication of users using the SAML Assertion previously issued by an Identity Provider.
They are responsible for intercepting each request made to an application, checking if a SAML assertion is present in the request, validating its signature and executing SAML specific validations and creating a security context for the user in the requested application.
The PicketLink Authenticator is basically a Tomcat Valve (org.apache.catalina.authenticator.FormAuthenticator). The only thing you need to do is change the valves configuration for your application.
This configuration changes for each supported binding.
In JBoss Application Server v7 the valves configuration are located inside the WEB-INF/jboss-web.xml file. Bellow is a example of how this file looks like:
<?xml version="1.0" encoding="UTF-8"?>
<jboss-web>
	<security-domain>sp</security-domain>
	<context-root>employee</context-root>
	<valve>
	    <class-name>org.picketlink.identity.federation.bindings.tomcat.sp.ServiceProviderAuthenticator</class-name>
	</valve>
</jboss-web>
The valve configuration is done using the <valve> element.
In JBoss Application Server v5 or v6, the valves configuration are located inside the WEB-INF/context.xml file. Bellow is a example of how this file looks like:
<?xml version="1.0" encoding="UTF-8"?>
<Context>
    <Valve className="org.picketlink.identity.federation.bindings.tomcat.sp.ServiceProviderAuthenticator" />
</Context>
The valve configuration is done using the <Valve> element.
In Apache Tomcat 6 the valves configuration are located inside the META-INF/context.xml file. Bellow is a example of how this file looks like:
<?xml version="1.0" encoding="UTF-8"?>
<Context>
    <Valve className="org.picketlink.identity.federation.bindings.tomcat.sp.ServiceProviderAuthenticator" />
</Context>
The valve configuration is done using the <Valve> element.
PicketLink provides default implementations for Service Provider Authenticators. The list bellow shows all the available implementations:
|
Name |
Description |
|---|---|
|
org.picketlink.identity. federation.bindings. tomcat.sp. ServiceProviderAuthenticator |
Preferred service provider authenticator. Supports both SAML HTTP Redirect and POST bindings. |
|
org.picketlink. identity.federation. bindings.tomcat. sp.SPPostFormAuthenticator |
Deprecated . Supports only HTTP POST Binding without signature of SAML assertions. |
|
org.picketlink. identity.federation. bindings.tomcat. sp.SPPostSignatureFormAuthenticator |
Deprecated . Supports only HTTP POST Binding with signature of SAML assertions. |
|
org.picketlink. identity.federation. bindings.tomcat. sp.SPRedirectFormAuthenticator |
Deprecated . Supports only HTTP Redirect Binding without signature of SAML assertions. |
|
org.picketlink. identity.federation. bindings.tomcat. sp.SPRedirectSignatureFormAuthenticator |
Deprecated . Supports only HTTP Redirect Binding with signature of SAML assertions. |
Warning
Prefer using the ??? ServiceProviderAuthenticator authenticator if you are using PicketLink v.2.1 or above. The others authenticators are DEPRECATED .
As of PicketLink v2.1, the ServiceProviderAuthenticator is the preferred Service Provider configuration to the deprecated Section 4.5.4.4.8, “SPPostFormAuthenticator” , Section 4.5.4.4.6, “SPRedirectFormAuthenticator” , Section 4.5.4.4.7, “SPPostSignatureFormAuthenticator” and Section 4.5.4.4.5, “SPRedirectSignatureFormAuthenticator” .
Warning
As of PicketLink v2.1, the Section 4.5.4.4.4, “ServiceProviderAuthenticator” is the preferred Service Provider configuration to the deprecated Section 4.5.4.4.8, “SPPostFormAuthenticator” , Section 4.5.4.4.6, “SPRedirectFormAuthenticator” , Section 4.5.4.4.7, “SPPostSignatureFormAuthenticator” and Section 4.5.4.4.5, “SPRedirectSignatureFormAuthenticator” .
SPRedirectSignatureFormAuthenticator is used to provide signature/encryption services to a Service Provider (SP) application for HTTP/Redirect binding of SAMLv2 specification. This authenticator
is an extension of the Section 4.5.4.4.6, “SPRedirectFormAuthenticator” .
Example 4.2. context.xml
<Context>
  <Valve className="org.picketlink.identity.federation.bindings.tomcat.sp.SPRedirectSignatureFormAuthenticator"
  />
</Context>
|
# |
Name |
Type |
Objective |
Since |
|---|---|---|---|---|
|
1 |
configFile |
String |
optional - fully qualified location of the config file Default: /WEB-INF/picketlink-idfed.xml |
2.0 |
|
2 |
samlHandlerChainClass |
String |
optional - fqn of a custom SAMLHandlerChain implementation |
2.0 |
|
3 |
serviceURL |
String |
optional - the service provider URL |
2.0 |
|
4 |
saveRestoreRequest |
boolean |
should the authenticator save the original request and restore it after authentication Default: true |
2.0 |
|
5 |
configProvider |
String |
optional - a fqn of the SAMLConfigurationProvider implementation |
2.0 |
|
6 |
issuerID |
String |
optional - customize the issuer id |
2.0 |
|
7 |
idpAddress |
String |
optional - If the request.getRemoteAddr is not exactly the IDP address that you have keyed in your deployment descriptor for keystore alias, you can configure it explicitly |
2.0 |
Warning
As of PicketLink v2.1, the Section 4.5.4.4.4, “ServiceProviderAuthenticator” is the preferred Service Provider configuration to the deprecated Section 4.5.4.4.8, “SPPostFormAuthenticator” , Section 4.5.4.4.6, “SPRedirectFormAuthenticator” , Section 4.5.4.4.7, “SPPostSignatureFormAuthenticator” and Section 4.5.4.4.5, “SPRedirectSignatureFormAuthenticator” .
SPRedirectFormAuthenticator provides the SAMLv2 HTTP/Redirect binding support for service provider (SP) applications.
Example 4.3. context.xml
<Context>
  <Valve className="org.picketlink.identity.federation.bindings.tomcat.sp.SPRedirectFormAuthenticator"
  />
</Context>
|
# |
Name |
Type |
Objective |
Since |
|---|---|---|---|---|
|
1 |
configFile |
String |
optional - fully qualified location of the config file Default: /WEB-INF/picketlink-idfed.xml |
2.0 |
|
2 |
samlHandlerChainClass |
String |
optional - fqn of a custom SAMLHandlerChain implementation |
2.0 |
|
3 |
serviceURL |
String |
optional - the service provider URL |
2.0 |
|
4 |
saveRestoreRequest |
boolean |
should the authenticator save the original request and restore it after authentication Default: true |
2.0 |
|
5 |
configProvider |
String |
optional - a fqn of the SAMLConfigurationProvider implementation |
2.0 |
|
6 |
issuerID |
String |
optional - customize the issuer id |
2.0 |
|
|
|
|
|
|
Warning
As of PicketLink v2.1, the Section 4.5.4.4.4, “ServiceProviderAuthenticator” is the preferred Service Provider configuration to the deprecated Section 4.5.4.4.8, “SPPostFormAuthenticator” , Section 4.5.4.4.6, “SPRedirectFormAuthenticator” , Section 4.5.4.4.7, “SPPostSignatureFormAuthenticator” and Section 4.5.4.4.5, “SPRedirectSignatureFormAuthenticator” .
SPPostSignatureFormAuthenticator is used to provide signature/encryption services to a Service Provider (SP) application for HTTP/POST binding of SAMLv2 specification. This authenticator
is an extension of the Section 4.5.4.4.8, “SPPostFormAuthenticator” .
Example 4.4. context.xml
<Context>
  <Valve className="org.picketlink.identity.federation.bindings.tomcat.sp.SPPostSignatureFormAuthenticator"
  />
</Context>
|
# |
Name |
Type |
Objective |
Since |
|---|---|---|---|---|
|
1 |
configFile |
String |
optional - fully qualified location of the config file Default: /WEB-INF/picketlink-idfed.xml |
2.0 |
|
2 |
samlHandlerChainClass |
String |
optional - fqn of a custom SAMLHandlerChain implementation |
2.0 |
|
3 |
serviceURL |
String |
optional - the service provider URL |
2.0 |
|
4 |
saveRestoreRequest |
boolean |
should the authenticator save the original request and restore it after authentication Default: true |
2.0 |
|
5 |
configProvider |
String |
optional - a fqn of the SAMLConfigurationProvider implementation |
2.0 |
|
6 |
issuerID |
String |
optional - customize the issuer id |
2.0 |
|
7 |
idpAddress |
String |
optional - If the request.getRemoteAddr is not exactly the IDP address that you have keyed in your deployment descriptor for keystore alias, you can configure it explicitly |
2.0 |
Warning
As of PicketLink v2.1, the Section 4.5.4.4.4, “ServiceProviderAuthenticator” is the preferred Service Provider configuration to the deprecated Section 4.5.4.4.8, “SPPostFormAuthenticator” , Section 4.5.4.4.6, “SPRedirectFormAuthenticator” , Section 4.5.4.4.7, “SPPostSignatureFormAuthenticator” and Section 4.5.4.4.5, “SPRedirectSignatureFormAuthenticator” .
SPPostFormAuthenticator is the main authenticator used to configure a service provider (SP) application for SAMLv2.0
Example 4.5. context.xml
<Context>
  <Valve className="org.picketlink.identity.federation.bindings.tomcat.sp.SPPostFormAuthenticator"
  />
</Context>
|
# |
Name |
Type |
Objective |
Since |
|---|---|---|---|---|
|
1 |
configFile |
String |
optional - fully qualified location of the config file Default: /WEB-INF/picketlink-idfed.xml |
2.0 |
|
2 |
samlHandlerChainClass |
String |
optional - fqn of a custom SAMLHandlerChain implementation |
2.0 |
|
3 |
serviceURL |
String |
optional - the service provider URL |
2.0 |
|
4 |
saveRestoreRequest |
boolean |
should the authenticator save the original request and restore it after authentication Default: true |
2.0 |
|
5 |
configProvider |
String |
optional - a fqn of the SAMLConfigurationProvider implementation |
2.0 |
|
6 |
issuerID |
String |
optional - customize the issuer id |
2.0 |
|
|
|
|
|
|
In order to handle the SAML assertions returned by the Identity Provider, the Service Provider needs to be configured with the properly security domain configuration. This is done by defining a <security-domain> element in jboss-web.xml.
<?xml version="1.0" encoding="UTF-8"?>
<jboss-web>
    <security-domain>sp</security-domain>
    <valve>
        <class-name>org.picketlink.identity.federation.bindings.tomcat.sp.ServiceProviderAuthenticator</class-name>
    </valve>
</jboss-web>
In order to use the security domain above, you need to configure it in your server. For JBoss AS7 you just need to add the following configuration to standalone.xml:
<subsystem xmlns="urn:jboss:domain:security:1.1">
    <security-domains>
        <security-domain name="sp" cache-type="default">
            <authentication>
                <login-module code="org.picketlink.identity.federation.bindings.jboss.auth.SAML2LoginModule" flag="required"/>
            </authentication>
    </security-domain>

    ...

</subsystem>
The PicketLink Identity Provider Authenticator is a component responsible for the authentication of users and for issue and validate SAML assertions.
Basically, there two different different authenticator implementations type:
-
Identity Provider Authenticators
-
Service Provider Authenticators
PicketLink includes a number of Authenticators for providing SAML support on Apache Tomcat and JBoss Application Server.
To support digital signatures of SAML assertions you should define a KeyProvider element inside a PicketLinkIDP or PicketLinkSP.
Important
When using digital signatures you need to configure and enable it in both Identity Provider and Service Providers. Otherwise the SAML assertions would probably be considered as invalid.
<KeyProvider ClassName="org.picketlink.identity.federation.core.impl.KeyStoreKeyManager">
    <Auth Key="KeyStoreURL" Value="/jbid_test_keystore.jks" />
    <Auth Key="KeyStorePass" Value="store123" />
    <Auth Key="SigningKeyPass" Value="test123" />
    <Auth Key="SigningKeyAlias" Value="servercert" />

    <ValidatingAlias Key="idp.example.com" Value="servercert" />
    <ValidatingAlias Key="localhost" Value="servercert" />
</KeyProvider>
In order to configure the KeyProvider, you need to specify some configurations about the Java KeyStore that should be used to sign SAML assertions:
|
Auth Key |
Description |
|---|---|
|
KeyStoreURL |
Where the value of the Value attribute points to the location of a Java KeyStore with the properly installed certificates. |
|
KeyStorePass |
Where the value of the Value attribute refers to the password of the referenced Java KeyStore. |
|
SigningKeyAlias |
Where the value of the Value attribute refers to the password of the installed certificate to be used to sign the SAML assertions. |
|
SigningKeyPass |
Where the value of the Value attribute refers to the alias of the certificate to be used to sign the SAML assertions. |
The Service Provider also needs to know how to verify the signatures for the SAML assertions. This is done by the ValidationAlias elements.
<ValidatingAlias Key="idp.example.com" Value="servercert" />
Tip
Note that we declare the validating certificate for each domain using the ValidatingAlias .
At the IDP side you need an entry for each server/domain name defined as a trusted domain (Trust/Domains elements).
At the SP side you need an entry for the the server/domain name where the IDP is deployed.
When digital signatures are enable, the authenticator will look at the SigningKeyAlias for the alias that should me used to look for a private key configured in the Java KeyStore. This private key will be used to sign the SAML assertion.
When digital signatures are enabled, the authenticator will look at the ValidatingAlias table for a entry that matches the value of the Key attribute with the host name of the Issuer of the SAML assertion. For example, consider the following SAML Assertion issued by an Identity Provider located at http://idp.example.com:
<saml2:Assertion xmlns:saml2="urn:oasis:names:tc:SAML:2.0:assertion"
    ID="ID_ab0392ef-b557-4453-95a8-a7e168da8ac5" IssueInstant="2010-09-30T19:13:37.869Z"
    Version="2.0">
    <saml2:Issuer>http://idp.example.com </saml2:Issuer>
    <saml2:Subject>
        <saml2:NameID NameQualifier="urn:picketlink:identity-federation">jduke</saml2:NameID>
        <saml2:SubjectConfirmation Method="urn:oasis:names:tc:SAML:2.0:cm:bearer" />
    </saml2:Subject>
    <saml2:Conditions NotBefore="2010-09-30T19:13:37.869Z"
         NotOnOrAfter="2010-09-30T21:13:37.869Z" />
    <ds:Signature xmlns:ds="http://www.w3.org/2000/09/xmldsig#">
        <ds:SignedInfo>
            <ds:CanonicalizationMethod Algorithm="http://www.w3.org/2001/10/xml-exc-c14n#WithComments" />
            <ds:SignatureMethod Algorithm="http://www.w3.org/2000/09/xmlds#rsa-sha1" />
            <ds:Reference URI="#ID_ab0392ef-b557-4453-95a8-a7e168da8ac5">
                <ds:Transforms>
                    <ds:Transform Algorithm="http://www.w3.org/2000/09/xmlds#enveloped-signature" />
                    <ds:Transform Algorithm="http://www.w3.org/2001/10/xml-exc-c14n#" />
                </ds:Transforms>
                <ds:DigestMethod Algorithm="http://www.w3.org/2000/09/xmlds#sha1" />
                <ds:DigestValue>0Y9QM5c5qCShz5UWmbFzBmbuTus=</ds:DigestValue>
            </ds:Reference>
        </ds:SignedInfo>
        <ds:SignatureValue>
            se/flQ2htUQ0IUYieVkXNn9cfjnfgv6H99nFarsTNTpRI9xuSlw5OTai/2PYdZI2Va9+QzzBf99m
            VFyigfFdfrqug6aKFhF0lsujzlFfPfmXBbDRiTFX+4SkBeV71uuy7rOUI/jRiitEA0QrKqs0e/pV
            \+C8PoaariisK96Mtt7A=
        </ds:SignatureValue>
        <ds:KeyInfo>
            <ds:KeyValue>
                <ds:RSAKeyValue>
                    <ds:Modulus>
                        suGIyhVTbFvDwZdx8Av62zmP+aGOlsBN8WUE3eEEcDtOIZgO78SImMQGwB2C0eIVMhiLRzVPqoW1
                        dCPAveTm653zHOmubaps1fY0lLJDSZbTbhjeYhoQmmaBro/tDpVw5lKJwspqVnMuRK19ju2dxpKw
                        lYGGtrP5VQv00dfNPbs=
                    </ds:Modulus>
                    <ds:Exponent>AQAB</ds:Exponent>
                </ds:RSAKeyValue>
            </ds:KeyValue>
        </ds:KeyInfo>
    </ds:Signature>
</saml2:Assertion>
During the signature validation for this SAML assertion, the authenticator (in this case a Service Provider Authenticator) will try to find a ValidationAlias element with the value idp.example.com for its Key attribute. This alias references a certificate in your Java KeyStore that will be used to check the signature validity.
Usually, Java KeyStores would contain a key pair (public and private keys) to be used for signing and validating messages for an specific server and the trusted public keys to be used to validate messages received from others servers.
When using PicketLink SAML Support, both IDP and SP need to be configured with Handlers . This handlers help the IDP and SP Authenticators to process SAML requests and responses.
The handlers are basically an implementation of the Chain of Responsibility pattern (Gof). Each handler provides a specific logic about how to process SAML requests and responses.
The handlers are configures inside the picketlink.xml file. Here is how it looks like:
<Handlers xmlns="urn:picketlink:identity-federation:handler:config:2.1">
    <Handler class="org.picketlink.identity.federation.web.handlers.saml2.SAML2IssuerTrustHandler" />
    <Handler class="org.picketlink.identity.federation.web.handlers.saml2.SAML2LogOutHandler" />
    <Handler class="org.picketlink.identity.federation.web.handlers.saml2.SAML2AuthenticationHandler" />
    <Handler class="org.picketlink.identity.federation.web.handlers.saml2.RolesGenerationHandler" />
</Handlers>
This element defines a list of Handler elements.
|
Name |
Description |
Value |
|---|---|---|
|
ChainClass |
Defines the name of a class that implements the org.picketlink. identity.federation. core.saml. v2.interfaces. SAML2HandlerChain interface. |
Defaults to org.picketlink. identity.federation. core.saml. v2.impl. DefaultSAML2HandlerChain. |
PicketLink provide ways to you create your own handlers. Just create a class that implements the org.picketlink.identity.federation.core.saml.v2.interfaces.SAML2Handler interface.
Before create your own implementations, please take a look at the built-in handlers. They can help you a lot.
PicketLink as part of the SAMLv2 support has a number of handlers that need to be configured.
The Handlers are:
org.picketlink.identity.federation.web.handlers.saml2.RolesGenerationHandler
Should be configured in WEB-INF/picketlink-handlers.xml
Example 4.6. WEB-INF/picketlink-handlers.xml
<Handlers xmlns="urn:picketlink:identity-federation:handler:config:1.0">
  <Handler class="org.picketlink.identity.federation.web.handlers.saml2.SAML2IssuerTrustHandler"/>
  <Handler class="org.picketlink.identity.federation.web.handlers.saml2.SAML2LogOutHandler"/>
  <Handler class="org.picketlink.identity.federation.web.handlers.saml2.SAML2AuthenticationHandler"/>
  <Handler class="org.picketlink.identity.federation.web.handlers.saml2.RolesGenerationHandler"/>
</Handlers>
|
# |
Name |
Type |
Objective |
Default Value |
SP/IDP |
Since Version |
|---|---|---|---|---|---|---|
|
1 |
ATTRIBUTE_ MANAGER |
string |
fqn of attribute manager class |
org.picketlink. identity.federation. core.impl. EmptyAttributeManager |
IDP |
2.0 |
Handler dealing with attributes for SAML2. On the SP side, it converts IDP-returned Attributes and stores them under the user's HttpSession. On the IDP side, converts the given HttpSession attributes into SAML Response Attributes. SP-side code can retrieve the Attributes from a Map stored under the session key GeneralConstants.SESSION_ATTRIBUTE_MAP.
org.picketlink.identity.federation.web.handlers.saml2.SAML2AttributeHandler
Should be configured in WEB-INF/picketlink-handlers.xml
Example 4.8. WEB-INF/picketlink-handlers.xml
<Handlers xmlns="urn:picketlink:identity-federation:handler:config:1.0">
  <Handler class="org.picketlink.identity.federation.web.handlers.saml2.SAML2IssuerTrustHandler"/>
  <Handler class="org.picketlink.identity.federation.web.handlers.saml2.SAML2LogOutHandler"/>
  <Handler class="org.picketlink.identity.federation.web.handlers.saml2.SAML2AuthenticationHandler"/>
  <Handler class="org.picketlink.identity.federation.web.handlers.saml2.RolesGenerationHandler"/>
</Handlers>
|
# |
Name |
Type |
Objective |
Default Value |
SP/IDP |
Since Version |
|---|---|---|---|---|---|---|
|
1 |
ATTRIBUTE_ MANAGER |
string |
fqn of attribute manager class |
org.picketlink. identity.federation. core.impl. EmptyAttributeManager |
IDP |
2.0 |
|
2 |
ATTRIBUTE_ KEYS |
String |
a comma separated list of string values representing attributes to be sent |
|
IDP |
2.0 |
|
3 |
ATTRIBUTE_ CHOOSE_ FRIENDLY_ NAME |
boolean |
set to true if you require attributes to be keyed by friendly name rather than default name. |
|
SP |
2.0 |
Example 4.9. WEB-INF/picketlink-handlers.xml
<Handler class="org.picketlink.
                    identity.federation.
                    web.handlers.
                    saml2.SAML2AttributeHandler">
<Option Key="ATTRIBUTE_CHOOSE_FRIENDLY_NAME" Value="true"/>
</Handler>
Map<String, List<Object>> sessionMap = (Map<String, List<Object>>) session .getAttribute(GeneralConstants.SESSION_ATTRIBUTE_MAP); assertNotNull(sessionMap);
List<Object> values = sessionMap.get("testKey"); assertEquals("hello", values.get(0));
org.picketlink.identity.federation.web.handlers.saml2.SAML2AuthenticationHandler
Should be configured in WEB-INF/picketlink-handlers.xml
Example 4.10. WEB-INF/picketlink-handlers.xml
<Handlers xmlns="urn:picketlink:identity-federation:handler:config:1.0">
  <Handler class="org.picketlink.identity.federation.web.handlers.saml2.SAML2IssuerTrustHandler"/>
  <Handler class="org.picketlink.identity.federation.web.handlers.saml2.SAML2LogOutHandler"/>
  <Handler class="org.picketlink.identity.federation.web.handlers.saml2.SAML2AuthenticationHandler"/>
  <Handler class="org.picketlink.identity.federation.web.handlers.saml2.RolesGenerationHandler"/>
</Handlers>
|
# |
Name |
Type |
Objective |
SP/IDP |
Since Version |
|---|---|---|---|---|---|
|
1 |
CLOCK_ SKEW_ MILIS |
string |
a long value in miliseconds to add a clock skew to assertion expiration validation at the Service provider |
SP |
2.0 |
|
2 |
DISABLE_ AUTHN_ STATEMENT |
boolean |
Setting a value will disable the generation of an AuthnStatement |
IDP |
2.0 |
|
3 |
DISABLE_ SENDING_ ROLES |
boolean |
Setting any value will disable the generation and return of roles to SP |
IDP |
2.0 |
|
4 |
DISABLE_ ROLE_ PICKING |
boolean |
Setting to true will disable picking IDP attribute statements |
SP |
2.0 |
|
5 |
ROLE_ KEY |
String |
a csv list of strings that represent the roles coming from IDP |
SP |
2.0 |
|
6 |
ASSERTION_ CONSUMER_ URL |
String |
the url to be used for assertionConsumerURL |
SP |
2.0 |
|
7 |
NAMEID_ FORMAT |
String |
Setting to a value will provide the nameid format to be sent to IDP |
SP |
2.0 |
|
8 |
ASSERTION_ SESSION_ ATTRIBUTE_ NAME |
String |
Specifies the name of the session attribute where the assertion will be stored. The assertion is stored as a DOM Document. This option is useful when you need to obtain the user's assertion to propagate or validate it against the STS. |
SP |
2.1.7 |
Example 4.11. WEB-INF/picketlink-handlers.xml
<Handler class="org.picketlink.identity.
                    federation.web.
                    handlers.saml2.SAML2AuthenticationHandler">
<Option Key="DISABLE_ROLE_PICKING" Value="true"/>
</Handler>
The transient and persistent nameid-formats are used to obfuscate the actual identity in order to make linking activities extremely difficult between different SPs being served by the same IDP. A transient policy only lasts for the duration of the login session, where a persistent policy will reuse the obfuscated identity across multiple login sessions.
The Value can either be one of the following "official" values or a vendor-specific value supported by the IDP. Any string value is passed through to the NameIDPolicy's Format attribute as-is in an AuthnRequest.
urn:oasis:names:tc:SAML:2.0:nameid-format: transient urn:oasis:names:tc:SAML:2.0:nameid-format: persistent urn:oasis:names:tc:SAML:1.1:nameid-format: unspecified urn:oasis:names:tc:SAML:1.1:nameid-format: emailAddress urn:oasis:names:tc:SAML:1.1:nameid-format: X509SubjectName urn:oasis:names:tc:SAML:1.1:nameid-format: WindowsDomainQualifiedName urn:oasis:names:tc:SAML:2.0:nameid-format: kerberos urn:oasis:names:tc:SAML:2.0:nameid-format: entity
Handles SAML Assertions Encryption and Signature Generation. This handler uses the configuration provided in the KeyProvider to encrypt and sign SAML Assertions.
org.picketlink.identity.federation.web.handlers.saml2.SAML2EncryptionHandler
-
This handler should be used only when configuring Identity Providers.
-
For Service Providers, the decryption of SAML Assertion is already done by the authenticators.
-
When using this handler, make sure that your service providers are also configured with the Section 4.5.7.11, “SAML2SignatureGenerationHandler” and the Section 4.5.7.12, “SAML2SignatureValidationHandler” handlers.
-
Do not use this handler with the __ Section 4.5.7.11, “SAML2SignatureGenerationHandler” _ configured in the same chain. Otherwise SAML messages will be signed several times._
Should be configured in WEB-INF/picketlink.xml:
<Handlers xmlns="urn:picketlink:identity-federation:handler:config:2.1">
    <Handler class="org.picketlink.identity.federation.web.handlers.saml2.SAML2IssuerTrustHandler" />
    <Handler class="org.picketlink.identity.federation.web.handlers.saml2.SAML2LogOutHandler" />
    <Handler class="org.picketlink.identity.federation.web.handlers.saml2.SAML2AuthenticationHandler" />
    <Handler class="org.picketlink.identity.federation.web.handlers.saml2.RolesGenerationHandler" />
    <Handler class="org.picketlink.identity.federation.web.handlers.saml2.SAML2EncryptionHandler" />
    <Handler class="org.picketlink.identity.federation.web.handlers.saml2.SAML2SignatureValidationHandler"/>
</Handlers>
Handles Issuer trust.Trust decisions are based on the url of the issuer of the saml request/response sent to the handler chain.
org.picketlink.identity.federation.web.handlers.saml2.SAML2IssuerTrustHandler
Should be configured in WEB-INF/picketlink-handlers.xml
Example 4.12. WEB-INF/picketlink-handlers.xml
<Handlers xmlns="urn:picketlink:identity-federation:handler:config:1.0">
  <Handler class="org.picketlink.identity.federation.web.handlers.saml2.SAML2IssuerTrustHandler"/>
  <Handler class="org.picketlink.identity.federation.web.handlers.saml2.SAML2LogOutHandler"/>
  <Handler class="org.picketlink.identity.federation.web.handlers.saml2.SAML2AuthenticationHandler"/>
  <Handler class="org.picketlink.identity.federation.web.handlers.saml2.RolesGenerationHandler"/>
</Handlers>
org.picketlink.identity.federation.web.handlers.saml2.SAML2LogOutHandler.java
Should be configured in WEB-INF/picketlink-handlers.xml
Example 4.13. WEB-INF/picketlink-handlers.xml
<Handlers xmlns="urn:picketlink:identity-federation:handler:config:1.0">
  <Handler class="org.picketlink.identity.federation.web.handlers.saml2.SAML2IssuerTrustHandler"/>
  <Handler class="org.picketlink.identity.federation.web.handlers.saml2.SAML2LogOutHandler"/>
  <Handler class="org.picketlink.identity.federation.web.handlers.saml2.SAML2AuthenticationHandler"/>
  <Handler class="org.picketlink.identity.federation.web.handlers.saml2.RolesGenerationHandler"/>
</Handlers>
Handles SAML Signature Generation. This handler uses the configuration provided in the KeyProvider to sign SAML messages.
org.picketlink.identity.federation.web.handlers.saml2.SAML2SignatureGenerationHandler
Should be configured in WEB-INF/picketlink.xml.
<Handlers xmlns="urn:picketlink:identity-federation:handler:config:2.1">
    <Handler class="org.picketlink.identity.federation.web.handlers.saml2.SAML2IssuerTrustHandler" />
    <Handler class="org.picketlink.identity.federation.web.handlers.saml2.SAML2LogOutHandler" />
    <Handler class="org.picketlink.identity.federation.web.handlers.saml2.SAML2AuthenticationHandler" />
    <Handler class="org.picketlink.identity.federation.web.handlers.saml2.RolesGenerationHandler" />
    <Handler class="org.picketlink.identity.federation.web.handlers.saml2.SAML2SignatureGenerationHandler" />
    <Handler class="org.picketlink.identity.federation.web.handlers.saml2.SAML2SignatureValidationHandler"/>
</Handlers>
Handles SAML Signature Validation. This handler uses the configuration provided in the KeyProvider to process signature validation.
org.picketlink.identity.federation.web.handlers.saml2.SAML2SignatureValidationHandler
Should be configured in WEB-INF/picketlink.xml.
<Handlers xmlns="urn:picketlink:identity-federation:handler:config:2.1">
    <Handler class="org.picketlink.identity.federation.web.handlers.saml2.SAML2IssuerTrustHandler" />
    <Handler class="org.picketlink.identity.federation.web.handlers.saml2.SAML2LogOutHandler" />
    <Handler class="org.picketlink.identity.federation.web.handlers.saml2.SAML2AuthenticationHandler" />
    <Handler class="org.picketlink.identity.federation.web.handlers.saml2.RolesGenerationHandler" />
    <Handler class="org.picketlink.identity.federation.web.handlers.saml2.SAML2SignatureGenerationHandler" />
    <Handler class="org.picketlink.identity.federation.web.handlers.saml2.SAML2SignatureValidationHandler"/>
</Handlers>
Table of Contents
Even though the SAML v2.0 specification has support for Global Logout, you have to use it very very wisely. Just remember that you need to keep the participants to a low number (say upto 5 participants with one IDP).
Global Logout : The user initiates GLO at one service provider which will log out the user at the IDP and all the service providers.
Local Logout : The user logs out of one service provider only. The session at the IDP and other service providers is intact.
The service provider url should be appended with "?GLO=true"
Basically, in the service provider page, have a url that has the query parameter.
Assume, your service provider is http://localhost:8080/sales/, then the url for the global log out would be http://localhost:8080/sales/?GLO=true
The service provider url should be appended with "?LLO=true"
Basically, in the service provider page, have a url that has the query parameter.
Assume, your service provider is http://localhost:8080/sales/, then the url for the local log out would be http://localhost:8080/sales/?LLO=true
When using LLO, you must be aware of some security implications. The user is only disconnect from the service provider from which he logged out, which means that the user's session in the identity provider and others service providers are still active. In other words, the user's SSO session is still active and he is still able to log in in any other service provider. We strongly recommend to always use the Single Logout Profile (GLO).
Important
In the case of LLO, the service provider invalidates the session and forwards to a default logout page (logout.jsp) .Custom logout page can be configured in picketlink.xml page. Please refer to Service Provider Configuration.
Table of Contents
It is possible to use different Configuration Providers at the IDP and SP.
The configuration providers will then be the sole configuration leaders (instead of picketlink.xml)
Fully Qualified Name: org.picketlink.identity.federation.web.config.IDPMetadataConfigurationProvider
How does it work?
You will need to provide the metadata file inside idp-metadata.xml and put it in the IDP web application classpath. Put it in WEB-INF/classes directory.
Fully Qualified Name: org.picketlink.identity.federation.web.config.SPPostMetadataConfigurationProvider
Binding Supported: SAML2/HTTP-POST
Fully Qualified Name: org.picketlink.identity.federation.web.config.SPRedirectMetadataConfigurationProvider
Binding Supported: SAML2/HTTP-Redirect
Both the IDP and SP applications when provided with the saml configuration provider will be given a parsed representation of the WEB-INF/picketlink-idfed.xml, which implies that the IDPType and SPType coming out finally will be a merger of the configuration provider and the settings from picketlink-idfed.xml
Table of Contents
It is possible to use different Configuration Providers at the IDP and SP. The configuration providers will then be the sole configuration leaders (instead of picketlink.xml) or provide additional configuration.
PicketLink SAML Metadata Support is provided and configured by the following configuration providers implementations:
|
Name |
Description |
Provider Type |
|---|---|---|
|
org.picketlink. identity.federation. web.config. IDPMetadataConfigurationProvider |
For Identity Providers |
IDP |
|
org.picketlink. identity.federation. web.config. SPPostMetadataConfigurationProvider |
For Service Providers using HTTP-POST Binding |
SP |
|
org.picketlink.identity. federation.web. config.SPRedirectMetadataConfigurationProvider |
For Service Providers using HTTP-REDIRECT Binding |
SP |
These providers allows you to define some additional configuration to your IDP or SP using a SAML Metadata XML Schema instance, merging them with the ones provided in your WEB-INF/picketlink.xml .
To configure the SAML Metadata Configuration Providers you need to follow these steps:
-
Define the PicketLink Authenticator (SP or IDP valves) and provide the configuration provider class name as an attribute
-
Depending if you're configuring an IDP or SP, provide a metadata file and put it on the classpath:
-
For Identity Providers : WEB-INF/classes/idp-metadata.xml
-
For Service Providers : WEB-INF/classes/sp-metadata.xml
To configure one of the provided SAML Metadata configuration providers you just need to configure the PicketLink Authenticator with the configProvider parameter/attribute.
For Identity Providers you should have a configuration as follow:
<jboss-web>
  <security-domain>idp</security-domain>
  <context-root>idp-metadata</context-root>
  <valve>
     <class-name>org.picketlink.identity.federation.bindings.tomcat.idp.IDPWebBrowserSSOValve</class-name>
     <param>
     	<param-name>configProvider</param-name>
     	<param-value>org.picketlink.identity.federation.web.config.IDPMetadataConfigurationProvider</param-value>
     </param>
   </valve>
</jboss-web>
For Service Providers you should have a configuration as follow:
<?xml version="1.0" encoding="UTF-8"?>
<jboss-web>
  <security-domain>sp</security-domain>
  <context-root>sales-metadata</context-root>
    <valve>
      <class-name>org.picketlink.identity.federation.bindings.tomcat.sp.ServiceProviderAuthenticator</class-name>
      <param>
	<param-name>configProvider</param-name>
	<param-value>org.picketlink.identity.federation.web.config.SPPostMetadataConfigurationProvider</param-value>
      </param>
    </valve>
</jboss-web>
Both the IDP and SP applications when provided with the saml configuration provider will be given a parsed representation of the WEB-INF/picketlink.xml, which implies that the IDPType and SPType coming out finally will be a merger of the configuration provider and the settings from picketlink.xml
The PicketLink Quickstarts provide some examples for the SAML Metadata Support. Please check the following provided quickstarts:
PicketLink supports the concept of Token Registry to store tokens using any store such databases, filesystem or memory.
They are useful for auditing and to track the tokens that were issued or revocated by the Identity Provider or the Security Token Service.
Tip
When running PicketLink in a clustered environment, consider using Token Registries with databases. That way changes to the token table are visible to all nodes.
The table bellow shows all implementations provided by PicketLink:
|
Name |
Description |
Version |
|---|---|---|
|
org.picketlink. identity.federation. core.sts. registry.DefaultTokenRegistry |
In-memory based registry. Used by default if no configuration is provided |
2.x.x |
|
org.picketlink. identity.federation. core.sts. registry.FileBasedTokenRegistry |
Filesystem based registry |
2.x.x |
|
org.picketlink. identity.federation. core.sts. registry.JPABasedTokenRegistry |
Database/JPA based registry |
2.1.3 |
Token Registries are configured through the PicketLinkSTS (Security Token Service configuration) element in the WEB-INF/picketlink.xml file:
Tip
Read the documentation for more information about the PicketLinkSTS element and the Section 4.5.3.6, “Security Token Service Configuration” .
<PicketLinkSTS xmlns="urn:picketlink:identity-federation:config:1.0" TokenTimeout="5000" ClockSkew="0">
        <TokenProviders>
		<TokenProvider
			ProviderClass="org.picketlink.identity.federation.core.saml.v2.providers.SAML20AssertionTokenProvider"
			TokenType="urn:oasis:names:tc:SAML:2.0:assertion"
			TokenElement="Assertion" TokenElementNS="urn:oasis:names:tc:SAML:2.0:assertion">
			<Property Key="TokenRegistry" Value="org.picketlink.identity.federation.core.sts.registry.JPABasedTokenRegistry" />
		</TokenProvider>
	</TokenProviders>
</PicketLinkSTS>
The example above uses a SAML v2 Token Provider configured with the org.picketlink.identity.federation.core.sts.registry.JPABasedTokenRegistry implementation. This is done by the TokenRegistry property.
<TokenProvider
	ProviderClass="org.picketlink.identity.federation.core.saml.v2.providers.SAML20AssertionTokenProvider"
	TokenType="urn:oasis:names:tc:SAML:2.0:assertion"
	TokenElement="Assertion" TokenElementNS="urn:oasis:names:tc:SAML:2.0:assertion">
    <Property Key="TokenRegistry" Value="FILE" />
    <Property Key="TokenRegistryFile" Value="/some/dir/token.registry" />
</TokenProvider>
Use the TokenRegistryFile to specify a file where the tokens should be persisted.
<TokenProvider
	ProviderClass="org.picketlink.identity.federation.core.saml.v2.providers.SAML20AssertionTokenProvider"
	TokenType="urn:oasis:names:tc:SAML:2.0:assertion"
	TokenElement="Assertion" TokenElementNS="urn:oasis:names:tc:SAML:2.0:assertion">
     <Property Key="TokenRegistry" Value="org.picketlink.identity.federation.core.sts.registry.JPABasedTokenRegistry" />
</TokenProvider>
This implementation requires that you have a valid JPA Persistence Unit named picketlink-sts.
If none of the built-in implementations are useful for you, PicketLink allows you to create your own implementation. To do that, just create a class that implements the org.picketlink.identity.federation.core.sts.registry.SecurityTokenRegistry interface.
Tip
We recommend that you take a look first at one of the provided implementation before building your own.
Bellow is an skeleton for a custom Token Registry implementation:
public class CustomSecurityTokenRegistry implements SecurityTokenRegistry {

    @Override
    public void addToken(String tokenID, Object token) throws IOException {
        // TODO: logic to add a token to the registry

    }

    @Override
    public void removeToken(String tokenID) throws IOException {
        // TODO: logic to remove a token to the registry
    }

    @Override
    public Object getToken(String tokenID) {
        // TODO: logic to get a token from the registry
        return null;
    }

}
PicketLink has SAMLv2 support for both JBossAS and a regular servlet container. The JBoss AS version contains deeper integration with the web container security such that you can make use of api such as request.getUserPrincipal() etc. Plus you can configure your favorite JAAS login module for authentication at the IDP side.
So, choose the JBossAS version of PicketLink . If you do not run on JBoss AS or Apache Tomcat, then choose the standalone version .
If your IDP or SP applications are not running on JBoss Application Server or Apache Tomcat, then you can use the standalone mode of PicketLink.
In your web.xml, configure a Section 4.5.13.6, “SPFilter” as shown below as an example:
Example 4.14. web.xml
<?xml version="1.0" encoding="UTF-8"?>
<web-app xmlns="http://java.sun.com/xml/ns/javaee"
   xmlns:xsi="http://www.w3.org/2001/XMLSchema-instance"
   xsi:schemaLocation="http://java.sun.com/xml/ns/javaee http://java.sun.com/xml/ns/javaee/web-app_2_5.xsd"
   version="2.5">

   <description>Sales Standalone Application</description>

   <filter>
     <description>
        The SP Filter intersects all requests at the SP and sees if there is a need to contact the IDP.
     </description>
     <filter-name>SPFilter</filter-name>
     <filter-class>org.picketlink.identity.federation.web.filters.SPFilter</filter-class>
     <init-param>
       <param-name>ROLES</param-name>
       <param-value>sales,manager</param-value>
     </init-param>
   </filter>

   <filter-mapping>
     <filter-name>SPFilter</filter-name>
     <url-pattern>/*</url-pattern>
     <dispatcher>REQUEST</dispatcher>
   </filter-mapping>
</web-app>
After the SAML workflow is completed, the user principal is available in the http session at "picketlink.principal".
Something like,
import org.picketlink.identity.federation.web.constants.GeneralConstants;
Principal userPrincipal = (Principal) session.getAttribute(GeneralConstants.PRINCIPAL_ID);
For an IDP web application to be SAML enabled on any Servlet Container, you will have to add listeners and servlets as shown in the web.xml below:
Part of the idp-standalone.war
Example 4.15. web.xml
<?xml version="1.0" encoding="ISO-8859-1"?>
<web-app xmlns="http://java.sun.com/xml/ns/javaee"
   xmlns:xsi="http://www.w3.org/2001/XMLSchema-instance"
   xsi:schemaLocation="http://java.sun.com/xml/ns/javaee http://java.sun.com/xml/ns/javaee/web-app_2_5.xsd"
   version="2.5">

  <display-name>Standalone IDP</display-name>
  <description>
    IDP Standalone Application
  </description>

  <!-- Listeners -->
  <listener>
    <listener-class>org.picketlink.identity.federation.web.core.IdentityServer</listener-class>
  </listener>


  <!-- Create the servlet -->
  <servlet>
    <servlet-name>IDPLoginServlet</servlet-name>
    <servlet-class>org.picketlink.identity.federation.web.servlets.IDPLoginServlet</servlet-class>
  </servlet>
  <servlet>
    <servlet-name>IDPServlet</servlet-name>
    <servlet-class>org.picketlink.identity.federation.web.servlets.IDPServlet</servlet-class>
  </servlet>

  <servlet-mapping>
    <servlet-name>IDPLoginServlet</servlet-name>
    <url-pattern>/</url-pattern>
  </servlet-mapping>

  <servlet-mapping>
    <servlet-name>IDPServlet</servlet-name>
    <url-pattern>/IDPServlet</url-pattern>
  </servlet-mapping>

</web-app>
A jsp for login would be:
Example 4.16. jsp/login.jsp
<html><head><title>Login Page</title></head>
<body>
<font size='5' color='blue'>Please Login</font><hr>

<form action='<%=application.getContextPath()%>/' method='post'>
<table>
 <tr><td>Name:</td>
   <td><input type='text' name='JBID_USERNAME'></td></tr>
 <tr><td>Password:</td>
   <td><input type='password' name='JBID_PASSWORD' size='8'></td>
 </tr>
</table>
<br>
  <input type='submit' value='login'>
</form></body>
 </html>
The jsp for error would be:
Example 4.17. jsp/error.jsp
<html> <head> <title>Error!</title></head>
<body>

<font size='4' color='red'>
  The username and password you supplied are not valid.
</p>
Click <a href='<%= response.encodeURL("login.jsp") %>'>here</a>
to retry login

</body>
</form>
</html>
IDPLoginServlet provides the login capabilities for IDP applications running on any servlet container.
|
# |
Name |
Type |
Objective |
Default |
Since |
|---|---|---|---|---|---|
|
1 |
loginClass |
String |
fqn of an implementation of the ILoginHandler interface. Provides the authentication/authorization. |
org.picketlink. identity.federation. web.handlers. DefaultLoginHandler |
2.0 |
|
|
|
|
|
|
|
|
|
|
|
|
|
|
IDPServlet supports the SAMLv2 HTTP/POST binding for an IDP running on any servlet container.
|
# |
Name |
Type |
Objective |
Default |
Since |
|---|---|---|---|---|---|
|
1 |
CONFIG_ PROVIDER |
String |
optional - fqn of an implementation of the SAMLConfigurationProvider interface. |
|
2.0 |
|
2 |
SIGN_ OUTGOING_ MESSAGES |
boolean |
optional - whether the IDP should sign outgoing messages |
true |
2.0 |
|
3 |
ROLE_ GENERATOR |
String |
optional - fqn of a RoleGenerator |
org.picketlink. identity.federation. web.roles. DefaultRoleGenerator |
2.0 |
|
4 |
ATTRIBUTE_ KEYS |
String |
optional - comma separated list of keys for attributes that need to be sent |
|
2.0 |
|
5 |
IDENTITY_ PARTICIPANT_ STACK |
String |
optional - fqn of a custom IdentityParticipantStack implementation |
|
2.0 |
|
|
|
|
|
|
|
The Section 4.5.13.4, “IDPLoginServlet” that is configured in the web application authenticates the user. The IDPServlet then sends back the SAML response message with the SAML assertion back to the Service Provider(SP).
SPFilter is the filter that service provider applications need to have to provide HTTP/POST binding of the SAMLv2 specification for web applications running on any servlet container.
|
# |
Name |
Type |
Objective |
Default |
Since |
|---|---|---|---|---|---|
|
1 |
IGNORE_ SIGNATURES |
boolean |
optional - should the SP ignore signatures |
false |
2.0 |
|
2 |
SAML_ HANDLER_ CHAIN_ CLASS |
String |
optional - fqn of custom SAMLHandlerChain interface |
|
2.0 |
|
3 |
ROLE_ VALIDATOR |
String |
optional - fqn of a IRoleValidator interface |
org.picketlink. identity.federation. web.roles. DefaultRoleValidator |
2.0 |
|
4 |
ROLES |
String |
optional - comma separated list of roles that the sp will take |
|
2.0 |
|
5 |
LOGOUT_ PAGE |
String |
optional - a logout page |
/logout.jsp |
2.0 |
|
|
|
|
|
|
|
Please refer to the wikipedia page for more information.
Please read it at http://community.jboss.org/wiki/PicketLinkSAMLV11Support
The WS-Trust specification defines extensions that build on WS-Security to provide a framework for requesting and issuing security tokens. Particularly, WS-Trust defines the concept of a security token service (STS), a service that can issue, cancel, renew and validate security tokens, and specifies the format of security token request and response messages.
Tip
Please look at the PicketLink Quickstarts for the PicketLink Identity Provider web application. The quickstarts are useful resources where you can get configuration files.
Page to list all the JBoss Web Services handlers that are part of the PicketLink project.
-
SAML2Handler
-
BinaryTokenHandler
-
WSAuthenticationHandler
-
WSAuthorizationHandler
A JBoss Web Services Handler that is stack agnostic that can be added on the client side to either pick a http header or cookie, that contains a binary token.
Configuration:
System Properties:
-
binary.http.header: http header name
-
binary.http.cookie: http cookie name
-
binary.http.encodingType: attribute value of the EncodingType attribute
-
binary.http.valueType: attribute value of the ValueType attribute
-
binary.http.valueType.namespace: namespace for the ValueType attribute
-
binary.http.valueType.prefix: namespace for the ValueType attribute
-
binary.http.cleanToken: true or false dependending on whether the binary token has to be cleaned
Setters:
Please see the see also section.See Also:setHttpHeaderName(String)setHttpCookieName(String)setEncodingType(String)setValueType(String)setValueTypeNamespace(String)setValueTypePrefix(String)
This is a JBossWS handler (stack agnostic) that supports the SAML token profile of the Oasis Web Services Security (WSS) standard.
It can be configured both on the client side and the server side. The configuration is shown below both the client(outbound) as well as server(inbound).
This is the behavior when the handler is configured on the client side.
The client side usage is shown in the following client class. If you need to use an XML file to specify the handler on the client side, then please look in the references section below.
Example 4.18. STSWSClientTestCase.java
package org.picketlink.test.trust.tests;

import java.net.URL;
import java.util.List;

import javax.xml.namespace.QName;
import javax.xml.ws.BindingProvider;
import javax.xml.ws.Service;
import javax.xml.ws.handler.Handler;

import org.junit.Test;
import org.picketlink.identity.federation.api.wstrust.WSTrustClient;
import org.picketlink.identity.federation.api.wstrust.WSTrustClient.SecurityInfo;
import org.picketlink.identity.federation.core.wstrust.WSTrustException;
import org.picketlink.identity.federation.core.wstrust.plugins.saml.SAMLUtil;
import org.picketlink.test.trust.ws.WSTest;
import org.picketlink.trust.jbossws.SAML2Constants;
import org.picketlink.trust.jbossws.handler.SAML2Handler;
import org.w3c.dom.Element;

/**
 * A Simple WS Test for the SAML Profile of WSS
 * @author Marcus Moyses
 * @author Anil Saldhana
 */
public class STSWSClientTestCase
{
   private static String username = "UserA";
   private static String password = "PassA";

   @SuppressWarnings("rawtypes")
   @Test
   public void testWSInteraction() throws Exception {
      WSTrustClient client = new WSTrustClient("PicketLinkSTS", "PicketLinkSTSPort",
            "http://localhost:8080/picketlink-sts/PicketLinkSTS",
            new SecurityInfo(username, password));
    Element assertion = null;
    try {
        System.out.println("Invoking token service to get SAML assertion for " + username);
        assertion = client.issueToken(SAMLUtil.SAML2_TOKEN_TYPE);
        System.out.println("SAML assertion for " + username + " successfully obtained!");
    } catch (WSTrustException wse) {
        System.out.println("Unable to issue assertion: " + wse.getMessage());
        wse.printStackTrace();
        System.exit(1);
    }

    URL wsdl = new URL("http://localhost:8080/picketlink-wstest-tests/WSTestBean?wsdl");
    QName serviceName = new QName("http://ws.trust.test.picketlink.org/", "WSTestBeanService");
    Service service = Service.create(wsdl, serviceName);
    WSTest port = service.getPort(new QName("http://ws.trust.test.picketlink.org/", "WSTestBeanPort"), WSTest.class);
    BindingProvider bp = (BindingProvider)port;
    bp.getRequestContext().put(SAML2Constants.SAML2_ASSERTION_PROPERTY, assertion);
    List<Handler> handlers = bp.getBinding().getHandlerChain();
    handlers.add(new SAML2Handler());
    bp.getBinding().setHandlerChain(handlers);

    port.echo("Test");
   }
}
Note: the SAML2Handler is instantiated and added to the handler list that is obtained from the BindingProvider binding.
There are two ways by which the SAML2Handler picks the SAML2 Assertion to send via the SOAP message.
-
The Client can push the SAML2 Assertion into the SOAP MessageContext under the key " org.picketlink.trust.saml.assertion ". In the example code above, look in the call bindingProvider.getRequestContext().put(xxxxx)
-
The SAML2 Assertion is available as part of the JAAS subject on the security context. This can happen if there has been a JAAS interaction with the usage of PicketLink STS login modules.
This is the behavior when the handler is configured on the server side.
The server side setting is as follows:
Example 4.19. handlers.xml
<?xml version="1.0" encoding="UTF-8"?>


<handler-chains xmlns="http://java.sun.com/xml/ns/javaee"
  xmlns:xsi="http://www.w3.org/2001/XMLSchema-instance"
  xmlns:ns1="http://org.jboss.ws/jaxws/samples/logicalhandler"
  xsi:schemaLocation="http://java.sun.com/xml/ns/javaee javaee_web_services_1_2.xsd">


  <handler-chain>
    <handler>
      <handler-name>SAML2Handler</handler-name>
      <handler-class>org.picketlink.trust.jbossws.handler.SAML2Handler</handler-class>
    </handler>
  </handler-chain>


</handler-chains>
The SAML2Handler looks for a SAML2 Assertion on the SOAP message. If it is available then it constructs a SamlCredential object with the assertion and then sets it on the SecurityContext for the JAAS layer to authenticate the call.
Assume that you have a POJO.
package org.picketlink.test.trust.ws;

import javax.jws.HandlerChain;
import javax.jws.WebMethod;
import javax.jws.WebService;
import javax.jws.soap.SOAPBinding;

/**
 * POJO that is exposed as WS
 * @author Anil Saldhana
 */
@WebService
@SOAPBinding(style = SOAPBinding.Style.RPC)
@HandlerChain(file="authorize-handlers.xml")
public class POJOBean
{
   @WebMethod
   public void echo(String echo)
   {
      System.out.println(echo);
   }

   @WebMethod
   public void echoUnchecked(String echo)
   {
      System.out.println(echo);
   }
}
Note the use of the @HandlerChain annotation that defines the handler xml.
The handler xml is authorize-handlers.xml.
<?xml version="1.0" encoding="UTF-8"?>


<handler-chains xmlns="http://java.sun.com/xml/ns/javaee"
  xmlns:xsi="http://www.w3.org/2001/XMLSchema-instance"
  xsi:schemaLocation="http://java.sun.com/xml/ns/javaee javaee_web_services_1_2.xsd">

  <handler-chain>


    <handler>
      <handler-name>WSAuthorizationHandler</handler-name>
      <handler-class>org.picketlink.trust.jbossws.handler.WSAuthorizationHandler</handler-class>
    </handler>

    <handler>
      <handler-name>WSAuthenticationHandler</handler-name>
      <handler-class>org.picketlink.trust.jbossws.handler.WSAuthenticationHandler</handler-class>
    </handler>

    <handler>
      <handler-name>SAML2Handler</handler-name>
      <handler-class>org.picketlink.trust.jbossws.handler.SAML2Handler</handler-class>
    </handler>


  </handler-chain>


</handler-chains>
Warning
Note : The order of execution of the handlers is SAML2Handler, WSAuthenticationHandler and WSAuthorizationHandler. These need to be defined in reverse order in the xml.
Since we intend to expose a POJO as a webservice, we need to package in a web archive (war).
The web.xml is:
<web-app xmlns="http://java.sun.com/xml/ns/javaee" xmlns:xsi="http://www.w3.org/2001/XMLSchema-instance"
	xsi:schemaLocation="http://java.sun.com/xml/ns/javaee http://java.sun.com/xml/ns/javaee/web-app_2_5.xsd"
	version="2.5">

	<servlet>
		<display-name>POJO Web Service</display-name>
		<servlet-name>POJOBeanService</servlet-name>
		<servlet-class>org.picketlink.test.trust.ws.POJOBean</servlet-class>
		<load-on-startup>1</load-on-startup>
	</servlet>
	<servlet-mapping>
		<servlet-name>POJOBeanService</servlet-name>
		<url-pattern>/POJOBeanService</url-pattern>
	</servlet-mapping>
</web-app>
Warning
Please do not define any <security-constraint> in the web.xml
The jboss-web.xml is:
<jboss-web>
  <security-domain>sts</security-domain>
</jboss-web>
The jboss-wsse.xml is
<jboss-ws-security xmlns="http://www.jboss.com/ws-security/config"
                   xmlns:xsi="http://www.w3.org/2001/XMLSchema-instance"
                   xsi:schemaLocation="http://www.jboss.com/ws-security/config
                   http://www.jboss.com/ws-security/schema/jboss-ws-security_1_0.xsd">

  <port name="POJOBeanPort">
    <operation name="{http://ws.trust.test.picketlink.org/}echoUnchecked">
      <config>
        <authorize>
          <unchecked/>
        </authorize>
      </config>
    </operation>

    <operation name="{http://ws.trust.test.picketlink.org/}echo">
      <config>
        <authorize>
          <role>JBossAdmin</role>
        </authorize>
      </config>
    </operation>
  </port>


</jboss-ws-security>
As you can see, there are two operations defined on the POJO web services and each of these operations require different access control. The echoUnchecked() method allows free access to any authenticated user whereas the echo() method requires the caller to have "JBossAdmin" role.
The war should look as:
anil@localhost:~/picketlink/picketlink/integration-tests/trunk/picketlink-trust-tests$ jar tvf target/pojo-test.war
     0 Mon Apr 11 19:48:32 CDT 2011 META-INF/
   123 Mon Apr 11 19:48:30 CDT 2011 META-INF/MANIFEST.MF
     0 Mon Apr 11 19:48:30 CDT 2011 WEB-INF/
     0 Mon Apr 11 19:48:30 CDT 2011 WEB-INF/classes/
     0 Mon Apr 11 19:48:30 CDT 2011 WEB-INF/classes/org/
     0 Mon Apr 11 19:48:30 CDT 2011 WEB-INF/classes/org/picketlink/
     0 Mon Apr 11 19:48:30 CDT 2011 WEB-INF/classes/org/picketlink/test/
     0 Mon Apr 11 19:48:30 CDT 2011 WEB-INF/classes/org/picketlink/test/trust/
     0 Mon Apr 11 19:48:30 CDT 2011 WEB-INF/classes/org/picketlink/test/trust/ws/
     0 Mon Apr 11 19:48:30 CDT 2011 WEB-INF/lib/
   858 Mon Apr 11 19:48:26 CDT 2011 WEB-INF/classes/authorize-handlers.xml
  1021 Mon Apr 11 19:48:28 CDT 2011 WEB-INF/classes/org/picketlink/test/trust/ws/POJOBean.class
    65 Mon Apr 11 12:00:32 CDT 2011 WEB-INF/jboss-web.xml
   770 Mon Apr 11 17:44:16 CDT 2011 WEB-INF/jboss-wsse.xml
   598 Mon Apr 11 16:25:46 CDT 2011 WEB-INF/web.xml
     0 Mon Apr 11 19:48:32 CDT 2011 META-INF/maven/
     0 Mon Apr 11 19:48:32 CDT 2011 META-INF/maven/org.picketlink/
     0 Mon Apr 11 19:48:32 CDT 2011 META-INF/maven/org.picketlink/picketlink-integration-trust-tests/
  7918 Mon Apr 11 18:56:16 CDT 2011 META-INF/maven/org.picketlink/picketlink-integration-trust-tests/pom.xml
   142 Mon Apr 11 19:48:30 CDT 2011 META-INF/maven/org.picketlink/picketlink-integration-trust-tests/pom.properties
anil@localhost:~/picketlink/picketlink/integration-tests/trunk/picketlink-trust-tests
The Test Case is something like:
 package org.picketlink.test.trust.tests;

import java.net.URL;
import java.util.List;

import javax.xml.namespace.QName;
import javax.xml.ws.BindingProvider;
import javax.xml.ws.Service;
import javax.xml.ws.handler.Handler;

import org.junit.Test;
import org.picketlink.identity.federation.api.wstrust.WSTrustClient;
import org.picketlink.identity.federation.api.wstrust.WSTrustClient.SecurityInfo;
import org.picketlink.identity.federation.core.wstrust.WSTrustException;
import org.picketlink.identity.federation.core.wstrust.plugins.saml.SAMLUtil;
import org.picketlink.test.trust.ws.WSTest;
import org.picketlink.trust.jbossws.SAML2Constants;
import org.picketlink.trust.jbossws.handler.SAML2Handler;
import org.w3c.dom.Element;

/**
 * A Simple WS Test for POJO WS Authorization using PicketLink
 * @author Anil Saldhana
 * @since Oct 3, 2010
 */
public class POJOWSAuthorizationTestCase
{
   private static String username = "UserA";
   private static String password = "PassA";

   @SuppressWarnings("rawtypes")
   @Test
   public void testWSInteraction() throws Exception
   {
      // Step 1:  Get a SAML2 Assertion Token from the STS
      WSTrustClient client = new WSTrustClient("PicketLinkSTS", "PicketLinkSTSPort",
            "http://localhost:8080/picketlink-sts/PicketLinkSTS",
            new SecurityInfo(username, password));
      Element assertion = null;
      try {
         System.out.println("Invoking token service to get SAML assertion for " + username);
         assertion = client.issueToken(SAMLUtil.SAML2_TOKEN_TYPE);
         System.out.println("SAML assertion for " + username + " successfully obtained!");
      } catch (WSTrustException wse) {
         System.out.println("Unable to issue assertion: " + wse.getMessage());
         wse.printStackTrace();
         System.exit(1);
      }

      // Step 2: Stuff the Assertion on the SOAP message context and add the SAML2Handler to client side handlers
      URL wsdl = new URL("http://localhost:8080/pojo-test/POJOBeanService?wsdl");
      QName serviceName = new QName("http://ws.trust.test.picketlink.org/", "POJOBeanService");
      Service service = Service.create(wsdl, serviceName);
      WSTest port = service.getPort(new QName("http://ws.trust.test.picketlink.org/", "POJOBeanPort"), WSTest.class);
      BindingProvider bp = (BindingProvider)port;
      bp.getRequestContext().put(SAML2Constants.SAML2_ASSERTION_PROPERTY, assertion);
      List<Handler> handlers = bp.getBinding().getHandlerChain();
      handlers.add(new SAML2Handler());
      bp.getBinding().setHandlerChain(handlers);

      //Step 3: Access the WS. Exceptions will be thrown anyway.
      port.echo("Test");
   }
}
Please refer to the documentation on WSAuthenticationHandler.
Important
The example is in WSAuthenticationHandler section.
PicketLink provides ways to protect your EJB endpoints using a SAML Security Token Service. This means that you can apply some security to your EJBs where only users with a valid SAML assertion can invoke to them.
This scenario is very common if you are looking for:
-
Leverage your Single Sign-On infrastructure to your service layer (EJBs, Web Services, etc)
-
Integrate your SAML Service Providers with your services by trusting the assertion previously issued by the Identity Provider
-
Any situation that requires the propagation of authorization/authentication information from one domain to another
The client must first obtain the SAML assertion from PicketLink STS by sending a WS-Trust request to the token service. This process usually involves authentication of the client. After obtaining the SAML assertion from the STS, the client includes the assertion in the security context of the EJB request before invoking an operation on the bean. Upon receiving the invocation, the EJB container extracts the assertion and validates it by sending a WS-Trust validate message to the STS. If the assertion is considered valid by the STS (and the proof of possession token has been verified if needed), the client is authenticated.

On JBoss, the SAML assertion validation process is handled by the SAML2STSLoginModule. It reads properties from a configurable file (specified by the configFile option) and establishes communication with the STS based on these properties. We will see how a configuration file looks like later on. If the assertion is valid, a Principal is created using the assertion subject name and if the assertion contains roles, these roles are also extracted and associated with the caller's Subject.
The client must first obtain the SAML assertion from the PicketLink STS or you Identity Provider. This process usually involves authentication of the client. After obtaining the SAML assertion, the client includes the assertion in the security context of the EJB request before invoking an operation on the bean. Upon receiving the invocation, the EJB container extracts the assertion and validates it by sending a WS-Trust validate message to the STS. If the assertion is considered valid by the STS (and the proof of possession token has been verified if needed), the client is authenticated.
On JBoss, the SAML assertion validation process is handled by the Section 4.7.1.5.3, “SAML2STSLoginModule” . It reads properties from a configurable file (specified by the configFile option) and establishes communication with the STS based on these properties. We will see how a configuration file looks like later on. If the assertion is valid, a Principal is created using the assertion subject name and if the assertion contains roles, these roles are also extracted and associated with the caller's Subject.
This section will cover two possible scenarios to protect and access your secured EJB endpoints. The main difference between these two scenarios is where the EJB client is deployed.
-
Remote EJB Client using JNDI
-
EJB Client is deployed at the same instance than your EJB endpoints
Important
Before starting, please take a look at the following documentation Remote EJB invocations via JNDI .
The configuration described in this section only works with versions 7.2.0+ and 7.1.3+ of JBoss Application Server.
If your endpoints are accessible from remote clients (in a different VM or server than your endpoints) you need to configure your JBoss Application Server 7 to allow use a SAML Assertion during the InitialContext creation.
Basically, the configuration envolves the following steps:
-
Add a new Security Realm to your standalone.xml
-
Create a Security Domain using the Section 4.7.1.5.3, “SAML2STSLoginModule”
-
Change the Remoting Connector to use the new Security Realm
Important
Security Realms are better described in the JBoss Application Server Documentation.
Edit your standalone.xml and add the following configuration for a new Security Realm:
<security-realm name="SAMLRealm">
    <authentication>
        <jaas name="ejb-remoting-sts"/>
    </authentication>
</security-realm>
The configuration above defines a Security Realm that delegates the username/password information to a JAAS Security Domain (that we'll create later) in order to authenticate an user.
When using the JAAS configuration for Security Realms, the remoting subsystem enables the PLAIN SASL authentication. This will allow your remote clients send the username/password where the password would be the previously issued SAML Assertion.In our case, the password will be the String representation of the SAML Assertion.
Tip
Make sure you also enable SSL. Otherwise all communication with the server will be done using plain text.
Edit your standalone.xml and add the following configuration for a new Security Domain:
<security-domain name="ejb-remoting-sts" cache-type="default">
    <authentication>
        <login-module code="org.picketlink.identity.federation.bindings.jboss.auth.SAML2STSLoginModule" flag="required" module="org.picketlink">
            <module-option name="configFile" value="${jboss.server.config.dir}/sts-config.properties"/>
            <module-option name="password-stacking" value="useFirstPass"/>
        </login-module>
    </authentication>
</security-domain>
This configuration above defines a Security Domain that uses the SAML2STSLoginModule to get the String representation of the SAML Assertion and validate it against the Security Token Service.
You may notice that we provided a properties file as module-option. This properties file defines all the configuration needed to invoke the PicketLink STS. It should look like this:
serviceName=PicketLinkSTS
portName=PicketLinkSTSPort
endpointAddress=http://localhost:8080/picketlink-sts/PicketLinkSTS
username=admin
#password=admin
password=MASK-0BbleBL2LZk=
salt=18273645
iterationCount=56

#java -cp picketlink-fed-core.jar org.picketlink.identity.federation.core.util.PBEUtils 18273645 56 admin
#Encoded password: MASK-0BbleBL2LZk=
This security domain will be used to authenticate your remote clients during the creation of the JNDI Initial Context.
Edit your standalone.xml and change the security-realm attribute of the remoting connector:
<subsystem xmlns="urn:jboss:domain:remoting:1.1">
    <connector name="remoting-connector" socket-binding="remoting" security-realm="SAMLRealm"/>
</subsystem>
The connector configuration is already present in your standalone.xml. You only need to change the security-realm attribute to match the one we created before.
The code above shows you how a EJB Rremote Client may look like:
// add the JDK SASL Provider that allows to use the PLAIN SASL Client
Security.addProvider(new Provider());

Element assertion = getAssertionFromSTS("UserA", "PassA");

// JNDI environment configuration properties
Hashtable<String, Object> env = new Hashtable<String, Object>();

env.put(Context.URL_PKG_PREFIXES, "org.jboss.ejb.client.naming");
env.put("java.naming.factory.initial", "org.jboss.naming.remote.client.InitialContextFactory");
env.put("java.naming.provider.url", "remote://localhost:4447");
env.put("jboss.naming.client.ejb.context", "true");
env.put("jboss.naming.client.connect.options.org.xnio.Options.SASL_POLICY_NOPLAINTEXT", "false");
env.put("javax.security.sasl.policy.noplaintext", "false");

// provide the user principal and credential. The credential is the previously issued SAML assertion
env.put(Context.SECURITY_PRINCIPAL, "admin");
env.put(Context.SECURITY_CREDENTIALS, DocumentUtil.getNodeAsString(assertion));

// create the JNDI Context and perform the authentication using the SAML2STSLoginModule
Context context = new InitialContext(env);

// lookup the EJB
EchoService object = (EchoService) context.lookup("ejb-test/EchoServiceImpl!org.picketlink.test.trust.ejb.EchoService");

// If everything is ok the Principal name will be added to the message
Assert.assertEquals("Hi UserA", object.echo("Hi "));
This page references the PicketLink Login Modules for the Security Token Server.
Tip
PicketLink STS Login Modules has the required details.
A variant of the PicketLink STSIssuingLoginModule that allows us to:
-
Inject BinaryTokenHandler or SAML2Handler or both as client side handlers to the STS WS call.
-
Inject the JaasSecurityDomainServerSocketFactory DomainSocketFactory as a request property to the BindingProvider set to the key "org.jboss.ws.socketFactory". This is useful for mutually authenticated SSL with the STS where in we use a trust store defined by a JaasSecurityDomain instance.
Options Include:
-
configFile : a properties file that gives details on the STS to the login module. This can be optional if you want to specify values directly.
-
handlerChain : Comma separated list of handlers you need to set for handling outgoing message to STS. Values: binary (to inject BinaryTokenHandler), saml2 (to inject SAML2Handler), map (to inject MapBasedTokenHandler) or class name of your own handler with default constructor.
-
cache.invalidation : set it to "true" if you want the JBoss auth cache to invalidate caches based on saml token expiry. By default, this value is false.
-
inject.callerprincipa l: set it to "true" if the login module should add a group principal called "CallerPrincipal" to the subject. This is useful in JBoss AS for programmatic security in web/ejb components.
-
groupPrincipalName : by default, JBoss AS security uses "Roles" as the group principal name in the subject. You can give a different value.
-
endpointAddress : endpoint url of STS
-
serviceName : service Name of STS
-
portName : port name of STS
-
username : username of account on STS.
-
password : password of account on STS
-
wsaIssuer : if you need to customize the WS-Addressing Issuer address in the WS-Trust call to the STS.
-
wspAppliesTo : if you need to customize the WS-Policy AppliesTo in the WS-Trust call to the STS.
-
securityDomainForFactory : if you have a JaasSecurityDomain mbean service in JBoss AS that provides the truststore.
-
map.token.key : key to find binary token in JAAS sharedState map. Defaults to "ClientID".
-
soapBinding : allow to change SOAP binding for SAML reuest.
-
requestType : allows to override SAML request type when sending request to STS. Default: "http://docs.oasis-open.org/ws-sx/ws-trust/200512/Issue" Other possible value: "http://docs.oasis-open.org/ws-sx/ws-trust/200512/Validate".
Note: The configFile option is optional. If you provide that, then it should be as below.
Configuration file such as sts-client.properties.
serviceName=PicketLinkSTS
portName=PicketLinkSTSPort
endpointAddress=http://localhost:8080/picketlink-sts/PicketLinkSTS
username=admin
password=admin
wsaIssuer=http://localhost:8080/someissuer
wspAppliesTo=http://localhost:8080/testws
Note:
-
the password can be masked according to http://community.jboss.org/wiki/PicketLinkConfigurationMaskpassword which would give us something like, password=MASK-dsfdsfdslkfh
-
wsaIssuer can be optionally added if you want a value for the WS-Addressing issuer in the WS-Trust call to the STS.
-
wspAppliesTo can be optionally added if you want a value for WS-Policy AppliesTo in the WS-Trust call to the STS.
-
serviceName, portName, endpointAddress are mandatory .
-
username and password keys are not needed if you are using mutual authenticated ssl (MASSL) with the STS.
Many a times, the login module has to communicate with the STS over a mutually authenticated SSL. In this case, you want to specify the truststore. JBoss AS provides JaasSecurityDomain mbean to specify truststore. For this reason, there is a special JaasSecurityDomainServerSocketFactory that can be used for making the JBWS calls. Specify the "securityDomainForFactory" module option with the security domain name (in the JaasSecurityDomain mbean service).
Either you specify the module options directly or you can use a properties file for the STS related properties.
<application-policy name="saml-issue-token">
 <authentication>
  <login-module code="org.picketlink.identity.federation.core.wstrust.auth.JBWSTokenIssuingLoginModule" flag="required">

       <module-option name="password-stacking">useFirstPass</module-option>

       <module-option name="endpointAddress">http://somests</module-option>

        <module-option name="serviceName">PicketLinkSTS</module-option>

       <module-option name="portName">PicketLinkPort</module-option>

       <module-option name="username">admin</module-option>

       <module-option name="password">admin</module-option>

       <module-option name="inject.callerprincipal">true</module-option>
       <module-option name="groupPrincipalName">Membership</module-option>
     </login-module>
    </authentication>
</application-policy>
<application-policy name="saml-issue-token">
 <authentication>
  <login-module code="org.picketlink.identity.federation.core.wstrust.auth.JBWSTokenIssuingLoginModule" flag="required">
       <module-option name="configFile">/sts-client.properties</module-option>
       <module-option name="password-stacking">useFirstPass</module-option>
<module-option name="cache.invalidation">true</module-option>
<module-option name="inject.callerprincipal">true</module-option>
<module-option name="groupPrincipalName">Membership</module-option>
     </login-module>
    </authentication>
</application-policy>
If the STS sends roles via Attribute Statements in the SAML assertion, then the user has to use the SAMLRoleLoginModule.
<application-policy name="saml">
  <authentication>
    <login-module code="org.picketlink.trust.jbossws.jaas.JBWSTokenIssuingLoginModule"  flag="required">
         <module-option name="endpointAddress">SOME_URL</module-option>
         <module-option name="serviceName">SecurityTokenService</module-option>
         <module-option name="portName">RequestSecurityToken</module-option>
         <module-option name="inject.callerprincipal">true</module-option>
         <module-option name="handlerChain">binary</module-option>
    </login-module>
    <login-module code="org.picketlink.trust.jbossws.jaas.SAMLRoleLoginModule"  flag="required"/>
  </authentication>
</application-policy>
If the STS does not send roles, then the user has to configure a different JAAS login module to pick the roles for the username. Something like the UsernamePasswordLoginModule.
<application-policy xmlns="urn:jboss:security-beans:1.0" name="binary">
      <authentication>
         <login-module code="org.picketlink.trust.jbossws.jaas.JBWSTokenIssuingLoginModule" flag="required">
            <module-option name="endpointAddress">http://localhost:8080/picketlink-sts/PicketLinkSTS</module-option>
            <module-option name="serviceName">PicketLinkSTS</module-option>
            <module-option name="portName">PicketLinkSTSPort</module-option>
            <module-option name="inject.callerprincipal">true</module-option>
            <module-option name="handlerChain">binary</module-option>
            <module-option name="username">admin</module-option>
            <module-option name="password">MASK-0BbleBL2LZk=</module-option>
            <module-option name="salt">18273645</module-option>
            <module-option name="iterationCount">56</module-option>
            <module-option name="useOptionsCredentials">true</module-option>
            <module-option name="overrideDispatch">true</module-option>
            <module-option name="wspAppliesTo">http://services.testcorp.org/provider1</module-option>
            <module-option name="wsaIssuer">http://something</module-option>
            <module-option name="password-stacking">useFirstPass</module-option>
         </login-module>

         <login-module code="org.jboss.security.auth.spi.UsersRolesLoginModule" flag="required">
            <module-option name="usersProperties">sts-users.properties</module-option>
            <module-option name="rolesProperties">sts-roles.properties</module-option>
            <module-option name="password-stacking">useFirstPass</module-option>
         </login-module>
      </authentication>
   </application-policy>
This LoginModule authenticates clients by validating their SAML assertions with an external security token service (such as PicketLinkSTS). If the supplied assertion contains roles, these roles are extracted and included in the Group returned by the getRoleSets method.
The LoginModule could be also used to retrieve and validate SAML assertion token from HTTP request header.
This module defines the following module options:
-
configFile - this property identifies the properties file that will be used to establish communication with the external security token service.
-
cache.invalidation : set it to true if you require invalidation of JBoss Auth Cache at SAML Principal expiration.
-
jboss.security.security_domain -security domain at which Principal will expire if cache.invalidation is used.
-
roleKey : key of the attribute name that we need to use for Roles from the SAML assertion. This can be a comma-separated string values such as (Role,Membership)
-
localValidation : if you want to validate the assertion locally for signature and expiry
-
localValidationSecurityDomain : the security domain for the trust store information (via the JaasSecurityDomain)
-
tokenEncodingType : encoding type of SAML token delivered via http request's header. Possible values are:
-
base64 - content encoded as base64. In case of encoding will vary between base64 and gzip use base64 and LoginModule will detect gzipped data.
-
gzip - gzipped content encoded as base64
-
none - content not encoded in any way
-
-
samlTokenHttpHeader - name of http request header to fetch SAML token from. For example: "Authorize"
-
samlTokenHttpHeaderRegEx - Java regular expression to be used to get SAML token from "samlTokenHttpHeader". Example: use: . "(. )".* to parse SAML token from header content like this: SAML_assertion="HHDHS=", at the same time set samlTokenHttpHeaderRegExGroup to 1.
-
samlTokenHttpHeaderRegExGroup - Group value to be used when parsing out value of http request header specified by "samlTokenHttpHeader" using "samlTokenHttpHeaderRegEx".
pattern = Pattern.compile(samlTokenHttpHeaderRegEx, Pattern.DOTALL);
Matcher m = pattern.matcher(content);
m.matches();
m.group(samlTokenHttpHeaderRegExGroup)
Any properties specified besides the above properties are assumed to be used to configure how the STSClient will connect to the STS. For example, the JBossWS StubExt.PROPERTY_SOCKET_FACTORY can be specified in order to inform the socket factory that must be used to connect to the STS. All properties will be set in the request context of the Dispatch instance used by the STSClient to send requests to the STS.
An example of a configFile can be seen bellow:
serviceName=PicketLinkSTS
portName=PicketLinkSTSPort
endpointAddress=[http://localhost:8080/picketlink-sts/PicketLinkSTS]
username=JBoss
password=JBoss
The first three properties specify the STS endpoint URL, service name, and port name. The last two properties specify the username and password that are to be used by the application server to authenticate to the STS and have the SAML assertions validated.
NOTE: Sub-classes can use getSTSClient() method to customize the STSClient class to make calls to STS
Example Configuration 1:
<application-policy xmlns="urn:jboss:security-beans:1.0" name="cache-test">
      <authentication>
         <login-module code="org.picketlink.identity.federation.bindings.jboss.auth.SAML2STSLoginModule" flag="required">
            <module-option name="password-stacking">useFirstPass</module-option>
            <module-option name="configFile">sts-config.properties</module-option>
            <module-option name="cache.invalidation">true</module-option>
            <module-option name="localValidation">true</module-option>
            <module-option name="localValidationSecurityDomain">MASSL</module-option>
         </login-module>
      </authentication>
   </application-policy>
Example Configuration 2 using http header and local validation:
   <application-policy xmlns="urn:jboss:security-beans:1.0" name="service">
      <authentication>
         <login-module code="org.picketlink.identity.federation.bindings.jboss.auth.SAML2STSLoginModule" flag="required">
            <module-option name="password-stacking">useFirstPass</module-option>
            <module-option name="cache.invalidation">true</module-option>
            <module-option name="localValidation">true</module-option>
            <module-option name="localValidationSecurityDomain">java:jaas/localValidationDomain</module-option>
            <module-option name="tokenEncodingType">gzip</module-option>
            <module-option name="samlTokenHttpHeader">Auth</module-option>
            <module-option name="samlTokenHttpHeaderRegEx">.*"(.*)".*</module-option>
            <module-option name="samlTokenHttpHeaderRegExGroup">1</module-option>
         </login-module>
         <login-module code="org.picketlink.trust.jbossws.jaas.SAMLRoleLoginModule" flag="required"/>
      </authentication>
   </application-policy>
In case of local validation here is example of jboss-beans.xml file to use to configure JAAS Security Domain for (JBoss AS6 or EAP5):
<?xml version="1.0" encoding="UTF-8"?>
<deployment xmlns="urn:jboss:bean-deployer:2.0">
   <!-- localValidationDomain bean -->
   <bean name="LocalValidationBean" class="org.jboss.security.plugins.JaasSecurityDomain">
     <constructor>
          <parameter>localValidationDomain</parameter>
     </constructor>
     <property name="keyStoreURL">file://${jboss.server.home.dir}/conf/stspub.jks</property>
     <property name="keyStorePass">keypass</property>
     <property name="keyStoreAlias">sts</property>
     <property name="securityManagement"><inject bean="JNDIBasedSecurityManagement"/></property>
   </bean>
</deployment>
For JBoss AS7 or JBoss EAP6 add following security domain to your configuration file:
<security-domain name="localValidationDomain">
      <jsse
         keystore-password="keypass"
         keystore-type="JKS"
         keystore-url="file:///${jboss.server.config.dir}/stspub.jks"
         server-alias="sts"/>
</security-domain>
and reference this security domain as: <module-option name="localValidationSecurityDomain">localValidationDomain</module-option>.
org.picketlink.identity.federation.bindings.jboss.auth. SAMLTokenCertValidatingLoginModule
This LoginModule authenticates clients by validating their SAML assertions locally. If the supplied assertion contains roles, these roles are extracted and included in the Group returned by the getRoleSets method.
The LoginModule is designed to validate SAML token using X509 certificate stored in XML signature within SAML assertion token.
It validates:
-
CertPath against specified truststore. It has to have common valid public certificate in the trusted entries.
-
X509 certificate stored in SAML token didn't expire
-
if signature itself is valid
-
SAML token expiration
This module defines the following module options:
-
roleKey : key of the attribute name that we need to use for Roles from the SAML assertion. This can be a comma-separated string values such as (Role,Membership)
-
localValidationSecurityDomain : the security domain for the trust store information (via the JaasSecurityDomain)
-
cache.invalidation - set it to true if you require invalidation of JBoss Auth Cache at SAML Principal expiration.
-
jboss.security.security_domain -security domain at which Principal will expire if cache.invalidation is used.
-
tokenEncodingType : encoding type of SAML token delivered via http request's header. Possible values are:
-
base64 - content encoded as base64. In case of encoding will vary between base64 and gzip use base64 and LoginModule will detect gzipped data.
-
gzip - gzipped content encoded as base64
-
none - content not encoded in any way
-
-
samlTokenHttpHeader - name of http request header to fetch SAML token from. For example: "Authorize"
-
samlTokenHttpHeaderRegEx - Java regular expression to be used to get SAML token from "samlTokenHttpHeader". Example: use: . "(. )".* to parse SAML token from header content like this: SAML_assertion="HHDHS=", at the same time set samlTokenHttpHeaderRegExGroup to 1.
-
samlTokenHttpHeaderRegExGroup - Group value to be used when parsing out value of http request header specified by "samlTokenHttpHeader" using "samlTokenHttpHeaderRegEx".
pattern = Pattern.compile(samlTokenHttpHeaderRegEx, Pattern.DOTALL);
Matcher m = pattern.matcher(content);
m.matches();
m.group(samlTokenHttpHeaderRegExGroup)
Example Configuration 1:
<application-policy xmlns="urn:jboss:security-beans:1.0" name="certpath">
      <authentication>
         <login-module code="org.picketlink.identity.federation.bindings.jboss.auth.SAMLTokenCertValidatingLoginModule" flag="required">
            <module-option name="password-stacking">useFirstPass</module-option>
            <module-option name="cache.invalidation">true</module-option>
            <module-option name="localValidationSecurityDomain">java:jaas/localValidationDomain</module-option>
         </login-module>
      </authentication>
</application-policy>
Example Configuration 2 using http header:
   <application-policy xmlns="urn:jboss:security-beans:1.0" name="service">
      <authentication>
         <login-module code="org.picketlink.identity.federation.bindings.jboss.auth.SAML2STSLoginModule" flag="required">
            <module-option name="password-stacking">useFirstPass</module-option>
            <module-option name="cache.invalidation">true</module-option>
            <module-option name="localValidationSecurityDomain">java:jaas/localValidationDomain</module-option>
            <module-option name="tokenEncodingType">gzip</module-option>
            <module-option name="samlTokenHttpHeader">Auth</module-option>
            <module-option name="samlTokenHttpHeaderRegEx">.*"(.*)".*</module-option>
            <module-option name="samlTokenHttpHeaderRegExGroup">1</module-option>
         </login-module>
      </authentication>
   </application-policy>
Example of jboss-beans.xml file to use to configure JAAS Security Domain containing trust store for above examples:
<?xml version="1.0" encoding="UTF-8"?>
<deployment xmlns="urn:jboss:bean-deployer:2.0">
   <!-- localValidationDomain bean -->
   <bean name="LocalValidationBean" class="org.jboss.security.plugins.JaasSecurityDomain">
     <constructor>
          <parameter>localValidationDomain</parameter>
     </constructor>
     <property name="keyStoreURL">file://${jboss.server.home.dir}/conf/stspub.jks</property>
     <property name="keyStorePass">keypass</property>
     <property name="keyStoreAlias">sts</property>
     <property name="securityManagement"><inject bean="JNDIBasedSecurityManagement"/></property>
   </bean>
</deployment>
-
Calls the configured STS and validates an available security token.
-
A call to STS typically requires authentication. This LoginModule uses credentials from one of the following sources:
-
Its properties file, if the useOptionsCredentials module-option is set to true
-
Previous login module credentials if the password-stacking module-option is set to useFirstPass
-
From the configured CallbackHandler by supplying a Name and Password Callback
-
-
Upon successful authentication, the SamlCredential is inserted in the Subject's public credentials if one with the same Assertion is not found to be already present there.
-
New features included since 1.0.4 based on PLFED-87 :
-
If a Principal MappingProvider is configured, retrieves and inserts the Principal into the Subject
-
If a RoleGroup MappingProvider is configured, retrieves and inserts the user roles into the Subject
-
Roles can only be returned if they are included in the Security Token. Configure your STS to return roles through an AttributeProvider
-
This page shows all the extensions and customizations available in the PicketLink project.
An authenticator that delegates actual authentication to a realm, and in turn to a security manager, by presenting a "conventional" identity. The security manager must accept the conventional identity and generate the real identity for the authenticated principal.
Your web.xml will define some security constraints. But it will define a <login-config> that is different from the servlet specifcation mandated BASIC, CLIENT-CERT, FORM or DIGEST methods. We suggest the use of SECURITY_DOMAIN as the method.
<security-constraint>
    <web-resource-collection>
        <web-resource-name>Restricted Access - Get Only</web-resource-name>
        <url-pattern>/*</url-pattern>
        <http-method>GET</http-method>
    </web-resource-collection>
    <auth-constraint>
 	<role-name>STSClient</role-name>
    </auth-constraint>
    <user-data-constraint>
        <transport-guarantee>NONE</transport-guarantee>
    </user-data-constraint>
</security-constraint>

<security-role>
    <role-name>STSClient</role-name>
</security-role>

<login-config>
    <auth-method>SECURITY_DOMAIN</auth-method>
    <realm-name>SECURITY_DOMAIN</realm-name>
    <form-login-config>
	<form-login-page>/login.html</form-login-page>
	<form-error-page>/error.html</form-error-page>
    </form-login-config>
</login-config>
Important
Note that we defined two pages in the <form-login-config> : login.html and error.html . Both pages must exists inside your deployment.
Change your WEB-INF/jboss-web.xml to configure the PicketLinkAuthenticator as a valve:
<jboss-web>
	<security-domain>authenticator</security-domain>
	<context-root>authenticator</context-root>
	<valve>
		<class-name>org.picketlink.identity.federation.bindings.tomcat.PicketLinkAuthenticator
		</class-name>
	</valve>
</jboss-web>
We also defined a <security-domain> configuration with the name of the security domain that you configured in your standalone.xml:
<security-domain name="authenticator" cache-type="default">
    <authentication>
        <login-module code="org.picketlink.test.trust.loginmodules.TestRequestUserLoginModule" flag="required">
            <module-option name="usersProperties" value="users.properties"/>
            <module-option name="rolesProperties" value="roles.properties"/>
        </login-module>
    </authentication>
</security-domain>
Tip
To use PicketLink you need to define it as a module dependency using the META-INF/jboss-deployment-structure.xml.
Your web.xml will define some security constraints. But it will define a <login-config> that is different from the servlet specifcation mandated BASIC, CLIENT-CERT, FORM or DIGEST methods. We suggest the use of SECURITY-DOMAIN as the method.
Create a context.xml in your WEB-INF directory of your web-archive.
<Context>
  <Valve className="org.picketlink.identity.federation.bindings.tomcat.PicketLinkAuthenticator" />
</Context>
Your web.xml may look as follows:
<?xml version="1.0" encoding="UTF-8"?>
<web-app version="2.4"
   xmlns="http://java.sun.com/xml/ns/j2ee"
   xmlns:xsi="http://www.w3.org/2001/XMLSchema-instance"
   xsi:schemaLocation="http://java.sun.com/xml/ns/j2ee
   http://java.sun.com/xml/ns/j2ee/web-app_2_4.xsd">

   <description>Sales Application</description>

   <security-constraint>
      <display-name>Restricted</display-name>
      <web-resource-collection>
         <web-resource-name>Restricted Access</web-resource-name>
         <url-pattern>/*</url-pattern>
      </web-resource-collection>
      <auth-constraint>
         <role-name>Sales</role-name>
      </auth-constraint>
      <user-data-constraint>
         <transport-guarantee>NONE</transport-guarantee>
      </user-data-constraint>
   </security-constraint>

   <security-role>
      <role-name>Sales</role-name>
   </security-role>

   <login-config>
      <auth-method>SECURITY-DOMAIN</auth-method>
   </login-config>
</web-app>
Warning
NOTE: The use of SECURITY-DOMAIN as the auth-method.
The war should be packaged as a regular web archive.
If you have a large number of web applications and it is not practical to include context.xml in all the war files, then you can configure the "authenticators" attribute in the war-deployers-jboss-beans.xml file in /server/default/deployers/jbossweb.deployer/META-INF of your JBoss AS instance.
<property name="authenticators">
         <map class="java.util.Properties" keyClass="java.lang.String" valueClass="java.lang.String">
            <entry>
               <key>BASIC</key>
               <value>org.apache.catalina.authenticator.BasicAuthenticator</value>
            </entry>
            <entry>
               <key>CLIENT-CERT</key>
               <value>org.apache.catalina.authenticator.SSLAuthenticator</value>
            </entry>
            <entry>
               <key>DIGEST</key>
               <value>org.apache.catalina.authenticator.DigestAuthenticator</value>
            </entry>
            <entry>
               <key>FORM</key>
               <value>org.apache.catalina.authenticator.FormAuthenticator</value>
            </entry>
            <entry>
               <key>NONE</key>
               <value>org.apache.catalina.authenticator.NonLoginAuthenticator</value>
            </entry>
               <key>SECURITY-DOMAIN</key>
               <value>org.picketlink.identity.federation.bindings.tomcat.PicketLinkAuthenticator</value>
            </entry>

         </map>
      </property>
-
Go to the deploy directory.
-
cp -R jmx-console.war test.war
-
In deploy/test.war/WEB-INF/web.xml, change the auth-method element to SECURITY-DOMAIN.
-
<login-config> <auth-method>SECURITY-DOMAIN</auth-method> <realm-name>JBoss JMX Console</realm-name> </login-config> -
Also uncomment the security constraints in web.xml. It should look as follows.
-
<!-- A security constraint that restricts access to the HTML JMX console to users with the role JBossAdmin. Edit the roles to what you want and uncomment the WEB-INF/jboss-web.xml/security-domain element to enable secured access to the HTML JMX console. --> <security-constraint> <web-resource-collection> <web-resource-name>HtmlAdaptor</web-resource-name> <description>An example security config that only allows users with the role JBossAdmin to access the HTML JMX console web application </description> <url-pattern>/*</url-pattern> <http-method>GET</http-method> <http-method>POST</http-method> </web-resource-collection> <auth-constraint> <role-name>JBossAdmin</role-name> </auth-constraint> </security-constraint> -
In the /server/default/conf/jboss-log4j.xml , add trace category for org.jboss.security.
-
Start JBoss AS.
-
Go to the following url: http://localhost:8080/test/
-
You should see a HTTP 403 message.
-
If you look inside the log, log/server.log, you will see the following exception trace:
-
2011-04-20 11:02:01,714 TRACE [org.jboss.security.plugins.auth.JaasSecurityManagerBase.jmx-console] (http-127.0.0.1-8080-1) Login failure
javax.security.auth.login.FailedLoginException: Password Incorrect/Password Required
        at org.jboss.security.auth.spi.UsernamePasswordLoginModule.login(UsernamePasswordLoginModule.java:252)
        at org.jboss.security.auth.spi.UsersRolesLoginModule.login(UsersRolesLoginModule.java:152)
        at sun.reflect.NativeMethodAccessorImpl.invoke0(Native Method)
        at sun.reflect.NativeMethodAccessorImpl.invoke(NativeMethodAccessorImpl.java:39)
        at sun.reflect.DelegatingMethodAccessorImpl.invoke(DelegatingMethodAccessorImpl.java:25)
        at java.lang.reflect.Method.invoke(Method.java:597)
        at javax.security.auth.login.LoginContext.invoke(LoginContext.java:769)
        at javax.security.auth.login.LoginContext.access$000(LoginContext.java:186)
        at javax.security.auth.login.LoginContext$4.run(LoginContext.java:683)
        at java.security.AccessController.doPrivileged(Native Method)
        at javax.security.auth.login.LoginContext.invokePriv(LoginContext.java:680)
        at javax.security.auth.login.LoginContext.login(LoginContext.java:579)
        at org.jboss.security.plugins.auth.JaasSecurityManagerBase.defaultLogin(JaasSecurityManagerBase.java:552)
        at org.jboss.security.plugins.auth.JaasSecurityManagerBase.authenticate(JaasSecurityManagerBase.java:486)
        at org.jboss.security.plugins.auth.JaasSecurityManagerBase.isValid(JaasSecurityManagerBase.java:365)
        at org.jboss.security.plugins.JaasSecurityManager.isValid(JaasSecurityManager.java:160)
        at org.jboss.web.tomcat.security.JBossWebRealm.authenticate(JBossWebRealm.java:384)
        at org.picketlink.identity.federation.bindings.tomcat.PicketLinkAuthenticator.authenticate(PicketLinkAuthenticator.java:104)
        at org.apache.catalina.authenticator.AuthenticatorBase.invoke(AuthenticatorBase.java:491)
        at org.jboss.web.tomcat.security.JaccContextValve.invoke(JaccContextValve.java:92)
        at org.jboss.web.tomcat.security.SecurityContextEstablishmentValve.process(SecurityContextEstablishmentValve.java:126)
        at org.jboss.web.tomcat.security.SecurityContextEstablishmentValve.invoke(SecurityContextEstablishmentValve.java:70)
        at org.apache.catalina.core.StandardHostValve.invoke(StandardHostValve.java:127)
        at org.apache.catalina.valves.ErrorReportValve.invoke(ErrorReportValve.java:102)
        at org.jboss.web.tomcat.service.jca.CachedConnectionValve.invoke(CachedConnectionValve.java:158)
        at org.apache.catalina.core.StandardEngineValve.invoke(StandardEngineValve.java:109)
        at org.apache.catalina.connector.CoyoteAdapter.service(CoyoteAdapter.java:330)
        at org.apache.coyote.http11.Http11Processor.process(Http11Processor.java:829)
        at org.apache.coyote.http11.Http11Protocol$Http11ConnectionHandler.process(Http11Protocol.java:598)
        at org.apache.tomcat.util.net.JIoEndpoint$Worker.run(JIoEndpoint.java:447)
        at java.lang.Thread.run(Thread.java:662)
As you can see from the stack trace, PicketLinkAuthenticator method has been kicked in.
This page shows you how to use the PicketLink API to programatically work with SAML Assertions.
The examples above demonstrates the following scenarios:
-
How to parse a XML to a PicketLink AssertionType
-
How to sign SAML Assertions
-
How to validate SAML Assertions
The following API classes were used:
-
org.picketlink.identity.federation.saml.v2.assertion.AssertionType
-
org.picketlink.identity.federation.core.saml.v2.util.AssertionUtil
-
org.picketlink.identity.federation.core.parsers.saml.SAMLParser
-
org.picketlink.identity.federation.core.saml.v2.writers.SAMLAssertionWriter
-
org.picketlink.identity.federation.api.saml.v2.sig.SAML2Signature
-
org.picketlink.identity.federation.core.impl.KeyStoreKeyManager
Important
Please, check the javadoc for more informations about these classes.
The PicketLink API provides the org.picketlink.identity.federation.saml.v2.assertion.AssertionType class to encapsulate the informations parsed from a SAML Assertion.
Let's suppose we have the following SAML Assertion:
<saml:Assertion xmlns:saml="urn:oasis:names:tc:SAML:2.0:assertion" ID="ID_75291c31-93f7-4f7f-8422-aacdb07466ee" IssueInstant="2012-05-25T10:40:58.912-03:00" Version="2.0">
    <saml:Issuer>http: //192.168.1.1:8080/idp-sig/</saml:Issuer>
    <saml:Subject>
        <saml:NameID Format="urn:oasis:names:tc:SAML:2.0:nameid-format:persistent">user</saml:NameID>
        <saml:SubjectConfirmation Method="urn:oasis:names:tc:SAML:2.0:cm:bearer">
            <saml:SubjectConfirmationData InResponseTo="ID_326a389f-6a8a-4712-b71d-77aa9c36795c" NotBefore="2012-05-25T10:40:58.894-03:00" NotOnOrAfter="2012-05-25T10:41:00.912-03:00" Recipient="http://192.168.1.4:8080/fake-sp" />
        </saml:SubjectConfirmation>
    </saml:Subject>
    <saml:Conditions NotBefore="2012-05-25T10:40:57.912-03:00" NotOnOrAfter="2012-05-25T10:41:00.912-03:00" />
    <saml:AuthnStatement AuthnInstant="2012-05-25T10:40:58.981-03:00">
        <saml:AuthnContext>
            <saml:AuthnContextClassRef>urn:oasis:names:tc:SAML:2.0:ac:classes:Password</saml:AuthnContextClassRef>
        </saml:AuthnContext>
    </saml:AuthnStatement>
    <saml:AttributeStatement>
        <saml:Attribute Name="Role">
            <saml:AttributeValue xmlns:xs="http://www.w3.org/2001/XMLSchema" xmlns:xsi="http://www.w3.org/2001/XMLSchema-instance" xsi:type="xs:string">test-role1</saml:AttributeValue>
        </saml:Attribute>
        <saml:Attribute Name="Role">
            <saml:AttributeValue xmlns:xs="http://www.w3.org/2001/XMLSchema" xmlns:xsi="http://www.w3.org/2001/XMLSchema-instance" xsi:type="xs:string">test-role2</saml:AttributeValue>
        </saml:Attribute>
        <saml:Attribute Name="Role">
            <saml:AttributeValue xmlns:xs="http://www.w3.org/2001/XMLSchema" xmlns:xsi="http://www.w3.org/2001/XMLSchema-instance" xsi:type="xs:string">test-role3</saml:AttributeValue>
        </saml:Attribute>
    </saml:AttributeStatement>
</saml:Assertion>
The code to parse this XML is:
/**
     * <p>
     * Parses a SAML Assertion XML representation and convert it to a {@link AssertionType} instance.
     * </p>
     *
     * @throws Exception
     */
    @Test
    public void testParseAssertion() throws Exception {
        // get a InputStream from the source XML file
        InputStream samlAssertionInputStream = getSAMLAssertion();

        SAMLParser samlParser = new SAMLParser();

        Object parsedObject = samlParser.parse(samlAssertionInputStream);

        Assert.assertNotNull(parsedObject);
        Assert.assertTrue(parsedObject.getClass().equals(AssertionType.class));

        // cast the parsed object to the expected type, in this case AssertionType
        AssertionType assertionType = (AssertionType) parsedObject;

        // checks if the Assertion has expired.
        Assert.assertTrue(AssertionUtil.hasExpired(assertionType));

        // let's write the parsed assertion to the sysout
        ByteArrayOutputStream baos = new ByteArrayOutputStream();

        SAMLAssertionWriter writer = new SAMLAssertionWriter(StaxUtil.getXMLStreamWriter(baos));

        writer.write(assertionType);

        System.out.println(new String(baos.toByteArray()));
    }
The PicketLink API provides the org.picketlink.identity.federation.api.saml.v2.sig.SAML2Signature to help during signature generation/validation for SAML Assertions.
/**
     * <p>
     * Signs a SAML Assertion.
     * </p>
     *
     * @throws Exception
     */
    @Test
    public void testSignAssertion() throws Exception {
        InputStream samlAssertionInputStream = getSAMLAssertion();

        // convert the InputStream to a DOM Document
        Document document = DocumentUtil.getDocument(samlAssertionInputStream);

        SAML2Signature samlSignature = new SAML2Signature();

        // get the key store manager instance.
        KeyStoreKeyManager keyStoreKeyManager = getKeyStoreManager();

        samlSignature.signSAMLDocument(document, keyStoreKeyManager.getSigningKeyPair());

        // let's print the signed assertion to the sysout
        System.out.println(DocumentUtil.asString(document));
    }
As you can see, we need to create a instance of org.picketlink.identity.federation.core.impl.KeyStoreKeyManager from where the certificates will be retrieved from. The code bellow shows you how to create it:
     /**
     * <p>
     * Creates a {@link KeyStoreKeyManager} instance.
     * </p>
     *
     * @throws Exception
     */
    private KeyStoreKeyManager getKeyStoreManager()
        throws TrustKeyConfigurationException, TrustKeyProcessingException {

        KeyStoreKeyManager keyStoreKeyManager = new KeyStoreKeyManager();

        ArrayList<AuthPropertyType> authProperties = new ArrayList<AuthPropertyType>();

        authProperties.add(createAuthProperty(KeyStoreKeyManager.KEYSTORE_URL, Thread.currentThread().getContextClassLoader().getResource("./keystore/jbid_test_keystore.jks").getFile()));
        authProperties.add(createAuthProperty(KeyStoreKeyManager.KEYSTORE_PASS, "store123"));

        authProperties.add(createAuthProperty(KeyStoreKeyManager.SIGNING_KEY_ALIAS, "servercert"));
        authProperties.add(createAuthProperty(KeyStoreKeyManager.SIGNING_KEY_PASS, "test123"));

        keyStoreKeyManager.setAuthProperties(authProperties);

        return keyStoreKeyManager;
    }

    public AuthPropertyType createAuthProperty(String key, String value) {
        AuthPropertyType authProperty = new AuthPropertyType();

        authProperty.setKey(key);
        authProperty.setValue(value);

        return authProperty;
    }
The code to validate signatures is almost the same for signing. You still need a KeyStoreKeyManager instance.
/**
     * <p>
     * Validates a SAML Assertion.
     * </p>
     *
     * @throws Exception
     */
    @Test
    public void testValidateSignatureAssertion() throws Exception {
        InputStream samlAssertionInputStream = getSAMLSignedAssertion();

        KeyStoreKeyManager keyStoreKeyManager = getKeyStoreManager();

        Document signedDocument = DocumentUtil.getDocument(samlAssertionInputStream);

        boolean isValidSignature = AssertionUtil.isSignatureValid(signedDocument.getDocumentElement(), keyStoreKeyManager.getSigningKeyPair().getPublic());

        Assert.assertTrue(isValidSignature);
    }
Common scenario is to use Picketlink as both Identity Provider (IDP) and Service Provider (SP), but sometimes it may be useful to integrate with 3rd party vendors as well. If your company is using services provided by 3rd party vendors like SalesForce or Google Apps, then SSO with these vendors may be real benefit for you.
We support these scenarios:
In first scenario we will use Salesforce as SAML SP and we will use Picketlink application as SAML IDP. In this tutorial, we will reuse application idp-sig.war from Picketlink quickstarts .
First you need to perform some actions on Salesforce side. Brief description is here. For more details, you can see Salesforce documentation.
-
Register Salesforce account - You will need to register in Salesforce with free developer account. You can do it here .
-
Register your salesforce domain - Salesforce supports SP-initiated SAML login workflow or IDP-initiated SAML login workflow. For picketlink integration, we will use SP-initiated login workflow, where user needs to access Salesforce and Salesforce will send SAMLRequest to Picketlink IDP. For achieving this, you need to create Salesforce domain. When registered and logged in www.salesforce.com , you will need to click on Your name in right top corner -> Link Setup -> Link Company Profile -> Link My Domain . Here you can create your Salesforce domain and make it available for testing.
-
SAML SSO configuration - Now you need again to click on Your name in right top corner -> Link Setup -> Link Security controls -> Link Single Sign-On Settings Then configure it as follows:
-
SAML Enabled checkbox needs to be checked
-
SAML Version needs to be 2.0
-
Issuer needs to be http://localhost:8080/idp-sig/ - This identifies issuer, which will be used as IDP for salesforce. NOTE: Be sure that URL really ends with "/" character.
-
Identity Provider Login URL also needs to be http://localhost:8080/idp-sig/ - This identifies URL where Salesforce SP will send it's SAMLRequest for login.
-
Identity Provider Logout URL points to URL where Salesforce redirects user after logout. You may also use your IDP address or something different according to your needs.
-
Subject mapping - You need to configure how to map Subject from SAMLResponse, which will be send by Picketlink IDP, to Salesforce user account. In the example, we will use that SAMLResponse will contain information about Subject in "NameIdentifier" element of SAMLResponse and ID of subject will be mapped to Salesforce Federation ID of particular user. So in: SAML User ID Type , you need to check option Assertion contains the Federation ID from the User object and for SAML User ID Location , you need to check User ID is in the NameIdentifier element of the Subject statement .
-
Entity ID - Here we will use https://saml.salesforce.com . Whole configuration can look as follows:
-
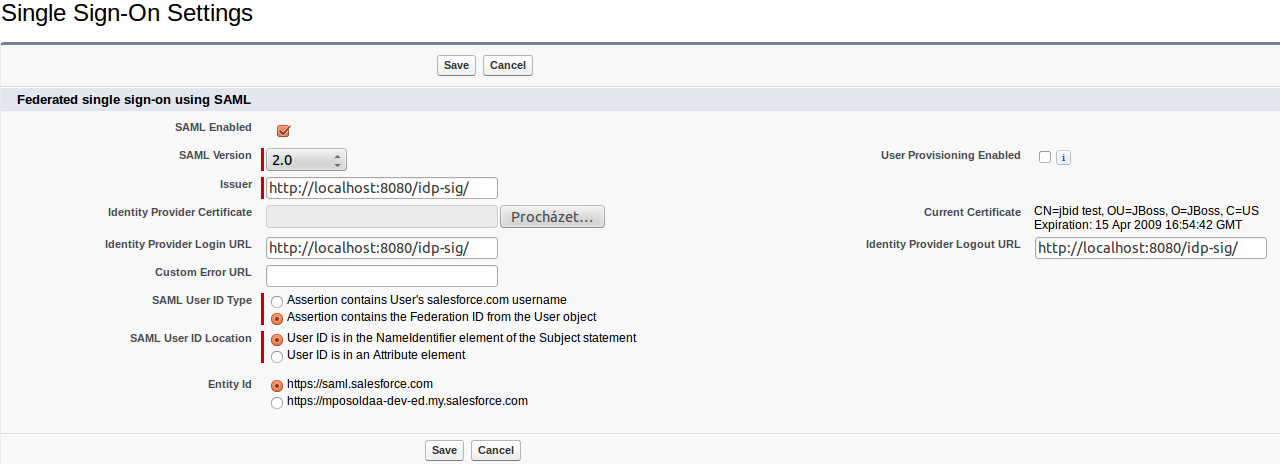
-
Certificate - Last very important thing is upload of your certificate to Salesforce, because Salesforce needs to verify signature on SAMLResponse sent from your Picketlink Identity Provider. So first you need to export certificate from your keystore file and then import this certificate into Salesforce. So in idp-sig.war/WEB-INF/classes you can run command like:
keytool -export -keystore jbid_test_keystore.jks -alias servercert -file test-certificate.crt
after typing keystore password store123 you should see exported certificate in file test-certificate.crt .
Then you can import this certificate test-certificate.crt into SalesForce via menu with SSO configuration.
-
Adding users - Last action you need to do in Salesforce is to add some users. You can do it in: Link Setup -> Link Manage Users -> Link Users . Now you can create user and fill some values as you want. Please note that username must be in form of email address. Note that Federation ID is the value, which is used for mapping the user with the NameIdentifier subject from SAML assertion, which will be sent from Picketlink IDP. So let's use Federation ID with value tomcat for our first user.

-
Download and import Salesforce certificate - SAMLRequest messages sent from Salesforce are signed with Salesforce certificate. In order to validate them, you need to download Salesforce client certificate from http://wiki.developerforce.com/page/Client_Certificate . Then you need to import the certificate into your keystore:
unzip -q /tmp/downloads/certificates/New_proxy.salesforce.com_certificate_chain.zip
keytool -import -keystore jbid_test_keystore.jks -file proxy-salesforce-com.123 -alias salesforce-cert
-
ValidatingAlias update - You need to update ValidatingAlias section, so the SAMLRequest from Salesforce will be validated with Salesforce certificate. You need to add the line into file idp-sig.war/WEB-INF/picketlink.xml :
<ValidatingAlias Key="saml.salesforce.com" Value="salesforce-cert" />
-
Trusted domain - update list of trusted domains and add domain "salesforce.com" to the list:
<Trust>
  <Domains>localhost,jboss.com,jboss.org,redhat.com,amazonaws.com,salesforce.com</Domains>
</Trust>
Now you have basic setup done but in order to support single logout, you need to do some additional actions. Especially Salesforce is not using same URL for login and single logout, which means that we need to configure SP metadata on Picketlink side to provide mapping between SP and their URL for logout. Needed actions are:
-
Download SAML metadata from Salesforce SSO settings. Save downloaded XML file as idp-sig.war/WEB-INF/sp-metadata.xml
-
Add SingleLogoutService element - unfortunately another element needs to be manually added into metadata as Salesforce doesn't use single logout configuration in their metadata. So let's add following element into metadata file after md:AssertionConsumerService element:
         <md:SingleLogoutService Binding="urn:oasis:names:tc:SAML:2.0:bindings:HTTP-POST"
                                 Location="https://login.salesforce.com/saml/logout-request.jsp?saml=MgoTx78aEPkEM4eGV5ZzptlliwIVkRkOWYKlqXQq2StV_sLo0EiRqKYtIc" index="0" isDefault="true"/>
Note that value of Location attribute will be different for your domain. You can see which value to use in Salesforce SSO settings page from element Salesforce.com Single Logout URL :
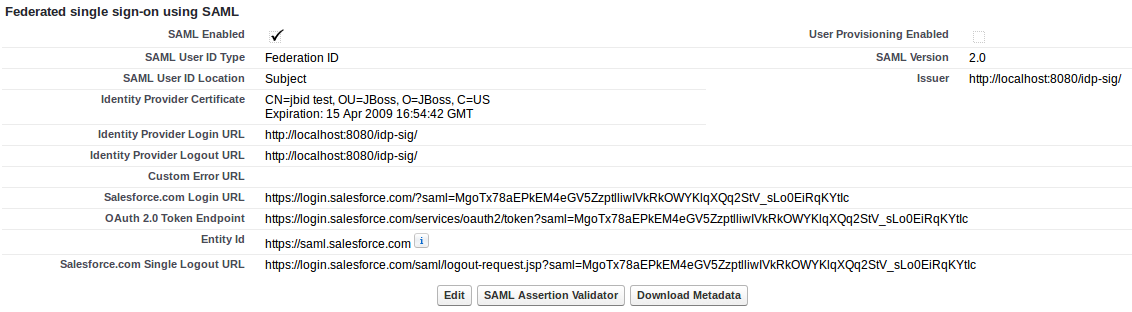
-
Add md:EntitiesDescriptor element - Finally you need to add enclosing element md:EntitiesDescriptor and encapsulate whole current content into it. This is needed as we may want to use more EntityDescriptor elements in this single metadata file (like another element for Google Apps etc):
<?xml version="1.0" encoding="UTF-8"?>
<md:EntitiesDescriptor xmlns="urn:oasis:names:tc:SAML:2.0:metadata"
                    xmlns:ds="http://www.w3.org/2000/09/xmldsig#"
                    xmlns:md="urn:oasis:names:tc:SAML:2.0:metadata">
  <md:EntityDescriptor xmlns:md="urn:oasis:names:tc:SAML:2.0:metadata" entityID="https://saml.salesforce.com" ....
  ...
  </md:EntityDescriptor>
</md:EntitiesDescriptor>
-
Configure metadata location - Let's add new MetaDataProvider into file idp-sig.war/WEB-INF/picketlink.xml after section with KeyProvider:
...
         </KeyProvider>

         <MetaDataProvider ClassName="org.picketlink.identity.federation.core.saml.md.providers.FileBasedEntitiesMetadataProvider">
           <Option Key="FileName" Value="/WEB-INF/sp-metadata.xml"/>
         </MetaDataProvider>
      </PicketLinkIDP>
.....
-
Start the server with Picketlink IDP
-
Visit URL of your salesforce domain. It should be likely something like: https://yourdomain.my.salesforce.com/ . Now Salesforce will send SAMLRequest to your IDP and so you should be redirected to login screen on your IDP on http://localhost:8080/idp-sig/
-
Login into Picketlink IDP as user tomcat . After successful login, SAMLRequest signature is validated by the certificate salesforce-cert and IDP produces SAMLResponse for IDP and performs redirection.
-
Now Salesforce parse SAMLResponse, validates it signature with imported Picketlink certificate and then you should be redirected to salesforce and logged as user tomcat in your Salesforce domain.
Salesforce provides simple tool in SSO menu, where you can see the status of last SAMLResponse sent to Salesforce SP and you can check what's wrong with the response here.
Good tool for checking communication between SP and IDP is also Firefox plugin SAML Tracer
In this part, we will use Salesforce as IDP and sample application from Picketlink as SP.
-
Disable Single Sign on in SSO settings if you enabled it previously. As in this step, we don't want to login into Salesforce through SSO but we want Salesforce to provide SSO for us and act as Identity Provider.
-
Identity provider setup - In link Setup -> Security controls -> Identity provider you need to setup Salesforce as IDP.
-
Generate certificate - first generate certificate on first screen. This certificate will be used to sign SAMLResponse messages sent from Salesforce IDP.
After certificate will be generated in Salesforce, you can download it to your computer.
-
Configure generated certificate for Identity Provider - In Identity Provider setup, you need to select the certificate, which you just generated
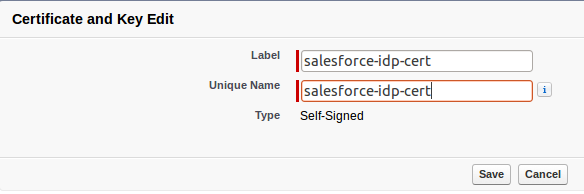
-
Add service provider - In section Setup -> Security Controls -> Identity Provider -> Service providers you can add your Picketlink application as Service Provider. We will use application sales-post-sig from Picketlink quickstarts . So in first screen of configuration of your Service provider, you need to add ACS URL and Entity ID like http://localhost:8080/sales-post-sig/ . Subject type needs to be Federation ID and you also need to upload certificate corresponding to signing key of sales-post-sig application. You first need to export this certificate from your keystore file. See previous tutorial for how to do it. In next screen, you can select profile for users, who will be able to login to this Service Provider. By checking first checkbox, you will automatically select all profiles. After confirm this screen, you will have your service provider created. Let's see how your final configuration can looks like after confirming:
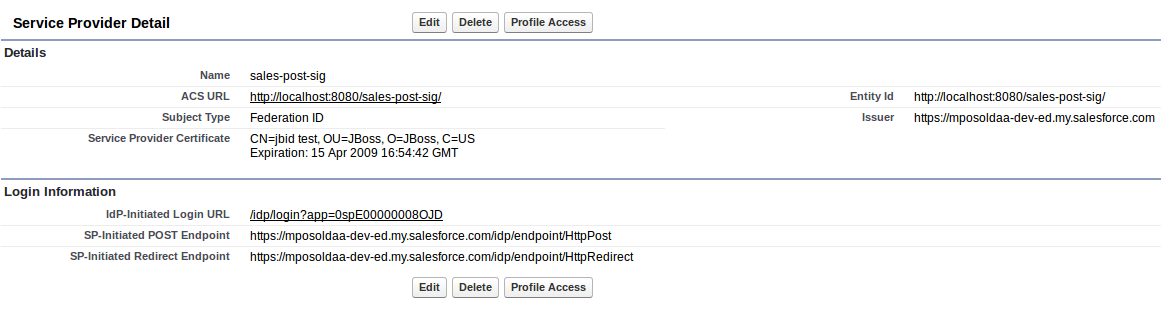
As already mentioned, we will use sample application sales-post-sig.war from picketlink quickstarts.
-
Import salesforce IDP certificate - In sales-post-sig.war/WEB-INF/classes you need to import downloaded certificate from salesforce into your keystore. You can use command like:
keytool -import -file salesforce_idp_cert.cer -keystore jbid_test_keystore.jks -alias salesforce-idp
-
Identity URL configuration - In sales-post-sig.war/WEB-INF/picketlink.xml you need to change identity URL to something like:
<IdentityURL>${idp-sig.url::https://yourdomain.my.salesforce.com/idp/endpoint/HttpPost}
-
ValidatingAlias configuration - In same file, you can add new validating alias for the salesforce host of your domain:
<ValidatingAlias Key="yourdomain.my.salesforce.com" Value="salesforce-idp" />
-
Roles mapping - Last very important step is mapping of roles for users, which are logged through Salesforce IDP. Normally when you have Picketlink as both IDP and SP, then SAMLResponse from IDP usually contains AttributeStatement as part of SAML assertion and this statement contains list of roles in attribute Role . Picketlink SP is then able to parse list of roles from statement and then it leverages SAML2LoginModule to assign these roles to JAAS Subject of logged principal. Thing is that SAML Response from Salesforce IDP does not contain any attribute statement with roles, so you need to handle roles assignment by yourself. Easiest way could be to chain SAML2LoginModule with another login module (like UsersRolesLoginModule for instance), which will ensure that assigning of JAAS roles is delegated from SAML2LoginModule to the second Login Module in chain. Needed steps:
-
In sales-post-sig.war/WEB-INF/jboss-web.xml you can change security-domain from value sp to something different like sp-salesforce
-
<security-domain>sp-salesforce</security-domain>
-
Create new application policy for this security domain. It differs in each application server, for example in JBoss 7 you need to edit JBOSS_HOME/standalone/configuration/standalone.xml and add this policy to particular section:
<security-domain name="sp-salesforce" cache-type="default">
  <authentication>
    <login-module code="org.picketlink.identity.federation.bindings.jboss.auth.SAML2LoginModule" flag="required">
      <module-option name="password-stacking" value="useFirstPass"/>
    </login-module>
    <login-module code="org.jboss.security.auth.spi.UsersRolesLoginModule" flag="required">
      <module-option name="password-stacking" value="useFirstPass"/>
      <module-option name="usersProperties" value="users.properties"/>
      <module-option name="rolesProperties" value="roles.properties"/>
    </login-module>
  </authentication>
</security-domain>
-
In sales-post-sig.war/WEB-INF/classes you need to create empty file users.properties and non-empty file roles.properties where you need to map roles. For example you can add line like:
tomcat=manager,employee,sales
where tomcat is Federation ID of some user from Salesforce, which you will use for login.
Now after server restart, let's try to access: http://localhost:8080/sales-post-sig/ . You should be redirected to salesforce login page with SAMLRequest sent from your Picketlink sales-post-sig application. Now let's login into Salesforce with username and password of some Salesforce user from your domain (like tomcat user). Make sure that this user has Federation ID and this Federation ID is mapped in file roles.properties on Picketlink SP side like described in previous steps. Now you should be redirected to http://localhost:8080/sales-post-sig/ as logged user.
Google Apps is another known business solution from Google. Google Apps supports SAML SSO in role of SAML SP, so you need to use your own application as SAML IDP. In this sample, we will again use idp-sig.war application from Picketlink quickstarts as IDP similarly like in this tutorial .
-
Creating Google Apps domain - you need to create Google Apps domain on http://www.google.com/apps . Follow the instructions on google page on how to do it.
-
Add some users - let's add some users, which will be available to login into your domain. So let's add user tomcat first. In Google & Apps control panel, you need to click Organization & Users -> Create new user and add him email tomcat@yourdomain.com . This will ensure that nick of new user will be tomcat . See screenshot:
-
Configure SAML SSO - In menu Advanced tools -> Set up single sign-on (SSO) you can setup SSO settings. For our testing purposes, you can set it like done on screenshot . Especially it's important to set Sign-in page to http://localhost:8080/idp-sig/ . Sign-out page can be also set but Google Apps don't support SAML Single Logout profile, so this is only page where will be users redirected after logout. Let's click checkbox _Use a domain specific issuer to true.
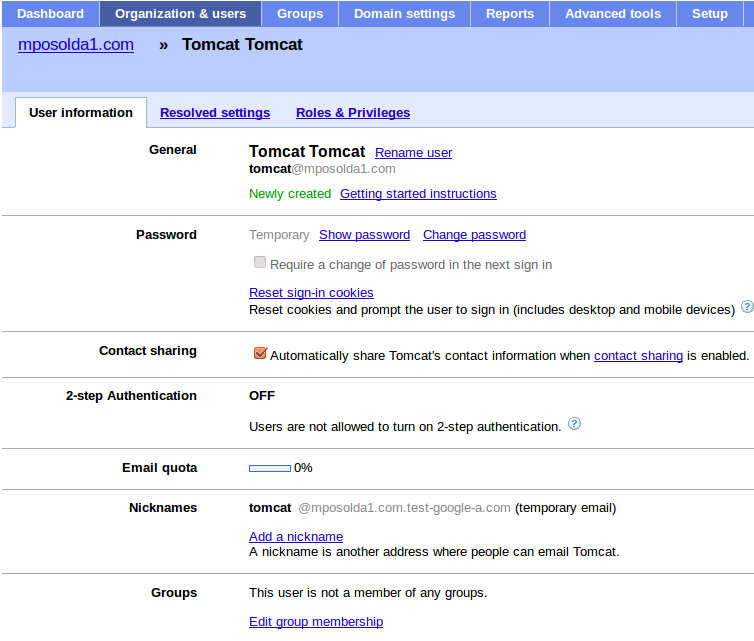
-
Certificate upload - you also need to upload certificate exported from your picketlink keystore in similar way, like done for Salesforce in previous tutorials . So let's upload test-certificate.crt into Google Apps.
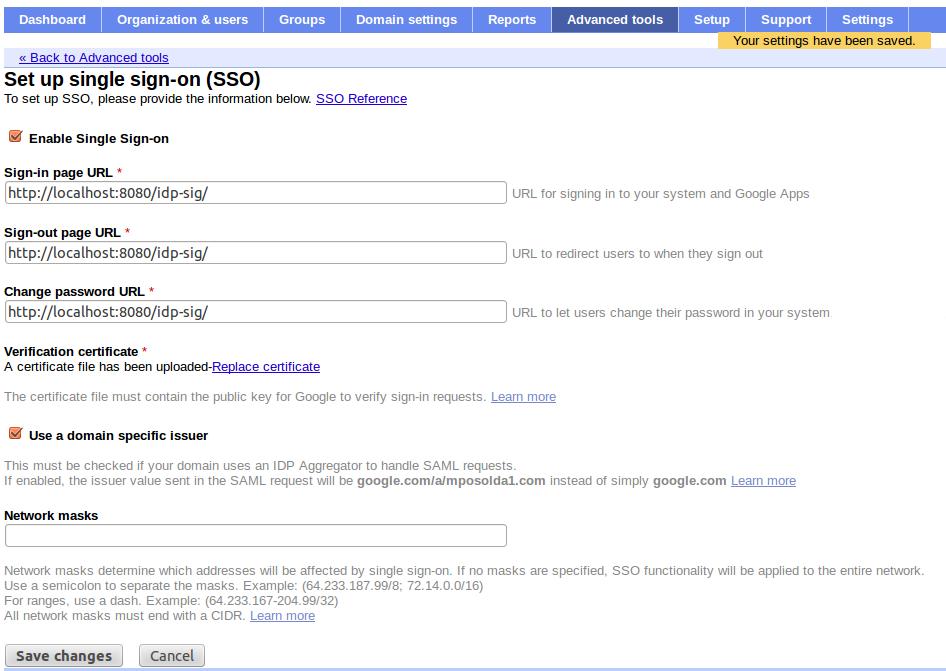
-
Trusted domains configuration - update domains in idp-sig.war/WEB-INF/picketlink.xml
<Trust>
  <Domains>localhost,jboss.com,jboss.org,redhat.com,amazonaws.com,salesforce.com,google.com</Domains>
</Trust>
-
Metadata configuration - We don't want SAMLRequest from Google Apps to be validated, because it's not signed. So let's add another metadata for Google Apps, which will specify that SAMLRequest from Google Apps Service Provider won't be signed. So let's add another EntityMetadataDescriptor entry for your domain google.com/a/yourdomain.com into sp-metadata.xml file created in previous tutorial (you may need to create new metadata file from scratch if not followed previous tutorial). Important attribute is especially AuthnRequestsSigned , which specifies that SAMLRequest from Google Apps are not signed.
<md:EntitiesDescriptor xmlns="urn:oasis:names:tc:SAML:2.0:metadata"
                    xmlns:ds="http://www.w3.org/2000/09/xmldsig#"
                    xmlns:md="urn:oasis:names:tc:SAML:2.0:metadata">
  <md:EntityDescriptor xmlns:md="urn:oasis:names:tc:SAML:2.0:metadata" entityID="https://saml.salesforce.com" validUntil="2022-06-18T14:08:08.052Z">

......
  </md:EntityDescriptor>
   <md:EntityDescriptor xmlns:md="urn:oasis:names:tc:SAML:2.0:metadata" entityID="google.com/a/yourdomain.com" validUntil="2022-06-13T21:46:02.496Z">
      <md:SPSSODescriptor AuthnRequestsSigned="false" WantAssertionsSigned="true" protocolSupportEnumeration="urn:oasis:names:tc:SAML:2.0:protocol" />
   </md:EntityDescriptor>
</md:EntitiesDescriptor>
Now logout from Google Apps and start server. And now you can do visit https://mail.google.com/a/yourdomain.com . After that Google Apps will send SAMLRequest and redirects you to http://localhost:8080/idp-sig . Please note that Google Apps is using SAML HTTP Redirect binding, so you can see SAMLRequest in browser URL. Also note that SAMLRequest is not signed, but this is not a problem as we configured it in metadata that requests from Google Apps are not signed. So after login into IDP as user tomcat, you should be automatically logged into your Google Apps as user "tomcat" as well.