PicketLink's Identity Management (IDM) features provide a rich and extensible API for managing the identities (such as users, groups and roles) of your applications and services. It also supports a flexible system for identity partitioning, allowing it to be used as a complete security solution in simple web applications and/or as an Identity Provider (IDP) in more complex multi-domain scenarios.
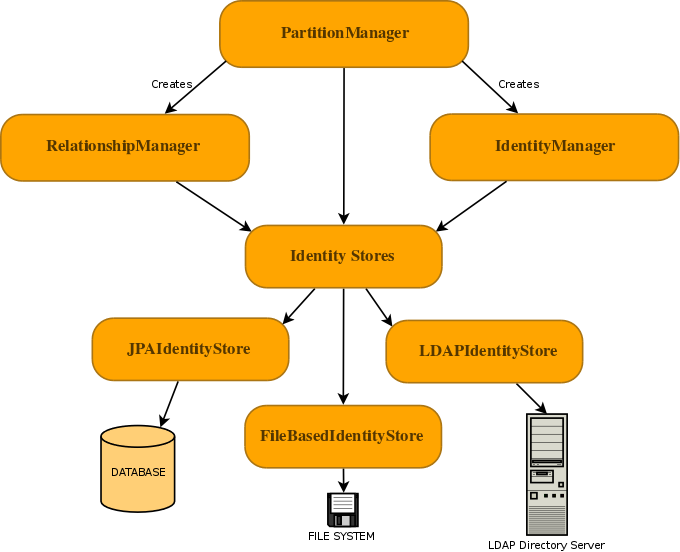
The Identity Management features of PicketLink are accessed primarily via the following three interfaces:
-
PartitionManageris used to manage identity partitions, which are essentially a container for a set of identity objects. ThePartitionManagerinterface provides a set of CRUD methods for creating, reading, updating and deleting partitions, as well as methods for creating anIdentityManagerorRelationshipManager(more on these next). A typical Java EE application with simple security requirements will likely not be required to access thePartitionManagerAPI directly. -
IdentityManageris used to manage identity objects within the scope of a partition. Some examples of identity objects are users, groups and roles, although PicketLink is not limited to just these. Besides providing the standard set of CRUD methods for managing and locating identity objects, theIdentityManagerinterface also defines methods for managing credentials and for creating identity queries which may be used to locate identities by their properties and attributes. -
RelationshipManageris used to manage relationships - a relationship is a typed association between two or more identities, with each identity having a definitive meaning within the relationship. Some examples of relationships that may already be familiar are group memberships (where a user is a member of a particular group) or granted roles (where a user is assigned to a role to afford them a certain set of privileges). TheRelationshipManagerprovides CRUD methods for managing relationships, and also for creating a relationship query which may be used to locate relationships between identities based on the relationship type and participating identity object/s.
Note
In case you are wondering why a separate RelationshipManager interface is required for managing relationships
between identites, it is because PicketLink supports relationships between identities belonging to separate partitions;
therefore the scope of a RelationshipManager instance is not constrained to a single partition in the same way
as the IdentityManager.
Interaction with the backend store that provides the persistent identity state is performed by configuring one or more
IdentityStores. PicketLink provides a few built-in IdentityStore implementations for storing
identity state in a database, file system or LDAP directory server, and it is possible to provide your own custom
implementation to support storing your application's identity data in other backends, or extend the built-in implementations
to override their default behaviour.
In a Java EE environment PicketLink provides a set of producer methods for injecting the primary identity management objects into your CDI beans. The following table outlines which IDM classes may be injected, and the CDI scope of each of the beans.
Table 3.1. Identity Management Objects
| Class Name | Scope |
|---|---|
org.picketlink.idm.PartitionManager | @ApplicationScoped |
org.picketlink.idm.IdentityManager | @RequestScoped |
org.picketlink.idm.RelationshipManager | @RequestScoped |
Since the IdentityManager and RelationshipManager beans are request scoped beans (as per the
above table) it is not possible to inject them directly into a @Startup bean as there is no request scope
available at application startup time. Instead, if you wish to use the IDM API within a @Startup bean in
your Java EE application you may inject the PartitionManager (which is application-scoped) from which you
can then get references to the IdentityManager and RelationshipManager:
@Singleton

@Startup

public class InitializeSecurity {

    @Inject private PartitionManager partitionManager;


    @PostConstruct

    public void create() {

        // Create an IdentityManager

        IdentityManager identityManager = partitionManager.createIdentityManager();


        User user = new User("shane");

        identityManager.add(user);


        Password password = new Password("password");

        identityManager.updateCredential(user, password);


        // Create a RelationshipManager

        RelationshipManager relationshipManager = partitionManager.createRelationshipManager();


        // Create some relationships

    }

}
Since PicketLink has multiple-partition support, it is important to be able to control the associated partition for
the injected IdentityManager. By default, PicketLink will injected an IdentityManager for the
default Realm (i.e. the org.picketlink.idm.model.sample.Realm partition with a name of
default). If your application has basic security requirements then this might well be adequate,
however if you wish to override this default behaviour then simply provide a producer method annotated with the
@PicketLink qualifier that returns the default partition for your application:
@ApplicationScoped

public class DefaultPartitionProducer {

    @Inject PartitionManager partitionManager;


    @Produces

    @PicketLink

    public Partition getDefaultPartition() {

        return partitionManager.getPartition(Tier.class, "warehouse.dispatch");

    }

}
If you'd like to get up and running with IDM quickly, the good news is that PicketLink will provide a default configuration
that stores your identity data on the file system if no other configuration is available. This means that if you
have the PicketLink libraries in your project, you can simply inject the PartitionManager,
IdentityManager or RelationshipManager beans into your own application and start using them
immediately:
@Inject PartitionManager partitionManager;

@Inject IdentityManager identityManager;

@Inject RelationshipManager relationshipManager;
Once you have injected an IdentityManager you can begin creating users, groups and roles for your
application:
Note
The following code examples make use of the classes provided as part of the sample identity model - see Chapter 5, Sample Identity Model for more information.
User user = new User("jdoe");

user.setFirstName("Jane");

user.setLastName("Doe");

identityManager.add(user);


Group group = new Group("employees");

identityManager.add(group);


Role admin = new Role("admin");

identityManager.add(admin);
Use the RelationshipManager to create relationships, such as role assignments and group memberships:
// Grant the admin role to the user

relationshipManager.add(new Grant(user, admin));


// Add the user to the employees group

relationshipManager.add(new GroupMembership(user, group));
The static methods provided by the org.picketlink.idm.model.sample.SampleModel class are based on the
sample identity model and may be used to lookup various identity objects, or test whether certain relationships exist.
These methods accept either an IdentityManager or RelationshipManager object as a parameter.
// Lookup the user by their username

User user = SampleModel.getUser(identityManager, "jdoe");


// Test if the user has the admin role

boolean isAdmin = SampleModel.hasRole(relationshipManager, user, role);


// Test if the user is a member of the employee group

boolean isEmployee = SampleModel.isMember(relationshipManager, user, group);
The Identity Model is a set of classes that define the security structure of an application. It may consist of identity
objects such as users, groups and roles; relationships such as group and role memberships; and partitions such as realms or
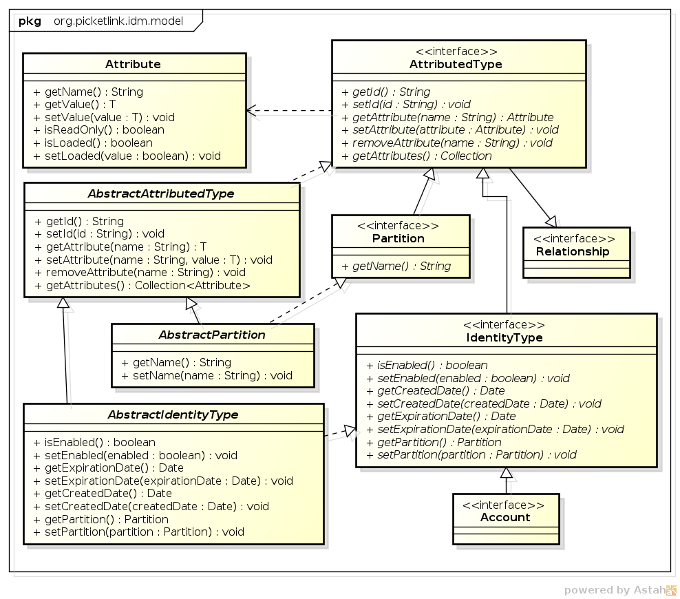
tiers. The classes found in the org.picketlink.idm.model package define the base types upon which the identity
model is built upon:
-
AttributedTypeis the base interface for the identity model. It declares a number of methods for managing a set of attribute values, plusgetId()andsetId()methods for setting a unique identifier value. -
Attributeis used to represent an attribute value. An attribute has a name and a (generically typed) value, and may be marked as read-only. Attribute values that are expensive to load (such as large binary data) may be lazy-loaded; theisLoaded()method may be used to determine whether the Attribute has been loaded or not. -
Partitionis the base interface for partitions. Since each partition must have a name it declares agetName()method. -
Relationshipis the base interface for relationships. Besides the base methods defined by theAttributedTypeinterface, relationship implementations have no further contractual requirements, however they will define methods that return the identities and attribute values in accordance with the relationship type. -
IdentityTypeis the base interface for Identity objects. It declares properties that indicate whether the identity object is enabled or not, optional created and expiry dates, plus methods to read and set the owningPartition. -
Accountis the base interface for identities that are capable of authenticating. Since the authentication process may not depend on one particular type of attribute (not all authentication is performed with a username and password) there are no hard-coded property accessors defined by this interface. It is up to each application to define theAccountimplementations required according to the application's requirements. -
AbstractAttributedTypeis an abstract base class for creatingAttributedTypeimplementations. -
AbstractPartitionis an abstract base class that implements the base methods of thePartitioninterface, to simplify the development of partition implementations. -
AbstractIdentityTypeis an abstract base class that implements the base methods of theIdentityTypeinterface, to simplify the development of identity objects.
The base identity types listed above do not define an identity model implementation themselves, so they cannot be used directly to service the security requirements of an application. Instead, an application must either define its own identity model (by providing implementations of whichever identity objects are required by the application, such as user, group or role classes) or by using a pre-prepared model. PicketLink provides a sample identity model (more details can be found in Chapter 5, Sample Identity Model) which provides a basic set of identity objects, however in case the sample identity model is insufficient, it is quite simple to define a custom model as we'll see in the next section.
A custom identity model typically consists of two types of objects - the identity objects which define the security constructs of an application, and the relationships which define how the identity objects interract with each other to establish a meaningful security policy. PicketLink treats both types of object in an abstract manner, so it is up to the developer to create meaning for these objects and their relationships within the context of their own application. This section will describe how to create new identity objects and customize their properties and attributes, while the following section will complete the picture by describing how custom relationships are created.
Let's start by looking at the source for some of the identity objects in the sample model, starting with the Agent
and User objects:
public class Agent extends AbstractIdentityType implements Account {

    private String loginName;


    public Agent() { }


    public Agent(String loginName) {

        this.loginName = loginName;

    }


    @AttributeProperty

    @Unique

    public String getLoginName() {

        return loginName;

    }


    public void setLoginName(String loginName) {

        this.loginName = loginName;

    }

}
public class User extends Agent {

    private String firstName;

    private String lastName;

    private String email;


    public User() { }


    public User(String loginName) {

        super(loginName);

    }


    @AttributeProperty

    public String getFirstName() {

        return firstName;

    }


    public void setFirstName(String firstName) {

        this.firstName = firstName;

    }


    @AttributeProperty

    public String getLastName() {

        return lastName;

    }


    public void setLastName(String lastName) {

        this.lastName = lastName;

    }


    @AttributeProperty

    public String getEmail() {

        return this.email;

    }


    public void setEmail(String email) {

        this.email = email;

    }

}
The Agent class is intended to represent a third party entity that may authenticate against an application,
whether human (a user) or non-human (an external or remote process). Because Agent implements the
Account marker interface, it is making a declaration that this identity object is capable of authenticating.
To support the typical username/password authentication method, the Agent class defines a loginName
property, however since the Account interface enforces no particular method of authentication (instead of a
using username for authentication your application may require a certificate or fingerprint) this property is arbitrary.
The User class represents a human user and extends Agent to add the human-specific properties
firstName, lastName and email. Since human users are also
capable of authenticating it will also inherit the loginName property from the Agent.
In the code above we can see that the getter methods of the identity objects are annotated with @AttributeProperty.
This annotation (from the org.picketlink.idm.model.annotation package) is used to indicate that the property
of the identity object should be persisted by the configured identity store when creating or updating the identity object. If
this annotation was missing, then the property value would be null when loading the identity object from the
identity store.
In this example, the annotation is placed on the getter method however it is also valid to place it on the corresponding field value.
In the above code listing for the Agent class, we can also see that there is a @Unique annotation
on the getLoginName() getter method (in addition to the @AttributeProperty annotation). This special
annotation (also from the org.picketlink.idm.model.annotation package) is used to indicate to PicketLink that a
unique constraint must be enforced on the property value - i.e. no two Agent objects (or their subclasses) may
return the same value for getLoginName().
One of the strengths of PicketLink is its ability to support custom relationship types. This extensibility allows you, the developer to create specific relationship types between two or more identities to address the domain-specific requirements of your own application.
Note
Please note that custom relationship types are not supported by all IdentityStore implementations -
see the Identity Store section above for more information.
To create a custom relationship type, we start by creating a new class that implements the Relationship interface.
To save time, we also extend the AbstractAttributedType abstract class which takes care of the identifier and
attribute management methods for us:
  public class Authorization extends AbstractAttributedType implements Relationship {


  }
The next step is to define which identities participate in the relationship. Once we create our identity property methods,
we also need to annotate them with the org.picketlink.idm.model.annotation.RelationshipIdentity annotation.
This is done by creating a property for each identity type.
  private User user;

  private Agent application;


  @RelationshipIdentity

  public User getUser() {

    return user;

  }


  public void setUser(User user) {

    this.user = user;

  }


  @RelationshipIdentity

  public Agent getApplication() {

    return application;

  }


  public void setApplication(Agent application) {

    this.application = application;

  }
We can also define some attribute properties, using the @RelationshipAttribute annotation:
  private String accessToken;


  @RelationshipAttribute

  public String getAccessToken() {

    return accessToken;

  }


  public void setAccessToken(String accessToken) {

    this.accessToken = accessToken;

  }
PicketLink has been designed from the ground up to support a system of partitioning, allowing the identity objects it manages to be separated into logical groupings. Partitions may be used to split identities into separate realms, allowing an application to serve multiple organisations (for example in a SaaS architecture) or to support a multi-tier application allowing each tier to define its own set of identity objects (such as groups or roles). PicketLink's architecture also allows you to define your own custom partition types, allowing more complex use cases to be supported.
The PartitionManager interface provides the following methods for managing partitions:
public interface PartitionManager extends Serializable {


    <T extends Partition> T getPartition(Class<T> partitionClass, String name);


    <T extends Partition> T lookupById(final Class<T> partitionClass, String id);


    void add(Partition partition);


    void add(Partition partition, String configurationName);


    void update(Partition partition);


    void remove(Partition partition);

}
To create a new Partition object you may use either of the add() methods. If a
configurationName parameter value isn't provided (see Chapter 6, Identity Management - Configuration for more
information), then the newly created Partition will use the default configuration.
// Create a new Realm partition called "acme"

partitionManager.add(new Realm("acme"));
// Create a new Tier partition called "sales" using the named configuration "companyAD"

partitionManager.add(new Tier("sales"), "companyAD");
Each new Partition object created will be automatically assigned a unique identifier value, which can be accessed
via its getId() method:
Realm realm = new Realm("acme");

partitionManager.add(realm);

String partitionId = realm.getId();
Partitions may be retrieved using either their name or their unique identifier value. Both methods require the exact partition class to be provided as a parameter:
Realm realm = partitionManager.getPartition(Realm.class, "acme");

Tier tier = partitionManager.lookupById(Tier.class, tierId);
Since Partition objects all implement the AttributedType interface, it is also possible to set
arbitrary attribute values:
realm.setAttribute(new Attribute<Date>("created", new Date()));
After making changes to an existing Partition object, the update() method may be used to persist
those changes:
partitionManager.update(realm);
A Partition object may also be removed with the remove() method:
Warning
Removing a Partition object is permanent, and will also remove all identity objects that exist within that
partition!
partitionManager.remove(realm);
Creating a custom partition type is extremely simple. PicketLink provides an abstract base class called
AbstractPartition (see above) which makes creating a custom partition class a trivial exercise -
simply extend the AbstractPartition class and then add any additional property getter/setter methods
that you might require. Let's take a look at the built-in Realm class to see how little code it
requires to create a custom partition:
@IdentityPartition(supportedTypes = {IdentityType.class})

public class Realm extends AbstractPartition {

    public Realm() {

        super(null);

    }


    public Realm(String name) {

        super(name);

    }

}
The @IdentityPartition annotation must be present on the partition class - the supportedTypes
member is used to configure which identity types may be stored in this partition. Any identity object (or subclass)
specified by supportedTypes is valid. There is also a unsupportedTypes member which may be
used to specify identity types which may not be stored in the partition. This value can be used
to trim unsupported classes (and their subclasses) off the supportedTypes.