Configuration in PicketLink is in essence quite simple; an IdentityConfiguration object must first
be created to hold the PicketLink configuration options. Once all configuration options have been set, you just create a
IdentityManagerFactory instance passing the previously created configuration.
The IdentityManagerFactory can then be used to create IdentityManager instances
via the createIdentityManager() method.
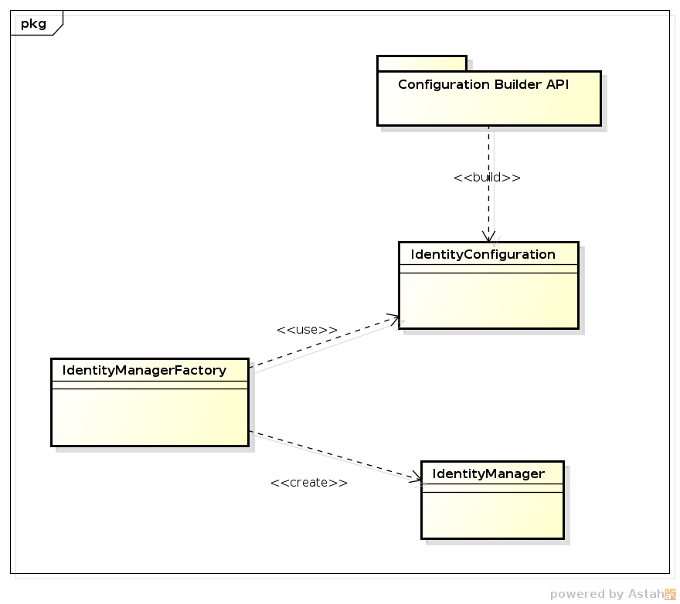
The IdentityConfiguration is usually created using a Configuration Builder API, which provides a rich and fluent API for every single aspect of PicketLink configuration.
Note
For now, all configuration is set programmatically using the Configuration Builder API only. Later versions will also support a declarative configuration in a form of XML documents.
Each IdentityManager instance has its own security context, represented by
the SecurityContext class. The security context contains temporary state which is maintained
for one or more identity management operations within the scope of a single realm or tier. The
IdentityManager (and its associated SecurityContext) is typically modelled as a
request-scoped object (for environments which support such a paradigm, such as a servlet container), or alternatively
as an actor within the scope of a transaction. In the latter case, the underlying resources being
utilised by the configured identity stores (such as a JPA EntityManager) would participate in
the active transaction, and changes made as a result of any identity management operations would either be
committed or rolled back as appropriate for the logic of the encapsulating business method.
The following sections describe various ways that configuration may be performed in different environments.
Configuration for Identity Management can be defined programmatically using the Configuration Builder API. The aim of this API is to make it easier to chain coding of configuration options in order to speed up the coding itself and make the configuration more readable.
Let's assume that you want to quick start with PicketLink Identity Management features using a file-based Identity Store.
First, a fresh instance of IdentityConfiguration is created using the IdentityConfigurationBuilder helper object,
where we choose which identity store we want to use (in this case a file-based store) and any other configuration option, if necessary.
Finally, we use the configuration to create a IdentityManagerFactory from where we can create IdentityManager instances and start to perform Identity Management operations:
IdentityConfigurationBuilder builder = new IdentityConfigurationBuilder();


builder

  .stores()

  .file()

  .supportAllFeatures();


IdentityConfiguration configuration = builder.build();


IdentityManagerFactory identityManagerFactory = new IdentityManagerFactory(configuration);


IdentityManager identityManager = identityManagerFactory.createIdentityManager();


User user = new SimpleUser("john");


identityManager.add(user);
The IdentityConfigurationBuilder is the entry point for PicketLink configuration.
It is a very simple class with some meaningful methods for all supported configuration options.
IdentityConfigurationBuilder builder = new IdentityConfigurationBuilder();


builder

  .stores() // supported identity stores configuration

    .file()

      // file-based identity store configuration

    .jpa()

      // JPA-based identity store configuration

    .ldap()

      // LDAP-based identity store configuration

  .contextFactory(...); // for custom SecurityContextFactory implementations
In the next sections we'll cover each supported Identity Store and their specific configuration.
The SecurityContext plays an important role in the PicketLink IDM achitecture. As discussed in the Architectural Overview,
it is strongly used during the execution of operations. It carries very sensitive and contextual information for a specific operation and provides access for some of the
IDM underlying services such as caching, event handling, UUID generator for IdentityTpe and Relationship instances, among others.
Operations are always executed by a specific IdentityStore in order to persist or store identity data using a specific repository (eg.: LDAP, databases, filesystem, etc).
When executing a operation the identity store must be able to:
-
Access the current
Partition. All operations are executed for a specificRealmorTier -
Access the current
IdentityManagerinstance, from which the operation was executed. -
Access the Event Handling API in order to fire events such as when an user is created, updated, etc.
-
Access the Caching API in order to cache identity data and increase performance.
-
Access the Credential Handler API in order to be able to update and validate credentials.
-
Access to external resources, provided before the operation is executed and initialized by a
ContextInitializer.
Sometimes you may need to provide additional configuration or even references for external resources before the operation is executed by an identity store.
An example is how you tell to theJPAIdentityStore which EntityManager instance should be used.
When executing an operation, the JPAIdentityStore must be able to access the current EntityManager to persist or retrieve data from the database.
You need someway to populate the SecurityContext with such information. When you're configuring an identity store, there is a configuration option
that allows you to provide a ContextInitializer implementation.
public interface ContextInitializer {

    void initContextForStore(SecurityContext context, IdentityStore<?> store);

}
The method initContextForStore will be invoked for every single operation and before its execution by the identity store.
It can be implemented to provide all the necessary logic to initialize and populate the SecurityContext for a specific IdentityStore.
The configuration is also very simple, you just need to provide the following configuration:
IdentityConfigurationBuilder builder = new IdentityConfigurationBuilder();


builder

  .stores()

    .file()

      .addContextInitializer(new MySecurityContextInitializer());

}
You can provide multiple initializers.
Note
Remember that initializers are executed for every single operation. Also, the same instance is used between operations which means your implementation should be “stateless”. You should be careful about the implementation in order to not impact performance, concurrency or introduce unexpected behaviors.
SecurityContext instances are created by the SecurityContextFactory. If for some reason you need to change how SecurityContext instances are created,
you can provide an implementation of this interface and configure it as follows:
IdentityConfigurationBuilder builder = new IdentityConfigurationBuilder();


builder

  .stores()

    .contextFactory(mew MySecurityContextFactory());

}
When configuring identity stores you must tell which features and operations should be executed by them. Features and operations are a key concept if you want to mix stores in order to execute operations against different repositories.
PicketLink provides a Java enum, called FeatureGroup, in which are defined all supported features. The table bellow summarize them:
Table 6.1. Identity class fields
| Feature | |
|---|---|
FeatureGroup.agent | |
FeatureGroup.user | |
FeatureGroup.role | |
FeatureGroup.group | |
FeatureGroup.relationship | |
FeatureGroup.credential | |
FeatureGroup.realm | |
FeatureGroup.tier |
The features are a determinant factor when choosing an identity store to execute a specific operation. For example, if an identity store is configured with FeatureGroup.user we're saying
that all User operations should be executed by this identity store. The same goes for FeatureGroup.credential, we're just saying that credentials can also be updated and validated using
the identity store.
Beside that, provide only the feature is not enough. We must also tell the identity store which operations are supported by a feature. For example, we can configure a identity store to support only
read operations for users, which is very common when using the LDAP identity store against a read-only tree. Operations are also defined by an enum, called FeatureOperation, as follows:
Table 6.2. Identity class fields
| Operation | |
|---|---|
Featureoperation.create | |
Featureoperation.read | |
Featureoperation.update | |
Featureoperation.delete | |
Featureoperation.validate |
During the configuration you can provide which features and operations should be supported using the Configuration API. You don't need to be forced to specify them individually, if you want to support all features and operations for a particular identity store you can use:
IdentityConfigurationBuilder builder = new IdentityConfigurationBuilder();


builder

  .stores()

    .file()

      .supportAllFeatures();

}
For a more granular configuration you can also use:
IdentityConfigurationBuilder builder = new IdentityConfigurationBuilder();


builder

  .stores()

    .file()

      .supportFeature(

        FeatureGroup.agent,

        FeatureGroup.user,

        FeatureGroup.role,

        FeatureGroup.group)

}
The configuration above defines the features individually. In this case the configured features are also supporting all operations. If you want to specify which operation should be supported by a feature you can use:
IdentityConfigurationBuilder builder = new IdentityConfigurationBuilder();


builder

  .stores()

    .file()

      .supportFeature(FeatureGroup.agent, FeatureOperation.read)

      .supportFeature(FeatureGroup.user, FeatureOperation.read))

      .supportFeature(FeatureGroup.role, FeatureOperation.create))

      .supportFeature(FeatureGroup.role, FeatureOperation.read))

      .supportFeature(FeatureGroup.role, FeatureOperation.update))

      .supportFeature(FeatureGroup.role, FeatureOperation.delete))

      .supportFeature(FeatureGroup.group, FeatureOperation.create))

      .supportFeature(FeatureGroup.group, FeatureOperation.read))

      .supportFeature(FeatureGroup.group, FeatureOperation.update))

      .supportFeature(FeatureGroup.group, FeatureOperation.delete))

}
For a more complex configuration evolving multiple identity stores with a different feature set, look at the example bellow:
IdentityConfigurationBuilder builder = new IdentityConfigurationBuilder();


builder

  .stores()

    .ldap()

      .supportFeature(FeatureGroup.agent)

      .supportFeature(FeatureGroup.user)

      .supportFeature(FeatureGroup.credential)

    .jpa()

      .supportFeature(FeatureGroup.role)

      .supportFeature(FeatureGroup.group)

      .supportFeature(FeatureGroup.relationship)

}
The configuration above shows how to use LDAP to store only agents, users and credentials and database for roles, groups and relationships.
Note
Remember that identity stores must have their features and operations configured. If you don't provide them you won't be able to build the configuration.
Actually it's possible to configure IDM with XML configuration. This possibility is good especially in case when you want Picketlink IDM to be part of bigger system and your users won't have a possibility to change source code and so they can't configure it programmatically with the Builder API. So they will just need to change the configuration in XML file instead of doing some changes directly in source code.
Whole Picketlink project provides unified format of configuration file, so that you can configure federation and IDM in same file.
<PicketLink xmlns="urn:picketlink:identity-federation:config:2.1">


  <PicketLinkIDP xmlns="urn:picketlink:identity-federation:config:1.0"

                 ServerEnvironment="tomcat" BindingType="POST" SupportsSignatures="true">

    <!-- SAML2 IDP configuration is here -->

  </PicketLinkIDP>


  <Handlers xmlns="urn:picketlink:identity-federation:handler:config:2.1">

     <!-- Configuration of SAML2 handlers is here -->

  </Handlers>


  <PicketLinkSTS xmlns="urn:picketlink:identity-federation:config:1.0"

                 STSName="Test STS" TokenTimeout="7200" EncryptToken="true">

    <!-- Configuration of Picketlink STS is here -->

  </PicketlinkSTS>


  <PicketLinkIDM>

    <!-- IDM configuration is here -->

  </PicketLinkIDM>


</PicketLink>
Note that if you don't want to use Picketlink Federation, you can omit it's configuration and use just IDM.
XML configuration is leveraging Builder API and Java reflection during it's parsing, so names of XML elements are actually same like names of particular Builder methods.
For example, let's assume that you want to use FileIdentityStore and your programmatic configuration looks like this:
IdentityConfigurationBuilder builder = new IdentityConfigurationBuilder();


builder

    .named(SIMPLE_FILE_STORE_CONFIG)

        .stores()

            .file()

            .preserveState(false)

            .supportGlobalRelationship(Relationship.class)

            .supportAllFeatures();
Same XML configuration to configure IDM with FileIdentityStore will look like this:
<PicketLink xmlns="urn:picketlink:identity-federation:config:2.1">


  <PicketLinkIDM>


    <named value="SIMPLE_FILE_STORE_CONFIG">

      <stores>

        <file>

          <preserveState value="false" />

          <supportGlobalRelationship value="org.picketlink.idm.model.Relationship" />

          <supportAllFeatures />

        </file>

      </stores>

    </named>


  </PicketLinkIDM>


</PicketLink>
You can take a look at testsuite to see more examples.
So to initialize Picketlink IDM from XML you can use the code like this:
// Replace with your own configuration file

String configFilePath = "config/embedded-file-config.xml";


ClassLoader tcl = Thread.currentThread().getContextClassLoader();

InputStream configStream = tcl.getResourceAsStream(configFilePath);

XMLConfigurationProvider xmlConfigurationProvider = new XMLConfigurationProvider();

IdentityConfigurationBuilder idmConfigBuilder =

  xmlConfigurationProvider.readIDMConfiguration(configStream);
Now you can bootstrap IDM from idmConfigBuilder in same way, like it's done in
Programmatic Configuration. Note that you can initialize builder
from XML file and then you can do some additional programmatic configuration. For example, you may need to programmatically
add JPAContextInitializer in case that you are using JPA, because you will need access to JPA EntityManager.