Table of Contents
Authentication is the act of verifying the identity of a user. PicketLink offers an extensible authentication API that allows for significant customization of the authentication process, while also providing sensible defaults for developers that wish to get up and running quickly. It also supports both synchronous and asynchronous user authentication, allowing for both a traditional style of authentication (such as logging in with a username and password), or alternatively allowing authentication via a federated identity service, such as OpenID, SAML or OAuth. This chapter will endeavour to describe the authentication API and the authentication process in some detail, and is a good place to gain a general overall understanding of authentication in PicketLink. However, please note that since authentication is a cross-cutting concern, various aspects (for example Identity Management-based authentication and Federated authentication) are documented in other chapters of this book.
The Identity bean (which can be found in the org.picketlink package) is central to PicketLink's
security API. This bean represents the authenticated user for the current session, and provides many useful methods for
controlling the authentication process and querying the user's assigned privileges. In terms of authentication, the
Identity bean provides the following methods:
AuthenticationResult login();


void logout();


boolean isLoggedIn();


Account getAccount();
The login() method is the primary point of entry for the authentication process. Invoking
this method will cause PicketLink to attempt to authenticate the user based on the credentials that they have provided.
The AuthenticationResult type returned by the login() method is a simple enum that defines the
following two values:
public enum AuthenticationResult {

    SUCCESS, FAILED

}
If the authentication process is successful, the login() method returns a result of SUCCESS,
otherwise it returns a result of FAILED. The default implementation of the Identity bean is
a @SessionScoped CDI bean, which means that once a user is authenticated they will stay authenticated for the
duration of the session.
Note
One significant point to note is the presence of the @Named annotation on the Identity bean,
which means that its methods may be invoked directly from the view layer (if the view layer, such as JSF, supports it)
via an EL expression.
One possible way to control the authentication process is by using an action bean, for example the following code might be used in a JSF application:
public @RequestScoped @Named class LoginAction {


    @Inject Identity identity;


    public void login() {

        AuthenticationResult result = identity.login();

        if (AuthenticationResult.FAILED.equals(result)) {

            FacesContext.getCurrentInstance().addMessage(null,

                new FacesMessage(

                        "Authentication was unsuccessful.  Please check your username and password " +

                        "before trying again."));

        }

    }

}
In the above code, the Identity bean is injected into the action bean via the CDI @Inject
annotation. The login() method
is essentially a wrapper method that delegates to Identity.login() and stores the authentication result in
a variable. If authentication was unsuccessful, a FacesMessage is created to let the user know that
their login failed. Also, since the bean is @Named it can be invoked directly from a JSF control like so:
<h:commandButton value="LOGIN" action="#{loginAction.login}"/>
The Identity.isLoggedIn() method may be used to determine whether there is a user logged in for the current session.
It is typically used as an authorization check to control either an aspect of the user interface (for example, not
displaying a menu item if the user isn't logged in), or to restrict certain business logic. While logged in,
the getAccount() method can be used to retrieve the currently authenticated account (i.e. the user). If the current
session is not authenticated, then getAccount() will return null. The following example
shows both the isLoggedIn() and getAgent() methods being used inside a JSF page:
<ui:fragment rendered="#{identity.loggedIn}">Welcome, #{identity.account.loginName}
Note
If you're wondering what an Account is, it is simply a representation of the external entity that is
interacting and authenticating with your application. The Account interface is actually the superclass of
the User and Agent
- see the Identity Management chapter for more details.
The logout() method allows the user to log out, thereby clearing the authentication state for their session.
Also, if the user's session expires (for example due to inactivity) their authentication state will also be lost
requiring the user to authenticate again.
The following JSF code example demonstrates how to render a log out button when the current user is logged in:
<ui:fragment rendered="#{identity.loggedIn}">

    <h:form>

        <h:commandButton value="Log out" action="#{identity.logout}"/>

    </h:form>

</ui:fragment>
While it is the Identity bean that controls the overall authentication process, the actual authentication
"business logic" is defined by the Authenticator interface:
public interface Authenticator {

    public enum AuthenticationStatus {

        SUCCESS,

        FAILURE,

        DEFERRED

    }


    void authenticate();


    void postAuthenticate();


    AuthenticationStatus getStatus();


    Account getAccount();

}
During the authentication process, the Identity bean will invoke the methods of the active
Authenticator (more on this in a moment) to perform user authentication. The authenticate() method
is the most important of these, as it defines the actual authentication logic. After authenticate() has been
invoked by the Identity bean, the getStatus() method will reflect the authentication status
(either SUCCESS, FAILURE or DEFERRED). If the authentication process was a
success, the getAccount() method will return the authenticated Account object and the
postAuthenticate() method will be invoked also. If the authentication was not a success,
getAccount() will return null.
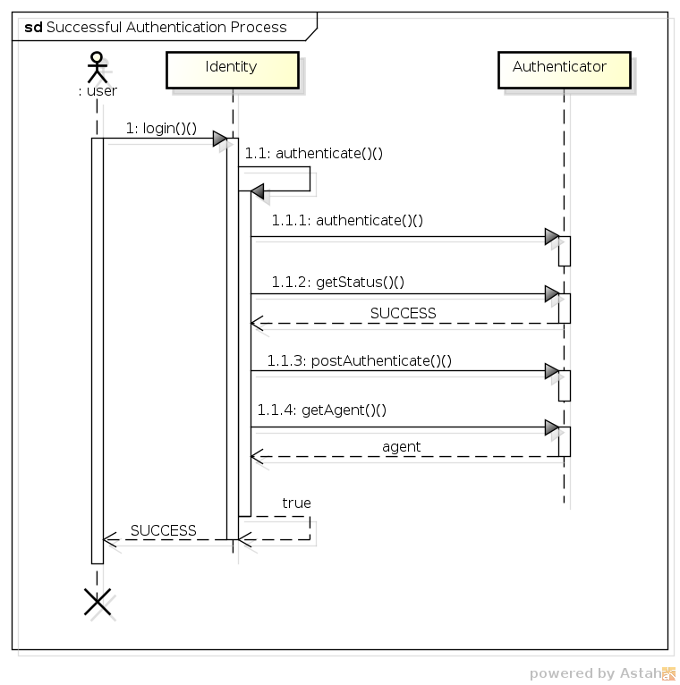
Now that we've looked at all the individual pieces, let's take a look at how they all work together to process an authentication request. For starters, the following sequence diagram shows the class interaction that occurs during a successful authentication:
-
1 - The user invokes the
login()method of theIdentitybean. -
1.1 - The
Identitybean (after performing a couple of validations) invokes its ownauthenticate()method. -
1.1.1 - Next the
Identitybean invokes theAuthenticatorbean'sauthenticate()method (which has a return value ofvoid). -
1.1.2 - To determine whether authentication was successful, the
Identitybean invokes theAuthenticator'sgetStatus()method, which returns aSUCCESS. -
1.1.3 - Upon a successful authentication, the
Identitybean then invokes theAuthenticator'spostAuthenticate()method to perform any post-authentication logic. -
1.1.4 - The
Identitybean then invokes theAuthenticator'sgetAccount()method, which returns anAccountobject representing the authenticated agent, which is then stored as a private field in theIdentitybean.
The authentication process ends when the Identity.authenticate() method returns a value of
true to the login() method, which in turn returns an authentication result
of SUCCESS to the invoking user.
Let's take a closer look at an extremely simple example of an Authenticator. The following
code demonstrates an Authenticator implementation that simply tests the username and password
credentials that the user has provided against hard coded values of jsmith for the username,
and abc123 for the password, and if they match then authentication is deemed to be a success:
@PicketLink

public class SimpleAuthenticator extends BaseAuthenticator {


    @Inject DefaultLoginCredentials credentials;


    @Override

    public void authenticate() {

        if ("jsmith".equals(credentials.getUserId()) &&

                "abc123".equals(credentials.getPassword())) {

            setStatus(AuthenticationStatus.SUCCESS);

            setAccount(new User("jsmith"));

        } else {

            setStatus(AuthenticationStatus.FAILURE);

            FacesContext.getCurrentInstance().addMessage(null, new FacesMessage(

                    "Authentication Failure - The username or password you provided were invalid."));

        }

    }

}
The first thing we can notice about the above code is that the class is annotated with the
@PicketLink annotation. This annotation indicates that this bean should be used
for the authentication process. The next thing is that the authenticator class extends something called
BaseAuthenticator. This abstract base class provided by PicketLink implements the
Authenticator interface and provides implementations of the getStatus() and
getAccount() methods (while also providing matching setStatus() and
setAccount() methods), and also provides an empty implementation of
the postAuthenticate() method. By extending BaseAuthenticator, our
Authenticator implementation simply needs to implement the authenticate() method
itself.
We can see in the above code that in the case of a successful authentication, the setStatus() method
is used to set the authentication status to SUCCESS, and the setAccount() method
is used to set the user (in this case by creating a new instance of User). For an
unsuccessful authentication, the setStatus() method is used to set the authentication status to
FAILURE, and a new FacesMessage is created to indicate to the user that
authentication has failed. While this code is obviously meant for a JSF application, it's possible to
execute whichever suitable business logic is required for the view layer technology being used.
One thing that hasn't been touched on yet is the following line of code:
@Inject DefaultLoginCredentials credentials;
This line of code injects the credentials that have been provided by the user using CDI's
@Inject annotation, so that our Authenticator implementation can query
the credential values to determine whether they're valid or not. We'll take a look at credentials in
more detail in the next section.
Note
You may be wondering what happens if you don't provide an Authenticator bean in your application.
If this is the case, PicketLink will automatically authenticate via the identity management API, using a
sensible default configuration. See the Identity Management chapter for more information.
If your application needs to support multiple authentication methods, you can provide the authenticator selection
logic within a producer method annotated with @PicketLink, like so:
@RequestScoped

@Named

public class AuthenticatorSelector {


    @Inject Instance<CustomAuthenticator> customAuthenticator;

    @Inject Instance<IdmAuthenticator> idmAuthenticator;


    private String authenticator;


    public String getAuthenticator() {

        return authenticator;

    }


    public void setAuthenticator(String authenticator) {

        this.authenticator = authenticator;

    }


    @Produces

    @PicketLink

    public Authenticator selectAuthenticator() {

        if ("custom".equals(authenticator)) {

            return customAuthenticator.get();

        } else {

            return idmAuthenticator.get();

        }

    }

}
This @Named bean exposes an authenticator property that can be set by a
user interface control in the view layer. If its value is set to "custom" then CustomAuthenticator
will be used, otherwise IdmAuthenticator (the Authenticator used to authenticate
using the identity management API) will be used instead. This is an extremely simple example but should give
you an idea of how to implement a producer method for authenticator selection.
Credentials are something that provides evidence of a user's identity; for example a username and password, an X509 certificate or some kind of biometric data such as a fingerprint. PicketLink has extensive support for a variety of credential types, and also makes it relatively simple to add custom support for credential types that PicketLink doesn't support out of the box itself.
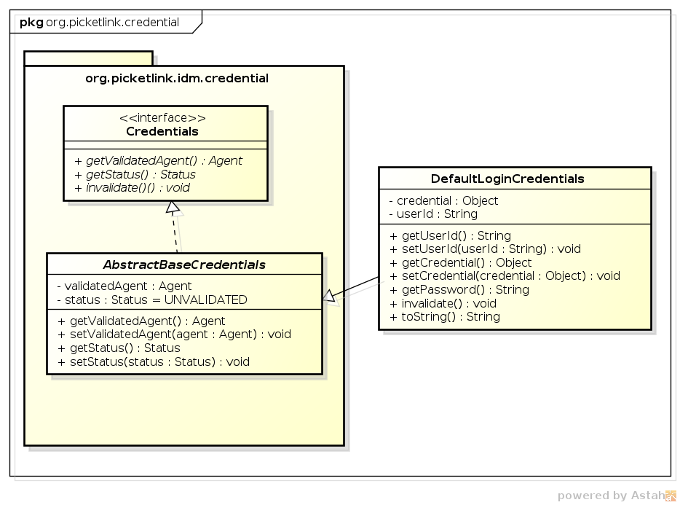
In the previous section, we saw a code example in which a DefaultLoginCredentials (an implementation of
the Credentials interface that supports a user ID and a credential value) was injected into the
SimpleAuthenticator
bean. The most important thing to know about the Credentials interface in relation to writing your own
custom Authenticator implementation is that you're not forced to use it.
However, while the Credentials interface is mainly designed for use with the
Identity Management API (which is documented in a separate chapter) and its methods would rarely be used in a custom
Authenticator, PicketLink provides some implementations which are suitably convenient to use as such,
DefaultLoginCredentials being one of them.
So, in a custom Authenticator such as this:
public class SimpleAuthenticator extends BaseAuthenticator {


    @Inject DefaultLoginCredentials credentials;


    // code snipped

}
The credential injection is totally optional. As an alternative example, it is totally valid to create a
request-scoped bean called UsernamePassword with simple getters and setters like so:
public @RequestScoped class UsernamePassword {

    private String username;

    private String password;


    public String getUsername() { return username; }

    public String getPassword() { return password; }


    public void setUsername(String username) { this.username = username; }

    public void setPassword(String password) { this.password = password; }

}
And then inject that into the Authenticator bean instead:
public class SimpleAuthenticator extends BaseAuthenticator {


    @Inject UsernamePassword usernamePassword;


    // code snipped

}
Of course it is not recommended that you actually do this, however this simplistic example serves adequately for demonstrating the case in point.
The DefaultLoginCredentials bean is provided by PicketLink as a convenience, and is intended to
serve as a general purpose Credentials implementation suitable for a variety of use cases. It
supports the setting of a userId and credential property, and provides convenience
methods for working with text-based passwords. It is a request-scoped bean and is also annotated with
@Named so as to make it accessible directly from the view layer.
A view technology with support for EL binding (such as JSF) can access the DefaultLoginCredentials
bean directly via its bean name, loginCredentials. The following code snippet shows some
JSF markup that binds the controls of a login form to DefaultLoginCredentials:
<div class="loginRow">

  <h:outputLabel for="name" value="Username" styleClass="loginLabel"/>

  <h:inputText id="name" value="#{loginCredentials.userId}"/>

</div>


<div class="loginRow">

  <h:outputLabel for="password" value="Password" styleClass="loginLabel"/>

  <h:inputSecret id="password" value="#{loginCredentials.password}" redisplay="true"/>

</div>