Table of Contents
- 6.1. Configuration
- 6.1.1. Architectural Overview
- 6.1.2. Default Configuration
- 6.1.3. Providing a Custom Configuration
- 6.1.4. Programmatic Configuration Overview
- 6.1.5. Providing Multiple Configurations
- 6.1.6. Providing Multiple Stores for a Configuration
- 6.1.7. Configuring Credential Handlers
- 6.1.8. Identity Context Configuration
- 6.1.9. IDM configuration from XML file
Configuration in PicketLink is in essence quite simple; an IdentityConfiguration object must first
be created to hold the PicketLink configuration options. Once all configuration options have been set, you just create a
PartitionManager instance passing the previously created configuration.
The PartitionManager can then be used to create Partition and IdentityManager instances.
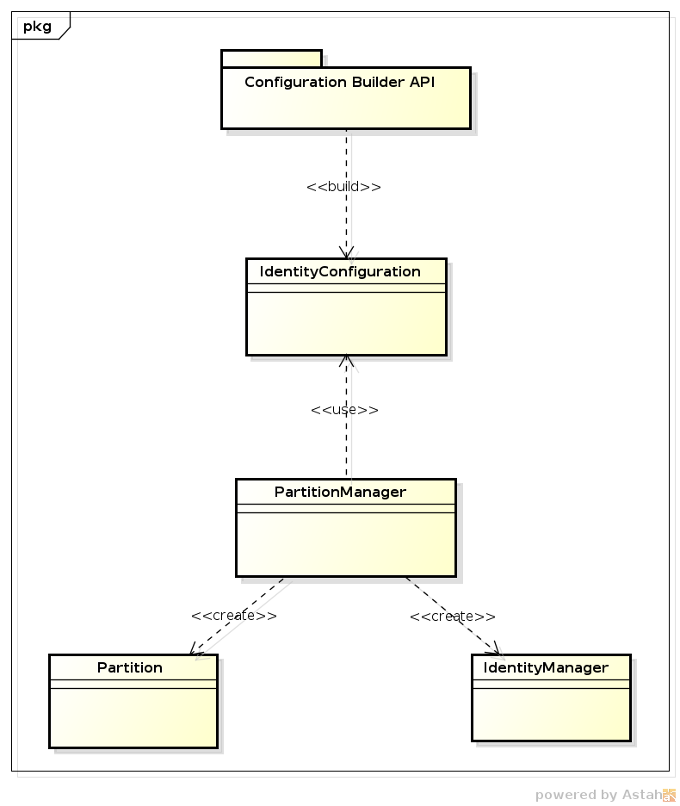
The IdentityConfiguration is usually created using a Configuration Builder API, which provides a rich and fluent
API for every single aspect of PicketLink configuration.
If you'd like to get up and running with IDM quickly, the good news is that PicketLink will provide a default configuration
that stores your identity data on the file system if no other configuration is available. This means that if you
have the PicketLink libraries in your project, you can simply inject the PartitionManager,
IdentityManager or RelationshipManager beans into your own application and start using them
immediately:
@Inject PartitionManager partitionManager;

@Inject IdentityManager identityManager;

@Inject RelationshipManager relationshipManager;
Note
The default configuration is very useful for developing and testing purposes, as you don't need a database or a LDAP server to start managing your identity data.
In certain cases the default configuration may not be enough to your application. You can easily provide your own configuration
by observing a specific IdentityConfigurationEvent:
@ApplicationScoped

public static class PicketLinkConfiguration {


  public void observeIdentityConfigurationEvent(@Observes IdentityConfigurationEvent event) {

    IdentityConfigurationBuilder builder = event.getConfig();


    // use the builder to provide your own configuration

  }

}
You can also provide your own configuration by producing one or more IdentityConfiguration instances using a
@Producer annotated method:
@ApplicationScoped

public static class PicketLinkConfiguration {


  @Produces

  public IdentityConfiguration produceJPAConfiguration() {

      IdentityConfigurationBuilder builder = new IdentityConfigurationBuilder();


      builder

          .named("jpa.config")

              .stores()

                  .jpa()

                    // configure the JPA store


      return builder.build();

  }


  @Produces

  public IdentityConfiguration produceLDAPConfiguration() {

      IdentityConfigurationBuilder builder = new IdentityConfigurationBuilder();


      builder

          .named("ldap.config")

              .stores()

                  .ldap()

                      // configure the LDAP store


      return builder.build();

  }

}
The example above produces two distinct configurations: one using a JPA store and another using the LDAP store. During the startup PicketLink will resolve both configurations and initialize the IDM subsystem with them. You can also provide a single configuration.
For last, you can also build your own PartitionManager instance if you want more control.
@ApplicationScoped

public static class PicketLinkConfiguration {


  @PicketLink

  @Produces

  public PartitionManager producePartitionManager() {

      IdentityConfigurationBuilder builder = new IdentityConfigurationBuilder();


      builder

          .named("produced.partition.manager.config")

              .stores()

                  .jpa()

                      .mappedEntity(

                              AccountTypeEntity.class,

                              RoleTypeEntity.class,

                              GroupTypeEntity.class,

                              IdentityTypeEntity.class,

                              RelationshipTypeEntity.class,

                              RelationshipIdentityTypeEntity.class,

                              PartitionTypeEntity.class,

                              PasswordCredentialTypeEntity.class,

                              DigestCredentialTypeEntity.class,

                              X509CredentialTypeEntity.class,

                              OTPCredentialTypeEntity.class,

                              AttributeTypeEntity.class

                      )

                      .addContextInitializer(this.contextInitializer)

                      .supportAllFeatures();


      return new DefaultPartitionManager(builder.build());

  }


}
The example above allows you to produce your own PartitionManager instance. Note that the producer
method is annotated with the PicketLink annotation. Another important thing when producing your own
PartitionManager is that you must manually create the partitions before start producing IdentityManager
instances (eg.: the default partition).
The Identity Management configuration can be defined programmatically using the Configuration Builder API. The aim of this API is to make it easier to chain coding of configuration options in order to speed up the coding itself and make the configuration more readable.
Let's assume that you want to quick start with PicketLink Identity Management features using a File-based Identity Store.
First, a fresh instance of IdentityConfiguration is created using the IdentityConfigurationBuilder helper object,
from where we choose which identity store we want to use (in this case a file-based store) and any other configuration option, if necessary.
Finally, we use the configuration to create a PartitionManager, from where we can create Partition and IdentityManager instances:
IdentityConfigurationBuilder builder = new IdentityConfigurationBuilder();


builder

  .named("default")

    .stores()

      .file()

        .supportAllFeatures();


DefaultPartitionManager partitionManager = new DefaultPartitionManager(builder.buildAll());


Realm defaultRealm = new Realm(Realm.DEFAULT_REALM);


// let's add the partition using the default configuration.

partitionManager.add(defaultRealm);


// if no partition is specified to createIdentityManager, defaults to the default Realm.

IdentityManager identityManager = partitionManager.createIdentityManager();


User john = new User("john");


// let's add john to the default partition

identityManager.add(user);
A PartitionManager can be built considering multiple configurations. This is a very powerful feature given
that you can manage your identity data between different partitions each one using a specific configuration.
As discussed before, each configuration has a name. The name can be used to identify a configuration set as well
to tell PicketLink the configuration that should be used to manage a specific Partition.
Let's take a more close look how you can use multiple configurations:
IdentityConfigurationBuilder builder = new IdentityConfigurationBuilder();


builder

    .named("ldap.config")

        .stores()

            .ldap()

              // specific configuration options for the LDAP store

              .supportAllFeatures();

    .named("jpa.config")

        .stores()

            .jpa()

              // specific configuration options for the JPA store

              .supportAllFeatures();


DefaultPartitionManager partitionManager = new DefaultPartitionManager(builder.buildAll());


Realm internalPartition = new Realm("internal");


// the 'internal' partition will use the 'ldap.config' configuration

partitionManager.add(internalPartition, "ldap.config");


// we create an IdentityManager for the LDAP managed partition

IdentityManager internalIdentityManager = partitionManager.createIdentityManager(internalPartition);


User john = new User("john");


// john will be added to the LDAP

internalIdentityManager.add(john);


Realm externalPartition = new Realm("external");


// the 'external' partition will use the 'jpa.config' configuration

partitionManager.add(externalPartition, "jpa.config");


User mary = new User("mary");


// we create an IdentityManager for the JPA managed partition

IdentityManager externalIdentityManager = partitionManager.createIdentityManager(externalPartition);


// mary will be added to the database

externalIdentityManager.add(mary);
The example above is just one of the different things you can do with PicketLink. The code above defines two partitions: one for internal users and another one for external users. Each partition is associated with one of the provided configurations where the internal partition will use LDAP to store users whether the external partition will use JPA.
When you create a IdentityManager for one of those partitions, all identity management operations will be done
considering the configuration associated with the current partition. In other words, considering the example above, the user 'john'
will be stored in the LDAP and 'mary' in a Database.
It is also possible to use multiple IdentityStore configurations in a single named configuration. This can be very useful
when your identity data is distributed in different stores or even if a specific store have any kind of limitation that can be provided
by another one.
For instance, the LDAP store have some limitations and does not support all features provided by PicketLink. One of those unsupported features is the ability to handle ad-hoc attributes. When using LDAP you're tied with a schema that usually is very hard to change in order to support all your needs.
In this cases, PicketLink allows you to combine in a single configuration the LDAP and the JPA store, for example. Where you can use LDAP for users, roles and groups and use the JPA store for relationships.
IdentityConfigurationBuilder builder = new IdentityConfigurationBuilder();


builder

  .named("default")

    .stores()

      .jpa()

        // configuration options for the jpa store

        .supportGlobalRelationship(Relationship.class)

        .supportAttributes(true)

      .ldap()

        // configuration options for the ldap store

        .supportType(IdentityType.class)
The example above defines a single configuration with two stores: LDAP and JPA. For the LDAP store configuration we define that only IdentityType types should
be supported. In other words, we're only storing users, roles and groups. For the JPA store configuration we define that only Relationship types should
be supported. In other words, we're only storing relationships such as Grant, GroupMembership, etc.
You may also notice that the JPA store is configured to support attributes too. What means that we can now use ad-hoc attributes for all the supported types.
Each IdentityStore may support a different set of credential handlers. This documentations describes the built-in credential handlers provided by PicketLink, but sometimes you
may want to provide your own implementations.
When you write your custom credential handler you need to tell PicketLink the identity store that will support it. This is done by the following code:
 IdentityConfigurationBuilder builder = new IdentityConfigurationBuilder();


 builder

   .named("default")

     .stores()

       .jpa()

         // other JPA configuration

         .addCredentialHandler(UserPasswordCredentialHandler.class)

         .supportAllFeatures();
The example above shows how to configure a credential handler for a JPA-based store using the addCredentialHandler method.
Some credential handlers support a set of configuration options to configure their behavior. These options can be specified as follows:
 IdentityConfigurationBuilder builder = new IdentityConfigurationBuilder();


 builder

   .named("default")

     .stores()

       .jpa()

         // other JPA configuration

         .setCredentialHandlerProperty(PasswordCredentialHandler.PASSWORD_ENCODER, new BCryptPasswordEncoder(4))

         .supportAllFeatures();
The example above shows how to set a property for the PasswordCredentialHandler using the setCredentialHandlerProperty method.
The IdentityContext plays an important role in the PicketLink IDM achitecture. It is strongly used during the execution of operations.
It carries very sensitive and contextual information for a specific operation and provides access for some of the
IDM underlying services such as caching, event handling, id generator for AttributedType instances, among others.
Operations are always executed by a specific IdentityStore in order to persist or store identity data using a specific repository (eg.: LDAP, databases, filesystem, etc).
When executing a operation the identity store must be able to:
-
Access the current
Partition. Eg.:RealmorTier. -
Access the Event Handling API in order to fire events such as when an user is created, updated, etc.
-
Access the Caching API in order to cache identity data and increase performance.
-
Access to external resources, provided before the operation is executed and initialized by a
ContextInitializer.
Sometimes you may need to provide additional configuration or even references for external resources before the operation is executed by an identity store.
An example is how you tell to the JPAIdentityStore which EntityManager instance should be used.
When executing an operation, the JPAIdentityStore must be able to access the current EntityManager to persist or retrieve data from the database.
You need someway to populate the IdentityContext with such information. When you're configuring an identity store, there is a configuration option
that allows you to provide a ContextInitializer implementation.
public interface ContextInitializer {

    void initContextForStore(IdentityContext context, IdentityStore<?> store);

}
The method initContextForStore will be invoked for every single operation and before its execution by the identity store.
It can be implemented to provide all the necessary logic to initialize and populate the IdentityContext for a specific IdentityStore.
The configuration is also very simple:
IdentityConfigurationBuilder builder = new IdentityConfigurationBuilder();


builder

  .named("default")

    .stores()

      .file()

        .supportAllFeatures();

        .addContextInitializer(new MyContextInitializer());
You can provide multiple initializers.
Note
Remember that initializers are executed for every single operation. Also, the same instance is used between operations which means your implementation should be “stateless”. You should be careful about the implementation in order to not impact performance, concurrency or introduce unexpected behaviors.
Actually it's possible to configure IDM with XML configuration. This possibility is good especially in case when you want Picketlink IDM to be part of bigger system and your users won't have a possibility to change source code and so they can't configure it programmatically with the Builder API. So they will just need to change the configuration in XML file instead of doing some changes directly in source code.
Whole Picketlink project provides unified format of configuration file, so that you can configure federation and IDM in same file.
<PicketLink xmlns="urn:picketlink:identity-federation:config:2.1">


  <PicketLinkIDP xmlns="urn:picketlink:identity-federation:config:1.0"

                 ServerEnvironment="tomcat" BindingType="POST" SupportsSignatures="true">

    <!-- SAML2 IDP configuration is here -->

  </PicketLinkIDP>


  <Handlers xmlns="urn:picketlink:identity-federation:handler:config:2.1">

     <!-- Configuration of SAML2 handlers is here -->

  </Handlers>


  <PicketLinkSTS xmlns="urn:picketlink:identity-federation:config:1.0"

                 STSName="Test STS" TokenTimeout="7200" EncryptToken="true">

    <!-- Configuration of Picketlink STS is here -->

  </PicketlinkSTS>


  <PicketLinkIDM>

    <!-- IDM configuration is here -->

  </PicketLinkIDM>


</PicketLink>
Note that if you don't want to use Picketlink Federation, you can omit it's configuration and use just IDM.
XML configuration is leveraging Builder API and Java reflection during it's parsing, so names of XML elements are actually same like names of particular Builder methods.
For example, let's assume that you want to use FileIdentityStore and your programmatic configuration looks like this:
IdentityConfigurationBuilder builder = new IdentityConfigurationBuilder();


builder

    .named(SIMPLE_FILE_STORE_CONFIG)

        .stores()

            .file()

            .preserveState(false)

            .supportGlobalRelationship(Relationship.class)

            .supportAllFeatures();
Same XML configuration to configure IDM with FileIdentityStore will look like this:
<PicketLink xmlns="urn:picketlink:identity-federation:config:2.1">


  <PicketLinkIDM>


    <named value="SIMPLE_FILE_STORE_CONFIG">

      <stores>

        <file>

          <preserveState value="false" />

          <supportGlobalRelationship value="org.picketlink.idm.model.Relationship" />

          <supportAllFeatures />

        </file>

      </stores>

    </named>


  </PicketLinkIDM>


</PicketLink>
You can take a look at testsuite to see more examples.
So to initialize Picketlink IDM from XML you can use the code like this:
// Replace with your own configuration file

String configFilePath = "config/embedded-file-config.xml";


ClassLoader tcl = Thread.currentThread().getContextClassLoader();

InputStream configStream = tcl.getResourceAsStream(configFilePath);

XMLConfigurationProvider xmlConfigurationProvider = new XMLConfigurationProvider();

IdentityConfigurationBuilder idmConfigBuilder =

  xmlConfigurationProvider.readIDMConfiguration(configStream);
Now you can bootstrap IDM from idmConfigBuilder in same way, like it's done in
Programmatic Configuration. Note that you can initialize builder
from XML file and then you can do some additional programmatic configuration. For example, you may need to programmatically
add JPAContextInitializer in case that you are using JPA, because you will need access to JPA EntityManager.