Create new RichFaces Documentation Jira issue

This will launch the RichFaces Jira page - to complete your feedback please login if needed, and submit the Jira.
JBoss.orgCommunity Documentation
The <rich:editor> component is used for creating a WYSIWYG editor on a page.
Seam text support
Manageable global configurations
Possibility to use custom plug-ins
Support of all TinyMCE's parameters through <f:param>
Table 6.380. rich : editor attributes
| Attribute Name |
Description

|
|---|---|
| autoResize | Attribute enables to get the Editor area to resize to the boundaries of the contents. |
| binding | JSF: The attribute takes a value-binding expression for a component property of a backing bean |
| configuration | Attribute defines configuration properties file name |
| converter | JSF: Id of Converter to be used or reference to a Converter |
| converterMessage | A ValueExpression enabled attribute that, if present, will be used as the text of the converter message, replacing any message that comes from the converter |
| customPlugins | Attribute defines property file name witch contains descriptors of custom plugins |
| dialogType | Attribute defines how dialogs/popups should be opened. Default value is "modal" |
| height | Attribute defines height of component. |
| id | JSF: Every component may have a unique id that is automatically created if omitted |
| immediate | A flag indicating that this component value must be converted and validated immediately (that is, during Apply Request Values phase), rather than waiting until a Process Validations phase |
| label | A localized user presentable name for this component. |
| language | Attribute defines Editor language |
| onchange | DHTML: The client-side script method to be called when the editor content is modified by TinyMCE |
| oninit | The client-side script method to be called when the initialization of the editor instances is finished |
| onsave | The client-side script method to be called when the editor content is extracted/saved |
| onsetup | The client-side script method to be called before the editor instances get rendered |
| plugins | Attribute defines Editor plugins |
| readonly | HTML: Attribute defines Editor is readonly |
| rendered | JSF: If "false", this component is not rendered |
| required | JSF: If "true", this component is checked for non-empty input |
| requiredMessage | A ValueExpression enabled attribute which defines text of validation message to show, if a required field is missing |
| skin | Attribute defines Editor skin |
| style | HTML: CSS style rules to be applied to the component |
| styleClass | JSF: Assigns one or more space-separated CSS class names to the component. Corresponds to the HTML "class" attribute. |
| tabindex | HTML: In visual mode the attribute works the same way as "tab_focus" TinyMCE's property the attribute enables you to specify an element ID to focus, when the TAB key is pressed . You can also use the special ":prev" and ":next" values that will then place the focus on an input element placed before/after the TinyMCE instance in the DOM. While in "source" mode the attribute works like standard HTML tabindex attribute. |
| theme | Attribute defines Editor theme |
| useSeamText | Attribute defines if model value should be converted to Seam Text. Default value is "false" |
| validator | JSF: MethodBinding pointing at a method that is called during Process Validations phase of the request processing lifecycle, to validate the current value of this component |
| validatorMessage | A ValueExpression enabled attribute that, if present, will be used as the text of the validator message, replacing any message that comes from the validator |
| value | JSF: The current value of this component |
| valueChangeListener | JSF: Listener for value changes |
| viewMode | Attribute defines if tinyMCE WYSIWYG should be disabled. Default value is "visual" |
| width | HTML: Attribute defines width of component. |
Table 6.381. Component identification parameters
| Name | Value |
|---|---|
| component-type | org.richfaces.component.editor |
| component-class | org.richfaces.component.html.Htmleditor |
| component-family | org.richfaces.component.editor |
| renderer-type | org.richfaces.renderkit.html.editorRenderer |
| tag-class | org.richfaces.taglib.editorTag |
To create the simplest variant on a page use the following syntax:
Example:
...

<rich:editor />

...
Example:
import org.richfaces.component.html.Htmleditor;

...

Htmleditor myeditor = new Htmleditor();

...
The <rich:editor> is fully based on TinyMCE web based Javascript HTML WYSIWYG editor control and supports all of the features it has. The <rich:editor> adapts the TinyMCE editor for JSF environment and adds some functional capabilities.
The easiest way to place the <rich:editor> on a page is as follows:
Example:
<rich:editor value="#{bean.editorValue}" />
Implementation of <rich:editor> provides three ways to define the properties of the component:
Using attributes
Using using <f:param> JSF tag
Using configuration files that allow you to set up multiple configurations for all editors in your application and change them in the runtime
The three methods are described in details in the chapter.
The most important properties are implemented as attributes and you can define them as any other attribute. The attributes of the <rich:editor> component match the corresponding properties of TinyMCE editor.
For example, a theme for the editor can be defined using the "theme" attribute like this:
Example:
<rich:editor value="#{bean.editorValue}" theme="advanced" />
Setting a different skin for the editor can be done using the "skin" attribute.
Another useful property that is implemented at attribute level is "viewMode" . The attribute switches between "visual" and "source" modes, toggling between modes is performed setting the attribute to "visual" and "source" respectively. Implementation of <rich:editor> also implies that you can change the modes dynamically setting the value of the "viewMode" attribute using EL-expression.
Example:
...

<rich:editor value="#{editor.submit}" theme="advanced" viewMode="#{editor.viewMode}" >

    ...

    <h:selectOneRadio value="#{editor.viewMode}" onchange="submit();">

        <f:selectItem itemValue="visual" itemLabel="visual" />

        <f:selectItem itemValue="source" itemLabel="source" />

    </h:selectOneRadio>

    ...

</rich:editor>

...
Most configuration options that TinyMCE provides can be applied using <f:param> JSF tag. The syntax is quite simple: the "name" attribute should contain the option, the "value" attribute assigns some value to the option.
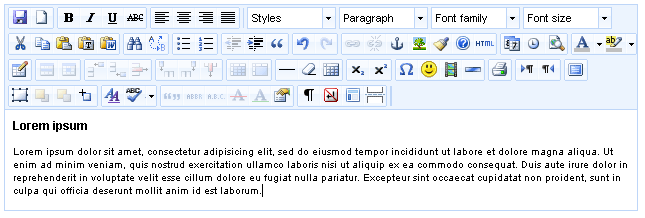
For example, this code adds some buttons to the editor and positions the toolbar.
Example:
...

<rich:editor value="#{bean.editorValue}" theme="advanced" plugins="save,paste" >

          <f:param name="theme_advanced_buttons1" value="bold,italic,underline, cut,copy,paste,pasteword"/>

          <f:param name="theme_advanced_toolbar_location" value="top"/>

          <f:param name="theme_advanced_toolbar_align" value="left"/>

</rich:editor>

...
This is what you get as a result:
The third way to configure the <rich:editor> is to use configuration file (.properties)
This method eases your life if you need to configure multiple instances of the <rich:editor> : you configure the editor once and in one spot and the configuration properties can be applied to any <rich:editor> in your application.
To implement this type of configuration you need to take a few steps:
Create a configuration file (.properties) in the classpath folder and add some properties to it.
Use standard syntax for the .properties files: parameter=value.
Here is an example of configuration file:
Example:
theme="advanced"

plugins="save,paste"

theme_advanced_buttons1="bold,italic,underline, cut,copy,paste,pasteword"

theme_advanced_toolbar_location="top"

theme_advanced_toolbar_align="left"
The properties stored in configuration file are passed to the <rich:editor> via "configuration" attribute which takes the name of the configuration file as a value (with out .properties extension).
For example, if you named the configuration file "editorconfig", you would address it as follows:
Example:
...

<rich:editor value="#{bean.editorValue}" configuration="editorconfig"/>

...
Alternately, you can use a EL-expression to define a configuration file. This way you can dynamically change the sets of configuration properties.
For example, you have two configuration files "configurationAdvanced" and "configurationSimple" and you want them to be applied under some condition.
To do this you need to bind "configuration" attribute to the appropriate bean property like this.
Example:
...

<rich:editor value="#{bean.editorValue}" configuration="#{editor.configuration}" />

...
Your Java file should look like this.
...

String configuration;


if(some condition){//defines some condition

        configuration = "configurationAdvanced"; //the name on the file with advanced properties

}

else{

        configuration= "configurationSimple"; //the name on the file with simplified properties

}

...
You also might want to add some custom plug-ins to your editor. You can read about how to create a plugin in TinyMCE Wiki article.
Adding a custom plugin also requires a few steps to take. Though, the procedure is very similar to adding a configuration file.
This is what you need to add a plugin:
Create a .properties file and put the name of the plug-in and a path to it into the file. The file can contain multiple plug-in declarations. Your .properties file should be like this.
Example:
...

pluginName=/mytinymceplugins/plugin1Name/editor_plugin.js

...
Use the "customPlugins" attribute to specify the .properties file with a plugin name and a path to it.
If your .properties file is named "myPlugins", then your will have this code on the page.
Example:
...

<rich:editor theme="advanced" customPlugins="myPlugins" plugins="pluginName" />

...
Some plug-ins which available for download might have some dependencies on TinyMCE scripts. For example, dialog pop-ups require tiny_mce_popup.js script file. Assuming that you will not plug custom plugins to the RF jar with editor component (standard TinyMCE plugins creation implies that plugins are put into TinyMCE's corresponding directory) you should manually add required TinyMCE scripts to some project folder and correct the js includes.
The implementation of the <rich:editor> component has two methods for handling events.
The attributes take some function name as a value with is triggered on the appropriate event. You need to use standard JavaScript function calling syntax.
Using attributes ( "onchange" , "oninit" , "onsave" , "onsetup" )
Example:
...

<rich:editor value="#{bean.editorValue}" onchange="myCustomOnChangeHandler()" />

...
Using <f:param> as a child element defining the "name" attribute with one of the TinyMCE's callbacks and the "value" attribute takes the function name you want to be called on the corresponding event as the value. Note, that the syntax in this case is a bit different: parentheses are not required.
Example:
...

<rich:editor value="#{bean.editorValue}">

        <f:param name="onchange" value="myCustomOnChangeHandler" />

</rich:editor>

...
The <rich:editor> component has a build-in converter that renders HTML code generated by the editor to Seam text (you can read more on Seam in Seam guide.), it also interprets Seam text passed to the <rich:editor> and renders it to HTML. The converter can be enable with the "useSeamText" attribute.
Example:
This HTML code generated by editor
...

<p><a href="http://mysite.com">Lorem ipsum</a> <i>dolor sit</i> amet, ea <u>commodo</u> consequat.</p>

...
will be parsed to the following Seam text:
...

[Lorem ipsum=>http://mysite.com] *dolor sit* amet, ea _commodo_ consequat.

...
Accordingly, if the Seam text is passed to the component it will be parsed to HTML code.
For skinnability implementation, the components use a style class redefinition method. Default style classes are mapped on skin parameters.
There are two ways to redefine the appearance of all <rich:editor> components at once:
Redefine the corresponding skin parameters
Add to your style sheets style classes used by a <rich:editor> component
Table 6.382. Skin parameters redefinition for containers
| Skin parameters | CSS properties |
|---|---|
| additionalBackgroundColor | background |
Table 6.383. Skin parameters redefinition for external controls
| Skin parameters | CSS properties |
|---|---|
| panelBorderColor | border-color |
Table 6.384. Skin parameters redefinition for layout
| Skin parameters | CSS properties |
|---|---|
| panelBorderColor | border-left-color |
| panelBorderColor | border-right-color |
| panelBorderColor | border-top-color |
| panelBorderColor | border-bottom-color |
| generalFamilyFont | font-family |
| generalTextColor | color |
| headerBackgroundColor | background-color |
Table 6.385. Skin parameters redefinition for buttons
| Skin parameters | CSS properties |
|---|---|
| headerBackgroundColor | background-color |
Table 6.386. Skin parameters redefinition for list box
| Skin parameters | CSS properties |
|---|---|
| tableBackgroundColor | background |
| panelBorderColor | border-color |
| generalFamilyFont | font-family |
Table 6.387. Skin parameters redefinition for color split button
| Skin parameters | CSS properties |
|---|---|
| tableBackgroundColor | background |
| panelBorderColor | border-color |
| generalFamilyFont | font-family |
| additionalBackgroundColor | background-color |
Table 6.388. Skin parameters redefinition for hovered color split button
| Skin parameters | CSS properties |
|---|---|
| headerBackgroundColor | border-color |
Table 6.389. Skin parameters redefinition for menu
| Skin parameters | CSS properties |
|---|---|
| panelBorderColor | border-color |
| tableBackgroundColor | background |
| generalFamilyFont | font-family |
| generalTextColor | color |
| additionalBackgroundColor | background-color |
| additionalBackgroundColor | background-color |
Table 6.390. Skin parameters redefinition for menu item
| Skin parameters | CSS properties |
|---|---|
| additionalBackgroundColor | background |
| panelBorderColor | border-bottom-color |
| generalTextColor | color |
| generalTextColor | color |
| tabDisabledTextColor | color |
Table 6.391. Skin parameters redefinition for progress and resize states
| Skin parameters | CSS properties |
|---|---|
| tableBackgroundColor | background |
| tableBorderColor | border-color |
Table 6.392. Skin parameters redefinition for dialog box
| Skin parameters | CSS properties |
|---|---|
| generalFamilyFont | font-family |
| generalBackgroundColor | background |
Table 6.393. Skin parameters redefinition for link in dialog box
| Skin parameters | CSS properties |
|---|---|
| generalTextColor | color |
| hoverLinkColor | color |
Table 6.394. Skin parameters redefinition for link in dialog box
| Skin parameters | CSS properties |
|---|---|
| generalTextColor | color |
| hoverLinkColor | color |
Table 6.395. Skin parameters redefinition for fieldset in dialog box
| Skin parameters | CSS properties |
|---|---|
| generalFamilyFont | font-family |
| panelBorderColor | border-color |
Table 6.396. Skin parameters redefinition for fieldset legend in dialog box
| Skin parameters | CSS properties |
|---|---|
| generalLinkColor | color |
Table 6.397. Skin parameters redefinition for input elements in dialog box
| Skin parameters | CSS properties |
|---|---|
| warningColor | color |
| warningColor | border-color |
| controlBackgroundColor | background |
| tableBorderColor | border-color |
| generalFamilyFont | font-family |
Table 6.398. Skin parameters redefinition for panel wrapper in dialog box
| Skin parameters | CSS properties |
|---|---|
| panelBorderColor | border-color |
| tableBackgroundColor | background |
Table 6.399. Skin parameters redefinition for headers in dialog box
| Skin parameters | CSS properties |
|---|---|
| generalLinkColor | color |
Table 6.400. Skin parameters redefinition for links in tabs in dialog box
| Skin parameters | CSS properties |
|---|---|
| generalFamilyFont | font-family |
| generalTextColor | color |
Table 6.401. Skin parameters redefinition for main text area
| Skin parameters | CSS properties |
|---|---|
| generalFamilyFont | font-family |
| generalTextColor | color |
| tableBackgroundColor | background |
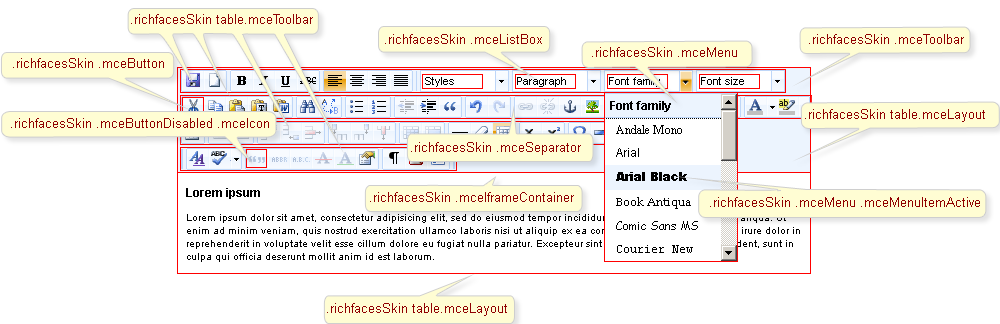
On the screenshot there are CSS selectors that define styles for component elements.
Table 6.402. CSS selectors for the layout of the editor
| Selector | Description |
|---|---|
| .richfacesSkin table.mceToolbar | Defines styles for the rows of icons within toolbar |
| .richfacesSkin .mceButton | Defines styles for the buttons |
| .richfacesSkin .mceButtonDisabled .mceIcon | Defines styles for the icons |
| .richfacesSkin .mceListBox | Defines styles for the list box |
| .richfacesSkin .mceSeparator | Defines styles for the buttons separator |
| .richfacesSkin .mceIframeContainer | Defines styles for the container |
| .richfacesSkin table.mceLayout | Defines styles for the table layout |
| .richfacesSkin .mceToolbar | Defines styles for the toolbar |
Table 6.403. CSS selectors for the menus
| Selector | Description |
|---|---|
| .richfacesSkin .mceMenu | Defines styles for the menus |
| .richfacesSkin .mceMenu .mceMenuItemActive | Defines styles for the active menu items |
| .richfacesSkin .mceMenu .mceMenuItemActive | Defines styles for the active menu items |
In order to redefine styles for all <rich:editor> components on a page using CSS, it's enough to create classes with the same names (possible classes could be found in the tables above) and define necessary properties in them.
Example:
...

.richfacesSkin .mceButton {

    border: 1px solid red;

}

...
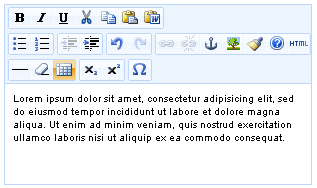
This is the result:
It's also possible to change styles of a particular <rich:editor> component. In this case you should create own style classes and use them in corresponding <rich:editor> "styleClass" attributes. An example is placed below:
Example:
...

.myClass{

    margin-top: 20px;

}

...
The "styleClass" attribute for <rich:editor> is defined as it's shown in the example below:
Example:
<rich:editor value="#{bean.text}" styleClass="myClass"/>
The <rich:editor> is based on TinyMCE editor and supports almost all its features and properties some of which are not described here since you can find more detailed documentation on them on the official web site.
On RichFaces LiveDemo page you can see an example of <rich:editor> usage and sources for the given example.