Create new RichFaces Documentation Jira issue

This will launch the RichFaces Jira page - to complete your feedback please login if needed, and submit the Jira.
JBoss.orgCommunity Documentation
The <a4j:support> component is the most important core component in the RichFaces library. It enriches any existing non-Ajax JSF or RichFaces component with Ajax capability. All other RichFaces Ajax components are based on the same principles <a4j:support> has.
The <a4j:support> component has two key attributes:
mandatory "event" attribute that defines the JavaScript event the Ajax support will be attached to
"reRender" attribute that defines id(s) of JSF component(s) that should be rerendered after an Ajax request
As mentioned above, the <a4j:support> component adds Ajax capability to non-Ajax JSF components. Let's create ajaxed <h:selectOneMenu> called "Planets and Their Moons".
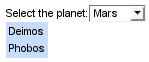
We begin with the common behavior description. When a page is rendered you see only one select box with the list of planets. When you select a planet the <h:dataTable> containing moons of the selected planet appears.
In other words we need <h:selectOneMenu> with the nested <a4j:support> component that is attached to the onchange event.
When an Ajax response comes back the <h:dataTable> is re-rendered on the server side and updated on the client.
...

<h:form id="planetsForm">

    <h:outputLabel value="Select the planet:" for="planets" />

    <h:selectOneMenu id="planets" value="#{planetsMoons.currentPlanet}" valueChangeListener="#{planetsMoons.planetChanged}">

        <f:selectItems value="#{planetsMoons.planetsList}" />

        <a4j:support event="onchange" reRender="moons" />

    </h:selectOneMenu>

    <h:dataTable id="moons" value="#{planetsMoons.moonsList}" var="item">

        <h:column>

            <h:outputText value="#{item}"/>

        </h:column>

    </h:dataTable>

</h:form>

...
Finally we need a backing bean:
...

public class PlanetsMoons {

    private String currentPlanet="";

    public List<SelectItem> planetsList = new ArrayList<SelectItem>();

    public List<String> moonsList = new ArrayList<String>();

    private static final String [] EARTH = {"The Moon"};

    private static final String [] MARS = {"Deimos", "Phobos"};

    private static final String [] JUPITER = {"Europa", "Gamymede", "Callisto"};


    public PlanetsMoons() {

        SelectItem item = new SelectItem("earth", "Earth");

        planetsList.add(item);

        item = new SelectItem("mars", "Mars");

        planetsList.add(item);

        item = new SelectItem("jupiter", "Jupiter");

        planetsList.add(item);

    }


    public void planetChanged(ValueChangeEvent event){

         moonsList.clear();

         String[] currentItems;

         if (((String)event.getNewValue()).equals("earth")) {

             currentItems = EARTH;

         }else if(((String)event.getNewValue()).equals("mars")){

             currentItems = MARS;

         }else{

             currentItems = JUPITER;

         }

         for (int i = 0; i < currentItems.length; i++) {

             moonsList.add(currentItems[i]);

         }

     }


    //Getters and Setters

    ...

}
There are two properties planetsList and moonsList.
The planetsList is filled with planets names in the constructor.
After you select the planet,
the planetChanged() listener is called and
the moonsList is populated with proper values of moons.
With the help of "onsubmit" and "oncomplete" attributes the <a4j:support> component allows to use JavaScript calls before and after an Ajax request respectively. Actually the JavaScript specified in the "oncomplete" attribute will be executed in any case whether the Ajax request is completed successfully or not.
You can easily add confirmation dialog for the planet select box and colorize <h:dataTable> after the Ajax response:
...

<h:form id="planetsForm">

    <h:outputLabel value="Select the planet:" for="planets" />

    <h:selectOneMenu id="planets" value="#{planetsMoons.currentPlanet}" valueChangeListener="#{planetsMoons.planetChanged}">

        <f:selectItems value="#{planetsMoons.planetsList}" />

        <a4j:support event="onchange" reRender="moons"

                    onsubmit="if(!confirm('Are you sure to change the planet?')) {form.reset(); return false;}"

                    oncomplete="document.getElementById('planetsForm:moonsPanel').style.backgroundColor='#c8dcf9';" />

    </h:selectOneMenu>

    <h:dataTable id="moons" value="#{planetsMoons.moonsList}" var="item">

        <h:column>

            <h:outputText value="#{item}"/>

        </h:column>

    </h:dataTable>

</h:form>

...
There is the result:
Information about the "process" attribute usage you can find in the " Decide what to process " guide section.
The <a4j:support> component created on a page as following
<h:inputText value="#{bean.text}">

      <a4j:support event="onkeyup" reRender="output" action="#{bean.action}"/>

</h:inputText>
is decoded in HTML as
<input onkeyup="A4J.AJAX.Submit( Some request parameters )"/>
Table of <a4j:support> attributes.
Table 6.5. Component Identification Parameters
| Name | Value |
|---|---|
| component-type | org.ajax4jsf.Support |
| component-family | org.ajax4jsf.AjaxSupport |
| component-class | org.ajax4jsf.component.html.HtmlAjaxSupport |
| renderer-type | org.ajax4jsf.components.AjaxSupportRenderer |
Visit <a4j:support> demo page at RichFaces live demo for examples of component usage and their sources.