Note
Before you can deploy and run the runtime validation example, you will need to install the SAVARA Validator module for JBoss.
The previous sections have provided a brief introduction to the design-time SOA governance features provided within the SAVARA Eclipse Tools distribution. The aim of these capabilities are to enable verification of an implementation, initially defined just using BPEL process definitions, against a choreography, which in turn has been verified against business requirements defined using scenarios. Therefore this helps to ensure that the implemented system meets the original business requirements.
Being able to statically check that the implementation should send or receive messages in the correct order is important, as it will reduce the amount of testing required to ensure the service behaves correctly. However it does not enable the internal implementation details to be verified, which may result in invalid decisions being made at runtime, resulting in unexpected paths being taken.
Therefore, to ensure this situation does not occur, we also need runtime governance. We still need to be able to verify that the services continue to conform to the choreography description. The Service Validator capability within the SAVARA distribution can be used to validate the behaviour of each service.
In this section, we will use the purchasing example found in the
${SAVARA}/samples/purchasing folder.
The service validator configuration is defined using specific annotation, that is associated with the 'exchange details' components (contained within interactions), within the choreography description.
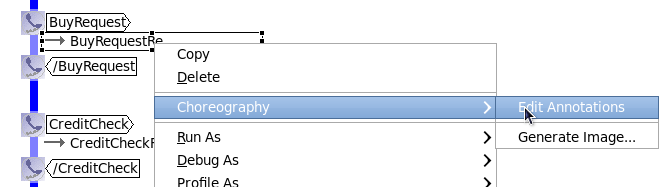
To view the pre-configured service validator configuration defined for the Purchasing
example, edit the PurchaseGoods.cdm file, navigate to the
Choreography Flows tab and then select the
Choreography->Edit Annotations menu item associated with the first
'exchange details' component (as shown below).
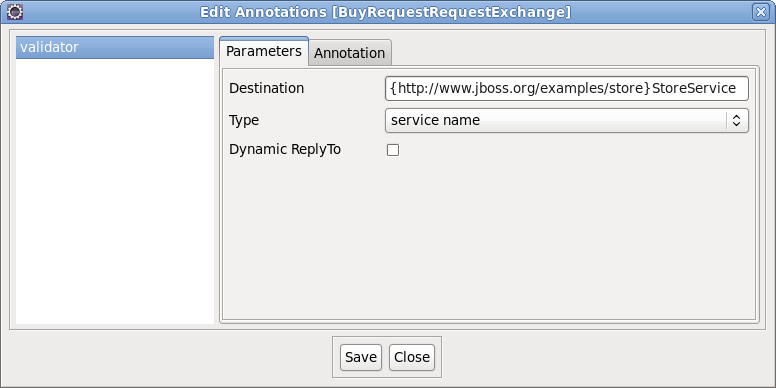
This will display the annotation editor, with the single configured annotation called 'validator'. This annotation defines the information required for the Service Validator to monitor this specific message exchange (e.g. the JMS destination on which the message will be passed, or in this case the Service Name for the target Web Service).
Once an annotation has been defined, it will also be displayed as part of the tooltip for the associated model component, for example:

Once the annotations have been defined for all relevant 'exchange details' components
in the choreography description, the choreography file can be copied to the
${JBossAS}/server/default/deploy/savara-validator-jboss.sar/models
folder in the JBossAS environment. The service validator configuration for the
purchasing example has been preconfigured to be deployed as part of
the installation procedure.
Note
If the savara-validator-jboss.sar/validator-config.xml within the JBossAS
environment is modified, or choreography description files added, removed or updated within
the savara-validator-jboss.sar/models sub-folder, then the changes will
automatically be detected and used to re-configure the service validators without having to
restart the server.
The SAVARA Monitor is an Eclipse based tool that can be used to help develop, test and validate a business process (encoded as a choreography) executing across a distributed system. (Future releases will include equivalent web based tooling to enable production based logging and query of the validation information).
The tool is used to observe a correlated view of the executing business transactions. Each service validator can be configured to report activites (i.e. sent and received messages) that it validates, to enable the correlator to reconstitute a global interpretation of each transaction.
This correlated view of each transaction can be used to understand where each transaction is within the process. It can also be used to report out of sequence, unexpected messages and more general errors in the context of the business process.
Once the following examples have been deployed to the JBossAS environment, and the server is running, then the monitoring tool can be launched from the Eclipse environment by selecting the Savara->Monitor menu item from the popup menu associated with the choreography (.cdm) file.
Wait for the monitor window to start, and indicate that the choreography is being monitored, shown in the status line at the bottom of the window.
Savara includes the ability to validate web services (and therefore BPEL processes) that use the jbossws-native stack. However the ODE engine, used to execute BPEL processes within RiftSaw, currently optimises communications between BPEL processes executing within the same engine, so that the communications do not occur using the Web Service stack. This means that Savara is currently unable to validate these interactions by default.
There are two solutions to this problem. The first is to disable the interprocess communications used between the two BPEL processes, which will be the approach described in this section. The other approach is to implement the 'Credit Agency' participant as a JAX-WS service.
Once the BPEL processes have been generated, and the implementation details added, it is currently necessary to disable the 'inter-process' communication that is used to communicate between the two processes (an ODE optimization when the processes are running in the same engine). This is achieved by editing the deployment descriptor for the Store process (using a text editor rather than the Eclipse form editor), and add the attribute usePeer2Peer="false" to the invoke element.
The next step is to deploy the BPEL processes for the Store and CreditAgency participants to a JBossAS server running RiftSaw. This can be achieved using the Eclipse Web Tooling Project (WTP) server support, in conjunction with the JBoss Tools features mentioned in the installation section.
Create a JBossAS server entry in the Servers view, using the New->Server menu item on the view's context menu. Configure the server entry to point to a JBossAS environment that has previously been configured to run RiftSaw. Select the server in the Servers view, and then select the Add and Remove ... menu item. This will show a dialog window that will include the CreditAgency and Store BPEL projects on the left. Select both projects, and press the Add button. When the Finish button is selected, the BPEL processes will be associated with the server.
Start the server using the Start menu item associated with
the JBossAS server in the Servers view, or manually from
a terminal window in the JBossAS server's bin folder using
the run script. Once the server
has fully started, the BPEL processes should have been deployed.
The next step is to start the Savara->Monitor associated
with the PurchaseGoods.cdm choreography description.
The final step is to send a test message to the Store
BPEL process. This can be achieved by selecting the PurchaseGoodsProcess_Store.wsdl
file, within the PurchaseGoodsProcess_Store project
(bpelContents folder), and then select the menu
item Web Services->Test with Web Services Explorer.
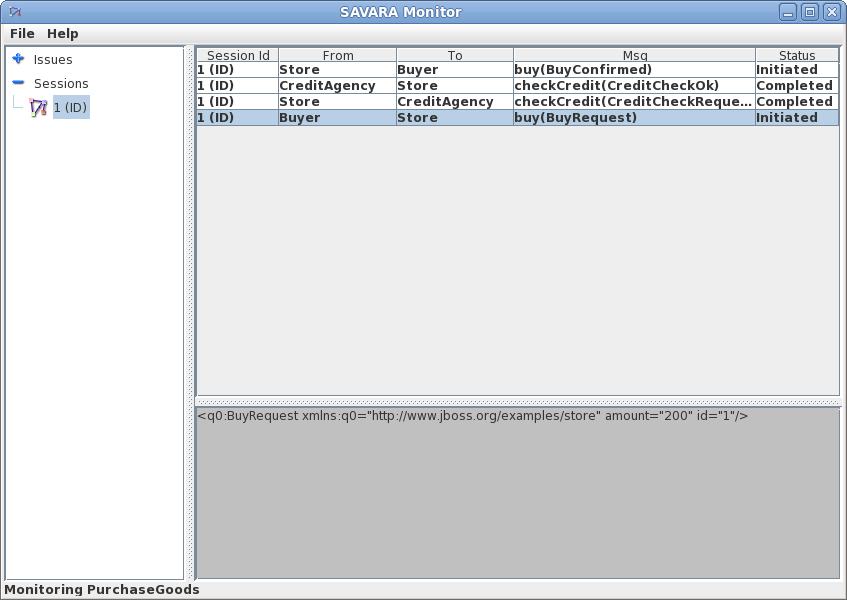
Expand the 'StoreInterfaceBinding' node, in the left hand panel of the explorer, and select the 'buy' operation. Then select the 'Source' link, which will show the various sections of the SOAP message to be sent. Edit the message body to be:
<q0:BuyRequest id="1" amount="200" />
Then press the 'Ok' button further down the panel. This will send the message to the Store process, and eventually cause a response to appear in the lower panel.
Four entries should appear in the SAVARA monitor, the buy request, credit check request, credit check ok (response) and buy confirmed (response).
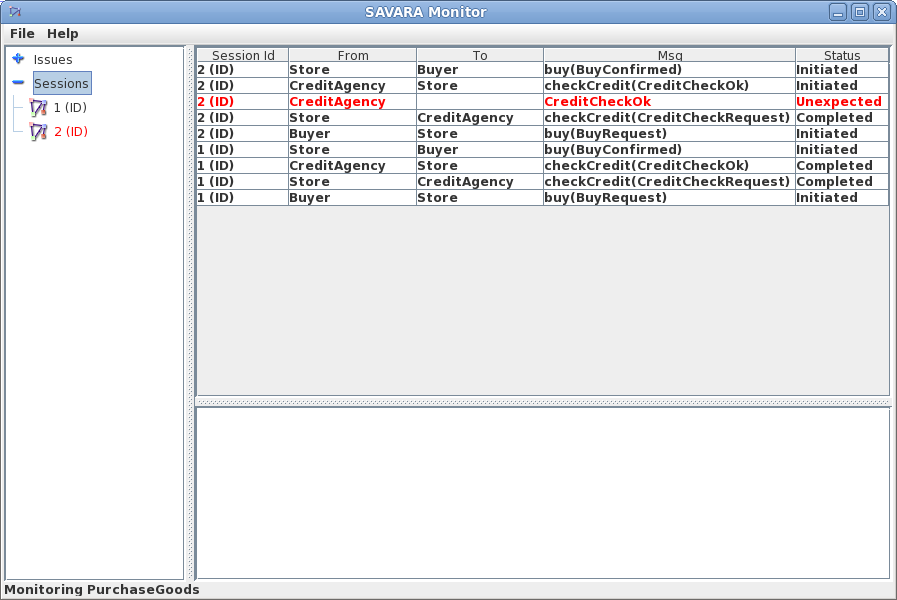
To demonstrate how an error would be detected and reported, issue a new request such as:
<q0:BuyRequest id="2" amount="300" />
This will result in an unexpected message to be reported, as there is a difference between the choreography and the CreditAgency BPEL process (implementation). The choreography defines that a valid credit check should be returned if the amount is less than 250. However the BPEL process has implemented this condition as a valid credit check is where the amount is less or equal to 500.
The first step to deploying the Trailblazer example is to configure the JBossAS environment:
-
Update the
${JBossAS}/server/default/deployers/esb.deployer/jbossesb-properties.xmlfile, in the section entitled "transports" and specify all of the SMTP mail server settings for your environment. -
Update the
trailblazer/trailblazer.propertiesUpdate the file.bank.monitored.directory and file.output.directory properties. These are folders used by the File Based Bank, and are set to
/tmp/inputand/tmp/outputby default. -
Update the
trailblazer/esb/conf/jboss-esb.xmlThere is a fs-provider block, update the directory attribute value to be the same as the file.output.directory value in
trailblazer.propertiesfile. - Start the JBossAS server
One the server has been started, the next step is to deploy the relevant components into the JBossAS environment. This is achieved by:
-
From the
trailblazerfolder, execute the following command to deploy the example to the ESB: ant deploythis should deploy the ESB and WAR files to your JBoss AS
server/default. -
From the
trailblazer/banksfolder, execute the command to start the JMS Bank service: ant runJMSBank. -
From the
trailblazer/banksfolder, execute the command to start the JMS Bank service: ant runFileBank.
To run the example, you need to start a browser and select the URL localhost:8080/trailblazer. This will show the following page, if the server has been configured correctly and the TrailBlazer example deployed:
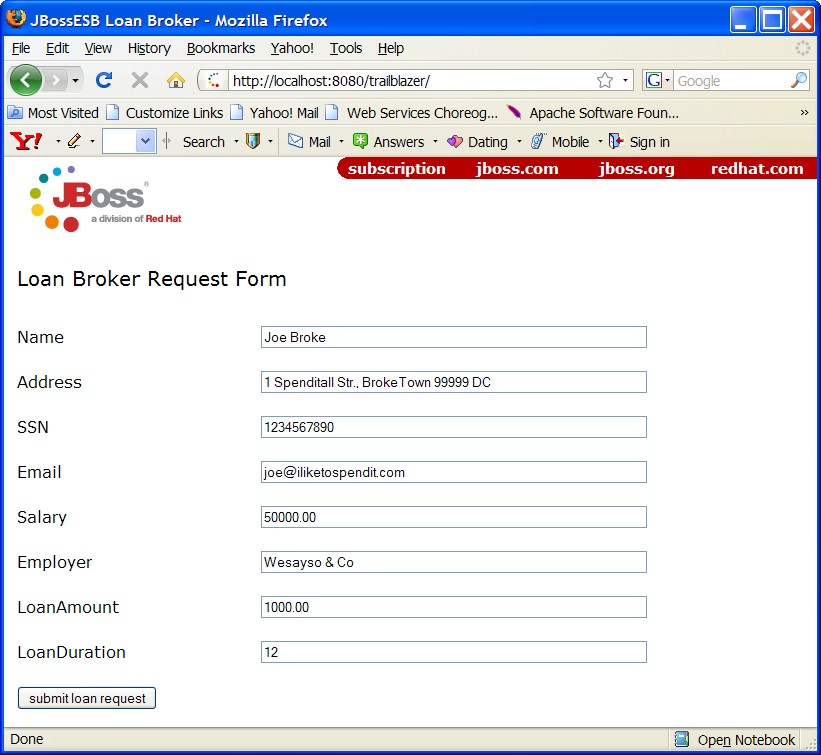
Now you can submit quotes, You will see either a loan request rejected (single email) because the score is less than 4, or two emails (one from JMS bank and one from FileBased bank) with valid quotes. When entering subsequent quotes, make sure that the quote reference is updated, so that each session has a unique id.
To demonstrate the detection of validation errors, there is an alternative implementation of the trailblazer modules that behaviour differently to the choreography that is being monitored. Specifically, the credit score threshold used to determine whether a loan request should be issued to the banks, is raised from 4 to 7.
To deploy the version of the TrailBlazer example that results in validation errors, then:
-
From the
${SAVARA}/samples/trailblazerfolder, execute the following command to deploy the example to the ESB: ant deploy-error-client.
The next step is to issue more transactions, until a credit check score occurs that is between 4 and 6 inclusive. This will result in a insufficientCredit interaction being reported, which would be unexpected in terms of the choreography.
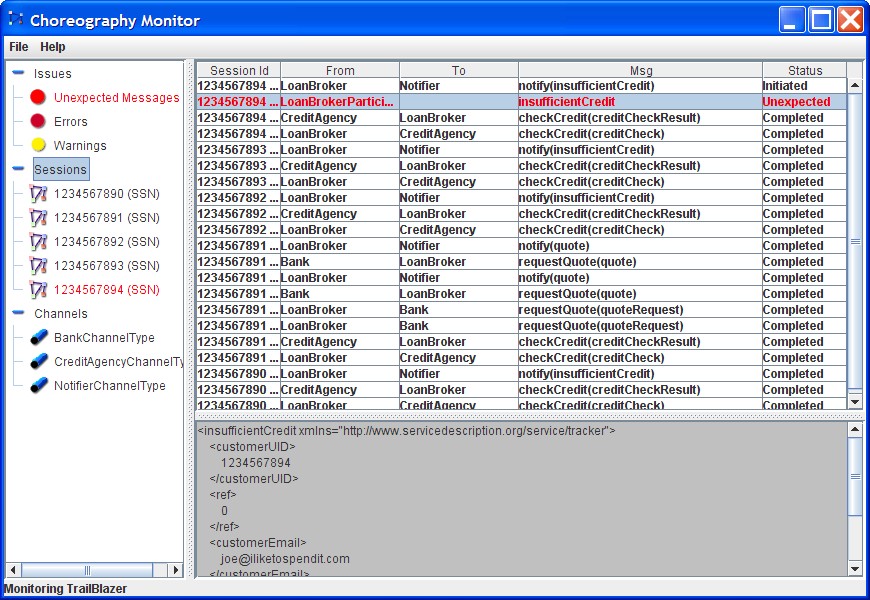
When errors, such as unexpected messages, are detected by the service validators and reported to the SAVARA Monitor, they are displayed in red.