The Seam Security API is an optional Seam feature that provides authentication and authorization features for securing both domain and page resources within your Seam project.
Seam Security provides two different modes of operation:
-
simplified mode - this mode supports authentication services and simple role-based security checks.
-
advanced mode - this mode supports all the same features as the simplified mode, plus it offers rule-based security checks using JBoss Rules.
That all depends on the requirements of your application. If you have minimal security requirements, for example if you only wish to restrict certain pages and actions to users who are logged in, or who belong to a certain role, then the simplified mode will probably be sufficient. The advantages of this is a more simplified configuration, significantly less libraries to include, and a smaller memory footprint.
If on the other hand, your application requires security checks based on contextual state or complex business rules, then you will require the features provided by the advanced mode.
If using the advanced mode features of Seam Security, the following jar files are required to be configured as modules in
application.xml. If you are using Seam Security in simplified mode, these are
not
required:
-
drools-compiler.jar
-
drools-core.jar
-
janino.jar
-
antlr-runtime.jar
-
mvel14.jar
For web-based security, jboss-seam-ui.jar must also be included in the application's war file.
In some situations it may be necessary to disable Seam Security, for example during unit tests. This can be done by
calling the static method Identity.setSecurityEnabled(false) to disable security checks. Doing this
prevents any security checks being performed for the following:
-
Entity Security
-
Hibernate Security Interceptor
-
Seam Security Interceptor
-
Page restrictions
The authentication features provided by Seam Security are built upon JAAS (Java Authentication and Authorization Service), and as such provide a robust and highly configurable API for handling user authentication. However, for less complex authentication requirements Seam offers a much more simplified method of authentication that hides the complexity of JAAS.
The simplified authentication method uses a built-in JAAS login module, SeamLoginModule, which
delegates authentication to one of your own Seam components. This login module is already configured inside Seam as
part of a default application policy and as such does not require any additional configuration files. It allows you to
write an authentication method using the entity classes that are provided by your own application. Configuring this
simplified form of authentication requires the identity component to be configured in
components.xml:
<components xmlns="http://jboss.com/products/seam/components"

            xmlns:core="http://jboss.com/products/seam/core"

            xmlns:security="http://jboss.com/products/seam/security"

            xmlns:xsi="http://www.w3.org/2001/XMLSchema-instance"

            xsi:schemaLocation=

                "http://jboss.com/products/seam/components http://jboss.com/products/seam/components-2.1.xsd

                 http://jboss.com/products/seam/security http://jboss.com/products/seam/security-2.1.xsd">


    <security:identity authenticate-method="#{authenticator.authenticate}"/>


</components>
If you wish to use the advanced security features such as rule-based permission checks, all you need to do is include the Drools (JBoss Rules) jars in your classpath, and add some additional configuration, described later.
The EL expression #{authenticator.authenticate} is a method binding indicating that
the authenticate method of the authenticator component will be used
to authenticate the user.
The authenticate-method property specified for identity in
components.xml specifies which method will be used by SeamLoginModule
to authenticate users. This method takes no parameters, and is expected to return a boolean indicating
whether authentication is successful or not. The user's username and password can be obtained from
Identity.instance().getUsername() and Identity.instance().getPassword(),
respectively. Any roles that the user is a member of should be assigned using
Identity.instance().addRole(). Here's a complete example of an authentication method
inside a JavaBean component:
@Name("authenticator")

public class Authenticator {

   @In EntityManager entityManager;


   public boolean authenticate() {

      try

      {

         User user = (User) entityManager.createQuery(

            "from User where username = :username and password = :password")

            .setParameter("username", Identity.instance().getUsername())

            .setParameter("password", Identity.instance().getPassword())

            .getSingleResult();


         if (user.getRoles() != null)

         {

            for (UserRole mr : user.getRoles())

               Identity.instance().addRole(mr.getName());

         }


         return true;

      }

      catch (NoResultException ex)

      {

         return false;

      }


   }


}
In the above example, both User and UserRole are application-specific
entity beans. The roles parameter is populated with the roles that the user is a member
of, which should be added to the Set as literal string values, e.g. "admin", "user".
In this case, if the user record is not found and a NoResultException thrown, the
authentication method returns false to indicate the authentication failed.
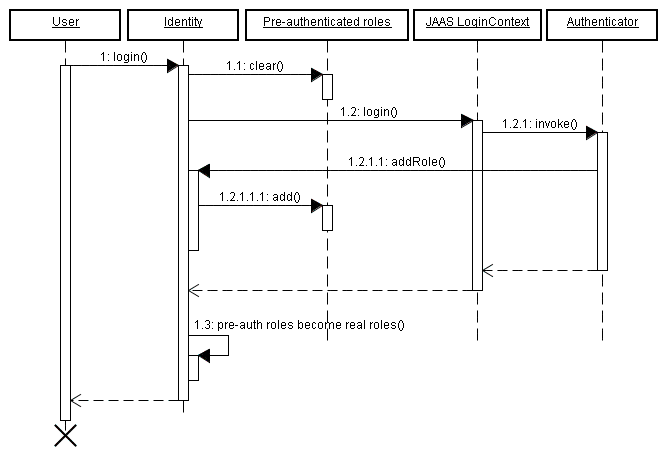
The Identity.addRole() method behaves differently depending on whether the current
session is authenticated or not. If the session is not authenticated, then addRole()
should
only
be called during the authentication process. When called here, the
role name is placed into a temporary list of pre-authenticated roles. Once authentication is successful,
the pre-authenticated roles then become "real" roles, and calling Identity.hasRole()
for those roles will then return true. The following sequence diagram represents the list of pre-authenticated
roles as a first class object to show more clearly how it fits in to the authentication process.
When writing an authenticator method, it is important that it is kept minimal and free from any side-effects. This is because there is no guarantee as to how many times the authenticator method will be called by the security API, and as such it may be invoked multiple times during a single request. Because of this, any special code that should execute upon a successful or failed authentication should be written by implementing an event observer. See the section on Security Events further down in this chapter for more information about which events are raised by Seam Security.
To give an example, let's say that upon a successful login that some user statistics must be
updated. We would do this by writing an event observer for the
org.jboss.seam.security.loginSuccessful event, like this:
   @In UserStats userStats;


   @Observer("org.jboss.seam.security.loginSuccessful")

   public void updateUserStats()

   {

      userStats.setLastLoginDate(new Date());

      userStats.incrementLoginCount();

   }
The Identity component provides both username and password
properties, catering for the most common authentication scenario. These properties can be bound directly to the
username and password fields on a login form. Once these properties are set, calling the
identity.login() method will authenticate the user using the provided credentials.
Here's an example of a simple login form:
<div>

    <h:outputLabel for="name" value="Username"/>

    <h:inputText id="name" value="#{identity.username}"/>

</div>


<div>

    <h:outputLabel for="password" value="Password"/>

    <h:inputSecret id="password" value="#{identity.password}"/>

</div>


<div>

    <h:commandButton value="Login" action="#{identity.login}"/>

</div>
Similarly, logging out the user is done by calling #{identity.logout}. Calling this
action will clear the security state of the currently authenticated user.
So to sum up, there are the three easy steps to configure authentication:
-
Configure an authentication method in
components.xml. -
Write an authentication method.
-
Write a login form so that the user can authenticate.
To prevent users from receiving the default error page in response to a security error, it's recommended that
pages.xml is configured to redirect security errors to a more "pretty" page. The two
main types of exceptions thrown by the security API are:
-
NotLoggedInException- This exception is thrown if the user attempts to access a restricted action or page when they are not logged in. -
AuthorizationException- This exception is only thrown if the user is already logged in, and they have attempted to access a restricted action or page for which they do not have the necessary privileges.
In the case of a NotLoggedInException, it is recommended that the user is redirected to
either a login or registration page so that they can log in. For an AuthorizationException,
it may be useful to redirect the user to an error page. Here's an example of a pages.xml
file that redirects both of these security exceptions:
<pages>


    ...


    <exception class="org.jboss.seam.security.NotLoggedInException">

        <redirect view-id="/login.xhtml">

            <message>You must be logged in to perform this action</message>

        </redirect>

    </exception>


    <exception class="org.jboss.seam.security.AuthorizationException">

        <end-conversation/>

        <redirect view-id="/security_error.xhtml">

            <message>You do not have the necessary security privileges to perform this action.</message>

        </redirect>

    </exception>


</pages>
Most web applications require even more sophisticated handling of login redirection, so Seam includes some special functionality for handling this problem.
You can ask Seam to redirect the user to a login screen when an unauthenticated user tries to access a particular view (or wildcarded view id) as follows:
<pages login-view-id="/login.xhtml">


    <page view-id="/members/*" login-required="true"/>


    ...


</pages>
(This is less of a blunt instrument than the exception handler shown above, but should probably be used in conjunction with it.)
After the user logs in, we want to automatically send them back where they came from, so
they can retry the action that required logging in. If you add the following event listeners
to components.xml, attempts to access a restricted view while not logged
in will be remembered, so that upon the user successfully logging in they will be redirected
to the originally requested view, with any page parameters that existed in the original
request.
<event type="org.jboss.seam.security.notLoggedIn">

    <action execute="#{redirect.captureCurrentView}"/>

</event>


<event type="org.jboss.seam.security.postAuthenticate">

    <action execute="#{redirect.returnToCapturedView}"/>

</event>
Note that login redirection is implemented as a conversation-scoped mechanism, so don't end
the conversation in your authenticate() method.
Although not recommended for use unless absolutely necessary, Seam provides means for authenticating
using either HTTP Basic or HTTP Digest (RFC 2617) methods. To use either form of authentication,
the authentication-filter component must be enabled in components.xml:
<web:authentication-filter url-pattern="*.seam" auth-type="basic"/>
To enable the filter for basic authentication, set auth-type to basic,
or for digest authentication, set it to digest. If using digest authentication, the
key and realm must also be set:
<web:authentication-filter url-pattern="*.seam" auth-type="digest" key="AA3JK34aSDlkj" realm="My App"/>
The key can be any String value. The realm is the name of the
authentication realm that is presented to the user when they authenticate.
If using digest authentication, your authenticator class should extend the abstract class
org.jboss.seam.security.digest.DigestAuthenticator, and use the
validatePassword() method to validate the user's plain text password
against the digest request. Here is an example:
   public boolean authenticate()

   {

      try

      {

         User user = (User) entityManager.createQuery(

            "from User where username = :username")

            .setParameter("username", identity.getUsername())

            .getSingleResult();


         return validatePassword(user.getPassword());

      }

      catch (NoResultException ex)

      {

         return false;

      }

   }
This section explores some of the advanced features provided by the security API for addressing more complex security requirements.
If you would rather not use the simplified JAAS configuration provided by the Seam Security API, you may
instead delegate to the default system JAAS configuration by providing a jaas-config-name
property in components.xml. For example, if you are using JBoss AS and wish to use
the other policy (which uses the UsersRolesLoginModule login module
provided by JBoss AS), then the entry in components.xml would look like this:
<security:identity authenticate-method="#{authenticator.authenticate}"

                      jaas-config-name="other"/>
Please keep in mind that doing this does not mean that your user will be authenticated in whichever container your Seam application is deployed in. It merely instructs Seam Security to authenticate itself using the configured JAAS security policy.
The security API produces a number of default faces messages for various security-related events.
The following table lists the message keys that can be used to override these messages by specifying
them in a message.properties resource file. To suppress the message, just put the
key with an empty value in the resource file.
Table 13.1. Security Message Keys
|
Message Key |
Description |
|---|---|
|
|
This message is produced when a user successfully logs in via the security API. |
|
|
This message is produced when the login process fails, either because the user provided an incorrect username or password, or because authentication failed in some other way. |
|
|
This message is produced when a user attempts to perform an action or access a page that requires a security check, and the user is not currently authenticated. |
|
|
This message is produced when a user that is already authenticated attempts to log in again. |
There are a number of authorization features provided by the Seam Security API for securing access to
components, component methods, and pages. This section describes each of these. An important thing to
note is that if you wish to use any of the advanced features (such as rule-based permissions) then
your components.xml must be configured to support this - see the Configuration section
above.
Each of the authorization mechanisms provided by the Seam Security API are built upon the concept of a user being granted roles and/or permissions. A role is a group , or type , of user that may have been granted certain privileges for performing one or more specific actions within an application. A permission on the other hand is a privilege (sometimes once-off) for performing a single, specific action. It is entirely possible to build an application using nothing but permissions, however roles offer a higher level of convenience when granting privileges to groups of users.
Roles are simple, consisting of only a name such as "admin", "user", "customer", etc. Permissions consist of
both a name and an action, and are represented within this documentation in the form name:action,
for example customer:delete, or customer:insert.
Let's start by examining the simplest form of authorization, component security, starting with the
@Restrict annotation.
Seam components may be secured either at the method or the class level, using the @Restrict
annotation. If both a method and it's declaring class are annotated with @Restrict,
the method restriction will take precedence (and the class restriction will not apply). If a method
invocation fails a security check, then an exception will be thrown as per the contract for
Identity.checkRestriction() (see Inline Restrictions). A @Restrict
on just the component class itself is equivalent to adding @Restrict to each of its
methods.
An empty @Restrict implies a permission check of componentName:methodName.
Take for example the following component method:
@Name("account")

public class AccountAction {

    @Restrict public void delete() {

      ...

    }

}
In this example, the implied permission required to call the delete() method is
account:delete. The equivalent of this would be to write
@Restrict("#{s:hasPermission('account','delete',null)}"). Now let's look at
another example:
@Restrict @Name("account")

public class AccountAction {

    public void insert() {

      ...

    }

    @Restrict("#{s:hasRole('admin')}")

    public void delete() {

      ...

    }

}
This time, the component class itself is annotated with @Restrict. This means that
any methods without an overriding @Restrict annotation require an implicit permission check.
In the case of this example, the insert() method requires a permission of
account:insert, while the delete() method requires that the user is a
member of the admin role.
Before we go any further, let's address the #{s:hasRole()} expression seen in the above
example. Both s:hasRole and s:hasPermission are EL functions, which
delegate to the correspondingly named methods of the Identity class. These
functions can be used within any EL expression throughout the entirety of the security API.
Being an EL expression, the value of the @Restrict annotation may reference any objects that
exist within a Seam context. This is extremely useful when performing permission checks for a specific
object instance. Look at this example:
@Name("account")

public class AccountAction {

    @In Account selectedAccount;

    @Restrict("#{s:hasPermission('account','modify',selectedAccount)}")

    public void modify() {

        selectedAccount.modify();

    }

}
The interesting thing to note from this example is the reference to selectedAccount
seen within the hasPermission() function call. The value of this variable will be
looked up from within the Seam context, and passed to the hasPermission() method
in Identity, which in this case can then determine if the user has the required
permission for modifying the specified Account object.
Sometimes it might be desirable to perform a security check in code, without using the
@Restrict annotation. In this situation, simply use
Identity.checkRestriction() to evaluate a security expression, like this:
public void deleteCustomer() {

    Identity.instance().checkRestriction("#{s:hasPermission('customer','delete',selectedCustomer)}");

}
If the expression specified doesn't evaluate to true, either
-
if the user is not logged in, a
NotLoggedInExceptionexception is thrown or -
if the user is logged in, an
AuthorizationExceptionexception is thrown.
It is also possible to call the hasRole() and hasPermission()
methods directly from Java code:
if (!Identity.instance().hasRole("admin"))

     throw new AuthorizationException("Must be admin to perform this action");


if (!Identity.instance().hasPermission("customer", "create", null))

     throw new AuthorizationException("You may not create new customers");
One indication of a well designed user interface is that the user is not presented with options for which they don't have the necessary privileges to use. Seam Security allows conditional rendering of either 1) sections of a page or 2) individual controls, based upon the privileges of the user, using the very same EL expressions that are used for component security.
Let's take a look at some examples of interface security. First of all, let's pretend that we have a
login form that should only be rendered if the user is not already logged in. Using the
identity.isLoggedIn() property, we can write this:
<h:form class="loginForm" rendered="#{not identity.loggedIn}">
If the user isn't logged in, then the login form will be rendered - very straight forward so far.
Now let's pretend there is a menu on the page that contains some actions which should only be accessible
to users in the manager role. Here's one way that these could be written:
<h:outputLink action="#{reports.listManagerReports}" rendered="#{s:hasRole('manager')}">

    Manager Reports

</h:outputLink>
This is also quite straight forward. If the user is not a member of the manager
role, then the outputLink will not be rendered. The rendered attribute can
generally be used on the control itself, or on a surrounding <s:div> or
<s:span> control.
Now for something more complex. Let's say you have a h:dataTable control on a
page listing records for which you may or may not wish to render action links depending on the
user's privileges. The s:hasPermission EL function allows us to pass in an
object parameter which can be used to determine whether the user has the requested permission
for that object or not. Here's how a dataTable with secured links might look:
<h:dataTable value="#{clients}" var="cl">

    <h:column>

        <f:facet name="header">Name</f:facet>

        #{cl.name}

    </h:column>

    <h:column>

        <f:facet name="header">City</f:facet>

        #{cl.city}

    </h:column>

    <h:column>

        <f:facet name="header">Action</f:facet>

        <s:link value="Modify Client" action="#{clientAction.modify}"

                rendered="#{s:hasPermission('client','modify',cl)"/>

        <s:link value="Delete Client" action="#{clientAction.delete}"

                rendered="#{s:hasPermission('client','delete',cl)"/>

    </h:column>

</h:dataTable>
Page security requires that the application is using a pages.xml file, however is
extremely simple to configure. Simply include a <restrict/> element within
the page elements that you wish to secure. If no explicit restriction is specified
by the restrict element, an implied permission of /viewId.xhtml:render
will be checked when the page is accessed via a non-faces (GET) request, and a permission of
/viewId.xhtml:restore will be required when any JSF postback (form submission) originates
from the page. Otherwise, the specified restriction will be evaluated as a standard security expression.
Here's a couple of examples:
<page view-id="/settings.xhtml">

    <restrict/>

</page>
This page has an implied permission of /settings.xhtml:render required for non-faces
requests and an implied permission of /settings.xhtml:restore for faces requests.
<page view-id="/reports.xhtml">

    <restrict>#{s:hasRole('admin')}</restrict>

</page>
Both faces and non-faces requests to this page require that the user is a member of the
admin role.
Seam security also makes it possible to apply security restrictions to read, insert, update and delete actions for entities.
To secure all actions for an entity class, add a @Restrict annotation on the class
itself:
@Entity

@Name("customer")

@Restrict

public class Customer {

  ...

}
If no expression is specified in the @Restrict annotation, the default security check
that is performed is a permission check of entityName:action,
where entityName is the Seam component name of the entity (or the fully-qualified class name if no @Name is
specified), and the action is either read,
insert, update or delete.
It is also possible to only restrict certain actions, by placing a @Restrict annotation
on the relevent entity lifecycle method (annotated as follows):
-
@PostLoad- Called after an entity instance is loaded from the database. Use this method to configure areadpermission. -
@PrePersist- Called before a new instance of the entity is inserted. Use this method to configure aninsertpermission. -
@PreUpdate- Called before an entity is updated. Use this method to configure anupdatepermission. -
@PreRemove- Called before an entity is deleted. Use this method to configure adeletepermission.
Here's an example of how an entity would be configured to perform a security check for any insert
operations. Please note that the method is not required to do anything, the only important thing in regard to
security is how it is annotated:
  @PrePersist @Restrict

  public void prePersist() {}
Using /META-INF/orm.xml
You can also specify the call back method in /META-INF/orm.xml:
<?xml version="1.0" encoding="UTF-8"?>

<entity-mappings xmlns="http://java.sun.com/xml/ns/persistence/orm"

                 xmlns:xsi="http://www.w3.org/2001/XMLSchema-instance"

                 xsi:schemaLocation="http://java.sun.com/xml/ns/persistence/orm http://java.sun.com/xml/ns/persistence/orm_1_0.xsd"

                 version="1.0">


   <entity class="Customer">

      <pre-persist method-name="prePersist" />

   </entity>


</entity-mappings>
Of course, you still need to annotate the prePersist()
method on Customer with @Restrict
And here's an example of an entity permission rule that checks if the authenticated user is allowed to insert
a new MemberBlog record (from the seamspace example). The entity for which the security
check is being made is automatically inserted into the working memory (in this case MemberBlog):
rule InsertMemberBlog
  no-loop
  activation-group "permissions"
when
  check: PermissionCheck(name == "memberBlog", action == "insert", granted == false)
  Principal(principalName : name)
  MemberBlog(member : member -> (member.getUsername().equals(principalName)))
then
  check.grant();
end;
This rule will grant the permission memberBlog:insert if the currently authenticated
user (indicated by the Principal fact) has the same name as the member for which the
blog entry is being created. The "principalName : name" structure that can be seen in the
Principal fact (and other places) is a variable binding - it binds the name
property of the Principal to a variable called principalName. Variable bindings
allow the value to be referred to in other places, such as the following line which compares the member's username
to the Principal name. For more details, please refer to the JBoss Rules documentation.
Finally, we need to install a listener class that integrates Seam security with your JPA provider.
Security checks for EJB3 entity beans are performed with an EntityListener.
You can install this listener by using the following META-INF/orm.xml file:
<?xml version="1.0" encoding="UTF-8"?>

<entity-mappings xmlns="http://java.sun.com/xml/ns/persistence/orm"

                 xmlns:xsi="http://www.w3.org/2001/XMLSchema-instance"

                 xsi:schemaLocation="http://java.sun.com/xml/ns/persistence/orm http://java.sun.com/xml/ns/persistence/orm_1_0.xsd"

                 version="1.0">


    <persistence-unit-metadata>

        <persistence-unit-defaults>

            <entity-listeners>

                <entity-listener class="org.jboss.seam.security.EntitySecurityListener"/>

            </entity-listeners>

        </persistence-unit-defaults>

    </persistence-unit-metadata>


</entity-mappings>
Up to this point there has been a lot of mention of permissions, but no information about how permissions are actually defined or granted. This section completes the picture, by explaining how permission checks are processed, and how to implement permission checks for a Seam application.
So how does the security API know whether a user has the customer:modify permission
for a specific customer? Seam Security provides quite a novel method for determining user permissions,
based on JBoss Rules. A couple of the advantages of using a rule engine are 1) a centralized location
for the business logic that is behind each user permission, and 2) speed - JBoss Rules uses very efficient
algorithms for evaluating large numbers of complex rules involving multiple conditions.
Seam Security expects to find a RuleBase component called securityRules
which it uses to evaluate permission checks. This is configured in components.xml as follows:
<components xmlns="http://jboss.com/products/seam/components"

            xmlns:core="http://jboss.com/products/seam/core"

            xmlns:security="http://jboss.com/products/seam/security"

            xmlns:drools="http://jboss.com/products/seam/drools"

            xmlns:xsi="http://www.w3.org/2001/XMLSchema-instance"

            xsi:schemaLocation=

                "http://jboss.com/products/seam/core http://jboss.com/products/seam/core-2.1.xsd

                 http://jboss.com/products/seam/components http://jboss.com/products/seam/components-2.1.xsd

                 http://jboss.com/products/seam/drools http://jboss.com/products/seam/drools-2.1.xsd"

                 http://jboss.com/products/seam/security http://jboss.com/products/seam/security-2.1.xsd">


   <drools:rule-base name="securityRules">

       <drools:rule-files>

           <value>/META-INF/security.drl</value>

       </drools:rule-files>

   </drools:rule-base>


</components>
Once the RuleBase component is configured, it's time to write the security rules.
For this step you need to create a file called security.drl in the
/META-INF directory of your application's jar file. In actual fact this file can be called
anything you want, and exist in any location as long as it is configured appropriately in
components.xml.
So what should the security rules file contain? At this stage it might be a good idea to at least skim through the JBoss Rules documentation, however to get started here's an extremely simple example:
package MyApplicationPermissions;

import org.jboss.seam.security.PermissionCheck;
import org.jboss.seam.security.Role;

rule CanUserDeleteCustomers
when
  c: PermissionCheck(name == "customer", action == "delete")
  Role(name == "admin")
then
  c.grant();
end;
Let's break this down. The first thing we see is the package declaration. A package in JBoss Rules is essentially a collection of rules. The package name can be anything you want - it doesn't relate to anything else outside the scope of the rule base.
The next thing we can notice is a couple of import statements for the PermissionCheck
and Role classes. These imports inform the rules engine that we'll be referencing
these classes within our rules.
Finally we have the code for the rule. Each rule within a package should be given a unique name (usually
describing the purpose of the rule). In this case our rule is called CanUserDeleteCustomers
and will be used to check whether a user is allowed to delete a customer record.
Looking at the body of the rule definition we can notice two distinct sections. Rules have what is known
as a left hand side (LHS) and a right hand side (RHS). The LHS consists of the conditional part of the
rule, i.e. a list of conditions which must be satisfied for the rule to fire. The LHS is represented by
the when section. The RHS is the consequence, or action section of the rule that will
only be fired if all of the conditions in the LHS are met. The RHS is represented by the
then section. The end of the rule is denoted by the end; line.
If we look at the LHS of the rule, we see two conditions listed there. Let's examine the first condition:
c: PermissionCheck(name == "customer", action == "delete")
In plain english, this condition is stating that there must exist a PermissionCheck object
with a name property equal to "customer", and an action property equal
to "delete" within the working memory.
So what is the working memory? Also known as a "stateful session" in Drools terminology, the working memory
is a session-scoped object that contains the contextual information that is required by the rules engine to
make a decision about a permission check. Each time the hasPermission() method is called,
a temporary PermissionCheck object, or
Fact
, is inserted into the
working memory. This PermissionCheck corresponds exactly to the permission that is being
checked, so for example if you call hasPermission("account", "create", null) then a
PermissionCheck object with a name equal to "account" and
action equal to "create" will be inserted into the working memory for the duration of the
permission check.
Besides the PermissionCheck facts, there is also a org.jboss.seam.security.Role
fact for each of the roles that the authenticated user is a member of. These Role facts
are synchronized with the user's authenticated roles at the beginning of every permission check. As a consequence,
any Role object that is inserted into the working memory during the course of a permission
check will be removed before the next permission check occurs, if the authenticated user is not a member of
that role. Besides the PermissionCheck and Role facts, the working
memory also contains the java.security.Principal object that was created during
the authentication process.
It is also possible to insert additional long-lived facts into the working memory by calling
((RuleBasedIdentity) RuleBasedIdentity.instance()).getSecurityContext().insert(),
passing the object as a parameter. The exception to this is Role objects, which as
already discussed are synchronized at the start of each permission check.
Getting back to our simple example, we can also notice that the first line of our LHS is prefixed with
c:. This is a variable binding, and is used to refer back to the object that is
matched by the condition. Moving onto the second line of our LHS, we see this:
Role(name == "admin")
This condition simply states that there must be a Role object with a
name of "admin" within the working memory. As mentioned, user roles are inserted into
the working memory at the beginning of each permission check. So, putting both conditions together, this
rule is essentially saying "I will fire if you are checking for the customer:delete
permission and the user is a member of the admin role".
So what is the consequence of the rule firing? Let's take a look at the RHS of the rule:
c.grant()
The RHS consists of Java code, and in this case is invoking the grant()
method of the c object, which as already mentioned is a variable binding
for the PermissionCheck object. Besides the name and
action properties of the PermissionCheck object, there
is also a granted property which is initially set to false.
Calling grant() on a PermissionCheck sets the
granted property to true, which means that the permission
check was successful, allowing the user to carry out whatever action the permission check was
intended for.
It is possible to implement a wildcard permission check (which allows all actions for a given permission
name), by omitting the action constraint for the PermissionCheck in
your rule, like this:
rule CanDoAnythingToCustomersIfYouAreAnAdmin
when
  c: PermissionCheck(name == "customer")
  Role(name == "admin")
then
  c.grant();
end;
This rule allows users with the admin role to perform
any
action for
any customer permission check.
Seam includes basic support for serving sensitive pages via the HTTPS protocol. This is easily
configured by specifying a scheme for the page in pages.xml.
The following example shows how the view /login.xhtml is configured to use
HTTPS:
<page view-id="/login.xhtml" scheme="https"/>
This configuration is automatically extended to both s:link and
s:button JSF controls, which (when specifying the view)
will also render the link using the correct protocol. Based on the previous example, the following
link will use the HTTPS protocol because /login.xhtml is configured to use it:
<s:link view="/login.xhtml" value="Login"/>
Browsing directly to a view when using the
incorrect
protocol will cause a
redirect to the same view using the
correct
protocol. For example, browsing
to a page that has scheme="https" using HTTP will cause a redirect to the same
page using HTTPS.
It is also possible to configure a
default scheme
for all pages. This is useful
if you wish to use HTTPS for a only few pages. If no default scheme is specified then the normal
behavior is to continue use the current scheme. So once the user accessed a page that required
HTTPS, then HTTPS would continue to be used after the user navigated away to other non-HTTPS pages.
(While this is good for security, it is not so great for performance!). To define HTTP as the
default scheme, add this line to pages.xml:
<page view-id="*" scheme="http" />
Of course, if none of the pages in your application use HTTPS then it is not required to specify a default scheme.
You may configure Seam to automatically invalidate the current HTTP session each time the scheme
changes. Just add this line to components.xml:
<core:servlet-session invalidate-on-scheme-change="true"/>
This option helps make your system less vulnerable to sniffing of the session id or leakage of sensitive data from pages using HTTPS to other pages using HTTP.
Though strictly not part of the security API, Seam provides a built-in CAPTCHA ( C ompletely A utomated P ublic T uring test to tell C omputers and H umans A part) algorithm to prevent automated processes from interacting with your application.
To get up and running, it is necessary to configure the Seam Resource Servlet, which will provide the Captcha
challenge images to your pages. This requires the following entry in web.xml:
<servlet>

    <servlet-name>Seam Resource Servlet</servlet-name>

    <servlet-class>org.jboss.seam.servlet.SeamResourceServlet</servlet-class>

</servlet>


<servlet-mapping>

    <servlet-name>Seam Resource Servlet</servlet-name>

    <url-pattern>/seam/resource/*</url-pattern>

</servlet-mapping>
Adding a CAPTCHA challenge to a form is extremely easy. Here's an example:
<h:graphicImage value="/seam/resource/captcha"/>

<h:inputText id="verifyCaptcha" value="#{captcha.response}" required="true">

   <s:validate />

</h:inputText>

<h:message for="verifyCaptcha"/>
That's all there is to it. The graphicImage control displays the CAPTCHA challenge,
and the inputText receives the user's response. The response is automatically
validated against the CAPTCHA when the form is submitted.
You may customize the CAPTCHA algorithm by overriding the built-in component:
@Name("org.jboss.seam.captcha")

@Scope(SESSION)

public class HitchhikersCaptcha extends Captcha

{

   @Override @Create

   public void init()

   {

      setChallenge("What is the answer to life, the universe and everything?");

      setCorrectResponse("42");

   }


   @Override

   public BufferedImage renderChallenge()

   {

       BufferedImage img = super.renderChallenge();

       img.getGraphics().drawOval(5, 3, 60, 14); //add an obscuring decoration

       return img;

   }

}
The following table describes a number of events (see Chapter 5, Events, interceptors and exception handling ) raised by Seam Security.
Table 13.2. Security Events
|
Event Key |
Description |
|---|---|
|
|
Raised when a login attempt is successful. |
|
|
Raised when a login attempt fails. |
|
|
Raised when a user that is already authenticated attempts to log in again. |
|
|
Raised when a security check fails when the user is not logged in. |
|
|
Raised when a security check fails when the user is logged in however doesn't have sufficient privileges. |
|
|
Raised just prior to user authentication. |
|
|
Raised just after user authentication. |
|
|
Raised after the user has logged out. |
|
|
Raised when the user's credentials have been changed. |
|
|
Raised when the Identity's rememberMe property is changed. |
Sometimes it may be necessary to perform certain operations with elevated privileges, such
as creating a new user account as an unauthenticated user. Seam Security supports such a
mechanism via the RunAsOperation class. This class allows either the
Principal or Subject, or the user's roles to be
overridden for a single set of operations.
The following code example demonstrates how RunAsOperation is used, by
overriding its getRoles() method to specify a set of roles to masquerade
as for the duration of the operation. The execute() method contains the
code that will be executed with the elevated privileges.
    new RunAsOperation() {

       @Override

       public String[] getRoles() {

          return new String[] { "admin" };

       }


       public void execute() {

          identityManager.createAccount(username, password);

          identityManager.grantRole(username, "user");

       }

    }.run();
In a similar way, the getPrincipal() or getSubject()
methods can also be overriden to specify the Principal and
Subject instances to use for the duration of the operation.
Finally, the run() method is used to carry out the
RunAsOperation.
Sometimes it might be necessary to extend the Identity component if your application has special security requirements. For example, users might be required to authenticate using a Company or Department ID, along with their usual username and password. If permission-based security is required then RuleBasedIdentity should be extended, otherwise Identity should be extended.
The following example shows an extended Identity component with an additional
companyCode field. The install precendence of APPLICATION
ensures that this extended Identity gets installed in preference to the built-in Identity.
@Name("org.jboss.seam.security.identity")

@Scope(SESSION)

@Install(precedence = APPLICATION)

@BypassInterceptors

@Startup

public class CustomIdentity extends Identity

{

   private static final LogProvider log = Logging.getLogProvider(CustomIdentity.class);


   private String companyCode;


   public String getCompanyCode()

   {

      return companyCode;

   }


   public void setCompanyCode(String companyCode)

   {

      this.companyCode = companyCode;

   }


   @Override

   public String login()

   {

      log.info("###### CUSTOM LOGIN CALLED ######");

      return super.login();

   }

}
Seam Security provides an optional identity management API, which offers the following features:
-
User management - the ability to create, delete and modify user accounts and their role memberships.
-
Authentication of users without the need for writing an Authenticator component.
-
A hierarchical role/group membership structure, allowing roles to be members of other roles.
-
Pluggable identity store, allowing the developer to choose their security provider, whether it be JPA, LDAP, Kerberos, etc.
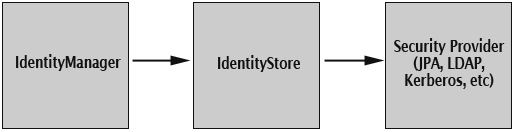
The core of the identity management API is the IdentityManager component. Before it can be
used however, it must be configured with an IdentityStore implementation. The
IdentityStore does the actual work of interacting with the underlying security provider,
whatever it may be.
Configuration of the IdentityManager is extremely simple, requiring only an
IdentityStore to be configured in components.xml.
The identity management namespace is http://jboss.com/products/seam/security/management
and its schema location is http://jboss.com/products/seam/identity-management-2.1.xsd.
Here's a simple example showing the configuration of a JPAIdentityStore - for the
IdentityManager to use it, it must be named identityStore:
<identity-management:jpa-identity-store name="identityStore" account-class="com.acme.UserAccount"/>
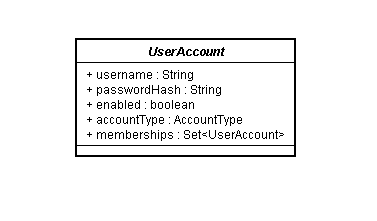
JPAIdentityStore is an IdentityStore implementation that uses
JPA as its underlying security provider. User accounts and their role memberships are stored in a
self-referencing database table, for which the corresponding entity bean must extend
org.jboss.seam.security.management.UserAccount to provide the following properties:
To provide a complete example, here's what the actual database tables may look like:
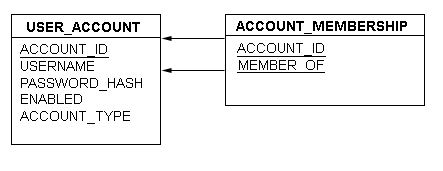
And an example of the corresponding entity bean:
@Entity @Table(name = "USER_ACCOUNT")

public class UserAccount extends org.jboss.seam.security.management.UserAccount

                         implements Serializable

{

   private Integer accountId;

   private String username;

   private String passwordHash;

   private boolean enabled;

   private AccountType accountType;

   private Set<UserAccount> memberships;


   @Id @GeneratedValue public Integer getAccountId() { return accountId; }

   public void setAccountId(Integer accountId) { this.accountId = accountId; }


   @NotNull @Override public String getUsername() { return username; }

   @Override public void setUsername(String username) { this.username = username; }


   @Override public String getPasswordHash() { return passwordHash; }

   @Override public void setPasswordHash(String passwordHash) { this.passwordHash = passwordHash; }


   @Override public AccountType getAccountType() { return accountType; }

   @Override public void setAccountType(AccountType accountType) { this.accountType = accountType; }


   @Override public boolean isEnabled() { return enabled; }

   @Override public void setEnabled(boolean enabled) { this.enabled = enabled; }


   @ManyToMany(targetEntity = MemberAccount.class) @JoinTable(name = "ACCOUNT_MEMBERSHIP",

         joinColumns = @JoinColumn(name = "ACCOUNT_ID"),

         inverseJoinColumns = @JoinColumn(name = "MEMBER_OF"))

   @Override public Set<UserAccount> getMemberships() { return memberships; }

   @Override public void setMemberships(Set<UserAccount> memberships) { this.memberships = memberships; }}
In the above example, the implementation of UserAccount is self-referencing
in that it has a many-to-many relationship with itself via its memberships
property. To keep the model simple, both user accounts and roles are persisted as
UserAccounts, with the accountType property acting as the
discriminator between the two. With this model, roles can be members of other roles, making it
possible to define complex role membership hierarchies.
Once the UserAccount implementation has been created, the JPAIdentityStore
must be configured to use that implementation any time it performs an identity management operation.
This is done by specifying the account-class property in components.xml.
In the following example, it is configured as com.acme.UserAccount:
<identity-management:jpa-identity-store name="identityStore" account-class="com.acme.UserAccount"/>
Please note that this is a required parameter, and must always be specified when using the
JPAIdentityStore.
The JPAIdentityStore stores a salted hash of the user's password, using the username
as the source material for salt generation. This guarantees that two users with the same password will
still have different password hashes. The method for generating a password hash is listed here for
convenience - it may be useful for generating password hashes for inclusion in DML scripts, etc:
   public String hashPassword(String password, String saltPhrase)

   {

      try {

         MessageDigest md = MessageDigest.getInstance("MD5");


         md.update(saltPhrase.getBytes());

         byte[] salt = md.digest();


         md.reset();

         md.update(password.getBytes("UTF-8"));

         md.update(salt);


         byte[] raw = md.digest();


         return new String(Hex.encodeHex(raw));

     }

     catch (Exception e) {

         throw new RuntimeException(e);

     }

   }
To authenticate using the Identity Management API, it is as simple as not specifying the
authenticate-method property for the Identity component.
If no authenticate-method is specified, then by default the authentication
process (controlled by SeamLoginModule) will attempt to authenticate using
IdentityManager's authenticate() method, and no
Authenticator component is necessary.
The IdentityManager can be accessed either by injecting it into your Seam
component as follows:
@In IdentityManager identityManager;
or by accessing it through its static instance() method:
IdentityManager identityManager = IdentityManager.instance();
The following table describes each of the methods that IdentityManager provides:
Table 13.3. Identity Management API
|
Method |
Returns |
Description |
|---|---|---|
|
|
|
Creates a new user account, with the specified name and password. Returns |
|
|
|
Deletes the user account with the specified name. Returns |
|
|
|
Enables the user account with the specified name. Accounts that are not enabled are
not able to authenticate. Returns |
|
|
|
Disables the user account with the specified name. Returns |
|
|
|
Changes the password for the user account with the specified name. Returns
|
|
|
|
Returns |
|
|
|
Grants the specified role to the specified user account. The role must already exist for it to
be granted. Returns |
|
|
|
Revokes the specified role from the specified user account. Returns |
|
|
|
Returns |
|
|
|
Returns a list of all user names, sorted in alpha-numeric order. |
|
|
|
Returns a list of all user names filtered by the specified filter parameter, sorted in alpha-numeric order. |
|
|
|
Returns a list of all role names. |
|
|
|
Returns a list of the names of all the roles explicitly granted to the specified user name. |
|
|
|
Returns a list of the names of all the roles implicitly granted to the specified user name.
Implicitly granted roles include those that are not directly granted to a user, rather they are
granted to the roles that the user is a member of. For example, is the |
|
|
|
Authenticates the specified username and password using the configured Identity Store. Returns
|
Using the Identity Management API requires that the calling user has the appropriate authorization to invoke
its methods. The following table describes the permission requirements for each of the methods in
IdentityManager.
Table 13.4. Identity Management Security Permissions
|
Method |
Permission Name |
Permission Action |
|---|---|---|
|
|
|
|
|
|
|
|
|
|
|
|
|
|
|
|
|
|
|
|
|
|
|
|
|
|
|
|
|
|
|
|
|
|
|
|
|
|
|
|
The following code listing provides an example set of security rules that grants access to all
Identity Management-related methods to members of the admin role:
rule CreateAccount
  no-loop
  activation-group "permissions"
when
  check: PermissionCheck(name == "seam.account", action == "create", granted == false)
  Role(name == "admin")
then
  check.grant();
end

rule ReadAccount
  no-loop
  activation-group "permissions"
when
  check: PermissionCheck(name == "seam.account", action == "read", granted == false)
  Role(name == "admin")
then
  check.grant();
end

rule UpdateAccount
  no-loop
  activation-group "permissions"
when
  check: PermissionCheck(name == "seam.account", action == "update", granted == false)
  Role(name == "admin")
then
  check.grant();
end

rule DeleteAccount
  no-loop
  activation-group "permissions"
when
  check: PermissionCheck(name == "seam.account", action == "delete", granted == false)
  Role(name == "admin")
then
  check.grant();
end
When creating a new project using seam-gen (see Chapter 2, Getting started with Seam, using seam-gen
), by default the
IdentityManager will be configured with a JPAIdentityStore
and a UserAccount implementation will be generated as part of the new project.
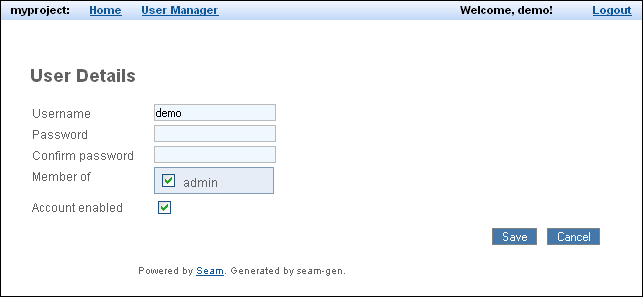
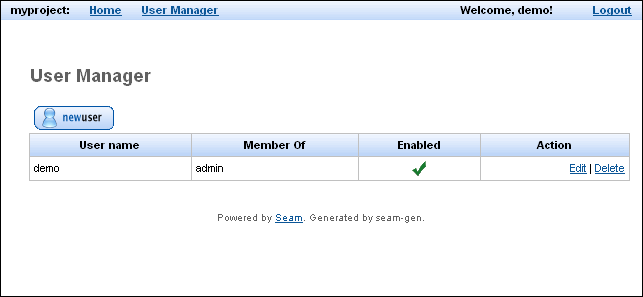
In addition to this, the project will include the following user management screens, allowing
new users to be created, roles assigned, etc:
The user detail screen: