- 1.1. Using the Seam examples
- 1.2. Your first Seam application: the registration example
- 1.3. Clickable lists in Seam: the messages example
- 1.4. Seam and jBPM: the todo list example
- 1.5. Seam pageflow: the numberguess example
- 1.6. A complete Seam application: the Hotel Booking example
- 1.7. Nested conversations: extending the Hotel Booking example
- 1.8. A complete application featuring Seam and jBPM: the DVD Store example
- 1.9. Bookmarkable URLs with the Blog example
Seam provides a number of example applications demonstrating how to use the various features
of Seam. This tutorial will guide you through a few of those examples to help you get started
learning Seam. The Seam examples are located in the examples subdirectory
of the Seam distribution. The registration example, which will be the first example we look at,
is in the examples/registration directory.
Each example has the same directory structure:
The
viewdirectory contains view-related files such as web page templates, images and stylesheets.The
resourcesdirectory contains deployment descriptors and other configuration files.The
srcdirectory contains the application source code.
The example applications run both on JBoss AS and Tomcat with no additional configuration.
The following sections will explain the procedure in both cases. Note that all the examples
are built and run from the Ant build.xml, so you'll need a recent version
of Ant installed before you get started.
The examples are configured for use on JBoss 4.2. You'll need to set jboss.home,
in the shared build.properties file in the root folder of your Seam
installation, to the location of your JBoss AS installation .
Once you've done that and started the application server, you can build
and deploy any example by typing ant deploy in the
the directory for that example. The examples all deploy to a URL
like /seam-.
For the registration example, the URL would be
examplehttp://localhost:8080/seam-registration/.
The examples are also configured for use on Tomcat 6.0. You will need to follow the instructions in Section 29.6.1, “Installing Embedded JBoss” for installing JBoss Embedded on Tomcat 6.0. JBoss Embedded is only required to run the Seam demos that use EJB3 components on Tomcat. There are also examples of non-EJB3 applications that can be run on Tomcat without the use of JBoss Embedded.
You'll need to
set tomcat.home, in the shared build.properties file in
the root folder of your Seam installation, to the location of your Tomcat installation.
make sure you set the location of your Tomcat.
You'll need to use a different Ant target when using Tomcat. Use
ant tomcat.deploy in example subdirectory to build and deploy
any example for Tomcat.
On Tomcat, the examples deploy to URLs like
/jboss-seam-, so for the registration
example the URL would be
examplehttp://localhost:8080/jboss-seam-registration/.
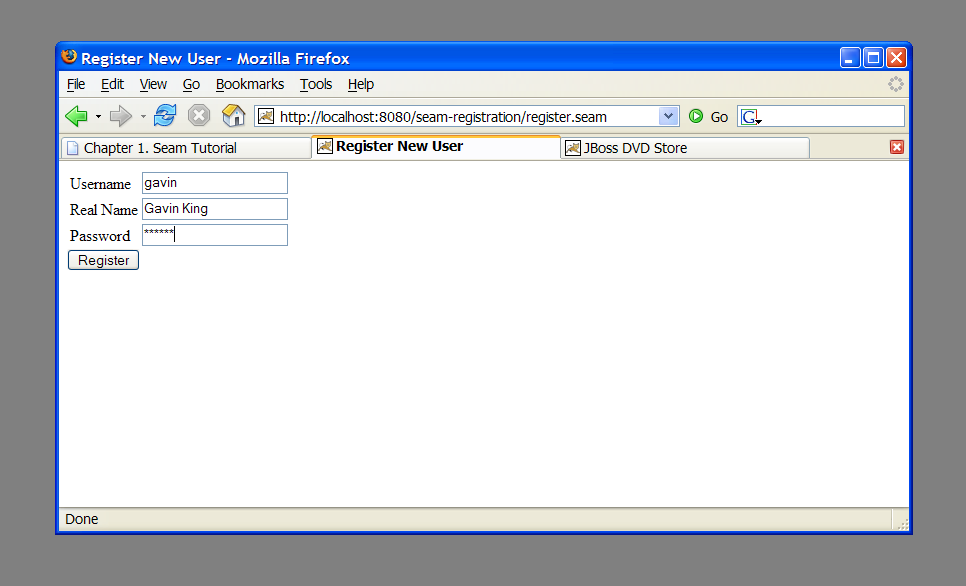
The registration example is a simple application that lets a new user store his username, real name and password in the database. The example isn't intended to show off all of the cool functionality of Seam. However, it demonstrates the use of an EJB3 session bean as a JSF action listener, and basic configuration of Seam.
We'll go slowly, since we realize you might not yet be familiar with EJB 3.0.
The start page displays a very basic form with three input fields. Try filling them in and then submitting the form. This will save a user object in the database.
The example is implemented with two Facelets templates, one entity bean and one stateless session bean. Let's take a look at the code, starting from the "bottom".
We need an EJB entity bean for user data. This class defines persistence and validation declaratively, via annotations. It also needs some extra annotations that define the class as a Seam component.
Example 1.1. User.java
@Entity

@Name("user")

@Scope(SESSION)

@Table(name="users")

public class User implements Serializable

{

   private static final long serialVersionUID = 1881413500711441951L;


   private String username;

   private String password;

   private String name;


   public User(String name, String password, String username)

   {

      this.name = name;

      this.password = password;

      this.username = username;

   }


   public User() {}


   @NotNull @Length(min=5, max=15)

   public String getPassword()

   {

      return password;

   }


   public void setPassword(String password)

   {

      this.password = password;

   }


   @NotNull

   public String getName()

   {

      return name;

   }


   public void setName(String name)

   {

      this.name = name;

   }


   @Id @NotNull @Length(min=5, max=15)

   public String getUsername()

   {

      return username;

   }


   public void setUsername(String username)

   {

      this.username = username;

   }


}
| The EJB3 standard |
| A Seam component needs a component name specified by the
|
| Whenever Seam instantiates a component, it binds the new instance to a context
variable in the component's default context. The default
context is specified using the
|
| The EJB standard |
|
|
| An empty constructor is both required by both the EJB specification and by Seam. |
| The |
| The EJB standard |
The most important things to notice in this example are the @Name and
@Scope annotations. These annotations establish that this class is a Seam component.
We'll see below that the properties of our User class are bound
directly to JSF components and are populated by JSF during the update model values phase. We
don't need any tedious glue code to copy data back and forth between the JSP pages and the
entity bean domain model.
However, entity beans shouldn't do transaction management or database access. So we can't use this component as a JSF action listener. For that we need a session bean.
Most Seam application use session beans as JSF action listeners (you can use JavaBeans instead if you like).
We have exactly one JSF action in our application, and one session bean method attached to it. In
this case, we'll use a stateless session bean, since all the state associated with our action is
held by the User bean.
This is the only really interesting code in the example!
Example 1.2. RegisterAction.java
@StatelessMessages.instance().add("User #{user.username} already exists"); return null; } } }
| The EJB |
| The
|
| The EJB standard |
| The Seam |
| The action listener method uses the standard EJB3
|
| Notice that Seam lets you use a JSF EL expression inside EJB-QL. Under the
covers, this results in an ordinary JPA |
| The |
| JSF action listener methods return a string-valued outcome that determines what page will be displayed next. A null outcome (or a void action listener method) redisplays the previous page. In plain JSF, it is normal to always use a JSF navigation rule to determine the JSF view id from the outcome. For complex application this indirection is useful and a good practice. However, for very simple examples like this one, Seam lets you use the JSF view id as the outcome, eliminating the requirement for a navigation rule. Note that when you use a view id as an outcome, Seam always performs a browser redirect. |
| Seam provides a number of built-in components to help solve
common problems. The |
Note that we did not explicitly specify a @Scope this time. Each Seam
component type has a default scope if not explicitly specified. For stateless session beans, the
default scope is the stateless context, which is the only sensible value.
Our session bean action listener performs the business and persistence logic for our mini-application. In more complex applications, we might need require a separate service layer. This is easy to achieve with Seam, but it's overkill for most web applications. Seam does not force you into any particular strategy for application layering, allowing your application to be as simple, or as complex, as you want.
Note that in this simple application, we've actually made it far more complex than it needs to be. If we had used the Seam application framework controllers, we would have eliminated all of our application code. However, then we wouldn't have had much of an application to explain.
Naturally, our session bean needs a local interface.
That's the end of the Java code. Now we'll look at the view.
The view pages for a Seam application could be implemented using any technology that supports JSF. In this example we use Facelets, because we think it's better than JSP.
Example 1.4. register.xhtml
<?xml version="1.0" encoding="utf-8"?>

<!DOCTYPE html PUBLIC "-//W3C//DTD XHTML 1.0 Transitional//EN"

                      "http://www.w3.org/TR/xhtml1/DTD/xhtml1-transitional.dtd">

<html xmlns="http://www.w3.org/1999/xhtml"

      xmlns:s="http://jboss.com/products/seam/taglib"

      xmlns:h="http://java.sun.com/jsf/html"

      xmlns:f="http://java.sun.com/jsf/core">


   <head>

      <title>Register New User</title>

   </head>

   <body>

      <f:view>

         <h:form>

            <s:validateAll>

               <h:panelGrid columns="2">

                  Username: <h:inputText value="#{user.username}" required="true"/>

                  Real Name: <h:inputText value="#{user.name}" required="true"/>

                  Password: <h:inputSecret value="#{user.password}" required="true"/>

               </h:panelGrid>

            </s:validateAll>

            <h:messages/>

            <h:commandButton value="Register" action="#{register.register}"/>

         </h:form>

      </f:view>

   </body>


</html>
The only thing here that is specific to Seam is the
<s:validateAll> tag. This JSF component tells JSF to validate all
the contained input fields against the Hibernate Validator annotations specified on the entity bean.
Example 1.5. registered.xhtml
<?xml version="1.0" encoding="utf-8"?>

<!DOCTYPE html PUBLIC "-//W3C//DTD XHTML 1.0 Transitional//EN"

                      "http://www.w3.org/TR/xhtml1/DTD/xhtml1-transitional.dtd">

<html xmlns="http://www.w3.org/1999/xhtml"

      xmlns:f="http://java.sun.com/jsf/core">


   <head>

      <title>Successfully Registered New User</title>

   </head>

   <body>

      <f:view>

         Welcome, #{user.name}, you are successfully registered as #{user.username}.

      </f:view>

   </body>


</html>
This is a simple Facelets page using some embedded EL. There is nothing specific to Seam here.
Since this is the first Seam app we've seen, we'll take a look at the deployment descriptors. Before we get into them, it is worth noting that Seam strongly values minimal configuration. These configuration files will be created for you when you create a Seam application. You'll never need to touch most of these files. We're presenting them now only to help you understand what all the pieces in the example are doing.
If you've used many Java frameworks before, you'll be used to having to declare all your component classes in some kind of XML file that gradually grows more and more unmanageable as your project matures. You'll be relieved to know that Seam does not require that application components be accompanied by XML. Most Seam applications require a very small amount of XML that does not grow very much as the project gets bigger.
Nevertheless, it is often useful to be able to provide for some external
configuration of some components (particularly the components built in to
Seam). You have a couple of options here, but the most flexible option is to provide this
configuration in a file called components.xml, located in the
WEB-INF directory. We'll use the components.xml file to tell
Seam how to find our EJB components in JNDI:
Example 1.6. components.xml
<?xml version="1.0" encoding="UTF-8"?>

<components xmlns="http://jboss.com/products/seam/components"

            xmlns:core="http://jboss.com/products/seam/core"

            xmlns:xsi="http://www.w3.org/2001/XMLSchema-instance">


     <core:init jndi-pattern="@jndiPattern@"/>


</components>
This code configures a property named jndiPattern of a built-in Seam component
named org.jboss.seam.core.init. The funny @ symbols are
there because our Ant build script puts the correct JNDI pattern in when we deploy the application.
The presentation layer for our mini-application will be deployed in a WAR. So we'll need a web deployment descriptor.
Example 1.7. web.xml
<?xml version="1.0" encoding="UTF-8"?>

<web-app version="2.5"

    xmlns="http://java.sun.com/xml/ns/javaee"

    xmlns:xsi="http://www.w3.org/2001/XMLSchema-instance"

    xsi:schemaLocation="http://java.sun.com/xml/ns/javaee

                        http://java.sun.com/xml/ns/javaee/web-app_2_5.xsd">


    <!-- Seam -->


    <listener>

        <listener-class>org.jboss.seam.servlet.SeamListener</listener-class>

    </listener>


    <!-- JSF -->


    <listener>

        <listener-class>com.sun.faces.config.ConfigureListener</listener-class>

    </listener>


    <context-param>

        <param-name>javax.faces.DEFAULT_SUFFIX</param-name>

        <param-value>.xhtml</param-value>

    </context-param>


    <servlet>

        <servlet-name>Faces Servlet</servlet-name>

        <servlet-class>javax.faces.webapp.FacesServlet</servlet-class>

        <load-on-startup>1</load-on-startup>

    </servlet>


    <servlet-mapping>

        <servlet-name>Faces Servlet</servlet-name>

        <url-pattern>*.seam</url-pattern>

    </servlet-mapping>


    <session-config>

        <session-timeout>10</session-timeout>

    </session-config>


</web-app>
This web.xml file configures Seam and JSF. The configuration you see here is
pretty much identical in all Seam applications.
Most Seam applications use JSF views as the presentation layer. So usually we'll need
faces-config.xml. In our case, we are going to use Facelets for
defining our views, so we need to tell JSF to use Facelets as its templating engine.
Example 1.8. faces-config.xml
<?xml version="1.0" encoding="UTF-8"?>

<faces-config version="1.2"

              xmlns="http://java.sun.com/xml/ns/javaee"

              xmlns:xsi="http://www.w3.org/2001/XMLSchema-instance"

              xsi:schemaLocation="http://java.sun.com/xml/ns/javaee http://java.sun.com/xml/ns/javaee/web-facesconfig_1_2.xsd">


    <!-- Facelets support -->

    <application>

        <view-handler>com.sun.facelets.FaceletViewHandler</view-handler>

    </application>


</faces-config>
Note that we don't need
any JSF managed bean declarations! Our managed beans are annotated Seam components. In Seam applications,
the faces-config.xml is used much less often than in plain JSF.
In fact, once you have all the basic descriptors set up, the only XML you need to write as you add new functionality to a Seam application is orchestration: navigation rules or jBPM process definitions. Seam takes the view that process flow and configuration data are the only things that truly belong in XML.
In this simple example, we don't even need a navigation rule, since we decided to embed the view id in our action code.
The ejb-jar.xml file integrates Seam with EJB3, by attaching the
SeamInterceptor to all session beans in the archive.
<ejb-jar xmlns="http://java.sun.com/xml/ns/javaee"

         xmlns:xsi="http://www.w3.org/2001/XMLSchema-instance"

         xsi:schemaLocation="http://java.sun.com/xml/ns/javaee

                             http://java.sun.com/xml/ns/javaee/ejb-jar_3_0.xsd"

         version="3.0">


   <interceptors>

      <interceptor>

         <interceptor-class>org.jboss.seam.ejb.SeamInterceptor</interceptor-class>

      </interceptor>

   </interceptors>


   <assembly-descriptor>

      <interceptor-binding>

         <ejb-name>*</ejb-name>

         <interceptor-class>org.jboss.seam.ejb.SeamInterceptor</interceptor-class>

      </interceptor-binding>

   </assembly-descriptor>


</ejb-jar>
The persistence.xml file tells the EJB persistence provider where to find the
datasource, and contains some vendor-specific settings. In this case, enables automatic schema
export at startup time.
<?xml version="1.0" encoding="UTF-8"?>

<persistence xmlns="http://java.sun.com/xml/ns/persistence"

             xmlns:xsi="http://www.w3.org/2001/XMLSchema-instance"

             xsi:schemaLocation="http://java.sun.com/xml/ns/persistence

                                 http://java.sun.com/xml/ns/persistence/persistence_1_0.xsd"

             version="1.0">


   <persistence-unit name="userDatabase">

      <provider>org.hibernate.ejb.HibernatePersistence</provider>

      <jta-data-source>java:/DefaultDS</jta-data-source>

      <properties>

         <property name="hibernate.hbm2ddl.auto" value="create-drop"/>

      </properties>

    </persistence-unit>


</persistence>
Finally, since our application is deployed as an EAR, we need a deployment descriptor there, too.
Example 1.9. registration application
<?xml version="1.0" encoding="UTF-8"?>

<application xmlns="http://java.sun.com/xml/ns/javaee"

             xmlns:xsi="http://www.w3.org/2001/XMLSchema-instance"

             xsi:schemaLocation="http://java.sun.com/xml/ns/javaee

                                 http://java.sun.com/xml/ns/javaee/application_5.xsd"

             version="5">


    <display-name>Seam Registration</display-name>


    <module>

        <web>

            <web-uri>jboss-seam-registration.war</web-uri>

            <context-root>/seam-registration</context-root>

        </web>

    </module>

    <module>

        <ejb>jboss-seam-registration.jar</ejb>

    </module>

    <module>

        <ejb>jboss-seam.jar</ejb>

    </module>

    <module>

        <java>jboss-el.jar</java>

    </module>


</application>
This deployment descriptor links modules in the enterprise archive and binds the web application
to the context root /seam-registration.
We've now seen all the files in the entire application!
When the form is submitted, JSF asks Seam to resolve the variable named user.
Since there is no value already bound to that name (in any Seam context), Seam instantiates the
user component, and returns the resulting User entity bean
instance to JSF after storing it in the Seam session context.
The form input values are now validated against the Hibernate Validator constraints specified on the
User entity. If the constraints are violated, JSF redisplays the page. Otherwise,
JSF binds the form input values to properties of the User entity bean.
Next, JSF asks Seam to resolve the variable named register. Seam finds the
RegisterAction stateless session bean in the stateless context and returns it.
JSF invokes the register() action listener method.
Seam intercepts the method call and injects the User entity from the Seam session
context, before continuing the invocation.
The register() method checks if a user with the entered username already exists.
If so, an error message is queued with the FacesMessages component, and a null
outcome is returned, causing a page redisplay. The FacesMessages component
interpolates the JSF expression embedded in the message string and adds a JSF
FacesMessage to the view.
If no user with that username exists, the "/registered.xhtml" outcome triggers a
browser redirect to the registered.xhtml page. When JSF comes to render the page, it
asks Seam to resolve the variable named user and uses property values of the returned
User entity from Seam's session scope.
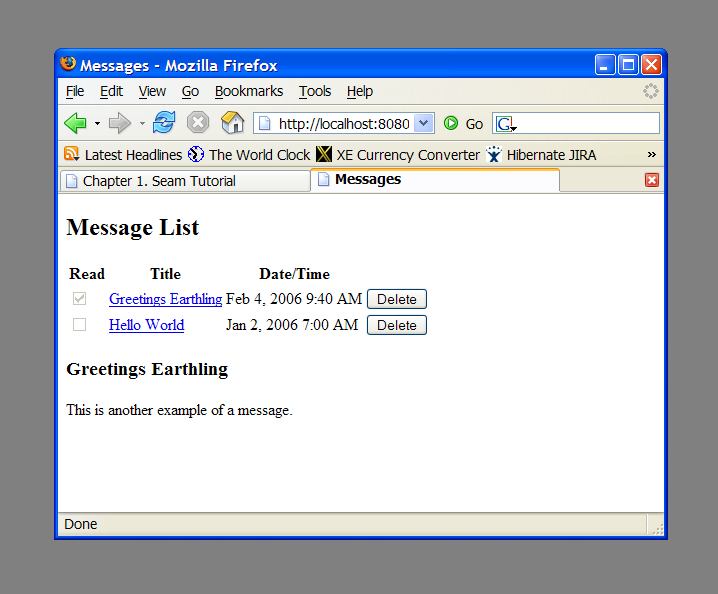
Clickable lists of database search results are such an important part of any online application that Seam
provides special functionality on top of JSF to make it easier to query data using EJB-QL or HQL and display
it as a clickable list using a JSF <h:dataTable>. The messages example
demonstrates this functionality.
The message list example has one entity bean, Message, one session bean,
MessageListBean and one JSP.
The Message entity defines the title, text, date and time of a message, and a
flag indicating whether the message has been read:
Example 1.10. Message.java
@Entity

@Name("message")

@Scope(EVENT)

public class Message implements Serializable

{

   private Long id;

   private String title;

   private String text;

   private boolean read;

   private Date datetime;


   @Id @GeneratedValue

   public Long getId() {

      return id;

   }

   public void setId(Long id) {

      this.id = id;

   }


   @NotNull @Length(max=100)

   public String getTitle() {

      return title;

   }

   public void setTitle(String title) {

      this.title = title;

   }


   @NotNull @Lob

   public String getText() {

      return text;

   }

   public void setText(String text) {

      this.text = text;

   }


   @NotNull

   public boolean isRead() {

      return read;

   }

   public void setRead(boolean read) {

      this.read = read;

   }


   @NotNull

   @Basic @Temporal(TemporalType.TIMESTAMP)

   public Date getDatetime() {

      return datetime;

   }

   public void setDatetime(Date datetime) {

      this.datetime = datetime;

   }


}
Just like in the previous example, we have a session bean, MessageManagerBean,
which defines the action listener methods for the two buttons on our form. One of the buttons
selects a message from the list, and displays that message. The other button deletes a message. So
far, this is not so different to the previous example.
But MessageManagerBean is also responsible for fetching the list of messages
the first time we navigate to the message list page. There are various ways the user could navigate
to the page, and not all of them are preceded by a JSF action—the user might have
bookmarked the page, for example. So the job of fetching the message list takes place in a Seam
factory method, instead of in an action listener method.
We want to cache the list of messages in memory between server requests, so we will make this a stateful session bean.
Example 1.11. MessageManagerBean.java
@Stateful
@Scope(SESSION)
@Name("messageManager")
public class MessageManagerBean implements Serializable, MessageManager
{

   @DataModel
   private List<Message> messageList;

   @DataModelSelection
   @Out(required=false)
   private Message message;

   @PersistenceContext(type=EXTENDED)
   private EntityManager em;

   @Factory("messageList")
   public void findMessages()
   {
      messageList = em.createQuery("select msg from Message msg order by msg.datetime desc")
                      .getResultList();
   }

   public void select()
   {
      message.setRead(true);
   }

   public void delete()
   {
      messageList.remove(message);
      em.remove(message);
      message=null;
   }

   @Remove
   public void destroy() {}

} | The |
| The |
| The |
| This stateful bean has an EJB3 extended persistence context.
The messages retrieved in the query remain in the managed state as long as the bean
exists, so any subsequent method calls to the stateful bean can update them without
needing to make any explicit call to the |
| The first time we navigate to the JSP page, there will be no value in the
|
| The |
| The |
| All stateful session bean Seam components must have a method
with no parameters marked |
Note that this is a session-scoped Seam component. It is associated with the user login session, and all requests from a login session share the same instance of the component. (In Seam applications, we usually use session-scoped components sparingly.)
All session beans have a business interface, of course.
Example 1.12. MessageManager.java
@Local

public interface MessageManager

{

   public void findMessages();

   public void select();

   public void delete();

   public void destroy();

}
From now on, we won't show local interfaces in our code examples.
Let's skip over components.xml, persistence.xml,
web.xml, ejb-jar.xml, faces-config.xml
and application.xml since they are much the same as the previous example, and go
straight to the JSP.
The JSP page is a straightforward use of the JSF <h:dataTable>
component. Again, nothing specific to Seam.
Example 1.13. messages.jsp
<%@ taglib uri="http://java.sun.com/jsf/html" prefix="h" %>

<%@ taglib uri="http://java.sun.com/jsf/core" prefix="f" %>

<html>

 <head>

  <title>Messages</title>

 </head>

 <body>

  <f:view>

   <h:form>

     <h2>Message List</h2>

     <h:outputText value="No messages to display"

                   rendered="#{messageList.rowCount==0}"/>

     <h:dataTable var="msg" value="#{messageList}"

                  rendered="#{messageList.rowCount>0}">

        <h:column>

           <f:facet name="header">

              <h:outputText value="Read"/>

           </f:facet>

           <h:selectBooleanCheckbox value="#{msg.read}" disabled="true"/>

        </h:column>

        <h:column>

           <f:facet name="header">

              <h:outputText value="Title"/>

           </f:facet>

           <h:commandLink value="#{msg.title}" action="#{messageManager.select}"/>

        </h:column>

        <h:column>

           <f:facet name="header">

              <h:outputText value="Date/Time"/>

           </f:facet>

           <h:outputText value="#{msg.datetime}">

              <f:convertDateTime type="both" dateStyle="medium" timeStyle="short"/>

           </h:outputText>

        </h:column>

        <h:column>

           <h:commandButton value="Delete" action="#{messageManager.delete}"/>

        </h:column>

     </h:dataTable>

     <h3><h:outputText value="#{message.title}"/></h3>

     <div><h:outputText value="#{message.text}"/></div>

   </h:form>

  </f:view>

 </body>

</html>
The first time we navigate to the messages.jsp page, the page will try to resolve the
messageList context variable. Since this context variable is not initialized,
Seam will call the factory method findMessages(), which performs a query against the
database and results in a DataModel being outjected. This
DataModel provides the row data needed for rendering the
<h:dataTable>.
When the user clicks the <h:commandLink>, JSF calls the
select() action listener. Seam intercepts this call and injects the selected row
data into the message attribute of the messageManager component.
The action listener fires, marking the selected Message as read. At the end of the
call, Seam outjects the selected Message to the context variable named
message. Next, the EJB container commits the transaction, and the change to the
Message is flushed to the database. Finally, the page is re-rendered,
redisplaying the message list, and displaying the selected message below it.
If the user clicks the <h:commandButton>, JSF calls the
delete() action listener. Seam intercepts this call and injects the selected row
data into the message attribute of the messageList component. The
action listener fires, removing the selected Message from the list, and also calling
remove() on the EntityManager. At the end of the call, Seam
refreshes the messageList context variable and clears the context variable named
message. The EJB container commits the transaction, and deletes the
Message from the database. Finally, the page is re-rendered, redisplaying the
message list.
jBPM provides sophisticated functionality for workflow and task management. To get a small taste of how jBPM integrates with Seam, we'll show you a simple "todo list" application. Since managing lists of tasks is such core functionality for jBPM, there is hardly any Java code at all in this example.
The center of this example is the jBPM process definition. There are also two JSPs and two trivial JavaBeans (There was no reason to use session beans, since they do not access the database, or have any other transactional behavior). Let's start with the process definition:
Example 1.14. todo.jpdl.xml
<process-definition name="todo"> <start-stat
| The |
| The |
| The |
| Tasks need to be assigned to a user or group of users when they are created. In this
case, the task is assigned to the current user, which we get from a built-in Seam
component named |
| The |
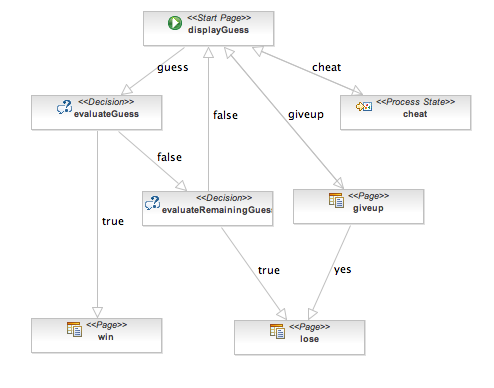
If we view this process definition using the process definition editor provided by JBossIDE, this is what it looks like:
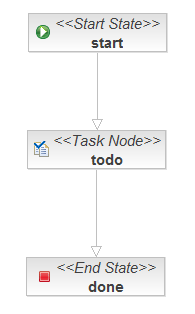
This document defines our business process as a graph of nodes. This is the most trivial possible business process: there is one task to be performed, and when that task is complete, the business process ends.
The first JavaBean handles the login screen login.jsp. Its job is just to
initialize the jBPM actor id using the actor component. In a real application, it
would also need to authenticate the user.
Example 1.15. Login.java
@Name("login")

public class Login {


   @In

   private Actor actor;


   private String user;


   public String getUser() {

      return user;

   }


   public void setUser(String user) {

      this.user = user;

   }


   public String login()

   {

      actor.setId(user);

      return "/todo.jsp";

   }

}
Here we see the use of @In to inject the built-in Actor
component.
The JSP itself is trivial:
Example 1.16. login.jsp
<%@ taglib uri="http://java.sun.com/jsf/html" prefix="h"%>

<%@ taglib uri="http://java.sun.com/jsf/core" prefix="f"%>

<html>

<head>

<title>Login</title>

</head>

<body>

<h1>Login</h1>

<f:view>

    <h:form>

      <div>

        <h:inputText value="#{login.user}"/>

        <h:commandButton value="Login" action="#{login.login}"/>

      </div>

    </h:form>

</f:view>

</body>

</html>
The second JavaBean is responsible for starting business process instances, and ending tasks.
Example 1.17. TodoList.java
@Name("todoList")
public class TodoList {

   private String description;

   public String getDescription()
   {
      return description;
   }

   public void setDescription(String description) {
      this.description = description;
   }

   @CreateProcess(definition="todo")
   public void createTodo() {}

   @StartTask @EndTask
   public void done() {}

} | The description property accepts user input form the JSP page, and exposes it to the process definition, allowing the task description to be set. |
| The Seam |
| The Seam |
In a more realistic example, @StartTask and @EndTask would not
appear on the same method, because there is usually work to be done using the application in order to
complete the task.
Finally, the core of the application is in todo.jsp:
Example 1.18. todo.jsp
<%@ taglib uri="http://java.sun.com/jsf/html" prefix="h" %>

<%@ taglib uri="http://java.sun.com/jsf/core" prefix="f" %>

<%@ taglib uri="http://jboss.com/products/seam/taglib" prefix="s" %>

<html>

<head>

<title>Todo List</title>

</head>

<body>

<h1>Todo List</h1>

<f:view>

   <h:form id="list">

      <div>

         <h:outputText value="There are no todo items."

                       rendered="#{empty taskInstanceList}"/>

         <h:dataTable value="#{taskInstanceList}" var="task"

                      rendered="#{not empty taskInstanceList}">

            <h:column>

                <f:facet name="header">

                    <h:outputText value="Description"/>

                </f:facet>

                <h:inputText value="#{task.description}"/>

            </h:column>

            <h:column>

                <f:facet name="header">

                    <h:outputText value="Created"/>

                </f:facet>

                <h:outputText value="#{task.taskMgmtInstance.processInstance.start}">

                    <f:convertDateTime type="date"/>

                </h:outputText>

            </h:column>

            <h:column>

                <f:facet name="header">

                    <h:outputText value="Priority"/>

                </f:facet>

                <h:inputText value="#{task.priority}" style="width: 30"/>

            </h:column>

            <h:column>

                <f:facet name="header">

                    <h:outputText value="Due Date"/>

                </f:facet>

                <h:inputText value="#{task.dueDate}" style="width: 100">

                    <f:convertDateTime type="date" dateStyle="short"/>

                </h:inputText>

            </h:column>

            <h:column>

                <s:button value="Done" action="#{todoList.done}" taskInstance="#{task}"/>

            </h:column>

         </h:dataTable>

      </div>

      <div>

      <h:messages/>

      </div>

      <div>

         <h:commandButton value="Update Items" action="update"/>

      </div>

   </h:form>

   <h:form id="new">

      <div>

         <h:inputText value="#{todoList.description}"/>

         <h:commandButton value="Create New Item" action="#{todoList.createTodo}"/>

      </div>

   </h:form>

</f:view>

</body>

</html>
Let's take this one piece at a time.
The page renders a list of tasks, which it gets from a built-in Seam component named
taskInstanceList. The list is defined inside a JSF form.
Example 1.19. todo.jsp
<h:form id="list">

   <div>

      <h:outputText value="There are no todo items." rendered="#{empty taskInstanceList}"/>

      <h:dataTable value="#{taskInstanceList}" var="task"

                   rendered="#{not empty taskInstanceList}">

         ...

      </h:dataTable>

   </div>

</h:form>
Each element of the list is an instance of the jBPM class TaskInstance. The
following code simply displays the interesting properties of each task in the list. For the description,
priority and due date, we use input controls, to allow the user to update these values.
<h:column>

    <f:facet name="header">

       <h:outputText value="Description"/>

    </f:facet>

    <h:inputText value="#{task.description}"/>

</h:column>

<h:column>

    <f:facet name="header">

        <h:outputText value="Created"/>

    </f:facet>

    <h:outputText value="#{task.taskMgmtInstance.processInstance.start}">

        <f:convertDateTime type="date"/>

    </h:outputText>

</h:column>

<h:column>

    <f:facet name="header">

        <h:outputText value="Priority"/>

    </f:facet>

    <h:inputText value="#{task.priority}" style="width: 30"/>

</h:column>

<h:column>

    <f:facet name="header">

        <h:outputText value="Due Date"/>

    </f:facet>

    <h:inputText value="#{task.dueDate}" style="width: 100">

        <f:convertDateTime type="date" dateStyle="short"/>

    </h:inputText>

</h:column>
This button ends the task by calling the action method annotated @StartTask
@EndTask. It passes the task id to Seam as a request parameter:
<h:column>

    <s:button value="Done" action="#{todoList.done}" taskInstance="#{task}"/>

</h:column>
Note that this is using a Seam <s:button> JSF control from the
seam-ui.jar package. This button is used to update the properties of the
tasks. When the form is submitted, Seam and jBPM will make any changes to the tasks persistent.
There is no need for any action listener method:
<h:commandButton value="Update Items" action="update"/>
A second form on the page is used to create new items, by calling the action method annotated
@CreateProcess.
<h:form id="new">

    <div>

        <h:inputText value="#{todoList.description}"/>

        <h:commandButton value="Create New Item" action="#{todoList.createTodo}"/>

    </div>

</h:form>
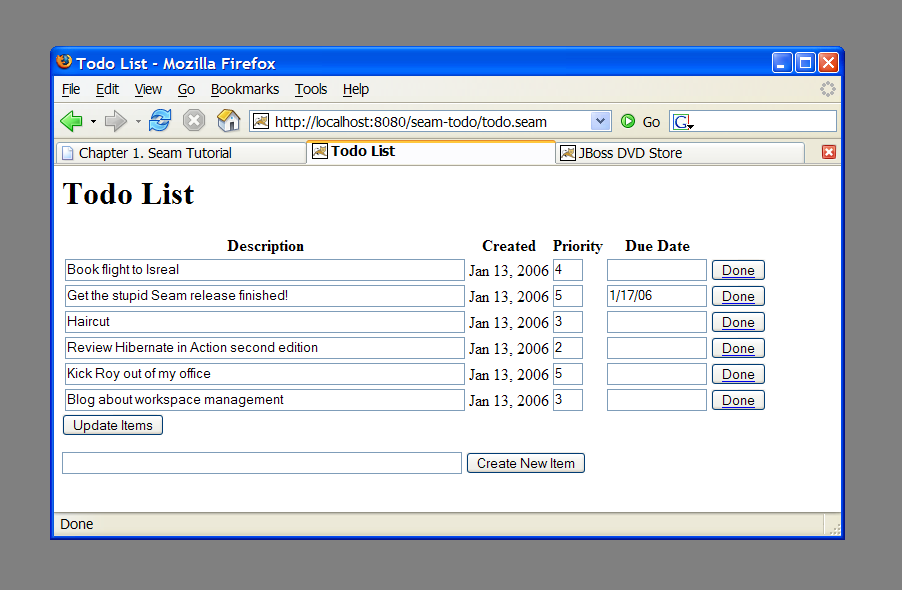
After logging in, todo.jsp uses the taskInstanceList component to display a table
of outstanding todo items for a the current user. Initially there are none. It
also presents a form to enter a new entry. When the user types the todo item and
hits the "Create New Item" button, #{todoList.createTodo} is called. This starts
the todo process, as defined in todo.jpdl.xml.
The process instance is created, starting in the start state and immediately transition to
the todo state, where a new task is created. The task description is set
based on the user's
input, which was saved to #{todoList.description}. Then, the task is
assigned to
the current user, which was stored in the seam actor component. Note that in
this example, the process has no extra process state. All the state in this example
is stored in the task definition. The process and task information is stored in the database
at the end of the request.
When todo.jsp is redisplayed, taskInstanceList now finds
the task that was just created.
The task is shown in an h:dataTable. The internal state of the task is
displayed in
each column: #{task.description}, #{task.priority},
#{task.dueDate}, etc... These fields
can all be edited and saved back to the database.
Each todo item also has "Done" button, which calls #{todoList.done}. The
todoList component
knows which task the button is for because each s:button specificies
taskInstance="#{task}", referring
to the task for that particular line of of the table. The @StartTast and
@EndTask annotations
cause seam to make the task active and immediately complete the task. The original process then
transitions into the done state, according to the process definition, where it ends.
The state of the task and process are both updated in the database.
When todo.jsp is displayed again, the now-completed task is no longer
displayed in the
taskInstanceList, since that component only display active tasks for the user.
For Seam applications with relatively freeform (ad hoc) navigation, JSF/Seam navigation rules are a perfectly good way to define the page flow. For applications with a more constrained style of navigation, especially for user interfaces which are more stateful, navigation rules make it difficult to really understand the flow of the system. To understand the flow, you need to piece it together from the view pages, the actions and the navigation rules.
Seam allows you to use a jPDL process definition to define pageflow. The simple number guessing example shows how this is done.
The example is implemented using one JavaBean, three JSP pages and a jPDL pageflow definition. Let's begin with the pageflow:
Example 1.20. pageflow.jpdl.xml
<pageflow-definition
        xmlns="http://jboss.com/products/seam/pageflow"
        xmlns:xsi="http://www.w3.org/2001/XMLSchema-instance"
        xsi:schemaLocation="http://jboss.com/products/seam/pageflow
                            http://jboss.com/products/seam/pageflow-2.1.xsd"
        name="numberGuess">

   <start-page name="displayGuess" view-id="/numberGuess.jspx">
      <redirect/>
      <transition name="guess" to="evaluateGuess">
         <action expression="#{numberGuess.guess}"/>
      </transition>
      <transition name="giveup" to="giveup"/>
      <transition name="cheat" to="cheat"/>
   </start-page>

   <decision name="evaluateGuess" expression="#{numberGuess.correctGuess}">
      <transition name="true" to="win"/>
      <transition name="false" to="evaluateRemainingGuesses"/>
   </decision>

   <decision name="evaluateRemainingGuesses" expression="#{numberGuess.lastGuess}">
      <transition name="true" to="lose"/>
      <transition name="false" to="displayGuess"/>
   </decision>

   <page name="giveup" view-id="/giveup.jspx">
      <redirect/>
      <transition name="yes" to="lose"/>
      <transition name="no" to="displayGuess"/>
   </page>

   <process-state name="cheat">
      <sub-process name="cheat"/>
      <transition to="displayGuess"/>
   </process-state>

   <page name="win" view-id="/win.jspx">
      <redirect/>
      <end-conversation/>
   </page>

   <page name="lose" view-id="/lose.jspx">
      <redirect/>
      <end-conversation/>
   </page>

</pageflow-definition> | The |
| The |
| A transition |
| A |
Here is what the pageflow looks like in the JBoss Developer Studio pageflow editor:
Now that we have seen the pageflow, it is very, very easy to understand the rest of the application!
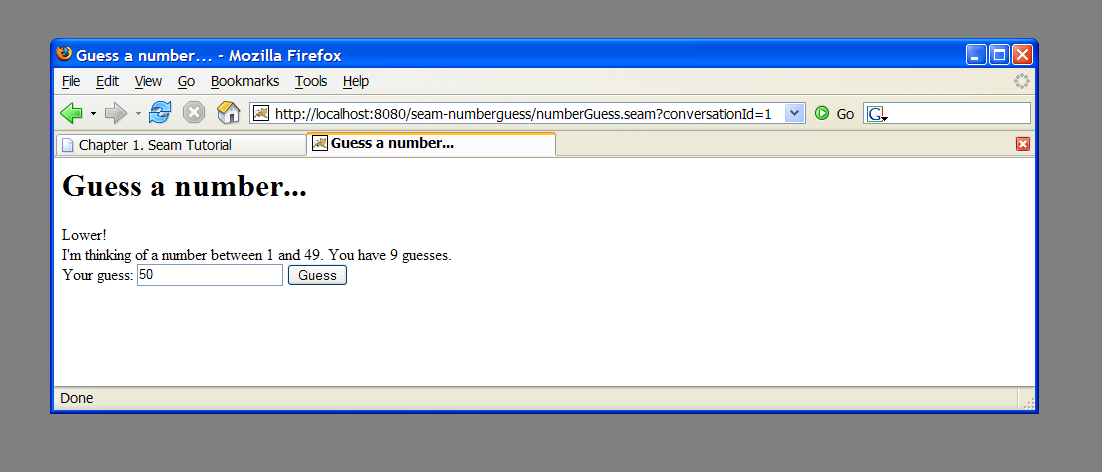
Here is the main page of the application, numberGuess.jspx:
Example 1.21. numberGuess.jspx
<<?xml version="1.0"?>

<jsp:root xmlns:jsp="http://java.sun.com/JSP/Page"

          xmlns:h="http://java.sun.com/jsf/html"

          xmlns:f="http://java.sun.com/jsf/core"

          xmlns:s="http://jboss.com/products/seam/taglib"

          xmlns="http://www.w3.org/1999/xhtml"

          version="2.0">

  <jsp:output doctype-root-element="html"

              doctype-public="-//W3C//DTD XHTML 1.0 Transitional//EN"

              doctype-system="http://www.w3c.org/TR/xhtml1/DTD/xhtml1-transitional.dtd"/>

  <jsp:directive.page contentType="text/html"/>

  <html>

  <head>

    <title>Guess a number...</title>

    <link href="niceforms.css" rel="stylesheet" type="text/css" />

    <script language="javascript" type="text/javascript" src="niceforms.js" />

  </head>

  <body>

    <h1>Guess a number...</h1>

    <f:view>

      <h:form styleClass="niceform">


        <div>

        <h:messages globalOnly="true"/>

        <h:outputText value="Higher!"

               rendered="#{numberGuess.randomNumber gt numberGuess.currentGuess}"/>

        <h:outputText value="Lower!"

               rendered="#{numberGuess.randomNumber lt numberGuess.currentGuess}"/>

        </div>


        <div>

        I'm thinking of a number between

        <h:outputText value="#{numberGuess.smallest}"/> and

        <h:outputText value="#{numberGuess.biggest}"/>. You have

        <h:outputText value="#{numberGuess.remainingGuesses}"/> guesses.

        </div>


        <div>

        Your guess:

        <h:inputText value="#{numberGuess.currentGuess}" id="inputGuess"

                     required="true" size="3"

                     rendered="#{(numberGuess.biggest-numberGuess.smallest) gt 20}">

          <f:validateLongRange maximum="#{numberGuess.biggest}"

                               minimum="#{numberGuess.smallest}"/>

        </h:inputText>

        <h:selectOneMenu value="#{numberGuess.currentGuess}"

                         id="selectGuessMenu" required="true"

                         rendered="#{(numberGuess.biggest-numberGuess.smallest) le 20 and

                                     (numberGuess.biggest-numberGuess.smallest) gt 4}">

          <s:selectItems value="#{numberGuess.possibilities}" var="i" label="#{i}"/>

        </h:selectOneMenu>

        <h:selectOneRadio value="#{numberGuess.currentGuess}" id="selectGuessRadio"

                          required="true"

                          rendered="#{(numberGuess.biggest-numberGuess.smallest) le 4}">

          <s:selectItems value="#{numberGuess.possibilities}" var="i" label="#{i}"/>

        </h:selectOneRadio>

        <h:commandButton value="Guess" action="guess"/>

        <s:button value="Cheat" view="/confirm.jspx"/>

        <s:button value="Give up" action="giveup"/>

        </div>


        <div>

        <h:message for="inputGuess" style="color: red"/>

        </div>


      </h:form>

    </f:view>

  </body>

  </html>

</jsp:root>
Notice how the command button names the guess transition instead of calling an
action directly.
The win.jspx page is predictable:
Example 1.22. win.jspx
<jsp:root xmlns:jsp="http://java.sun.com/JSP/Page"
          xmlns:h="http://java.sun.com/jsf/html"
          xmlns:f="http://java.sun.com/jsf/core"
          xmlns="http://www.w3.org/1999/xhtml"
          version="2.0">
  <jsp:output doctype-root-element="html"
              doctype-public="-//W3C//DTD XHTML 1.0 Transitional//EN"
              doctype-system="http://www.w3c.org/TR/xhtml1/DTD/xhtml1-transitional.dtd"/>
  <jsp:directive.page contentType="text/html"/>
  <html>
  <head>
    <title>You won!</title>
    <link href="niceforms.css" rel="stylesheet" type="text/css" />
  </head>
  <body>
    <h1>You won!</h1>
    <f:view>
      Yes, the answer was <h:outputText value="#{numberGuess.currentGuess}" />.
      It took you <h:outputText value="#{numberGuess.guessCount}" /> guesses.
      <h:outputText value="But you cheated, so it doesn't count!"
                    rendered="#{numberGuess.cheat}"/>
      Would you like to <a href="numberGuess.seam">play again</a>?
    </f:view>
  </body>
  </html>
</jsp:root>
The lose.jspx looks roughly the same, so we'll skip over it.
Finally, we'll look at the actual application code:
Example 1.23. NumberGuess.java
@Name("numberGuess")
@Scope(ScopeType.CONVERSATION)
public class NumberGuess implements Serializable {

   private int randomNumber;
   private Integer currentGuess;
   private int biggest;
   private int smallest;
   private int guessCount;
   private int maxGuesses;
   private boolean cheated;

   @Create
   public void begin()
   {
      randomNumber = new Random().nextInt(100);
      guessCount = 0;
      biggest = 100;
      smallest = 1;
   }

   public void setCurrentGuess(Integer guess)
   {
      this.currentGuess = guess;
   }

   public Integer getCurrentGuess()
   {
      return currentGuess;
   }

   public void guess()
   {
      if (currentGuess>randomNumber)
      {
         biggest = currentGuess - 1;
      }
      if (currentGuess<randomNumber)
      {
         smallest = currentGuess + 1;
      }
      guessCount ++;
   }

   public boolean isCorrectGuess()
   {
      return currentGuess==randomNumber;
   }

   public int getBiggest()
   {
      return biggest;
   }

   public int getSmallest()
   {
      return smallest;
   }

   public int getGuessCount()
   {
      return guessCount;
   }

   public boolean isLastGuess()
   {
      return guessCount==maxGuesses;
   }

   public int getRemainingGuesses() {
      return maxGuesses-guessCount;
   }

   public void setMaxGuesses(int maxGuesses) {
      this.maxGuesses = maxGuesses;
   }

   public int getMaxGuesses() {
      return maxGuesses;
   }

   public int getRandomNumber() {
      return randomNumber;
   }

   public void cheated()
   {
      cheated = true;
   }

   public boolean isCheat() {
      return cheated;
   }

   public List<Integer> getPossibilities()
   {
      List<Integer> result = new ArrayList<Integer>();
      for(int i=smallest; i<=biggest; i++) result.add(i);
      return result;
   }

}
| The first time a JSP page asks for a |
The pages.xml file starts a Seam
conversation (much more about that later), and specifies the
pageflow definition to use for the conversation's page flow.
Example 1.24. pages.xml
<?xml version="1.0" encoding="UTF-8"?>

<pages xmlns="http://jboss.com/products/seam/pages"

       xmlns:xsi="http://www.w3.org/2001/XMLSchema-instance"

       xsi:schemaLocation="http://jboss.com/products/seam/pages http://jboss.com/products/seam/pages-2.1.xsd">


  <page view-id="/numberGuess.jspx">

    <begin-conversation join="true" pageflow="numberGuess"/>

  </page>


</pages>
As you can see, this Seam component is pure business logic! It doesn't need to know anything at all about the user interaction flow. This makes the component potentially more reuseable.
We'll step through basic flow of the application. The game starts with the
numberGuess.jspx view. When the page is first displayed, the
pages.xml configuration causes conversation to begin and associates
the numberGuess pageflow
with that conversation. The pageflow starts with a start-page tag,
which is a wait state, so the numberGuess.xhtml is rendered.
The view references the numberGuess component, causing a new
instance to be created and stored in the conversation. The @Create method
is called, initializing the state of the game. The view displays an h:form
that allows the user to edit #{numberGuess.currentGuess}.
The "Guess" button triggers the guess action. Seam defers to the pageflow
to handle the action, which says that the pageflow should transition to the evaluateGuess
state, first invoking #{numberGuess.guess}, which updates the guess count
and highest/lowest suggestions in the numberGuess component.
The evaluateGuess state checks the value of #{numberGuess.correctGuess}
and transitions either to the win or evaluatingRemainingGuesses
state. We'll assume the number was incorrect, in which case the pageflow transitions to
evaluatingRemainingGuesses. That is also a decision state, which
tests the #{numberGuess.lastGuess} state to determine whether or not the user has
more guesses. If there are more guesses (lastGuess is false),
we transition back to the original displayGuess state. Finally we've
reached a page state, so the associated page /numberGuess.jspx is displayed.
Since the page has a redirect element, Seam sends a redirect to the the user's browser,
starting the process over.
We won't follow the state any more except to note that if on a future request either the
win or the lose transition were taken, the user would
be taken to either the /win.jspx or /lose.jspx.
Both states specify that Seam should end the conversation, tossing away all the game state and
pageflow state, before redirecting the user to the
final page.
The numberguess example also contains Giveup and Cheat buttons. You should be able to
trace the pageflow state for both actions relatively easily. Pay particular attention
to the cheat transtition, which loads a sub-process to handle that flow.
Although it's
overkill for this application, it does demonstrate how complex pageflows can be broken down into
smaller parts to make them easier to understand.
The booking application is a complete hotel room reservation system incorporating the following features:
User registration
Login
Logout
Set password
Hotel search
Hotel selection
Room reservation
Reservation confirmation
Existing reservation list
The booking application uses JSF, EJB 3.0 and Seam, together with Facelets for the view. There is also a port of this application to JSF, Facelets, Seam, JavaBeans and Hibernate3.
One of the things you'll notice if you play with this application for long enough is that it is extremely robust. You can play with back buttons and browser refresh and opening multiple windows and entering nonsensical data as much as you like and you will find it very difficult to make the application crash. You might think that we spent weeks testing and fixing bugs to achive this. Actually, this is not the case. Seam was designed to make it very straightforward to build robust web applications and a lot of robustness that you are probably used to having to code yourself comes naturally and automatically with Seam.
As you browse the sourcecode of the example application, and learn how the application works, observe how the declarative state management and integrated validation has been used to achieve this robustness.
The project structure is identical to the previous one, to install and deploy this application,
please refer to Section 1.1, “Using the Seam examples”. Once you've successfully started the application, you
can access it by pointing your browser to
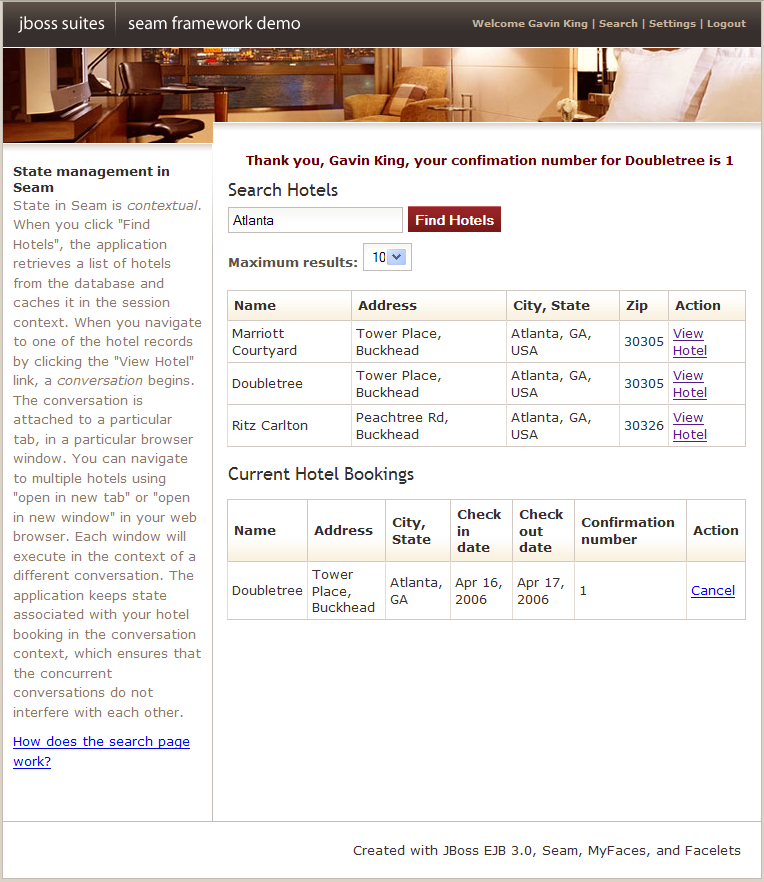
http://localhost:8080/seam-booking/
The application uses six session beans for to implement the business logic for the listed features.
AuthenticatorActionprovides the login authentication logic.BookingListActionretrieves existing bookings for the currently logged in user.ChangePasswordActionupdates the password of the currently logged in user.HotelBookingActionimplements booking and confirmation functionality. This functionality is implemented as a conversation, so this is one of the most interesting classes in the application.HotelSearchingActionimplements the hotel search functionality.RegisterActionregisters a new system user.
Three entity beans implement the application's persistent domain model.
Hotelis an entity bean that represent a hotelBookingis an entity bean that represents an existing bookingUseris an entity bean to represents a user who can make hotel bookings
We encourage you browse the sourcecode at your pleasure. In this tutorial we'll concentrate upon one particular piece of functionality: hotel search, selection, booking and confirmation. From the point of view of the user, everything from selecting a hotel to confirming a booking is one continuous unit of work, a conversation. Searching, however, is not part of the conversation. The user can select multiple hotels from the same search results page, in different browser tabs.
Most web application architectures have no first class construct to represent a conversation. This
causes enormous problems managing conversational state. Usually, Java web applications
use a combination of several techniques. Some state can be transfered in the URL.
What can't is either thrown into the
HttpSession or flushed to the database after every
request, and reconstructed from the database at the beginning of each new request.
Since the database is the least scalable tier, this often results in an utterly unacceptable lack of scalability. Added latency is also a problem, due to the extra traffic to and from the database on every request. To reduce this redundant traffic, Java applications often introduce a data (second-level) cache that keeps commonly accessed data between requests. This cache is necessarily inefficient, because invalidation is based upon an LRU policy instead of being based upon when the user has finished working with the data. Furthermore, because the cache is shared between many concurrent transactions, we've introduced a whole raft of problem's associated with keeping the cached state consistent with the database.
Now consider the state held in the HttpSession. The HttpSession is great
place for true session data, data that is common to all requests that the user has with the application.
However, it's a bad place to store data related to individual series of requests. Using the session of
conversational quickly breaks down when dealing with the back button and multiple windows.
On top of that, without careful
programming, data in the HTTP Session can grow quite large, making the HTTP session difficult
to cluster. Developing mechanisms to isolate session state associated with different concurrent
conversations, and incorporating failsafes to ensure that conversation state is destroyed when
the user aborts one of the
conversations by closing a browser window or tab is not for the faint hearted. Fortunately, with Seam,
you don't have to worry about that.
Seam introduces the conversation context as a first class construct. You can safely keep conversational state in this context, and be assured that it will have a well-defined lifecycle. Even better, you won't need to be continually pushing data back and forth between the application server and the database, since the conversation context is a natural cache of data that the user is currently working with.
In this application, we'll use the conversation context to store stateful session beans.
There is an ancient canard in the Java
community that stateful session beans are a scalability killer. This may have been true in the
early days of enterprise Java, but it is no longer true today. Modern application servers have
extremely
sophisticated mechanisms for stateful session bean state replication. JBoss AS, for example, performs
fine-grained replication, replicating only those bean attribute values which actually
changed. Note that all the traditional technical arguments for why stateful beans are inefficient apply
equally to the HttpSession, so the practice of shifting state from business tier
stateful session bean components to the web session to try and improve performance is unbelievably
misguided. It is certainly possible to write unscalable applications using stateful session beans, by
using stateful beans incorrectly, or by using them for the wrong thing. But that doesn't mean you should
never use them.
If you remain unconvinced, Seam allows the use of POJOs instead of stateful session beans.
With Seam, the choice is yours.
The booking example application shows how stateful components with different scopes can collaborate together to achieve complex behaviors. The main page of the booking application allows the user to search for hotels. The search results are kept in the Seam session scope. When the user navigates to one of these hotels, a conversation begins, and a conversation scoped component calls back to the session scoped component to retrieve the selected hotel.
The booking example also demonstrates the use of RichFaces Ajax to implement rich client behavior without the use of handwritten JavaScript.
The search functionality is implemented using a session-scope stateful session bean, similar to the one we saw in the message list example.
Example 1.25. HotelSearchingAction.java
@Stateful
| The EJB standard |
| The |
| The
|
| The EJB standard |
The main page of the application is a Facelets page. Let's look at the fragment which relates to searching for hotels:
Example 1.26. main.xhtml
<div class="section">
<span class="errors">
<h:messages globalOnly="true"/>
</span>
<h1>Search Hotels</h1>
<h:form id="searchCriteria">
<fieldset>
<h:inputText id="searchString" value="#{hotelSearch.searchString}"
style="width: 165px;">
<a:support event="onkeyup" actionListener="#{hotelSearch.find}"
reRender="searchResults" />
</h:inputText>
 
<a:commandButton id="findHotels" value="Find Hotels" action="#{hotelSearch.find}"
reRender="searchResults"/>
 
<a:status>
<f:facet name="start">
<h:graphicImage value="/img/spinner.gif"/>
</f:facet>
</a:status>
<br/>
<h:outputLabel for="pageSize">Maximum results:</h:outputLabel> 
<h:selectOneMenu value="#{hotelSearch.pageSize}" id="pageSize">
<f:selectItem itemLabel="5" itemValue="5"/>
<f:selectItem itemLabel="10" itemValue="10"/>
<f:selectItem itemLabel="20" itemValue="20"/>
</h:selectOneMenu>
</fieldset>
</h:form>
</div>
<a:outputPanel id="searchResults">
<div class="section">
<h:outputText value="No Hotels Found"
rendered="#{hotels != null and hotels.rowCount==0}"/>
<h:dataTable id="hotels" value="#{hotels}" var="hot"
rendered="#{hotels.rowCount>0}">
<h:column>
<f:facet name="header">Name</f:facet>
#{hot.name}
</h:column>
<h:column>
<f:facet name="header">Address</f:facet>
#{hot.address}
</h:column>
<h:column>
<f:facet name="header">City, State</f:facet>
#{hot.city}, #{hot.state}, #{hot.country}
</h:column>
<h:column>
<f:facet name="header">Zip</f:facet>
#{hot.zip}
</h:column>
<h:column>
<f:facet name="header">Action</f:facet>
<s:link id="viewHotel" value="View Hotel"
action="#{hotelBooking.selectHotel(hot)}"/>
</h:column>
</h:dataTable>
<s:link value="More results" action="#{hotelSearch.nextPage}"
rendered="#{hotelSearch.nextPageAvailable}"/>
</div>
</a:outputPanel> | The RichFaces Ajax |
| The RichFaces Ajax |
| The RichFaces Ajax |
| The Seam If you're wondering how navigation occurs,
you can find all the rules in |
This page displays the search results dynamically as we type, and lets us choose a hotel and pass it
to the selectHotel() method of the HotelBookingAction, which is
where the really interesting stuff is going to happen.
Now let's see how the booking example application uses a conversation-scoped stateful session bean to achieve a natural cache of persistent data related to the conversation. The following code example is pretty long. But if you think of it as a list of scripted actions that implement the various steps of the conversation, it's understandable. Read the class from top to bottom, as if it were a story.
Example 1.27. HotelBookingAction.java
@Stateful
@Name("hotelBooking")
@Restrict("#{identity.loggedIn}")
public class HotelBookingAction implements HotelBooking
{

   @PersistenceContext(type=EXTENDED)
   private EntityManager em;

   @In
   private User user;

   @In(required=false) @Out
   private Hotel hotel;

   @In(required=false)
   @Out(required=false)
   private Booking booking;

   @In
   private FacesMessages facesMessages;

   @In
   private Events events;

   @Logger
   private Log log;

   private boolean bookingValid;

   @Begin
   public void selectHotel(Hotel selectedHotel)
   {
      hotel = em.merge(selectedHotel);
   }

   public void bookHotel()
   {
      booking = new Booking(hotel, user);
      Calendar calendar = Calendar.getInstance();
      booking.setCheckinDate( calendar.getTime() );
      calendar.add(Calendar.DAY_OF_MONTH, 1);
      booking.setCheckoutDate( calendar.getTime() );
   }

   public void setBookingDetails()
   {
      Calendar calendar = Calendar.getInstance();
      calendar.add(Calendar.DAY_OF_MONTH, -1);
      if ( booking.getCheckinDate().before( calendar.getTime() ) )
      {
         facesMessages.addToControl("checkinDate", "Check in date must be a future date");
         bookingValid=false;
      }
      else if ( !booking.getCheckinDate().before( booking.getCheckoutDate() ) )
      {
         facesMessages.addToControl("checkoutDate",
                                    "Check out date must be later than check in date");
         bookingValid=false;
      }
      else
      {
         bookingValid=true;
      }
   }

   public boolean isBookingValid()
   {
      return bookingValid;
   }

   @End
   public void confirm()
   {
      em.persist(booking);
      facesMessages.add("Thank you, #{user.name}, your confimation number " +
                        " for #{hotel.name} is #{booki g.id}");
      log.info("New booking: #{booking.id} for #{user.username}");
      events.raiseTransactionSuccessEvent("bookingConfirmed");
   }

   @End
   public void cancel() {}

   @Remove
   public void destroy() {}
| This bean uses an EJB3 extended persistence context, so that any entity instances remain managed for the whole lifecycle of the stateful session bean. |
| The
|
| The
|
| The
|
| This EJB remove method will be called when Seam destroys the conversation context. Don't forget to define this method! |
HotelBookingAction contains all the action listener methods that implement selection,
booking and booking confirmation, and holds state related to this work in its instance variables. We
think you'll agree that this code is much cleaner and simpler than getting and setting
HttpSession attributes.
Even better, a user can have multiple isolated conversations per login session. Try it! Log in, run a search, and navigate to different hotel pages in multiple browser tabs. You'll be able to work on creating two different hotel reservations at the same time. If you leave any one conversation inactive for long enough, Seam will eventually time out that conversation and destroy its state. If, after ending a conversation, you backbutton to a page of that conversation and try to perform an action, Seam will detect that the conversation was already ended, and redirect you to the search page.
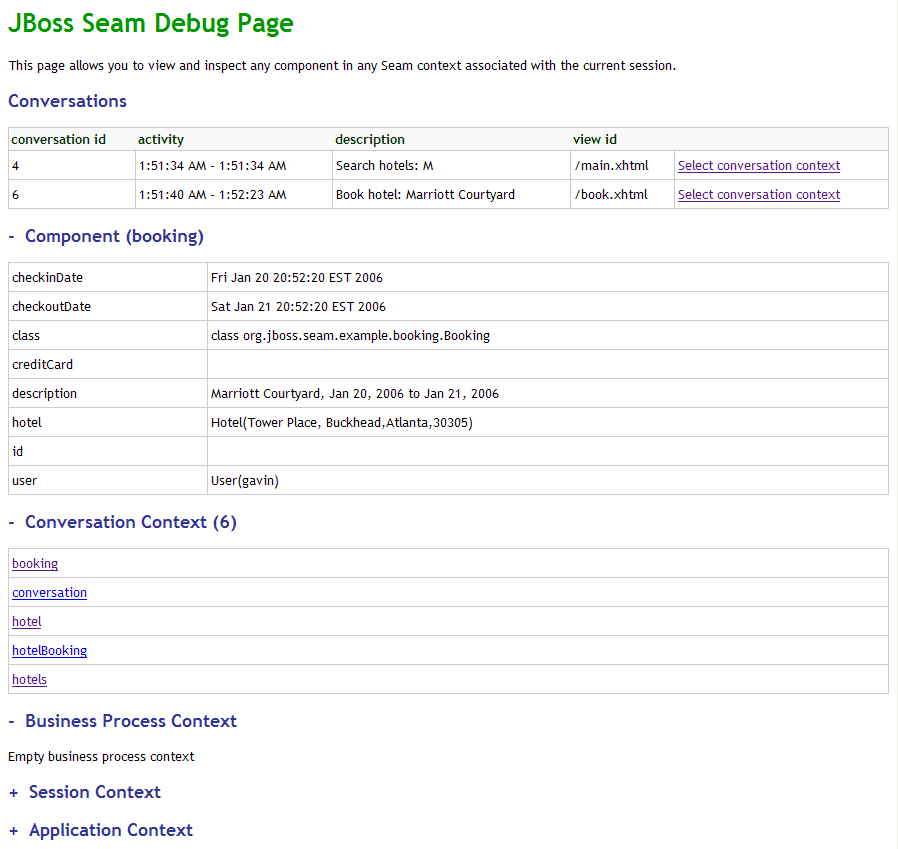
The WAR also includes seam-debug.jar. The Seam debug page will be available
if this jar is deployed in
WEB-INF/lib, along with the Facelets, and if you set the debug property
of the init component:
<core:init jndi-pattern="@jndiPattern@" debug="true"/>
This page lets you browse and inspect the Seam components
in any of the Seam contexts associated with your current login session. Just point your browser at
http://localhost:8080/seam-booking/debug.seam
.
Long-running conversations make it simple to maintain consistency of state in an application even in the face of multi-window operation and back-buttoning. Unfortunately, simply beginning and ending a long-running conversation is not always enough. Depending on the requirements of the application, inconsistencies between what the user's expectations and the reality of the application’s state can still result.
The nested booking application extends the features of the hotel booking application to incorporate the selection of rooms. Each hotel has available rooms with descriptions for a user to select from. This requires the addition of a room selection page in the hotel reservation flow.
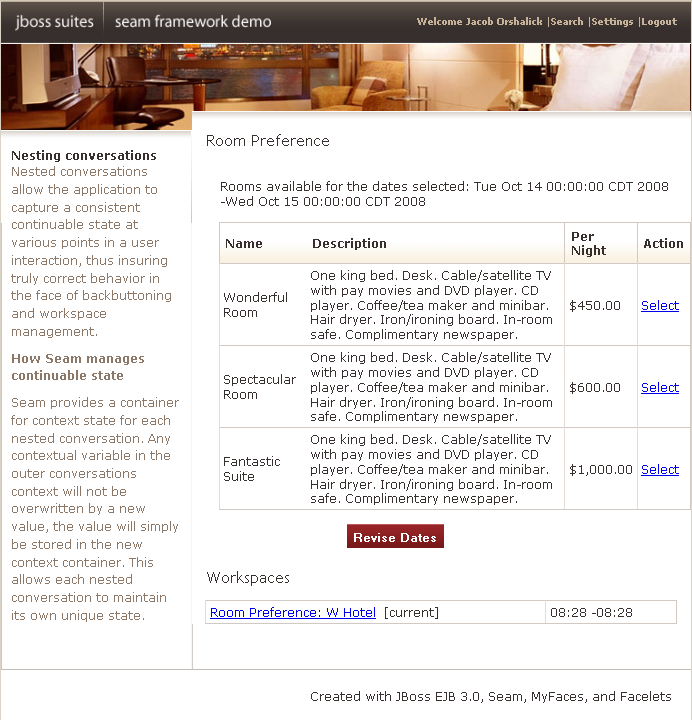
The user now has the option to select any available room to be included in the booking. As with the
hotel booking application we saw previously, this can lead to issues with state consistency. As with storing state
in the HTTPSession, if a conversation variable changes it affects all windows operating within
the same conversation context.
To demonstrate this, let’s suppose the user clones the room selection screen in a new window. The user then selects the Wonderful Room and proceeds to the confirmation screen. To see just how much it would cost to live the high-life, the user returns to the original window, selects the Fantastic Suite for booking, and again proceeds to confirmation. After reviewing the total cost, the user decides that practicality wins out and returns to the window showing Wonderful Room to confirm.
In this scenario, if we simply store all state in the conversation, we are not protected from multi-window operation within the same conversation. Nested conversations allow us to achieve correct behavior even when context can vary within the same conversation.
Now let's see how the nested booking example extends the behavior of the hotel booking application through use of nested conversations. Again, we can read the class from top to bottom, as if it were a story.
Example 1.28. RoomPreferenceAction.java
@Stateful
@Name("roomPreference")
@Restrict("#{identity.loggedIn}")
public class RoomPreferenceAction implements RoomPreference
{

   @Logger
   private Log log;

   @In private Hotel hotel;

   @In private Booking booking;

   @DataModel(value="availableRooms")
   private List<Room> availableRooms;

   @DataModelSelection(value="availableRooms")
   private Room roomSelection;

   @In(required=false, value="roomSelection")
   @Out(required=false, value="roomSelection")
   private Room room;

   @Factory("availableRooms")
   public void loadAvailableRooms()
   {
      availableRooms = hotel.getAvailableRooms(booking.getCheckinDate(), booking.getCheckoutDate());
      log.info("Retrieved #0 available rooms", availableRooms.size());
   }

   public BigDecimal getExpectedPrice()
   {
      log.info("Retrieving price for room #0", roomSelection.getName());

      return booking.getTotal(roomSelection);
   }

   @Begin(nested=true)
   public String selectPreference()
   {
      log.info("Room selected");

      this.room = this.roomSelection;

      return "payment";
   }

   public String requestConfirmation()
   {
      // all validations are performed through the s:validateAll, so checks are already
      // performed
      log.info("Request confirmation from user");

      return "confirm";
   }

   @End(beforeRedirect=true)
   public String cancel()
   {
      log.info("ending conversation");

      return "cancel";
   }

   @Destroy @Remove
   public void destroy() {}
}
| The |
| When
|
| The |
| The
|
When we being a nested conversation it is pushed onto the conversation stack. In the nestedbooking
example, the conversation stack consists of the outer long-running conversation (the booking) and each of the nested conversations (room
selections).
Example 1.29. rooms.xhtml
<div class="section">
<h1>Room Preference</h1>
</div>
<div class="section">
<h:form id="room_selections_form">
<div class="section">
<h:outputText styleClass="output"
value="No rooms available for the dates selected: "
rendered="#{availableRooms != null and availableRooms.rowCount == 0}"/>
<h:outputText styleClass="output"
value="Rooms available for the dates selected: "
rendered="#{availableRooms != null and availableRooms.rowCount > 0}"/>
<h:outputText styleClass="output" value="#{booking.checkinDate}"/> -
<h:outputText styleClass="output" value="#{booking.checkoutDate}"/>
<br/><br/>
<h:dataTable value="#{availableRooms}" var="room"
rendered="#{availableRooms.rowCount > 0}">
<h:column>
<f:facet name="header">Name</f:facet>
#{room.name}
</h:column>
<h:column>
<f:facet name="header">Description</f:facet>
#{room.description}
</h:column>
<h:column>
<f:facet name="header">Per Night</f:facet>
<h:outputText value="#{room.price}">
<f:convertNumber type="currency" currencySymbol="$"/>
</h:outputText>
</h:column>
<h:column>
<f:facet name="header">Action</f:facet>
<h:commandLink id="selectRoomPreference"
action="#{roomPreference.selectPreference}">Select</h:commandLink>
</h:column>
</h:dataTable>
</div>
<div class="entry">
<div class="label"> </div>
<div class="input">
<s:button id="cancel" value="Revise Dates" view="/book.xhtml"/>
</div>
</div>
</h:form>
</div>
| When requested from EL, the |
| Invoking the |
| Revising the dates simply returns to the |
Now that we have seen how to nest a conversation, let's see how we can confirm the booking once a room has been selected. This
can be achieved by simply extending the behavior of the HotelBookingAction.
Example 1.30. HotelBookingAction.java
@Stateful
@Name("hotelBooking")
@Restrict("#{identity.loggedIn}")
public class HotelBookingAction implements HotelBooking
{

   @PersistenceContext(type=EXTENDED)
   private EntityManager em;

   @In
   private User user;

   @In(required=false) @Out
   private Hotel hotel;

   @In(required=false)
   @Out(required=false)
   private Booking booking;

   @In(required=false)
   private Room roomSelection;

   @In
   private FacesMessages facesMessages;

   @In
   private Events events;

   @Logger
   private Log log;

   @Begin
   public void selectHotel(Hotel selectedHotel)
   {
      log.info("Selected hotel #0", selectedHotel.getName());
      hotel = em.merge(selectedHotel);
   }

   public String setBookingDates()
   {
      // the result will indicate whether or not to begin the nested conversation
      // as well as the navigation.  if a null result is returned, the nested
      // conversation will not begin, and the user will be returned to the current
      // page to fix validation issues
      String result = null;

      Calendar calendar = Calendar.getInstance();
      calendar.add(Calendar.DAY_OF_MONTH, -1);

      // validate what we have received from the user so far
      if ( booking.getCheckinDate().before( calendar.getTime() ) )
      {
         facesMessages.addToControl("checkinDate", "Check in date must be a future date");
      }
      else if ( !booking.getCheckinDate().before( booking.getCheckoutDate() ) )
      {
         facesMessages.addToControl("checkoutDate", "Check out date must be later than check in date");
      }
      else
      {
         result = "rooms";
      }

      return result;
   }

   public void bookHotel()
   {
      booking = new Booking(hotel, user);
      Calendar calendar = Calendar.getInstance();
      booking.setCheckinDate( calendar.getTime() );
      calendar.add(Calendar.DAY_OF_MONTH, 1);
      booking.setCheckoutDate( calendar.getTime() );
   }

   @End(root=true)
   public void confirm()
   {
      // on confirmation we set the room preference in the booking.  the room preference
      // will be injected based on the nested conversation we are in.
      booking.setRoomPreference(roomSelection);

      em.persist(booking);
      facesMessages.add("Thank you, #{user.name}, your confimation number for #{hotel.name} is #{booking.id}");
      log.info("New booking: #{booking.id} for #{user.username}");
      events.raiseTransactionSuccessEvent("bookingConfirmed");
   }

   @End(root=true, beforeRedirect=true)
   public void cancel() {}

   @Destroy @Remove
   public void destroy() {}
}
| Annotating an action with
|
| The |
| By simply annotating the cancellation action with
|
Feel free to deploy the application, open many windows or tabs and attempt combinations of various hotels with various room preferences. Confirming a booking always results in the correct hotel and room preference thanks to the nested conversation model.
The DVD Store demo application shows the practical usage of jBPM for both task management and pageflow.
The user screens take advantage of a jPDL pageflow to implement searching and shopping cart functionality.
The administration screens take use jBPM to manage the approval and shipping cycle for orders. The business process may even be changed dynamically, by selecting a different process definition!

The Seam DVD Store demo can be run from dvdstore directory,
just like the other demo applications.
Seam makes it very easy to implement applications which keep state on the server-side. However, server-side state is not always appropriate, especially in for functionality that serves up content. For this kind of problem we often want to keep application state in the URL so that any page can be accessed at any time through a bookmark. The blog example shows how to a implement an application that supports bookmarking throughout, even on the search results page. This example demonstrates how Seam can manage application state in the URL as well as how Seam can rewrite those URLs to be even
The Blog example demonstrates the use of "pull"-style MVC, where instead of using action listener methods to retrieve data and prepare the data for the view, the view pulls data from components as it is being rendered.
This snippet from the index.xhtml facelets page displays a list of recent blog
entries:
Example 1.31.
<h:dataTable value="#{blog.recentBlogEntries}" var="blogEntry" rows="3">
<h:column>
<div class="blogEntry">
<h3>#{blogEntry.title}</h3>
<div>
<s:formattedText value="#{blogEntry.excerpt==null ? blogEntry.body : blogEntry.excerpt}"/>
</div>
<p>
<s:link view="/entry.xhtml" rendered="#{blogEntry.excerpt!=null}" propagation="none"
value="Read more...">
<f:param name="blogEntryId" value="#{blogEntry.id}"/>
</s:link>
</p>
<p>
[Posted on 
<h:outputText value="#{blogEntry.date}">
<f:convertDateTime timeZone="#{blog.timeZone}" locale="#{blog.locale}" type="both"/>
</h:outputText>]
 
<s:link view="/entry.xhtml" propagation="none" value="[Link]">
<f:param name="blogEntryId" value="#{blogEntry.id}"/>
</s:link>
</p>
</div>
</h:column>
</h:dataTable>
If we navigate to this page from a bookmark, how does the #{blog.recentBlogEntries}
data used by the <h:dataTable> actually get initialized?
The Blog is retrieved lazily—"pulled"—when needed, by a Seam
component named blog. This is the opposite flow of control to what is used in
traditional action-based web frameworks like Struts.
Example 1.32.
@Name("blog")
@Scope(ScopeType.STATELESS)
@AutoCreate
public class BlogService
{

   @In EntityManager entityManager;

   @Unwrap
   public Blog getBlog()
   {
      return (Blog) entityManager.createQuery("select distinct b from Blog b left join fetch b.blogEntries")
            .setHint("org.hibernate.cacheable", true)
            .getSingleResult();
   }

} | This component uses a seam-managed persistence context. Unlike the other examples we've seen, this persistence context is managed by Seam, instead of by the EJB3 container. The persistence context spans the entire web request, allowing us to avoid any exceptions that occur when accessing unfetched associations in the view. |
| The |
This is good so far, but what about bookmarking the result of form submissions, such as a search results page?
The blog example has a tiny form in the top right of each page that allows the user to search for
blog entries. This is defined in a file, menu.xhtml, included by the facelets
template, template.xhtml:
Example 1.33.
<div id="search">

   <h:form>

      <h:inputText value="#{searchAction.searchPattern}"/>

      <h:commandButton value="Search" action="/search.xhtml"/>

   </h:form>

</div>
To implement a bookmarkable search results page, we need to perform a browser redirect after processing the search form submission. Because we used the JSF view id as the action outcome, Seam automatically redirects to the view id when the form is submitted. Alternatively, we could have defined a navigation rule like this:
<navigation-rule>

   <navigation-case>

      <from-outcome>searchResults</from-outcome>

      <to-view-id>/search.xhtml</to-view-id>

      <redirect/>

   </navigation-case>

</navigation-rule>
Then the form would have looked like this:
<div id="search">

   <h:form>

      <h:inputText value="#{searchAction.searchPattern}"/>

      <h:commandButton value="Search" action="searchResults"/>

   </h:form>

</div>
But when we redirect, we need to include the values submitted with the form
in the URL
get a bookmarkable URL like
http://localhost:8080/seam-blog/search/. JSF does not provide
an easy way to do this, but Seam does. We use two Seam features
to accomplish this: page parameters and URL rewriting.
Both are defined in WEB-INF/pages.xml:
Example 1.34.
<pages>

   <page view-id="/search.xhtml">

      <rewrite pattern="/search/{searchPattern}"/>

      <rewrite pattern="/search"/>


      <param name="searchPattern" value="#{searchService.searchPattern}"/>


   </page>

   ...

</pages>
The page parameter instructs Seam to link the request parameter named searchPattern
to the value of #{searchService.searchPattern}, both whenever a request for
the Search page comes in and whenever a link to the search page is generated. Seam
takes responsibility for maintaining the link between URL state and application state, and you,
the developer, don't have to worry about it.
Without URL rewriting, the URL for a search on the term book
would be http://localhost:8080/seam-blog/seam/search.xhtml?searchPattern=book.
This is nice, but Seam can make the URL even simpler using a rewrite rule. The first
rewrite rule, for the pattern /search/{searchPattern}, says that
any time we have have a URL for search.xhtml with a searchPattern request parameter, we can
fold that URL into the simpler URL. So,the URL we saw earlier,
http://localhost:8080/seam-blog/seam/search.xhtml?searchPattern=book
can be written instead as http://localhost:8080/seam-blog/search/book.
Just like with page parameters, URL rewriting is bi-directional. That means that Seam
forwards requests for the simpler URL to the the right view, and it also automatically generates
the simpler view for you. You never need to worry about constructing URLs. It's
all handled transparently behind the scenes. The only requirement is that to use URL rewriting,
the rewrite filter needs to be enabled in components.xml.
<web:rewrite-filter view-mapping="/seam/*" />
The redirect takes us to the search.xhtml page:
<h:dataTable value="#{searchResults}" var="blogEntry">

  <h:column>

     <div>

        <s:link view="/entry.xhtml" propagation="none" value="#{blogEntry.title}">

           <f:param name="blogEntryId" value="#{blogEntry.id}"/>

        </s:link>

        posted on

        <h:outputText value="#{blogEntry.date}">

            <f:convertDateTime timeZone="#{blog.timeZone}" locale="#{blog.locale}" type="both"/>

        </h:outputText>

     </div>

  </h:column>

</h:dataTable>
Which again uses "pull"-style MVC to retrieve the actual search results using Hibernate Search.
@Name("searchService")

public class SearchService

{


   @In

   private FullTextEntityManager entityManager;


   private String searchPattern;


   @Factory("searchResults")

   public List<BlogEntry> getSearchResults()

   {

      if (searchPattern==null || "".equals(searchPattern) ) {

         searchPattern = null;

         return entityManager.createQuery("select be from BlogEntry be order by date desc").getResultList();

      }

      else

      {

         Map<String,Float> boostPerField = new HashMap<String,Float>();

         boostPerField.put( "title", 4f );

         boostPerField.put( "body", 1f );

         String[] productFields = {"title", "body"};

         QueryParser parser = new MultiFieldQueryParser(productFields, new StandardAnalyzer(), boostPerField);

         parser.setAllowLeadingWildcard(true);

         org.apache.lucene.search.Query luceneQuery;

         try

         {

            luceneQuery = parser.parse(searchPattern);

         }

         catch (ParseException e)

         {

            return null;

         }


         return entityManager.createFullTextQuery(luceneQuery, BlogEntry.class)

               .setMaxResults(100)

               .getResultList();

      }

   }


   public String getSearchPattern()

   {

      return searchPattern;

   }


   public void setSearchPattern(String searchPattern)

   {

      this.searchPattern = searchPattern;

   }


}
Very occasionally, it makes more sense to use push-style MVC for processing RESTful pages, and so
Seam provides the notion of a page action. The Blog example uses a page action for
the blog entry page, entry.xhtml. Note that this is a little bit contrived, it would
have been easier to use pull-style MVC here as well.
The entryAction component works much like an action class in a traditional
push-MVC action-oriented framework like Struts:
@Name("entryAction")

@Scope(STATELESS)

public class EntryAction

{

   @In Blog blog;


   @Out BlogEntry blogEntry;


   public void loadBlogEntry(String id) throws EntryNotFoundException

   {

      blogEntry = blog.getBlogEntry(id);

      if (blogEntry==null) throw new EntryNotFoundException(id);

   }


}
Page actions are also declared in pages.xml:
<pages>

   ...


    <page view-id="/entry.xhtml">

        <rewrite pattern="/entry/{blogEntryId}" />

        <rewrite pattern="/entry" />


        <param name="blogEntryId"

               value="#{blogEntry.id}"/>


        <action execute="#{entryAction.loadBlogEntry(blogEntry.id)}"/>

    </page>


    <page view-id="/post.xhtml" login-required="true">

        <rewrite pattern="/post" />


        <action execute="#{postAction.post}"

                if="#{validation.succeeded}"/>


        <action execute="#{postAction.invalid}"

                if="#{validation.failed}"/>


        <navigation from-action="#{postAction.post}">

            <redirect view-id="/index.xhtml"/>

        </navigation>

    </page>


    <page view-id="*">

        <action execute="#{blog.hitCount.hit}"/>

    </page>


</pages>
Notice that the example is using page actions for post validation and the pageview counter. Also notice the use of a parameter in the page action method binding. This is not a standard feature of JSF EL, but Seam lets you use it, not just for page actions but also in JSF method bindings.
When the entry.xhtml page is requested, Seam first binds the page parameter
blogEntryId to the model. Keep in mind that because of the URL rewriting,
the blogEntryId parameter name won't show up in the URL. Seam then runs the page action, which retrieves
the needed
data—the blogEntry—and places it in the Seam event context.
Finally, the following is rendered:
<div class="blogEntry">
<h3>#{blogEntry.title}</h3>
<div>
<s:formattedText value="#{blogEntry.body}"/>
</div>
<p>
[Posted on 
<h:outputText value="#{blogEntry.date}">
<f:convertDateTime timeZone="#{blog.timeZone}" locale="#{blog.locale}" type="both"/>
</h:outputText>]
</p>
</div>
If the blog entry is not found in the database, the EntryNotFoundException
exception is thrown. We want this exception to result in a 404 error, not a 505, so we annotate the
exception class:
@ApplicationException(rollback=true)

@HttpError(errorCode=HttpServletResponse.SC_NOT_FOUND)

public class EntryNotFoundException extends Exception

{

   EntryNotFoundException(String id)

   {

      super("entry not found: " + id);

   }

}
An alternative implementation of the example does not use the parameter in the method binding:
@Name("entryAction")

@Scope(STATELESS)

public class EntryAction

{

   @In(create=true)

   private Blog blog;


   @In @Out

   private BlogEntry blogEntry;


   public void loadBlogEntry() throws EntryNotFoundException

   {

      blogEntry = blog.getBlogEntry( blogEntry.getId() );

      if (blogEntry==null) throw new EntryNotFoundException(id);

   }

}
<pages>

   ...


   <page view-id="/entry.xhtml" action="#{entryAction.loadBlogEntry}">

      <param name="blogEntryId" value="#{blogEntry.id}"/>

   </page>


   ...

</pages>
It is a matter of taste which implementation you prefer.
The blog demo also demonstrates very simple password authentication, posting to the blog, page fragment caching and atom feed generation.