Seam integrates with JBossWS to allow standard JEE web services to take full advantage of Seam's contextual framework, including support for conversational web services. This chapter walks through the steps required to allow web services to run within a Seam environment.
To allow Seam to intercept web service requests so that the necessary Seam contexts can be created for the request, a special SOAP handler must be configured; org.jboss.seam.webservice.SOAPRequestHandler is a SOAPHandler implementation that does the work of managing Seam's lifecycle during the scope of a web service request.
A special configuration file, standard-jaxws-endpoint-config.xml should be placed into the META-INF directory of the jar file that contains the web service classes. This file contains the following SOAP handler configuration:
<jaxws-config xmlns="urn:jboss:jaxws-config:2.0"

              xmlns:xsi="http://www.w3.org/2001/XMLSchema-instance"

              xmlns:javaee="http://java.sun.com/xml/ns/javaee"

              xsi:schemaLocation="urn:jboss:jaxws-config:2.0 jaxws-config_2_0.xsd">

   <endpoint-config>

      <config-name>Seam WebService Endpoint</config-name>

      <pre-handler-chains>

         <javaee:handler-chain>

            <javaee:protocol-bindings>##SOAP11_HTTP</javaee:protocol-bindings>

            <javaee:handler>

               <javaee:handler-name>SOAP Request Handler</javaee:handler-name>

               <javaee:handler-class>org.jboss.seam.webservice.SOAPRequestHandler</javaee:handler-class>

            </javaee:handler>

         </javaee:handler-chain>

      </pre-handler-chains>

   </endpoint-config>

</jaxws-config>
So how are conversations propagated between web service requests? Seam uses a SOAP header element present in both the SOAP request and response messages to carry the conversation ID from the consumer to the service, and back again. Here's an example of a web service request that contains a conversation ID:
<soapenv:Envelope xmlns:soapenv="http://schemas.xmlsoap.org/soap/envelope/"

    xmlns:seam="http://seambay.example.seam.jboss.org/">

  <soapenv:Header>

    <seam:conversationId xmlns:seam='http://www.jboss.org/seam/webservice'>2</seam:conversationId>

  </soapenv:Header>

  <soapenv:Body>

    <seam:confirmAuction/>

  </soapenv:Body>

</soapenv:Envelope>
As you can see in the above SOAP message, there is a conversationId element within the SOAP header that contains the conversation ID for the request, in this case 2. Unfortunately, because web services may be consumed by a variety of web service clients written in a variety of languages, it is up to the developer to implement conversation ID propagation between individual web services that are intended to be used within the scope of a single conversation.
An important thing to note is that the conversationId header element must be qualified with a namespace of http://www.jboss.org/seam/webservice, otherwise Seam will not be able to read the conversation ID from the request. Here's an example of a response to the above request message:
<env:Envelope xmlns:env='http://schemas.xmlsoap.org/soap/envelope/'>

  <env:Header>

    <seam:conversationId xmlns:seam='http://www.jboss.org/seam/webservice'>2</seam:conversationId>

  </env:Header>

  <env:Body>

    <confirmAuctionResponse xmlns="http://seambay.example.seam.jboss.org/"/>

  </env:Body>

</env:Envelope>
As you can see, the response message contains the same conversationId element as the request.
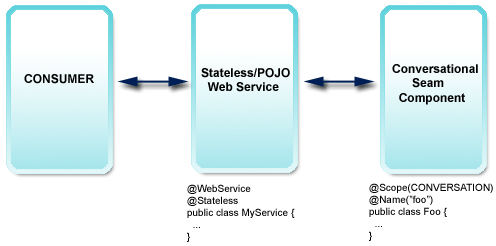
As web services must be implemented as either a stateless session bean or POJO, it is recommended that for conversational web services, the web service acts as a facade to a conversational Seam component.
If the web service is written as a stateless session bean, then it is also possible to make it a Seam component by giving it a @Name. Doing this allows Seam's bijection (and other) features to be used in the web service class itself.
Let's walk through an example web service. The code in this section all comes from the seamBay example application in Seam's /examples directory, and follows the recommended strategy as described in the previous section. Let's first take a look at the web service class and one of its web service methods:
@Stateless

@WebService(name = "AuctionService", serviceName = "AuctionService")

public class AuctionService implements AuctionServiceRemote

{

   @WebMethod

   public boolean login(String username, String password)

   {

      Identity.instance().setUsername(username);

      Identity.instance().setPassword(password);

      Identity.instance().login();

      return Identity.instance().isLoggedIn();

   }


   // snip

}
As you can see, our web service is a stateless session bean, and is annotated using the JWS annotations from the javax.jws package, as defined by JSR-181. The @WebService annotation tells the container that this class implements a web service, and the @WebMethod annotation on the login() method identifies the method as a web service method. The name and serviceName attributes in the @WebService annotation are optional.
As is required by the specification, each method that is to be exposed as a web service method must also be declared in the remote interface of the web service class (when the web service is a stateless session bean). In the above example, the AuctionServiceRemote interface must declare the login() method as it is annotated as a @WebMethod.
As you can see in the above code, the web service implements a login() method that delegates to Seam's built-in Identity component. In keeping with our recommended strategy, the web service is written as a simple facade, passing off the real work to a Seam component. This allows for the greatest reuse of business logic between web services and other clients.
Let's look at another example. This web service method begins a new conversation by delegating to the AuctionAction.createAuction() method:
   @WebMethod

   public void createAuction(String title, String description, int categoryId)

   {

      AuctionAction action = (AuctionAction) Component.getInstance(AuctionAction.class, true);

      action.createAuction();

      action.setDetails(title, description, categoryId);

   }
And here's the code from AuctionAction:
   @Begin

   public void createAuction()

   {

      auction = new Auction();

      auction.setAccount(authenticatedAccount);

      auction.setStatus(Auction.STATUS_UNLISTED);

      durationDays = DEFAULT_AUCTION_DURATION;

   }
From this we can see how web services can participate in long running conversations, by acting as a facade and delegating the real work to a conversational Seam component.
Seam integrates the RESTEasy implementation of the JAX-RS specification (JSR 311). You can decide how "deep" the integration into your Seam application is going to be:
Seamless integration of RESTEasy bootstrap and configuration, automatic detection of resources and providers.
Serving HTTP/REST requests with the SeamResourceServlet, no external servlet or configuration in web.xml required.
Writing resources as Seam components, with full Seam lifecycle management and interception (bijection).
First, get the RESTEasy libraries and the jaxrs-api.jar, deploy them with the other libraries of your application. Also deploy the integration library, jboss-seam-resteasy.jar.
On startup, all classes annotated @javax.ws.rs.Path will be discovered automatically and registered as HTTP resources. Seam automatically accepts and serves HTTP requests with its built-in SeamResourceServlet. The URI of a resource is build as follows:
The URI starts with the host and context path of your application, e.g.
http://your.hostname/myapp.Then the pattern mapped in
web.xmlfor theSeamResourceServlet, e.g/seam/resourceif you follow the common examples, is appended. Change this setting to expose your RESTful resources under a different base. Note that this is a global change and other Seam resources (e.g.s:graphicImage) are then also served under that base path.The RESTEasy integration for Seam then appends a configurable string to the base path, by default this is
/rest. Hence, the full base path of your resources would e.g. be/myapp/seam/resource/rest. We recommend that you change this string in your application, you could for example add a version number to prepare for a future REST API upgrade of your services (old clients would keep the old URI base):/myapp/seam/resource/restv1.Finally, the actual resource is available under the defined
@Path, e.g. a resource mapped with@Path("/customer")would be available under/myapp/seam/resource/rest/customer.
As an example, the following resource definition would return a plaintext representation for any GET requests using the URI http://your.hostname/myapp/seam/resource/rest/customer/123:
@Path("/customer")

public class MyCustomerResource {


    @GET

    @Path("/{customerId}")

    @Produces("text/plain")

    public String getCustomer(@PathParam("customerId") int id) {

         return ...;

    }


}
No additional configuration is required, you do not have to edit web.xml or any other setting if these defauls are acceptable. However, you can configure RESTEasy in your Seam application. First import the resteasy namespace into your XML configuration file header:
<components

   xmlns="http://jboss.com/products/seam/components"

   xmlns:resteasy="http://jboss.com/products/seam/resteasy"

   xmlns:xsi="http://www.w3.org/2001/XMLSchema-instance"

   xsi:schemaLocation=

     http://jboss.com/products/seam/resteasy

         http://jboss.com/products/seam/resteasy-2.2.xsd

     http://jboss.com/products/seam/components

         http://jboss.com/products/seam/components-2.2.xsd">
You can then change the /rest prefix as mentioned earlier:
<resteasy:application resource-path-prefix="/restv1"/>
The full base path to your resources is now /myapp/seam/resource/restv1/{resource} - note that your @Path definitions and mappings do NOT change. This is an application-wide switch usually used for versioning of the HTTP interface.
Seam will scan your classpath for any deployed @javax.ws.rs.Path resources and any @javax.ws.rs.ext.Provider classes. You can disable scanning and configure these classes manually:
<resteasy:application

     scan-providers="false"

     scan-resources="false"

     use-builtin-providers="true">


     <resteasy:resource-class-names>

         <value>org.foo.MyCustomerResource</value>

         <value>org.foo.MyOrderResource</value>

         <value>org.foo.MyStatelessEJBImplementation</value>

     </resteasy:resource-class-names>


     <resteasy:provider-class-names>

         <value>org.foo.MyFancyProvider</value>

     </resteasy:provider-class-names>


 </resteasy:application>
The use-built-in-providers switch enables (default) or disables the RESTEasy built-in providers. We recommend you leave them enabled, as they provide plaintext, JSON, and JAXB marshalling out of the box.
RESTEasy supports plain EJBs (EJBs that are not Seam components) as resources. Instead of configuring the JNDI names in a non-portable fashion in web.xml (see RESTEasy documentation), you can simply list the EJB implementation classes, not the business interfaces, in components.xml as shown above. Note that you have to annotate the @Local interface of the EJB with @Path, @GET, and so on - not the bean implementation class. This allows you to keep your application deployment-portable with the global Seam jndi-pattern switch on <core:init/>. Note that plain (non-Seam component) EJB resources will not be found even if scanning of resources is enabled, you always have to list them manually. Again, this whole paragraph is only relevant for EJB resources that are not also Seam components and that do not have an @Name annotation.
Finally, you can configure media type and language URI extensions:
<resteasy:application>


    <resteasy:media-type-mappings>

       <key>txt</key><value>text/plain</value>

    </resteasy:media-type-mappings>


    <resteasy:language-mappings>

       <key>deutsch</key><value>de-DE</value>

    </resteasy:language-mappings>


</resteasy:application>
This definition would map the URI suffix of .txt.deutsch to additional Accept and Accept-Language header values text/plain and de-DE.
Any resource and provider instances are managed by RESTEasy by default. That means a resource class will be instantiated by RESTEasy and serve a single request, after which it will be destroyed. This is the default JAX-RS lifecycle. Providers are instantiated once for the whole application and are effectively singletons and supposed to be stateless.
You can write resources as Seam components and benefit from the richer lifecycle management of Seam, and interception for bijection, security, and so on. Simply make your resource class a Seam component:
@Name("customerResource")

@Path("/customer")

public class MyCustomerResource {


    @In

    CustomerDAO customerDAO;


    @GET

    @Path("/{customerId}")

    @Produces("text/plain")

    public String getCustomer(@PathParam("customerId") int id) {

         return customerDAO.find(id).getName();

    }


}
An instance of customerResource is now handled by Seam when a request hits the server. This is a Seam JavaBean component that is EVENT-scoped, hence no different than the default JAX-RS lifecycle. You get full Seam injection and interception support, and all other Seam components and contexts are available to you. Currently also supported are APPLICATION and STATELESS resource Seam components. These three scopes allow you to create an effectively stateless Seam middle-tier HTTP request-processing application.
You can annotate an interface and keep the implementation free from JAX-RS annotations:
@Path("/customer")

public interface MyCustomerResource {


    @GET

    @Path("/{customerId}")

    @Produces("text/plain")

    public String getCustomer(@PathParam("customerId") int id);


}
@Name("customerResource")

@Scope(ScopeType.STATELESS)

public class MyCustomerResourceBean implements MyCustomerResource {


    @In

    CustomerDAO customerDAO;


    public String getCustomer(int id) {

         return customerDAO.find(id).getName();

    }


}
You can use SESSION-scoped Seam components. By default, the session will however be shortened to a single request. In other words, when an HTTP request is being processed by the RESTEasy integration code, an HTTP session will be created so that Seam components can utilize that context. When the request has been processed, Seam will look at the session and decide if the session was created only to serve that single request (no session identifier has been provided with the request, or no session existed for the request). If the session has been created only to serve this request, the session will be destroyed after the request!
Assuming that your Seam application only uses event, application, or stateless components, this procedure prevents exhaustion of available HTTP sessions on the server. The RESTEasy integration with Seam assumes by default that sessions are not used, hence anemic sessions would add up as every REST request would start a session that will only be removed when timed out.
If your RESTful Seam application has to preserve session state across REST HTTP requests, disable this behavior in your configuration file:
<resteasy:application destroy-session-after-request="false"/>
Every REST HTTP request will now create a new session that will only be removed by timeout or explicit invalidation in your code through Session.instance().invalidate(). It is your responsibility to pass a valid session identifier along with your HTTP requests, if you want to utilize the session context across requests.
CONVERSATION-scoped resource components and mapping of conversations to temporary HTTP resources and paths is planned but currently not supported.
EJB Seam components are supported as REST resources. Always annotate the local business interface, not the EJB implementation class, with JAX-RS annotations. The EJB has to be STATELESS.
Note
Sub-resources as defined in the JAX RS specification, section 3.4.1, can not be Seam component instances at this time. Only root resource classes can be registered as Seam components. In other words, do not return a Seam component instance from a root resource method.
Note
Provider classes can currently not be Seam components. Although you can configure an @Provider annotated class as a Seam component, it will at runtime be managed by RESTEasy as a singleton with no Seam interception, bijection, etc. The instance will not be a Seam component instance. We plan to support Seam component lifecycle for JAX-RS providers in the future.
You can enable the Seam authentication filter for HTTP Basic and Digest authentication in components.xml:
<web:authentication-filter url-pattern="/seam/resource/rest/*" auth-type="basic"/>
See the Seam security chapter on how to write an authentication routine.
After successful authentication, authorization rules with the common @Restrict and @PermissionCheck annotations are in effect. You can also access the client Identity, work with permission mapping, and so on. All regular Seam security features for authorization are available.
Section 3.3.4 of the JAX-RS specification defines how checked or unchecked exceptions are handled by the JAX RS implementation. In addition to using an exception mapping provider as defined by JAX-RS, the integration of RESTEasy with Seam allows you to map exceptions to HTTP response codes within Seam's pages.xml facility. If you are already using pages.xml declarations, this is easier to maintain than potentially many JAX RS exception mapper classes.
Exception handling within Seam requires that the Seam filter is executed for your HTTP request. Ensure that you do filter all requests in your web.xml, not - as some Seam examples might show - a request URI pattern that doesn't cover your REST request paths. The following example intercepts all HTTP requests and enables Seam exception handling:
<filter>

    <filter-name>Seam Filter</filter-name>

    <filter-class>org.jboss.seam.servlet.SeamFilter</filter-class>

</filter>


<filter-mapping>

    <filter-name>Seam Filter</filter-name>

    <url-pattern>/*</url-pattern>

</filter-mapping>
To convert the unchecked UnsupportedOperationException thrown by your resource methods to a 501 Not Implemented HTTP status response, add the following to your pages.xml descriptor:
<exception class="java.lang.UnsupportedOperationException">

    <http-error error-code="501">

        <message>The requested operation is not supported</message>

    </http-error>

</exception>
Custom or checked exceptions are handled the same:
<exception class="my.CustomException" log="false">

    <http-error error-code="503">

        <message>Service not available: #{org.jboss.seam.handledException.message}</message>

    </http-error>

</exception>
You do not have to send an HTTP error to the client if an exception occurs. Seam allows you to map the exception as a redirect to a view of your Seam application. As this feature is typically used for human clients (web browsers) and not for REST API remote clients, you should pay extra attention to conflicting exception mappings in pages.xml.
Note that the HTTP response still passes through the servlet container, so an additional mapping might apply if you have <error-page> mappings in your web.xml configuration. The HTTP status code would then be mapped to a rendered HTML error page with status 200 OK!
Seam makes it really easy to use a RESTful approach for accessing application data. One of the improvements that Seam introduces is the ability to expose parts of your SQL database for remote access via plain HTTP calls. For this purpose, the Seam/RESTEasy integration module provides two components: ResourceHome and ResourceQuery, which benefit from the API provided by the Seam Application Framework (Chapitre 13, Le serveur d'application Seam). These components allow you to bind domain model entity classes to an HTTP API.
ResourceQuery exposes entity querying capabilities as a RESTful web service. By default, a simple underlying Query component, which returns a list of instances of a given entity class, is created automatically. Alternatively, the ResourceQuery component can be attached to an existing Query component in more sophisticated cases. The following example demonstrates how easily ResourceQuery can be configured:
<resteasy:resource-query

   path="/user"

   name="userResourceQuery"

   entity-class="com.example.User"/>
With this single XML element, a ResourceQuery component is set up. The configuration is straightforward:
The component will return a list of
com.example.Userinstances.The component will handle HTTP requests on the URI path
/user.The component will by default transform the data into XML or JSON (based on client's preference). The set of supported mime types can be altered by using the
media-typesattribute, for example:
<resteasy:resource-query

   path="/user"

   name="userResourceQuery"

   entity-class="com.example.User"

   media-types="application/fastinfoset"/>
Alternatively, if you do not like configuring components using XML, you can set up the component by extension:
@Name("userResourceQuery")

@Path("user")

public class UserResourceQuery extends ResourceQuery<User>

{

}
Queries are read-only operations, the resource only responds to GET requests. Furthermore, ResourceQuery allows clients of a web service to manipulate the resultset of a query using the following path parameters:
| Parameter name | Example | Description |
|---|---|---|
| start | /user?start=20 | Returns a subset of a database query result starting with the 20th entry. |
| show | /user?show=10 | Returns a subset of the database query result limited to 10 entries. |
For example, you can send an HTTP GET request to /user?start=30&show=10 to get a list of entries representing 10 rows starting with row 30.
Note
RESTEasy uses JAXB to marshall entities. Thus, in order to be able to transfer them over the wire, you need to annotate entity classes with @XMLRootElement. Consult the JAXB and RESTEasy documentation for more information.
Just as ResourceQuery makes Query's API available for remote access, so does ResourceHome for the Home component. The following table describes how the two APIs (HTTP and Home) are bound together.
Tableau 24.1.
| HTTP method | Path | Function | ResourceHome method |
|---|---|---|---|
| GET | {path}/{id} | Read | getResource() |
| POST | {path} | Create | postResource() |
| PUT | {path}/{id} | Update | putResource() |
| DELETE | {path}/{id} | Delete | deleteResource() |
You can GET, PUT, and DELETE a particular user instance by sending HTTP requests to /user/{userId}
Sending a POST request to
/usercreates a new user entity instance and persists it. Usually, you leave it up to the persistence layer to provide the entity instance with an identifier value and thus an URI. Therefore, the URI is sent back to the client in theLocationheader of the HTTP response.
The configuration of ResourceHome is very similar to ResourceQuery except that you need to explicitly specify the underlying Home component and the Java type of the entity identifier property.
<resteasy:resource-home

   path="/user"

   name="userResourceHome"

   entity-home="#{userHome}"

   entity-id-class="java.lang.Integer"/>
Again, you can write a subclass of ResourceHome instead of XML:
@Name("userResourceHome")

@Path("user")

public class UserResourceHome extends ResourceHome<User, Integer>

{


   @In

   private EntityHome<User

> userHome;


   @Override

   public Home<?, User

> getEntityHome()

   {

      return userHome;

   }

}
For more examples of ResourceHome and ResourceQuery components, take a look at the Seam Tasks example application, which demonstrates how Seam/RESTEasy integration can be used together with a jQuery web client. In addition, you can find more code example in the Restbay example, which is used mainly for testing purposes.
Seam includes a unit testing utility class that helps you create unit tests for a RESTful architecture. Extend the SeamTest class as usual and use the ResourceRequestEnvironment.ResourceRequest to emulate HTTP requests/response cycles:
import org.jboss.seam.mock.ResourceRequestEnvironment;

import org.jboss.seam.mock.EnhancedMockHttpServletRequest;

import org.jboss.seam.mock.EnhancedMockHttpServletResponse;

import static org.jboss.seam.mock.ResourceRequestEnvironment.ResourceRequest;

import static org.jboss.seam.mock.ResourceRequestEnvironment.Method;


public class MyTest extends SeamTest {


   ResourceRequestEnvironment sharedEnvironment;


   @BeforeClass

   public void prepareSharedEnvironment() throws Exception {

       sharedEnvironment = new ResourceRequestEnvironment(this) {

            @Override

            public Map<String, Object> getDefaultHeaders() {

               return new HashMap<String, Object>() {{

                   put("Accept", "text/plain");

               }};

            }

         };

   }


   @Test

   public void test() throws Exception

   {

      //Not shared: new ResourceRequest(new ResourceRequestEnvironment(this), Method.GET, "/my/relative/uri)


      new ResourceRequest(sharedEnvironment, Method.GET, "/my/relative/uri)

      {

         @Override

         protected void prepareRequest(EnhancedMockHttpServletRequest request)

         {

            request.addQueryParameter("foo", "123");

            request.addHeader("Accept-Language", "en_US, de");

         }


         @Override

         protected void onResponse(EnhancedMockHttpServletResponse response)

         {

            assert response.getStatus() == 200;

            assert response.getContentAsString().equals("foobar");

         }


      }.run();

   }

}
This test only executes local calls, it does not communicate with the SeamResourceServlet through TCP. The mock request is passed through the Seam servlet and filters and the response is then available for test assertions. Overriding the getDefaultHeaders() method in a shared instance of ResourceRequestEnvironment allows you to set request headers for every test method in the test class.
Note that a ResourceRequest has to be executed in a @Test method or in a @BeforeMethod callback. You can not execute it in any other callback, such as @BeforeClass.