Configuration is a very boring topic and an extremely tedious pastime. Unfortunately, several lines of XML are required to integrate Seam into your JSF implementation and servlet container. There's no need to be too put off by the following sections; you'll never need to type any of this stuff yourself, since you can just use seam-gen to start your application or you can copy and paste from the example applications!
最初に JSF と Seam を併用する場合に常に必要となる基本の設定について見ていくことにします。
当然 faces サーブレットが必要になります。
<servlet>

    <servlet-name

>Faces Servlet</servlet-name>

    <servlet-class

>javax.faces.webapp.FacesServlet</servlet-class>

    <load-on-startup

>1</load-on-startup>

</servlet>


<servlet-mapping>

    <servlet-name

>Faces Servlet</servlet-name>

    <url-pattern

>*.seam</url-pattern>

</servlet-mapping

>
(適宜 URL パターンを調整することができます。)
また、 Seam には web.xmlファイルに次の記述も必要になります。
<listener>

    <listener-class

>org.jboss.seam.servlet.SeamListener</listener-class>

</listener

>
このリスナーは Seam のブートストラップおよびセッションとアプリケーションコンテキストの破棄を行います。
JSF 実装の中には Seam の対話伝播と動作するサーバー側状態保存の実装が破損しているものがあります。 フォームサブミット中の対話伝播に関する問題が見られる場合はクライアント側状態保存に切り替えて見てください。 web.xml に次が必要となります。
<context-param>

    <param-name

>javax.faces.STATE_SAVING_METHOD</param-name>

    <param-value

>client</param-value>

</context-param

>
ビュー状態値の変異性に関する JSF 仕様には不明瞭な部分があります。 Seam は JSF ビュー状態を使用してその PAGE スコープを支えるため、 特定の場合に問題となる可能性があります。 JSF-RI でサーバー側状態保存を使用し PAGE スコープの Bean に任意のページの特定ビューに対するその正確な値を維持させたい場合には次のコンテキストパラメータを指定する必要があります。 そうしなければ、 ユーザー−が「戻る」ボタンを使用したときに PAGE スコープのコンポーネントは最新の値を持つことになります。 つまり「戻る」ページの値から変えていればその値が使われます。 ( 仕様に関する問題 を参照)。 要求ごとに JSFビューのシリアライズが発生し性能に影響するため、 この設定はデフォルトでは有効にされません。
<context-param>

    <param-name>com.sun.faces.serializeServerState</param-name>

    <param-value>true</param-value>

</context-param>
If you want follow our advice and use Facelets instead of JSP, add the following lines to faces-config.xml:
<application>

    <view-handler

>com.sun.facelets.FaceletViewHandler</view-handler>

</application

>
そして、 web.xmlに下の記述も必要です。
<context-param>

    <param-name

>javax.faces.DEFAULT_SUFFIX</param-name>

    <param-value

>.xhtml</param-value>

</context-param

>
If you are using facelets in JBoss AS, you'll find that Facelets logging is broken (the log messages don't make it to the server log). Seam provides a bridge to fix this, to use it copy lib/interop/jboss-seam-jul.jar to $JBOSS_HOME/server/default/deploy/jboss-web.deployer/jsf-libs/ and include the jboss-seam-ui.jar in the WEB-INF/lib of your application. The Facelets logging catagories are itemized in the Facelets Developer Documentation.
Seam リソースサーブレットは Seam Remoting 、キャプチャ (セキュリティの章を参照) や JSF の UI コントロールで使用されるリソースを提供します。 Seam リソースサーブレットの設定には web.xml に以下の記述が必要です。
<servlet>

  <servlet-name

>Seam Resource Servlet</servlet-name>

  <servlet-class

>org.jboss.seam.servlet.SeamResourceServlet</servlet-class>

</servlet>


<servlet-mapping>

  <servlet-name

>Seam Resource Servlet</servlet-name>

  <url-pattern

>/seam/resource/*</url-pattern>

</servlet-mapping

>
Seam は基本的な操作の場合はサーブレットフィルタを必要としません。 ただし、 フィルタの使用に依存する機能がいくつかあります。 Seam ではわかりやすいように他の組み込み Seam コンポーネントを設定する場合と同じようにしてサーブレットフィルタを追加したり設定することができます。 この機能を利用するにはまず web.xml にマスターフィルタをインストールする必要があります。
<filter>

    <filter-name

>Seam Filter</filter-name>

    <filter-class

>org.jboss.seam.servlet.SeamFilter</filter-class>

</filter>


<filter-mapping>

    <filter-name

>Seam Filter</filter-name>

    <url-pattern

>/*</url-pattern>

</filter-mapping

>
Seam マスターフィルタは web.xml で指定される 一番目のフィルタでなければなりません。 これによりマスターフィルタが一番最初に実行されるようになります。
Seam フィルタはいくつかの共通の属性を持ちます。 これらに加えて以降で説明するパラメータを components.xml に設定することができます。
url-pattern— フィルタされる要求を指定するのに使用します。 デフォルトは全要求です。url-patternはワイルドカードサフィックスを許可する Tomcat スタイルのパターンになります。regex-url-pattern— フィルタされる要求を指定するのに使用します。 デフォルトは全要求です。regex-url-patternは要求パスにマッチする正規表現になります。disabled— 組み込みのフィルタの無効化に使用します。
パターンは要求の URI パスに対してマッチングが行われる点 (HttpServletRequest.getURIPath() を参照)、 およびサーブレットコンテキスト名はマッチングが行われる前に削除される点に注意してください。
マスターフィルタを組み込むことにより、以下の組み込みフィルタを使用できるようになります。
このフィルタは pages.xml で例外マッピングの機能を提供します (ほぼすべてのアプリケーションでこの機能が必要とされます)。 また、 捕捉されなかった例外が発生した場合にコミットされていないトランザクションのロールバックも行います。 (Java EE 仕様によるとこれは Web コンテナによって自動的に行われるはずですが、 すべてのアプリケーションサーバーでこの動作をあてにできるわけではないことが判明しています。 また、 Tomcat のようなプレーンなサーブレットエンジンには必要ありません。)
デフォルトで、すべての要求に対して例外処理フィルタが適用されますが、下のように、 components.xmlに<web:exception-filter>を記述して、 これを変更することもできます。
<components xmlns="http://jboss.com/products/seam/components"

            xmlns:web="http://jboss.com/products/seam/web">


    <web:exception-filter url-pattern="*.seam"/>


</components

>
このフィルタはSeamがブラウザのリダイレクトにより対話コンテキストを伝搬する事を可能にします。 ブラウザリダイレクトをインタセプトし、 Seam の対話 ID をパラメータに追加することにより、実現しています。
リダイレクトフィルタも、デフォルトですべての要求を対象としますが、 components.xmlの記述を以下のようにして変更することが可能です。
<web:redirect-filter url-pattern="*.seam"/>
このフィルタにより Seam は pages.xml ファイルの設定をベースとしたビューの URL 書き換えを適用することができるようになります。 このフィルタはデフォルトではアクティブにはなっていませんが、 components.xml に設定を追加することでアクティブにすることができます。
<web:rewrite-filter view-mapping="*.seam"/>
view-mapping パラメータは web.xml ファイルにある Faces サーブレット用に定義されたサーブレットマッピングに合致しなければなりません。 省略するとリライトフィルタはパターンが *.seam であるとみなします。
この機能は Seam のファイルアップロード JSF コントロールを使用するときに必要となります。 マルチパートフォームの要求を検出すると、 RFC-2388 (multipart/form-data 仕様) に従い処理を行います。 デフォルトの設定をオーバーライドするためには components.xmlに以下の設定を追加します。
<web:multipart-filter create-temp-files="true"

                      max-request-size="1000000"

                      url-pattern="*.seam"/>
create-temp-files—trueにセットするとアップロードされたファイルがメモリに維持される代わりにテンポラリファイルに書き込まれます。 大容量ファイルのアップロードが予期される場合は考慮すべき重要な点となるかもしれません。 デフォルト設定はfalseです。max-request-size— ファイルのアップロード要求サイズがこの値を越えると (要求内のContent-Lengthヘッダーを読み取り判定される) その要求は中断されます。 デフォルト設定は 0 です (サイズ制限なし)。
送信されたフォームデータのキャラクターエンコーディングをセットします。
デフォルトではこのフィルタはインストールされていませんので、components.xml に以下の記述が必要です。
<web:character-encoding-filter encoding="UTF-16"

                               override-client="true"

                               url-pattern="*.seam"/>
encoding— 使用するエンコーディングです。override-client—trueにセットすると要求エンコーディングはその要求がすでにエンコーディングを指定しているか否かにかかわらずencodingで指定されているものにセットされます。falseにセットすると要求エンコーディングは要求がまだエンコーディングを指定していない場合にのみセットされます。 デフォルト設定はfalseです。
RichFaces をプロジェクトに使用すると Seam は RichFaces Ajax フィルタをインストールしてその他すべての組み込みフィルタより先にこのフィルタがインストールされるようにします。 web.xml に手作業で RichFaces Ajax をインストールする必要はありません。
RichFaces Ajax フィルタは RichFaces jar 群がプロジェクトにある場合にのみインストールされます。
デフォルトの設定を上書きするには次のエントリを components.xml に追加します。 オプションは RichFaces Developer Guide に記載されているものと同じです。
<web:ajax4jsf-filter force-parser="true"

                     enable-cache="true"

                     log4j-init-file="custom-log4j.xml"

                     url-pattern="*.seam"/>
force-parser— JSF の全ページが Richfaces の XML 構文チェッカーにより強制的に検証されるようにします。falseなら AJAX の応答のみが検証され整形式の XML に変換されます。force-parserをfalseに設定するとパフォーマンスは向上しますが AJAX 更新でおかしな結果が見えてしまう可能性があります。enable-cache— フレームワーク生成のリソースのキャッシュ化を有効にします (javascript、 CSS、 イメージなど)。 カスタムの javascript や CSS を開発している場合は true に設定するとブラウザにリソースをキャッシュさせないようにします。log4j-init-file— アプリケーションごとのログ記録のセットアップに使用されます。 log4j.xml 設定ファイルへのパスをウェブアプリケーションコンテキストからの相対パスで与えてください。
このフィルタは認証されたユーザー名を log4j マップ診断コンテキストに追加するため、 パターンに %X{username} を追加することで必要に応じてユーザー名をフォーマット化されたログ出力に含めることができます。
デフォルトではロギングフィルタは全要求を処理しますが、 以下の例で示すように <web:logging-filter> のエントリを components.xml に追加してこの動作を調整することができます。
<components xmlns="http://jboss.com/products/seam/components"

            xmlns:web="http://jboss.com/products/seam/web">

    <web:logging-filter url-pattern="*.seam"/>

</components

>
JSF サーブレット以外のサーブレットに直接送信される要求は、JSFのライフサイクルでは処理されません。 そこで、Seamは Seamのコンポーネントにアクセスする必要の有る その他のサーブレットに対してサーブレットフィルタを提供しています。
このフィルタを適用することにより、カスタムなサーブレットが Seamコンテキストと相互に作用することを可能にします。 個々の要求の最初にSeamコンテキストをセットアップし、要求の終了畤にこれを破棄します。このフィルタは JSFの FacesServlet には決して適用されないようにしてください。 Seam はJSFの要求のコンテキスト管理には phase listenerを使用します。
デフォルトではこのフィルタはインストールされていませんので、components.xml に以下の記述が必要です。
<web:context-filter url-pattern="/media/*"/>
コンテキストフィルタはconversationIdという名前で要求パラメータ中に対話 ID を探そうとします。必ず、要求パラメータに対話 IDを含めるようにしてください。
また、新たな対話 IDをクライアント側に確実に伝える必要があります。 Seamは組み込みコンポーネント conversationのプロパティとして対話 IDを公開しています。
Seam does not automatically add cache-control HTTP headers to any resources served by the Seam resource servlet, or directly from your view directory by the servlet container. This means that your images, Javascript and CSS files, and resource representations from Seam resource servlet such as Seam Remoting Javascript interfaces are usually not cached by the browser. This is convenient in development but should be changed in production when optimizing the application.
You can configure a Seam filter to enable automatic addition of cache-control headers depending on the requested URI in components.xml:
<web:cache-control-filter name="commonTypesCacheControlFilter"

                          regex-url-pattern=".*(\.gif|\.png|\.jpg|\.jpeg|\.css|\.js)"

                          value="max-age=86400"/> <!-- 1 day -->


<web:cache-control-filter name="anotherCacheControlFilter"

                          url-pattern="/my/cachable/resources/*"

                          value="max-age=432000"/> <!-- 5 days -->
You do not have to name the filters unless you have more than one filter enabled.
Seam はカスタムのフィルタをインストールすることができ、 チェーン内にフィルタを配置する 場所 を指定できます (サーブレットの仕様はフィルタを web.xml に指定したときの明確な順序を提供しません)。 @Filter アノテーションを Seam コンポーネント (javax.servlet.Filter を実装しなければなりません) に追加するだけです。
@Startup

@Scope(APPLICATION)

@Name("org.jboss.seam.web.multipartFilter")

@BypassInterceptors

@Filter(within="org.jboss.seam.web.ajax4jsfFilter")

public class MultipartFilter extends AbstractFilter {
@Startup アノテーションを追加すると Seam 起動時にコンポーネントが使用可能となります。 バイジェクションはここでは使用できません (@BypassInterceptors)。 フィルタは RichFaces フィルタよりチェーンの下方になります (@Filter(within="org.jboss.seam.web.ajax4jsfFilter"))。
In a Seam application, EJB components have a certain duality, as they are managed by both the EJB container and Seam. Actually, it's more that Seam resolves EJB component references, manages the lifetime of stateful session bean components, and also participates in each method call via interceptors. Let's start with the configuration of the Seam interceptor chain.
We need to apply the SeamInterceptor to our Seam EJB components. This interceptor delegates to a set of built-in server-side interceptors that handle such concerns as bijection, conversation demarcation, and business process signals. The simplest way to do this across an entire application is to add the following interceptor configuration in ejb-jar.xml:
<interceptors>

    <interceptor>

        <interceptor-class

>org.jboss.seam.ejb.SeamInterceptor</interceptor-class>

    </interceptor>

</interceptors>


<assembly-descriptor>

    <interceptor-binding>

        <ejb-name

>*</ejb-name>

        <interceptor-class

>org.jboss.seam.ejb.SeamInterceptor</interceptor-class>

    </interceptor-binding>

</assembly-descriptor>
Seam needs to know where to go to find session beans in JNDI. One way to do this is specify the @JndiName annotation on every session bean Seam component. However, this is quite tedious. A better approach is to specify a pattern that Seam can use to calculate the JNDI name from the EJB name. Unfortunately, there is no standard mapping to global JNDI defined in the EJB3 specification, so this mapping is vendor-specific (and may depend on your own naming conventions as well). We usually specify this option in components.xml.
JBossアプリケーションサーバーでは、次のパターンが正しいです。
<core:init jndi-name="earName/#{ejbName}/local" />
In this case, earName is the name of the EAR in which the bean is deployed, Seam replaces #{ejbName} with the name of the EJB, and the final segment represents the type of interface (local or remote).
Outside the context of an EAR (when using the JBoss Embeddable EJB3 container), the first segment is dropped since there is no EAR, leaving us with the following pattern:
<core:init jndi-name="#{ejbName}/local" />
How these JNDI names are resolved and somehow locate an EJB component might appear a bit like black magic at this point, so let's dig into the details. First, let's talk about how the EJB components get into JNDI.
The folks at JBoss don't care much for XML, if you can't tell. So when they designed JBoss AS, they decided that EJB components would get assigned a global JNDI name automatically, using the pattern just described (i.e., EAR name/EJB name/interface type). The EJB name is the first non-empty value from the following list:
The value of the
<ejb-name>element in ejb-jar.xmlThe value of the
nameattribute in the @Stateless or @Stateful annotationThe simple name of the bean class
Let's look at an example. Assume that you have the following EJB bean and interface defined.
package com.example.myapp;


import javax.ejb.Local;


@Local

public interface Authenticator

{

    boolean authenticate();

}


package com.example.myapp;


import javax.ejb.Stateless;


@Stateless

@Name("authenticator")

public class AuthenticatorBean implements Authenticator

{

    public boolean authenticate() { ... }

}
Assuming your EJB bean class is deployed in an EAR named myapp, the global JNDI name myapp/AuthenticatorBean/local will be assigned to it on JBoss AS. As you learned, you can reference this EJB component as a Seam component with the name authenticator and Seam will take care of finding it in JNDI according to the JNDI pattern (or @JndiName annotation).
So what about the rest of the application servers? Well, according to the Java EE spec, which most vendors try to adhere to religiously, you have to declare an EJB reference for your EJB in order for it to be assigned a JNDI name. That requires some XML. It also means that it is up to you to establish a JNDI naming convention so that you can leverage the Seam JNDI pattern. You might find the JBoss convention a good one to follow.
There are two places you have to define the EJB reference when using Seam on non-JBoss application servers. If you are going to be looking up the Seam EJB component through JSF (in a JSF view or as a JSF action listener) or a Seam JavaBean component, then you must declare the EJB reference in web.xml. Here is the EJB reference for the example component just shown:
<ejb-local-ref>

    <ejb-ref-name>myapp/AuthenticatorBean/local</ejb-ref-name>

    <ejb-ref-type>Session</ejb-ref-type>

    <local>org.example.vehicles.action.Authenticator</local>

</ejb-local-ref>
This reference will cover most uses of the component in a Seam application. However, if you want to be able to inject a Seam EJB component into another Seam EJB component using @In, you need to define this EJB reference in another location. This time, it must be defined in ejb-jar.xml, and it's a bit tricker.
Within the context of an EJB method call, you have to deal with a somewhat sheltered JNDI context. When Seam attempts to find another Seam EJB component to satisfy an injection point defined using @In, whether or not it finds it depends on whether an EJB reference exists in JNDI. Strictly speaking, you cannot simply resolve JNDI names as you please. You have to define the references explicitly. Fortunately, JBoss recognized how aggrevating this would be for the developer and all versions of JBoss automatically register EJBs so they are always available in JNDI, both to the web container and the EJB container. So if you are using JBoss, you can skip the next few paragraphs. However, if you are deploying to GlassFish, pay close attention.
For application servers that stubbornly adhere to the EJB specification, EJB references must always be defined explicitly. But unlike with the web context, where a single resource reference covers all uses of the EJB from the web environment, you cannot declare EJB references globally in the EJB container. Instead, you have to specify the JNDI resources for a given EJB component one-by-one.
Let's assume that we have an EJB named RegisterAction (the name is resolved using the three steps mentioned previously). That EJB has the following Seam injection:
@In(create = true)

Authenticator authenticator;
In order for this injection to work, the link must be established in the ejb-jar.xml file as follows:
<ejb-jar>

    <enterprise-beans>

        <session>

            <ejb-name>RegisterAction</ejb-name>

            <ejb-local-ref>

                <ejb-ref-name>myapp/AuthenticatorAction/local</ejb-ref-name>

                <ejb-ref-type>Session</ejb-ref-type>

                <local>com.example.myapp.Authenticator</local>

            </ejb-local-ref>

        </session>

    </enterprise-beans>


    ...


</ejb-jar>
Notice that the contents of the <ejb-local-ref> are identical to what we defined in web.xml. What we are doing is bringing the reference into the EJB context where it can be used by the RegisterAction bean. You will need to add one of these references for any injection of a Seam EJB compoenent into another Seam EJB component using @In. (You can see an example of this setup in the jee5/booking example).
But what about @EJB? It's true that you can inject one EJB into another using @EJB. However, by doing so, you are injecting the actual EJB reference rather than the Seam EJB component instance. In this case, some Seam features will work, while others won't. That's because Seam's interceptor is invoked on any method call to an EJB component. But that only invokes Seam's server-side interceptor chain. What you lose is Seam's state management and Seam's client-side interceptor chain. Client-side interceptors handle concerns such as security and concurrency. Also, when injecting a SFSB, there is no guarantee that you will get the SFSB bound to the active session or conversation, whatever the case may be. Thus, you definitely want to inject the Seam EJB component using @In.
That covers how JNDI names are defined and used. The lesson is that with some application servers, such as GlassFish, you are going to have to specify JNDI names for all EJB components explicitly, and sometimes twice! And even if you are following the same naming convention as JBoss AS, the JNDI pattern in Seam may need to be altered. For instance, the global JNDI names are automatically prefixed with java:comp/env on GlassFish, so you need to define the JNDI pattern as follows:
<core:init jndi-name="java:comp/env/earName/#{ejbName}/local" />
Finally, let's talk about transactions. In an EJB3 environment, we recommend the use of a special built-in component for transaction management, that is fully aware of container transactions, and can correctly process transaction success events registered with the Events component. If you don't add this line to your components.xml file, Seam won't know when container-managed transactions end:
<transaction:ejb-transaction/>
最後にもう一つ理解しておくことがあります。 Seamコンポーネントがデプロイされるどのようなアーカイブにも、 seam.properties、META-INF/seam.properties あるいは META-INF/components.xmlを作成しておく必要があります (空のファイルであってもかまいません)。 Seamは起動時に Seamコンポーネントを探すために、すべてのアーカイブでseam.propertiesをスキャンします。
Seamコンポーネントがある場合には、webアーカイブ (WAR) のWEB-INF/classesディレクトリに seam.propertiesファイルを作成する必要があります。
すべての Seam サンプルに空白の seam.properties ファイルがあるのはこのためです。 このファイルを削除してしまうだけですべてが動作しなくなります。
You might think this is silly and what kind of idiot framework designers would make an empty file affect the behavior of their software?? Well, this is a workaround for a limitation of the JVM — if we didn't use this mechanism, our next best option would be to force you to list every component explicitly in components.xml, just like some other competing frameworks do! I think you'll like our way better.
Seam ではデフォルトの JPA プロバイダとして Hibernate がパッケージ化され、設定されています。 別の JPA プロバイダを使用する必要がある場合は seam に指示しなければなりません。
これは暫定の方策です。
JPA プロバイダの設定は将来的にはより簡単になり、 カスタムの永続プロバイダ実装を追加しない限り設定変更を必要としなくなります。
Seam への別の JPA プロバイダ情報の指示は 2 種類いずれかの方法で行うことができます。
アプリケーションの components.xml を更新します。 これにより汎用 PersistenceProvider は hibernate バージョンより優先となります。 次をこのファイルに追加するだけです。
<component name="org.jboss.seam.persistence.persistenceProvider"

           class="org.jboss.seam.persistence.PersistenceProvider"

           scope="stateless">

</component

>
JPA プロバイダの非標準の機能を利用したい場合は PersistenceProvider の独自の実装を書く必要があります。 HibernatePersistenceProvider を起点として使用します (コミュニティに貢献するのも忘れないでくださいね)。 つぎに前述した通り seam にそれを使うよう指示する必要があります。
<component name="org.jboss.seam.persistence.persistenceProvider"

           class="org.your.package.YourPersistenceProvider">

</component

>
あとは正しいプロバイダクラスおよび使用するプロバイダが必要とするプロパティで persistence.xml を更新するだけです。 新しいプロバイダの jar ファイル群をアプリケーションでパッケージ化する必要があればそれも忘れないようにしてください。
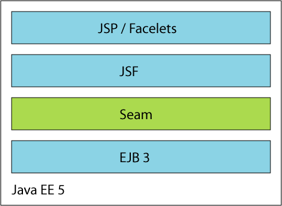
Java EE 5 環境で実行している場合は Seam を使いはじめるのに必要な設定はこれだけです。
EAR にこれらすべてをパッケージ化したらアーカイブの構造は以下のようになります。
my-application.ear/
    jboss-seam.jar
    lib/
        jboss-el.jar
    META-INF/
        MANIFEST.MF
        application.xml
    my-application.war/
        META-INF/
            MANIFEST.MF
        WEB-INF/
            web.xml
            components.xml
            faces-config.xml
            lib/
                jsf-facelets.jar
                jboss-seam-ui.jar
        login.jsp
        register.jsp
        ...
    my-application.jar/
        META-INF/
            MANIFEST.MF
            persistence.xml
        seam.properties
        org/
            jboss/
                myapplication/
                    User.class
                    Login.class
                    LoginBean.class
                    Register.class
                    RegisterBean.class
                    ...
jboss-seam.jar を ejb モジュールとして META-INF/application.xml で宣言しなければなりません。 jboss-el.jar は EAR の lib ディレクトリに配置されるはずです (EAR クラスパスに配置します)。
jBPM または Drools を使用したい場合は EAR の lib ディレクトリに必要な jar 群を含ませなければなりません。
facelets を使用する場合 (推奨) は WARのWEB-INF/libディレクトリに jsf-facelets.jarを含める必要があります。
Seam のタグライブラリを使用する場合には (ほとんどの Seam アプリケーションで使用されます)、 WAR ファイルの WEB-INF/lib ディレクトリに jboss-seam-ui.jar を含める必要があります。 PDFや email のタグライブラリを使用する場合には、 WEB-INF/lib に jboss-seam-pdf.jar または jboss-seam-mail.jar を含める必要があります。
Seam デバッグページを使用する (facelets を使用している場合のみ利用可能) 場合には WARの WEB-INF/libディレクトリにjboss-seam-debug.jarを含めます。
サンプルアプリケーションには EJB 3.0をサポートする Java EEコンテナにデプロイ可能ないくつかの Seam アプリケーションがふくまれています。
設定に関するトピックはこれですべてですと言いたいところなんですが、 実はまた3 分の一しか説明していません。 退屈な設定の説明ばかりであきてしまった場合は残りのセクションは飛ばしてあとでもう一度読み直して頂いても構いません。
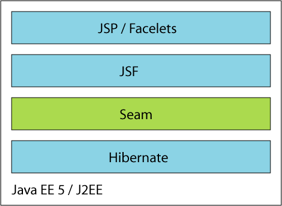
Seam は EJB 3.0 の使用にまだ思い切りがつかない方にも便利です。 このような場合には EJB 3.0 永続性ではなく Hibernate3 か JPA を使用し、 セッション Bean の代わりにプレーン JavaBean を使用するとよいでしょう。 セッション Bean のいくつかの優れた機能は使用できませんが、 一旦決心がついたら EJB 3.0 への移行が非常に簡単になりますし、 それまでの間は Seam 固有の宣言的な状態管理アーキテクチャを利用することができます。
Seam JavaBean コンポーネントはセッション Bean のような宣言的トランザクション境界設定は提供しません。 手作業で JTA UserTransaction を使用するか、 宣言的に Seam の @Transactional アノテーションを使って管理することが できます。 ただし JavaBean と Hibernate を使用する場合、ほとんどのアプリケーションは Seam 管理のトランザクションを使用します。
Seam ディストリビューションには、EJB3 の代わりに Hibernate や JavaBean を使用した 予約サンプルアプリケーションが含まれています。 このサンプルアプリケーションはどんなJ2EEアプリケーションサーバーでも すぐにデプロイ可能です。
Seam は組み込みコンポーネントがインストールされていれば、 hibernate.cfg.xml ファイルから Hibernate の SessionFactory をブートストラップします。
<persistence:hibernate-session-factory name="hibernateSessionFactory"/>
この時、インジェクションを使って、Seamの管理する HibernateのSessionを利用するのであれば、 managed sessionを設定する必要があります。
<persistence:managed-hibernate-session name="hibernateSession"

                            session-factory="#{hibernateSessionFactory}"/>
Seam はもし組み込みコンポーネントがインストールされていれば、persistence.xml からEntityManagerFactory JPAをブートストラップします。
<persistence:entity-manager-factory name="entityManagerFactory"/>
インジェクションで Seam 管理のJPA EntityManager を使用可能にしたい場合は 管理永続コンテキスト を設定する必要があります。
<persistence:managed-persistence-context name="entityManager"

                            entity-manager-factory="#{entityManagerFactory}"/>
アプリケーションは WARとしてパッケージすることができ、その構成は以下の様になります。
my-application.war/
    META-INF/
        MANIFEST.MF
    WEB-INF/
        web.xml
        components.xml
        faces-config.xml
        lib/
            jboss-seam.jar
            jboss-seam-ui.jar
            jboss-el.jar
            jsf-facelets.jar
            hibernate3.jar
            hibernate-annotations.jar
            hibernate-validator.jar
            ...
            my-application.jar/
                META-INF/
                   MANIFEST.MF
                seam.properties
                hibernate.cfg.xml
                org/
                    jboss/
                        myapplication/
                            User.class
                            Login.class
                            Register.class
                            ...
    login.jsp
    register.jsp
    ...
Hibernate を Tomcat や TestNG のような EE 以外の環境にデプロイしたい場合はもう少し作業が必要となります。
Seam を完全に EE 環境の外側で使用することが可能です。 この場合、 使用できる JTA がないので Seam にどのようにトランザクションを管理するのかを指示する必要があります。 JPA を使用している場合は Seam に JPA リソースローカルのトランザクション、 EntityTransaction などを使用するよう指示することができます。
<transaction:entity-transaction entity-manager="#{entityManager}"/>
Hibernate を使用している場合は Seam に次のように Hibernate トランザクション API を使用するよう指示することができます。
<transaction:hibernate-transaction session="#{session}"/>
当然、 データソースも定義する必要があります。
よりよい代替としては JBoss Embedded を使用して EE の API にアクセスします。
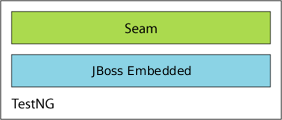
JBoss Embedded により Java EE 5 アプリケーションサーバーのコンテキストの外側で EJB 3 のコンポーネントを実行することができるようになります。 これには限られませんが、 特にテストに便利です。
Seam 予約サンプルアプリケーションには TestNG 統合テストスィートが含まれ、 SeamTest を通じて JBoss Embedded で実行します。
この予約サンプルアプリケーションは Tomcat にもデプロイ可能です。
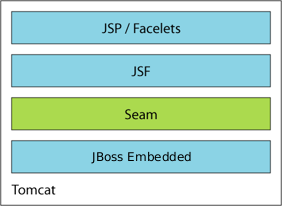
Embedded JBoss must by installed into Tomcat for Seam applications to run correctly on it. Embedded JBoss runs with JDK 5 or JDK 6 ( see 項42.1. 「JDK の依存性」 for details on using JDK 6). Embedded JBoss can be downloaded here. The process for installing Embedded JBoss into Tomcat 6 is quite simple. First, you should copy the Embedded JBoss JARs and configuration files into Tomcat.
jndi.propertiesファイルを除き、 Embedded JBoss のbootstrapディレクトリとlibディレクトリの配下にある全ファイルとディレクトリを Tomcat のlibディレクトリにコピーします。Tomcat の
libディレクトリからannotations-api.jarファイルを削除します。
次に、 Embedded JBoss 固有の機能を追加するため 2 つの設定ファイルを更新する必要があります。
Embedded JBoss リスナー
EmbeddedJBossBootstrapListenerをconf/server.xmlに追加します。 このファイル内の他のすべてのリスナーの後ろに現れなければなりません。<Server port="8005" shutdown="SHUTDOWN">
<!-- Comment these entries out to disable JMX MBeans support used for the
administration web application -->
<Listener className="org.apache.catalina.core.AprLifecycleListener" />
<Listener className="org.apache.catalina.mbeans.ServerLifecycleListener" />
<Listener className="org.apache.catalina.mbeans.GlobalResourcesLifecycleListener" />
<Listener className="org.apache.catalina.storeconfig.StoreConfigLifecycleListener" />
  <!-- Add this listener -->

  <Listener className="org.jboss.embedded.tomcat.EmbeddedJBossBootstrapListener" />
WAR ファイルのスキャンは
WebinfScannerリスナーをconf/context.xmlに追加することで有効になるはずです。<Context>
<!-- Default set of monitored resources -->
<WatchedResource>WEB-INF/web.xml</WatchedResource>
<!-- Uncomment this to disable session persistence across Tomcat restarts -->
<!--
<Manager pathname="" />
-->
  <!-- Add this listener -->

  <Listener className="org.jboss.embedded.tomcat.WebinfScanner" />
</Context

>
If you are using Sun JDK 6, you need to set the Java option
sun.lang.ClassLoader.allowArraySyntaxtotruein the JAVA_OPTS environment variable used by the Catalina startup script (catalina.bat on Windows or catalina.sh on Unix).Open the script appropriate for your operating system in a text editor. Add a new line immediately below the comments at the top of the file where you will define the JAVA_OPTS environment variable. On Windows, use the following syntax:
set JAVA_OPTS=%JAVA_OPTS% -Dsun.lang.ClassLoader.allowArraySyntax=true
On Unix, use this syntax instead:
JAVA_OPTS="$JAVA_OPTS -Dsun.lang.ClassLoader.allowArraySyntax=true"
設定オプションの詳細については Embedded JBoss Tomcat 統合 wiki エントリ を参照してください。
Tomcat のような サーブレットエンジンへの WAR ベースのデプロイメントのアーカイブの構造は、以下のようになります。
my-application.war/
    META-INF/
        MANIFEST.MF
    WEB-INF/
        web.xml
        components.xml
        faces-config.xml
        lib/
            jboss-seam.jar
            jboss-seam-ui.jar
            jboss-el.jar
            jsf-facelets.jar
            jsf-api.jar
            jsf-impl.jar
            ...
            my-application.jar/
                META-INF/
                    MANIFEST.MF
                    persistence.xml
                seam.properties
                org/
                    jboss/
                        myapplication/
                            User.class
                            Login.class
                            LoginBean.class
                            Register.class
                            RegisterBean.class
                            ...
    login.jsp
    register.jsp
    ...
ほとんどの Seam サンプルアプリケーションは、ant deploy.tomcat を実行することによって、 Tomcat にデプロイすることも可能です。
Seam の jBPM 統合はデフォルトではインストールされないため組み込みコンポーネントをインストールすることにより jBPM を有効にする必要があります。 また、 使用するプロセスとページフローの定義を components.xml で明示的に記載する必要があります。
<bpm:jbpm>

    <bpm:pageflow-definitions>

        <value

>createDocument.jpdl.xml</value>

        <value

>editDocument.jpdl.xml</value>

        <value

>approveDocument.jpdl.xml</value>

    </bpm:pageflow-definitions>

    <bpm:process-definitions>

        <value

>documentLifecycle.jpdl.xml</value>

    </bpm:process-definitions>

</bpm:jbpm

>
ページフローのみの指定であれば、これ以上の設定は不要です。ビジネスプロセス定義を利用する場合、 jBPM 設定および jBPM 用の Hibernate 設定も用意する必要があります。Seam DVD Store demoは Seam で機能する jbpm.cfg.xmlとhibernate.cfg.xmlを含めた サンプルです。
<jbpm-configuration>


  <jbpm-context>

    <service name="persistence">

       <factory>

          <bean class="org.jbpm.persistence.db.DbPersistenceServiceFactory">

             <field name="isTransactionEnabled"

><false/></field>

          </bean>

       </factory>

    </service>

    <service name="tx" factory="org.jbpm.tx.TxServiceFactory" />

    <service name="message" factory="org.jbpm.msg.db.DbMessageServiceFactory" />

    <service name="scheduler" factory="org.jbpm.scheduler.db.DbSchedulerServiceFactory" />

    <service name="logging" factory="org.jbpm.logging.db.DbLoggingServiceFactory" />

    <service name="authentication"

             factory="org.jbpm.security.authentication.DefaultAuthenticationServiceFactory" />

  </jbpm-context>


</jbpm-configuration

>
ここでのもっとも重要なことは、jBPMトランザクション制御は無効になっているということです。 Seam、あるいはEJB3がJTAトランザクションを制御するべきです。
jBPM 設定やプロセスおよびページフローの定義ファイルに対する明確なパッケージング形式がいまだありません。 Seam サンプルでは単純にこうしたファイルはすべて EAR のルートにパッケージすることにしました。 将来的には何らかの標準的なパッケージング形式を設計することになると思います。 EAR は次のようになります。
my-application.ear/
    jboss-seam.jar
    lib/
       jboss-el.jar
       jbpm-3.1.jar
    META-INF/
        MANIFEST.MF
        application.xml
    my-application.war/
        META-INF/
            MANIFEST.MF
        WEB-INF/
            web.xml
            components.xml
            faces-config.xml
            lib/
                jsf-facelets.jar
                jboss-seam-ui.jar
        login.jsp
        register.jsp
        ...
    my-application.jar/
        META-INF/
            MANIFEST.MF
            persistence.xml
        seam.properties
        org/
            jboss/
                myapplication/
                    User.class
                    Login.class
                    LoginBean.class
                    Register.class
                    RegisterBean.class
                    ...
    jbpm.cfg.xml
    hibernate.cfg.xml
    createDocument.jpdl.xml
    editDocument.jpdl.xml
    approveDocument.jpdl.xml
documentLifecycle.jpdl.xmlステートフルセッション Bean のタイムアウトは HTTP セッションのタイムアウトより高く設定することが非常に重要となります。 これをしないと SFSB がユーザーの HTTP セッションが終了する前にタイムアウトする可能性があります。 JBoss Application Server はセッション Bean タイムアウトがデフォルトでは 30 分になり、 server/default/conf/standardjboss.xml (default は各自の設定セット名に置き換えてください) で設定されています。
デフォルトの SFSB タイムアウトは LRUStatefulContextCachePolicy キャッシュ設定内の max-bean-life の値を変更して調整することができます。
<container-cache-conf>

    <cache-policy

>org.jboss.ejb.plugins.LRUStatefulContextCachePolicy</cache-policy>

    <cache-policy-conf>

        <min-capacity

>50</min-capacity>

        <max-capacity

>1000000</max-capacity>

        <remover-period

>1800</remover-period>


        <!-- SFSB timeout in seconds; 1800 seconds == 30 minutes -->

        <max-bean-life

>1800</max-bean-life

>


        <overager-period

>300</overager-period>

        <max-bean-age

>600</max-bean-age>

        <resizer-period

>400</resizer-period>

        <max-cache-miss-period

>60</max-cache-miss-period>

        <min-cache-miss-period

>1</min-cache-miss-period>

        <cache-load-factor

>0.75</cache-load-factor>

    </cache-policy-conf>

</container-cache-conf

>
The default HTTP session timeout can be modified in server/default/deploy/jbossweb-tomcat55.sar/conf/web.xml for JBoss 4.0.x, or in server/default/deploy/jboss-web.deployer/conf/web.xml for JBoss 4.2.x or later. The following entry in this file controls the default session timeout for all web applications:
<session-config>

    <!-- HTTP Session timeout, in minutes -->

    <session-timeout

>30</session-timeout>

</session-config

>
使用するアプリケーション用にこの値を上書きするにはこのエントリをそのアプリケーションの web.xml に含めるだけです。
Seam アプリケーションを porlet で実行させたい場合は Seam および RichFaces 用の拡張を持ち portlet 内で JSF をサポートする JSR-301 の実装 JBoss Portlet Bridge を見てみてください。 詳細は http://labs.jboss.com/portletbridge を参照してください。
Seam はリソースの起動時に /seam.properties、 /META-INF/components.xml、 または /META-INF/seam.properties を含むすべての jar をスキャンします。 たとえば、 @Name アノテーションが付与されたクラスはすべて Seam コンポーネントとして Seam に登録されます。
また、 Seam にカスタムのリソースを処理させたい場合があります。 一般的な使用例としては特定のアノテーションを処理することで、 Seam はこれに対する固有のサポートを提供します。 まず Seam に /META-INF/seam-deployment.properties で処理するアノテーションを指示します。
# A colon-separated list of annotation types to handle
org.jboss.seam.deployment.annotationTypes=com.acme.Foo:com.acme.Bar
するとアプリケーション起動時に @Foo アノテーションが付くすべてのクラスを捕らえることができます。
@Name("fooStartup")
@Scope(APPLICATION)
@Startup
public class FooStartup {

   @In("#{deploymentStrategy.annotatedClasses['com.acme.Foo']}")
   private Set<Class<Object>> fooClasses;

   @In("#{hotDeploymentStrategy.annotatedClasses['com.acme.Foo']}")
   private Set<Class<Object>> hotFooClasses;

   @Create
   public void create() {
      for (Class clazz: fooClasses) {
         handleClass(clazz);
      }
      for (Class clazz: hotFooClasses) {
         handleClass(clazz);
      }
   }

   public void handleClass(Class clazz) {
       // ...
   }

}
また、 あらゆる リソースを処理することができます。 たとえば、 .foo.xml 拡張子が付くファイルすべてを処理する場合、 カスタムのデプロイメントハンドラを記述する必要があります。
public class FooDeploymentHandler implements DeploymentHandler {
    private static DeploymentMetadata FOO_METADATA = new DeploymentMetadata()
    {

        public String getFileNameSuffix() {
            return ".foo.xml";
        }
    };

   public String getName() {
      return "fooDeploymentHandler";
   }

    public DeploymentMetadata getMetadata() {
        return FOO_METADATA;
    }
}
ここではサフィックス .foo.xml が付くすべてのファイルの一覧を作成しているだけです。
Then, we need to register the deployment handler with Seam in /META-INF/seam-deployment.properties. You can register multiple deployment handler using a comma separated list.
# For standard deployment
org.jboss.seam.deployment.deploymentHandlers=com.acme.FooDeploymentHandler
# For hot deployment
org.jboss.seam.deployment.hotDeploymentHandlers=com.acme.FooDeploymentHandler
Seam uses deployment handlers internally to install components and namespaces. You can easily access the deployment handler during an APPLICATION scoped component's startup:
@Name("fooStartup")
@Scope(APPLICATION)
@Startup
public class FooStartup {

   @In("#{deploymentStrategy.deploymentHandlers['fooDeploymentHandler']}")
   private FooDeploymentHandler myDeploymentHandler;

   @In("#{hotDeploymentStrategy.deploymentHandlers['fooDeploymentHandler']}")
   private FooDeploymentHandler myHotDeploymentHandler;

   @Create
   public void create() {
      for (FileDescriptor fd: myDeploymentHandler.getResources()) {
           handleFooXml(fd);
      }

      for (FileDescriptor f: myHotDeploymentHandler.getResources()) {
           handleFooXml(fd);
      }
   }

   public void handleFooXml(FileDescriptor fd) {
       // ...
   }
}