- 30.1. Basic Seam configuration
- 30.2. Using Alternate JPA Providers
- 30.3. Configuring Seam in Java EE 5
- 30.4. Configuring Seam in J2EE
- 30.5. Configuring Seam in Java SE, without JBoss Embedded
- 30.6. Configuring Seam in Java SE, with JBoss Embedded
- 30.7. Configuring jBPM in Seam
- 30.8. Configuring SFSB and Session Timeouts in JBoss AS
- 30.9. Running Seam in a Portlet
- 30.10. Deploying custom resources
Configuration is a very boring topic and an extremely tedious pastime. Unfortunately, several lines of XML are required to integrate Seam into your JSF implementation and servlet container. There's no need to be too put off by the following sections; you'll never need to type any of this stuff yourself, since you can just use seam-gen to start your application or you can copy and paste from the example applications!
First, let's look at the basic configuration that is needed whenever we use Seam with JSF.
Of course, you need a faces servlet!
<servlet>

    <servlet-name>Faces Servlet</servlet-name>

    <servlet-class>javax.faces.webapp.FacesServlet</servlet-class>

    <load-on-startup>1</load-on-startup>

</servlet>


<servlet-mapping>

    <servlet-name>Faces Servlet</servlet-name>

    <url-pattern>*.seam</url-pattern>

</servlet-mapping>
(You can adjust the URL pattern to suit your taste.)
In addition, Seam requires the following entry in your web.xml file:
<listener>

    <listener-class>org.jboss.seam.servlet.SeamListener</listener-class>

</listener>
This listener is responsible for bootstrapping Seam, and for destroying session and application contexts.
Some JSF implementations have a broken implementation of server-side state saving that interferes
with Seam's conversation propagation. If you have problems with conversation propagation during form
submissions, try switching to client-side state saving. You'll need this in web.xml:
<context-param>

    <param-name>javax.faces.STATE_SAVING_METHOD</param-name>

    <param-value>client</param-value>

</context-param>
There is a minor gray area in the JSF specification regarding the mutability of view state values. Since Seam uses the JSF view state to back its PAGE scope this can become an issue in some cases. If you're using server side state saving with the JSF-RI and you want a PAGE scoped bean to keep its exact value for a given view of a page you will need to specify the following context-param. Otherwise if a user uses the "back" button a PAGE scoped component will have the latest value if it has changed not the value of the "back" page. (see Spec Issue ). This setting is not enabled by default because of the performance hit of serializing the JSF view with every request.
<context-param>

    <param-name>com.sun.faces.serializeServerState</param-name>

    <param-value>true</param-value>

</context-param>
If you want follow our advice and use Facelets instead of JSP, add the following lines to
faces-config.xml:
<application>

    <view-handler>com.sun.facelets.FaceletViewHandler</view-handler>

</application>
And the following lines to web.xml:
<context-param>

    <param-name>javax.faces.DEFAULT_SUFFIX</param-name>

    <param-value>.xhtml</param-value>

</context-param>
If you are using facelets in JBoss AS, you'll find that Facelets logging is broken (the log messages
don't make it to the server log). Seam provides a bridge to fix this, to use it copy
lib/interop/jboss-seam-jul.jar to
$JBOSS_HOME/server/default/deploy/jboss-web.deployer/jsf-libs/ and include the
jboss-seam-ui.jar in the WEB-INF/lib of your application. The
Facelets logging catagories are itemized in the Facelets Developer
Documentation.
The Seam Resource Servlet provides resources used by Seam Remoting, captchas (see the security
chapter) and some JSF UI controls. Configuring the Seam Resource Servlet requires the following entry in
web.xml:
<servlet>

  <servlet-name>Seam Resource Servlet</servlet-name>

  <servlet-class>org.jboss.seam.servlet.SeamResourceServlet</servlet-class>

</servlet>


<servlet-mapping>

  <servlet-name>Seam Resource Servlet</servlet-name>

  <url-pattern>/seam/resource/*</url-pattern>

</servlet-mapping>
Seam doesn't need any servlet filters for basic operation. However, there are several features which
depend upon the use of filters. To make things easier, Seam lets you add and configure
servlet filters just like you would configure other built-in Seam components. To take advantage of this
feature, we must first install a master filter in web.xml:
<filter>

    <filter-name>Seam Filter</filter-name>

    <filter-class>org.jboss.seam.servlet.SeamFilter</filter-class>

</filter>


<filter-mapping>

    <filter-name>Seam Filter</filter-name>

    <url-pattern>/*</url-pattern>

</filter-mapping>
The Seam master filter must be the first filter specified in
web.xml. This ensures it is run first.
The Seam filters share a number of common attributes, you can set these in
components.xml in addition to any parameters discussed
below:
url-pattern— Used to specify which requests are filtered, the default is all requests.url-patternis a Tomcat style pattern which allows a wildcard suffix.regex-url-pattern— Used to specify which requests are filtered, the default is all requests.regex-url-patternis a true regular expression match for request path.disabled— Used to disable a built in filter.
Note that the patterns are matched against the URI path of the request (see
HttpServletRequest.getURIPath()) and that the name of the servlet context is
removed before matching.
Adding the master filter enables the following built-in filters.
This filter provides the exception mapping functionality in pages.xml (almost
all applications will need this). It also takes care of rolling back uncommitted transactions when
uncaught exceptions occur. (According to the Java EE specification, the web container should do this
automatically, but we've found that this behavior cannot be relied upon in all application servers.
And it is certainly not required of plain servlet engines like Tomcat.)
By default, the exception handling filter will process all requests, however this behavior may be
adjusted by adding a <web:exception-filter> entry to
components.xml, as shown in this example:
<components xmlns="http://jboss.com/products/seam/components"

            xmlns:web="http://jboss.com/products/seam/web">


    <web:exception-filter url-pattern="*.seam"/>


</components>
This filter allows Seam to propagate the conversation context across browser redirects. It intercepts any browser redirects and adds a request parameter that specifies the Seam conversation identifier.
The redirect filter will process all requests by default, but this behavior can also be adjusted
in components.xml:
<web:redirect-filter url-pattern="*.seam"/>
This filter allows Seam to apply URL rewriting for views based on configuration in the
pages.xml file. This filter is not activate by default, but can be
activated
by adding the configuration to components.xml:
<web:rewrite-filter view-mapping="*.seam"/>
The view-mapping parameter must match the servlet mapping defined for the Faces Servlet
in the web.xml file. If ommitted, the rewrite filter assumes
the pattern *.seam.
This feature is necessary when using the Seam file upload JSF control. It detects multipart form
requests and processes them according to the multipart/form-data specification (RFC-2388). To
override the default settings, add the following entry to components.xml:
<web:multipart-filter create-temp-files="true"

                      max-request-size="1000000"

                      url-pattern="*.seam"/>
create-temp-files— If set totrue, uploaded files are written to a temporary file (instead of held in memory). This may be an important consideration if large file uploads are expected. The default setting isfalse.max-request-size— If the size of a file upload request (determined by reading theContent-Lengthheader in the request) exceeds this value, the request will be aborted. The default setting is 0 (no size limit).
Sets the character encoding of submitted form data.
This filter is not installed by default and requires an entry in
components.xml to enable it:
<web:character-encoding-filter encoding="UTF-16"

                               override-client="true"

                               url-pattern="*.seam"/>
encoding— The encoding to use.override-client— If this is set totrue, the request encoding will be set to whatever is specified byencodingno matter whether the request already specifies an encoding or not. If set tofalse, the request encoding will only be set if the request doesn't already specify an encoding. The default setting isfalse.
If RichFaces is used in your project, Seam will install the
RichFaces Ajax filter for you, making sure to install it
before all other built-in filters. You don't need to install
the RichFaces Ajax filter in web.xml
yourself.
The RichFaces Ajax filter is only installed if the RichFaces jars are present in your project.
To override the default settings, add the following entry to components.xml.
The options are the same as those specified in the RichFaces Developer Guide:
<web:ajax4jsf-filter force-parser="true"

                     enable-cache="true"

                     log4j-init-file="custom-log4j.xml"

                     url-pattern="*.seam"/>
force-parser— forces all JSF pages to be validated by Richfaces's XML syntax checker. Iffalse, only AJAX responses are validated and converted to well-formed XML. Settingforce-parsertofalseimproves performance, but can provide visual artifacts on AJAX updates.enable-cache— enables caching of framework-generated resources (e.g. javascript, CSS, images, etc). When developing custom javascript or CSS, setting to true prevents the browser from caching the resource.log4j-init-file— is used to setup per-application logging. A path, relative to web application context, to the log4j.xml configuration file should be provided.
This filter adds the authenticated user name to the log4j mapped diagnostic context so that it can be included in formatted log output if desired, by adding %X{username} to the pattern.
By default, the logging filter will process all requests, however this behavior may be
adjusted by adding a <web:logging-filter> entry to
components.xml, as shown in this example:
<components xmlns="http://jboss.com/products/seam/components"

            xmlns:web="http://jboss.com/products/seam/web">

    <web:logging-filter url-pattern="*.seam"/>

</components>
Requests sent direct to some servlet other than the JSF servlet are not processed through the JSF lifecycle, so Seam provides a servlet filter that can be applied to any other servlet that needs access to Seam components.
This filter allows custom servlets to interact with the Seam contexts. It sets up the Seam
contexts at the beginning of each request, and tears them down at the end of the request. You should
make sure that this filter is never applied to the JSF
FacesServlet. Seam uses the phase listener for context management in a JSF
request.
This filter is not installed by default and requires an entry in
components.xml to enable it:
<web:context-filter url-pattern="/media/*"/>
The context filter expects to find the conversation id of any conversation context in a request
parameter named conversationId. You are responsible for ensuring that it gets
sent in the request.
You are also responsible for ensuring propagation of any new conversation id back to the client.
Seam exposes the conversation id as a property of the built in component
conversation.
Seam does not automatically add cache-control HTTP headers to
any resources served by the Seam resource servlet, or directly from your view directory by the servlet
container. This means that your images, Javascript and CSS files, and resource representations from
Seam resource servlet such as Seam Remoting Javascript interfaces are usually not cached by the browser.
This is convenient in development but should be changed in production when optimizing the application.
You can configure a Seam filter to enable automatic addition of cache-control headers
depending on the requested URI in components.xml:
<web:cache-control-filter name="commonTypesCacheControlFilter"

                          regex-url-pattern=".*(\.gif|\.png|\.jpg|\.jpeg|\.css|\.js)"

                          value="max-age=86400"/> <!-- 1 day -->


<web:cache-control-filter name="anotherCacheControlFilter"

                          url-pattern="/my/cachable/resources/*"

                          value="max-age=432000"/> <!-- 5 days -->
You do not have to name the filters unless you have more than one filter enabled.
Seam can install your filters for you, allowing you to specify where in the
chain your filter is placed (the servlet specification doesn't provide a well defined order if you
specify your filters in a web.xml). Just add the @Filter
annotation to your Seam component (which must implement javax.servlet.Filter):
@Startup

@Scope(APPLICATION)

@Name("org.jboss.seam.web.multipartFilter")

@BypassInterceptors

@Filter(within="org.jboss.seam.web.ajax4jsfFilter")

public class MultipartFilter extends AbstractFilter {
Adding the @Startup annotation means thar the component is available during
Seam startup; bijection isn't available here (@BypassInterceptors); and the filter
should be further down the chain than the RichFaces filter
(@Filter(within="org.jboss.seam.web.ajax4jsfFilter")).
In a Seam application, EJB components have a certain duality, as they are managed by both the EJB container and Seam. Actually, it's more that Seam resolves EJB component references, manages the lifetime of stateful session bean components, and also participates in each method call via interceptors. Let's start with the configuration of the Seam interceptor chain.
We need to apply the SeamInterceptor to our Seam EJB components. This interceptor
delegates to a set of built-in server-side interceptors that handle such concerns as bijection,
conversation demarcation, and business process signals. The simplest way to do this across an entire
application is to add the following interceptor configuration in ejb-jar.xml:
<interceptors>

    <interceptor>

        <interceptor-class>org.jboss.seam.ejb.SeamInterceptor</interceptor-class>

    </interceptor>

</interceptors>


<assembly-descriptor>

    <interceptor-binding>

        <ejb-name>*</ejb-name>

        <interceptor-class>org.jboss.seam.ejb.SeamInterceptor</interceptor-class>

    </interceptor-binding>

</assembly-descriptor>
Seam needs to know where to go to find session beans in JNDI. One way to do this is specify the
@JndiName annotation on every session bean Seam component. However, this is quite
tedious. A better approach is to specify a pattern that Seam can use to calculate the JNDI name from the
EJB name. Unfortunately, there is no standard mapping to global JNDI defined in the EJB3 specification,
so this mapping is vendor-specific (and may depend on your own naming conventions as well). We usually
specify this option in components.xml.
For JBoss AS, the following pattern is correct:
<core:init jndi-name="earName/#{ejbName}/local" />
In this case, earName is the name of the EAR in which the bean is deployed, Seam
replaces #{ejbName} with the name of the EJB, and the final segment represents the
type of interface (local or remote).
Outside the context of an EAR (when using the JBoss Embeddable EJB3 container), the first segment is dropped since there is no EAR, leaving us with the following pattern:
<core:init jndi-name="#{ejbName}/local" />
How these JNDI names are resolved and somehow locate an EJB component might appear a bit like black magic at this point, so let's dig into the details. First, let's talk about how the EJB components get into JNDI.
The folks at JBoss don't care much for XML, if you can't tell. So when they designed JBoss AS, they decided that EJB components would get assigned a global JNDI name automatically, using the pattern just described (i.e., EAR name/EJB name/interface type). The EJB name is the first non-empty value from the following list:
The value of the
<ejb-name>element in ejb-jar.xmlThe value of the
nameattribute in the @Stateless or @Stateful annotationThe simple name of the bean class
Let's look at an example. Assume that you have the following EJB bean and interface defined.
package com.example.myapp;


import javax.ejb.Local;


@Local

public interface Authenticator

{

    boolean authenticate();

}


package com.example.myapp;


import javax.ejb.Stateless;


@Stateless

@Name("authenticator")

public class AuthenticatorBean implements Authenticator

{

    public boolean authenticate() { ... }

}
Assuming your EJB bean class is deployed in an EAR named myapp, the global JNDI name
myapp/AuthenticatorBean/local will be assigned to it on JBoss AS. As you learned, you can reference this
EJB component as a Seam component with the name authenticator and Seam will take care
of finding it in JNDI according to the JNDI pattern (or @JndiName annotation).
So what about the rest of the application servers? Well, according to the Java EE spec, which most vendors try to adhere to religiously, you have to declare an EJB reference for your EJB in order for it to be assigned a JNDI name. That requires some XML. It also means that it is up to you to establish a JNDI naming convention so that you can leverage the Seam JNDI pattern. You might find the JBoss convention a good one to follow.
There are two places you have to define the EJB reference when using Seam on non-JBoss application servers. If you are going to be looking up the Seam EJB component through JSF (in a JSF view or as a JSF action listener) or a Seam JavaBean component, then you must declare the EJB reference in web.xml. Here is the EJB reference for the example component just shown:
<ejb-local-ref>

    <ejb-ref-name>myapp/AuthenticatorBean/local</ejb-ref-name>

    <ejb-ref-type>Session</ejb-ref-type>

    <local>org.example.vehicles.action.Authenticator</local>

</ejb-local-ref>
This reference will cover most uses of the component in a Seam application. However, if you want to
be able to inject a Seam EJB component into another Seam EJB component using @In, you
need to define this EJB reference in another location. This time, it must be defined in ejb-jar.xml, and
it's a bit tricker.
Within the context of an EJB method call, you have to deal with a somewhat sheltered JNDI context.
When Seam attempts to find another Seam EJB component to satisfy an injection point defined using
@In, whether or not it finds it depends on whether an EJB reference exists in
JNDI. Strictly speaking, you cannot simply resolve JNDI names as you please. You have to define
the references explicitly. Fortunately, JBoss recognized how aggrevating this would be for the
developer and all versions of JBoss automatically register EJBs so they are always available in
JNDI, both to the web container and the EJB container. So if you are using JBoss, you can skip the next
few paragraphs. However, if you are deploying to GlassFish, pay close attention.
For application servers that stubbornly adhere to the EJB specification, EJB references must always be defined explicitly. But unlike with the web context, where a single resource reference covers all uses of the EJB from the web environment, you cannot declare EJB references globally in the EJB container. Instead, you have to specify the JNDI resources for a given EJB component one-by-one.
Let's assume that we have an EJB named RegisterAction (the name is resolved using the three steps mentioned previously). That EJB has the following Seam injection:
@In(create = true)

Authenticator authenticator;
In order for this injection to work, the link must be established in the ejb-jar.xml file as follows:
<ejb-jar>

    <enterprise-beans>

        <session>

            <ejb-name>RegisterAction</ejb-name>

            <ejb-local-ref>

                <ejb-ref-name>myapp/AuthenticatorAction/local</ejb-ref-name>

                <ejb-ref-type>Session</ejb-ref-type>

                <local>com.example.myapp.Authenticator</local>

            </ejb-local-ref>

        </session>

    </enterprise-beans>


    ...


</ejb-jar>
Notice that the contents of the <ejb-local-ref> are identical to what we
defined in web.xml. What we are doing is bringing the reference into the EJB context where it can be
used by the RegisterAction bean. You will need to add one of these references for any injection of a
Seam EJB compoenent into another Seam EJB component using @In. (You can see an
example of this setup in the jee5/booking example).
But what about @EJB? It's true that you can inject one EJB into another using
@EJB. However, by doing so, you are injecting the actual EJB reference rather than the
Seam EJB component instance. In this case, some Seam features will work, while others won't. That's
because Seam's interceptor is invoked on any method call to an EJB component. But that only invokes
Seam's server-side interceptor chain. What you lose is Seam's state management and Seam's client-side
interceptor chain. Client-side interceptors handle concerns such as security and concurrency. Also, when
injecting a SFSB, there is no guarantee that you will get the SFSB bound to the active session or
conversation, whatever the case may be. Thus, you definitely want to inject the Seam EJB component using
@In.
That covers how JNDI names are defined and used. The lesson is that with some application servers, such as GlassFish, you are going to have to specify JNDI names for all EJB components explicitly, and sometimes twice! And even if you are following the same naming convention as JBoss AS, the JNDI pattern in Seam may need to be altered. For instance, the global JNDI names are automatically prefixed with java:comp/env on GlassFish, so you need to define the JNDI pattern as follows:
<core:init jndi-name="java:comp/env/earName/#{ejbName}/local" />
Finally, let's talk about transactions. In an EJB3 environment, we recommend the use of a special
built-in component for transaction management, that is fully aware of container transactions, and can
correctly process transaction success events registered with the Events component. If
you don't add this line to your components.xml file, Seam won't know when
container-managed transactions end:
<transaction:ejb-transaction/>
There is one final item you need to know about. You must place a seam.properties,
META-INF/seam.properties or META-INF/components.xml file in
any archive in which your Seam components are deployed (even an empty properties file will do). At
startup, Seam will scan any archives with seam.properties files for seam components.
In a web archive (WAR) file, you must place a seam.properties file in the
WEB-INF/classes directory if you have any Seam components included here.
That's why all the Seam examples have an empty seam.properties file. You can't
just delete this file and expect everything to still work!
You might think this is silly and what kind of idiot framework designers would make an empty file
affect the behavior of their software?? Well, this is a workaround for a limitation of the
JVM — if we didn't use this mechanism, our next best option would be to force you to list every
component explicitly in components.xml, just like some other competing frameworks do!
I think you'll like our way better.
Seam comes packaged and configured with Hibernate as the default JPA provider.
If you require using a different JPA provider you must tell seam
about it.
This is a workaround
Configuration of the JPA provider will be easier in the future and will not require configuration changes, unless you are adding a custom persistence provider implementation.
Telling seam about a different JPA provider can be be done in one of two ways:
Update your application's components.xml
so that the generic PersistenceProvider takes
precedence over the hibernate version. Simply add the following
to the file:
<component name="org.jboss.seam.persistence.persistenceProvider"

           class="org.jboss.seam.persistence.PersistenceProvider"

           scope="stateless">

</component>
If you want to take advantage of your JPA provider's
non-standard features you will need to write you own implementation of
the PersistenceProvider. Use
HibernatePersistenceProvider as a starting
point (don't forget to give back to the community :). Then you
will need to tell seam to use it as before.
<component name="org.jboss.seam.persistence.persistenceProvider"

           class="org.your.package.YourPersistenceProvider">

</component>
All that is left is updating the persistence.xml
file with the correct provider class, and what ever properties your
provider needs. Don't forget to package your new provider's jar files in the
application if they are needed.
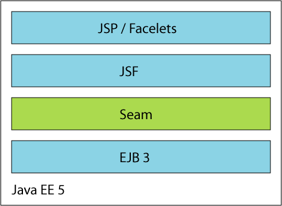
If you're running in a Java EE 5 environment, this is all the configuration required to start using Seam!
Once you've packaged all this stuff together into an EAR, the archive structure will look something like this:
my-application.ear/
    jboss-seam.jar
    lib/
        jboss-el.jar
    META-INF/
        MANIFEST.MF
        application.xml
    my-application.war/
        META-INF/
            MANIFEST.MF
        WEB-INF/
            web.xml
            components.xml
            faces-config.xml
            lib/
                jsf-facelets.jar
                jboss-seam-ui.jar
        login.jsp
        register.jsp
        ...
    my-application.jar/
        META-INF/
            MANIFEST.MF
            persistence.xml
        seam.properties
        org/
            jboss/
                myapplication/
                    User.class
                    Login.class
                    LoginBean.class
                    Register.class
                    RegisterBean.class
                    ...
You should declare jboss-seam.jar as an ejb module in META-INF/application.xml;
jboss-el.jar should be placed in the EAR's lib directory (putting it in the EAR classpath.
If you want to use jBPM or Drools, you must include the needed jars in the EAR's lib directory.
If you want to use facelets (our recommendation), you must include
jsf-facelets.jar in the WEB-INF/lib directory of the WAR.
If you want to use the Seam tag library (most Seam applications do), you must include
jboss-seam-ui.jar in the WEB-INF/lib directory of the WAR. If
you want to use the PDF or email tag libraries, you need to put jboss-seam-pdf.jar or
jboss-seam-mail.jar in WEB-INF/lib.
If you want to use the Seam debug page (only works for applications using facelets), you must include
jboss-seam-debug.jar in the WEB-INF/lib directory of the WAR.
Seam ships with several example applications that are deployable in any Java EE container that supports EJB 3.0.
I really wish that was all there was to say on the topic of configuration but unfortunately we're only about a third of the way there. If you're too overwhelmed by all this tedious configuration stuff, feel free to skip over the rest of this section and come back to it later.
Seam is useful even if you're not yet ready to take the plunge into EJB 3.0. In this case you would use Hibernate3 or JPA instead of EJB 3.0 persistence, and plain JavaBeans instead of session beans. You'll miss out on some of the nice features of session beans but it will be very easy to migrate to EJB 3.0 when you're ready and, in the meantime, you'll be able to take advantage of Seam's unique declarative state management architecture.

Seam JavaBean components do not provide declarative transaction demarcation like session beans do. You
could manage your transactions manually using the JTA
UserTransaction or declaratively using Seam's @Transactional
annotation. But most applications will just use Seam managed transactions when using Hibernate with
JavaBeans.
The Seam distribution includes a version of the booking example application that uses Hibernate3 and JavaBeans instead of EJB3, and another version that uses JPA and JavaBeans. These example applications are ready to deploy into any J2EE application server.
Seam will bootstrap a Hibernate SessionFactory from your
hibernate.cfg.xml file if you install a built-in component:
<persistence:hibernate-session-factory name="hibernateSessionFactory"/>
You will also need to configure a managed session if you want a Seam managed
Hibernate Session to be available via injection.
<persistence:managed-hibernate-session name="hibernateSession"

                            session-factory="#{hibernateSessionFactory}"/>
Seam will bootstrap a JPA EntityManagerFactory from your
persistence.xml file if you install this built-in component:
<persistence:entity-manager-factory name="entityManagerFactory"/>
You will also need to configure a managed persistence context if you want a
Seam managed JPA EntityManager to be available via injection.
<persistence:managed-persistence-context name="entityManager"

                            entity-manager-factory="#{entityManagerFactory}"/>
We can package our application as a WAR, in the following structure:
my-application.war/
    META-INF/
        MANIFEST.MF
    WEB-INF/
        web.xml
        components.xml
        faces-config.xml
        lib/
            jboss-seam.jar
            jboss-seam-ui.jar
            jboss-el.jar
            jsf-facelets.jar
            hibernate3.jar
            hibernate-annotations.jar
            hibernate-validator.jar
            ...
            my-application.jar/
                META-INF/
                   MANIFEST.MF
                seam.properties
                hibernate.cfg.xml
                org/
                    jboss/
                        myapplication/
                            User.class
                            Login.class
                            Register.class
                            ...
    login.jsp
    register.jsp
    ...
If we want to deploy Hibernate in a non-EE environment like Tomcat or TestNG, we need to do a little bit more work.
It is possible to use Seam completely outside of an EE environment. In this case, you need to tell Seam
how to manage transactions, since there will be no JTA available. If you're using JPA, you can tell
Seam to use JPA resource-local transactions, ie. EntityTransaction, like so:
<transaction:entity-transaction entity-manager="#{entityManager}"/>
If you're using Hibernate, you can tell Seam to use the Hibernate transaction API like this:
<transaction:hibernate-transaction session="#{session}"/>
Of course, you'll also need to define a datasource.
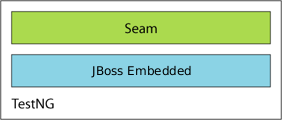
A better alternative is to use JBoss Embedded to get access to the EE APIs.
JBoss Embedded lets you run EJB3 components outside the context of the Java EE 5 application server. This is especially, but not only, useful for testing.
The Seam booking example application includes a TestNG integration test suite that runs on JBoss Embedded
via SeamTest.
The booking example application may even be deployed to Tomcat.
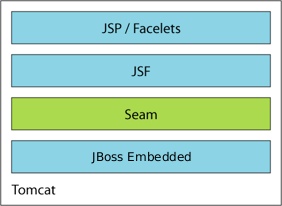
Embedded JBoss must by installed into Tomcat for Seam applications to run correctly on it. Embedded JBoss runs with JDK 5 or JDK 6 ( see Section 42.1, “JDK Dependencies” for details on using JDK 6). Embedded JBoss can be downloaded here. The process for installing Embedded JBoss into Tomcat 6 is quite simple. First, you should copy the Embedded JBoss JARs and configuration files into Tomcat.
Copy all files and directories under the Embedded JBoss
bootstrapandlibdirectories, except for thejndi.propertiesfile, into the Tomcatlibdirectory.Remove the
annotations-api.jarfile from the Tomcatlibdirectory.
Next, two configuration files need to be updated to add Embedded JBoss-specific functionality.
Add the Embedded JBoss listener
EmbeddedJBossBootstrapListenertoconf/server.xml. It must appear after all other listeners in the file:<Server port="8005" shutdown="SHUTDOWN">
<!-- Comment these entries out to disable JMX MBeans support used for the
administration web application -->
<Listener className="org.apache.catalina.core.AprLifecycleListener" />
<Listener className="org.apache.catalina.mbeans.ServerLifecycleListener" />
<Listener className="org.apache.catalina.mbeans.GlobalResourcesLifecycleListener" />
<Listener className="org.apache.catalina.storeconfig.StoreConfigLifecycleListener" />
  <!-- Add this listener -->

  <Listener className="org.jboss.embedded.tomcat.EmbeddedJBossBootstrapListener" />
WAR file scanning should be enabled by adding the
WebinfScannerlistener toconf/context.xml:<Context>
<!-- Default set of monitored resources -->
<WatchedResource>WEB-INF/web.xml</WatchedResource>
<!-- Uncomment this to disable session persistence across Tomcat restarts -->
<!--
<Manager pathname="" />
-->
  <!-- Add this listener -->

  <Listener className="org.jboss.embedded.tomcat.WebinfScanner" />
</Context>
If you are using Sun JDK 6, you need to set the Java option
sun.lang.ClassLoader.allowArraySyntaxtotruein the JAVA_OPTS environment variable used by the Catalina startup script (catalina.bat on Windows or catalina.sh on Unix).Open the script appropriate for your operating system in a text editor. Add a new line immediately below the comments at the top of the file where you will define the JAVA_OPTS environment variable. On Windows, use the following syntax:
set JAVA_OPTS=%JAVA_OPTS% -Dsun.lang.ClassLoader.allowArraySyntax=true
On Unix, use this syntax instead:
JAVA_OPTS="$JAVA_OPTS -Dsun.lang.ClassLoader.allowArraySyntax=true"
For more configuration options, please see the Embedded JBoss Tomcat integration wiki entry.
The archive structure of a WAR-based deployment on an servlet engine like Tomcat will look something like this:
my-application.war/
    META-INF/
        MANIFEST.MF
    WEB-INF/
        web.xml
        components.xml
        faces-config.xml
        lib/
            jboss-seam.jar
            jboss-seam-ui.jar
            jboss-el.jar
            jsf-facelets.jar
            jsf-api.jar
            jsf-impl.jar
            ...
            my-application.jar/
                META-INF/
                    MANIFEST.MF
                    persistence.xml
                seam.properties
                org/
                    jboss/
                        myapplication/
                            User.class
                            Login.class
                            LoginBean.class
                            Register.class
                            RegisterBean.class
                            ...
    login.jsp
    register.jsp
    ...
Most of the Seam example applications may be deployed to Tomcat by running ant
deploy.tomcat.
Seam's jBPM integration is not installed by default, so you'll need to enable jBPM by installing a
built-in component. You'll also need to explicitly list your process and pageflow definitions. In
components.xml:
<bpm:jbpm>

    <bpm:pageflow-definitions>

        <value>createDocument.jpdl.xml</value>

        <value>editDocument.jpdl.xml</value>

        <value>approveDocument.jpdl.xml</value>

    </bpm:pageflow-definitions>

    <bpm:process-definitions>

        <value>documentLifecycle.jpdl.xml</value>

    </bpm:process-definitions>

</bpm:jbpm>
No further special configuration is needed if you only have pageflows. If you do have business process
definitions, you need to provide a jBPM configuration, and a Hibernate configuration for jBPM. The Seam DVD
Store demo includes example jbpm.cfg.xml and hibernate.cfg.xml files
that will work with Seam:
<jbpm-configuration>


  <jbpm-context>

    <service name="persistence">

       <factory>

          <bean class="org.jbpm.persistence.db.DbPersistenceServiceFactory">

             <field name="isTransactionEnabled"><false/></field>

          </bean>

       </factory>

    </service>

    <service name="tx" factory="org.jbpm.tx.TxServiceFactory" />

    <service name="message" factory="org.jbpm.msg.db.DbMessageServiceFactory" />

    <service name="scheduler" factory="org.jbpm.scheduler.db.DbSchedulerServiceFactory" />

    <service name="logging" factory="org.jbpm.logging.db.DbLoggingServiceFactory" />

    <service name="authentication"

             factory="org.jbpm.security.authentication.DefaultAuthenticationServiceFactory" />

  </jbpm-context>


</jbpm-configuration>
The most important thing to notice here is that jBPM transaction control is disabled. Seam or EJB3 should control the JTA transactions.
There is not yet any well-defined packaging format for jBPM configuration and process/pageflow definition files. In the Seam examples we've decided to simply package all these files into the root of the EAR. In future, we will probably design some other standard packaging format. So the EAR looks something like this:
my-application.ear/
    jboss-seam.jar
    lib/
       jboss-el.jar
       jbpm-3.1.jar
    META-INF/
        MANIFEST.MF
        application.xml
    my-application.war/
        META-INF/
            MANIFEST.MF
        WEB-INF/
            web.xml
            components.xml
            faces-config.xml
            lib/
                jsf-facelets.jar
                jboss-seam-ui.jar
        login.jsp
        register.jsp
        ...
    my-application.jar/
        META-INF/
            MANIFEST.MF
            persistence.xml
        seam.properties
        org/
            jboss/
                myapplication/
                    User.class
                    Login.class
                    LoginBean.class
                    Register.class
                    RegisterBean.class
                    ...
    jbpm.cfg.xml
    hibernate.cfg.xml
    createDocument.jpdl.xml
    editDocument.jpdl.xml
    approveDocument.jpdl.xml
documentLifecycle.jpdl.xml It is very important that the timeout for Stateful Session Beans is set higher than the timeout for HTTP
Sessions, otherwise SFSB's may time out before the user's HTTP session has ended. JBoss Application Server
has a default session bean timeout of 30 minutes, which is configured in
server/default/conf/standardjboss.xml (replace default with your
own configuration).
The default SFSB timeout can be adjusted by modifying the value of max-bean-life in
the LRUStatefulContextCachePolicy cache configuration:
<container-cache-conf>

    <cache-policy>org.jboss.ejb.plugins.LRUStatefulContextCachePolicy</cache-policy>

    <cache-policy-conf>

        <min-capacity>50</min-capacity>

        <max-capacity>1000000</max-capacity>

        <remover-period>1800</remover-period>


        <!-- SFSB timeout in seconds; 1800 seconds == 30 minutes -->

        <max-bean-life>1800</max-bean-life>


        <overager-period>300</overager-period>

        <max-bean-age>600</max-bean-age>

        <resizer-period>400</resizer-period>

        <max-cache-miss-period>60</max-cache-miss-period>

        <min-cache-miss-period>1</min-cache-miss-period>

        <cache-load-factor>0.75</cache-load-factor>

    </cache-policy-conf>

</container-cache-conf>
The default HTTP session timeout can be modified in
server/default/deploy/jbossweb-tomcat55.sar/conf/web.xml for JBoss 4.0.x, or in
server/default/deploy/jboss-web.deployer/conf/web.xml for JBoss 4.2.x or later. The following
entry in this file controls the default session timeout for all web applications:
<session-config>

    <!-- HTTP Session timeout, in minutes -->

    <session-timeout>30</session-timeout>

</session-config>
To override this value for your own application, simply include this entry in your application's own
web.xml.
If you want to run your Seam application in a portlet, take a look at the JBoss Portlet Bridge, an implementation of JSR-301 that supports JSF within a portlet, with extensions for Seam and RichFaces. See http://labs.jboss.com/portletbridge for more.
Seam scans all jars containing /seam.properties,
/META-INF/components.xml or /META-INF/seam.properties
on startup for resources. For example, all classes annotated with
@Name are registered with Seam as Seam components.
You may also want Seam to handle custom resources. A common use case
is to handle a specific annotation and Seam provides specific
support for this. First, tell Seam which annotations to handle in
/META-INF/seam-deployment.properties:
# A colon-separated list of annotation types to handle
org.jboss.seam.deployment.annotationTypes=com.acme.Foo:com.acme.Bar
Then, during application startup you can get hold of all classes
annotated with @Foo:
@Name("fooStartup")
@Scope(APPLICATION)
@Startup
public class FooStartup {

   @In("#{deploymentStrategy.annotatedClasses['com.acme.Foo']}")
   private Set<Class<Object>> fooClasses;

   @In("#{hotDeploymentStrategy.annotatedClasses['com.acme.Foo']}")
   private Set<Class<Object>> hotFooClasses;

   @Create
   public void create() {
      for (Class clazz: fooClasses) {
         handleClass(clazz);
      }
      for (Class clazz: hotFooClasses) {
         handleClass(clazz);
      }
   }

   public void handleClass(Class clazz) {
       // ...
   }

}
You can also handle any resource. For example,
you process any files with the extension .foo.xml.
To do this, we need to write a custom deployment handler:
public class FooDeploymentHandler implements DeploymentHandler {
    private static DeploymentMetadata FOO_METADATA = new DeploymentMetadata()
    {

        public String getFileNameSuffix() {
            return ".foo.xml";
        }
    };

   public String getName() {
      return "fooDeploymentHandler";
   }

    public DeploymentMetadata getMetadata() {
        return FOO_METADATA;
    }
}
Here we are just building a list of any files with the suffix
.foo.xml.
Then, we need to register the deployment handler with Seam in
/META-INF/seam-deployment.properties.
You can register multiple deployment handler using a comma
separated list.
# For standard deployment
org.jboss.seam.deployment.deploymentHandlers=com.acme.FooDeploymentHandler
# For hot deployment
org.jboss.seam.deployment.hotDeploymentHandlers=com.acme.FooDeploymentHandler
Seam uses deployment handlers internally to install components and
namespaces. You can easily access the deployment handler during an
APPLICATION scoped component's startup:
@Name("fooStartup")
@Scope(APPLICATION)
@Startup
public class FooStartup {

   @In("#{deploymentStrategy.deploymentHandlers['fooDeploymentHandler']}")
   private FooDeploymentHandler myDeploymentHandler;

   @In("#{hotDeploymentStrategy.deploymentHandlers['fooDeploymentHandler']}")
   private FooDeploymentHandler myHotDeploymentHandler;

   @Create
   public void create() {
      for (FileDescriptor fd: myDeploymentHandler.getResources()) {
           handleFooXml(fd);
      }

      for (FileDescriptor f: myHotDeploymentHandler.getResources()) {
           handleFooXml(fd);
      }
   }

   public void handleFooXml(FileDescriptor fd) {
       // ...
   }
}