SeamとJBossWSを統合することで、標準のJEE のWebサービスにたいして、対話型Webサービスにも対応したSeamのコンテキストフレームワークを十分に活用することができます。本章では、Seam環境でWebサービスが動作するのに必要な手順を説明します。
Webサービス要求をSeamがインタセプトできるように、必要なSeamのコンテキストがその要求に合わせて生成できなければなりませんが、それにはSOAPハンドラを特別に設定する必要があります。org.jboss.seam.webservice.SOAPRequestHandlerはSOAPHandler実装として、Webサービス要求のスコープ中にSeamのライフサイクルを管理するのに使われています。
特殊な設定ファイルであるstandard-jaxws-endpoint-config.xmlは、Webサービスクラスを含むjarファイルのMETA-INFディレクトリに配置する必要があります。このファイルには、以下のようなSOAPハンドラの設定が含まれています。
<jaxws-config xmlns="urn:jboss:jaxws-config:2.0"

              xmlns:xsi="http://www.w3.org/2001/XMLSchema-instance"

              xmlns:javaee="http://java.sun.com/xml/ns/javaee"

              xsi:schemaLocation="urn:jboss:jaxws-config:2.0 jaxws-config_2_0.xsd">

   <endpoint-config>

      <config-name

>Seam WebService Endpoint</config-name>

      <pre-handler-chains>

         <javaee:handler-chain>

            <javaee:protocol-bindings

>##SOAP11_HTTP</javaee:protocol-bindings>

            <javaee:handler>

               <javaee:handler-name

>SOAP Request Handler</javaee:handler-name>

               <javaee:handler-class

>org.jboss.seam.webservice.SOAPRequestHandler</javaee:handler-class>

            </javaee:handler>

         </javaee:handler-chain>

      </pre-handler-chains>

   </endpoint-config>

</jaxws-config

>
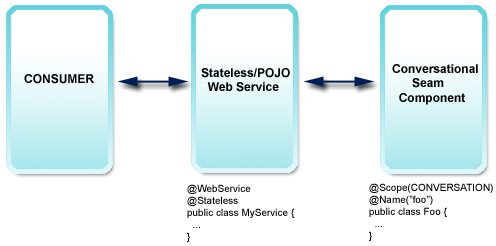
では、Webサービス要求間でどのように対話が伝播されているのでしょう? Seamでは、SOAP要求と応答メッセージの両方でSOAPヘッダー要素を使い、そのconversation IDをコンシューマからサービスへ、またサービスからコンシューマへと伝えています。以下はconversation IDを含むWebサービスの要求の一例です。
<soapenv:Envelope xmlns:soapenv="http://schemas.xmlsoap.org/soap/envelope/"

    xmlns:seam="http://seambay.example.seam.jboss.org/">

  <soapenv:Header>

    <seam:conversationId xmlns:seam='http://www.jboss.org/seam/webservice'

>2</seam:conversationId>

  </soapenv:Header>

  <soapenv:Body>

    <seam:confirmAuction/>

  </soapenv:Body>

</soapenv:Envelope

>
上記のSOAPメッセージで見られるように、SOAPヘッダー内にその要求のためのconversation ID(ここでは2)を持つconversationId要素があります。残念ながら、Webサービスを使うクライアントは多種多様で、なおかつさまざまな言語で記述されているため、ひとつの対話のスコープ内で使われると想定されるconversation IDの伝播をどのように実装するかは、個々のWebサービス間の開発者次第です。
ここで重要なのは、 conversationIdヘッダー要素はhttp://www.jboss.org/seam/webserviceの名前空間に適したものでなければいけません。そうでなければ、Seamはその要求からconversation IDを読み取ることができなくなってしまいます。上記の要求メッセージに対する応答の一例を以下に示します。
<env:Envelope xmlns:env='http://schemas.xmlsoap.org/soap/envelope/'>

  <env:Header>

    <seam:conversationId xmlns:seam='http://www.jboss.org/seam/webservice'

>2</seam:conversationId>

  </env:Header>

  <env:Body>

    <confirmAuctionResponse xmlns="http://seambay.example.seam.jboss.org/"/>

  </env:Body>

</env:Envelope

>
ここにあるように、応答メッセージには要求と同じconversationId要素が含まれています。
Webサービスの一例を見てみましょう。ここで例示するコードは、すべてSeamの/examplesディレクトリにあるseamBayの例から引用したもので、前節で述べた推奨される方法に添っています。まず、Webサービスのクラスとそのメソッドから見てみましょう。
@Stateless

@WebService(name = "AuctionService", serviceName = "AuctionService")

public class AuctionService implements AuctionServiceRemote

{

   @WebMethod

   public boolean login(String username, String password)

   {

      Identity.instance().setUsername(username);

      Identity.instance().setPassword(password);

      Identity.instance().login();

      return Identity.instance().isLoggedIn();

   }


   // snip

}
ここで、WebサービスはステートレスセッションBeanで、JSR-181で定義されている通り、javax.jwsパッケージのJWSアノテーションを使ってアノテートされています。@WebServiceアノテーションは、このクラスがWebサービスを実装していることをコンテナに伝えます。そして、 login()メソッドの@WebMethodアノテーションがWebサービスとしてのメソッドを定義しています。@WebServiceアノテーションのnameとserviceName属性はオプションです。
仕様書にある通り、Webサービスのメソッドとして指定された各メソッドは、そのWebサービスのクラスのリモートインタフェース中でも宣言しておく必要があります。(WebサービスがステートレスセッションBeanの場合) 上記の例では、AuctionServiceRemoteインタフェースが@WebMethodとしてアノテートされているため、login()メソッドを宣言しなければなりません。
上記のコードにあるように、Webサービスが実装するlogin()メソッドは、Seamの組み込みIdentityコンポーネントに委譲されています。前節で推奨した方法を踏まえると、単にファサードとして記述されたWebサービスは、実際の作業をSeamコンポーネントに流します。これによって、Webサービスとクライアント間でビジネスロジックを最大限に再利用できます。
もう一つの例を見てみましょう。このWebサービスメソッドは、AuctionAction.createAuction()メソッドに委譲されることで新しい対話が始まります。
   @WebMethod

   public void createAuction(String title, String description, int categoryId)

   {

      AuctionAction action = (AuctionAction) Component.getInstance(AuctionAction.class, true);

      action.createAuction();

      action.setDetails(title, description, categoryId);

   }
以下は、AuctionActionからのコードです。
   @Begin

   public void createAuction()

   {

      auction = new Auction();

      auction.setAccount(authenticatedAccount);

      auction.setStatus(Auction.STATUS_UNLISTED);

      durationDays = DEFAULT_AUCTION_DURATION;

   }
これにより、Webサービスがファサードとして実際の作業を対話型Seamコンポーネントに委譲することで、長い対話を続けていることが判ります。
SeamはJAX-RS 仕様(JSR 311)にあるRESTEasyの実装を組み込んでいます。これをSeamアプリケーションのどこまで”深く”取り入れるかは、以下のように自分で設定することができます。
RESTEasy ブートストラップと設定をシームレスに組み込み、リソースとプロバイダを自動検出。
SeamResourceServlet によりHTTP/REST 要求を処理し、外部サーブレットやweb.xml での設定は不要。
Seam コンポーネントとしてリソースを記述することで、Seamのライフサイクル管理とインタセプション(バイジェクション)をすべて利用可能。
First, get the RESTEasy libraries and the jaxrs-api.jar, deploy them with the other libraries of your application. Also deploy the integration library, jboss-seam-resteasy.jar.
起動時には、@javax.ws.rs.Pathでアノテートされた全クラスが自動的に検出され、HTTPリソースとして登録されます。Seamは組み込まれたSeamResourceServletを使って自動的にHTTP要求を処理します。リソースのURIは以下のようにビルドされます。
一般的な例に合わせて説明すると、URIは
SeamResourceServletに対してweb.xml内でマップしてあるパターン(例えば、/seam/resource)で始まります。ベースが異なる場合、RESTful リソースが処理されるように、この設定を変更してください。この変更はグローバルなものなので、他のSeamリソース(例えば、s:graphicImage)もそのベースパスで処理されることに注意してください。次にSeamのRESTEasy の組み込みで、このベースパスに任意の文字列を追加します。デフォルトでは
/restになっています。従って、この例の場合、リソースのフルベースパスは/seam/resource/restになります。アプリケーションで使う場合、例えば将来的にそのサービスのREST API をアップグレードすることを考慮して、バージョン番号を追加する等して(/seam/resource/restv1)、この文字列は変えておいたほうが良いでしょう。(古いクライアントは元のURIベースを保持します)これで、 実際のリソースは定義した
@Path以下で利用できるようになります。例えば、@Path("/customer")でマップしたリソースは、/seam/resource/rest/customer以下で利用できます。
一例として、以下のリソース定義ではhttp://your.hostname/seam/resource/rest/customer/123というURIを使った、いかなるGET要求に対してもプレーンテキスト表示を返します。
@Path("/customer")

public class MyCustomerResource {


    @GET

    @Path("/{customerId}")

    @Produces("text/plain")

    public String getCustomer(@PathParam("customerId") int id) {

         return ...;

    }


}
他に設定する必要はありません。つまり、以上のようにデフォルトで問題なければ、web.xmlや他の設定を変更する必要はありません。あるいは、自分のSeamアプリケーションのRESTEasyの設定を変えても良いでしょう。まず、resteasy名前空間をXML設定ファイルのヘッダーにインポートします。
<components

   xmlns="http://jboss.com/products/seam/components"

   xmlns:resteasy="http://jboss.com/products/seam/resteasy"

   xmlns:xsi="http://www.w3.org/2001/XMLSchema-instance"

   xsi:schemaLocation=

     http://jboss.com/products/seam/resteasy

         http://jboss.com/products/seam/resteasy-2.1.xsd

     http://jboss.com/products/seam/components

         http://jboss.com/products/seam/components-2.1.xsd"

>
次に、先に述べたように/restプレフィックスを変更できます。
<resteasy:application resource-path-prefix="/restv1"/>
この場合、リソースへのフルベースパスは/seam/resource/restv1/{resource}になります。ここで@Pathの定義とマッピングは変更しません。これは通常HTTP APIのバージョニングに使われる、アプリケーション全体のスイッチです。
リソース中においてフルパスでマップしたい場合は、ベースパスのストリッピングを無効にすることができます。
<resteasy:application strip-seam-resource-path="false"/>
これにより、リソースのパスは、例えば@Path("/seam/resource/rest/customer")でマップされています。この場合、リソースクラスのマッピングは、特定のデプロイメントシナリオに制限されるので、この機能は無効にしないほうが良いでしょう。
デプロイされたすべての@javax.ws.rs.Pathリソースおよび@javax.ws.rs.ext.Providerクラスに対し、Seamはクラスパスをスキャンします。このスキャンを無効化し、マニュアルでクラスを設定することもできます。
<resteasy:application

     scan-providers="false"

     scan-resources="false"

     use-builtin-providers="true">


     <resteasy:resource-class-names>

         <value>org.foo.MyCustomerResource</value>

         <value>org.foo.MyOrderResource</value>

         <value>org.foo.MyStatelessEJBImplementation</value>

     </resteasy:resource-class-names>


     <resteasy:provider-class-names>

         <value>org.foo.MyFancyProvider</value>

     </resteasy:provider-class-names>


 </resteasy:application>
use-built-in-providersは、RESTEasy組み込みプロバイダを有効もしくは無効にします。(デフォルトでは有効) プレーンテキストやJSON、JAXBをそのままで整列化できるので、この機能は有効にしておくと良いでしょう。
RESTEasy supports plain EJBs (EJBs that are not Seam components) as resources. Instead of configuring the JNDI names in a non-portable fashion in web.xml (see RESTEasy documentation), you can simply list the EJB implementation classes, not the business interfaces, in components.xml as shown above. Note that you have to annotate the @Local interface of the EJB with @Path, @GET, and so on - not the bean implementation class. This allows you to keep your application deployment-portable with the global Seam jndi-pattern switch on <core:init/>. Note that EJB resources will not be found even if scanning of resources is enabled, you always have to list them manually. Again, this is only relevant for EJB resources that are not also Seam components and that do not have a @Name annotation.
最後に、メディアタイプと言語のURI拡張子を設定できます。
<resteasy:application>


    <resteasy:media-type-mappings>

       <key>txt</key><value>text/plain</value>

    </resteasy:media-type-mappings>


    <resteasy:language-mappings>

       <key>deutsch</key><value>de-DE</value>

    </resteasy:language-mappings>


</resteasy:application>
この定義によって、.txt.deutsch というURIサフィックスに、付加的なAcceptおよびAccept-Languageのヘッダー値であるtext/plainとde-DEをマップすることができます。
どのリソースやプロバイダのインスタンスも、デフォルトでRESTEasyで管理されています。つまり、あるリソースのクラスをRESTEasyがインスタンス化し、ある要求が処理された後に、そのクラスは破棄されます。これがデフォルトのJAX-RSのライフサイクルになっています。プロバイダに関しては、アプリケーション全体に対して一度インスタンス化され、効率的に、シングルトンとなり、またステートレスになるよう想定されています。
リソースやプロバイダをSeamコンポーネントとして記述することもできます。こうすることでSeamのより豊富なライフサイクル管理のほか、バイジェクションやセキュリティ等のインタセプションを利用することができます。リソースのクラスをSeamコンポーネントにするのは簡単で、以下のようにします。
@Name("customerResource")

@Path("/customer")

public class MyCustomerResource {


    @In

    CustomerDAO customerDAO;


    @GET

    @Path("/{customerId}")

    @Produces("text/plain")

    public String getCustomer(@PathParam("customerId") int id) {

         return customerDAO.find(id).getName();

    }


}
An instance of customerResource is now handled by Seam when a request hits the server. This is a Seam JavaBean component that is EVENT-scoped, hence no different than the default JAX-RS lifecycle. You get full Seam injection and interception support, and all other Seam components and contexts are available to you. Currently also supported are APPLICATION and STATELESS resource Seam components. These three scopes allow you to create an effectively stateless Seam middle-tier HTTP request-processing application.
You can annotate an interface and keep the implementation free from JAX-RS annotations:
@Path("/customer")

public interface MyCustomerResource {


    @GET

    @Path("/{customerId}")

    @Produces("text/plain")

    public String getCustomer(@PathParam("customerId") int id);


}
@Name("customerResource")

@Scope(ScopeType.STATELESS)

public class MyCustomerResourceBean implements MyCustomerResource {


    @In

    CustomerDAO customerDAO;


    public String getCustomer(int id) {

         return customerDAO.find(id).getName();

    }


}
You can use SESSION-scoped Seam components. By default, the session will however be shortened to a single request. In other words, when an HTTP request is being processed by the RESTEasy integration code, an HTTP session will be created so that Seam components can utilize that context. When the request has been processed, Seam will look at the session and decide if the session was created only to serve that single request (no session identifier has been provided with the request, or no session existed for the request). If the session has been created only to serve this request, the session will be destroyed after the request!
Assuming that your Seam application only uses event, application, or stateless components, this procedure prevents exhaustion of available HTTP sessions on the server. The RESTEasy integration with Seam assumes by default that sessions are not used, hence anemic sessions would add up as every REST request would start a session that will only be removed when timed out.
If your RESTful Seam application has to preserve session state across REST HTTP requests, disable this behavior in your configuration file:
<resteasy:application destroy-session-after-request="false"/>
Every REST HTTP request will now create a new session that will only be removed by timeout or explicit invalidation in your code through Session.instance().invalidate(). It is your responsibility to pass a valid session identifier along with your HTTP requests, if you want to utilize the session context across requests.
CONVERSATION-scoped resource components and mapping of conversations to temporary HTTP resources and paths is planned but currently not supported.
EJB Seam components are supported. Always annotate the local business interface, not the EJB implementation class, with JAX-RS annotations. The EJB has to be STATELESS.
Provider classes can also be Seam components, only APPLICATION-scoped provider components are supported. You can annotate the bean interface or implementation with JAX-RS annotations. EJB Seam components as providers are currently NOT supported, only POJOs!
You can enable the Seam authentication filter for HTTP Basic and Digest authentication in components.xml:
<web:authentication-filter url-pattern="/seam/resource/rest/*" auth-type="basic"/>
See the Seam security chapter on how to write an authentication routine.
After successful authentication, authorization rules with the common @Restrict and @PermissionCheck annotations are in effect. You can also access the client Identity, work with permission mapping, and so on. All regular Seam security features for authorization are available.
Section 3.3.4 of the JAX-RS specification defines how checked or unchecked exceptions are handled by the JAX RS implementation. In addition to using an exception mapping provider as defined by JAX-RS, the integration of RESTEasy with Seam allows you to map exceptions to HTTP response codes within Seam's pages.xml facility. If you are already using pages.xml declarations, this is easier to maintain than potentially many JAX RS exception mapper classes.
Exception handling within Seam requires that the Seam filter is executed for your HTTP request. Ensure that you do filter all requests in your web.xml, not - as some Seam examples might show - a request URI pattern that doesn't cover your REST request paths. The following example intercepts all HTTP requests and enables Seam exception handling:
<filter>

    <filter-name>Seam Filter</filter-name>

    <filter-class>org.jboss.seam.servlet.SeamFilter</filter-class>

</filter>


<filter-mapping>

    <filter-name>Seam Filter</filter-name>

    <url-pattern>/*</url-pattern>

</filter-mapping>
To convert the unchecked UnsupportedOperationException thrown by your resource methods to a 501 Not Implemented HTTP status response, add the following to your pages.xml descriptor:
<exception class="java.lang.UnsupportedOperationException">

    <http-error error-code="501">

        <message>The requested operation is not supported</message>

    </http-error>

</exception>
Custom or checked exceptions are handled the same:
<exception class="my.CustomException" log="false">

    <http-error error-code="503">

        <message>Service not available: #{org.jboss.seam.handledException.message}</message>

    </http-error>

</exception>
You do not have to send an HTTP error to the client if an exception occurs. Seam allows you to map the exception as a redirect to a view of your Seam application. As this feature is typically used for human clients (web browsers) and not for REST API remote clients, you should pay extra attention to conflicting exception mappings in pages.xml.
Note that the HTTP response still passes through the servlet container, so an additional mapping might apply if you have <error-page> mappings in your web.xml configuration. The HTTP status code would then be mapped to a rendered HTML error page with status 200 OK!
Seam includes an extended unit testing superclass that helps you in creating unit tests for a RESTful architecture. Extend the ResourceSeamTest class to emulate HTTP requests/response cycles:
import org.jboss.seam.resteasy.testfwk.ResourceSeamTest;

import org.jboss.seam.resteasy.testfwk.MockHttpServletResponse;

import org.jboss.seam.resteasy.testfwk.MockHttpServletRequest;


public class MyTest extends ResourceSeamTest {


   @Override

   public Map<String, Object> getDefaultHeaders()

   {

      return new HashMap<String, Object>()

      {{

            put("Accept", "text/plain");

      }};

   }


   @Test

   public void test() throws Exception

   {

      new ResourceRequest(Method.GET, "/my/relative/uri)

      {


         @Override

         protected void prepareRequest(MockHttpServletRequest request)

         {

            request.addQueryParameter("foo", "123");

            request.addHeader("Accept-Language", "en_US, de");

         }


         @Override

         protected void onResponse(MockHttpServletResponse response)

         {

            assert response.getStatus() == 200;

            assert response.getContentAsString().equals("foobar");

         }


      }.run();

   }


}
This test only executes local calls, it does not communicate with the SeamResourceServlet through TCP. The mock request is passed through the Seam servlet and filters and the response is then available for test assertions. Overriding the getDefaultHeaders() method allows you to set request headers for every test method in the test class.
Note that a ResourceRequest has to be executed in a @Test method or in a @BeforeMethod callback. You can and should not execute it in any other callback, such as @BeforeClass. (This is an implementation limitation we will remove in a future update.)
Also note that the imported mock objects are not the same as the mock objects you use in other Seam unit tests, which are in the package org.jboss.seam.mock. The org.jboss.seam.resteasy.testfwk variations mimic real requests and responses much more closely.