Salesforce metadata is structured relationally. Salesforce Objects and the fields on those objects are analogous to relational tables and columns. Because of this similarity, the modeling of Salesforce metadata and interaction with the data through standard SQL is easily accomplished within Teiid. However, the properties of the objects in a Salesforce application are not an exact match to the properties that are available on the standard Teiid Relational Table and Column. In order to bridge the gap between these metadata properties, integration with Salesforce requires extensions to the standard Teiid Relational Base Table and Column. The extensions required are created within the Model Project by the Salesforce Importer and appropriate values are set into these properties by the importer.
The Salesforce Importer will model the unique metadata that is exposed to it by the Salesforce API as determined by the credentials used in the importer. Users with different profiles within the same Salesforce instance may be authorized to see different subsets of the applications metadata and data. Keep this in mind when binding a connector to the model. You must ensure that the credentials used in the binding have access to all of the data that is exposed in the model, or exceptions will occur. The importer also understands customizations that have been made to applications and will model them as well.
Select File->Import to display the Wizard Selection Dialog.
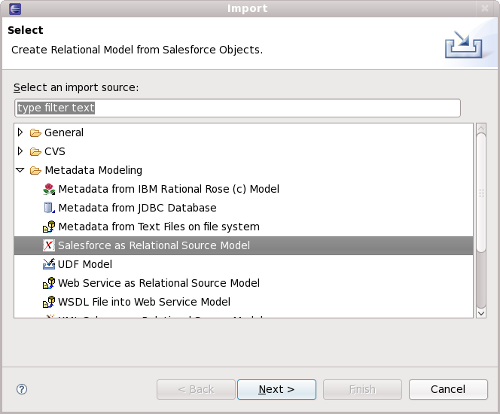
Select Salesforce as Relational Source Model from in the list displayed and click Next. The Salesforce Importer is displayed.
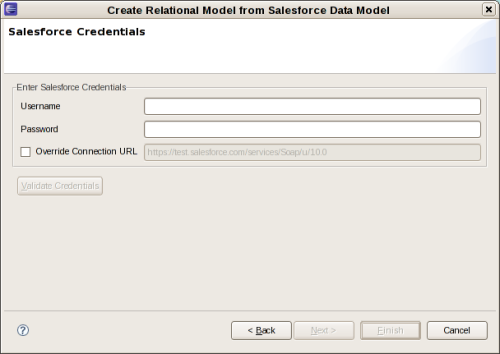
Enter a valid Username and Password into the text fields and click Validate Credentials. If you are connecting to a sandbox instance of a Salesforce application, enable the Override Connection URL textbox and enter the URL to the sandbox instance. The default value will probably be correct in most instances. After the Username and Password are supplied, the Validate Credentials button will be come active and you click this button to validate the connection parameters and enable the Next Button. After clicking Next the Salesforce Objects page is displayed.
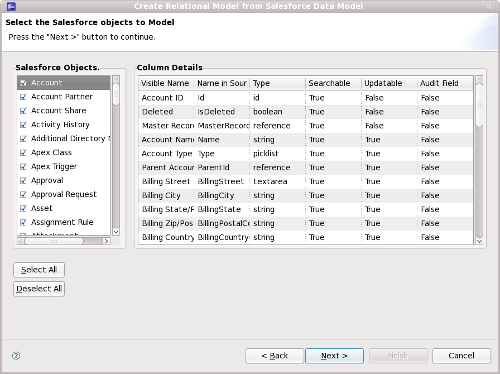
In the left column the Salesforce objects in the system are listed and can be selected for modeling. Each object selected will be modeled as a Table. In the Column Details table metadata from the fields on the currently selected object are displayed, and these will be modeled as columns on the tables.
When you have selected all of the Salesforce objects that you wish to model, click Next. The Target Model Selection page will be displayed.
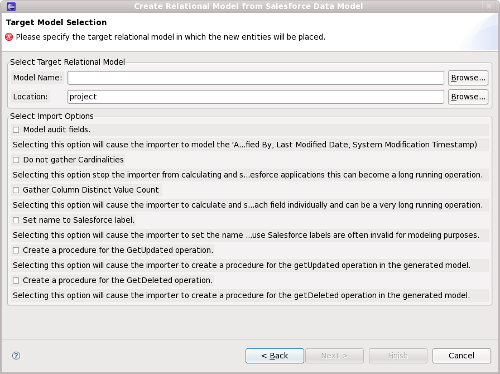
Select the model name, location, and options.
Model Name: type the name of the new model to be created, or browse to select an preexisting model to update.
Location: type or browse to the location of the model project to create the model in.
Model audit fields: each Salesforce object has fields that track changes to the object, such as LastModifiedDate and CreateById. These fields are know as audit fields. Because each object in the application has these fields, and some of these fields have relations to other Salesforce objects, modeling these fields can cause a model to be congested with relations. If you do not plan to use a model to query audit data, you probably want to suppress modeling of these fields. Checking this box will override the default behavior and will model the audit fields.
Do not gather Cardinalities: by default the importer will calculate the table cardinalites. Cardinality metadata can greatly improve query performance, but it may take the importer some time calculate this information. Checking this box will suppress the calculation of cardinalities.
Gather Column Distinct Value Count: by default the importer does not calculate column distinct value counts. Checking this box will cause the importer to calculate these values. This can be an extremely long running operation.
Set name to Salesforce Label: each Salesforce object has a label (user visible name) that can be modified, and names (the fixed internal name). By default the importer will use the name when modeling objects. Checking this box will cause the importer to use the label as the table name.
Create a procedure for the GetUpdated operation: checking this box will cause the importer to create a procedure for the getUpdated operation in the generated model.
Create a procedure for the GetDeleted operation: checking this box will cause the importer to create a procedure for the getDeleted operation in the generated model.
Click Finish.
After the Salesforce Importer has finished, you will find two new models created in your model project. One will have the name you supplied in the last page of the importer, and the other will be named SalesforceExtensions.xmi.
The SalesforceExtensions.xmi model contains the extensions to the standard relational model. These extensions enable the model to provided enhanced data to the Salesforce Connector at query time. For example, some objects in Salesforce do not support the query operation. In order to enforce this limitation the extension model defined a Supports Query property, and the Salesforce Importer enters the correct value into this property for each Table. The Salesforce Connector validates that each table included in a query operation has the value true for this property before executing a query and will throw and exception in the event that the table is not querable.
The other model created by the importer contains the model of the data in the Salesforce instance that you selected in the importer. This is the model you will execute your SQL statements against.