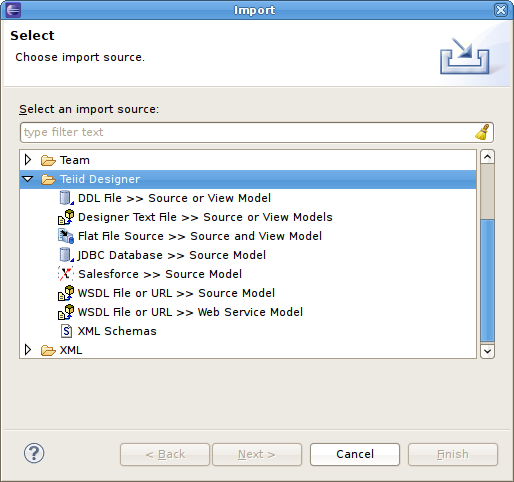
The Import Wizard provides a means to create a model based on the structure of a data source, to convert existing metadata (i.e. WSDL or XML Schema) into a source model or to load existing metadata files into the current VDB.
To launch the Import Wizard, choose the File > Import action or select a project, folder or model in the tree and right-click choose "Import..."
Source relational models can be created by importing DDL.
You can create relational source models from your DDL using the steps below.
Step 1 - In Model Explorer choose the File > Import action
 in the toolbar or select a project, folder or
model in the tree and choose Import...
in the toolbar or select a project, folder or
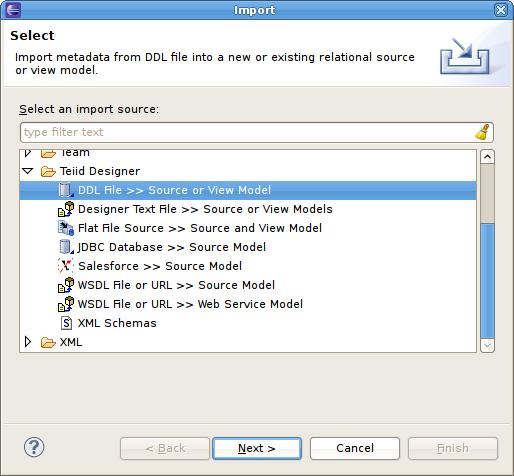
model in the tree and choose Import...Step 2 - Select the import option Teiid Designer > DDL File >> Source or View Model and click Next>
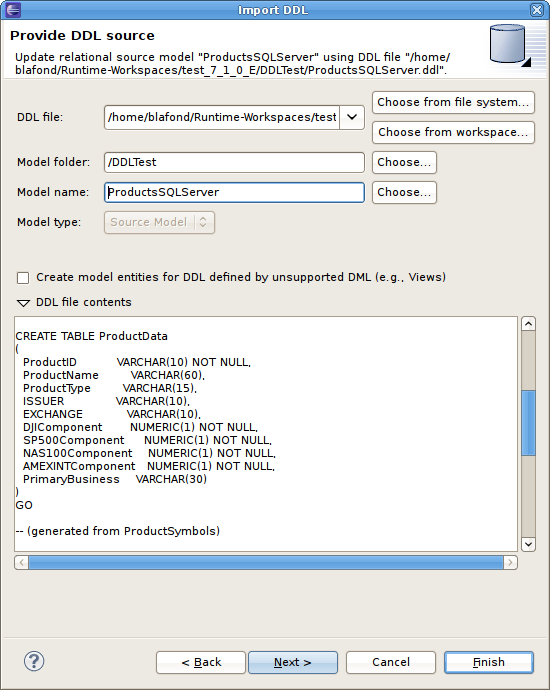
Step 3 - Select existing DDL from either or . set the Model folder location, enter or select valid model name, set Model type (Source Model or View Model), set desired options and click NEXT> (or FINISH> if enabled)
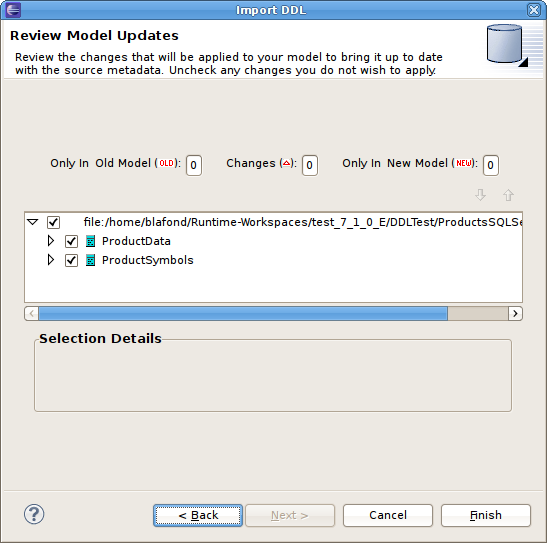
Step 4 - If NEXT> is pressed, a difference report is presented for viewing or de-selecting individual relational entities. Press FINISH> to complete.
You can create relational source models from your JDBC source schema data using the steps below.
Note
Depending the detail provided in the database connection url information and schema, Steps 5 through 7 may not be required.
Step 1 - In Model Explorer choose the File > Import action
in the toolbar or select a project, folder or
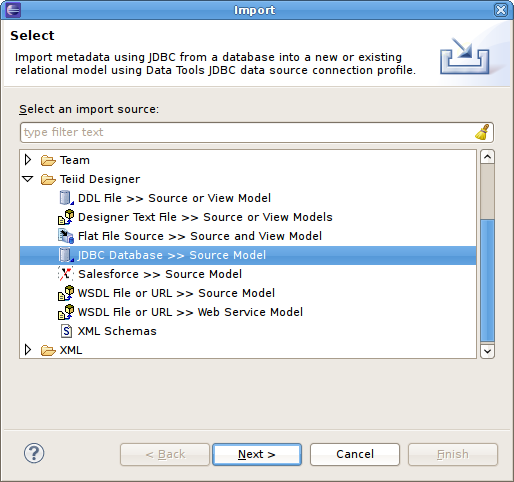
model in the tree and choose Import...Step 2 - Select the import option Metadata Modeling > JDBC Database >> Source Model and click Next>
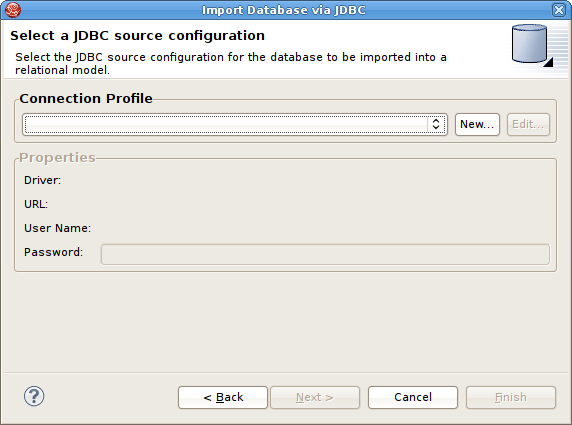
Step 3 - Select existing or previous connection profile from the drop-down selector or press button to launch the New Connection Profile dialog (See Eclispe Data Tools documentation) or to modify/change an existing connection profile prior to selection. Note that the Connection Profile selection list will be populated with only JDBC Database connections.
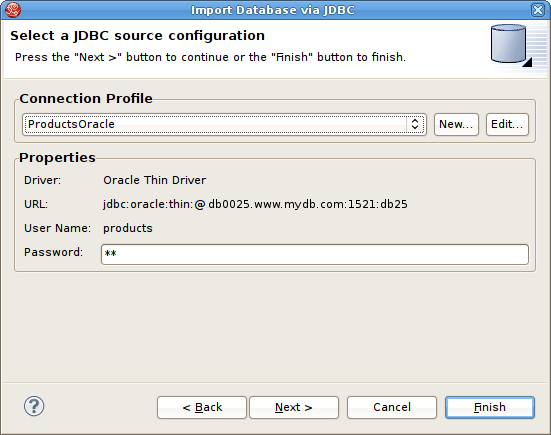
Step 4 - After selecting a Connection Profile, input password (if not provided). Press Next> (or Finish> if enabled)
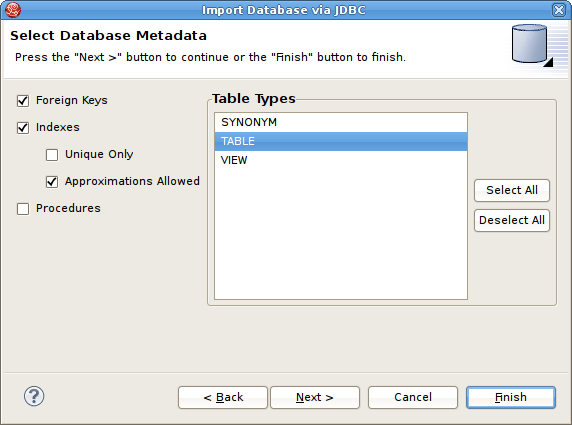
Step 5 - On the Select Database Metadata page, select the types of objects in the database to import. Press Next> (or Finish> if enabled).
Step 6 - On the Select Database Objects page, view the contents of the schema, or change selections. Select which database schema objects will be used to construct relational objects. Press Next> (or Finish> if enabled)
Step 7 - On the Specify Import Options page, specify desired Model Name as well as any other options used to customize the constructed relational objects. Press Finish> to complete.

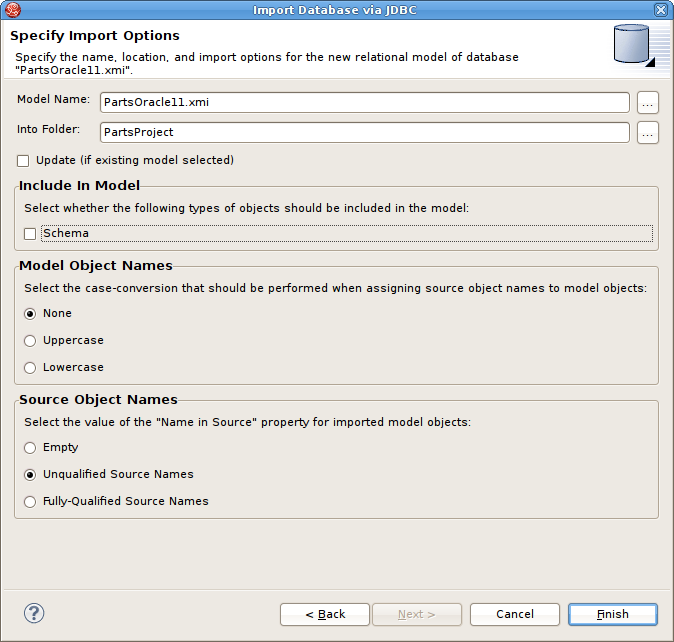
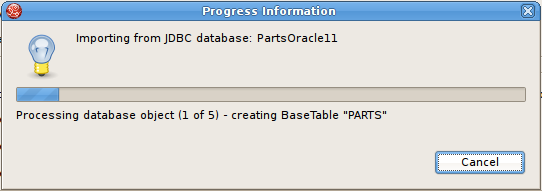
During the Finish processing, a monitor will be displayed providing feedback on the import progress.
You can import metadata from your flat file data sources and create the metmodels required to query your data in minutes. Using the steps below you will define your flat file data source, configure your parsing paramaters for the flat file, generate a source model containing the standard Teiid flat file procedures and create view tables containing the SQL defining the column data in your flat file.
Teiid supports Flat Files as data sources. In release 7.5, Teiid Designer introduces a new Import wizard designed to assist in creating the metadata models required to access the data in your flat files. As with Designer's JDBC, Salesforce and WSDL importers, the Flat File importer is based on utilizing a specific Data Tools Connection Profile.
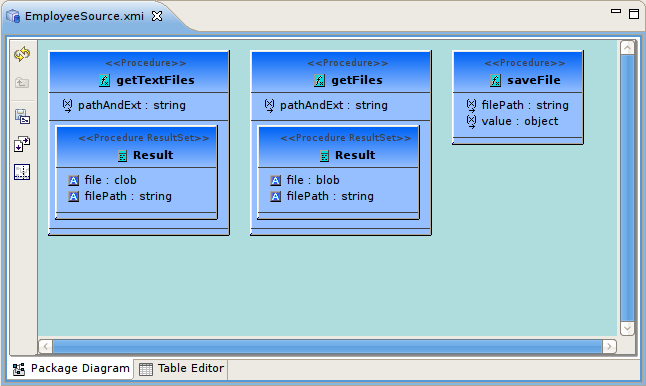
The results of the importer will include a source model containing the three Flat File procedures supported by Teiid. Namely:
getFiles()
getTextFiles()
saveFile()
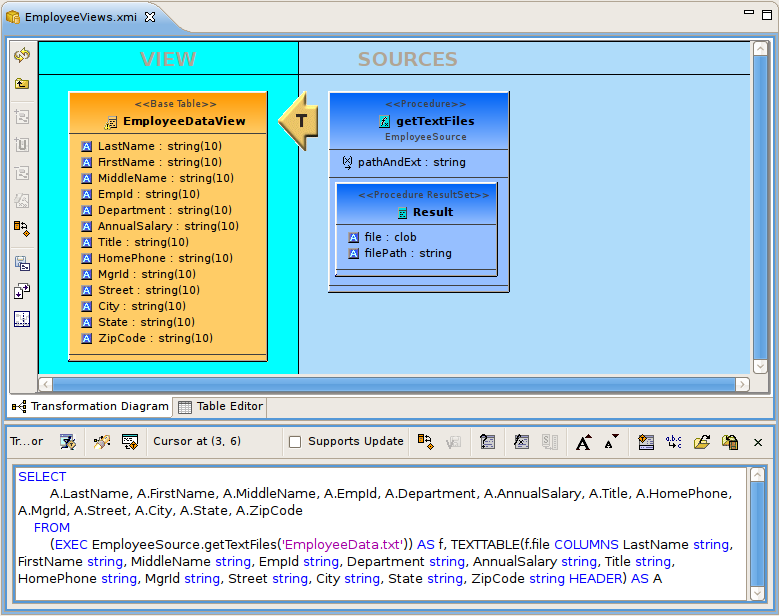
The importer will also create a new view model containing a view table for each of your selected flat file source files. Within these view tables will be generated SQL transformations containing the "getTextFiles()" procedure from your source model as well as the column definitions and parameters required for the Teiid TEXTTABLE() function used to query the data file. You can also choose to update an existing view model instead of creating a new view model.
The TEXTTABLE function, as defined in the Teiid documentation, processes character input to produce tabular ouptut. It supports both fixed and delimited file format parsing. The function itself defines what columns it projects. The TEXTTABLE function is implicitly a nested table and may be correlated to preceeding FROM clause entries.
TEXTTABLE(expression COLUMNS <COLUMN>, ... [DELIMITER char] [(QUOTE|ESCAPE) char]
[HEADER [integer]] [SKIP integer]) AS name
Teiid Designer will construct the full SQL statement for each view table in the form:
SELECT
	A.Name, A.Sport, A.Position, A.Team, A.City, A.StateCode, A.AnnualSalary
FROM
	(EXEC PlayerDataSource.getTextFiles('PlayerData.txt')) AS f,
	 TEXTTABLE(f.file COLUMNS Name string, Sport string, Position string,
	 Team string, City string, StateCode string, AnnualSalary string
	 HEADER 2 SKIP 3) AS A
Step 1 - In Model Explorer choose the File > Import action
in the toolbar or select a project, folder or
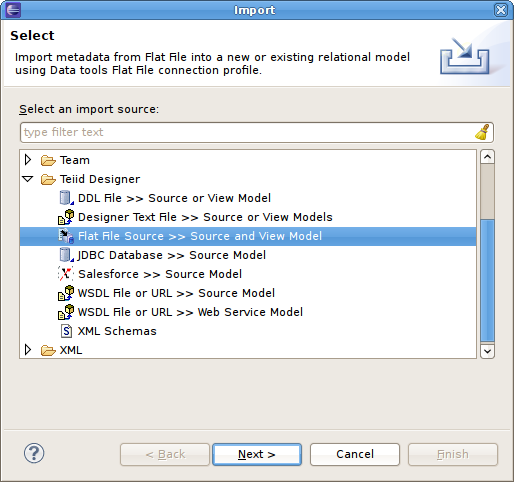
model in the tree and choose Import...Step 2 - Select the import option Teiid Designer > Flat File Source >> Source and View Model and click Next>
Step 3 - Select existing or previous connection profile from the drop-down selector or press button to launch the New Connection Profile dialog (See Eclispe Data Tools documentation) or to modify/change an existing connection profile prior to selection. Note that the Flat File Source selection list will be populated with only Flat File connection profiles.
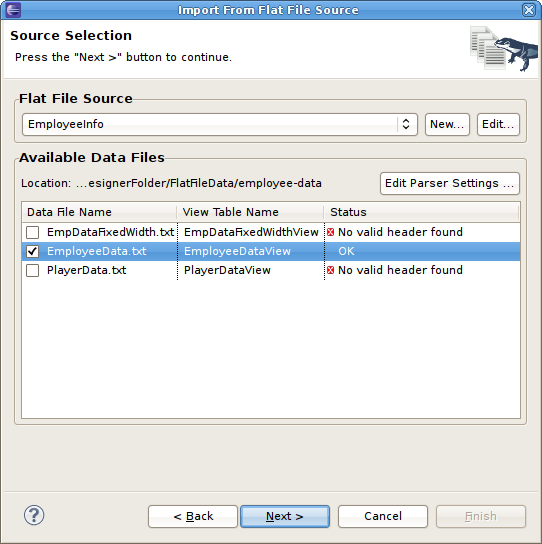
Step 3a - After selecting a Connection Profile, the file contents of the folder defined in the connection profile will be displayed in the Available Data Files panel. Check each data file you wish to process. Each file will be used to construct a view table containing the required SQL transformation for retrieving your data and returning a result set.
Each data file will analized and validated based on a set of parser settings. You can view the details via the Edit Parser Settings... button. If the validation fails, an Error Status will be displayed instead of OK and you will be required to fix the errors in order to proceed with importing that data file. You are encouraged to view the parser settings for ALL your data files to insure that header information, column names etc. are what you expect.
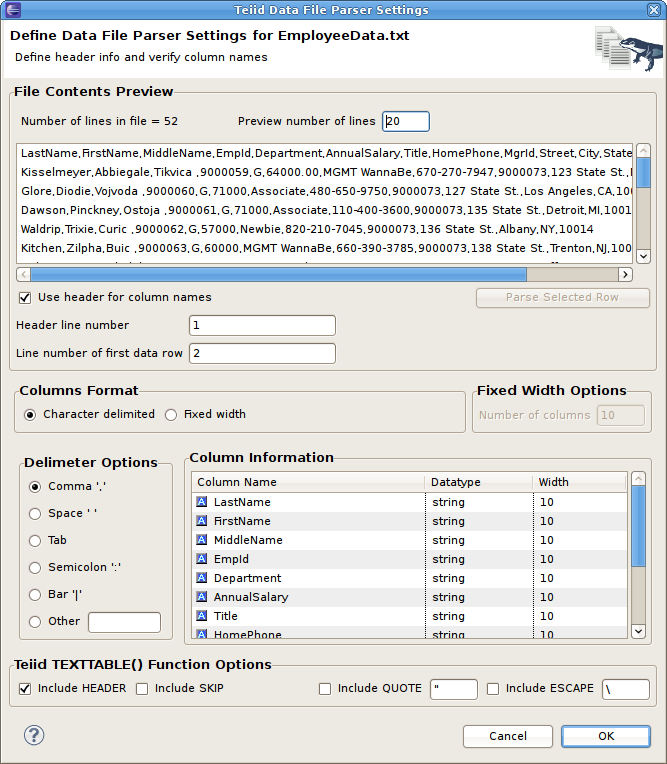
The Teiid Data File Parser Settings dialog, shown below, contains the various parser settings and TEXTTABLE() method and parameter options. The File Contents Preview section displays a portion of the raw file contents. If your data is character delimited (default), choose the delimiter character in Delimiter Options section. If User header for column names check-box is selected, the dialog will attempt to parse the header line and extract your column names. If Fixed Width option is selected, no header is expected and you are requried to specifiy the number of data columns, their names, data types and width of each column.
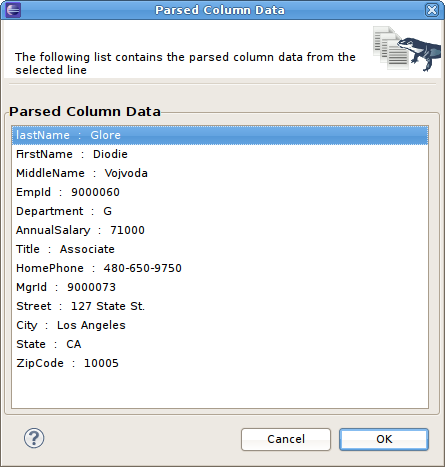
Step 3b - To aid in determining if your parser settings are correct you can select a data row in your File Contents Preview section and click the Parse Selected Row button. A dialog will be displayed showing the list of columns and the resulting column data. If your column data is not what you expected, you'll need to adjust your settings accordingly.
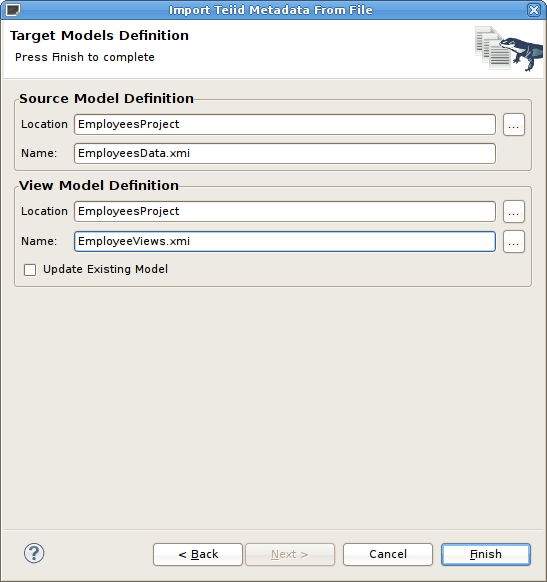
Step 4 - On the Target Models Definition page, select the target folder locations where your new source and view models will be created. In the case of the view model, you can also select an existing model for your new view tables. In this case the Update Existing Model option will be selected. Press Finish> to generate your models and finish the wizard.
When your import is finished your source model will be opened in an editor and show a diagram containing the three generated flat file procedures.
In addition, the view model will be opened in an editor and will show the generated view tables containing the completed SQL required to access the data in your flat file using the "getFiles" procedure above and the Teiid TEXTTABLE() function. The following figure is an example of a generated view table.
You can create relational source models from your Salesforce connection using the steps below.
Note
Depending the detail provided in the database connection url information and schema, Steps 5 through 7 may not be required.
Step 1 - In Model Explorer choose the File > Import action
in the toolbar or select a project, folder or
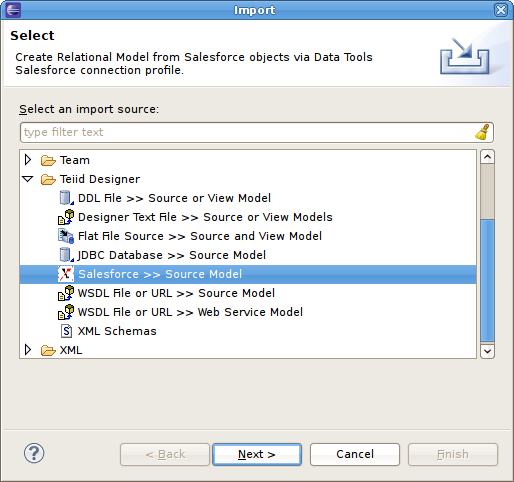
model in the tree and choose Import...Step 2 - Select the import option Teiid Designer > Salesforce >> Source Model and click Next>
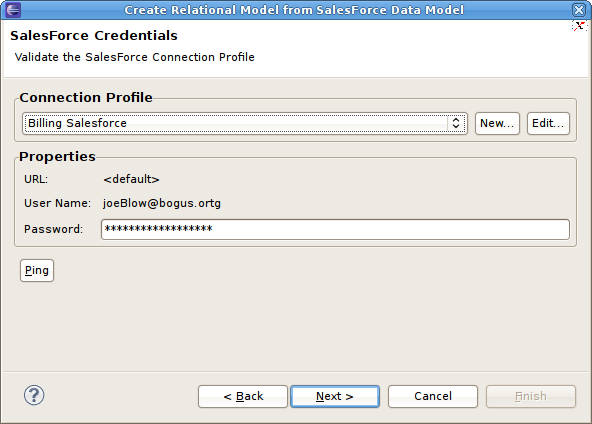
Step 3 - Select existing or previous connection profile from the drop-down selector or press button to launch the New Connection Profile dialog (See Eclispe Data Tools documentation) or to modify/change an existing connection profile prior to selection. Note that the Connection Profile selection list will be populated with only Salesforce connection profiles.
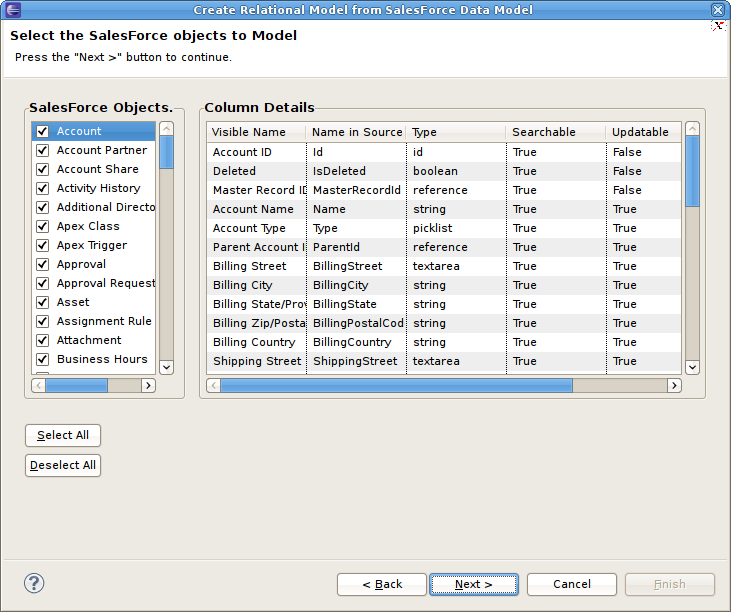
Step 4 - After selecting a Connection Profile, input password (if not provided). Press Next> to display the Salesforce Objects selection page.
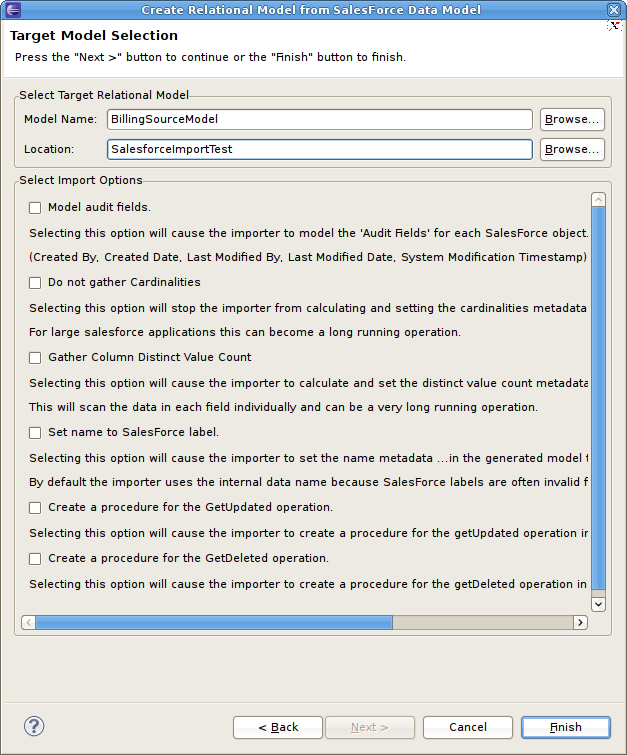
Step 5 - On the Target Model Selection page, specify the target folder location for your generated model, a unique model name and select desired import options. Press Next> (or Finish> if enabled).
Step 5a - If you are updating an existing relational model, the next page will be Review Model Updates page. Any differences. Press Finish> to create your models and tables.

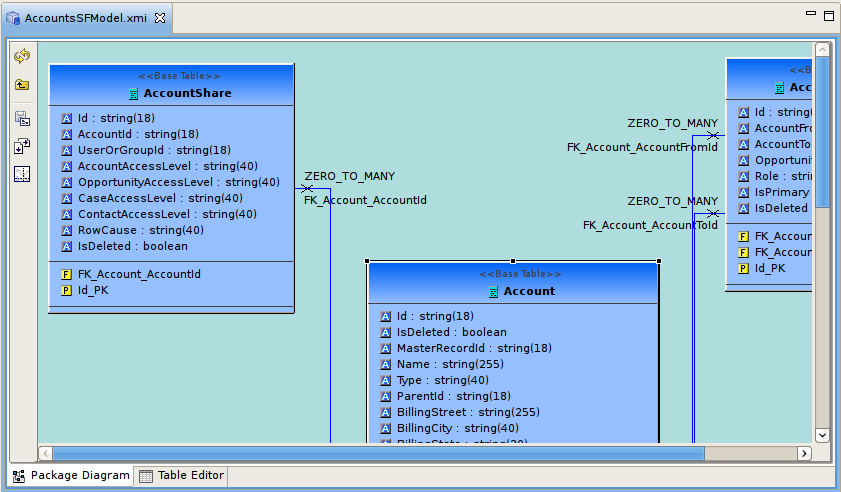
When finished, the new or changed relational model's package diagram will be displayed showing your new tables.
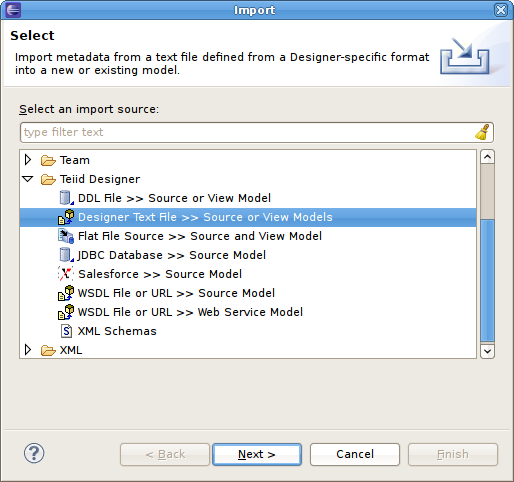
The Teiid Designer provides various import options for parsing comma delimited text file metadata into models. This is accomplished via the Import > Teiid Designer > Designer Text File >> Source or View Models option.
Step 1 - In Designer choose the File > Import action
in the toolbar or select a project, folder or
model in the tree and choose Import...Step 2 - Select the import option Teiid Designer > Designer Text File >> Source or View Models and click Next>
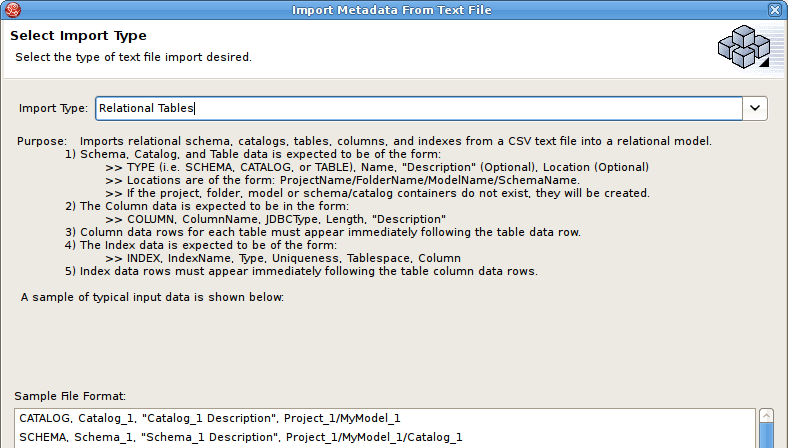
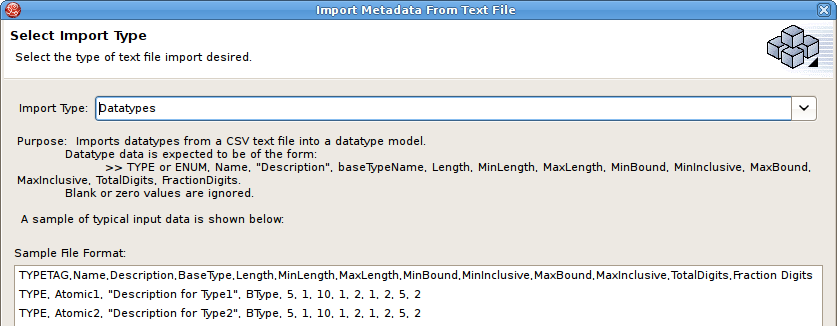
Step 3 - Select an import type via the drop-down menu shown below.
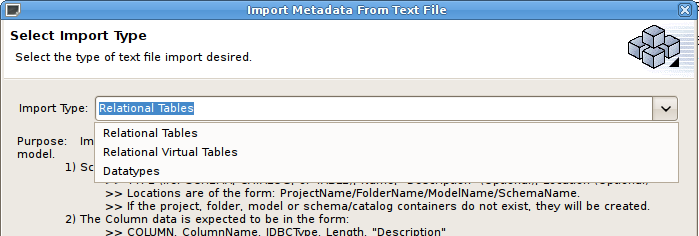
These steps required for each type are defined below:
To create relational tables from imported text file metadata:
Perform Steps 1 through 3 (above) and select the Relational Tables import type, then click Next >
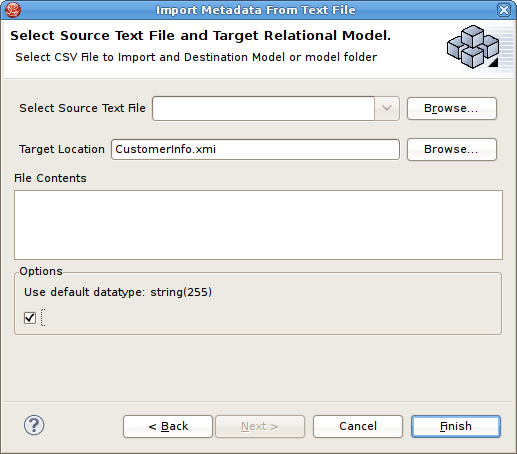
Step 4 - In the next page, you'll need to provide a source text file containing the metadata formatted to the specifications on the previous page.
Step 5 - Select an existing relational model as the target location for your new relational components using the Browse... button to open the Relational Model Selector Dialog. Select a relational model from your workspace or specify a unique name to create a new model.
Step 6 - Select any additional options and choose Finish.
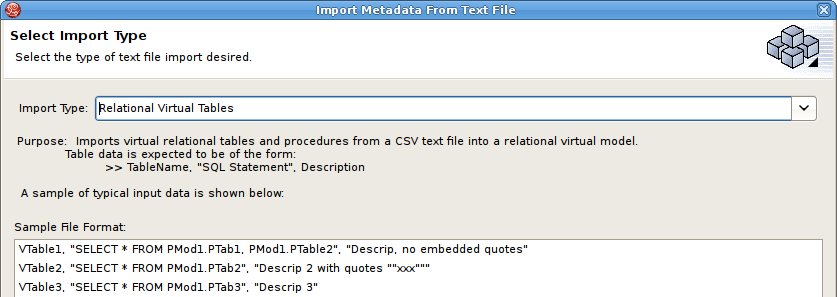
To create relational virtual tables from imported text file metadata:
Perform Steps 1 through 3 (above) and select the Relational Virtual Tables import type, then click Next >
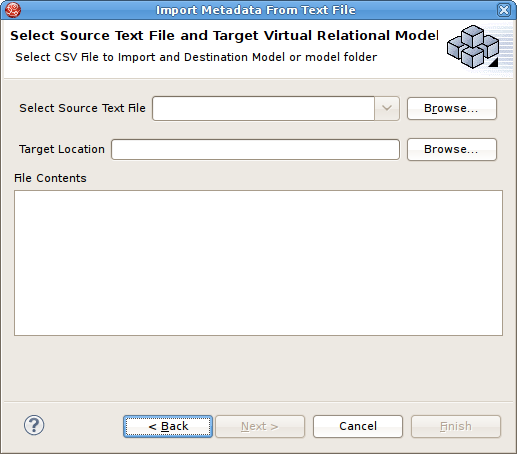
Step 4 - In the next page, you'll need to provide a source text file containing the metadata formatted to the specifications on the previous page.
Step 5 - Select an existing relational virtual model as the target location for your new model components using the Browse... button to open the Virtual Model Selector Dialog. Select a virtual relational model from your workspace or specify a unique name to create a new model.
Step 6 - Select Finish.
To create datatypes from imported text file metadata:
Perform Steps 1 through 3 (above) and select the Datatypes import type, then click Next >
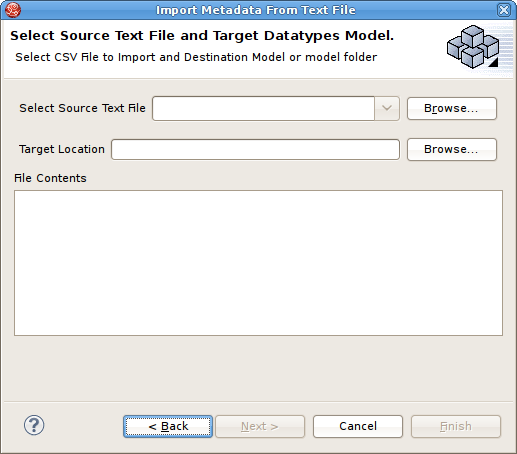
Step 4 - In the next page, you'll need to provide a source text file containing the metadata formatted to the specifications on the previous page.
Step 5 - Select an existing datatype model as the target location for your new model components using the button to open the Datatypes Model Selector Dialog. Select a datatypes model from your workspace or specify a unique name to create a new model.
Step 6 - Select any additional options and choose Finish.
You can create a Relational model by selecting an existing Web Services Connection Profile defined by a WSDL file in your workspace or defined by a URL. Designer will interpret the WSDL, locate any associated or dependent XML schema files, generate a physical model to invoke the service, and generate virtual models containg procedures to build and parse the XML declared as the service messages.
The sample WSDL for this section defines the following:
A single wsdl:service named Share_BSM_Real_Time_Data_Design_Server_RealTimeData_portService
A single wsdl:port named Share_BSM_Real_Time_Data_Design_Server_RealTimeData_portPort0"
A single wsdl:portType named Share_BSM_Real_Time_Data_Design_Server_RealTimeData_portPortType
A single wsdl:operation named OnHand

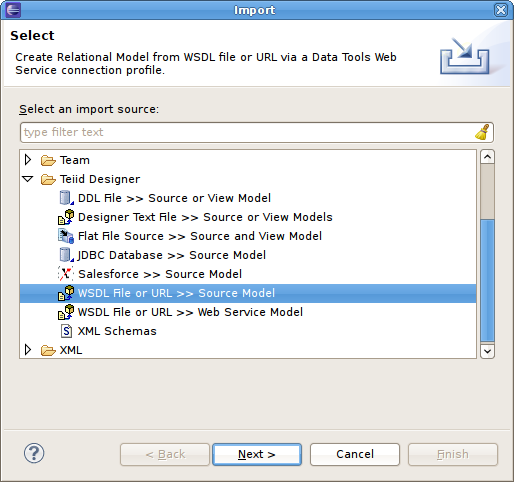
To create relational models from WSDL use the steps below.
Step 1 - In Model Explorer choose the File > Import action in the toolbar or select a project, folder or model in the tree and choose Import...
Step 2 - Select the import option Teiid Designer > WSDL File or URL >> Source Model and click Next>
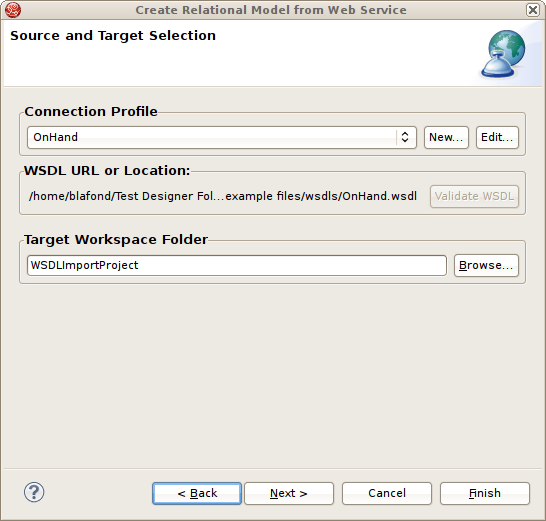
Step 3 - On the next page select an existing Web Service Connection Profile from the list, or click the New Button to create a new profile.
Step 4 - When the connection profile is selected, you'll be required to validate your WSDL via the Validate WSDL button (see above figure). If the WSDL is not valid, or does not comply with WS-I 1.0, the validation failures will be displayed in an error dialog.
Step 5 - Select a model project in the Target Workspace Folder field via the Browse... button. Click Next> when the target is defined.
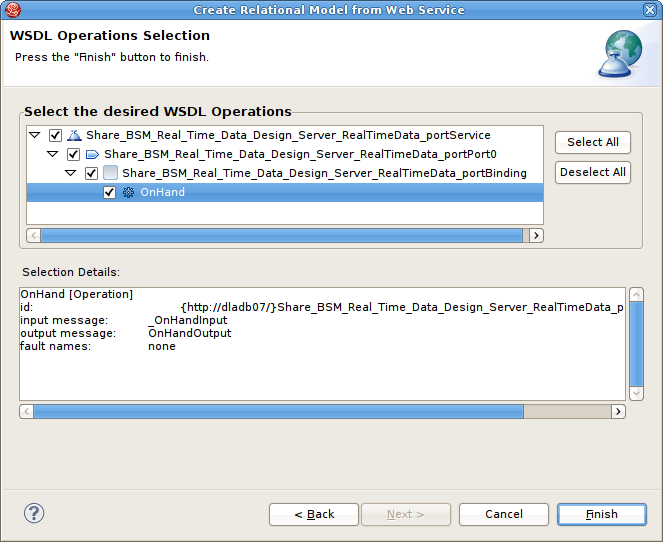
Step 6 - The next page allows you to selected individual Web Service Operations to model. The default behavior of this page selects all available operations in the tree. Operations can be de-selected if they are not being modeled. The Selection Details editor displays static information about the operation such as the names of the input and output messages, and faults thrown by the operation.
Step 7 - Click Finish. After generation the new models can be found in the specified location in your workspace.
In the Model Explorer you can see the importer created the following:
A single physical model containing a single procedure called invoke. This model and procedure correspond to the single port declared in the WSDL. For a WSDL with multiple wsdl:port declarations the importer would create a physical model with an invoke procedure for each wsdl:port declaration. This facilitates binding each physical model to its own Teiid WebService Connector and allowing the connector to supply the endpoint.
A single view model containing a catalog named after the operation declared in the WSDL. For a WSDL with multiple wsdl:operation declarations, the importer would create multiple catalogs. The catalog contains procedure declarations that use the SQLXML calls supported by Teiid to create and parse the XML defined as the operation messages.

The user can now use the procedures defined by the importer in a higher level view model that builds the request, executes the service via the invoke procedure, and extracts the results from the response.
You can create a Web Service model by selecting a WSDL file in your workspace, importing WSDL files from the file system or by defining a URL. The Teiid Designer will interpret the WSDL, locate any associated or dependent XML Schema files, generate an XML View of the schema components and create a Web Service model representing the interfaces and operations defined in the WSDL.
There are three options for selecting the WSDL for your Web Service generation
Workspace Location
File System Location
URL
Detailed steps for each of these options is described below, as well as a description of how the wizard handles WSDL errors.
You can create a Web Service model by selecting a WSDL file from your workspace.
Step 1 - Choose the File Import choose the File > Import action
in the toolbar or select a project, folder or
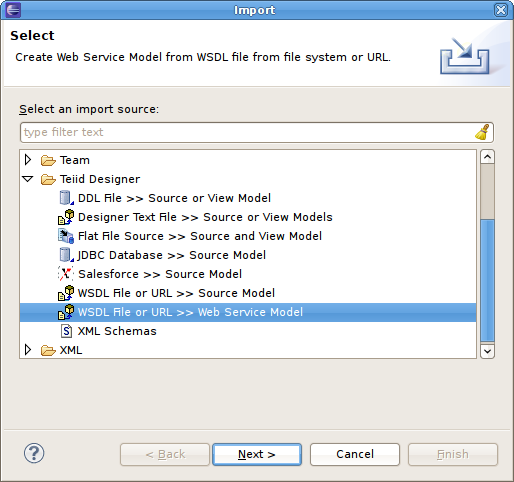
model in the tree and choose Import...Step 2 - Select the import option Teiid Designer > WSDL File or URL >> Web Service Model option shown below and click Next>
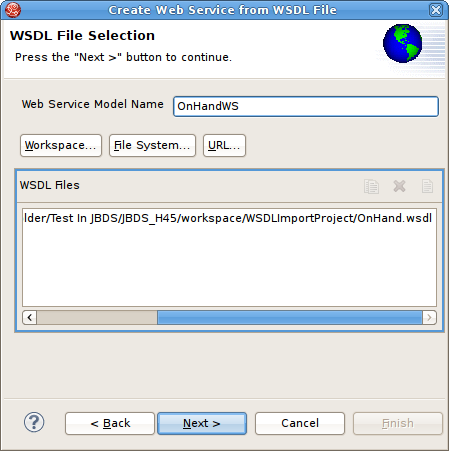
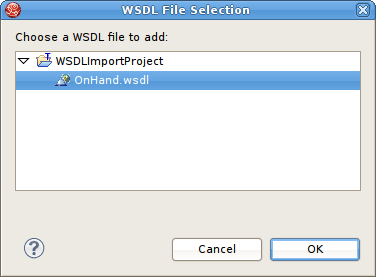
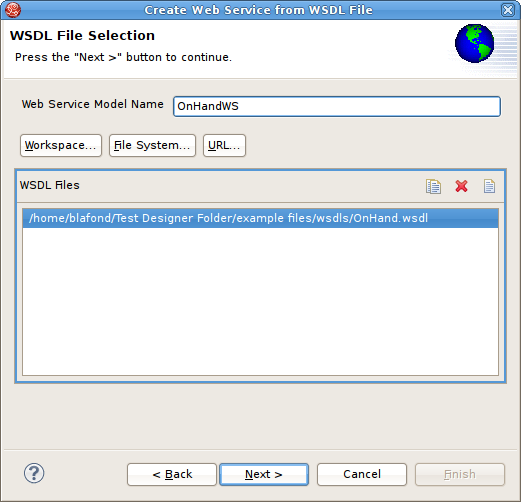
Step 3 - Input a valid name for your Web Service model and select the Workspace... button. Locate your workspace WSDL file in the selection dialog and click OK>. Click Next> to continue.
Note
If no WSDL is selected or specified then the importer will only create an empty Web Service model. No XML Schema or XML View models will be generated.
Any referenced files (WSDLs or schemas) must either be embedded in the WSDL file or exist on your file system.
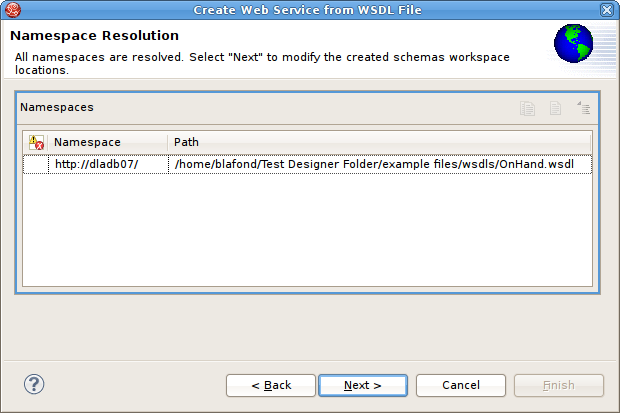
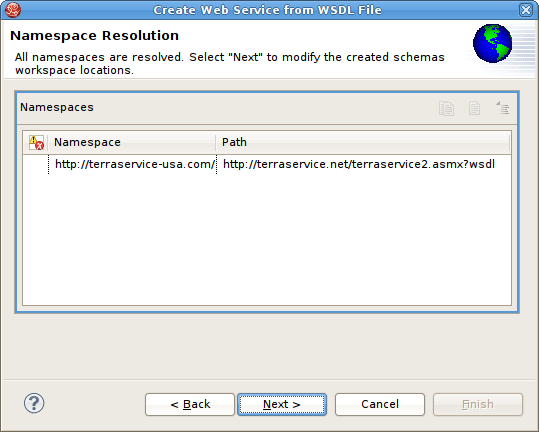
Step 4 - The next page is titled Namespace Resolution. This page identifies successful and errant WSDL namespace resolution. The main WSDL document will essentially always be resolved, since the workspace file chooser is used to obtain the path. Problems will occur when the main WSDL file imports other WSDL files that cannot be resolved. If no errors, select Next to proceed, or Finish (if enabled) to complete with default options.
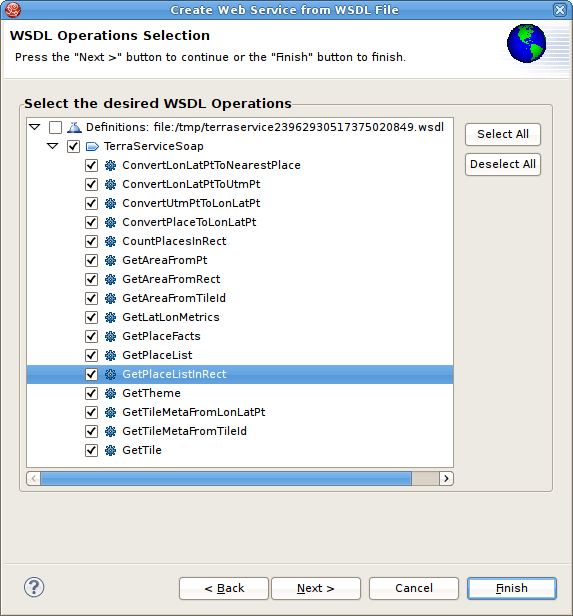
Step 5 - The next page WSDL Operations Selection allows customizing the resulting content of your Web Service model by selecting/deselecting various operations and interfaces in the following dialog.
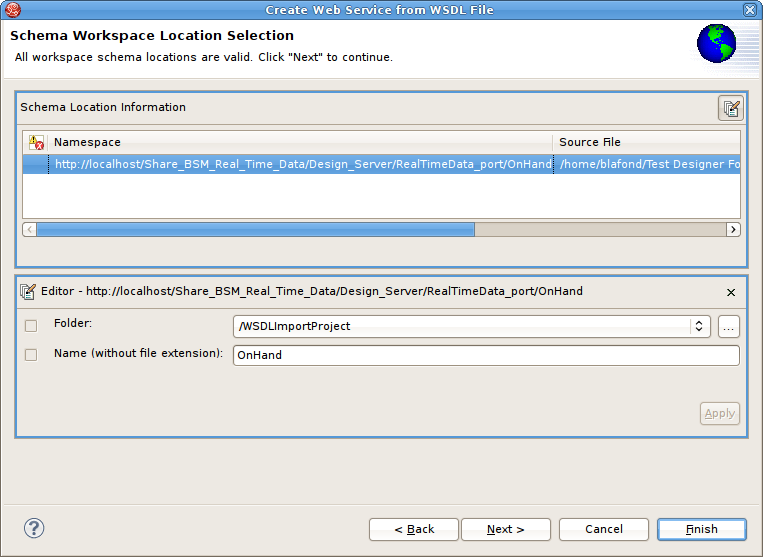
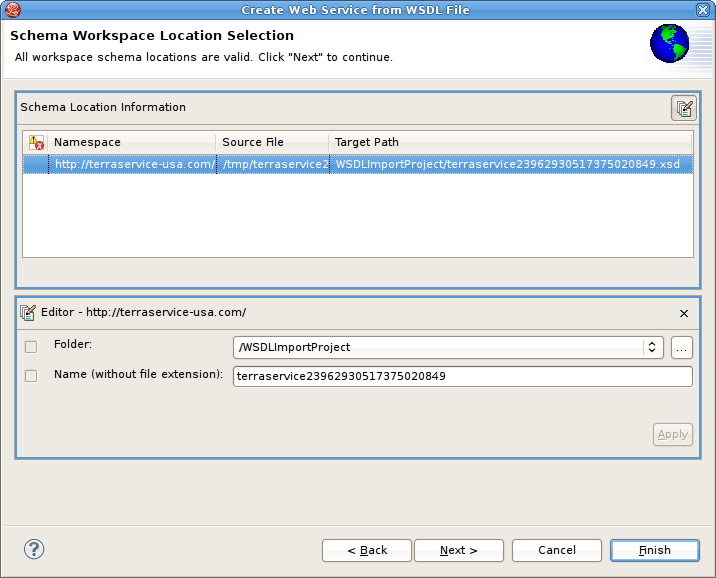
Step 6 - The next page is titled Schema Workspace Location Selection. This page lists all schemas imported by the WSDL (along with any dependent schemas referenced within schemas) as well as schemas embedded in the WSDL and indicates whether or not they are resolvable. All resolved schemas will be created in a separate file and added to the workspace. The editor panel allows you to change the default file name of the new schema file(s).
If no errors, select Next to proceed, or Finish to complete with default option
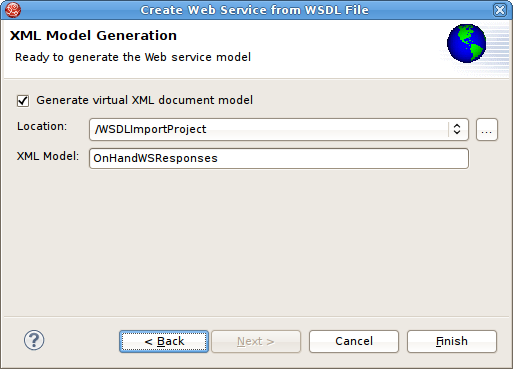
Step 7 - The last page titled XML Model Generation allows you to change the name of the XML View model if the Generate virtual XML document model is checked. Input desired name or use the default name provide. Select Finish to complete.

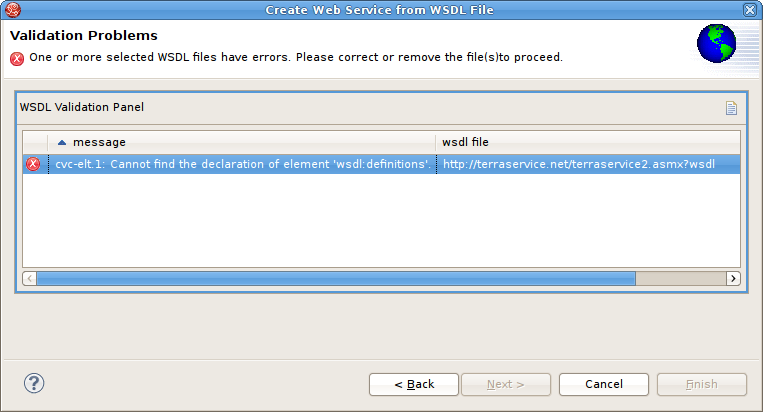
In order to successfully generate Web Services from WSDL, the WSDL must be error free. WSDL validation is performed during Step 3 above. If errors do exist, a error summary dialog will be displayed (shown below) and you will not be able to Finish the wizard until the WSDL problems are fixed or you re-import and select a valid WSDL file.
You can create a Web Service model by selecting a WSDL file from your local file system.
Step 1 - Choose the File Import choose the File > Import action
in the toolbar or select a project, folder or
model in the tree and choose Import...Step 2 - Select the import option Teiid Designer > WSDL File or URL >> Web Service Model and click Next>
Step 3 - Input a valid name for your Web Service model and select the File System... button. Locate your file system WSDL file in the selection dialog and click OK>.
Note
If no WSDL is selected or specified then the importer will only create an empty Web Service model. No XML Schema or XML View models will be generated.
Any referenced files (WSDLs or schemas) must either be embedded in the WSDL file or exist on your file system.
Step 4 - The next page is titled Namespace Resolution. This page identifies successful and errant WSDL namespace resolution. The main WSDL document will essentially always be resolved, since the workspace file chooser is used to obtain the path. Problems will occur when the main WSDL file imports other WSDL files that cannot be resolved. If no errors, select Next to proceed, or Finish (if enabled) to complete with default options.
Step 5 - The next page WSDL Operations Selection allows customizing the resulting content of your Web Service model by selecting/deselecting various operations and interfaces in the following dialog.
Step 6 - The next page is titled Schema Workspace Location Selection. This page lists all schemas imported by the WSDL (along with any dependent schemas referenced within schemas) as well as schemas embedded in the WSDL and indicates whether or not they are resolvable. All resolved schemas will be created in a separate file and added to the workspace. The editor panel allows you to change the default file name of the new schema file(s).
If no errors, select Next to proceed, or Finish to complete with default option
Step 7 - The last page titled XML Model Generation allows you to change the name of the XML View model if the Generate virtual XML document model is checked. Input desired name or use the default name provide. Select Finish to complete.
In order to successfully generate Web Services from WSDL, the WSDL must be error free. WSDL validation is performed during Step 3 above. If errors do exist, a error summary dialog will be displayed (shown below) and you will not be able to Finish the wizard until the WSDL problems are fixed or you re-import and select a valid WSDL file.
You can create a Web Service model by selecting a WSDL file based on a URL.
Step 1 - Choose the File Import choose the File > Import action
in the toolbar or select a project, folder or
model in the tree and choose Import...Step 2 - Select the import option Teiid Designer > WSDL File or URL >> Web Service Model and click Next>
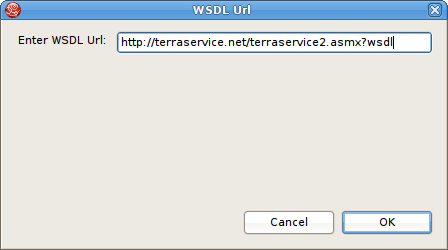
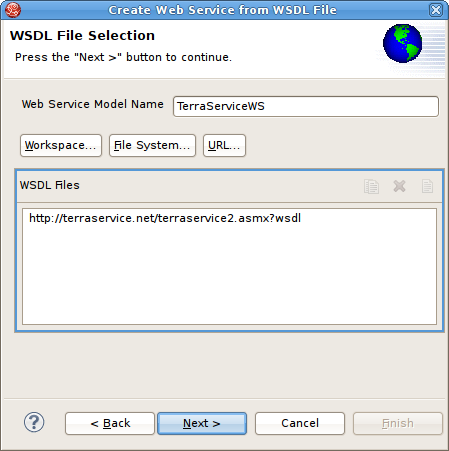
Step 3 - Input a valid name for your Web Service model and select the URL... button. Enter a valid WSDL URL in the dialog click OK>. Click Next> to continue.
Note
If no WSDL is selected or specified then the importer will only create an empty Web Service model. No XML Schema or XML View models will be generated.
Any referenced files (WSDLs or schemas) must either be embedded in the WSDL file or exist on your file system.
Step 4 - The next page is titled Namespace Resolution. This page identifies successful and errant WSDL namespace resolution. The main WSDL document will essentially always be resolved, since the workspace file chooser is used to obtain the path. Problems will occur when the main WSDL file imports other WSDL files that cannot be resolved. If no errors, select Next to proceed, or Finish (if enabled) to complete with default options.
Step 5 - The next page WSDL Operations Selection allows customizing the resulting content of your Web Service model by selecting/deselecting various operations and interfaces in the following dialog.
Step 6 - The next page is titled Schema Workspace Location Selection. This page lists all schemas imported by the WSDL (along with any dependent schemas referenced within schemas) as well as schemas embedded in the WSDL and indicates whether or not they are resolvable. All resolved schemas will be created in a separate file and added to the workspace. The editor panel allows you to change the default file name of the new schema file(s).
If no errors, select Next to proceed, or Finish to complete with default option
Step 7 - The last page titled XML Model Generation allows you to change the name of the XML View model if the Generate virtual XML document model is checked. Input desired name or use the default name provide. Select Finish to complete.
In order to successfully generate Web Services from WSDL, the WSDL must be error free. WSDL validation is performed during Step 3 above. If errors do exist, a error summary dialog will be displayed (shown below) and you will not be able to Finish the wizard until the WSDL problems are fixed or you re-import and select a valid WSDL file.
You can import XML Schema file (XSD) files using the steps below.
Step 1 - In Model Explorer choose the File > Import action
in the toolbar or select a project, folder or
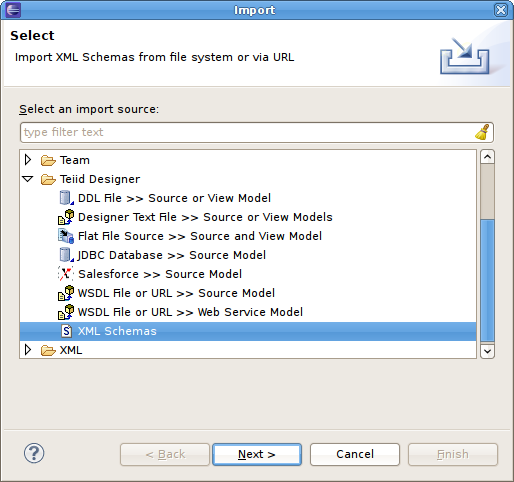
model in the tree and choose Import...Step 2 - Select the import option Metadata Modeling > XSD Schemas and click Next>
Step 3 - Select either Import XSD Schemas from file system or Import XSD Schemas via URL and click Next >
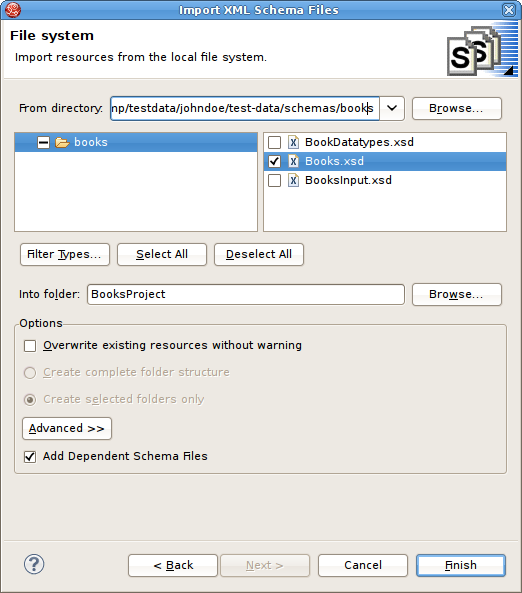
Step 4a - If importing from file system, the Import XSD Files dialog is displayed. Click on the Browse button to find the directory that contains the XSD file(s) you wish to import.
To select all of the XSD files in the directory, click the checkbox next to the folder in the left panel.
To select individual XSD files, click the checkboxes next to the files you want in the right panel
Step 4b - If importing from URL, select the Import XML Schemas via URL option and click OK to display the final Add XML Schema URLs wizard page.
Step 5 - Click the Add XML Schema URL button
 . Enter a valid schema URL. Click OK. Schema will be validated
and resulting entry added to the list of XML Schema URLs.
. Enter a valid schema URL. Click OK. Schema will be validated
and resulting entry added to the list of XML Schema URLs.The schema URL is now displayed in the XML Schema URLs list.
Step 6 - Click Finish.
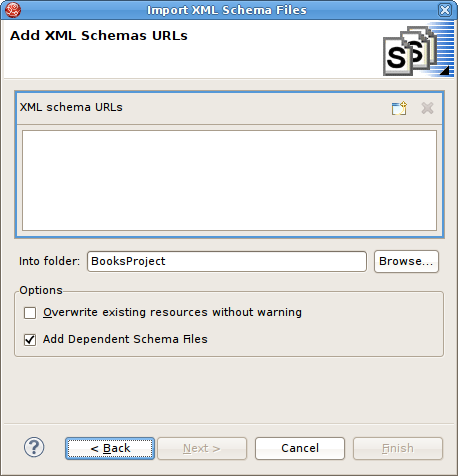


Note
XSD files may have dependent files. This importer will determine these dependencies and import these as well if Add Dependent Schema Files is checked