Validation of input is an important part of any Web application. All Apache Jakarta frameworks, including Struts, can use a common Jakarta Validation Framework for streamlining this aspect of Web application development. The Validation Framework allows you to define validation rules and then apply these rules on the client-side or the server-side.
JBoss Developer Studio makes using the Validation Framework in Struts even easier with the help of a specialized editor for the XML files that controls validation in a project. In this document, we'll show you how this all works by creating some simple client-side validation and server-side validation examples.
The example assumes that you have already created our sample "StrutsHello" application from the Getting Started Guide for Creating a Struts Application. You should have the JBoss Developer Studio perspective open on this StrutsHello project.
In these steps you will set up the validation that can be used for either client-side or server side validation. You need to enable validation as a part of the project, define an error message, and tie it into an appropriate part of the application.
Right-click on a "plug-ins" node under the StrutsHello > Configuration > default > struts-config.xml node in the Web Projects view and select Create Special Plugin > Validators from the context menu
Further down in the Web Projects view, right-click on the StrutsHello > ResourceBundles node and select New > Properties File...from the context menu
In the dialog box, click on the Browse...button next to the Folder field, expand the JavaSource folder in this next dialog box, select the sample subfolder, and click on the OK button
Back in the first dialog box, type in "applResources" for the Name field and click on the Finish button
Right-click on a newly created file and select Add > Default Error Messages from the context menu
Drag up the sample.applResources icon until you can drop it on the resources folder under struts-config.xml
Select File > Save All from the menu bar
Select validation.xml under the StrutsHello > Validation node and double-click it to open it with the JBoss Tools XML Editor
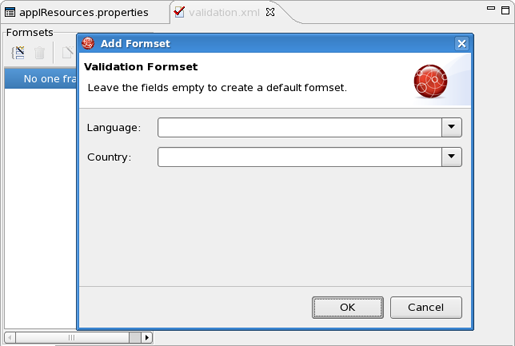
Here you must create a Formset.
In the validation.xml file editor click the button Create Formset on the panel Formsets
In the dialog Add Formset fill the fields Language and Country or just leave them empty to create a default formset. Click OK
Expand the "form-beans" node under the StrutsHello > Configuration > default > struts-config.xml node. Then, drag the form bean "GetNameForm" and drop it onto a formset in the XML Editor
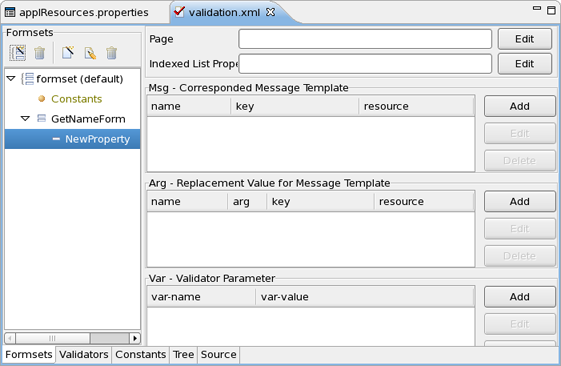
In the Validation Editor, expand the formset node, right-click GetNameForm, and select Create Field... from the context menu
Enter a name for Property in the dialog box. A new property will be created:
In the Properties view for the name field to the right of the "tree" for the validation.xml file, click on the Change...button next to the Depends entry field
In the displayed double list, select required from the left list and then click Add
Click Ok
Right-click name and select Add Arg... from the context menu
In the Add Arg dialog box, click on the Change...button next to the Key field
In the Key dialog box that appears now, click on the Add button
Enter "name.required" in the Name field, and enter a person's name in the Value field
Click Finish, then Ok, and then Ok again
Select File > Save All from the menu bar
Client-side validation uses a scripting language (like JavaScript) running in the client browser to actually do the validation. In a Struts application using the Validation Framework, however, you don't actually have to do any of the script coding. The Validation Framework handles this.
To see how this works in our application, you'll just need to make a couple of modifications to one of the JSP files.
Double-click inputname.jsp under StrutsHello > WEB-ROOT(WebContent) > pages to open it for editing
Find the tag near the top and hit Return to make a new line under it
In the JBoss Tools Palette view to the right, open the Struts HTML folder and click on the javascript tag
Back in the editor, just in front of the closing slash for this inserted tag, hit Ctrl+Space and select "formName" from the prompting menu
Over in the Web Projects view, select GetNameForm under the StrutsHello > Configuration > default > struts-config.xml > form-beans node, drag it, and drop it between the quotes in the editor
Modify the <html:form> tag by inserting this attribute:
onsubmit="return validateGetNameForm(this)"
The file should now look like this:
<%@ taglib uri="/WEB-INF/struts-html.tld" prefix="html" %>

<html:html>

<head>

    <title>Input name</title>

    <html:javascript formName="GetNameForm"/>

</head>

<body>

    <html:form action="/greeting.do" onsubmit="return

        <para>validateGetNameForm(this)"></para>

        <table border="0" cellspacing="0" cellpadding="0">

            <tr>

                <td><b>Input name:</b></td>

            </tr>

            <tr>

                <td>

                    <html:text property="name" />

                    <html:submit value=" Say Hello! " />

                </td>

            </tr>

        </table>

    </html:form>

</body>

</html:html>
Select File > Save from the menu bar
Start JBoss Application Server by clicking on its icon (a right-pointing arrow) in the toolbar
Click the Run icon or right click your project folder and select Run As > Run on Server

In the browser window, click on the "Say Hello!" button without having entered any name in the form
A JavaScript error message should be displayed in an alert box.
Server side validation does the validation inside the application on the server. In a Struts application using the Validation Framework, you still don't have to do any of the actual validation coding. The Validation Framework handles this. You will though have to make a few changes to the JSP file you modified for client-side validation along with a change to an action and a few changes to the form bean class.
Reopen inputname.jsp for editing
Delete the "onsubmit" attribute in the <html:form> element that you put in for client-side validation
Add an <html:errors> tag after the <html:form> tag
The JSP file should now look like this:
<%@ taglib uri="/WEB-INF/struts-html.tld" prefix="html" %>

<html:html>

<head>

    <title>Input name</title>

    <html:javascript formName="GetNameForm"/>

</head>

<body>

    <html:form action="/greeting.do">

        <table border="0" cellspacing="0" cellpadding="0">

            <tr>

                <td><b>Input name:</b></td>

            </tr>

            <tr>

                <td>

                    <html:text property="name" />

                    <html:submit value=" Say Hello! " />

                </td>

            </tr>

        </table>

    </html:form>

    <html:errors />

</body>

</html:html>
In the Web Projects view, expand the node under the StrutsHello > Configuration > default > struts-config.xml > action-mappings node, right-click the /greeting action, and then select Properties...from the context menu
In the Edit Properties window, insert the cursor into the value column for the input property and click on the ... button
In the dialog box, make sure the Pages tab is selected, select StrutsHello > WEB-ROOT(WebContent) > pages > inputname.jsp, click the Ok button, and then click on the Close button
Right-click the /greeting action again and select Open Form-bean Source to open the GetNameForm.java file for editing
Change the class that it extends from: org.apache.struts.action.ActionForm to org.apache.struts.validator.ValidatorForm
Comment out a validate method
The file should now look like this:
package sample;

import javax.servlet.http.HttpServletRequest;

import org.apache.struts.action.ActionErrors;

import org.apache.struts.action.ActionMapping;

public class GetNameForm extends


org.apache.struts.validator.ValidatorForm

{


  private String name = "";


  /**

  * @return Returns the name.

  */

  public String getName()

  {

    return name;

  }


  /**

  * @param name The name to set.

  */

  public void setName(String name)

  {

    this.name = name;

  }


  public GetNameForm ()

  {

  }


  public void reset(ActionMapping actionMapping,

    HttpServletRequest request)

  {

    this.name = "";

  }


  // public ActionErrors validate(ActionMapping actionMapping,

    HttpServletRequest request)

  {

    // ActionErrors errors = new ActionErrors();

    // return errors;

    // }

    }
Select File > Save All from the menu bar
Reload the application into JBoss AS by clicking on the "Change Time Stamp" icon (a finger pointing with a little star) in the toolbar
Run the application
In the browser window, click on the "Say Hello!" button without having entered any name in the form
The error message should appear in a refreshed version of the form.
You can also read Struts chapter in our "Visual Web Tools" guide for more information on this topic.