
Firstly, we assume that you have already launched Eclipse with JBoss Tools installed and also that the Web Development perspective is the current perspective. (If not, make it active by selecting Window > Open Perspective > Other > Web Development from the menu bar.)
We are first going to create a new project for the application.
Go to the menu bar and select File > New > Struts Project
Next enter "StrutsHello" as the project name
Leave everything else as it is, and click Next
If you have server runtime already defined, just pass to next point. Otherwise in the Runtime section click the New button and target at needed server runtime environment. Click Finish.
Click Next
Make sure that struts-bean.tld , struts-html.tld , and struts-logic.tld are checked in the list of included tag libraries and then hit Finish
A "StrutsHello" node should appear in the Package Explorer view.
Click the plus sign next to StrutsHello to reveal the child nodes
Click the plus sign next to WebContent under StrutsHello
Click the plus sign next to WEB-INF under WebContent
Then, double-click on the struts-config.xml node to display a diagram of the Struts application configuration file in the editing area
At this point, its empty except for the background grid lines.
Now, we will design the application by creating the individual components as placeholders first. (We don't have to complete all of the details inside the components until afterwards.)
Next, let's create and place two JSP pages. We will not write any code for the files, but only create them as placeholders so that we can create links to them in the diagram. We will write the code a little bit later.
Bring the Web Projects view to the front of the Package Explorer view by selecting the Web Projects tab next to that tab.
Right-click the StrutsHello > WEB-ROOT (WebContent) folder in the Web Projects view and select New > Folder...
Enter pages for a folder name and click Finish
We will keep our presentation files in this folder
Right-click the pages folder and select New > File > JSP...
For Name type in inputname (the JSP extension will be automatically added to the file), for Template select StrutsForm and then click on the Finish button
Right-click the pages folder again and select New > File > JSP...
For Name type in greeting , for Template leave as Blank, and then click on the Finish button
Just leave these files as is for now.
Lets now place the two pages just created on the diagram.
Click on the struts-config.xml tab in the editing area to bring the diagram to the front
Click on the inputname.jsp page in the Web Projects view, drag it onto the diagram, and drop it
Click on the greeting.jsp page in the Web Projects view, drag it onto the diagram, and drop it to the right of the /pages/inputname.jsp icon with some extra space
You should now have two JSP pages in the diagram.
Using a context menu on the diagram, we are next going to create an Action mapping.
Right-click between the two icons and select New > Action
Enter the following values:
Table 2.1. Action values
| path | /greeting |
| name | GetNameForm |
| scope | request |
| type | sample.GreetingAction |
| validate | <leave blank> |
("GetNameForm" is the name for a form bean that we will create later.)
Click Finish
The /greeting action should appear in four places, in the diagram, under the action-mappings node, under the struts-config.xml node in Tree view, in Web Projects view and in the Outline view. Also, note the asterisk to the right of the name, struts-config.xml, in the Outline view showing that the file has been changed, but not saved to disk.
Let's now create a link from the inputname.jsp page to the action.
On the left-hand side of the diagram in the column of icons, click on this icon:

In the connect-the-components mode you are in now, click on the /pages/inputname.jsp icon in the diagram and then click on the /greeting action
A link will be created from the page to the action.
Next, we are going to create a forward for the action.
On the left-hand side of the diagram in the column of icons, click on this icon, again:
Click on the /greeting action icon in the diagram and then click on the pages/greeting.jsp icon
That's it. A link will be drawn from the actions new greeting forward to the greeting.jsp JSP page. Note that the forwards name will be set based on the name of the target JSP file name. If you don't like it, you can easily change it
Select the Tree tab at the bottom of the editor window (between Diagram and Source)
Expand the struts-config.xml/action-mappings/ /greeting node and then select the greeting forward
In the Properties Editor to the right, change the text to "sayHello" in the Name field
Select the Diagram tab at the bottom of the editor window and see how the diagram is also updated to reflect the change
One last component that we need to create in the diagram is a global forward.
Somewhere in the top-left corner of diagram, right-click and select New > Global Forward
Enter getName in the Name field
Select the Change... button for Path
In the Edit Path window, switch to the Pages tab
Expand the StrutsHello > WEB-ROOT (WebContent) > pages node and then select the inputname.jsp page
Click Ok .
Leave the rest of the fields blank and click OK
A forward object now appears on the diagram and also in the global-forwards folder in the Outline view.
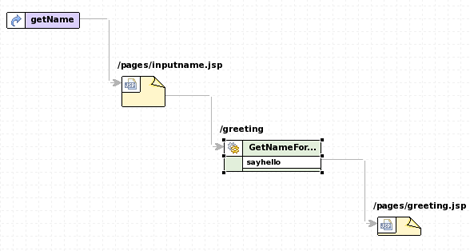
Tidy up the diagram, by clicking and dragging around each icon, so that the diagram looks something like this:
One last thing that we need to do is to create a form bean.
Switch to the Tree viewer in the editor for the struts-config.xml file, by selecting the Tree tab at the bottom of the editor window
Right-click struts-config.xml > form-beans and select Create Form Bean
Enter GetNameForm in the name field and sample.GetNameForm for type
Click Finish
To save your changes to struts-config.xml, select File > Save from the menu bar
Note the disappearance of the asterisk next to the name, struts-config.xml.