Create new JBDS Documentation Jira issue

This will launch the JBDS Jira page - to complete your feedback please login if needed, and submit the Jira.
JBoss.comEnterprise Documentation
In the JSF Tools Reference Guide and Struts Tools Reference Guide you had possibility to read about Graphical Editor for JSF and Struts configuration files, Graphical Editor for Tiles Files, Graphical Editor for Struts Validation Files. All these editors have OpenOn and Content Assist features, which are described in more details in this document. In addition you get to know a Visual Page Editor for combined visual and source editing of Web pages and many other editors for different types of files.
JBoss Developer Studio has powerful editor features that help you easily navigate
within your application and make use of content and code assist no matter what project
file (.jsp, .xhtml, .xml, .css, etc.) you are working on.
The mentioned features are the following:
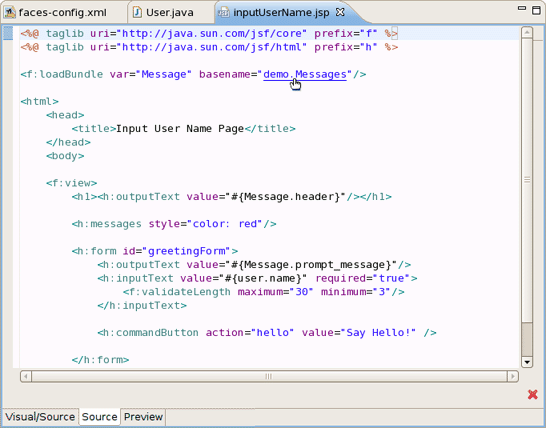
OpenOn lets you easily link directly from one resource to another in your project without using the Package Explorer view (project tree). With OpenOn, you can simply use F3 or Ctrl+Click on a reference to another file and the file will be opened.
OpenOn is available for:
Press and hold down the Ctrl key. As you move the mouse cursor over different file references in the file, they display an underline. When you hover the name of the file you want to open, click and the file will open in its own editor.
Use the OpenOn functionality for the next entries defined in XML file:
OpenOn is also available in JSP and XHTML pages edited in the Visual Page Editor. It will allow you to quickly jump to the reference instead of having to hunt around in the project structure.
You can use OpenOn for the following JSP/XHTML file entries:
Imported property files
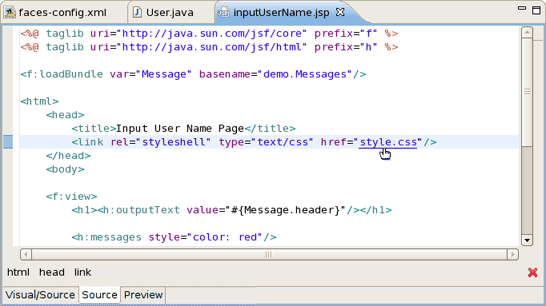
CSS files used in a JSP/XHTML page
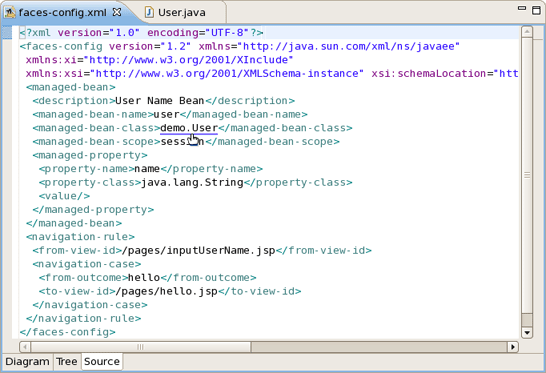
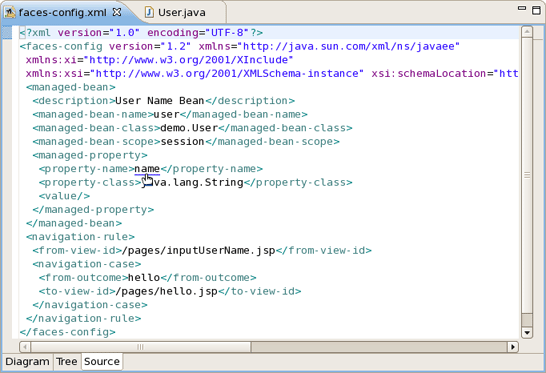
Managed beans and their properties
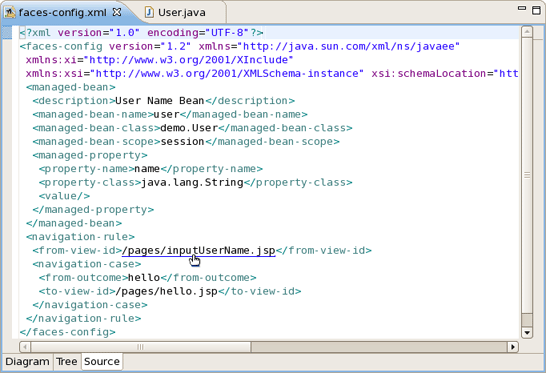
Navigation rules in JSP files
For JSP files in a JSF project, you can easily open the navigation rules by applying OpenOn to the JSF tag for the navigation outcome:
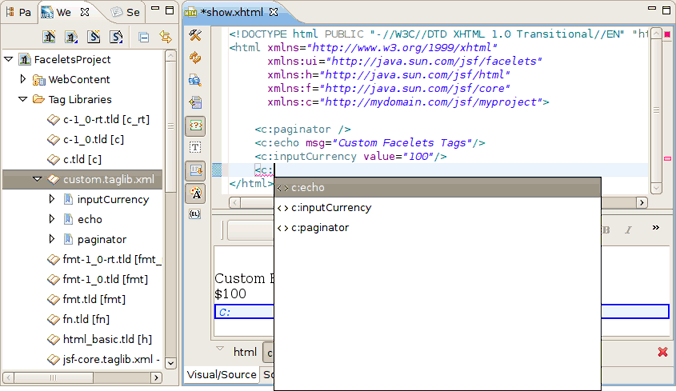
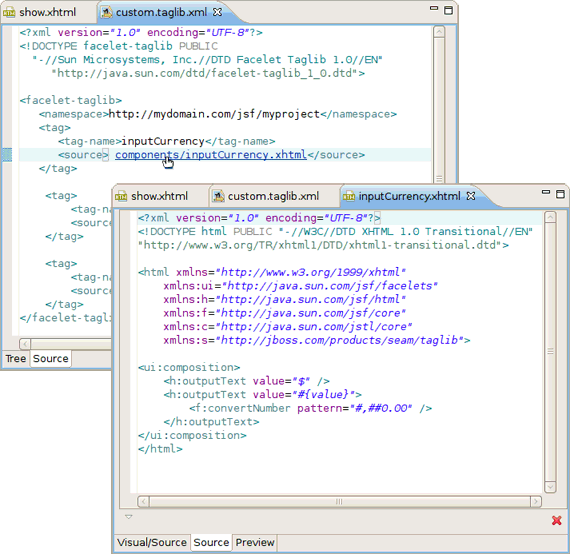
Custom Facelets tag libraries in XHTML pages
For details, see "OpenOn for Custom Facelets Tag Libraries" later in this guide.
Custom JJSF 2.0 components
You can quickly navigate through CSS classes using OpenOn
OpenOn is also implemented for css classes added by a complex link.
Content assist is available when working with
Notice, that code completion for EL variables has icons illustrating what they are from. Currently it's performed for resource bundles, JSF and Seam components.
Also, as you can see, the ranking and sorting are available in EL code completions.
When working with JSF project in JBoss Developer Studio, you can use various Content Assist features while developing:
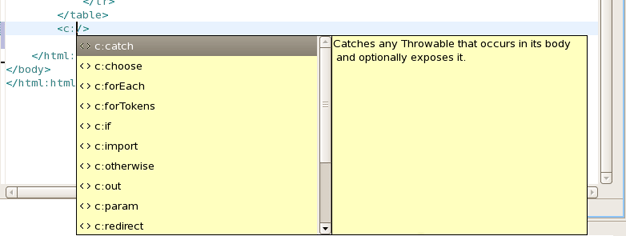
Content Assist for XML, XHTML, JSP and JSF configuration files
Content Assist for Composite Components
Content Assist based on project data
Content Assist with graphical JSF editor
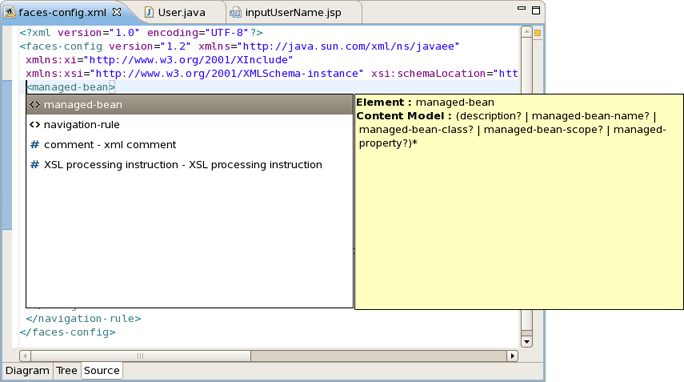
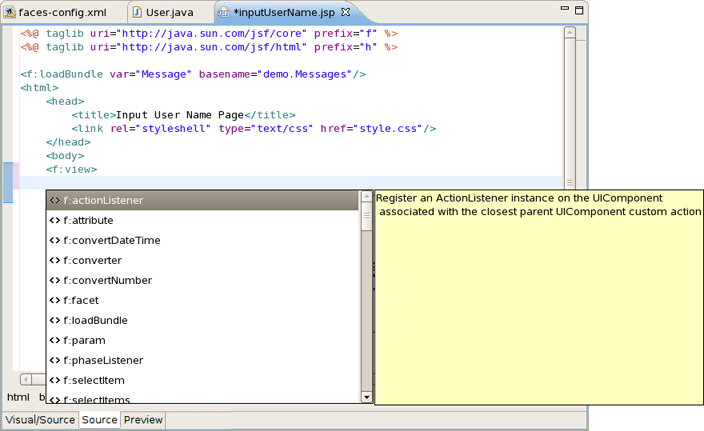
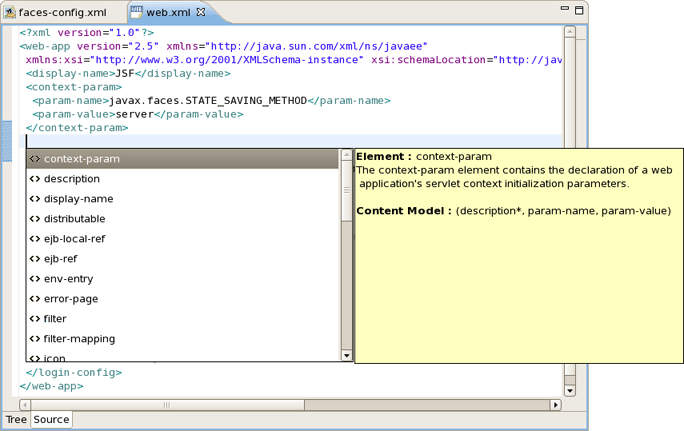
At any point when working with any XML, JSP and JSF configuration files Content Assist is available to help you. Simply type Ctrl-Space to see what is available.
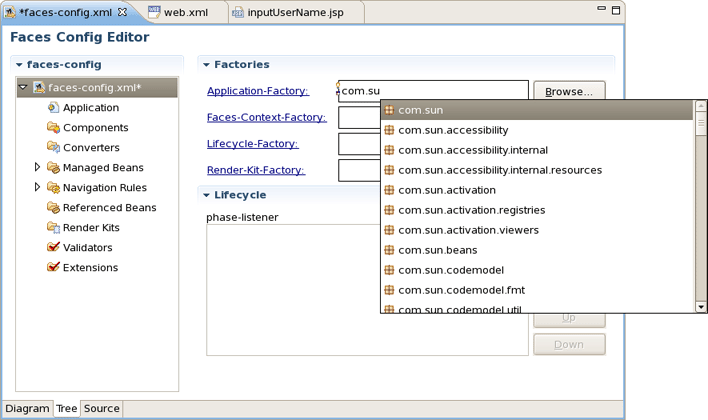
Content Assist for JSF configuration file:
Content Assist for JSF JSP file:
Content Assist for other JSF XML project files (web.xml shown):
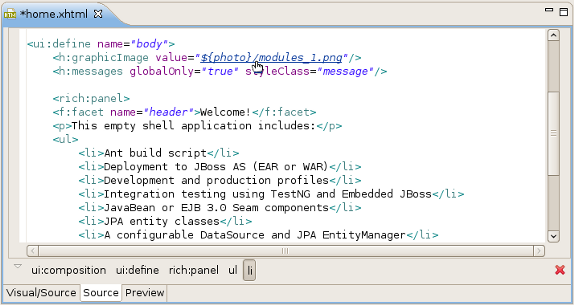
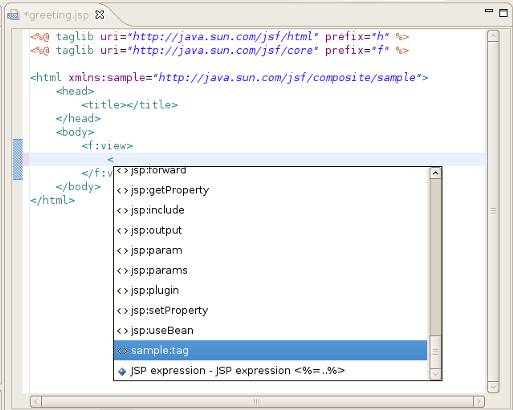
Content assist functionality is also available for composite components. On the screen is shown content assist for a composite component file "tag.xhtml" within a JSF 1.2 project with facelets
JBoss Developer Studio takes Content Assist to the next level. Studio will constantly scan your project and you will be able to insert code into the JSP page from your project that includes:
Values from Property files
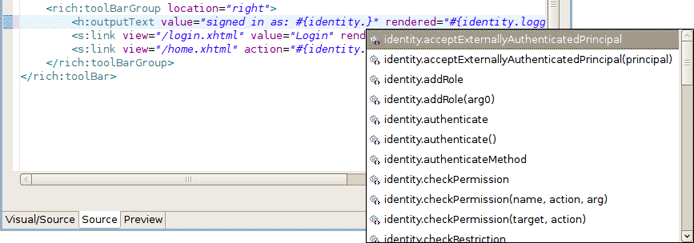
"Managed beans" attributes and methods
Navigation Rule Outcomes
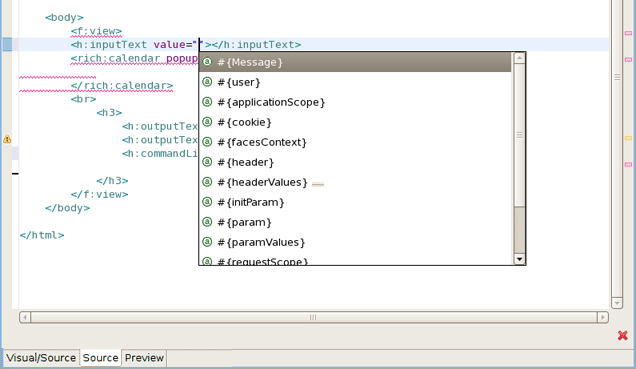
JSF variables (context, request etc...)
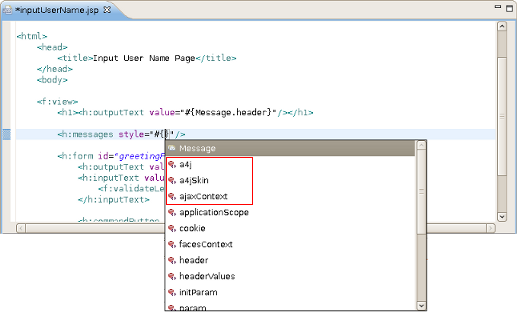
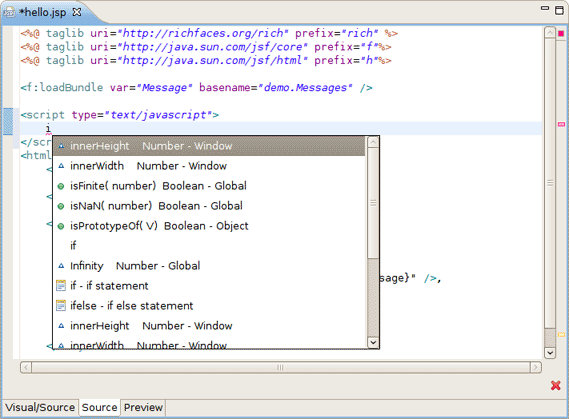
The figure below shows how to insert message from a Properties files. You simply put the cursor inside the "value" attribute and press Ctrl-Space. JBoss Developer Studio will scan your project and show a list of possible values to insert.
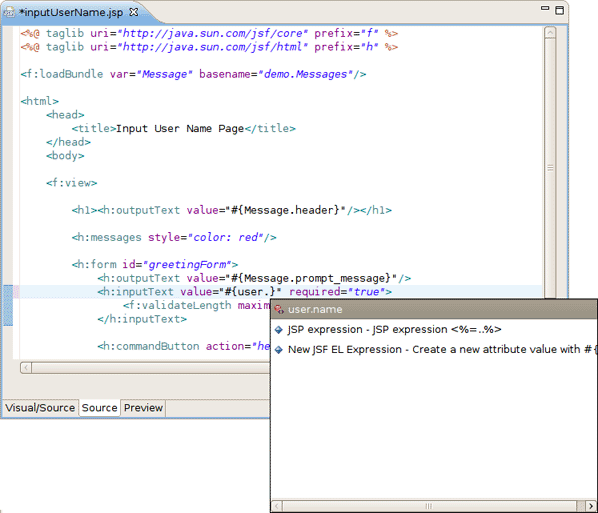
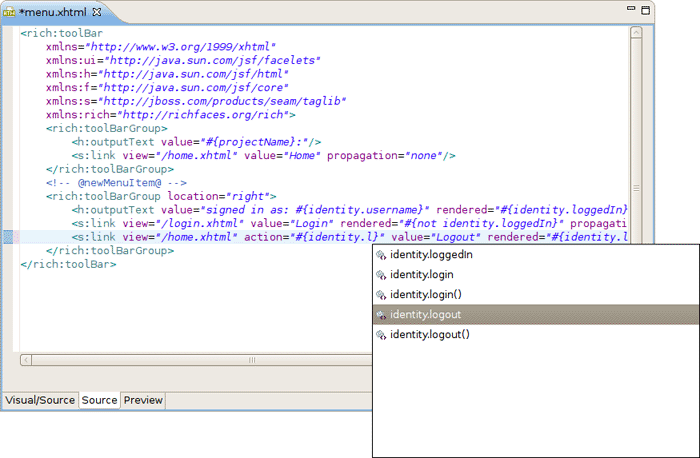
In the following screenshot we are inserting a "Managed bean" attribute value. Again, by simply clicking Ctrl-Space, JBoss Developer Studio will show a list of all possible values that you can insert.
Once you select a Managed bean, it will show you a list of all available attributes for the selected Managed bean (userBean).
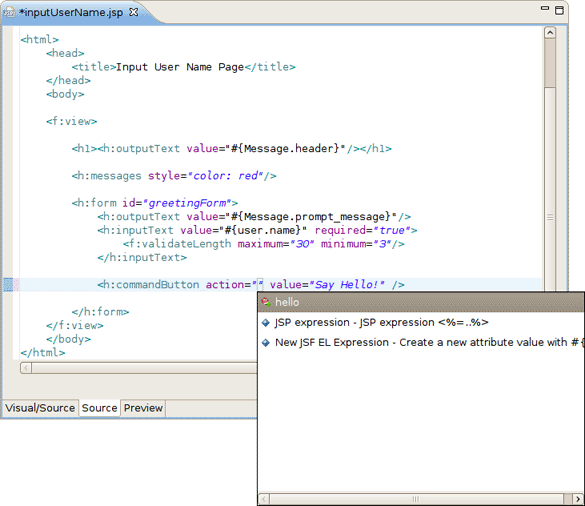
Code Assist based on project data will also prompt you for navigation rules that exist in your JSF configuration file.
Code Assist can also provide you with access to the beans located in jar archives.
Content Assist features are available when you work with Struts projects.
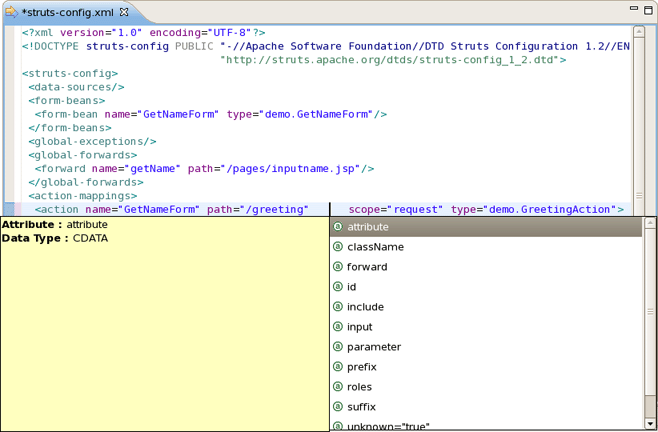
Content Assist helps you in Struts Configuration file.
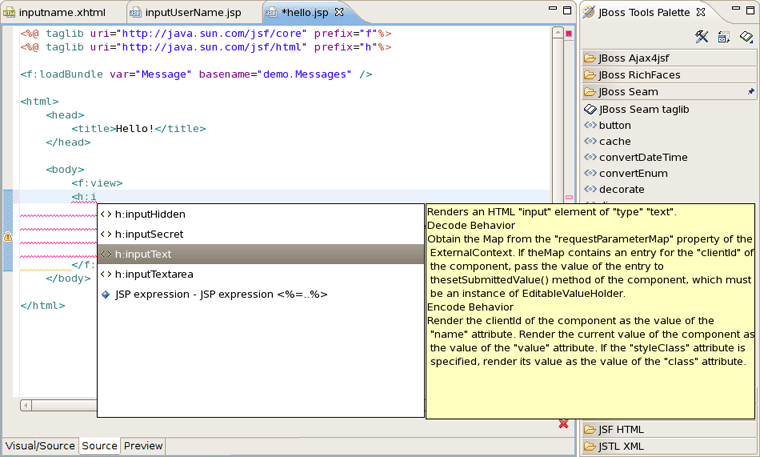
JBDS provides full code completion for JSF tags:
When the tag is selected the required attributes, if there any, are already inserted and the cursor is located to the first attribute. At this point you can ask for attribute proposals.
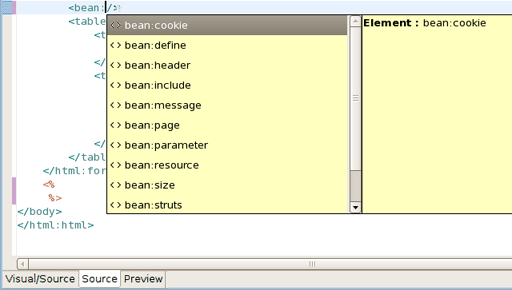
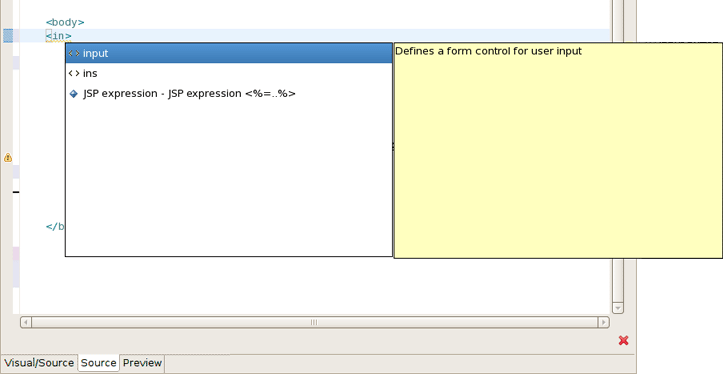
Content assist for HTML tags has the same mechanism as for JSF tags:
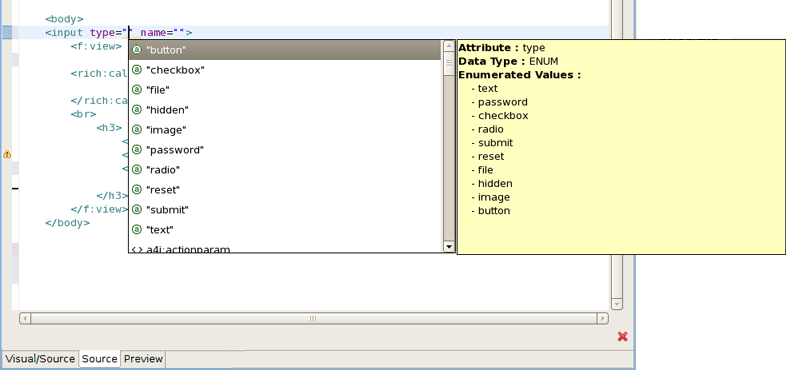
You can use as well attributes proposals for HTML tags:
The code completion for the Seam components in a Seam project shows the proposals marked with Seam icon.
If XHTML file uses custom Facelets components, the Content Assist should also be available for them. For details, see "Content Assist for Custom Facelets Components" later in this guide.
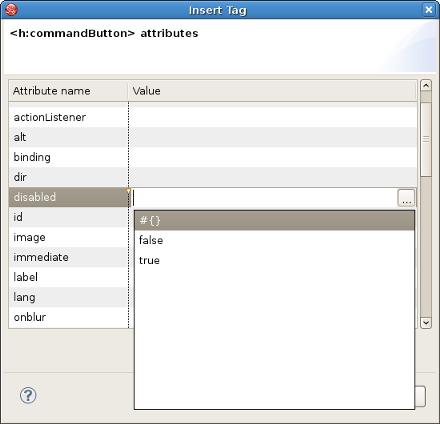
Content Assist is also available for any attribute value of Insert Tag wizard.
Here is what you need to do to add project based code assist to a custom component added in JBoss Developer Studio 2.X:
Create a new xml file in <JBDS_home>studio/eclipse/plugins/org.jboss.tools.common.kb_***/schemas/tld/. For example call it JeniaFaces.xml . The file should be written according to <JBDS_home>/studio/eclipse/plugins/org.jboss.tools.common.kb/kb.jar/org/jboss/tools/common/kb/kb-schema_1.0.dtd
Follow these steps to set what is available for code assist:
Adds code assist for JSF pre-defined objects, such as
value="#{param}"
:
<AttributeType ...>

       <proposal type="jsfVariables"/>

</AttributeType>
Add bundle resource (property file) code assist:
<AttributeType ...>

       <proposal type="bundleProperty"/>

</AttributeType>
Add managed bean property code assist:
<AttributeType ...>

       <proposal type="beanProperty"/>

</AttributeType>
Add managed bean property but of a specified type:
<AttributeType ...>

       <proposal type="beanProperty">

          <param name="type" value="java.lang.Boolean"/>

       </proposal>

</AttributeType>
Add managed bean method with a signature:
<AttributeType ...>

       <proposal type="beanMethodBySignature">

          <param name="paramType" value="javax.faces.context.FacesContext"/>

          <param name="paramType" value="javax.faces.component.UIComponent"/>

          <param name="paramType" value="java.lang.Object"/>

          <param name="returnType" value="void"/>

       </proposal>

</AttributeType>
Add information on your xml file in <JBDS_home>/studio/eclipse/plugins/org.jboss.common.kb_***/plugin.xml
         <tld

            jsf="true"

            name="Jenia Faces"

            schema-location="schemas/tld/myJSF.xml"

            uri="http://www.jenia.org/jsf/dataTools"/>
Restart Eclipse. You should now have code assist for the component.
From JBoss Developer Studio 3.0.0.M1 you should not do any of the steps described before,dynamic code assist to custom components is added automatically.
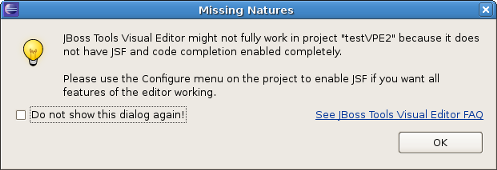
If you open projects that were created in older studio versions such message could appear:
It shows that some features of content assist including this one probably will not work. To fix this problem and turn off the message box execute the following steps:
Right click the project in Package Explorer.
Select Configure -> Add JSF Capabilities from the context menu.
Configure your project using Add JSF Capabilities wizard and press Finish
JBoss Developer Studio offers the flexibility to edit any files in either source or extra visual modes at the same time.
The project is yours and so is the source. JBoss Developer Studio provides you many different graphical editors to speed your application development. At the same time, you always have a full control over all project source files. Any changes you make in the source view immediately appear in the graphical view.
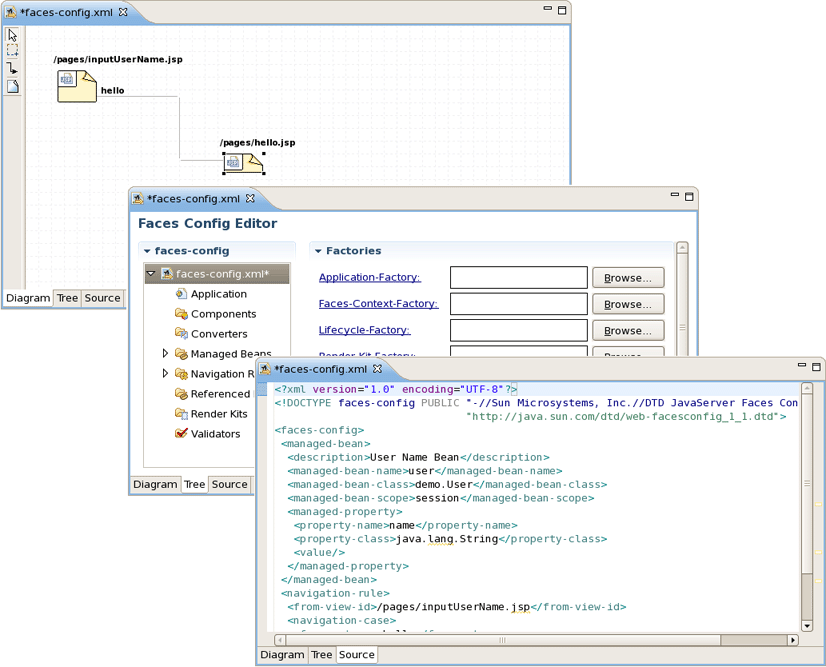
The JSF configuration file editor has three views: Diagram, Tree and Source. All views are synchronized, you can edit the file in any view.
The same is relevant to all other JBoss Developer Studio editors.
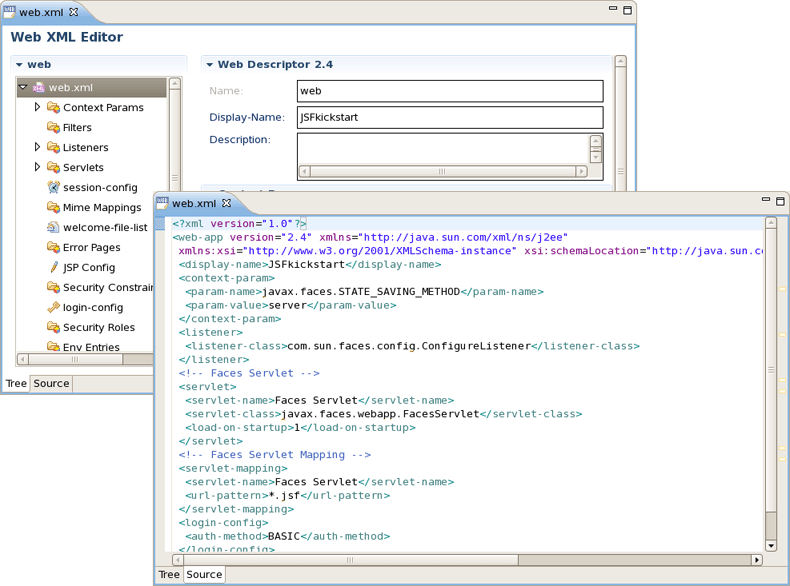
Web XML editor is shown. Web XML editor has a graphical view (Tree) and source (Source).
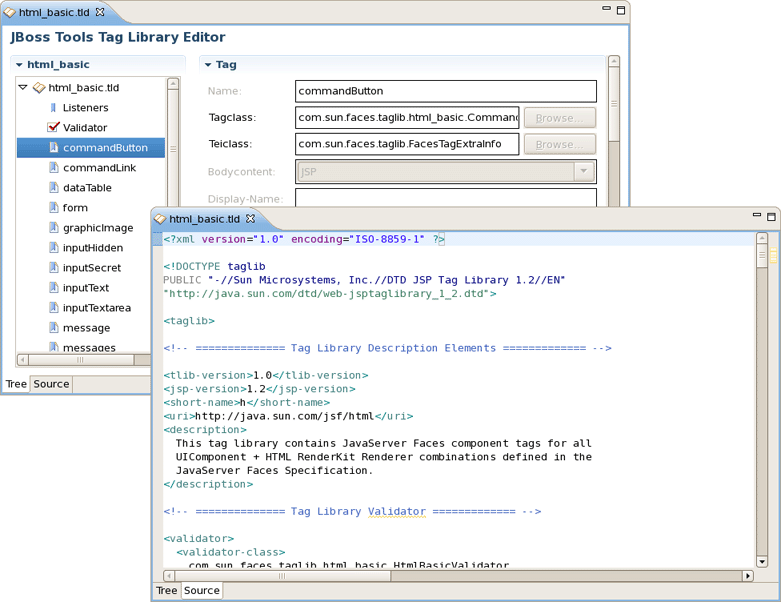
JBoss Developer Studio TLD file editor is shown in Tree view. At any point you can edit the source by switching to Source view.
JBoss Developer Studio comes with a powerful and customizable Visual Page Editor (VPE). You can use the Visual Page Editor to develop an application using any technology: JSF, Struts, JSP, HTML and others. Double-click on the necessary file in the Package Explorer view to open it in the Visual Editor or just drag-and-drop it into perspective (the drag-and-drop feature can be also applied to JSP, XHTML or HTML files created locally).
As a new JSF 2.0 specification has been released, support of new features is now implemented in the Visual Page Editor.
The JSF 2.0 tags like <h:body>, <h:head>, <h:outputscript>, <h:outputstyle>
are supported in the editor as well as the composite components and the resource handling from the expression language. (See the following link on how to use composite components and
following blog post on how to handle the resources form the EL).
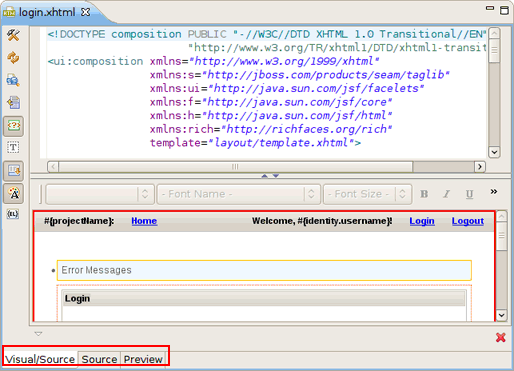
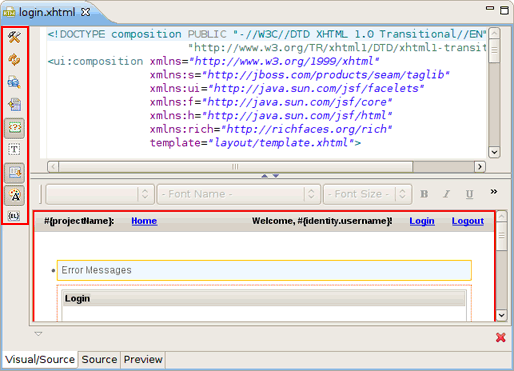
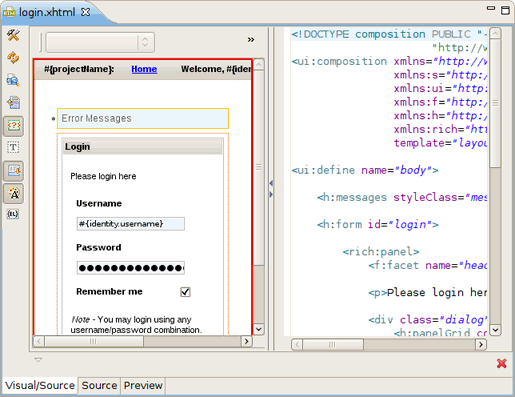
Current VPE version has three tabs: Visual/Source, Source and Preview. To switch between the views you can use tabs at the bottom of the VPE or the shortcuts Ctrl + PageUp/Ctrl + PageDown .
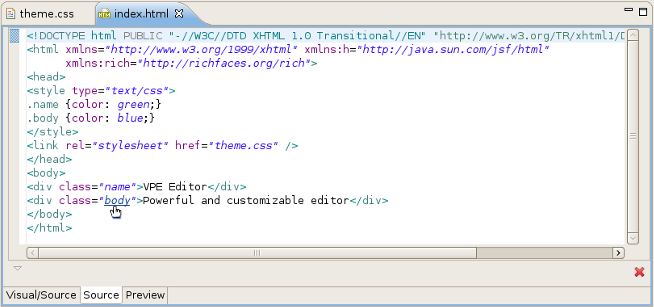
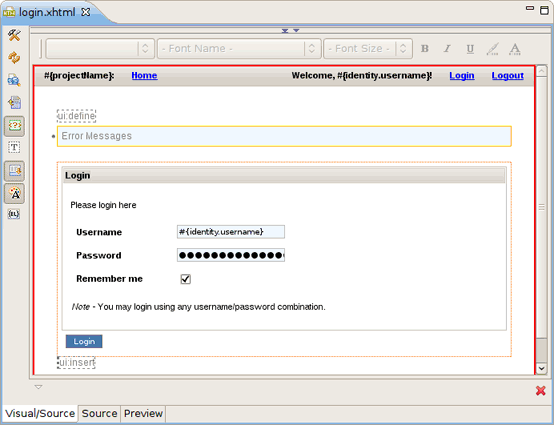
Using the Visual/Source view you can edit your pages in the Source and Visual modes simultaneously having an instant synchronization between them:
The view is designed in the form of a split pane with toggle buttons for quickly moving between Source, Visual or Source/Visual modes as shown on the figure above.
One more way to toggle between the various states of the split pane is using the shortcuts Shift + F6 for maximizing/restoring the Source part and Shift + Alt + F6 for maximizing/restoring the Visual part.
When editing large documents hiding the Visual part will speed up the editing.
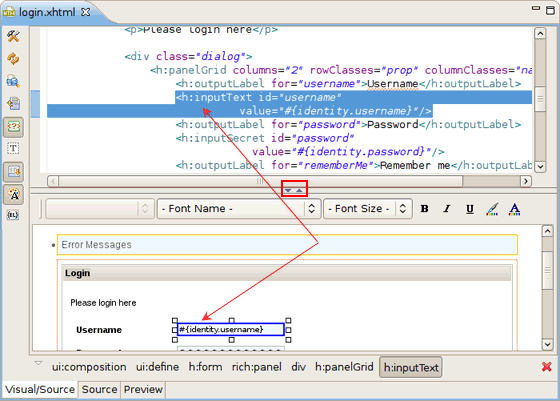
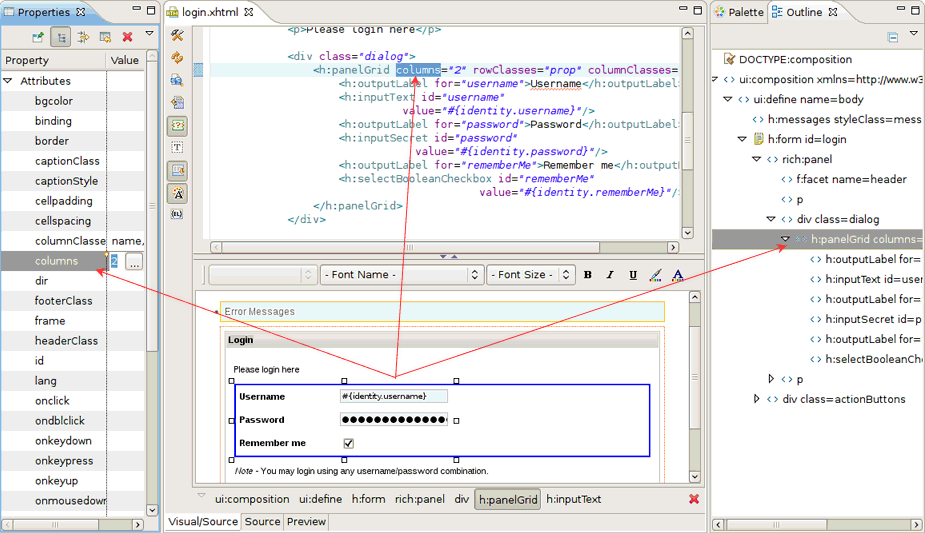
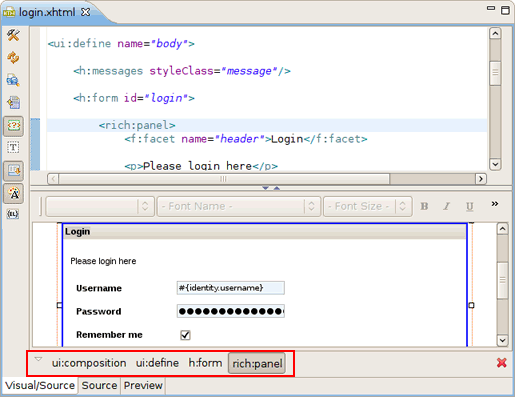
It should be pointed out that, no matter in what mode you are working, you get a full integration with Properties and Outline views:
The Outline view displays a specific outline of a structured file that is currently open in the editor area, and lists its structural elements. Right-click on the elements will open additional options that allow adding other specific elements in necessary positions.
The Properties view shows property names and their values for a selected item. The values are editable, just select any and click on the button that appeared to choose a new value. Key combination Ctrl+Z will return the previous value, Ctrl+Y will return the new value again. The Properties view has additional options and can be set up to display categories and advanced properties.
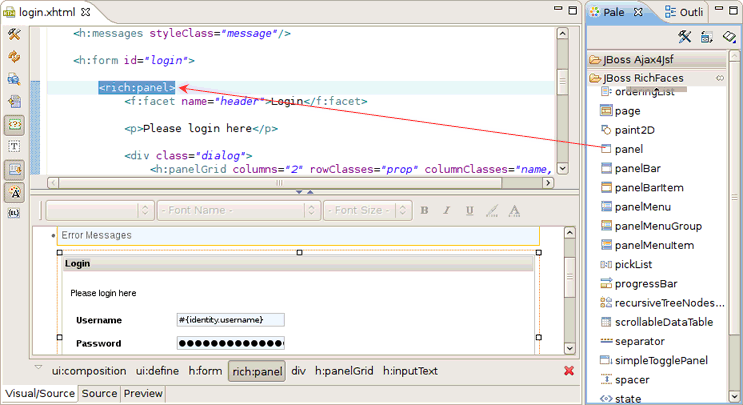
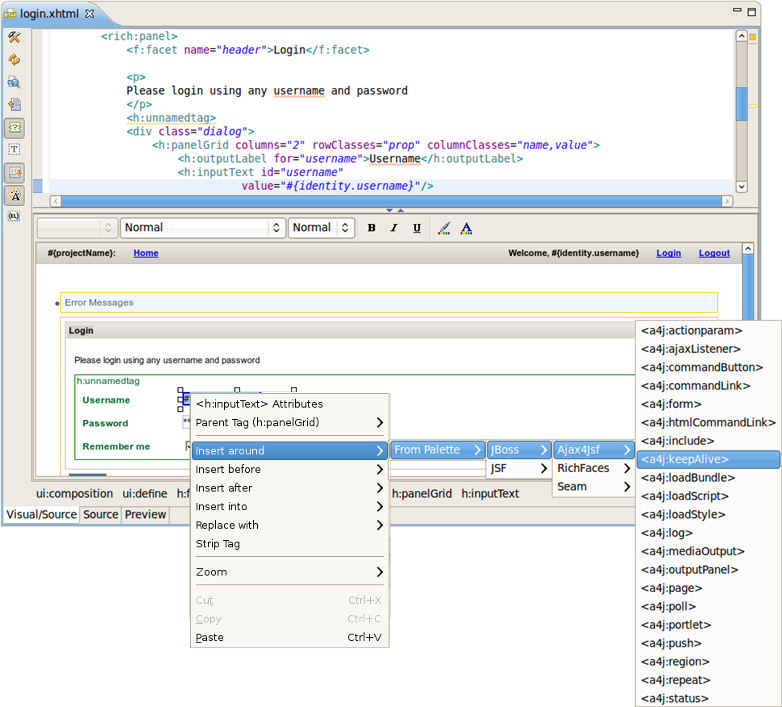
It's also possible to use the JBoss Tools Palette to insert any tag from the list of tag libraries to the page you are editing with just a click or drag-and-drop.
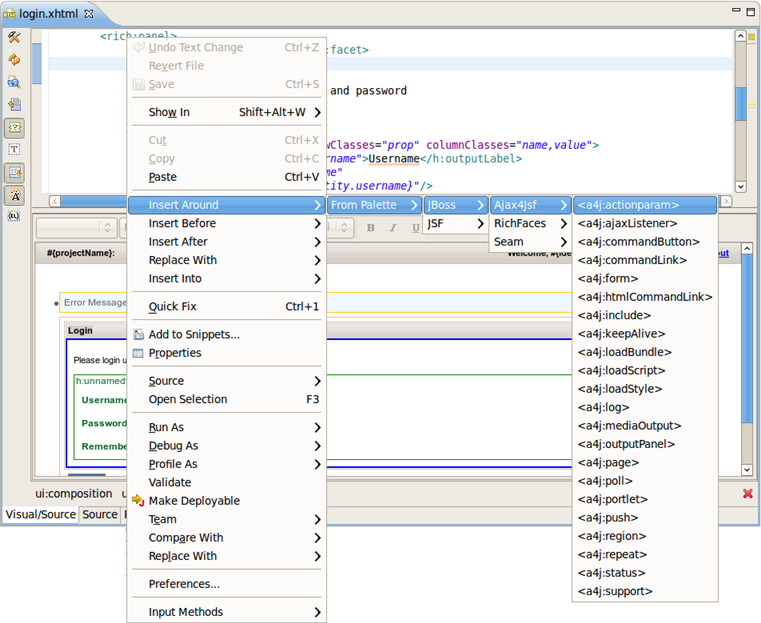
You can insert a tag/component from the palette into either the Source or the Visual part by calling a context menu and selecting Insert around, Insert before, Insert after or Replace With, pointing to From Palette, picking the type of the tag and finally choosing the tag you want to insert.
The image below illustrates how you can insert a tag into the Source part.
And this is how a tag is inserted using a context menu in the Visual part.
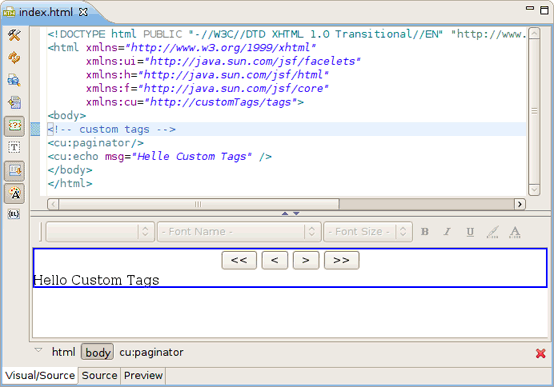
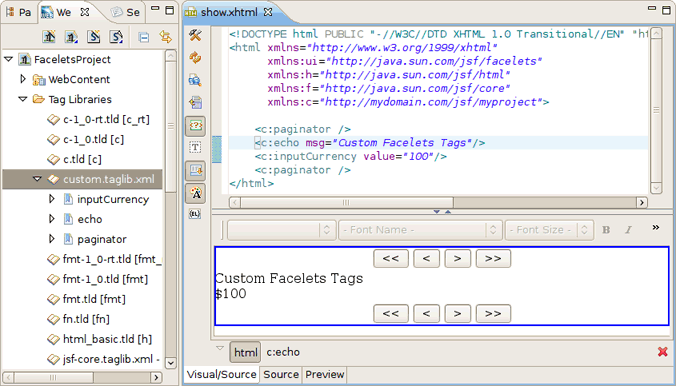
Visual Page Editor also displays custom tags correctly if they are configured properly. The picture below shows an example how custom tags "pagination" and "echo" will be displayed in VPE.
The listings of the custom tags implementations will help to clear how VPE works.
echo.xhtml:
<ui:composition xmlns:ui="http://java.sun.com/jsf/facelets">

    <span class="message">#{msg}</span>

</ui:composition>
paginator.xhtml:
<?xml version="1.0" encoding="UTF-8"?>
<!DOCTYPE html PUBLIC "-//W3C//DTD XHTML 1.0 Transitional//EN"
"http://www.w3.org/TR/xhtml1/DTD/xhtml1-transitional.dtd">
<html xmlns="http://www.w3.org/1999/xhtml"
xmlns:ui="http://java.sun.com/jsf/facelets"
xmlns:h="http://java.sun.com/jsf/html"
xmlns:f="http://java.sun.com/jsf/core">
<ui:component>
<!-- h:inputHidden id="currentPage" replace, because if on page two fields,
two elements with equal id has been used, but should be used only one -->
<h:panelGrid style="margin-right:auto;margin-left:auto;" columns="4">
<h:commandButton value="<<" type="submit"
onclick="document.getElementById('currentPage').value=0" >
</h:commandButton>
<h:commandButton value="<" type="submit"
onclick="document.getElementById('currentPage').value=#{user.currentPage-user.rowsPerPage}">
</h:commandButton>
<h:commandButton value=">" type="submit"
onclick="document.getElementById('currentPage').value=#{user.currentPage+user.rowsPerPage}">
</h:commandButton>
<h:commandButton value=">>" type="submit"
onclick="document.getElementById('currentPage').value=#{user.numberOfItems - user.rowsPerPage}">
</h:commandButton>
</h:panelGrid>
<h:inputHidden id="currentPage" value=""/>
</ui:component>
</html>
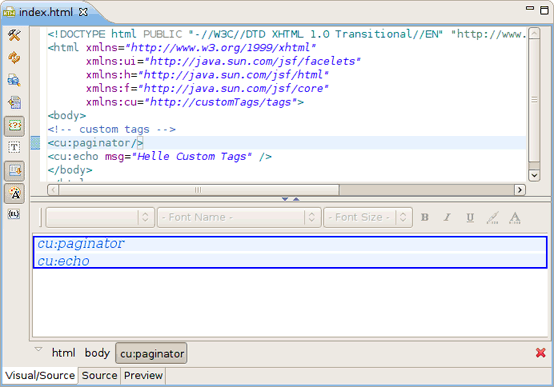
If your custom tags aren't configured correctly your Visual mode will look like this:
VPE supports possibility to add comments in files you are working with (JSP, XHTML, etc.):
HTML comments (<!-- -->) which are output to the client
JSP comments (
<%-- --%>
) which are not output to the client as part of the JSP page
output
Visual Page Editor lets you collapse (hide) and expand (show) sections of your code to make it easier to navigate and read.
Code folding can be enabled by right-clicking on the left margin on the Source part of Visual Page Editor, selecting Folding and checking the Enable Folding checkbox or using the Ctrl+Numpad_Divide shortcut.
When the code folding is enabled a minus sing (  ) will appear on the left margin of the editor next to each
opening block tag.
) will appear on the left margin of the editor next to each
opening block tag.
Click the minus sign to collapse a block tag.
When the minus sing is clicked on the appropriate tag collapses and a plus
sing (  ) is displayed on the left margin as well as a gray
rectangle two dots (
) is displayed on the left margin as well as a gray
rectangle two dots (  ) appears after opening and closing tags.
When working in JBoss Tools JSP editor you are constantly provided with feedback and contextual error checking as you type.
VPE templates support custom tag libs, e.g. Seam Mail facelet taglib, RichFaces taglibs or any other created by you.
VPE templates also provide a support for various versions of tag libraries. It means that the VPE takes control over those components which have different parameters or preview according to the framework version (like seam 1.2 and seam 2.0, or JSF 1.1 and JSF 1.2).
For example,
<s:decorate>
element in seam has different parameters in versions 1.2 and 2.0 as
well as
<h:outputLink>
JSF element has different preview in versions 1.1 and 1.2.
Most web pages use the cascading style sheets (CSS) to control the way they look. With Visual Page Editor you can easily stylise your pages. In this section we are going to introduce you to a powerful mechanism that VPE provides for a complete control over pages styling. More helpful information on wok with CSS files can be found in CSS Perspective chapter
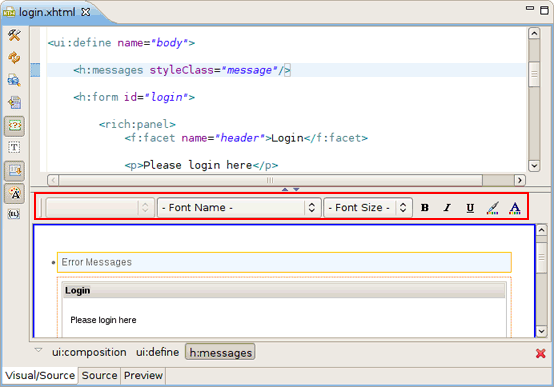
In the Visual part of the VPE there is a graphical
toolbar, use it to add inline styling to JSF and Struts tags on your page. The
toolbar can be hidden with the help of the special button (
![]() ) on the VPE toolbar.
) on the VPE toolbar.
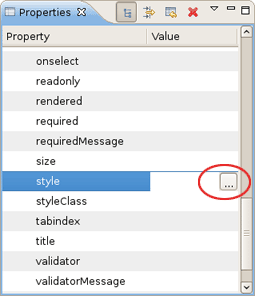
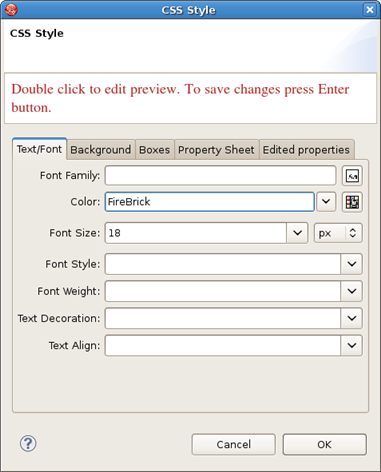
For editing inline styles for DOM elements VPE provides the CSS Dialog. It can be called from style line in the Properties view for a currently selected element.
CSS Style Dialog has several tabs where css properties for text, background, borders and others can be specified. A simple preview which is generated at the top of the CSS Style Dialog allows you to see the changes before you apply them.
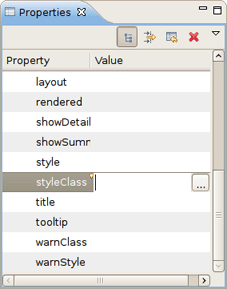
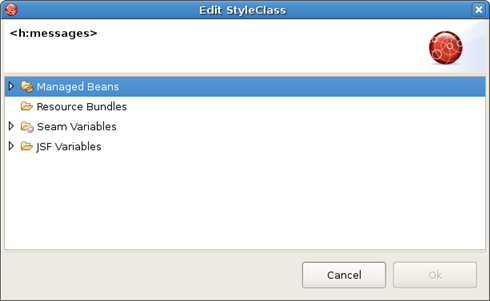
The pages you are working with in VPE can use external stylesheets. VPE allows you to create new style classes in existing stylesheets and/or edit them as well. For these purposes Edit Style Class Dialog is provided.
Select the element for which you need to create or edit style class and press button next to styleClass field in Properties view.
It'll pick up the Edit Style Class Dialog which looks like on the figure below:
Choose a style class from the variants provided and click on the Ok button to apply the changes.
To open a CSS dialog based on the active CSS file click on  in the top panel or use hot-keys (Shift+Ctrl+C).
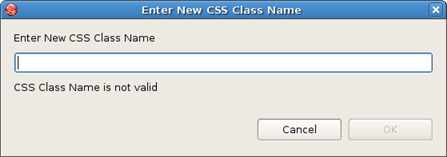
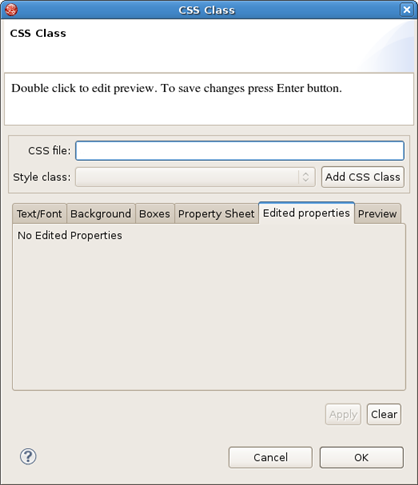
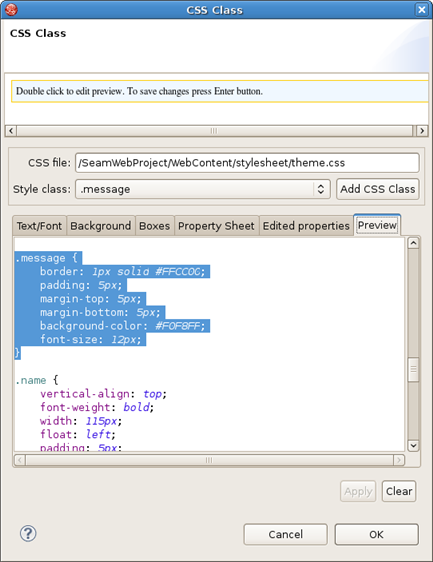
To create a new CSS class for the file click on the Add CSS Class button, write its name in the field appeared and click on the Ok button:
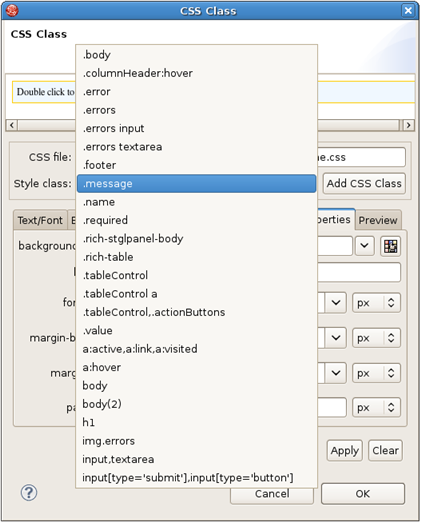
Then you can configure style settings switching between the tabs: Text/Font, Background, Boxes, Property Sheet. The list of already existing classes with names beginning with the symbols printed will be displayed on standard "Ctrl+Space" key combination. To add existing styling to the chosen element just point to the necessary one. Each time you select any class it is displayed in the Preview tab. Click on the Apply button will apply the changes without closing the window.
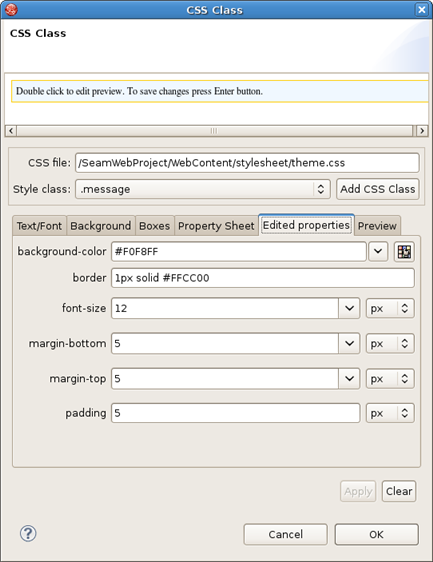
The Edited properties tab gives a preview of the properties which are set for the existing style class. You can easily modify them with the help of this wizard.
If the style class isn't chosen, the tab doesn't show any properties.
The Preview tab is for observing the content of the chosen CSS file. This tab is hidden if no CSS file is chosen.
At the top of the CSS Class Dialog you can see a preview box which visualizes the result. To edit the preview you should double click in the box. To leave the focus, use Ctrl + Tab.
The dialog for creating a new CSS class, which is called from New > Other... > JBoss Tools Web > CSS Class, looks this way:
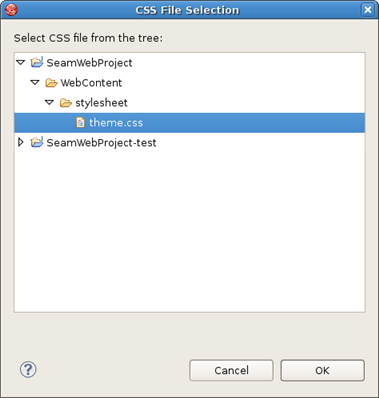
Click on the Browse button to open a dialog to select the CSS file to create a CSS class for:
Choose the necessary CSS file and click on the Ok button.
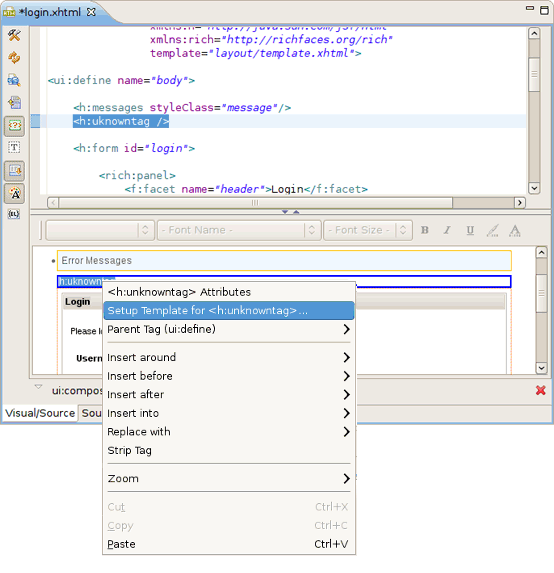
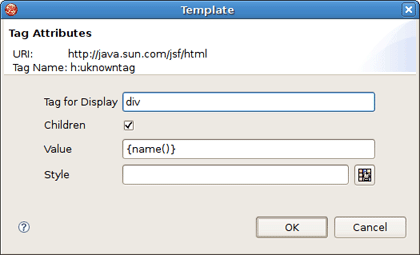
The VPE also makes it possible to create templates for unknown tags.
To call the Template dialog for a tag, right-click on it in Visual mode and select Setup Template for <tag name> option.
Here is what the Template dialog looks like.
Tag for Display field in the Template dialog requires specifying a type of tag. It can be SPAN, DIV, TABLE or any other html element. Check Children , if you want to mark a tag as a child element.
The Value field is for setting a tag value.
As for the Style field, you can fill it out manually or make use of the button next to the field to bring the CSS Dialog for editing styles.
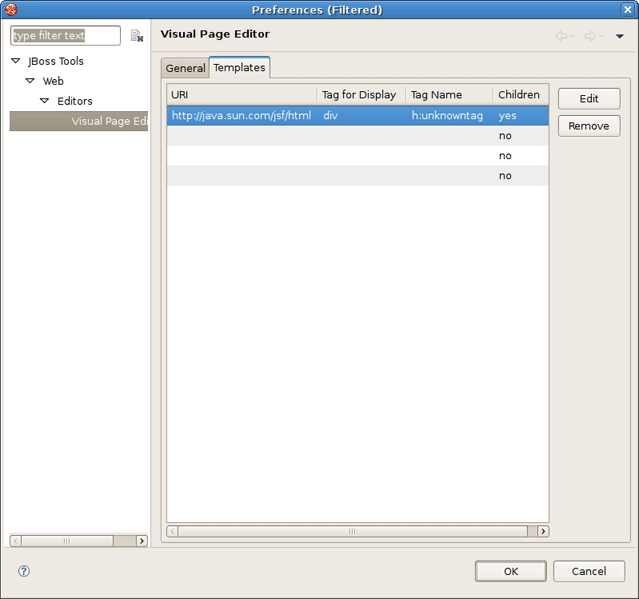
You can observe all defined templates in the VPE Preferences on the Templates tab which you can quickly access by pressing Preferences button.
Here it's possible to edit or remove any listed in the table template.
The Visual Page Editor toolbar includes the next buttons:
Preferences
(
![]() )
)
Refresh
(
![]() )
)
Show bundle's messages as EL expressions (
 )
)
The
Preferences
button
(
![]() )
provides a quick access to the Visual Page
Editor preferences.
)
provides a quick access to the Visual Page
Editor preferences.
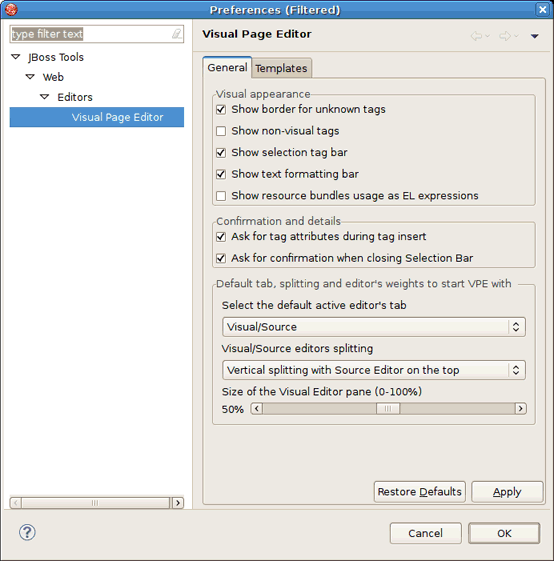
This page provides a number of options associated with the editor representation. The more detailed description on each one you can find in the "JBoss Tools Preferences" chapter under Visual Page Editor.
The
Page Design Options
button
(
![]() )
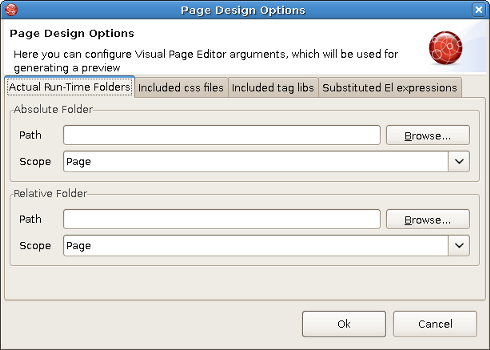
leads to a window which helps you specify necessary
references of the resources. It is represented by a window with 4 tabs. The
first one,
Actual Run-Time folders,
is used to replace absolute and relative path values when
generating a preview:
)
leads to a window which helps you specify necessary
references of the resources. It is represented by a window with 4 tabs. The
first one,
Actual Run-Time folders,
is used to replace absolute and relative path values when
generating a preview:
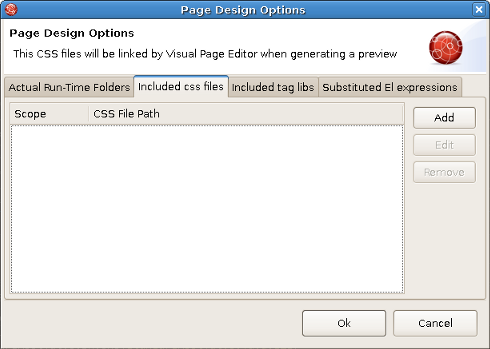
The second tab, Included CSS files , is used to add CSS files to be linked by Visual Page Editor when generating a preview:
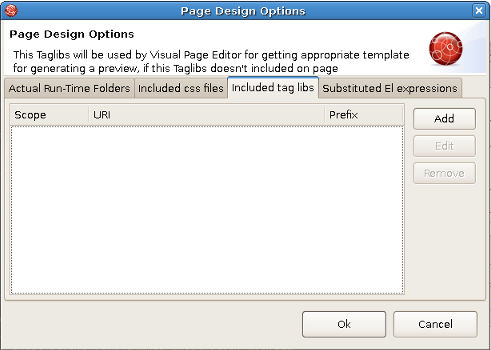
The third one, Included tag libs, can be used to add Taglibs that can be used by the editor for getting appropriate templates to generate a preview:
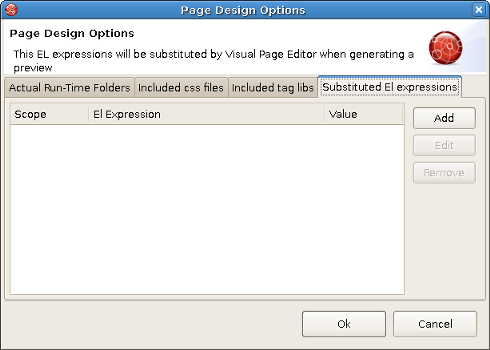
And finally, the Substituted El expressions tab is used to add El expressions that will be substituted by the editor when generating a preview:
The first two tabs of the window let you define actual runtime folders. The example below will help you understand how this can be done.
Suppose you have the following project structure:
WebContent/

  pages/

    img/

       a.gif

    header.jsp

  main.jsp
The content of the header.jsp is:
My Header

<img src="img/a.gif"/>
and main.jsp content is:
<jsp:include page="pages/header.jsp" />
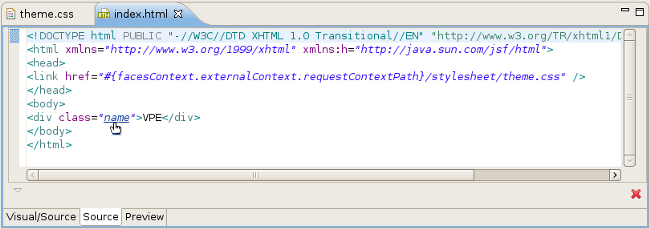
When you open main.jsp in Visual Page Editor, it will not be able to resolve the image from the header, however, it will work fine in runtime. To fix this in design time, click the Page Design Options button and set Actual Run-Time Relative Folder to 'projectName > WebContent > pages' and you will see the image appeared.
Let' consider an example for other tabs. For instance, the definition of your CSS on the page is the next:
<link rel="stylesheet" type="text/css"

    href="#{facesContext.externalContext.requestContextPath}/style.css"/>
This will work fine in runtime, but the Visual Page Editor doesn't know what requestContextPath in design time is. In order to see the necessary styles applied in design time your should add a path to your stylesheet in the CSS File Path section.
The next URI section lets you add URI taglibs so that the editor knows where to find the tag libraries.
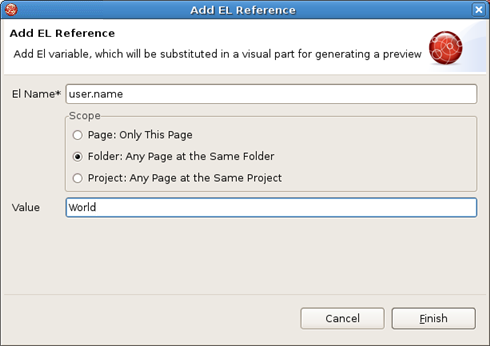
And the last Substituted EL expressions section is provided to specify the values for specific EL variables. It can be useful for a preview generation.
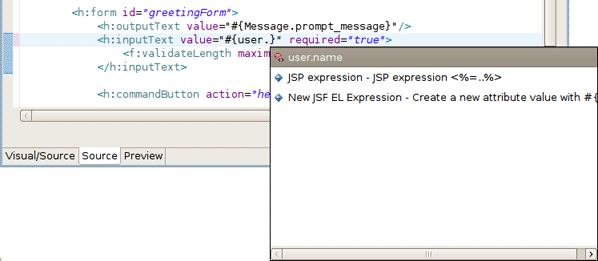
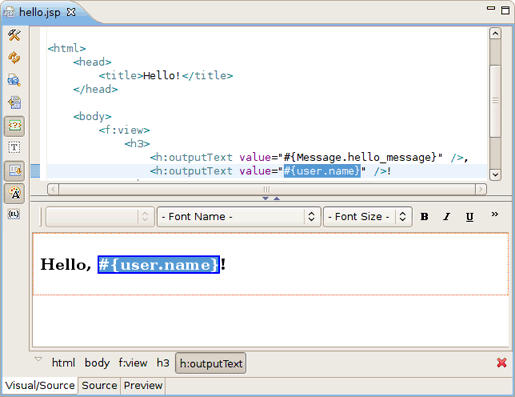
As an example look at the figure below:
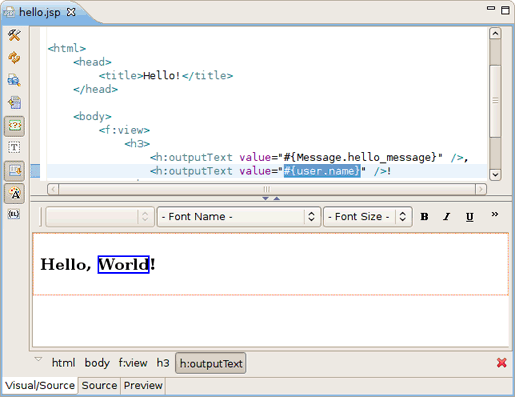
Here bath in Source and Visual modes you see the EL expression #{user.name}. When you switch to Preview view, you'll also see this expression. Now press Page Design Options button and set the value for the "user.name" as World.
As a result in Visual mode and Preview view the word World is displayed.
The Visual/Source Editors splitting buttons provide the possibility to choose one of the four possible layouts for the Visual/Source Editor.
The available layouts and corresponding buttons are as follows:
Vertical Source on top( )
)
Vertical Visual on top (  )
)
Horizontal Source to the left (  )
)
Horizontal Visual to the left (  )
)
Note, at the current view there is only
one button, that proposes the possibility to change it in order the Source and the View are moved
in a clockwise direction.
The option is a self explanatory, i. e. if you want unknown tags to be wrapped in a border in the VPE visual part, just press the
Show border for unknown tags button
(
 ) on the toolbar.
Visual Page Editor provides the option for displaying
non-visual tags in Visual mode of the editor. To enable it select the
Show non-visual tags button (
 ) on the VPE toolbar.
On the figure you can see non-visual elements with gray dashed borders.
You can also switch on this option in the VPE preferences, having clicked on the Preferences
button
(![]() ).
).
You can find useful one more functionality provided by VPE. At the bottom of the Visual/Source view there is a Selection Tag Bar. It's updated automatically allowing to see tags tree for a current component selected in Visual or Source mode, also it allows to select tags back and forward.
If you want to hide the Selection Tag Bar, use
the
Show Selection Bar button (
 ) on the VPE toolbar.
VPE comes with design-time preview feature which is available for:
Struts Pages
JSF Pages
Seam Pages
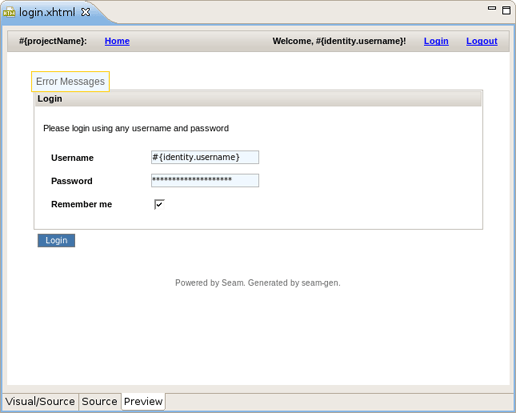
Preview view is read-only, it shows how the page will look like in a browser.
Visual Page Editor (starting from 3.0.0.M3 version of JBoss Tools) supports
custom Facelets tag libraries both declared in the web.xml file
(for details, see
Creating a component) and packed into the JAR file.
In case of Facelets tag library packed in .jar, remember to put *.taglib.xml in right place:
[filename].jar/META-INF/*.taglib.xml
Visual Page Editor recognizes the tags from the custom Facelets tag library and correctly renders them both in source and visual view of the editor.
While editing an XHTML file that uses a custom Facelets components you can always make use of the following editor's features:
Call the content assist as usual by using Ctrl+Space when typing a tag. As proposals you should see custom Facelets tags defined in your Facelets tag library.
While developing using Facelets you can make use of:
OpenOn functionality in XHTML files is available in two views of the Visual Page Editor:
Source view
Ctrl+Click on the namespace will open the Facelets tag file in a separate window.
Ctrl+Click on any custom Facelets tag declared on the page will do the same. The selected tag will be highlighted in the opened file.
Visual view
In the visual view of the VPE, double-click a custom component and the Facelets tag file
(*.taglib.xml) where it is declared will be opened.
Linux users who are going to use earlier then JBoss Tools 3.1.0.M4 versions may need to do the following to get the Visual Page Editor to work correctly on their machines.
The Visual Page Editor requires the library libstdc++.so.5. This library is contained in the compat-libstdc++-33.i386 package.
To install this package on Fedora Core or Red Hat Enterprise Linux run the following command:
yum install compat-libstdc++-33.i386
On any other rpm based distributions download libstdc++.so.5 and run the following command:
rpm -Uvh compat-libstdc++-33.i386
On Debian based distributives run the following command:
apt-get install compat-libstdc++-33.i386
In case you have the library installed and you still have issue with starting the visual page editor then close all browser views/editors and leave one visual page editor open and restart eclipse. This should force a load of the right XULRunner viewer.
If it doesn't help and you use Fedora Core Linux and Eclipse Version: 3.4.1,the issue can be produced because libswt-xulrunner-gtk-3449.so file doesn't present in eclipse-swt-3.4.1-5.fc10.x86_64.rpm/eclipse/plugins/org.eclipse.swt.gtk.linux.x86_64_3.4.1.v3449c.jar.To add this file to eclipse you should:
Decompress eclipse/plugins/org.eclipse.swt.gtk.linux.x86_3.4.1.v3449c.jar form eclipse-SDK-3.4.1-linux-gtk-x86_64.tar.gz
Copy libswt-xulrunner-gtk-3449.so file to your Fedora Eclipse location.
Open the file eclipse.ini,which can be found in your Fedora Eclipse location and add the following line:
-Dswt.library.path=/usr/lib/eclipse
,where /usr/lib/eclipse is the path to your eclipse folder.
Besides Visual Page Editor JBDS is supplied with a huge range of various editors for different file types: properties, TLD, web.xml, tiles, and so on.
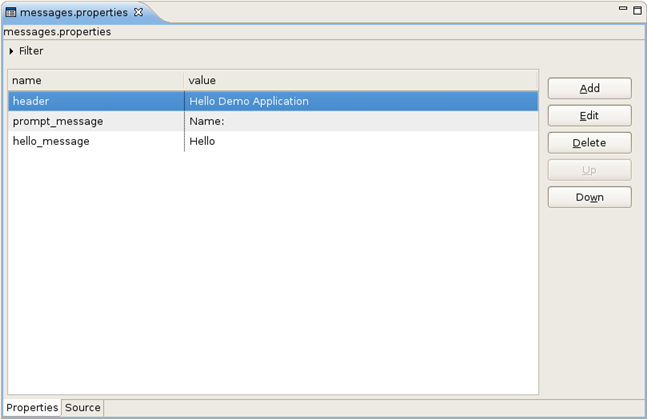
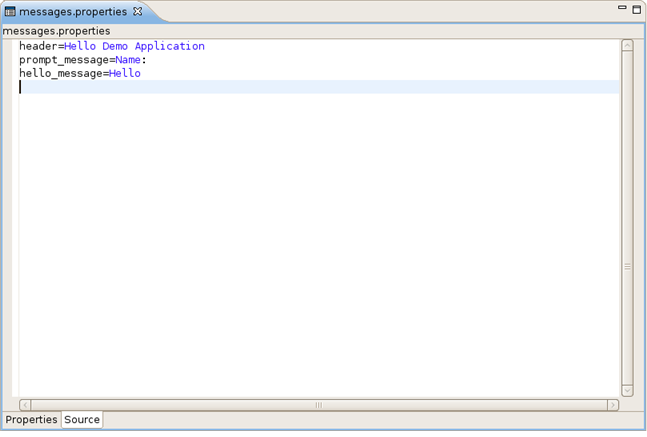
The Properties editor allows you to work in two different modes and also supports unicode characters.
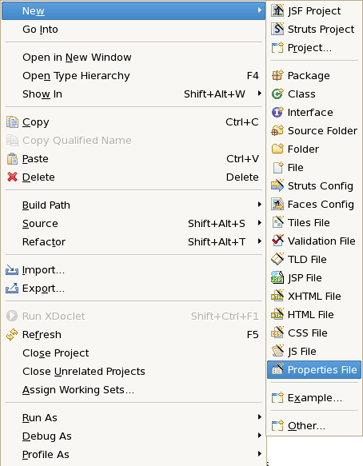
To create a new properties file, in the Package Explorer view, select New > Properties File from the right-click context menu on the folder where you want to create the file.
You can edit the file using a table-oriented "Properties" viewer:
You can also use a Source viewer for editing the file:
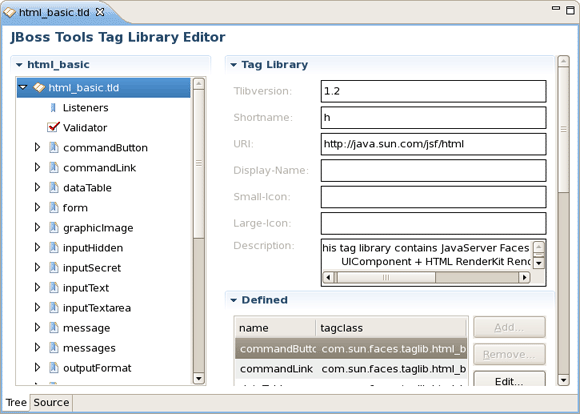
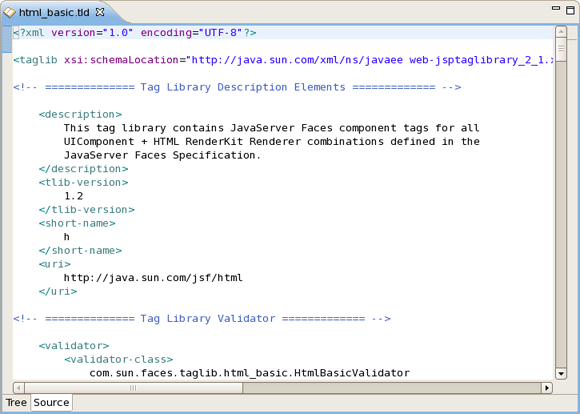
The TLD editor comes with same features you will find in all other JBoss Developer Studio editors:
Graphical and source edit modes
Validation and error checking
You can easily switch from Tree to Source by selecting the Source tab at the bottom of the editor.
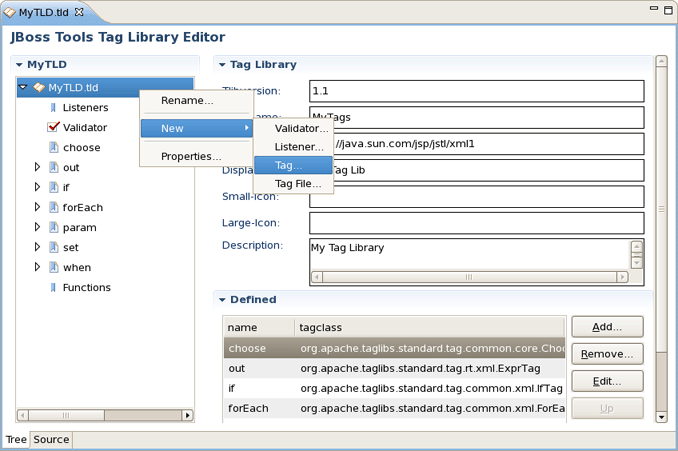
You can easily add a new tag:
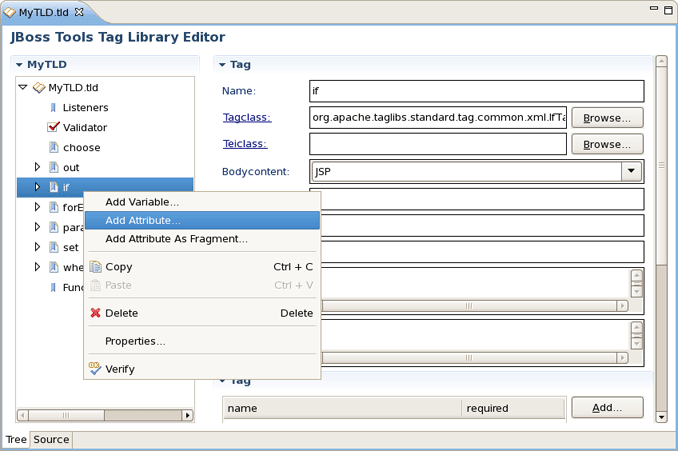
You can also easily add a new attribute to an existing tag:
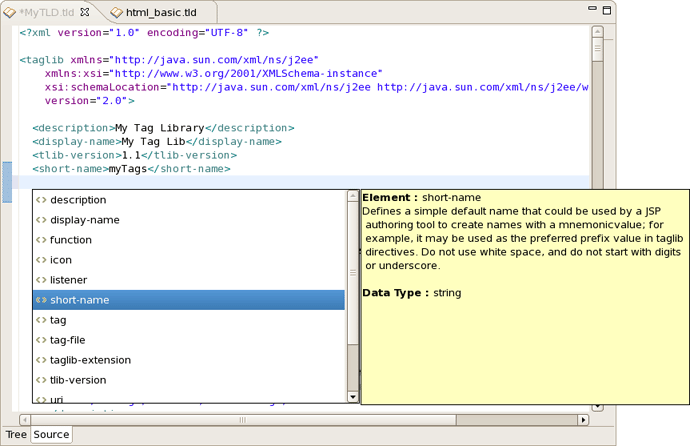
Content assist is available when editing the file using the Source viewer:
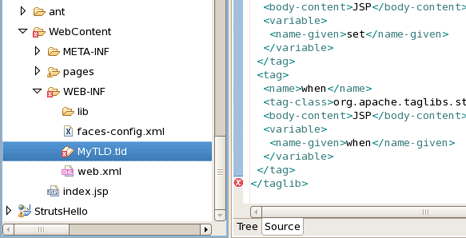
In the Source viewer, if at any point a tag is incorrect or incomplete, an error will be indicated next to the line and also in the Problems view below.
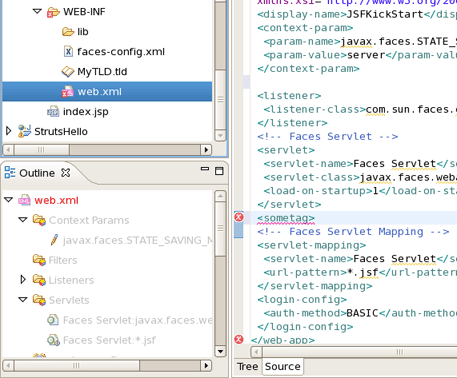
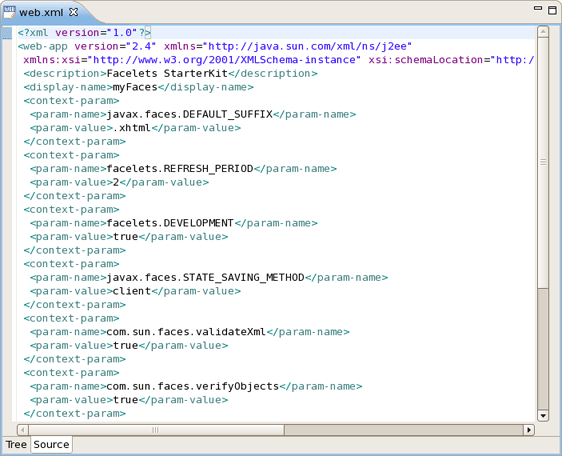
The deployment descriptor web.xml file is intended for describing the servlets, container-managed security constraints and various deployment properties specific for your Web Application.
To edit the deployment descriptor JBoss Developer Studio provides its own web.xml editor that comes with the same features you will find in all other JBDS editors:
Graphical and source edit modes
Validation and error checking
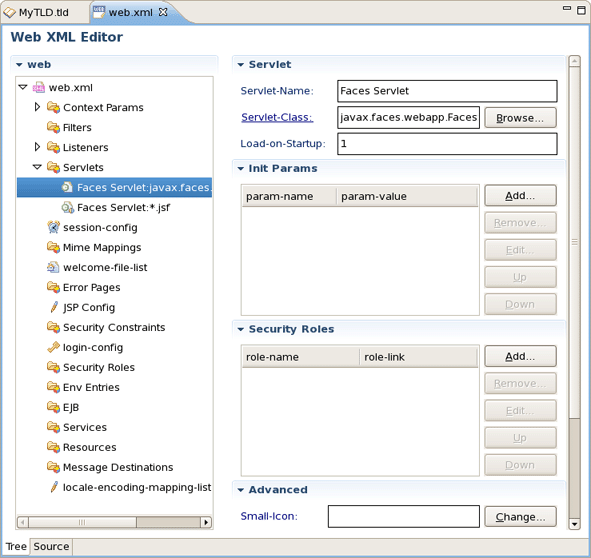
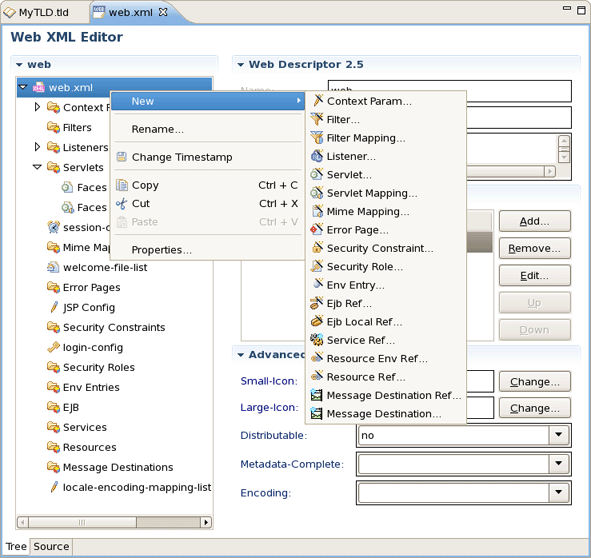
Switch to the Tree view if you want to edit web.xml in a graphical mode. All elements that web.xml could include are located in the left area of the editor in a tree format. Click a node on the left to display and edit its properties that will appear in the right-hand area.
You can add any new elements right in the Tree viewer:
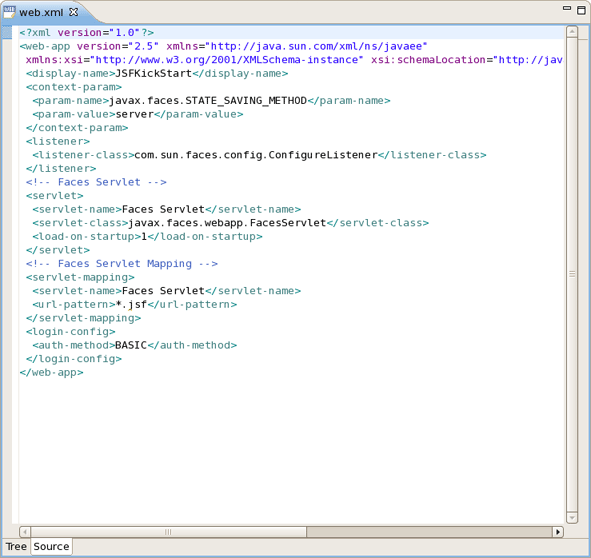
Switch to the Source viewer to edit the web.xml file by hand at any time:
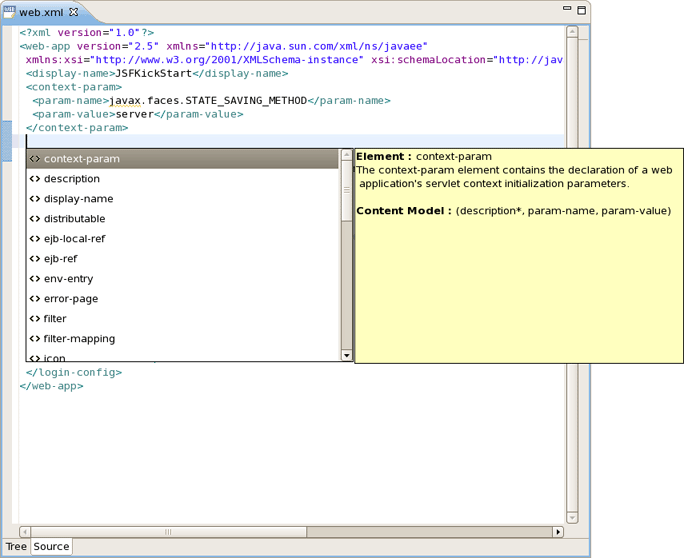
Content assist is available in the Source viewer. Simply click CTRL-Space anywhere in the file.
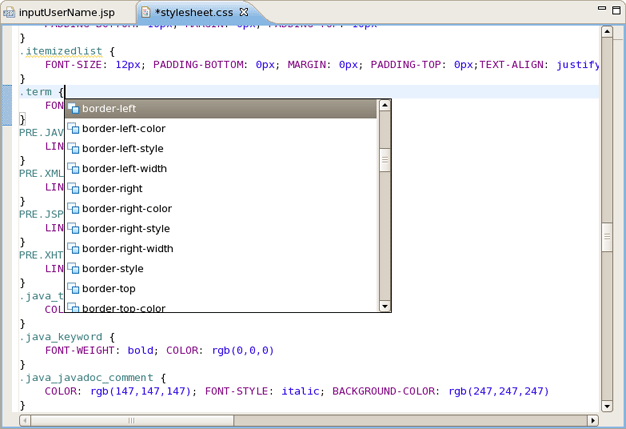
The CSS editor comes with the same features you will find in all other JBoss Developer Studio editors.
Content assist
Validation and error checking
With the CSS (Cascading Style Sheet) editor, you can take advantage of code prompting:
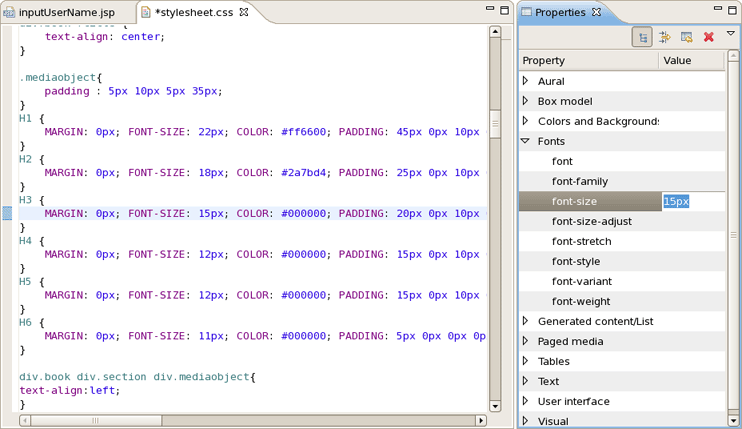
And you can also use the Properties view next to the editor to edit existing stylesheet declaration properties:
To make you work on CSS files more comfortable, CSS perspective is available, read more about it in CSS Editing Perspective chapter
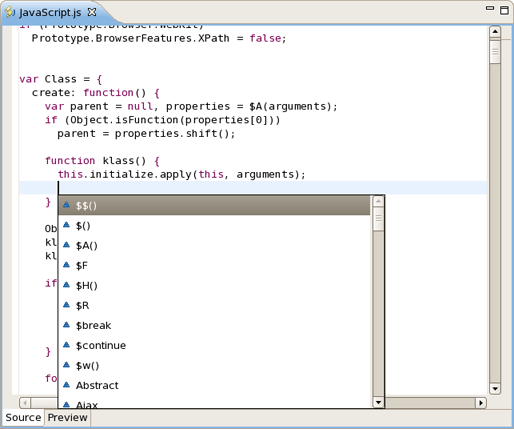
The JavaScript editor includes a Preview viewer and a Source viewer. In the Source viewer, you can use code assist:
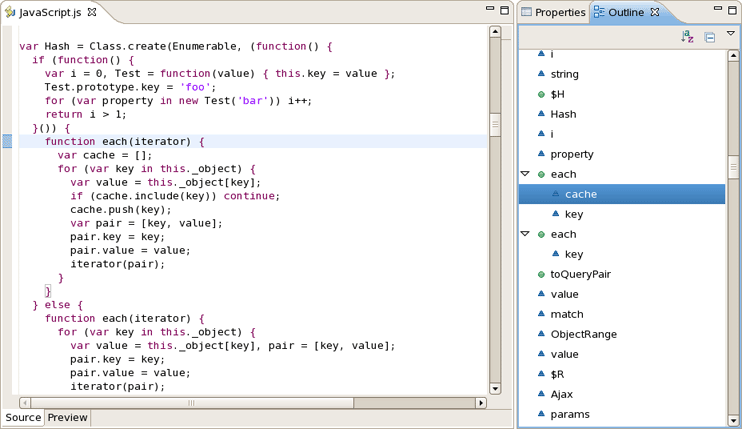
You can also use the Source viewer with the Outline view to navigate around the file:
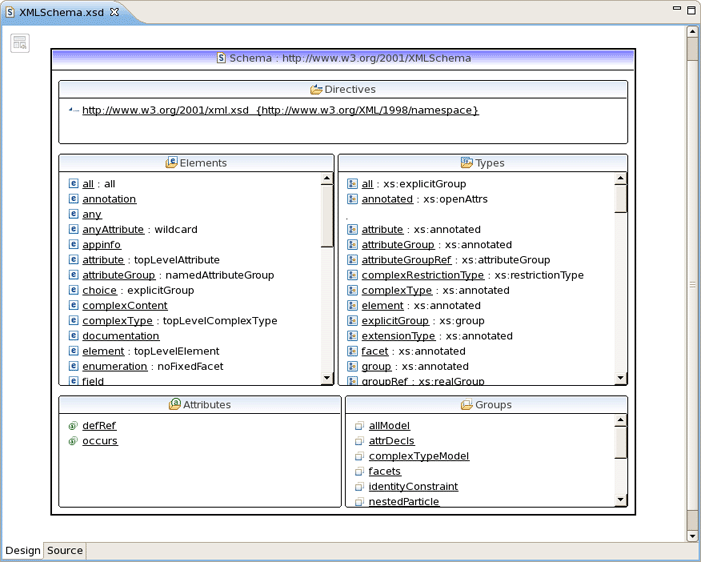
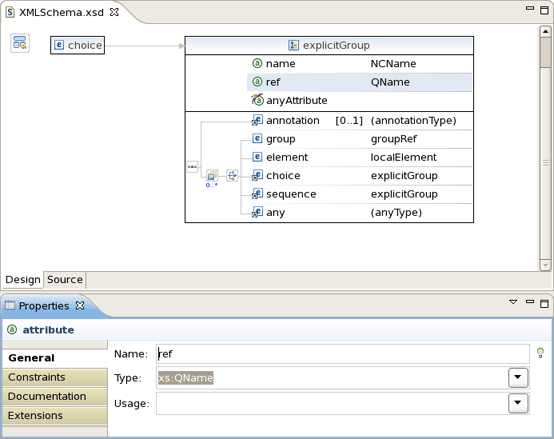
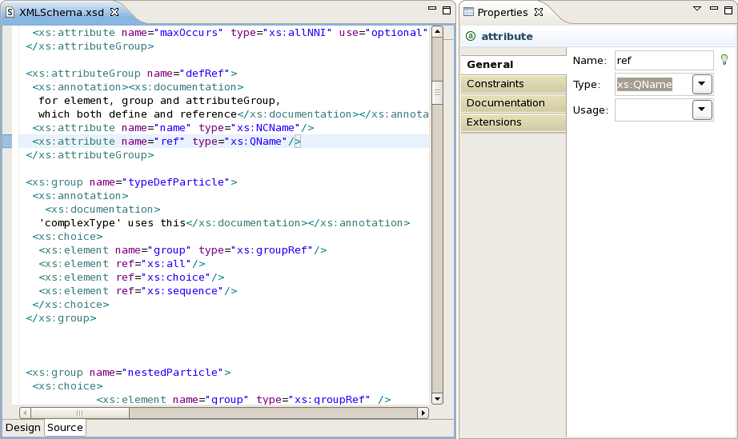
JBoss Developer Studio comes with an XSD Editor for XML Schema files. This editor comes from the Web Tools Project (WTP) (see WTP Getting Started).
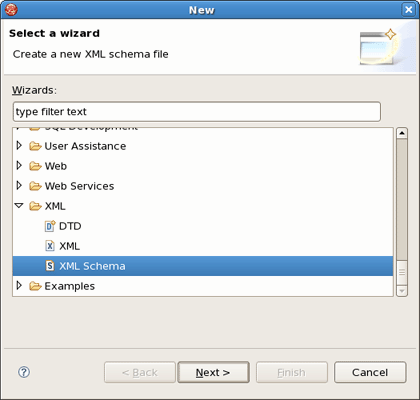
To create a new XSD file, right-click a folder in the Package Explorer view, select New > Other... from the context menu and then select XML > XML Schema in the dialog box.
The XSD Editor includes two viewers for working on the file, a Design viewer and a Source viewer:
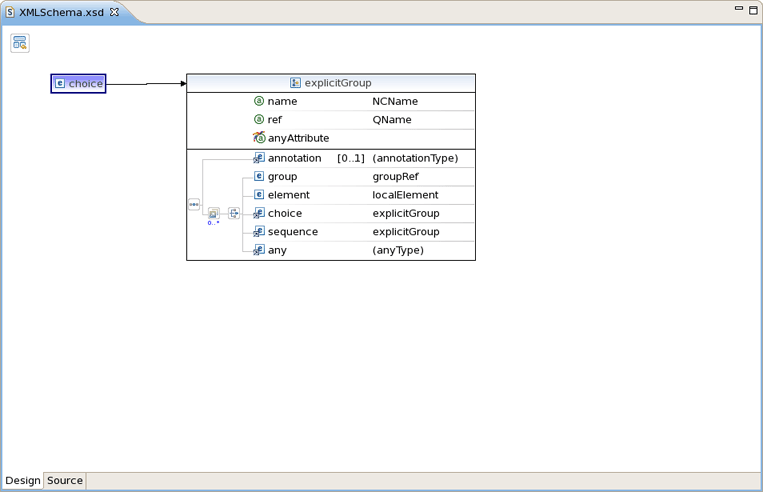
In the Design viewer, you can drill down on an element by double-clicking on it:
Various edit options are available when you right-click an element in the diagram:
You can also use the Properties view to edit a selected element:
You can also use a Source viewer for the file. In this viewer, along with direct editing of the source code, you can also edit the file by using the Properties view on the right: