JBoss Tools includes wizards for the creation of sample web services. These include:
Create a sample Web Service for a JAX-WS web service; and
Create a sample RESTful Web Service for a JAX-RS web service.
These wizards are used within a Dynamic Web project. A dynamic web project can be created by following the steps in Creating a dynamic web project.
Procedure 6.1. Creating a dynamic web project
Access the New Project Dialog
Select → →
Result:
The New Project screen displays.
Define the Project Type
Click the Dynamic Web Project label by expanding the folder.
Click the button to proceed.
Result:
The New Dynamic Web Project screen displays.
Define the Project Attributes
Define the Dynamic Web Project attributes according to the options displayed in Table 6.1, “New Dynamic Web Project”
Table 6.1. New Dynamic Web Project
Field Mandatory Instruction Description Project name yes Enter the project name. The project name can be any name defined by the user. Project location yes Click the Use default location checkbox to define the project location as the Eclipse workspace or define a custom path in the Location field. The default location corresponds to the Eclipse workspace. Target runtime no Select a pre-configured runtime from the available options or configure a new runtime environment. The target runtime defines the server to which the application will be deployed.
Dynamic web module version yes Select the required web module version. This option adds support for the Java Servlet API with module versions corresponding to J2EE levels as listed in Table 6.2, “New Dynamic Project - Dynamic web module version”.
Configuration yes Select the project configuration from the available options. The project can be based on either a custom or a set of pre-defined configurations as described in Table 6.3, “New Dynamic Project - Configuration”.
EAR membership no Add the project to an existing EAR project. The project can be added to an existing EAR project by selecting the checkbox. Once checked, a new EAR project can be defined by clicking the button.
Working sets no Add the project to an existing working set. A working set provides the ability to group projects or project attributes in a customized way to improve access. A new working set can be defined once the button has been clicked.
Table 6.2. New Dynamic Project - Dynamic web module version
Option Description 2.2 This web module version corresponds to the J2EE 1.2 implementation. 2.3 This web module version corresponds to the J2EE 1.3 implementation. 2.4 This web module version corresponds to the J2EE 1.4 implementation. 2.5 This web module version corresponds to the JEE 5 implementation. Table 6.3. New Dynamic Project - Configuration
Option Description <custom> Choosing from one of the pre-defined configurations will minimise the effort required to set up the project. BIRT Charting Web Project A project with the BIRT Charting Runtime Component. BIRT Charting Web Project A project with the BIRT Reporting Runtime Component. CXF Web Services Project v2.5 Configures a project with CXF using Web Module v2.5 and Java v5.0. Default Configuration for JBoss 5.0 Runtime This option is a suitable starting point. Additional facets can be installed later to add new functionality. Dynamic Web Project with Seam 1.2 Configures a project to use Seam v1.2. Dynamic Web Project with Seam 2.0 Configures a project to use Seam v2.0. Dynamic Web Project with Seam 2.1 Configures a project to use Seam v2.1. Dynamic Web Project with Seam 2.2 Configures a project to use Seam v2.2. JBoss WS Web Service Project v3.0 Configures a project with JBossWS using Web Module v2.5 and Java v5.0. JavaServer Faces v1.2 Project Configures a project to use JSF v1.2. Minimal Configuration The minimum required facets are installed. Additional facets can be chosen later to add functionality to the project. Access the Java sub-dialog
Click Next to proceed.
Result:
The New Dynamic Web Project - Java dialog displays.
Define the source and output folders
Define the Dynamic Web Project source and output folders by adding or editing folders as required.
Access the Web Module sub-dialog
Click Next to proceed.
Result:
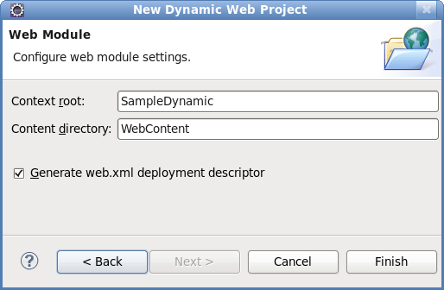
The New Dynamic Web Project - Web Module dialog displays.
Enter the web module settings
Define the settings as listed in Table 6.4, “New Dynamic Web Project - Web Module” including the root folder for path names in the web project context and the name of the web content directory.
Table 6.4. New Dynamic Web Project - Web Module
Field Mandatory Instruction Description Context root yes Enter the context root for the project. The context root identifies a web application to the server and which URLs to delegate to the application. Content directory yes Enter the directory name for the web content. Web resources such as html, jsp files and graphic files will be written to the specified content directory. Generate web.xml deployment descriptor no Check this box to generate a deployment descriptor for the project. URL to servlet mappings and servlet authentication details are written to the deployment descriptor enabling the web server to serve requests. Open the Java EE perspective.
Click the button to complete the project setup.
Result:
If not already set, a dialog will appear prompting the user to open the relevant perspective.
Click the button to display the Java EE perspective.
Result:
The project is configured and the Java EE perspective is displayed.

These sections describe how to generate and deploy a sample web service.
A sample web service can be created by using the Create a Sample Web Service wizard as described in Generate a sample web service
Procedure 6.2. Generate a sample web service
Access the New - Select a wizard dialog
Right click on the project name in the Project Explorer view.
Select → .
Click the Create a Sample Web Service label by expanding the folder.
Result:
The New - Select a wizard dialog displays with the selected wizard type highlighted.
Access the Generate a Sample Web Service dialog
Click the button to proceed.
Result:
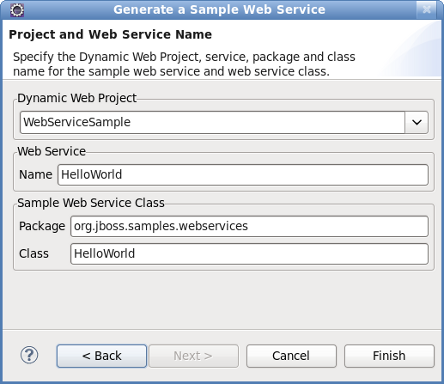
The Generate a Sample Web Service - Project and Web Service Name dialog displays.
Define the service attributes
Define the project, web service, package and class names according to the options displayed in Table 6.5, “Project and Web Service Name”
Table 6.5. Project and Web Service Name
Dialog group Field Mandatory Instruction Description Dynamic Web Project yes Enter the project name. The project name will default to the highlighted project in the Project Explorer. A different project can be selected from the list or entered directly in the editable drop-down list. Web Service Name yes Enter the name for the web service. The web service name will be the url for the service as mapped in the deployment descriptor ( web.xml).Sample Web Service Class Package yes Enter the package for the web service servlet. The default package for the sample web service will be displayed. Class yes Enter the name of the web service servlet. The default class name will correspond to the default web service name resulting in an equivalent url to servlet name mapping in the deployment descriptor ( web.xml).Generate the web service
Click the button to complete the web service setup.
Result:
The web service classes will be generated and the web.xml file updated with the deployment details.
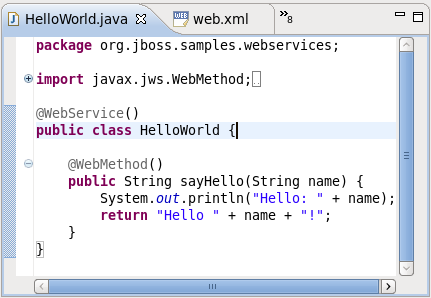
Browse the HelloWorld.java class
Double click the
HelloWorld.javaclass and note the annotated class name and method. These annotations identify the web service entities to the server.Browse the web.xml deployment decriptor
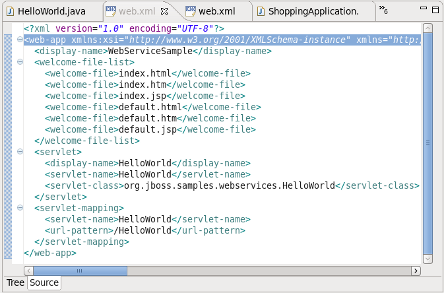
Double click the
web.xmlfile and note the servlet mapping as defined in Figure 6.3, “Generate a Sample Web Service - Project and Web Service Name”. Note also that:the main servlet for the application is
org.jboss.samples.webservices.HelloWorldwhich is given the custom name HelloWorld; andthe main servlet is mapped to the particular url
/HelloWorld[1].
Upon start up, the server will write a WSDL file to the
server-profile/data/wsdl/directory and the WSDL can be accessed with http://localhost:8080/ProjectName/[1]?WSDL or, http://localhost:8080/WebServiceSample/HelloWorld?WSDL.
Once created, the sample web service can be deployed to the target runtime as described in Export the project as a Web Archive (WAR).
Procedure 6.3. Export the project as a Web Archive (WAR)
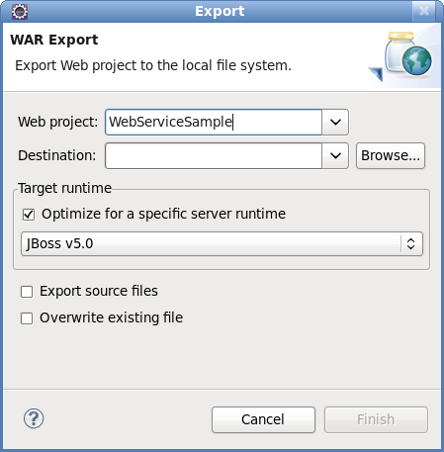
Access the Export dialog
Right click on the project name in the Project Explorer view.
Select → .
Result:
The Export- WAR Export dialog displays with the selected web project highlighted.
Complete the export dialog
Define the WAR file attributes as described in Table 6.6, “Export - War Export”
Table 6.6. Export - War Export
Field Mandatory Instruction Description Web project yes Enter the web project name. The project name will default to the highlighted project in the Project Explorer. A different project can be selected from the list or entered directly in the editable drop-down list. Destination yes Enter or browse to the destination. Set the destination as the buildfolder to store the WAR file within the project. Alternatively, deploy the project directly to thedeploydirectory of the target server profile.Optimize for a specific server runtime no Select this box to optimize the WARfile for deployment to the targeted runtime.The list of available runtimes will be those configured during the project set-up or by selecting → → . Deploy the application
Copy the file to the
deploydirectory of the required target server profile, such as theallprofile. Note that the WAR file destination may have already been set as the deploy directory in Step 2.
A sample Restful web service can be generated by following the steps outlined in Generate a sample RESTful web service.
Procedure 6.4. Generate a sample RESTful web service
Target runtime must have RESTEasy installed
The sample RESTful web service will not work unless it is deployed to a server with RESTEasy installed.
Access the New - Select a wizard dialog
Right click on the project name in the Project Explorer view.
Select → .
Click the Create a Sample RESTful Web Service label by expanding the folder.
Result:
The New - Select a wizard dialog displays with the selected wizard type highlighted.
Access the Generate a Sample RESTful Web Service dialog
Click the button to proceed.
Result:
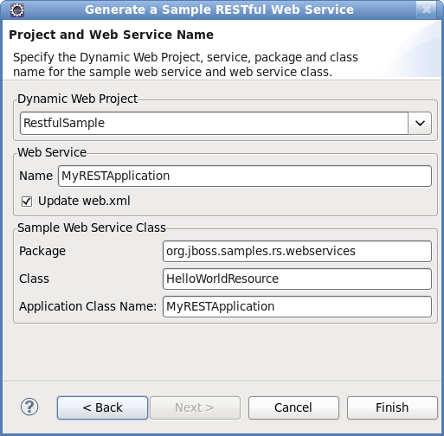
The Generate a Sample RESTful Web Service - Project and Web Service Name dialog displays.
Define the service attributes
Define the project, web service, package and class names according to the options displayed in Table 6.7, “Project and Web Service Name”
Table 6.7. Project and Web Service Name
Dialog group Field Mandatory Instruction Description Dynamic Web Project yes Enter the project name. The project name will default to the highlighted project in the Project Explorer. A different project can be selected from the list or entered directly in the editable drop-down list. Web Service Name yes Enter the name for the web service. The web service name will be the url for the service as mapped in the deployment descriptor ( web.xml).Update web.xml no Check this box to add the service to the deployment descriptor. This option is checked by default and may be unchecked when deploying to JBoss AS 6.0 or RESTEasy 2.0 servers. Service information is not required in the deployment descriptor for these servers. Sample Web Service Class Package yes Enter the package for the web service class. The default package for the sample web service will be displayed. Class yes Enter the name of the web service class containing the JAX-RS annotated path. This class defines the path to the web service and is referenced in the Application Class Name. The Application Class Name is declared in the deployment descriptor providing indirect access to the annotated path. Application Class Name yes Enter the name of the Application Class Name. The Application Class Name constructor instantiates objects of the web service class containing the JAX-RS annotated path, GET and POST methods. It serves as a single point of access to the application for the web server. Generate the web service
Click the button to complete the web service setup.
Result:
The web service classes will be generated and the web.xml file updated with the deployment details.
Browse the MyRESTApplication.java class
Double click the
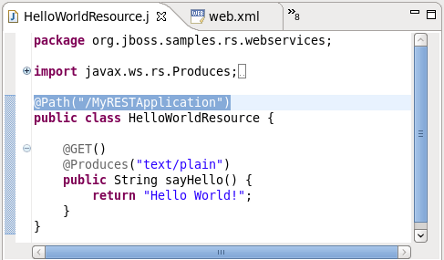
MyRESTApplication.javaclass and note the constructor instantiating objects of type HelloWorldResource. The relevance of this will be discussed shortly.Browse the HelloWorldResource.java class
Double click the
HelloWorldResource.javaclass and note the JAX-RS annotated path and the annotated GET method.Browse the web.xml deployment descriptor
Double click the
web.xmlfile and note thejax.ws.rs.Applicationparameter mapped to the Application class. Note also that:the main servlet for the application is
org.jboss.resteasy.plugins.server.servlet.HttpServletDispatcherwhich is given the custom name Resteasy; andthe main servlet is not mapped to a particular url as indicated by
/*.
The url for sending GET requests can be resolved as follows:
Identify the Application Class as defined in the deployment descriptor.
Note the object type instantiated in the Application class and added to the singleton set:
HelloWorldResource.Note the JAX-RS annotated path declared in the corresponding
HelloWorldResourceclass:@Path("/MyRESTApplication")[1].
The url for sending GET requests is therefore http://localhost:8080/ProjectName/[1] or, http://localhost:8080/RestfulSample/MyRESTApplication.