The JBoss Developer Studio provides sophisticated tools for enterprise applications. With the JBoss Developer Studio, you can get started very quickly with a web prototype, and then scale up your application to include enterprise features (e.g., business processes, web services, etc.) using the same developer tools. It is a "scalable" RAD (Rapid Application Development) tool.
A core element that makes the JBoss Developer Studio "scalable" is the JBoss Seam framework.
The main purpose of this chapter is to tell you about build a simple Seam web application in minutes with the JBoss Developer Studio.
This section helps you to create a simple Seam project.
To create a new web application in Seam, you should create a Seam web project. This section provides all the necessary steps to organize a new project with appropriate tooling and adjust the settings that match your needs. In order to find out more information, see Seam Dev Tools Reference guide
First, select New > Project ... > Seam > Seam Web Project . You will be prompted to enter a name and a location directory for your new project. The wizard has an option for selecting the actual Server (and not just WTP runtime) that will be used for the project. This allow the wizard to correctly identify where the needed datasource and driver libraries need to go.
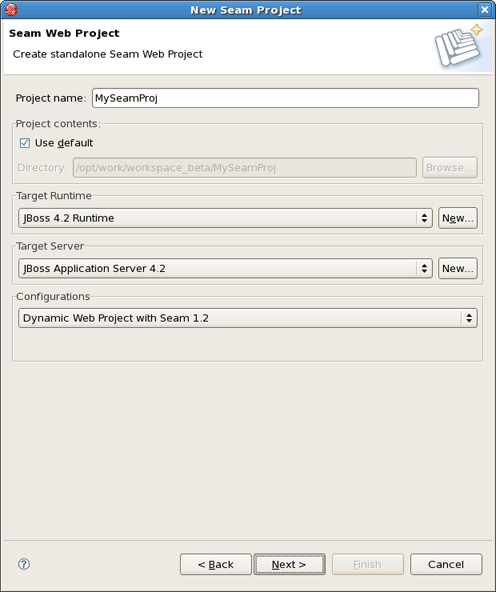
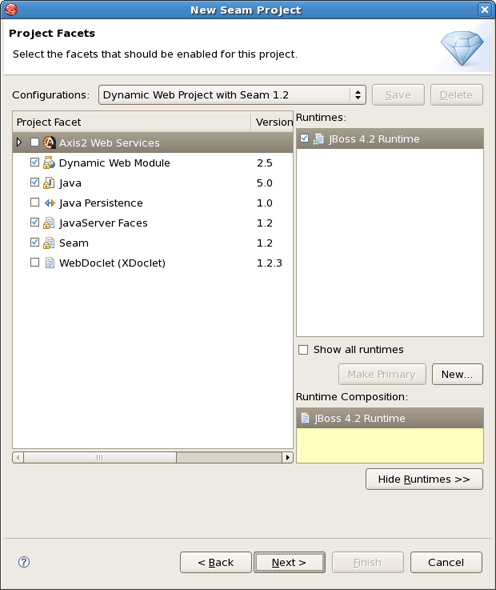
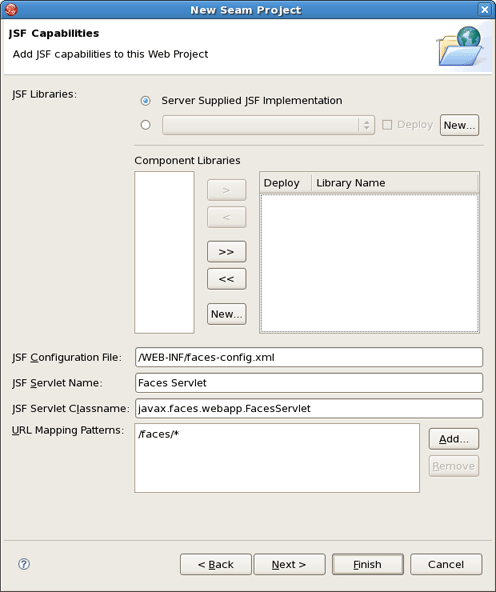
Next, you will be asked to select the "features" you want to use in your project. This allows JBoss Developer Studio to setup the appropriate tooling for your project. Since JBoss Seam integrates all popular Java EE frameworks, you can select any combination of technologies from the list. Here, for this project, we will select Dynamic Web Module, Java, JavaServer Faces (JSF), and Seam Facet for a typical database-driven web application.
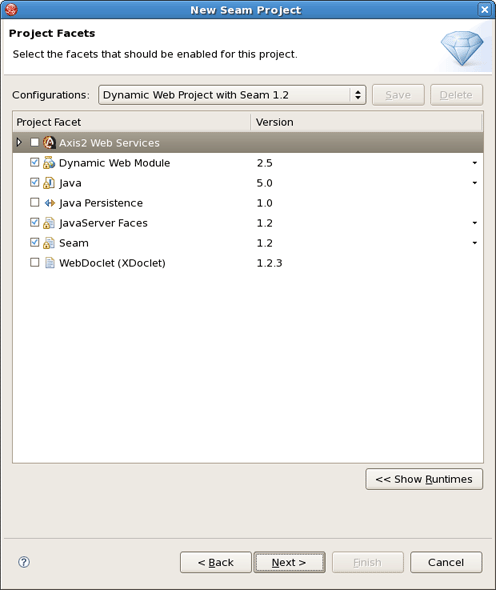
In this screen you can also bring up server runtimes panel by clicking Show Runtimes in the bottom right corner. This panel shows available server runtimes. Then this button will be changed into Hide Runtimes one.
Click Next to proceed further.
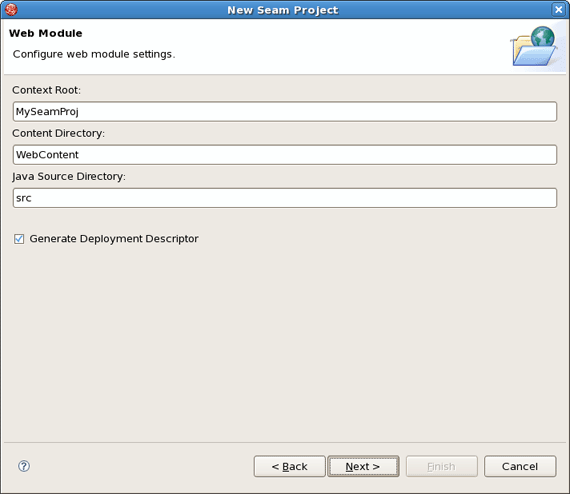
A dynamic web application contains both web pages and Java code. The wizard will ask you where you want to put those files. You can just leave the default values or choose another folder.
On the next form, you will be able to select where those library JARs come from. The easiest is just to select the JARs provided by the JBoss AS runtime associated with this project. That is why it is important to chose the right JBoss AS 4.2 runtime in the project setup window.
Check Server Supplied JSF Implementation . We will use JSF implementation that comes with JBoss server
Click Next
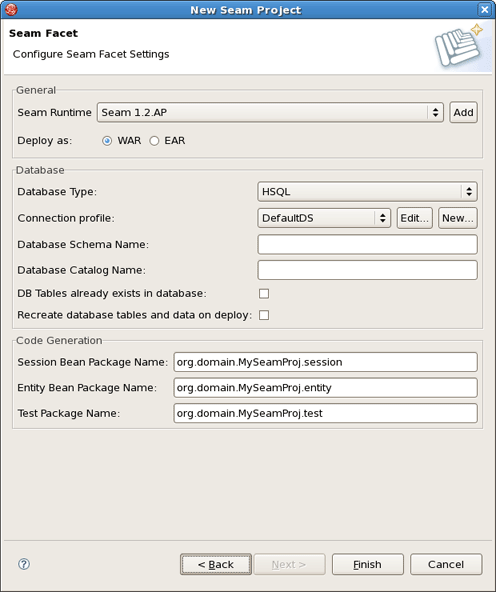
We will also use a default Hibernate Dialect - org.hibernate.dialect.HSQLDialect and deploy as a war archive.
The project setup wizard also asks you to configure how Seam generates code for the project. The Seam Home Folder should point to a valid Seam distribution. By default, it is set to the Seam distribution bundled in your JBoss Developer Studio tool. If you need another one choose setting up the appropriate check box:
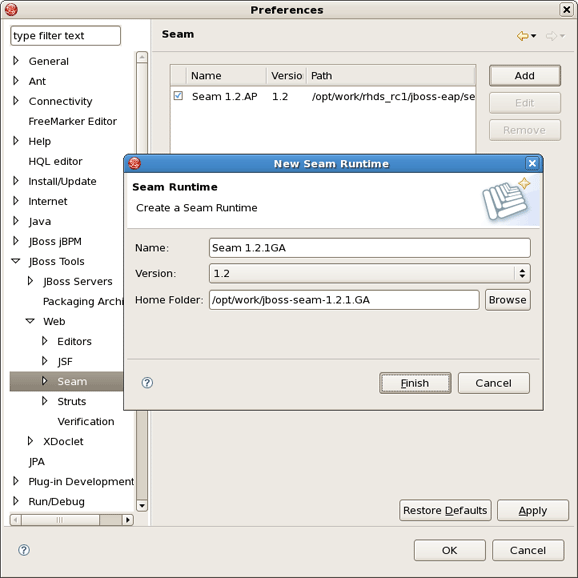
If in this list there is no Seam runtime you want to use add it through Window > Preferences > JBoss Tools > Web > Seam or just click Add button near the Seam Runtime list:
For the deployment format, choose WAR deployment if you want to use POJOs for UI event handling and business logic; choose EAR deployment if you want to EJB3 beans for added features. In most web applications, the WAR deployment option would suffice. You should also enter Java packages for the entity beans (for database mapping) and session beans (for action handlers). All generated code will be placed in those packages.
Click on Finish to generate a project. The generated project contains all the necessary library JARs, XML configuration files, the ANT build script, as well as simple XHTML web pages and Java classes for the skeleton web application. The project will be shown in Project Explorer as well as in Seam Components view. If Seam Components view is not open select Window > Show View > Seam Components .
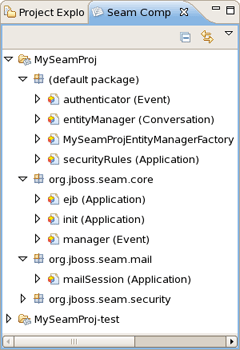
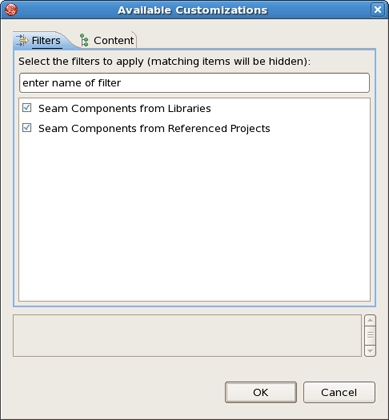
You can hide unused Seam components from this view.
Click the button Menu on the top of the view (down-pointing arrow)
Choose Customize View..
In the dialog Available Customization check the filter you want to apply under the Filters tab
Here, we will show you how to deploy our web project to the server and then view the application as a web site from a URL.
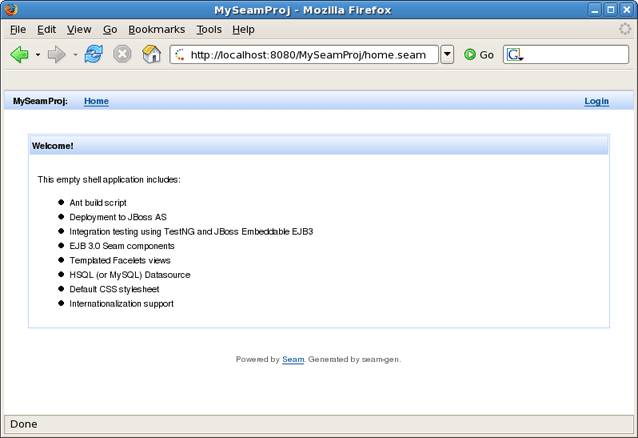
Once the application is generated, you can use the "Run on server" menu to build and deploy it into the JBoss AS runtime associated with the project. All you need is to start JBoss AS in the server manager, and load the browser at URL http://localhost:8080/MySeamProj/. You should see the following web page.
To make simple changes to the page, you just need to double click on the WebContent/home.xhtml file and edit it in the visual editor. Notice that the visual editor lets you both the XHTML code and the rendered page. The rendered view is designed to make it easy to find stuff in a complex XHTML page. If you'd like to learn more about the VPE, read the Editors section in the Visual Web Tools Reference guide.
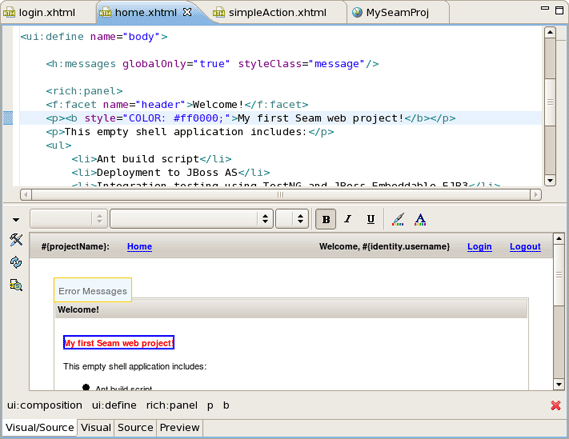
Once you finished editing, save the file ( File > Save ), and reload the browser to see the changes.

Notice that we do not need to re-build and re-deploy the application. Just save the edited page and reload the browser.
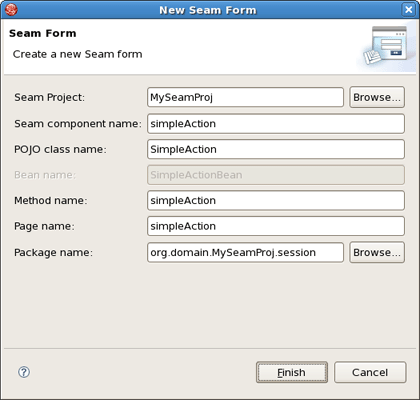
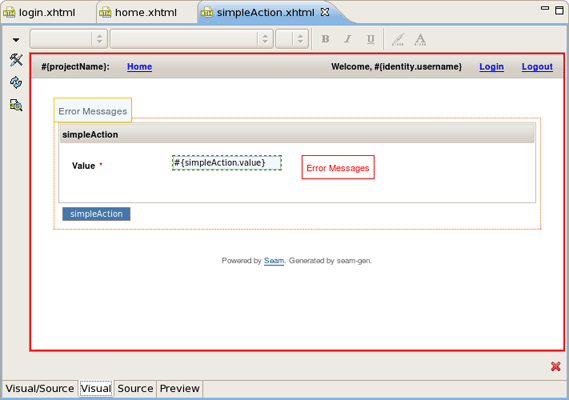
Here, we are going to add a new page and related UI action to the project.
To do this use the New > Other ... > Seam > Seam Form wizard. You are prompted to enter the name of the project and seam component name, all the others fields will be filled by the wizard.
The wizard generate a web page with a single text input field and an action button. Notice that the generated page uses layout/template.xhtml as a template. The template page provides the page header, footer, side menu, and CSS styles (see the template.xhtml for more details). The simpleAction.xhtml is assembled into the template when the simpleAction.seam URL is loaded.
<!DOCTYPE composition PUBLIC "-//W3C//DTD XHTML 1.0 Transitional//EN"

                "http://www.w3.org/TR/xhtml1/DTD/xhtml1-transitional.dtd">


  <ui:composition>  xmlns:s="http://jboss.com/products/seam/taglib"

                              xmlns:ui="http://java.sun.com/jsf/facelets"

                              xmlns:f="http://java.sun.com/jsf/core"

                              xmlns:h="http://java.sun.com/jsf/html"

                              template="layout/template.xhtml">


<ui:define name="body">


    <h:messages globalOnly="true" styleClass="message"/>


    <h:form id="simpleActionForm">

        <rich:panel>

            <f:facet name="header">simpleAction</f:facet>

                    <s:decorate id="valueDecoration" template="layout/edit.xhtml">

                        <ui:define name="label">Value</ui:define>

                        <h:inputText id="value" required="true"

                            value="#{simpleAction.value}"/>

                    </s:decorate>

                    <div style="clear:both"/>

         </rich:panel>


         <div class="actionButtons">

             <h:commandButton id="simpleAction" value="simpleAction"

                             action="#{simpleAction.simpleAction}"/>

        </div>

    </h:form>

</ui:define>


</ui:composition>
The #{simpleAction.value} notation on the web page maps to the "value" property in the backend component named "simpleAction", and the #{simpleAction.simpleAction} notation indicates that the simpleAction() method is called when the button is clicked on. Here is the "simpleAction" named backend Seam component generated by the wizard.
package org.domain.MySeamProj.session;


import org.jboss.seam.annotations.Name;

import org.jboss.seam.annotations.In;

import org.jboss.seam.annotations.Logger;

import org.jboss.seam.log.Log;

import org.jboss.seam.core.FacesMessages;

import org.hibernate.validator.Length;


@Name("simpleAction")

public class SimpleAction {


    @Logger private Log log;


    @In

    FacesMessages facesMessages;


    private String value;


    //seam-gen method

    public void simpleAction()

    {

        //implement your business logic here

        log.info("simpleAction.simpleAction()

              action called with: #{simpleAction.value}");

        facesMessages.add("simpleAction #{simpleAction.value}");

    }


    //add additional action methods


    @Length(max=10)

    public String getValue()

    {

        return value;

    }


    public void setValue(String value)

    {

        this.value = value;

    }


}
Load the Simplepage.seam in the web browser. Type something in the text field and click on the "simpleAction" button. A JSF message containing the input string is created by the simpleAction.simpleAction() method. The message is displayed on the page via the <h:message> tag.
In this section we'll focus on the support of input validations.
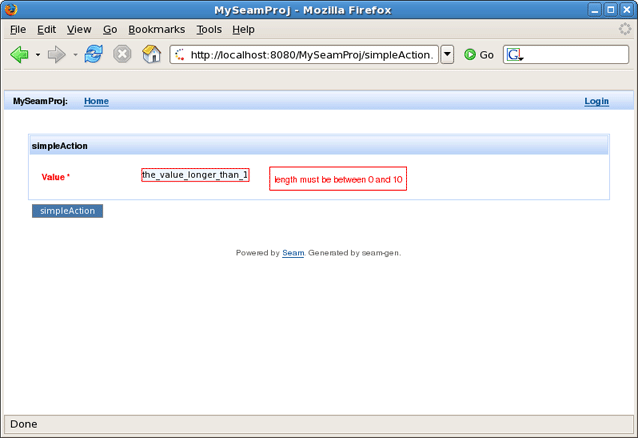
Notice that in the generated SimpleAction class, there is a @Length annotation to validate the input when the input string is bound to #{simpleAction.value} . To see how this works, enter a text string longer than 10 chars and click on the button. This is what you should see.
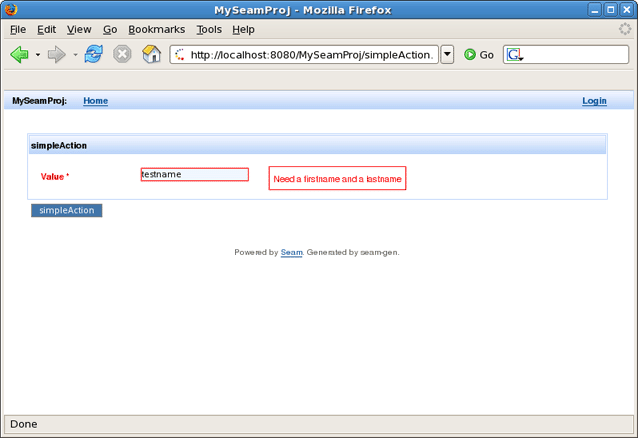
Seam supports many different input validation annotations. To see an example, you can replace the @Length(max=10) annotation with the following. It would require the input string to have a first name and last name separated by a space. If the validation fails, the web page would print the customized error message.
@NotNull

@Pattern(regex="^[a-zA-Z.-]+ [a-zA-Z.-]+",

      message="Need a firstname and a lastname")

public String getValue()

{

        return value;

}
Save the Java file, deploy the application, and reload the browser to see the new validation scheme in action.
This section tells you about how you can add a new UI Component.
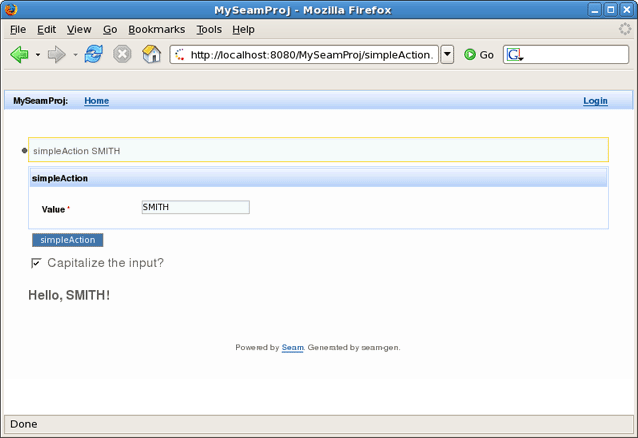
Now, let's add a little more logic to the application. We will add a new boolean property to the action component. If it is set to true, the action would capitalize the input string and display it on the web page. The following code in the SimpleAction class implements the logic.
@Name("simpleAction")

public class SimpleAction {


    private boolean convertToCap;


    public boolean getConvertToCap () { return convertToCap; }

    public void setConvertToCap (boolean b) { convertToCap = b; }


    public String hello()

    {

        if (convertToCap) {

          value = value.toUpperCase ();

        }

        return null;

    }

    ... ...

}
Next, on the web page, add the following line to display the value property on the simpleAction component. Notice that code completion is supported for the JSF EL expression.
<p><b>Hello, #{simpleAction.value}</b></p>
Finally, on the web page, we add a boolean selection box component. It is bound to the convertToCap property on the backend component.
<h:selectBooleanCheckbox title="convertToCap"

  value="#{simpleAction.convertToCap}" />

Capitalize the input?
Deploy the application and see it in action now.
As the last point, we can add an access control to the application.
You have probably noticed that the web page template has a login link at the top of the page. You can use the Seam security framework to secure access to any web page or web action. We just use hardcoded username and password but you can easily change it to use database, LDAP or any other means. The simplest use case for Seam security is to add a declarative security in pages.xml ( WebContent > WEB-INF > pages.xml ) like this:
<!DOCTYPE pages PUBLIC

                     "-//JBoss/Seam Pages Configuration DTD 1.2//EN"

                     "http://jboss.com/products/seam/pages-1.2.dtd">


<pages no-conversation-view-id="/home.xhtml"

                 login-view-id="/login.xhtml">

...


 <page view-id="/simpleAction.xhtml" login-required="true"/>


</pages>
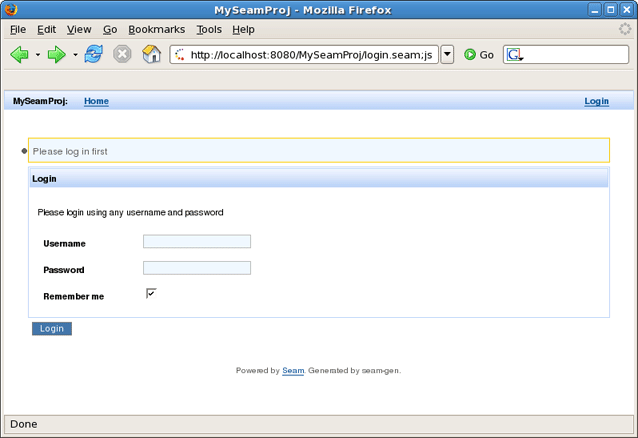
Re-deploy the application and try the action button. The application redirects to the login page asking for login credentials. The method is invoked after you successfully logged in.
Seam on JBoss: Seam Framework
Ten Good Reasons to use Seam: Why Seam
Getting Started: Getting Started with JBoss Seam
Wiki: JBoss Wiki
FAQ: JBoss Seam FAQ
Downloads: JBoss Seam Downloads
Jira: Jira issue tracker
Rules Framework: JBoss Rules
Seam Tools - New and Noteworthy: What's new and noteworthy
Max Andersen's blogs: Max's blog, In Relation To...