Create new JBoss Tools Documentation Jira issue

This will launch the Jboss Tools Jira page - to complete your feedback please login if needed, and submit the Jira.
JBoss.orgCommunity Documentation
Go To: Table of Contents
The Import Wizard provides a means to create a model based on the structure of a data source, to convert existing metadata (i.e. WSDL or XML Schema) into a source model or to load existing metadata files into the current VDB.
To launch the Import Wizard, choose the File > Import action or select a project, folder or model in the tree and right-click choose "Import..."
You can import files from within an archive file using the steps below.
Step 1 - In Model Explorer
choose the File > Import action ![]() in the toolbar or select a project, folder or
model in the tree and choose Import...
in the toolbar or select a project, folder or
model in the tree and choose Import...
Step 2 - Select the import option General > Archive file and click NEXT>
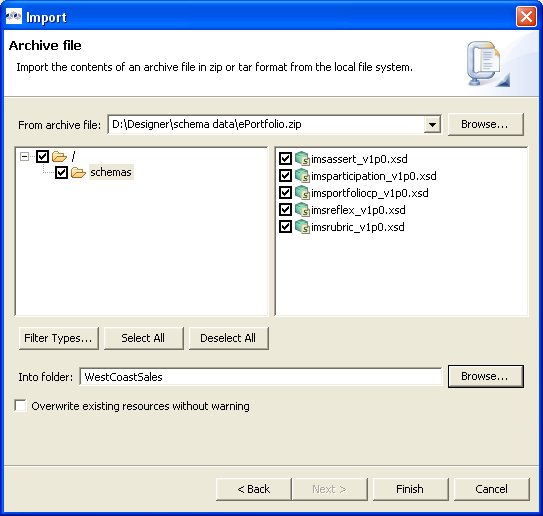
Step 3 - Click on the Browse button to find the archive (i.e. zip) file you wish to import. and click NEXT>
Step 4 - Open directory structure tree in left panel. Define which files from archive to import by checking/unchecking in trees.
Step 5 - Specify valid Into Folder by editing the text field, or select Browse... button to locate and select a folder or project in your workspace.
Step 6 - Click Finish.
You can import files located on your local file system using the steps below.
Step 1 - In Model Explorer
choose the File > Import action ![]() in the toolbar or select a project, folder or
model in the tree and choose Import...
in the toolbar or select a project, folder or
model in the tree and choose Import...
Step 2 - Select the import option General > File system and click Next>
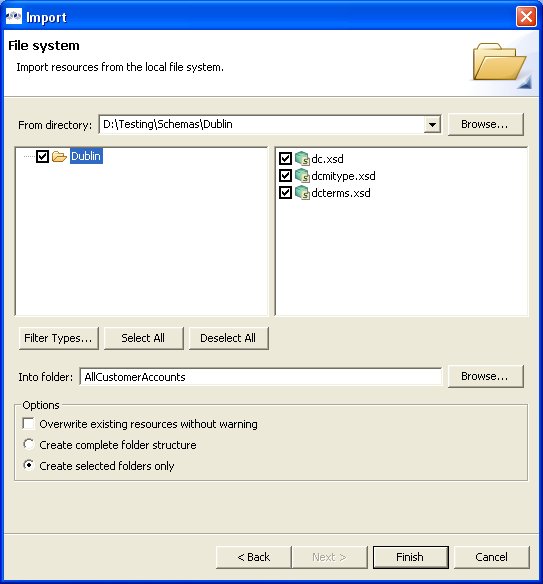
Step 3 - Click on the Browse button to find the archive (i.e. zip) file you wish to import. and click NEXT>
Step 4 - Open directory structure tree in left panel. Define which files to import by checking/unchecking in trees.
Step 5 - Specify valid Into Folder by editing the text field, or select Browse... button to locate and select a folder or project in your workspace.
Step 6 - Modify any Options to customize the imported files.
Step 7 - Click Finish.
You can create relational source models from your JDBC source schema data using the steps below.
Depending the detail provided in the database connection url information and schema, Steps 5 thru 7 may not be required.
Step 1 - In Model Explorer
choose the File > Import action ![]() in the toolbar or select a project, folder or
model in the tree and choose Import...
in the toolbar or select a project, folder or
model in the tree and choose Import...
Step 2 - Select the import option Metadata Modeling > Metadata from JDBC Database and click Next>
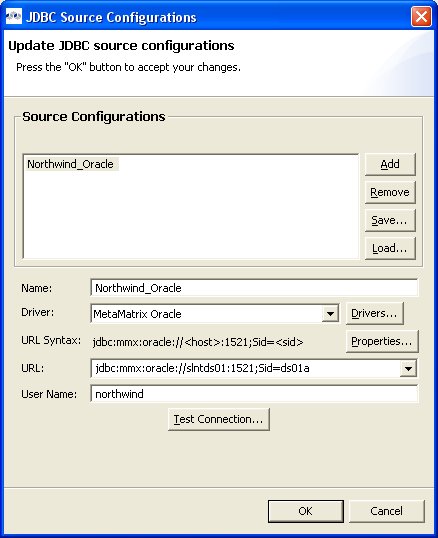
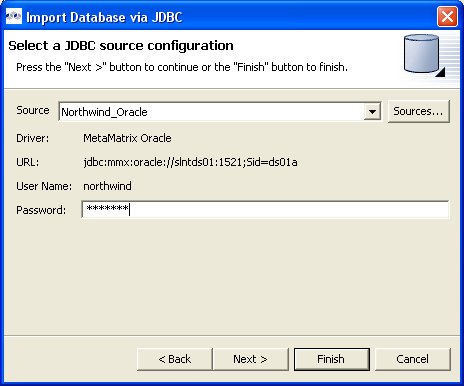
Step 3 - In the Import Database via JDBC dialog, select existing or previous source configuration or press Sources... to create new source configurations.
Step 4 - After selecting Source, input password and press Connect to Database. Press Next> (or Finish> if enabled)
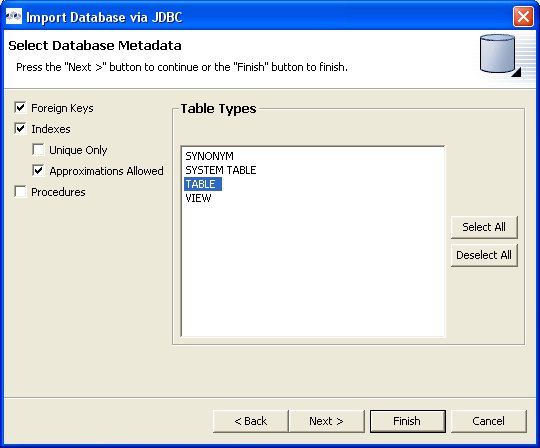
Step 5 - On the Select Database Metadata page, select the types of objects in the database to import. Press Next> (or Finish> if enabled).
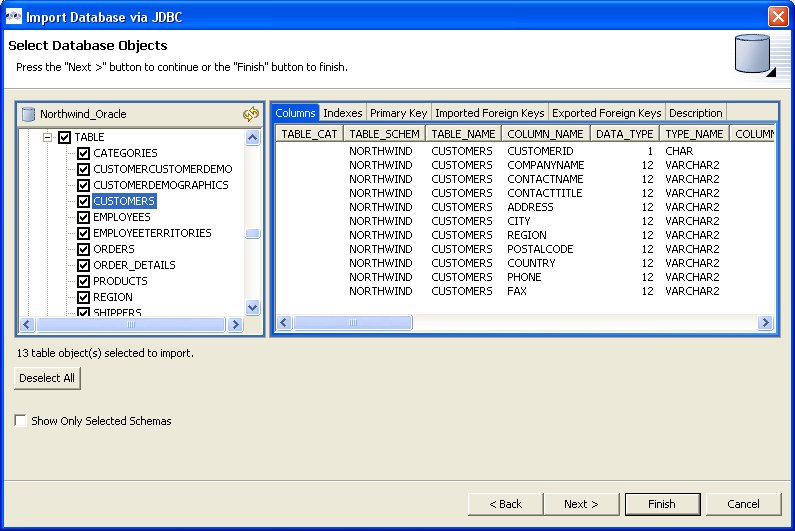
Step 6 - On the Select Database Objects page, view the contents of the schema, or change selections. Select which database schema objects will be used to construct relational objects. Press Next> (or Finish> if enabled)
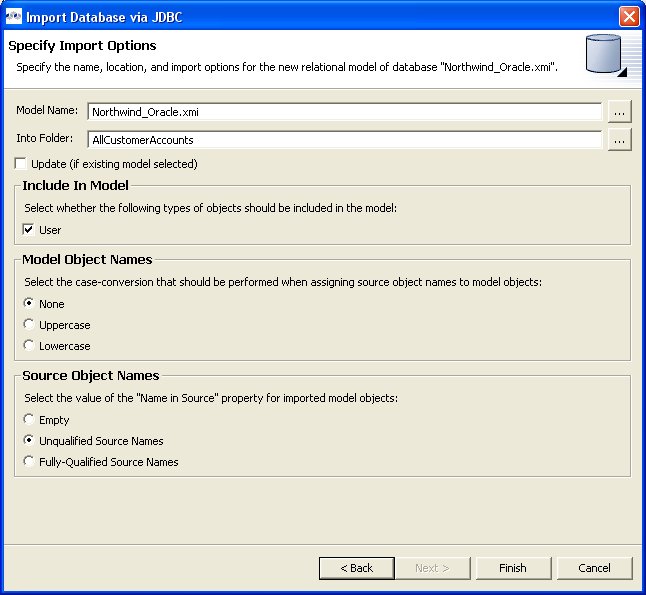
Step 7 - On the Specify Import Options page, specify desired Model Name as well as any other options used to customize the constructed relational objects. Press Finish> to complete.
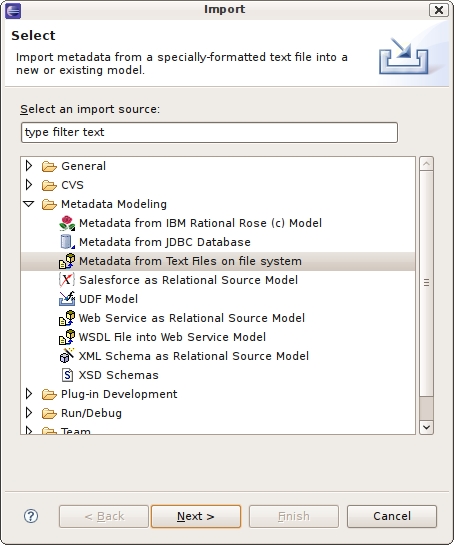
The Teiid Designer provides various import options for translating specific text file metadata into models. This is accomplished via the Import > Metadata from Text Files on file system option.
Step 1 - In Model Explorer
choose the File > Import action ![]() in the toolbar or select a project, folder or
model in the tree and choose Import...
in the toolbar or select a project, folder or
model in the tree and choose Import...
Step 2 - Select the import option Metadata Modeling > Metadata from Text Files on file system and click Next>
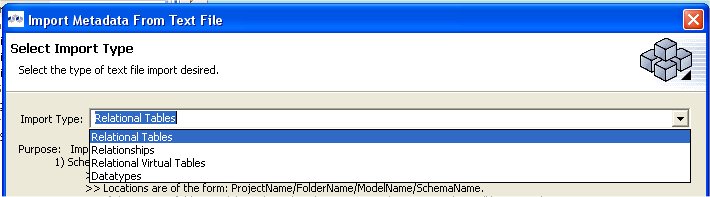
Step 3 - Select an import type via the drop-down menu shown below.
These steps required for each type are defined below:
To create relational tables from imported text file metadata:
Perform Steps 1 thru 3 (above) and select the Relational Tables import type, then click Next >
Step 4 - In the next page, you'll need to provide a source text file containing the metadata formatted to the specifications on the previous page.
Step 5 - Select an existing relational model as the target location for your new relational components using the Browse... button to open the Relational Model Selector Dialog. Select a relational model from your workspace or specify a unique name to create a new model.
Step 6 - Select any additional options and choose Finish.
To create relational virtual tables from imported text file metadata:
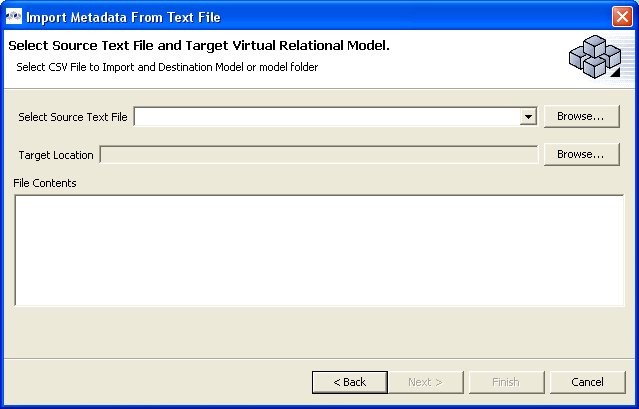
Perform Steps 1 thru 3 (above) and select the Relational Virtual Tables import type, then click Next >
Step 4 - In the next page, you'll need to provide a source text file containing the metadata formatted to the specifications on the previous page.
Step 5 - Select an existing relational virtual model as the target location for your new model components using the Browse... button to open the Virtual Model Selector Dialog. Select a virtual relational model from your workspace or specify a unique name to create a new model.
Step 6 - Select Finish.
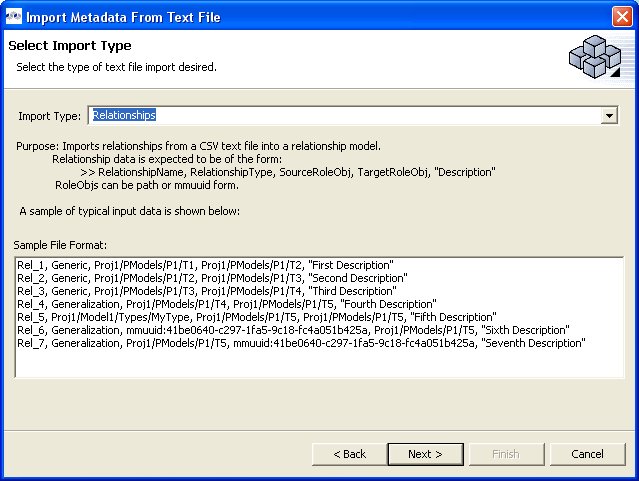
To create relationships from imported text file metadata:
Perform Steps 1 thru 3 (above) and select the Relationships import type, then click Next >
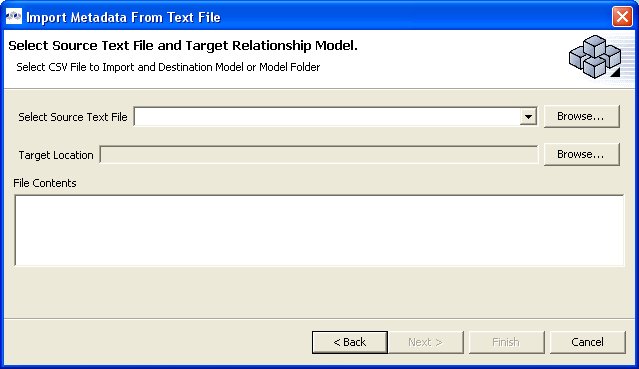
Step 4 - In the next page, you'll need to provide a source text file containing the metadata formatted to the specifications on the previous page.
Step 5 - Select an existing relationship model as the target location for your new model components using the Browse... button to open the Relationship Model Selector Dialog. Select a relationship model from your workspace or specify a unique name to create a new model.
Step 6 - Select Finish.
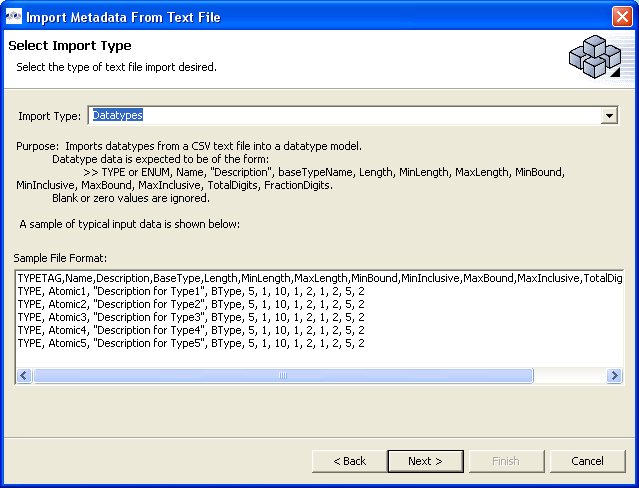
To create datatypes from imported text file metadata:
Perform Steps 1 thru 3 (above) and select the Datatypes import type, then click Next >
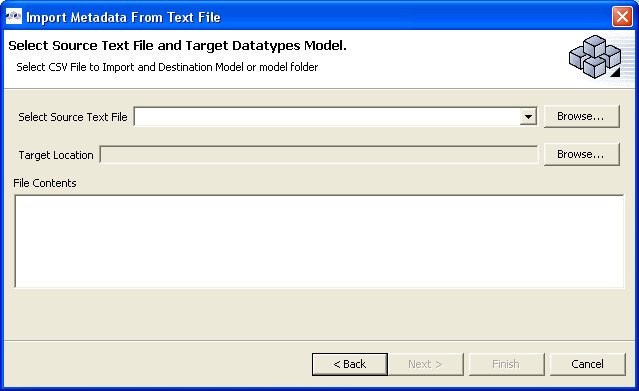
Step 4 - In the next page, you'll need to provide a source text file containing the metadata formatted to the specifications on the previous page.
Step 5 - Select an existing datatype model as the target location for your new model components using the Browse... button to open the Datatypes Model Selector Dialog. Select a datatypes model from your workspace or specify a unique name to create a new model.
Step 6 - Select any additional options and choose Finish.
In addition to creating relational source models by importing your metadata (Import Relational Data ) you can also turn your WSDL into relational models.
To create relational models from WSDL use the steps below.
Step 1 - In Model Explorer
choose the File > Import action ![]() in the toolbar or select a project, folder or
model in the tree and choose Import...
in the toolbar or select a project, folder or
model in the tree and choose Import...
Step 2 - Select the import option Metadata Modeling > Web Service as Relational Source Model and click Next>
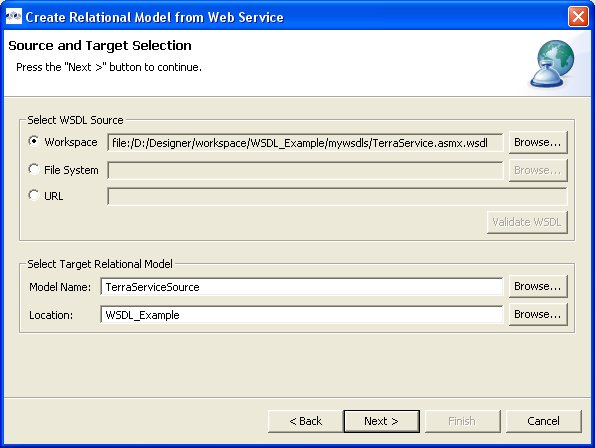
Step 3 - On the next page provide a source WSDL file, either in your workspace, local on your file system or provide a valid URL.
Step 4 - When WSDL is defined, you'll be required to validate your WSDL via the Validate WSDL button (see above figure).
Step 5 - Specify a unique target relational model name in the Model Name field, or select an existing relational model in your workspace via the Browse... button. Click Next> when model name is defined.
Step 6 - Specify a unique target location in the Location field (i.e. project or folder) for the relational model or select an existing location in your workspace via the Browse... button. Click Next> when location is defined.
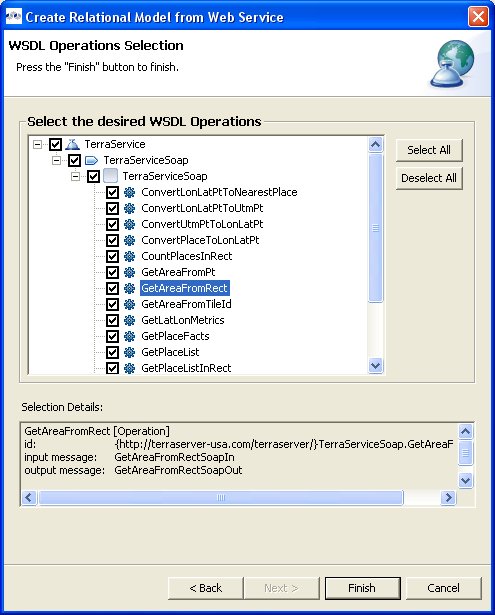
Step 7 - The next page allows you to selected individual Web Service Operations from which to create relational tables. The default behavior of this page selects all available operations in the tree. For WSDLs backed with large schemas, there may be numerous operations which may result in a very large number of tables being generated. In this case, you may wish choose a limited number of operations at a time and repeat this process using the same target relational model.
To select all of the XSD files in the directory, click the checkbox next to the folder in the left panel.
To select individual XSD files, click the checkboxes next to the files you want in the right panel
Step 5 - Click Finish. After generation the new model can be found in the specified location in your workspace..
You can create a Web Service model by selecting a WSDL file in your workspace, importing WSDL files from the file system or by defining a URL. The Teiid Designer will interpret the WSDL, locate any associated or dependent XML Schema files, generate an XML View of the schema components and create a Web Service model representing the interfaces and operations defined in the WSDL.
There are three options for selecting the WSDL for your Web Service generation
Workspace Location
File System Location
URL
Detailed steps for each of these options is described below, as well as a description of how the wizard handles WSDL errors.
You can create a Web Service model by selecting a WSDL file from your workspace.
Step 1 - In Model Explorer
choose the File > Import action ![]() in the toolbar or select a project, folder or
model in the tree and choose Import...
in the toolbar or select a project, folder or
model in the tree and choose Import...
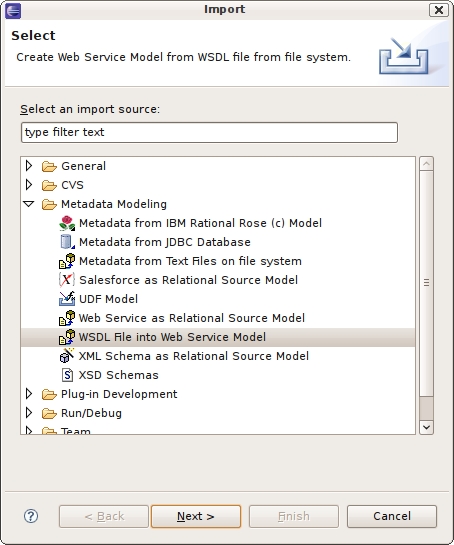
Step 2 - Select the import option Metadata Modeling > WSDL File into Web Service Model and click Next>
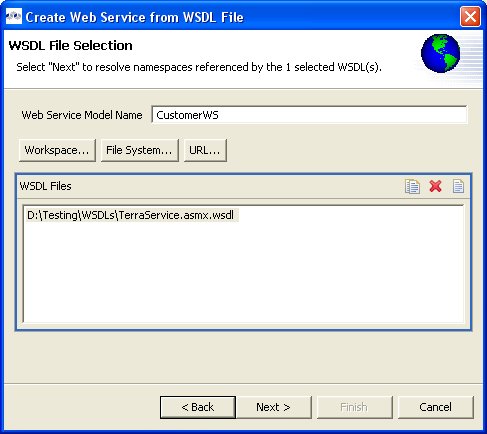
Step 3 - Input a valid name for your Web Service model and select the Workspace... button. Locate your workspace WSDL file in the selection dialog and click OK>.
If no WSDL is selected or specified then the importer will only create an empty Web Service model. No XML Schema or XML View models will be generated.
Any referenced files (WSDLs or schemas) must either be embedded in the WSDL file or exist on your file system.
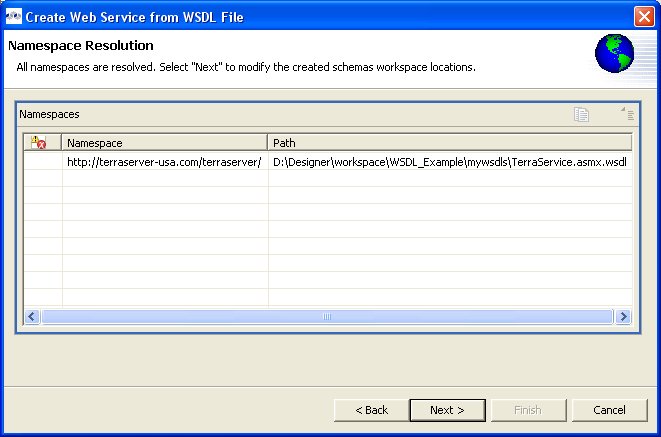
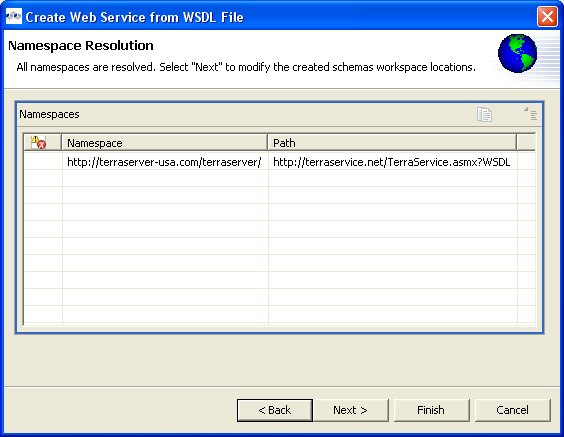
Step 4 - The next page is titled Namespace Resolution. This page identifies successful and errant WSDL namespace resolution. The main WSDL document will essentially always be resolved, since the workspace file chooser is used to obtain the path. Problems will occur when the main WSDL file imports other WSDL files that cannot be resolved. If no errors, select Next to proceed, or Finish (if enabled) to complete with default options.
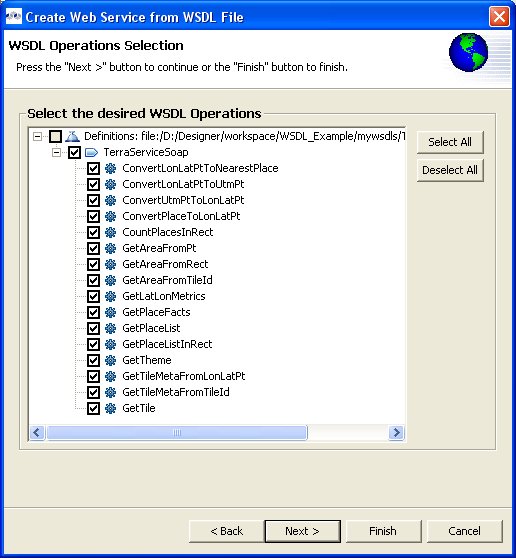
Step 5 - The next page WSDL Operations Selection allows customizing the resulting content of your Web Service model by selecting/deselecting various operations and interfaces in the following dialog.
Step 6 - The next page is titled Schema Workspace Location Selection. This page lists all schemas imported by the WSDL (along with any dependent schemas referenced within schemas) as well as schemas embedded in the WSDL and indicates whether or not they are resolvable. All resolved schemas will be created in a separate file and added to the workspace. The editor panel allows you to change the default file name of the new schema file(s).
If no errors, select Next to proceed, or Finish to complete with default option
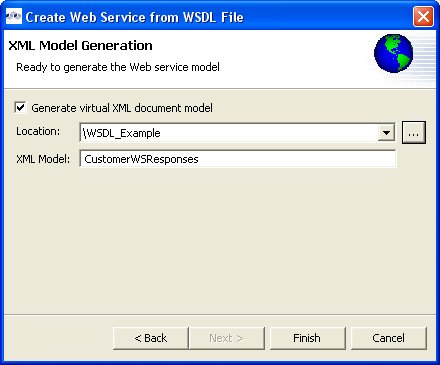
Step 7 - The last page titled XML Model Generation allows you to change the name of the XML View model if the Generate virtual XML document model is checked. Input desired name or use the default name provide. Select Finish to complete.
You can create a Web Service model by selecting a WSDL file from your local file system.
Step 1 - In Model Explorer
choose the File > Import action ![]() in the toolbar or select a project, folder or
model in the tree and choose Import...
in the toolbar or select a project, folder or
model in the tree and choose Import...
Step 2 - Select the import option Metadata Modeling > WSDL File into Web Service Model and click Next>
Step 3 - Input a valid name for your Web Service model and select the File System... button. Locate your file system WSDL file in the selection dialog and click OK>.
If no WSDL is selected or specified then the importer will only create an empty Web Service model. No XML Schema or XML View models will be generated.
Any referenced files (WSDLs or schemas) must either be embedded in the WSDL file or exist on your file system.
Step 4 - The next page is titled Namespace Resolution. This page identifies successful and errant WSDL namespace resolution. The main WSDL document will essentially always be resolved, since the workspace file chooser is used to obtain the path. Problems will occur when the main WSDL file imports other WSDL files that cannot be resolved. If no errors, select Next to proceed, or Finish (if enabled) to complete with default options.
Step 5 - The next page WSDL Operations Selection allows customizing the resulting content of your Web Service model by selecting/deselecting various operations and interfaces in the following dialog.
Step 6 - The next page is titled Schema Workspace Location Selection. This page lists all schemas imported by the WSDL (along with any dependent schemas referenced within schemas) as well as schemas embedded in the WSDL and indicates whether or not they are resolvable. All resolved schemas will be created in a separate file and added to the workspace. The editor panel allows you to change the default file name of the new schema file(s).
If no errors, select Next to proceed, or Finish to complete with default option
Step 7 - The last page titled XML Model Generation allows you to change the name of the XML View model if the Generate virtual XML document model is checked. Input desired name or use the default name provide. Select Finish to complete.
You can create a Web Service model by selecting a WSDL file based on a URL.
Step 1 - In Model Explorer
choose the File > Import action ![]() in the toolbar or select a project, folder or
model in the tree and choose Import...
in the toolbar or select a project, folder or
model in the tree and choose Import...
Step 2 - Select the import option Metadata Modeling > WSDL File into Web Service Model and click Next>
Step 3 - Input a valid name for your Web Service model and select the URL... button. Locate your file system WSDL file in the selection dialog and click OK>.
If no WSDL is selected or specified then the importer will only create an empty Web Service model. No XML Schema or XML View models will be generated.
Any referenced files (WSDLs or schemas) must either be embedded in the WSDL file or exist on your file system.
Step 4 - The next page is titled Namespace Resolution. This page identifies successful and errant WSDL namespace resolution. The main WSDL document will essentially always be resolved, since the workspace file chooser is used to obtain the path. Problems will occur when the main WSDL file imports other WSDL files that cannot be resolved. If no errors, select Next to proceed, or Finish (if enabled) to complete with default options.
Step 5 - The next page WSDL Operations Selection allows customizing the resulting content of your Web Service model by selecting/deselecting various operations and interfaces in the following dialog.
Step 6 - The next page is titled Schema Workspace Location Selection. This page lists all schemas imported by the WSDL (along with any dependent schemas referenced within schemas) as well as schemas embedded in the WSDL and indicates whether or not they are resolvable. All resolved schemas will be created in a separate file and added to the workspace. The editor panel allows you to change the default file name of the new schema file(s).
If no errors, select Next to proceed, or Finish to complete with default option
Step 7 - The last page titled XML Model Generation allows you to change the name of the XML View model if the Generate virtual XML document model is checked. Input desired name or use the default name provide. Select Finish to complete.
In addition to creating relational source models by importing your metadata you can also turn your existing XML Schema into relational source or view models. You can create XML View models using the steps below.
You can import files located on your local file system using the steps below.
Step 1 - Choose the File > Import
action ![]() in the toolbar or select a project, folder or
model in the tree and choose Import... to launch the
Import Wizard
in the toolbar or select a project, folder or
model in the tree and choose Import... to launch the
Import Wizard
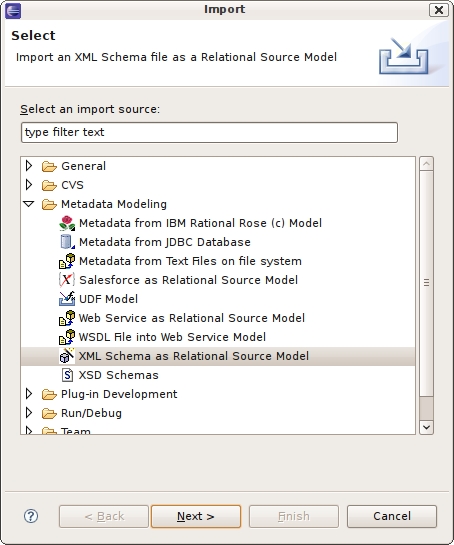
Step 2 - Select the import option Metadata Modeling > XML Schema as Relational Source and click Next >
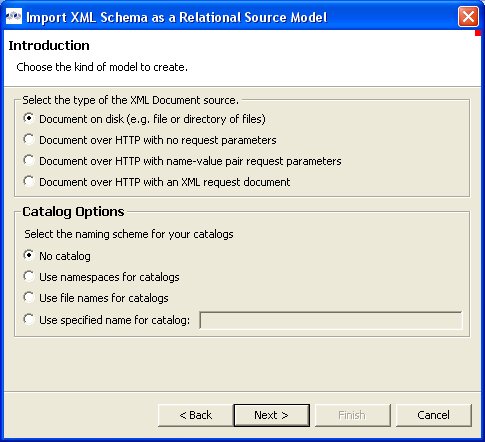
Step 3 - On the next page, specify all options for defining document source and catalog options then click Next >
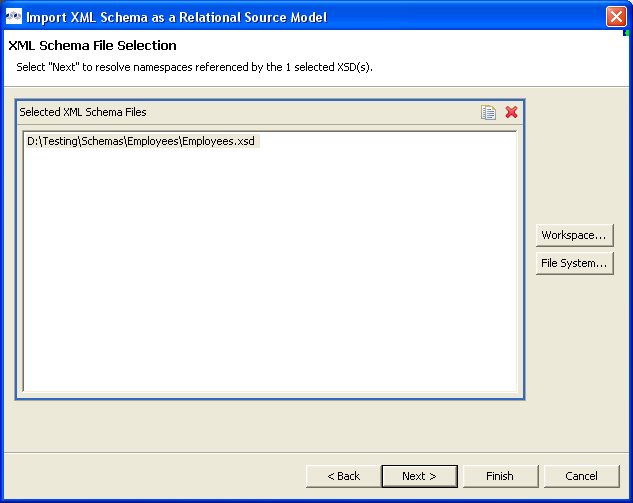
Step 4 - On the XML Schema File Selection page, choose a schema file located in your Workspace... or a file on your local File System... . Click Next >
Step 5 - Select global elements that will be used as root elements in your XML documents and move them to the Document Root Elements list. Change any Mapping Options. Click Next >
Step 6 - Select or deselect schema elements to use in creating relational tables. Click Next >
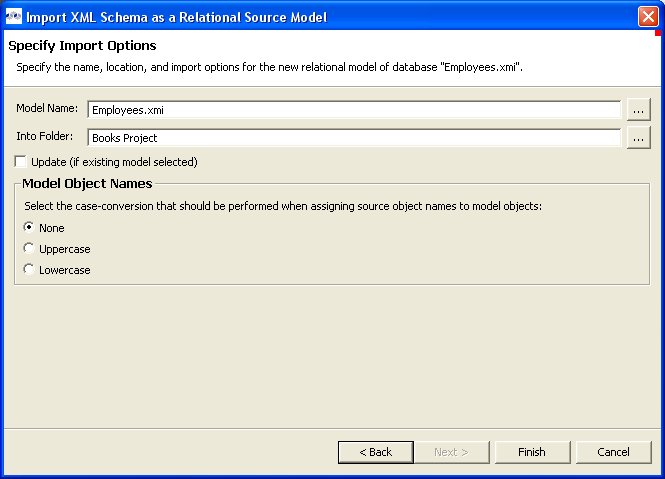
Step 7 - Provide unique model name, model location (project or folder) and options. Click Finish
You can import XML Schema file (XSD) files using the steps below.
Step 1 - In Model Explorer
choose the File > Import action ![]() in the toolbar or select a project, folder or
model in the tree and choose Import...
in the toolbar or select a project, folder or
model in the tree and choose Import...
Step 2 - Select the import option Metadata Modeling > XSD Schema files on file system and click Next>
Step 3 - Select either Import XSD Schemas from file system or Import XSD Schemas via URL and click Next >
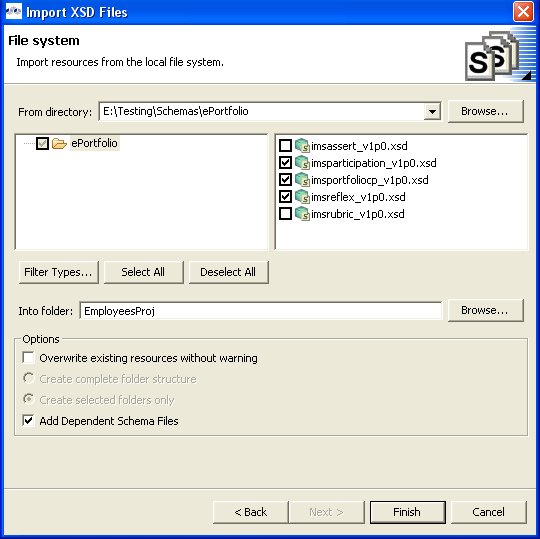
Step 4a - If importing from file system, the Import XSD Files dialog is displayed. Click on the Browse button to find the directory that contains the XSD file(s) you wish to import.
To select all of the XSD files in the directory, click the checkbox next to the folder in the left panel.
To select individual XSD files, click the checkboxes next to the files you want in the right panel
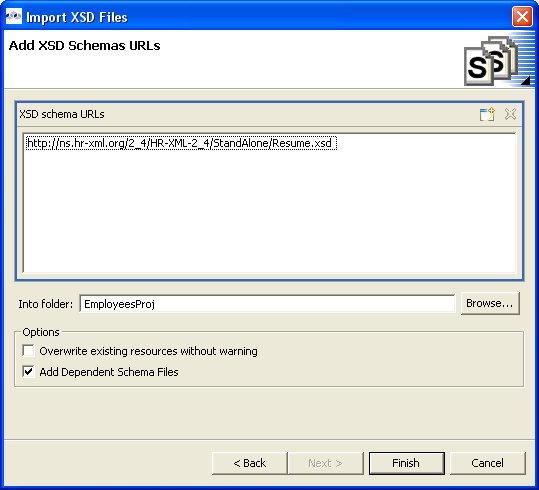
Step 4b - If importing from URL, enter valid XSD Schema URL and click OK to display the final Add XSD Schema URL's wizard page displaying the schemas available for import.
Step 5 - Click Finish.
XSD files may have dependent files. This importer will determine these dependencies and import these as well if Add Dependent Schema Files is checked
The Teiid Designer provides an option to an importer for files exported from Rational Rose versions 2000 and 2001.
The importer creates UML models in the workspace. Supported structural features of UML will be defined by the UMLClasses Metamodel Project. The content of the Rose model file that matches these supported features of the UML metamodel are imported.
The importer allows for subsequent re-importing of the Rose model file which will incorporate changes into the UML model. Any properties of the supported UML constructs that are unique to your use of Rose are implemented using the Teiid Designer's metadata extension functionality.
To import an Rose file, follow the steps below.
Step 1 - In Model Explorer
choose the File > Import action ![]() in the toolbar or select a project, folder or
model in the tree and choose Import...
in the toolbar or select a project, folder or
model in the tree and choose Import...
Step 2 - Select the import option Metadata Modeling > Metadata from IBM Rational Rose Model and click Next> to open the Rose model selection dialog.
Step 3 - Click on the ![]() button to locate and select your
IBM Rational Rose Model ( *.mdl or *.cat) file.
Check the appropriate models and/or model children to import. Click Next >
button to locate and select your
IBM Rational Rose Model ( *.mdl or *.cat) file.
Check the appropriate models and/or model children to import. Click Next >
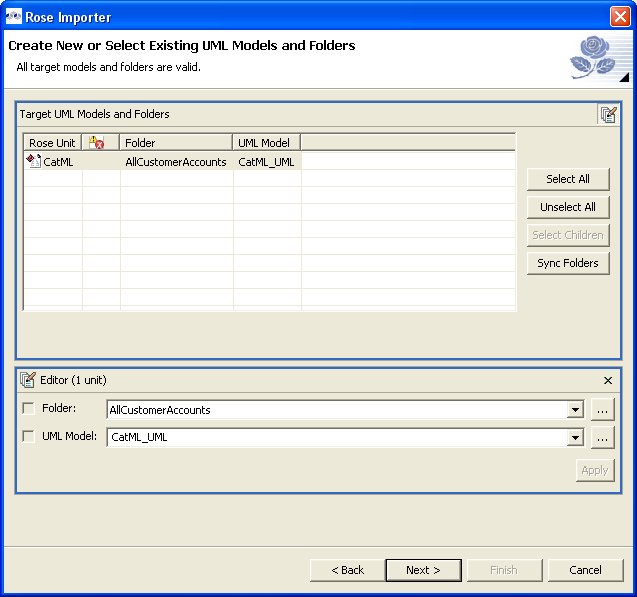
Step 4 - Select the target models and folders in editor panel and click Next > to display a target models and folders dialog. A progress monitor will display intermediate processing status.
If preserving the file system structure of the source Rose Units being imported is desired, a similar file system structure must exist in the model target location prior to starting the wizard.
This wizard page consists of two distinct areas: the selected source Rose Units table and an Editor.
The table identifies the Rose Units being imported. For each Rose Unit a target folder and target model name is shown, as well as, an error or warning indicator. The initial value of the target folder will be set to the model project or folder that was selected prior to starting the wizard (or none if there was no previous selection). Selection buttons to the right of the table aid in selecting table rows. Values in the selected table rows are changed via the editor.
The Editor allows target folders and model names to be changed. The editor modifies all selected table rows (the top area) with its information once the Apply button is selected. If more than one row is selected, the information area shows only the common information.
For example, if two rows are selected that have the same target folder, then that target folder will show in the editor. However, if two rows are selected with different target folders, the editor will not show any information for the folder.
When changes are made in the editor, the appropriate checkbox is automatically checked. Unchecking the checkbox will reset the editor back to the original value. For both the target folder and target model properties, using their respective browse buttons can set new values. This allows navigation of the workspace. Selecting a recently used value in the drop-down dialog can also set new values. The editor can be closed and opened either by using the editor's toolbar button or the top areas toolbar button.
Step 5 - Selecting this import option gives you the opportunity to de-select specific UML model entity(s). All checked elements will be included in your UML model.
Step 6 - Click Finish.