Create new JBDS Documentation Jira issue

JBoss.comEnterprise Documentation
Version: 3.0.0.GA
Copyright © 2007, 2008, 2009, 2010 JBoss by Red Hat
- 1. Visual Web Tools
- 2. Spring Tools
- 2.1. Spring IDE guide
- 2.1.1. Add Spring Project Nature
- 2.1.2. Create New Spring Project
- 2.1.3. Add References To Other Spring Projects
- 2.1.4. Add Spring Beans Config Files
- 2.1.5. Create Spring Beans Config Sets
- 2.1.6. Open Spring Explorer
- 2.1.7. Validate Spring Beans Config
- 2.1.8. Open Spring Beans Graph
- 2.1.9. Search Spring Beans
- 3. Editors
- 4. JBoss Tools Palette
- 5. CSS Editing Perspective
- 6. RichFaces Support
- 7. Web Projects View
- 8. JBoss Tools Preferences
- 8.1. Packaging Archives
- 8.2. Editors
- 8.3. Visual Page Editor
- 8.4. El Variables
- 8.5. JSF
- 8.6. JSF Pages
- 8.7. JSF Project
- 8.8. JSF Validator
- 8.9. JSF Flow Diagram
- 8.10. Label Decorations
- 8.11. Seam
- 8.12. Seam Validator
- 8.13. Seam Pages Diagram
- 8.14. Struts
- 8.15. Struts Automation
- 8.16. Plug-in Insets
- 8.17. Resource Insets
- 8.18. Struts Customization
- 8.19. Struts Project
- 8.20. Struts Support
- 8.21. Struts Pages
- 8.22. Struts Flow Diagram
- 8.23. Tiles Diagram
- 8.24. Verification
- 8.25. Server Preferences
- 8.26. XDoclet
- 9. Context Menu Preferences and Options
- 10. FAQ
- 11. Conclusion
This guide covers the usage of Visual Web Tools in JBoss Developer Studio and JBoss Tools. The difference between these products is that JBoss Tools are just a set of Eclipse plugins where JBoss Developer Studio adds the following functionality:
an installer
Eclipse and Web Tools preconfigured
JBoss EAP with JBoss AS and Seam preconfigured
3rd party plugins bundled and configured
access to RHEL and Red Hat Network
access to the JBoss/Red Hat supported software
For additional information, please visit the JBoss Developer Studio home page at: http://www.jboss.com/products/devstudio.
In JBoss Tools there is an extensive collection of specialized wizards, editors and views that can be used in various scenarios while developing Web applications. The following chapters walk through these features.
Here is the table of the main features of Visual Web Tools:
Table 1.1. Key Functionality for Visual Web Tools
| Feature | Benefit | Chapter |
|---|---|---|
| Visual Page Editor | Powerful and customizable visual page editor. Possibility to develop an application using any web technology: jsf, seam, struts, jsp, html and others. Developing using four tabs: visual/source, visual, source and preview. Fast and easy switching between these tabs. Split screen design of visual and source views. Full and instant synchronization between source and visual views. Integration with properties and outline views. Graphical toolbar to add inline styling to any tag. | visual page editor |
| Multiple Editors | An extensive collection of specialized editors for different file types: properties, TLD, web.xml, tiles, and so on: Graphical Properties Editor, Graphical TLD Editor, Graphical Web Application File (web.xml) Editor, CSS Editor, JavaScript Editor, XSD Editor, Support for XML Schema. | more editors |
| JBoss Tools Palette | Organizing various tags by groups, inserting tags into a jsp or xhtml page with one click, adding custom or 3rd party tag libraries into the palette, easy controlling the number of tag groups shown on the palette. | jboss tools palette |
| Web Projects View | Visualizing and displaying projects by function. Easy selecting of different kinds of items and dropping them into jsp pages. Using context menus to develop the application. Using icon shortcuts to create and import JSF and Struts projects. Expanding and inspecting tag library files. Selecting custom and third-party tag libraries to drag and drop onto the JBoss Tools Palette. | web projects view |
| OpenOn | Easy navigation between views and other parts of your projects. | openOn |
| Content Assist | Code completion proposals while working with html, java, JavaScript , xml, jsp, xhtml, xhtml, seam project and jsf configuration files. Content assist based on project data (dynamic code assist); with graphical editor. Code completion for values from property files, beans attributes and methods, navigation rule outcomes and jsf variables. | content assist |
| Drag-and-Drop | Possibility of inserting any tag onto the page you are editing by just drag-and-droping it from the palette to this page. Adding any properties, managed bean attributes, navigation rules, tag library file declarations, jsp files from web projects view by clicking them and dragging to source code. | visual page editor drag-and-drop |
| RichFaces Support | Tight integration between JBDS and RichFaces frameworks. Easy managing RichFaces components in any web application. Support for RichFaces and Ajax4jsf libraries in JBoss Tools Palette. Rendering RichFaces components in Visual Page Editor. | RichFaces support |
| Flexible Configuration | Various features of JBoss Developer Studio can be easily configured via the Preferences screen. | preferences |
All JBoss Developer Studio/JBoss Tools release documentation you can find athttp://docs.jboss.org/tools in the corresponding release directory.
The latest documentation builds are available at http://download.jboss.org/jbosstools/nightly-docs.
- 2.1. Spring IDE guide
- 2.1.1. Add Spring Project Nature
- 2.1.2. Create New Spring Project
- 2.1.3. Add References To Other Spring Projects
- 2.1.4. Add Spring Beans Config Files
- 2.1.5. Create Spring Beans Config Sets
- 2.1.6. Open Spring Explorer
- 2.1.7. Validate Spring Beans Config
- 2.1.8. Open Spring Beans Graph
- 2.1.9. Search Spring Beans
JBoss Developer Studio is bundled with Spring IDE for Eclipse. Visit Spring IDE site for the latest versions and documentation.
2.1. Spring IDE guide
Spring IDE is a graphical user interface for the configuration files used by the Spring Framework. It's built as a set of plugins for the Eclipse platform.
2.1.1. Add Spring Project Nature
2.1.2. Create New Spring Project
2.1.6. Open Spring Explorer
2.1.7. Validate Spring Beans Config
2.1.8. Open Spring Beans Graph
2.1.9. Search Spring Beans
In the JSF Tools Reference Guide and Struts Tools Reference Guide you had possibility to read about Graphical Editor for JSF and Struts configuration files, Graphical Editor for Tiles Files, Graphical Editor for Struts Validation Files. All these editors have OpenOn and Content Assist features, which are described in more details in this document. In addition you get to know a Visual Page Editor for combined visual and source editing of Web pages and many other editors for different types of files.

JBoss Developer Studio has powerful editor features that help you easily navigate
within your application and make use of content and code assist no matter what project
file (.jsp, .xhtml, .xml, .css, etc.) you are working on.
The mentioned features are the following:
OpenOn lets you easily link directly from one resource to another in your project without using the Package Explorer view (project tree). With OpenOn, you can simply use F3 or Ctrl+Click on a reference to another file and the file will be opened.
OpenOn is available for:
Press and hold down the Ctrl key. As you move the mouse cursor over different file references in the file, they display an underline. When you hover the name of the file you want to open, click and the file will open in its own editor.
Use the OpenOn functionality for the next entries defined in XML file:
OpenOn is also available in JSP and XHTML pages edited in the Visual Page Editor. It will allow you to quickly jump to the reference instead of having to hunt around in the project structure.
You can use OpenOn for the following JSP/XHTML file entries:
Imported property files
CSS files used in a JSP/XHTML page
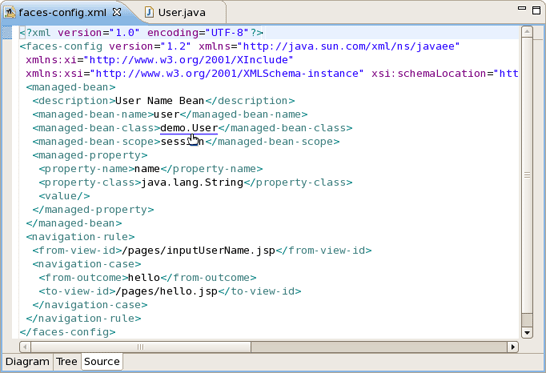
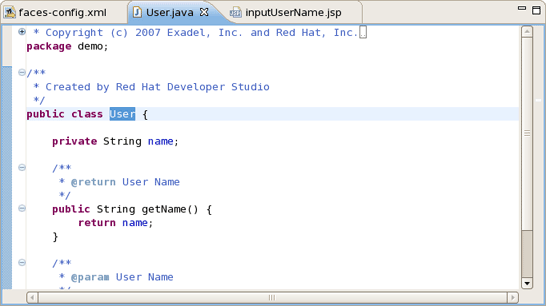
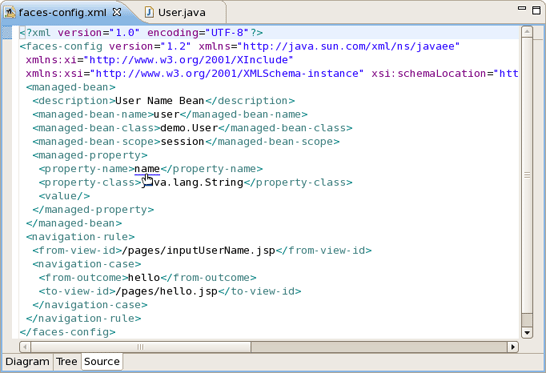
Managed beans and their properties
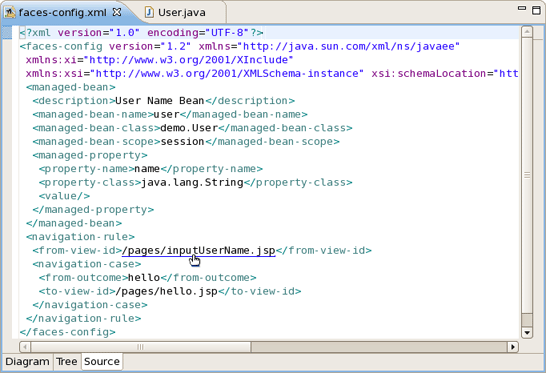
Navigation rules in JSP files
For JSP files in a JSF project, you can easily open the navigation rules by applying OpenOn to the JSF tag for the navigation outcome:
Custom Facelets tag libraries in XHTML pages
For details, see "OpenOn for Custom Facelets Tag Libraries" later in this guide.
Custom JJSF 2.0 components

You can quickly navigate through CSS classes using OpenOn
OpenOn is also implemented for css classes added by a complex link.
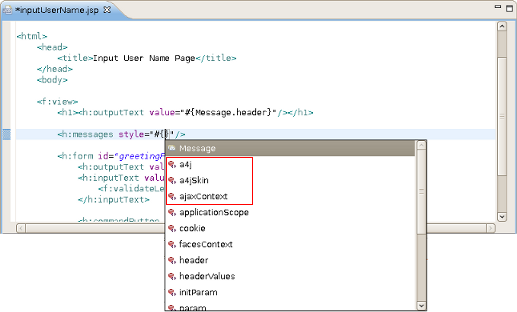
Content assist is available when working with
Notice, that code completion for EL variables has icons illustrating what they are from. Currently it's performed for resource bundles, JSF and Seam components.
Also, as you can see, the ranking and sorting are available in EL code completions.
When working with JSF project in JBoss Developer Studio, you can use various Content Assist features while developing:
Content Assist for XML, XHTML, JSP and JSF configuration files
Content Assist for Composite Components
Content Assist based on project data
Content Assist with graphical JSF editor
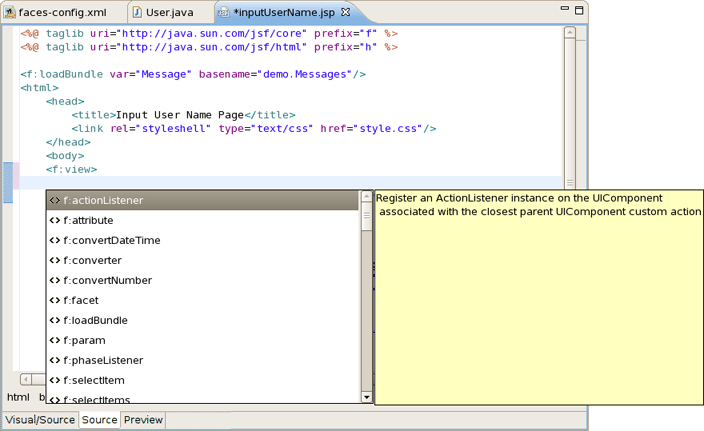
At any point when working with any XML, JSP and JSF configuration files Content Assist is available to help you. Simply type Ctrl-Space to see what is available.
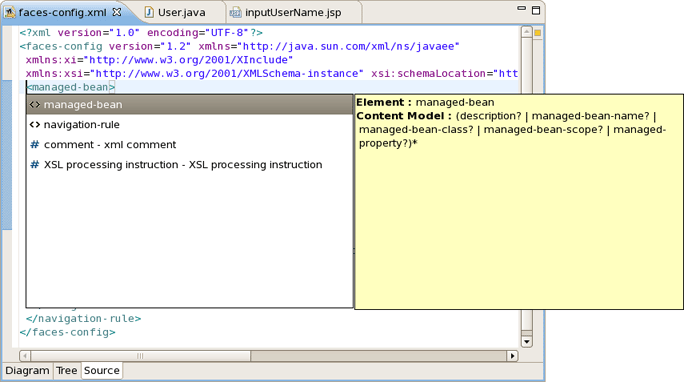
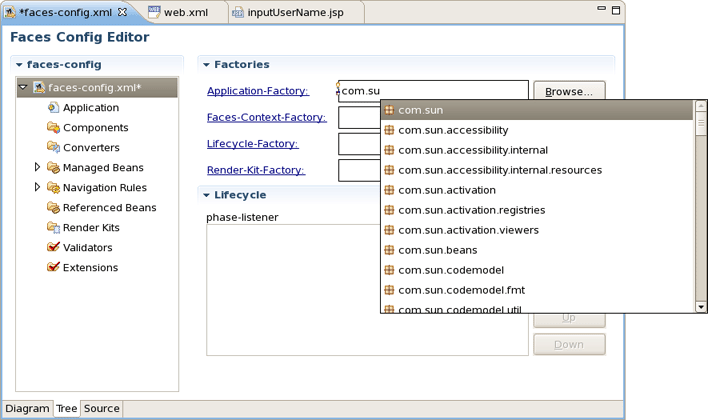
Content Assist for JSF configuration file:
Content Assist for JSF JSP file:
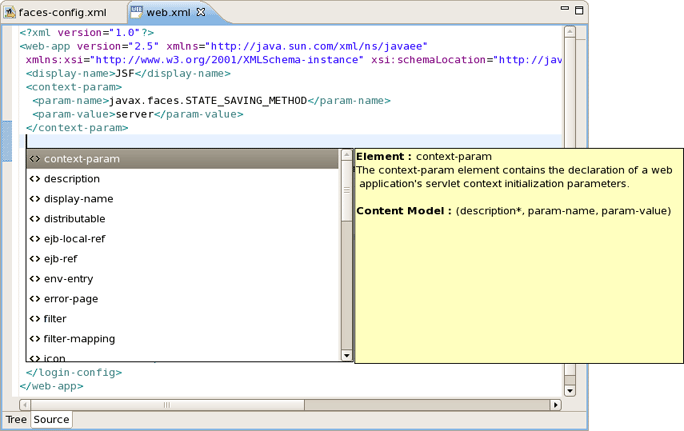
Content Assist for other JSF XML project files (web.xml shown):
Content assist functionality is also available for composite components. On the screen is shown content assist for a composite component file "tag.xhtml" within a JSF 1.2 project with facelets
JBoss Developer Studio takes Content Assist to the next level. Studio will constantly scan your project and you will be able to insert code into the JSP page from your project that includes:
Values from Property files
"Managed beans" attributes and methods
Navigation Rule Outcomes
JSF variables (context, request etc...)
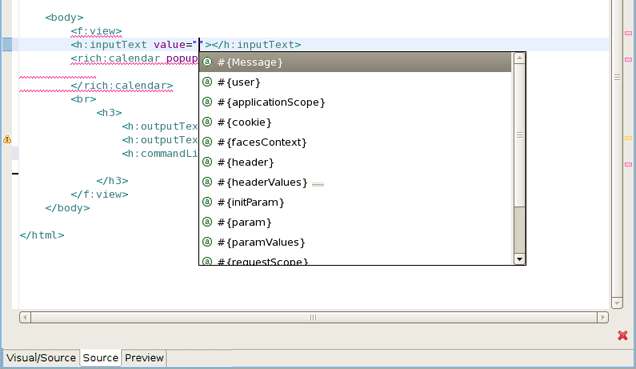
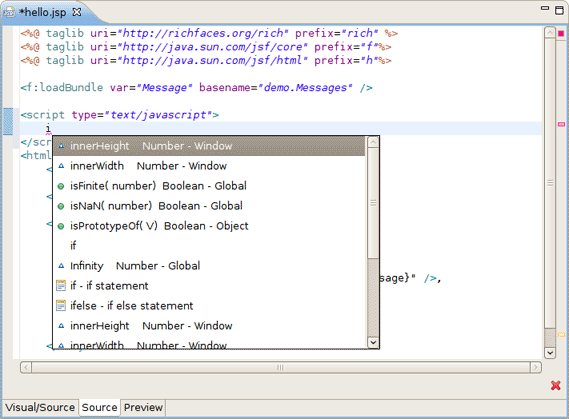
The figure below shows how to insert message from a Properties files. You simply put the cursor inside the "value" attribute and press Ctrl-Space. JBoss Developer Studio will scan your project and show a list of possible values to insert.
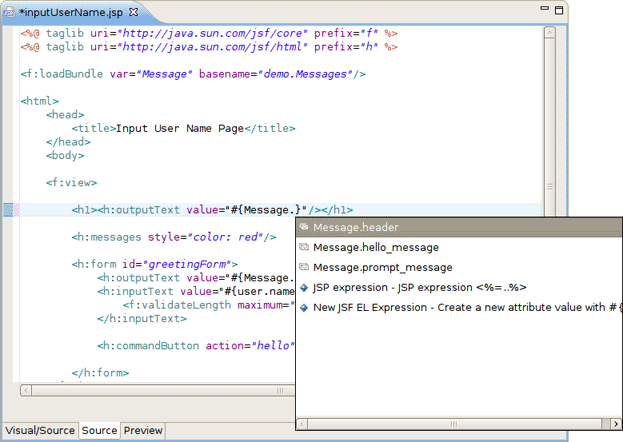
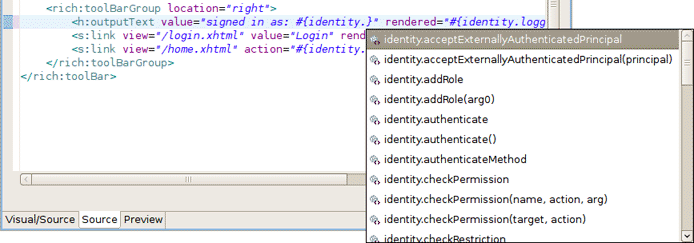
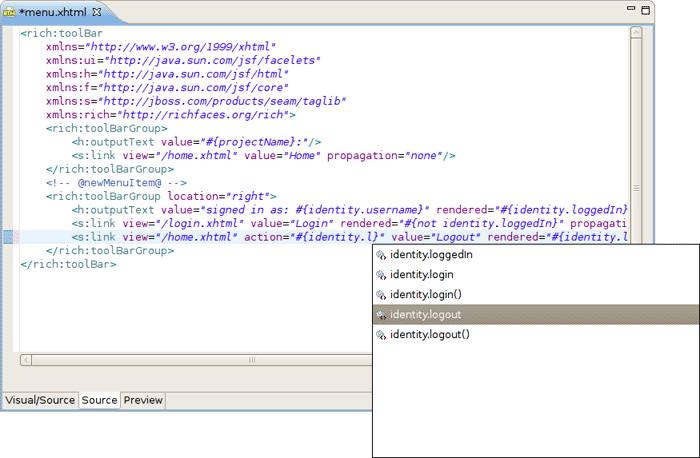
In the following screenshot we are inserting a "Managed bean" attribute value. Again, by simply clicking Ctrl-Space, JBoss Developer Studio will show a list of all possible values that you can insert.
Once you select a Managed bean, it will show you a list of all available attributes for the selected Managed bean (userBean).
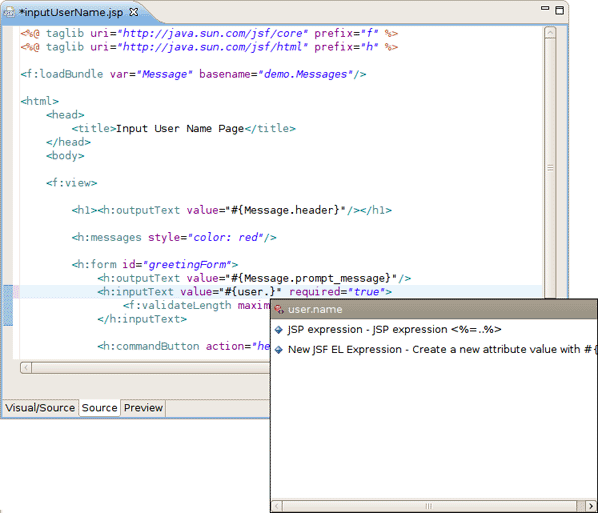
Code Assist based on project data will also prompt you for navigation rules that exist in your JSF configuration file.

Code Assist can also provide you with access to the beans located in jar archives.
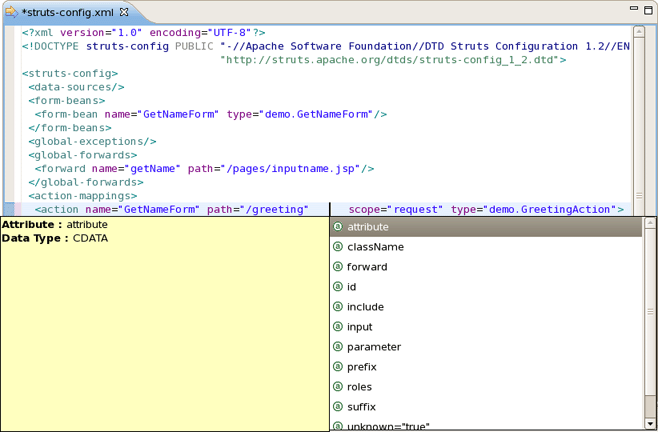
Content Assist features are available when you work with Struts projects.
Content Assist helps you in Struts Configuration file.
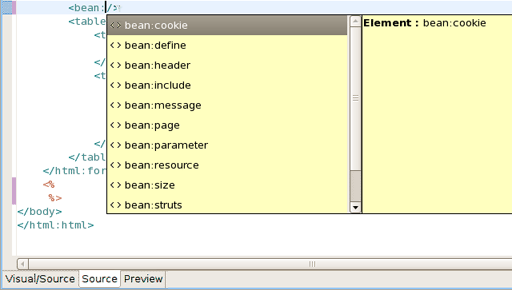
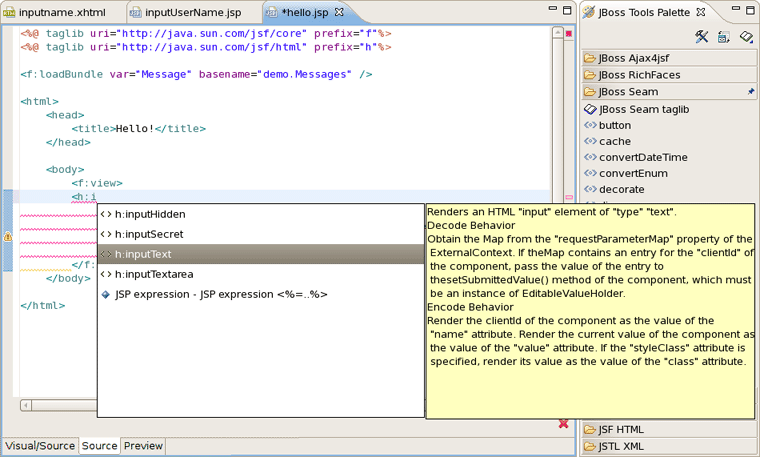
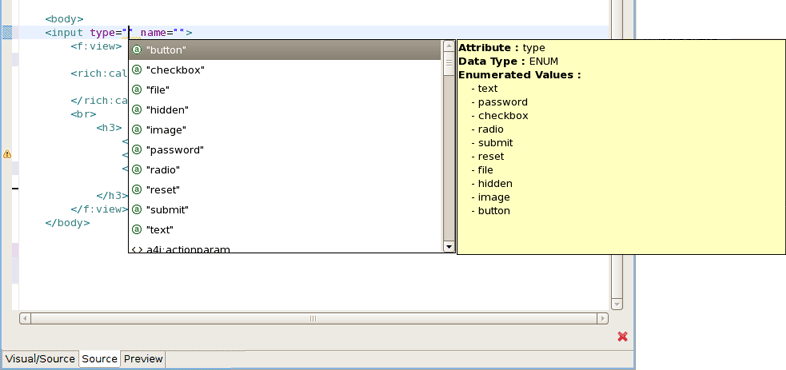
JBDS provides full code completion for JSF tags:
When the tag is selected the required attributes, if there any, are already inserted and the cursor is located to the first attribute. At this point you can ask for attribute proposals.
Content assist for HTML tags has the same mechanism as for JSF tags:
You can use as well attributes proposals for HTML tags:
The code completion for the Seam components in a Seam project shows the proposals marked with Seam icon.
If XHTML file uses custom Facelets components, the Content Assist should also be available for them. For details, see "Content Assist for Custom Facelets Components" later in this guide.

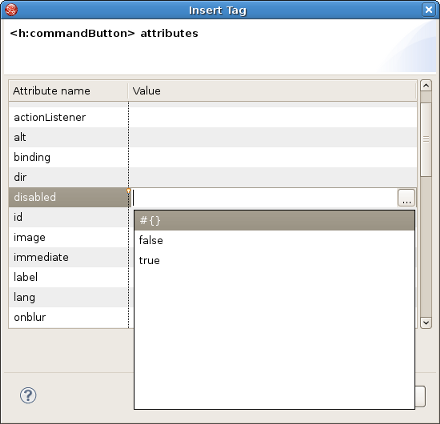
Content Assist is also available for any attribute value of Insert Tag wizard.
Here is what you need to do to add project based code assist to a custom component added in JBoss Developer Studio 2.X:
Create a new xml file in <JBDS_home>studio/eclipse/plugins/org.jboss.tools.common.kb_***/schemas/tld/. For example call it JeniaFaces.xml . The file should be written according to <JBDS_home>/studio/eclipse/plugins/org.jboss.tools.common.kb/kb.jar/org/jboss/tools/common/kb/kb-schema_1.0.dtd
Follow these steps to set what is available for code assist:
Adds code assist for JSF pre-defined objects, such as
value="#{param}":
<AttributeType ...>

       <proposal type="jsfVariables"/>

</AttributeType>
Add bundle resource (property file) code assist:
<AttributeType ...>

       <proposal type="bundleProperty"/>

</AttributeType>
Add managed bean property code assist:
<AttributeType ...>

       <proposal type="beanProperty"/>

</AttributeType>
Add managed bean property but of a specified type:
<AttributeType ...>

       <proposal type="beanProperty">

          <param name="type" value="java.lang.Boolean"/>

       </proposal>

</AttributeType>
Add managed bean method with a signature:
<AttributeType ...>

       <proposal type="beanMethodBySignature">

          <param name="paramType" value="javax.faces.context.FacesContext"/>

          <param name="paramType" value="javax.faces.component.UIComponent"/>

          <param name="paramType" value="java.lang.Object"/>

          <param name="returnType" value="void"/>

       </proposal>

</AttributeType>
Add information on your xml file in <JBDS_home>/studio/eclipse/plugins/org.jboss.common.kb_***/plugin.xml
         <tld

            jsf="true"

            name="Jenia Faces"

            schema-location="schemas/tld/myJSF.xml"

            uri="http://www.jenia.org/jsf/dataTools"/>
Restart Eclipse. You should now have code assist for the component.
From JBoss Developer Studio 3.0.0.M1 you should not do any of the steps described before,dynamic code assist to custom components is added automatically.
If you open projects that were created in older studio versions such message could appear:

It shows that some features of content assist including this one probably will not work. To fix this problem and turn off the message box execute the following steps:
Right click the project in Package Explorer.
Select Configure -> Add JSF Capabilities from the context menu.
Configure your project using Add JSF Capabilities wizard and press Finish
JBoss Developer Studio offers the flexibility to edit any files in either source or extra visual modes at the same time.
The project is yours and so is the source. JBoss Developer Studio provides you many different graphical editors to speed your application development. At the same time, you always have a full control over all project source files. Any changes you make in the source view immediately appear in the graphical view.
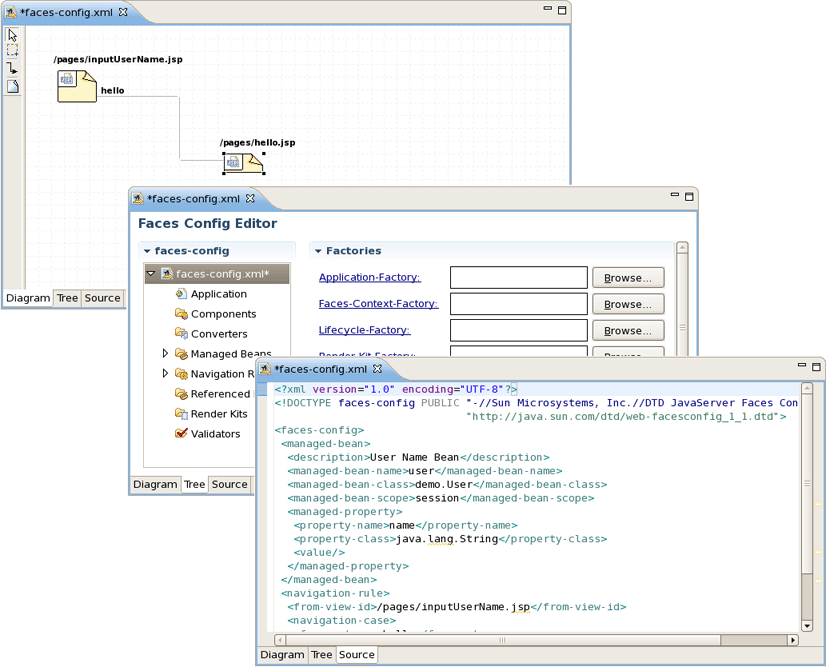
The JSF configuration file editor has three views: Diagram, Tree and Source. All views are synchronized, you can edit the file in any view.
The same is relevant to all other JBoss Developer Studio editors.
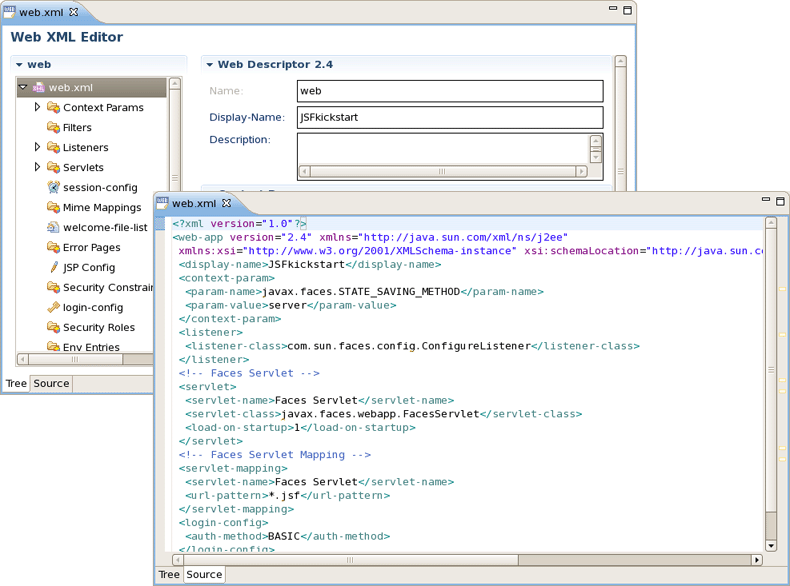
Web XML editor is shown. Web XML editor has a graphical view (Tree) and source (Source).
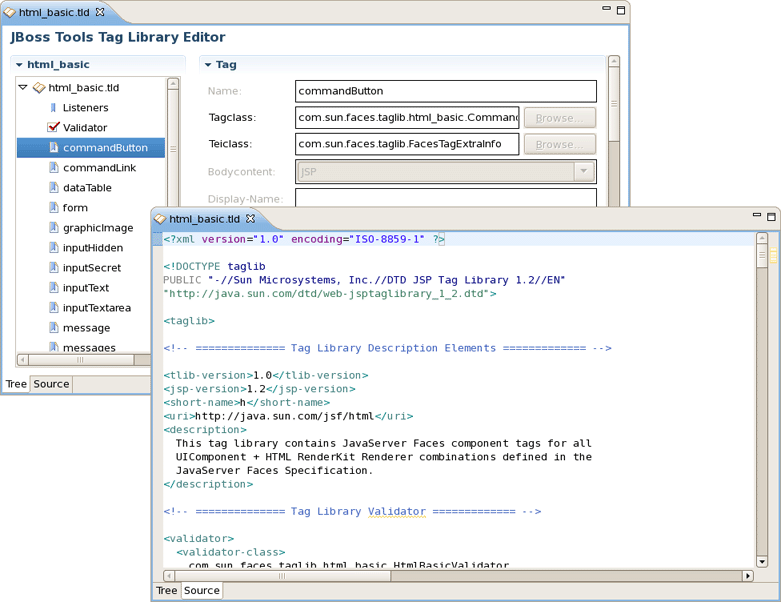
JBoss Developer Studio TLD file editor is shown in Tree view. At any point you can edit the source by switching to Source view.
JBoss Developer Studio comes with a powerful and customizable Visual Page Editor (VPE). You can use the Visual Page Editor to develop an application using any technology: JSF, Struts, JSP, HTML and others. Double-click on the necessary file in the Package Explorer view to open it in the Visual Editor or just drag-and-drop it into perspective (the drag-and-drop feature can be also applied to JSP, XHTML or HTML files created locally).
As a new JSF 2.0 specification has been released, support of new features is now implemented in the Visual Page Editor.
The JSF 2.0 tags like <h:body>, <h:head>, <h:outputscript>, <h:outputstyle>
are supported in the editor as well as the composite components and the resource handling from the expression language. (See the following link on how to use composite components and
following blog post on how to handle the resources form the EL).
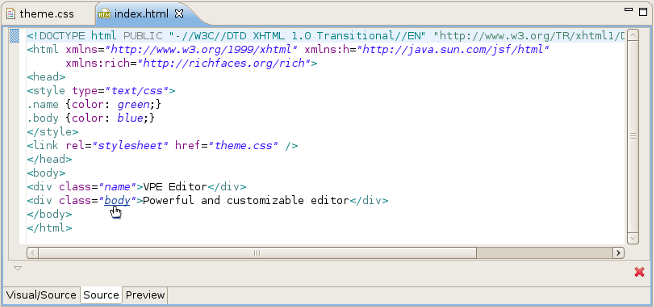
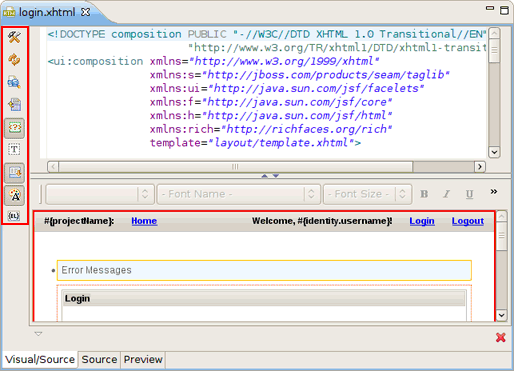
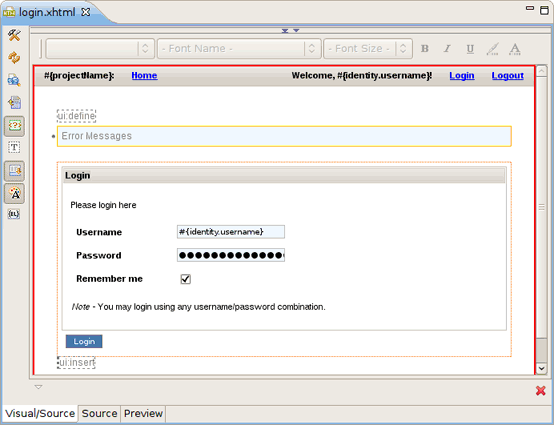
Current VPE version has three tabs: Visual/Source, Source and Preview. To switch between the views you can use tabs at the bottom of the VPE or the shortcuts Ctrl + PageUp/Ctrl + PageDown .
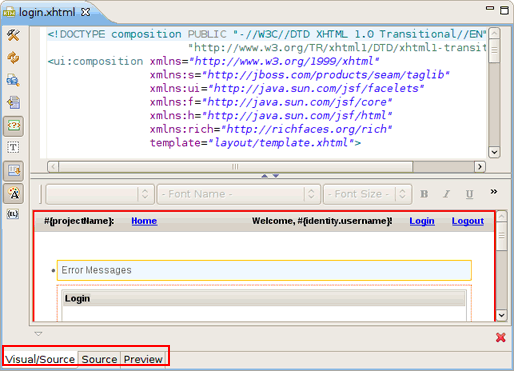
Using the Visual/Source view you can edit your pages in the Source and Visual modes simultaneously having an instant synchronization between them:
The view is designed in the form of a split pane with toggle buttons for quickly moving between Source, Visual or Source/Visual modes as shown on the figure above.
One more way to toggle between the various states of the split pane is using the shortcuts Shift + F6 for maximizing/restoring the Source part and Shift + Alt + F6 for maximizing/restoring the Visual part.
Tip:
When editing large documents hiding the Visual part will speed up the editing.
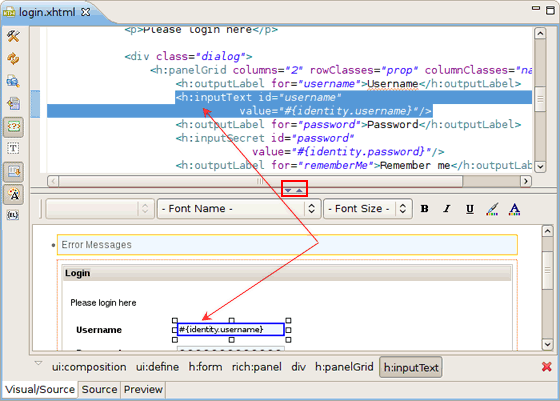
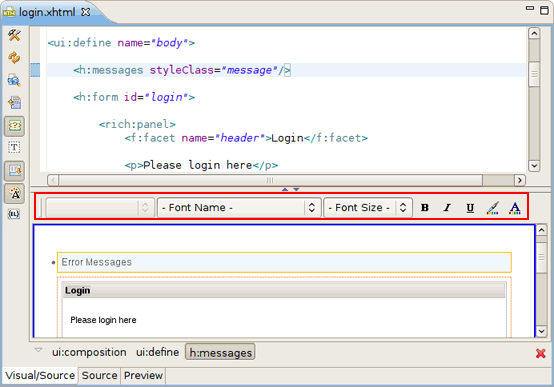
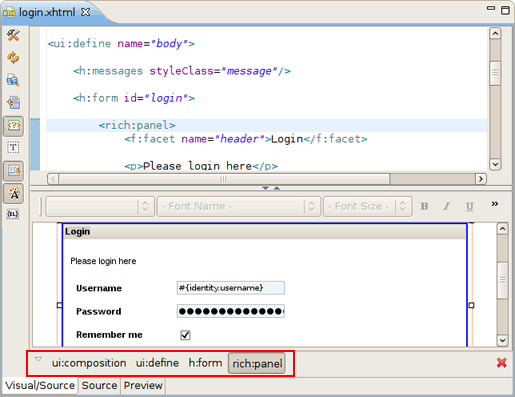
It should be pointed out that, no matter in what mode you are working, you get a full integration with Properties and Outline views:
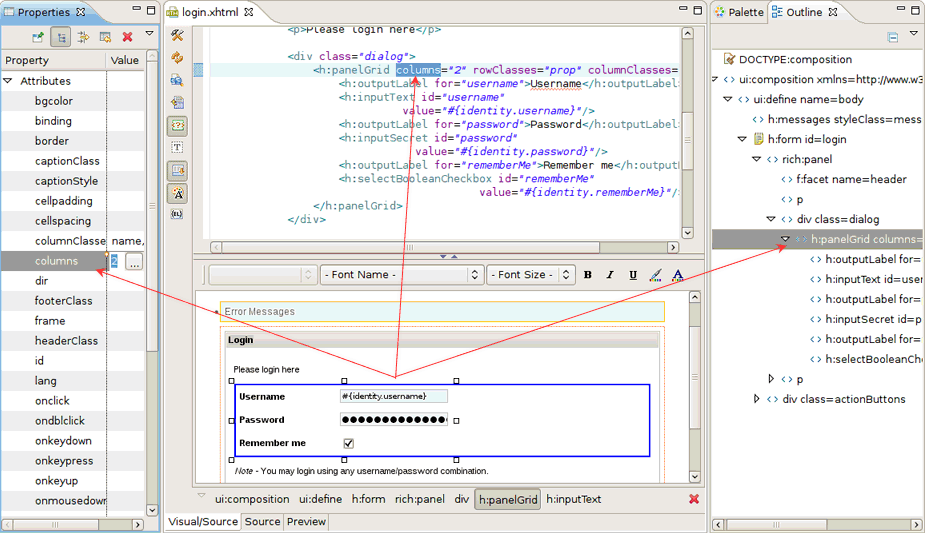
The Outline view displays a specific outline of a structured file that is currently open in the editor area, and lists its structural elements. Right-click on the elements will open additional options that allow adding other specific elements in necessary positions.
The Properties view shows property names and their values for a selected item. The values are editable, just select any and click on the button that appeared to choose a new value. Key combination Ctrl+Z will return the previous value, Ctrl+Y will return the new value again. The Properties view has additional options and can be set up to display categories and advanced properties.
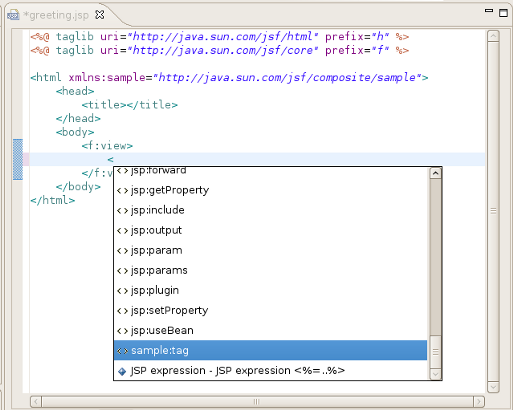
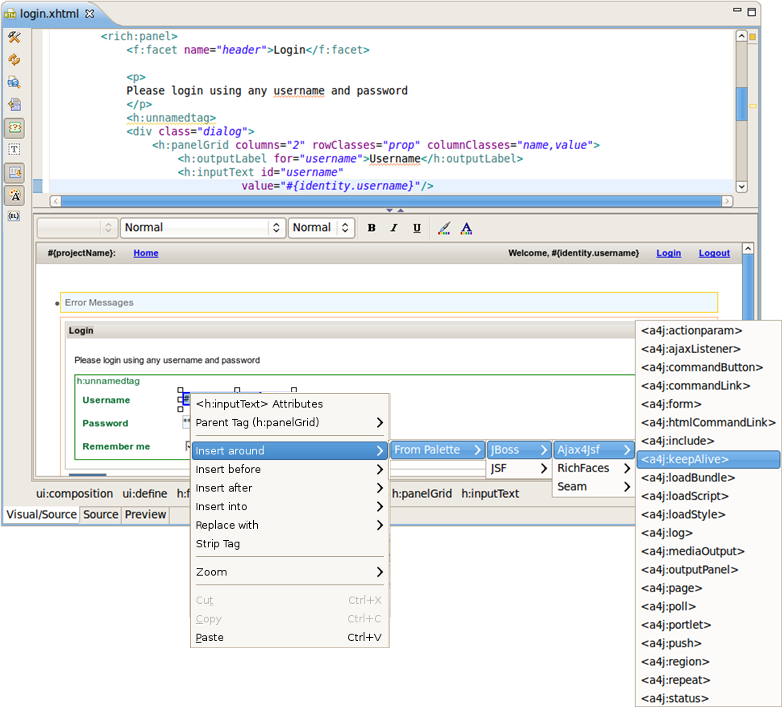
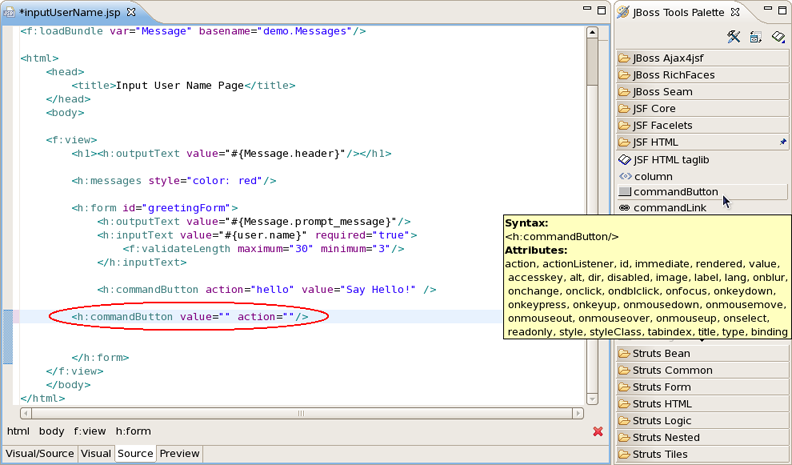
It's also possible to use the JBoss Tools Palette to insert any tag from the list of tag libraries to the page you are editing with just a click or drag-and-drop.
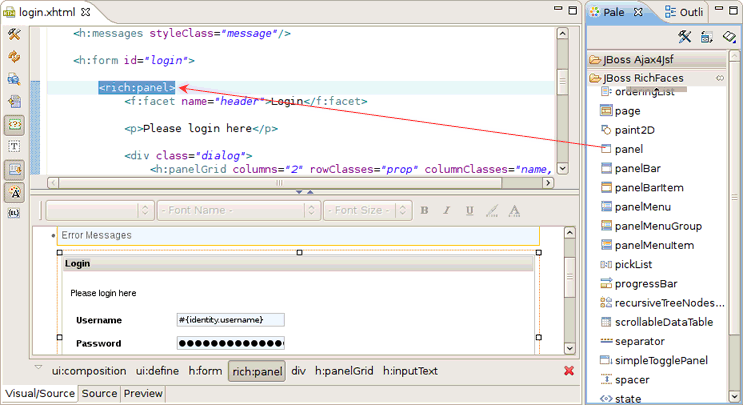
You can insert a tag/component from the palette into either the Source or the Visual part by calling a context menu and selecting Insert around, Insert before, Insert after or Replace With, pointing to From Palette, picking the type of the tag and finally choosing the tag you want to insert.
The image below illustrates how you can insert a tag into the Source part.
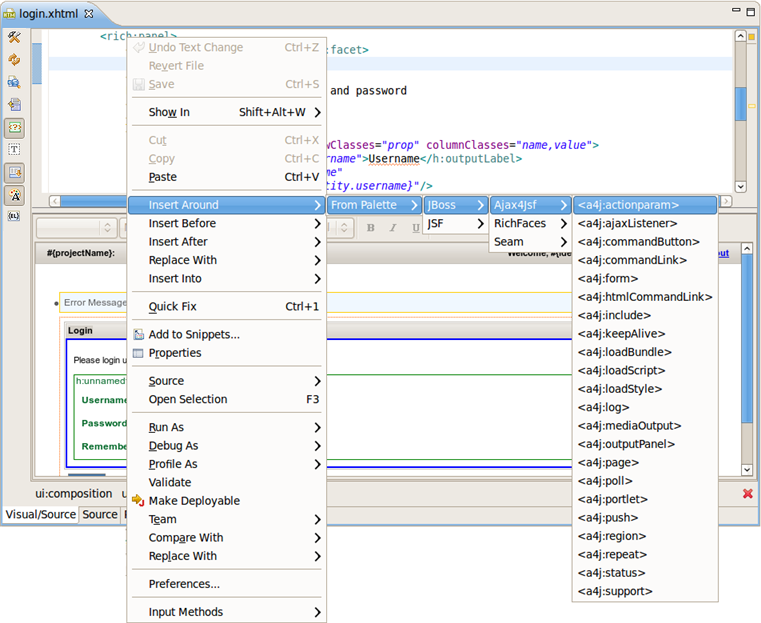
And this is how a tag is inserted using a context menu in the Visual part.
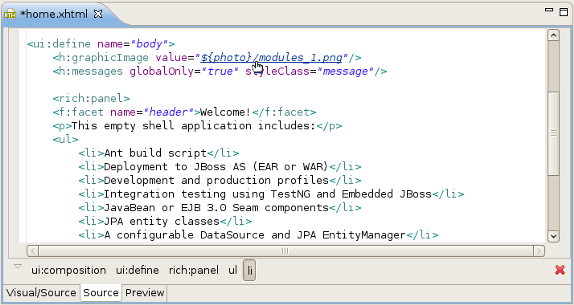
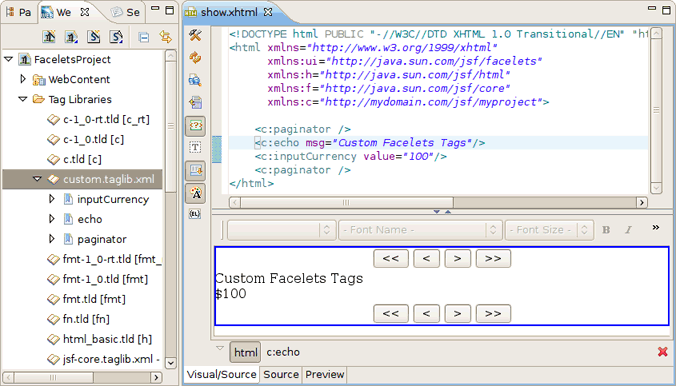
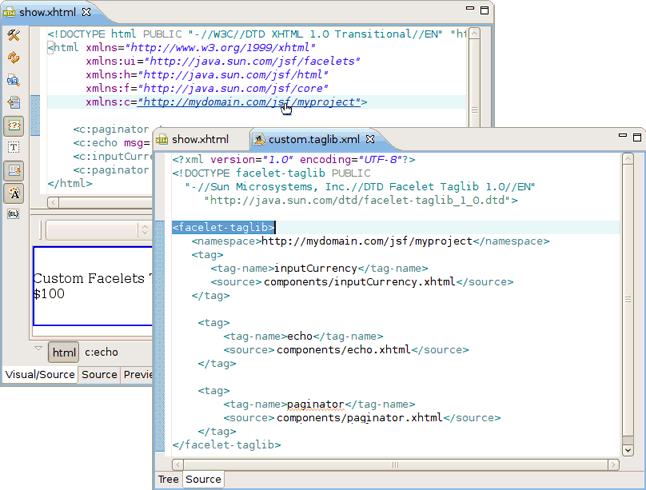
Visual Page Editor also displays custom tags correctly if they are configured properly. The picture below shows an example how custom tags "pagination" and "echo" will be displayed in VPE.
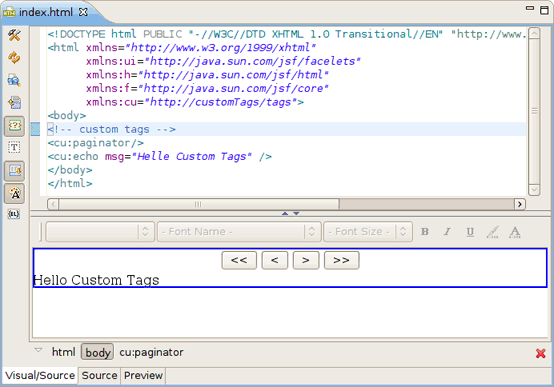
The listings of the custom tags implementations will help to clear how VPE works.
echo.xhtml:
<ui:composition xmlns:ui="http://java.sun.com/jsf/facelets">

    <span class="message">#{msg}</span>

</ui:composition>
paginator.xhtml:
<?xml version="1.0" encoding="UTF-8"?>
<!DOCTYPE html PUBLIC "-//W3C//DTD XHTML 1.0 Transitional//EN"
"http://www.w3.org/TR/xhtml1/DTD/xhtml1-transitional.dtd">
<html xmlns="http://www.w3.org/1999/xhtml"
xmlns:ui="http://java.sun.com/jsf/facelets"
xmlns:h="http://java.sun.com/jsf/html"
xmlns:f="http://java.sun.com/jsf/core">
<ui:component>
<!-- h:inputHidden id="currentPage" replace, because if on page two fields,
two elements with equal id has been used, but should be used only one -->
<h:panelGrid style="margin-right:auto;margin-left:auto;" columns="4">
<h:commandButton value="<<" type="submit"
onclick="document.getElementById('currentPage').value=0" >
</h:commandButton>
<h:commandButton value="<" type="submit"
onclick="document.getElementById('currentPage').value=#{user.currentPage-user.rowsPerPage}">
</h:commandButton>
<h:commandButton value=">" type="submit"
onclick="document.getElementById('currentPage').value=#{user.currentPage+user.rowsPerPage}">
</h:commandButton>
<h:commandButton value=">>" type="submit"
onclick="document.getElementById('currentPage').value=#{user.numberOfItems - user.rowsPerPage}">
</h:commandButton>
</h:panelGrid>
<h:inputHidden id="currentPage" value=""/>
</ui:component>
</html>
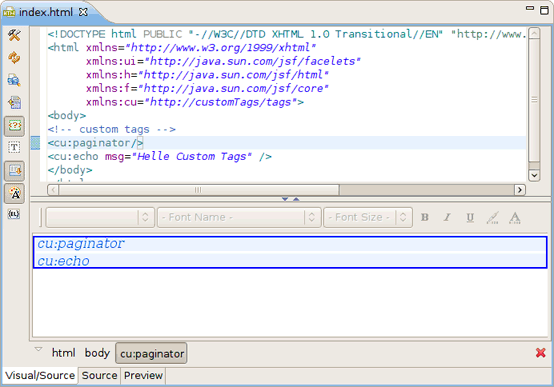
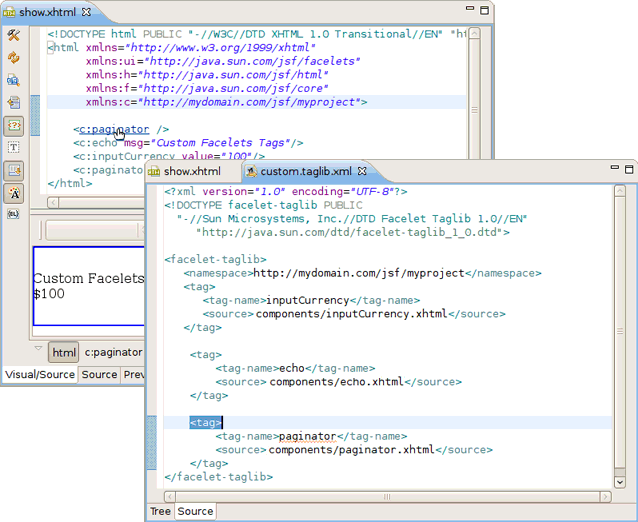
If your custom tags aren't configured correctly your Visual mode will look like this:
VPE supports possibility to add comments in files you are working with (JSP, XHTML, etc.):
HTML comments (
<!-- -->) which are output to the clientJSP comments (
<%-- --%>) which are not output to the client as part of the JSP page output
Visual Page Editor lets you collapse (hide) and expand (show) sections of your code to make it easier to navigate and read.
Code folding can be enabled by right-clicking on the left margin on the Source part of Visual Page Editor, selecting Folding and checking the Enable Folding checkbox or using the Ctrl+Numpad_Divide shortcut.
When the code folding is enabled a minus sing (  ) will appear on the left margin of the editor next to each
opening block tag.
) will appear on the left margin of the editor next to each
opening block tag.
Click the minus sign to collapse a block tag.
When the minus sing is clicked on the appropriate tag collapses and a plus
sing (  ) is displayed on the left margin as well as a gray
rectangle two dots (
) is displayed on the left margin as well as a gray
rectangle two dots (  ) appears after opening and closing tags.

When working in JBoss Tools JSP editor you are constantly provided with feedback and contextual error checking as you type.
VPE templates support custom tag libs, e.g. Seam Mail facelet taglib, RichFaces taglibs or any other created by you.
VPE templates also provide a support for various versions of tag libraries. It means that the VPE takes control over those components which have different parameters or preview according to the framework version (like seam 1.2 and seam 2.0, or JSF 1.1 and JSF 1.2).
For example,
<s:decorate>
element in seam has different parameters in versions 1.2 and 2.0 as
well as
<h:outputLink>
JSF element has different preview in versions 1.1 and 1.2.
Most web pages use the cascading style sheets (CSS) to control the way they look. With Visual Page Editor you can easily stylise your pages. In this section we are going to introduce you to a powerful mechanism that VPE provides for a complete control over pages styling. More helpful information on wok with CSS files can be found in CSS Perspective chapter
In the Visual part of the VPE there is a graphical
toolbar, use it to add inline styling to JSF and Struts tags on your page. The
toolbar can be hidden with the help of the special button (
![]() ) on the VPE toolbar.
) on the VPE toolbar.
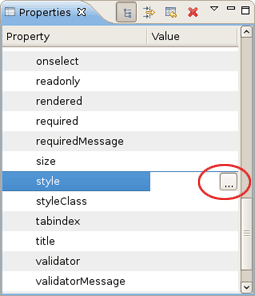
For editing inline styles for DOM elements VPE provides the CSS Dialog. It can be called from style line in the Properties view for a currently selected element.
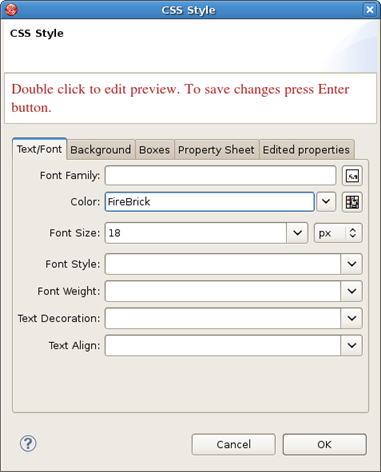
CSS Style Dialog has several tabs where css properties for text, background, borders and others can be specified. A simple preview which is generated at the top of the CSS Style Dialog allows you to see the changes before you apply them.
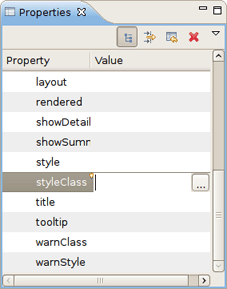
The pages you are working with in VPE can use external stylesheets. VPE allows you to create new style classes in existing stylesheets and/or edit them as well. For these purposes Edit Style Class Dialog is provided.
Select the element for which you need to create or edit style class and press button next to styleClass field in Properties view.
It'll pick up the Edit Style Class Dialog which looks like on the figure below:
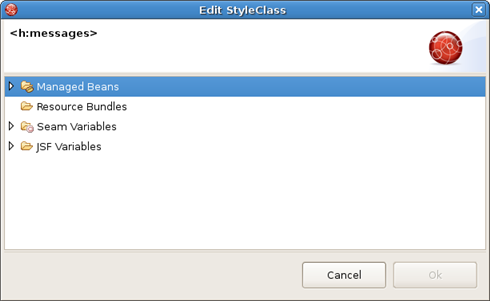
Choose a style class from the variants provided and click on the Ok button to apply the changes.
To open a CSS dialog based on the active CSS file click on  in the top panel or use hot-keys (Shift+Ctrl+C).
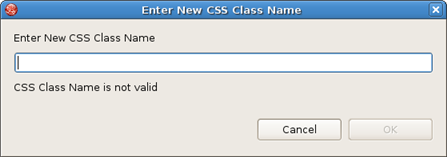
To create a new CSS class for the file click on the Add CSS Class button, write its name in the field appeared and click on the Ok button:
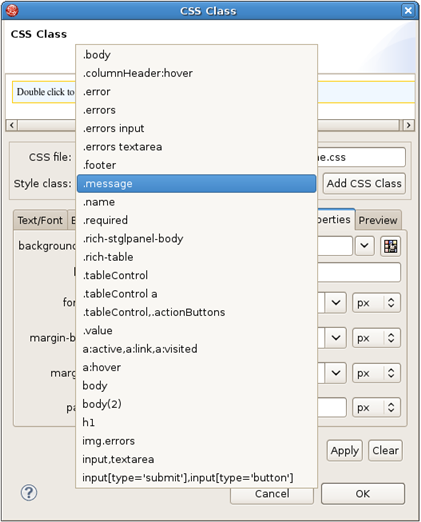
Then you can configure style settings switching between the tabs: Text/Font, Background, Boxes, Property Sheet. The list of already existing classes with names beginning with the symbols printed will be displayed on standard "Ctrl+Space" key combination. To add existing styling to the chosen element just point to the necessary one. Each time you select any class it is displayed in the Preview tab. Click on the Apply button will apply the changes without closing the window.
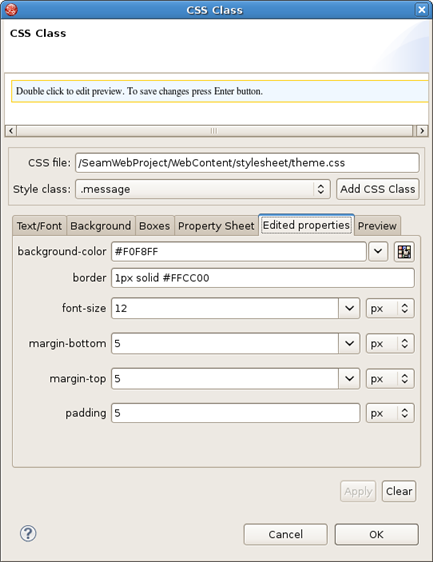
The Edited properties tab gives a preview of the properties which are set for the existing style class. You can easily modify them with the help of this wizard.
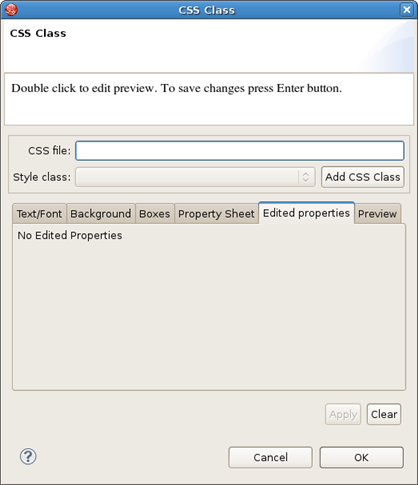
If the style class isn't chosen, the tab doesn't show any properties.
The Preview tab is for observing the content of the chosen CSS file. This tab is hidden if no CSS file is chosen.
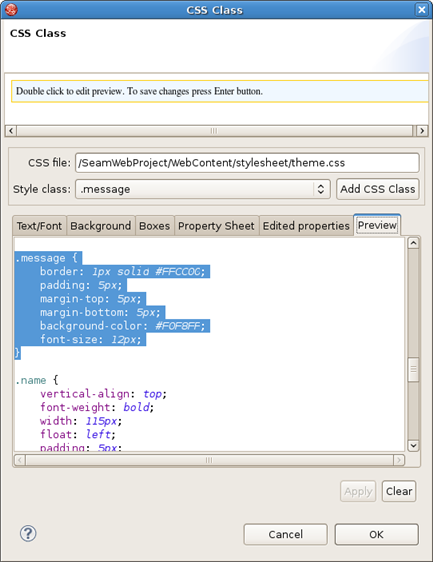
At the top of the CSS Class Dialog you can see a preview box which visualizes the result. To edit the preview you should double click in the box. To leave the focus, use Ctrl + Tab.

The dialog for creating a new CSS class, which is called from New > Other... > JBoss Tools Web > CSS Class, looks this way:
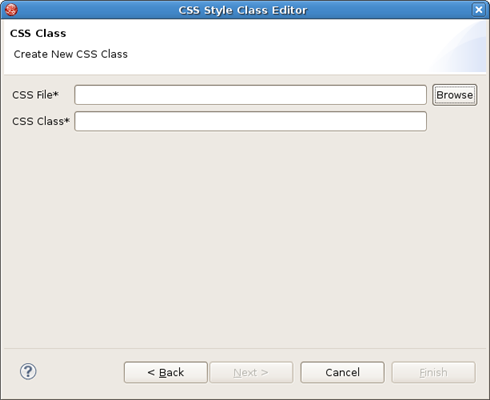
Click on the Browse button to open a dialog to select the CSS file to create a CSS class for:
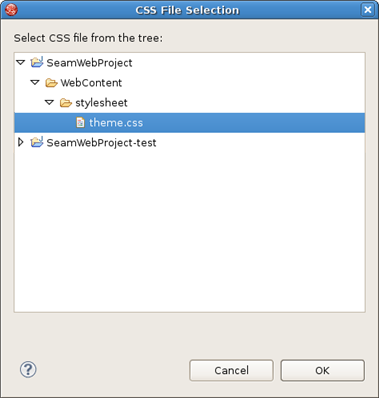
Choose the necessary CSS file and click on the Ok button.
The VPE also makes it possible to create templates for unknown tags.
To call the Template dialog for a tag, right-click on it in Visual mode and select Setup Template for <tag name> option.
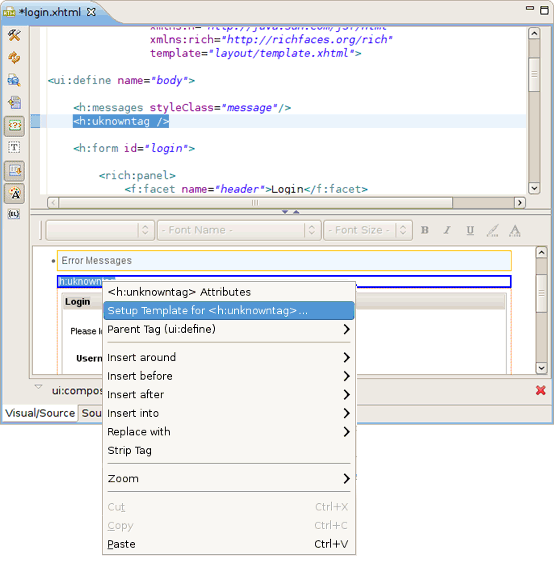
Here is what the Template dialog looks like.
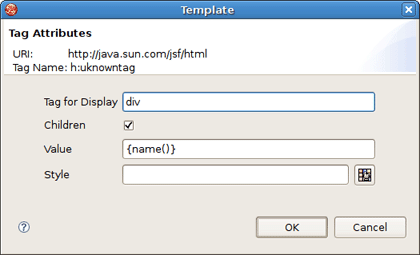
Tag for Display field in the Template dialog requires specifying a type of tag. It can be SPAN, DIV, TABLE or any other html element. Check Children , if you want to mark a tag as a child element.
The Value field is for setting a tag value.
As for the Style field, you can fill it out manually or make use of the button next to the field to bring the CSS Dialog for editing styles.
You can observe all defined templates in the VPE Preferences on the Templates tab which you can quickly access by pressing Preferences button.
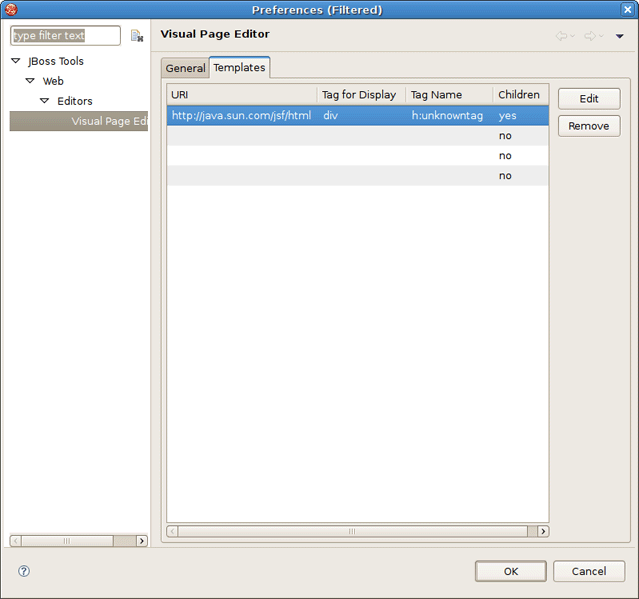
Here it's possible to edit or remove any listed in the table template.
The Visual Page Editor toolbar includes the next buttons:
Preferences (
 )
)Refresh (
 )
)Show bundle's messages as EL expressions (
 )
)
The
Preferences
button
(
![]() )
provides a quick access to the Visual Page
Editor preferences.
)
provides a quick access to the Visual Page
Editor preferences.
This page provides a number of options associated with the editor representation. The more detailed description on each one you can find in the "JBoss Tools Preferences" chapter under Visual Page Editor.
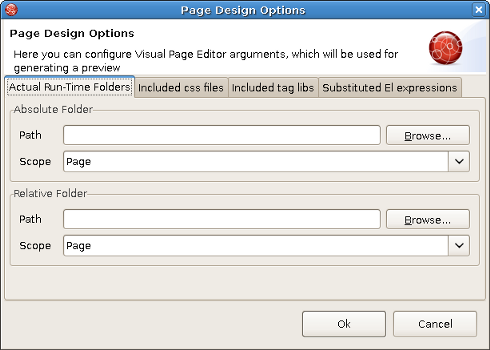
The
Page Design Options
button
(
![]() )
leads to a window which helps you specify necessary
references of the resources. It is represented by a window with 4 tabs. The
first one,
Actual Run-Time folders,
is used to replace absolute and relative path values when
generating a preview:
)
leads to a window which helps you specify necessary
references of the resources. It is represented by a window with 4 tabs. The
first one,
Actual Run-Time folders,
is used to replace absolute and relative path values when
generating a preview:
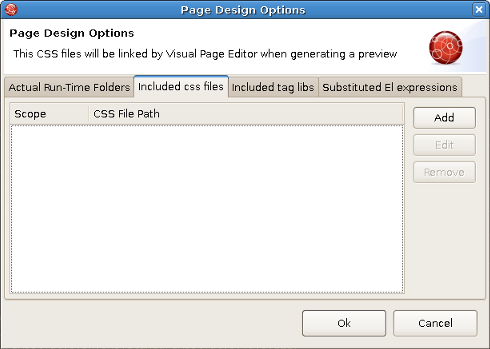
The second tab, Included CSS files , is used to add CSS files to be linked by Visual Page Editor when generating a preview:
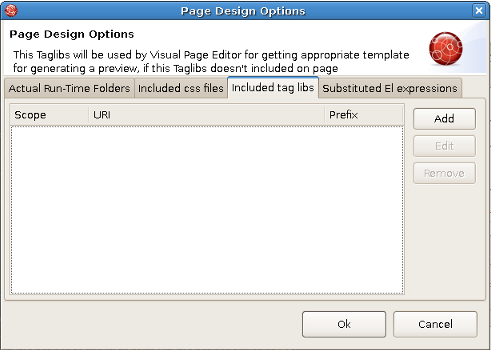
The third one, Included tag libs, can be used to add Taglibs that can be used by the editor for getting appropriate templates to generate a preview:
And finally, the Substituted El expressions tab is used to add El expressions that will be substituted by the editor when generating a preview:

The first two tabs of the window let you define actual runtime folders. The example below will help you understand how this can be done.
Suppose you have the following project structure:
WebContent/

  pages/

    img/

       a.gif

    header.jsp

  main.jsp
The content of the header.jsp is:
My Header

<img src="img/a.gif"/>
and main.jsp content is:
<jsp:include page="pages/header.jsp" />
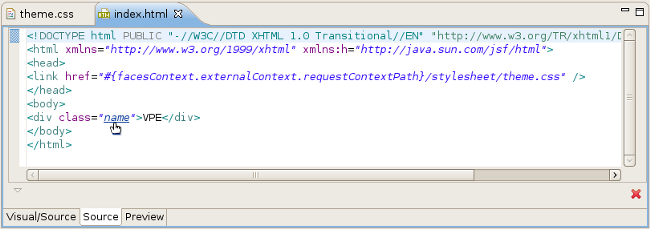
When you open main.jsp in Visual Page Editor, it will not be able to resolve the image from the header, however, it will work fine in runtime. To fix this in design time, click the Page Design Options button and set Actual Run-Time Relative Folder to 'projectName > WebContent > pages' and you will see the image appeared.
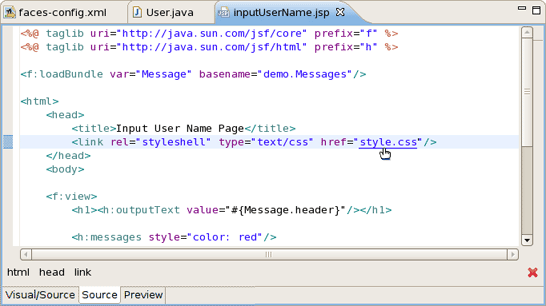
Let' consider an example for other tabs. For instance, the definition of your CSS on the page is the next:
<link rel="stylesheet" type="text/css"

    href="#{facesContext.externalContext.requestContextPath}/style.css"/>
This will work fine in runtime, but the Visual Page Editor doesn't know what requestContextPath in design time is. In order to see the necessary styles applied in design time your should add a path to your stylesheet in the CSS File Path section.
The next URI section lets you add URI taglibs so that the editor knows where to find the tag libraries.
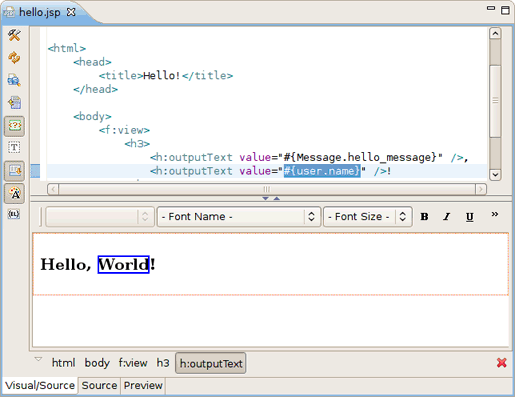
And the last Substituted EL expressions section is provided to specify the values for specific EL variables. It can be useful for a preview generation.
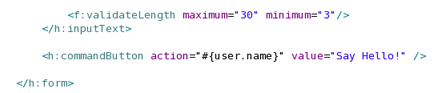
As an example look at the figure below:
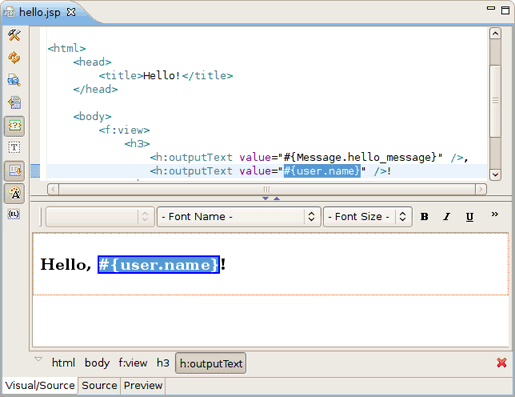
Here bath in Source and Visual modes you see the EL expression #{user.name}. When you switch to Preview view, you'll also see this expression. Now press Page Design Options button and set the value for the "user.name" as World.
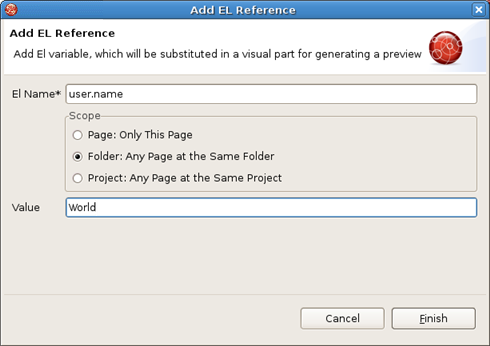
As a result in Visual mode and Preview view the word World is displayed.
The Visual/Source Editors splitting buttons provide the possibility to choose one of the four possible layouts for the Visual/Source Editor.
The available layouts and corresponding buttons are as follows:
Vertical Source on top(
 )
)Vertical Visual on top (
 )
)Horizontal Source to the left (
 )
)Horizontal Visual to the left (
 )
)
Note, at the current view there is only
one button, that proposes the possibility to change it in order the Source and the View are moved
in a clockwise direction.
The option is a self explanatory, i. e. if you want unknown tags to be wrapped in a border in the VPE visual part, just press the
Show border for unknown tags button
(
 ) on the toolbar.
Visual Page Editor provides the option for displaying
non-visual tags in Visual mode of the editor. To enable it select the
Show non-visual tags button (
 ) on the VPE toolbar.
On the figure you can see non-visual elements with gray dashed borders.
You can also switch on this option in the VPE preferences, having clicked on the Preferences
button
(![]() ).
).
You can find useful one more functionality provided by VPE. At the bottom of the Visual/Source view there is a Selection Tag Bar. It's updated automatically allowing to see tags tree for a current component selected in Visual or Source mode, also it allows to select tags back and forward.
If you want to hide the Selection Tag Bar, use
the
Show Selection Bar button (
 ) on the VPE toolbar.
VPE comes with design-time preview feature which is available for:
Struts Pages
JSF Pages
Seam Pages
Preview view is read-only, it shows how the page will look like in a browser.

Visual Page Editor (starting from 3.0.0.M3 version of JBoss Tools) supports
custom Facelets tag libraries both declared in the web.xml file
(for details, see
Creating a component) and packed into the JAR file.
Tip:
In case of Facelets tag library packed in .jar, remember to put *.taglib.xml in right place:
[filename].jar/META-INF/*.taglib.xml
Visual Page Editor recognizes the tags from the custom Facelets tag library and correctly renders them both in source and visual view of the editor.
While editing an XHTML file that uses a custom Facelets components you can always make use of the following editor's features:
Call the content assist as usual by using Ctrl+Space when typing a tag. As proposals you should see custom Facelets tags defined in your Facelets tag library.
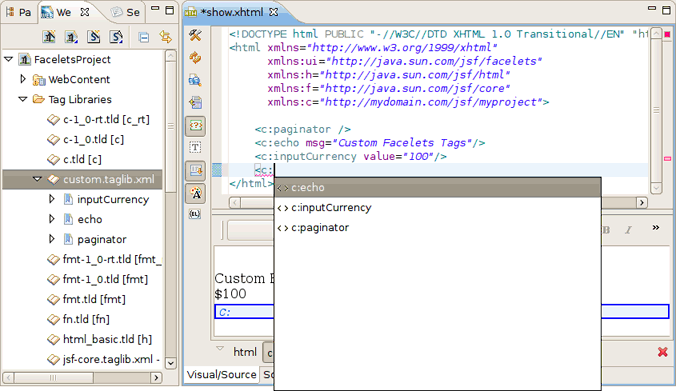
While developing using Facelets you can make use of:
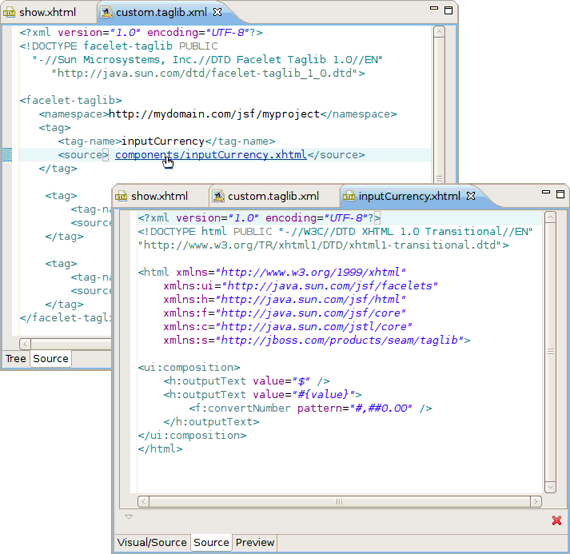
OpenOn functionality in XHTML files is available in two views of the Visual Page Editor:
Source view
Ctrl+Click on the namespace will open the Facelets tag file in a separate window.
Ctrl+Click on any custom Facelets tag declared on the page will do the same. The selected tag will be highlighted in the opened file.
Visual view
In the visual view of the VPE, double-click a custom component and the Facelets tag file (
*.taglib.xml) where it is declared will be opened.
Linux users who are going to use earlier then JBoss Tools 3.1.0.M4 versions may need to do the following to get the Visual Page Editor to work correctly on their machines.
The Visual Page Editor requires the library libstdc++.so.5. This library is contained in the compat-libstdc++-33.i386 package.
Note
Starting from JBoss Tools 3.1.0.M4 the libstdc++.so.5 library isn't required.To install this package on Fedora Core or Red Hat Enterprise Linux run the following command:
yum install compat-libstdc++-33.i386
On any other rpm based distributions download libstdc++.so.5 and run the following command:
rpm -Uvh compat-libstdc++-33.i386
On Debian based distributives run the following command:
apt-get install compat-libstdc++-33.i386
In case you have the library installed and you still have issue with starting the visual page editor then close all browser views/editors and leave one visual page editor open and restart eclipse. This should force a load of the right XULRunner viewer.
If it doesn't help and you use Fedora Core Linux and Eclipse Version: 3.4.1,the issue can be produced because libswt-xulrunner-gtk-3449.so file doesn't present in eclipse-swt-3.4.1-5.fc10.x86_64.rpm/eclipse/plugins/org.eclipse.swt.gtk.linux.x86_64_3.4.1.v3449c.jar.To add this file to eclipse you should:
Decompress eclipse/plugins/org.eclipse.swt.gtk.linux.x86_3.4.1.v3449c.jar form eclipse-SDK-3.4.1-linux-gtk-x86_64.tar.gz
Copy libswt-xulrunner-gtk-3449.so file to your Fedora Eclipse location.
Open the file eclipse.ini,which can be found in your Fedora Eclipse location and add the following line:
-Dswt.library.path=/usr/lib/eclipse
,where
/usr/lib/eclipseis the path to your eclipse folder.
Besides Visual Page Editor JBDS is supplied with a huge range of various editors for different file types: properties, TLD, web.xml, tiles, and so on.
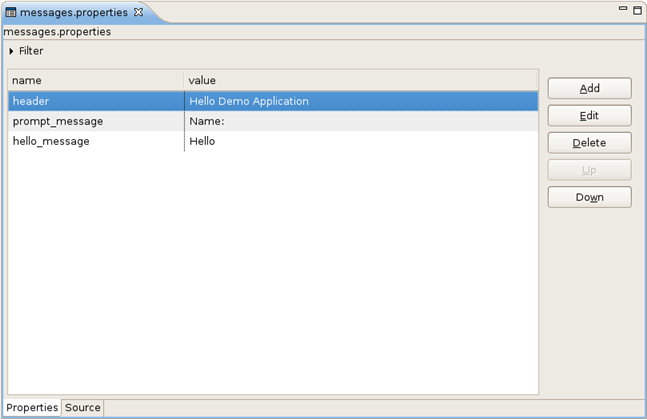
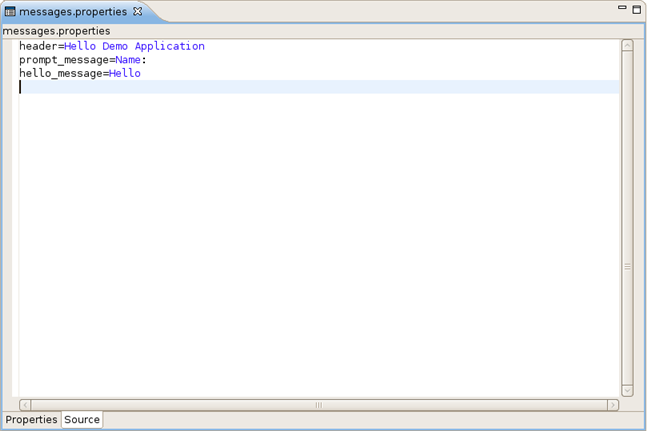
The Properties editor allows you to work in two different modes and also supports unicode characters.
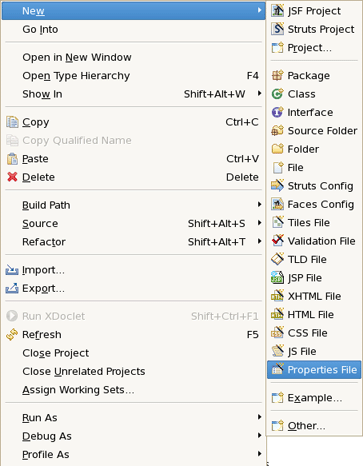
To create a new properties file, in the Package Explorer view, select New > Properties File from the right-click context menu on the folder where you want to create the file.
You can edit the file using a table-oriented "Properties" viewer:
You can also use a Source viewer for editing the file:
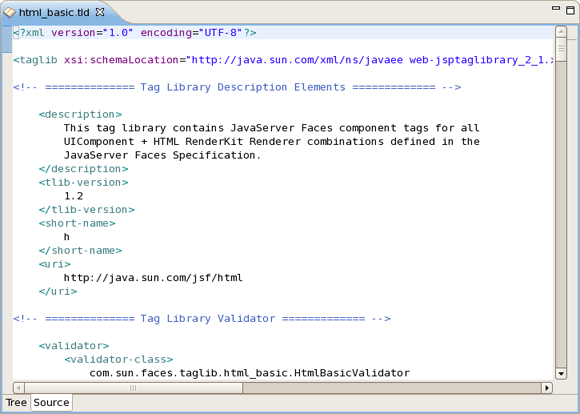
The TLD editor comes with same features you will find in all other JBoss Developer Studio editors:
Graphical and source edit modes
Validation and error checking
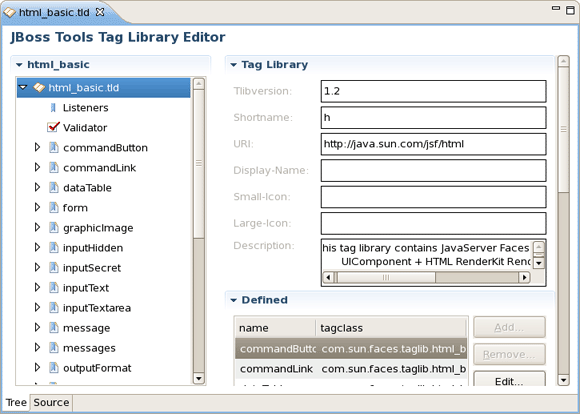
You can easily switch from Tree to Source by selecting the Source tab at the bottom of the editor.
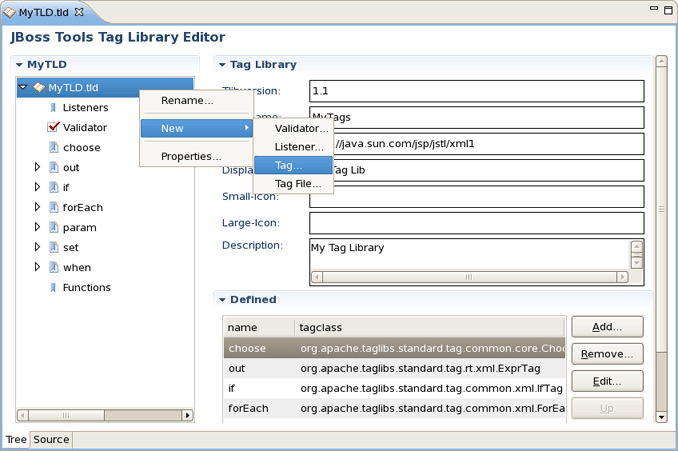
You can easily add a new tag:
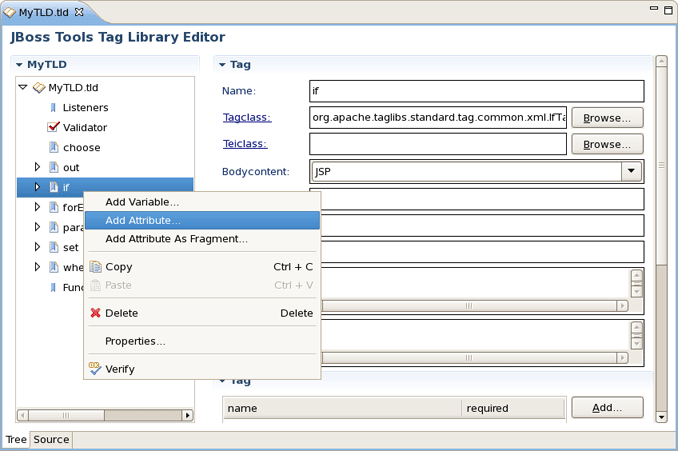
You can also easily add a new attribute to an existing tag:
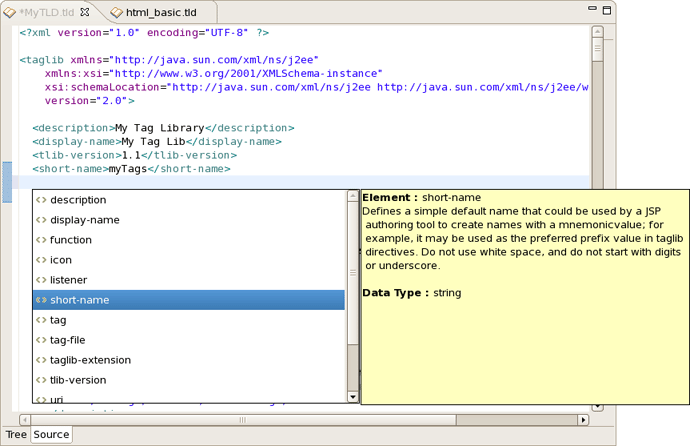
Content assist is available when editing the file using the Source viewer:
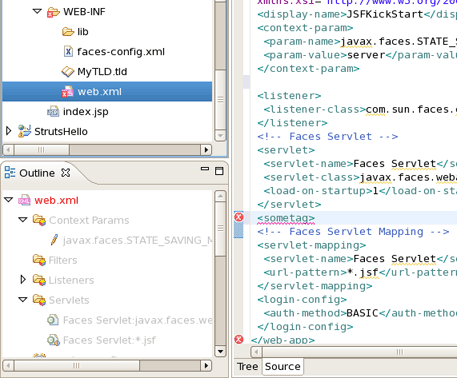
In the Source viewer, if at any point a tag is incorrect or incomplete, an error will be indicated next to the line and also in the Problems view below.
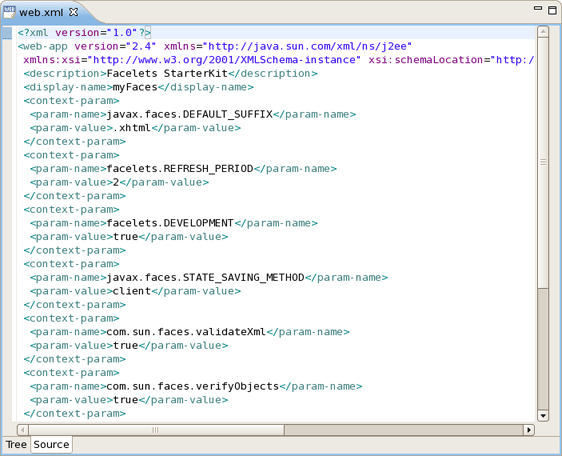
The deployment descriptor web.xml file is intended for describing the servlets, container-managed security constraints and various deployment properties specific for your Web Application.
To edit the deployment descriptor JBoss Developer Studio provides its own web.xml editor that comes with the same features you will find in all other JBDS editors:
Graphical and source edit modes
Validation and error checking
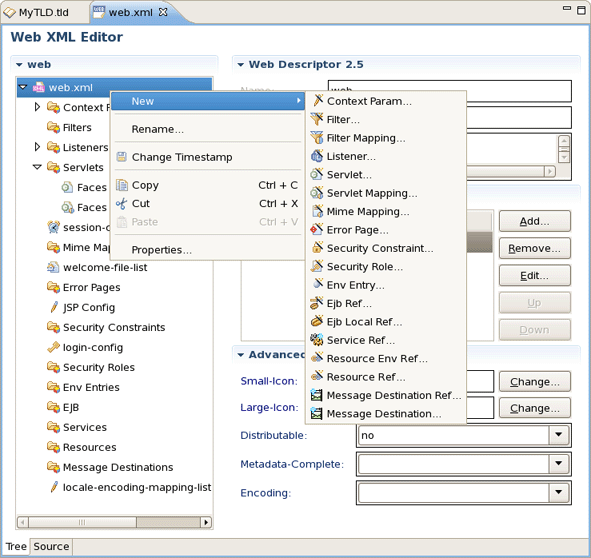
Switch to the Tree view if you want to edit web.xml in a graphical mode. All elements that web.xml could include are located in the left area of the editor in a tree format. Click a node on the left to display and edit its properties that will appear in the right-hand area.

You can add any new elements right in the Tree viewer:
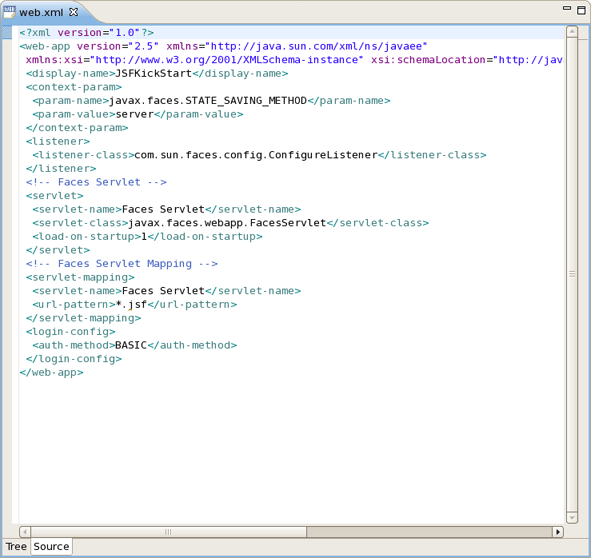
Switch to the Source viewer to edit the web.xml file by hand at any time:
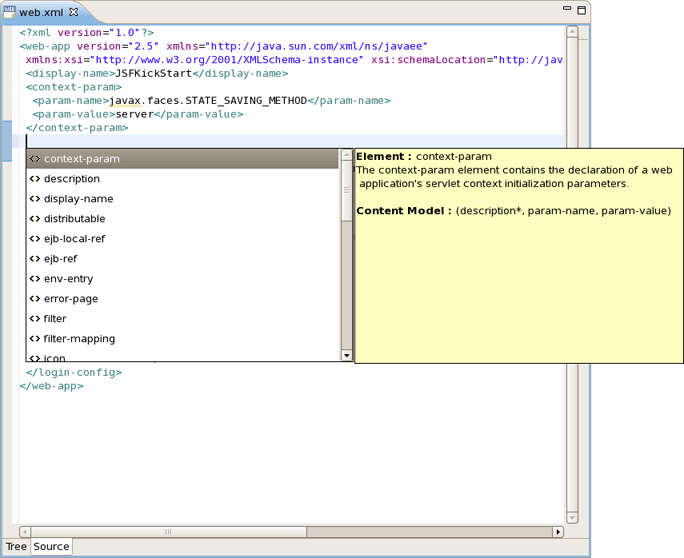
Content assist is available in the Source viewer. Simply click CTRL-Space anywhere in the file.
The CSS editor comes with the same features you will find in all other JBoss Developer Studio editors.
Content assist
Validation and error checking
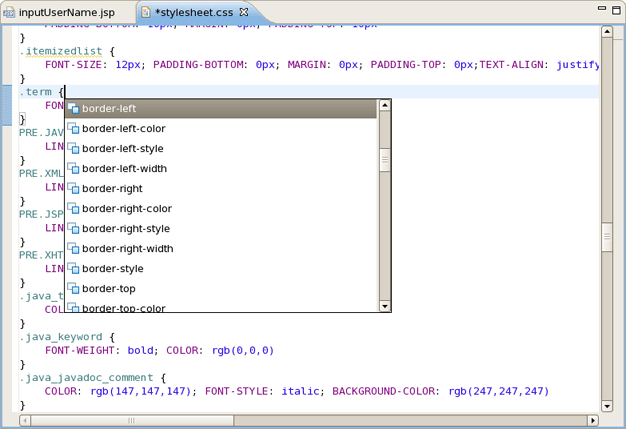
With the CSS (Cascading Style Sheet) editor, you can take advantage of code prompting:
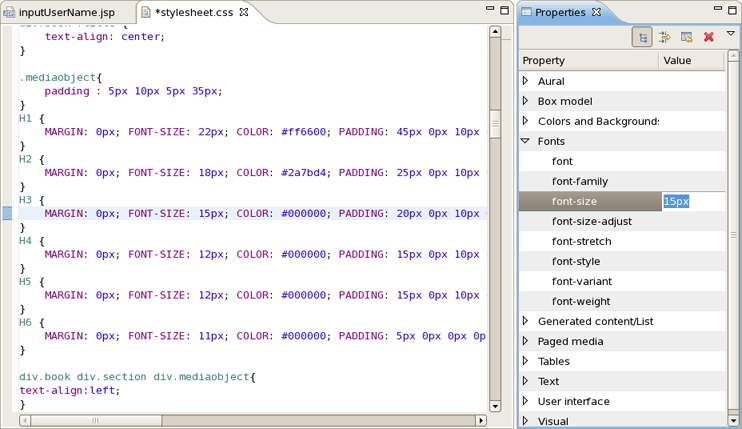
And you can also use the Properties view next to the editor to edit existing stylesheet declaration properties:
To make you work on CSS files more comfortable, CSS perspective is available, read more about it in CSS Editing Perspective chapter
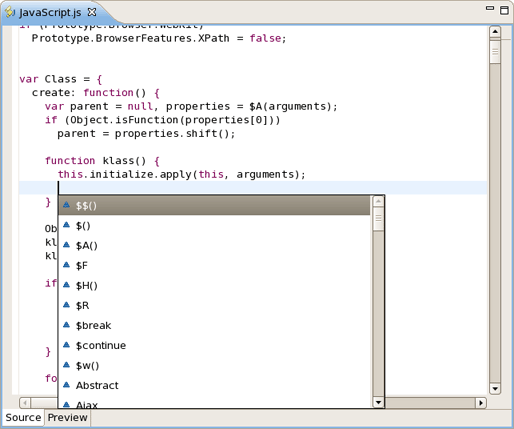
The JavaScript editor includes a Preview viewer and a Source viewer. In the Source viewer, you can use code assist:
You can also use the Source viewer with the Outline view to navigate around the file:

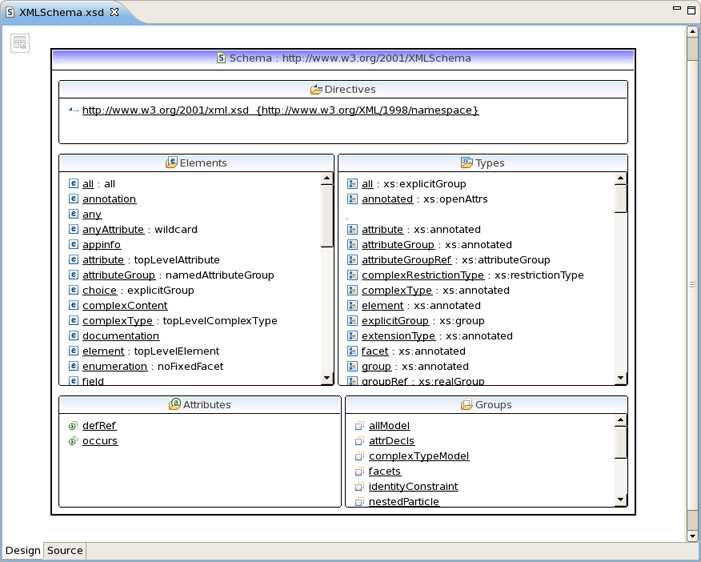
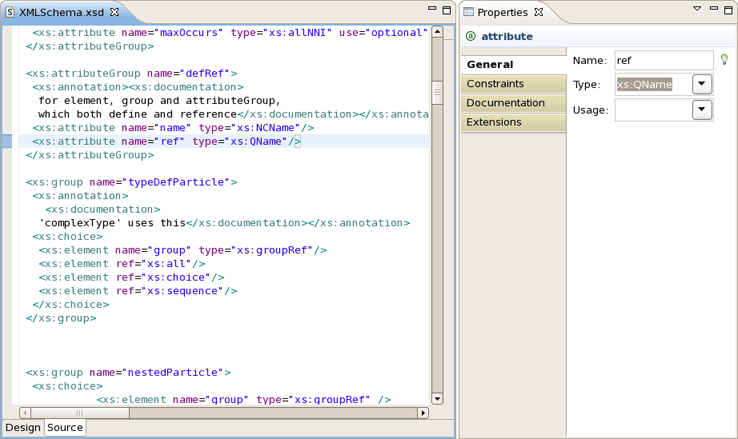
JBoss Developer Studio comes with an XSD Editor for XML Schema files. This editor comes from the Web Tools Project (WTP) (see WTP Getting Started).
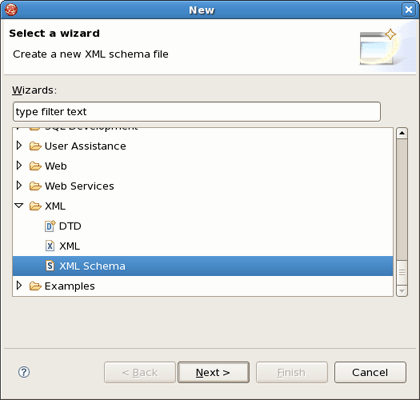
To create a new XSD file, right-click a folder in the Package Explorer view, select New > Other... from the context menu and then select XML > XML Schema in the dialog box.
The XSD Editor includes two viewers for working on the file, a Design viewer and a Source viewer:
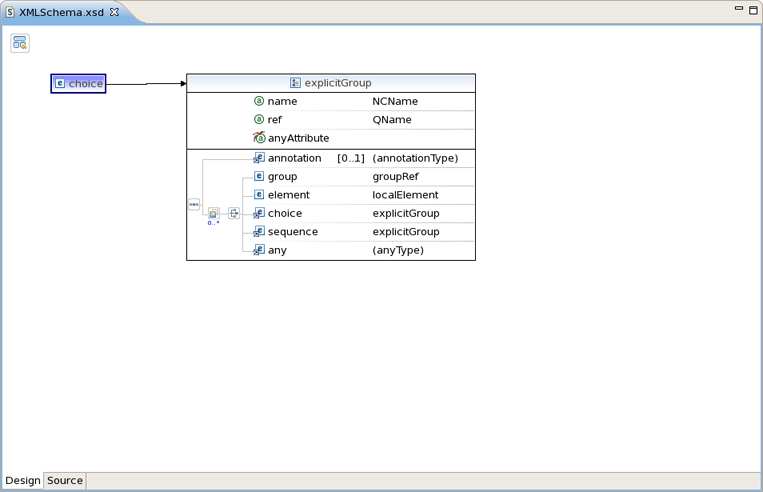
In the Design viewer, you can drill down on an element by double-clicking on it:
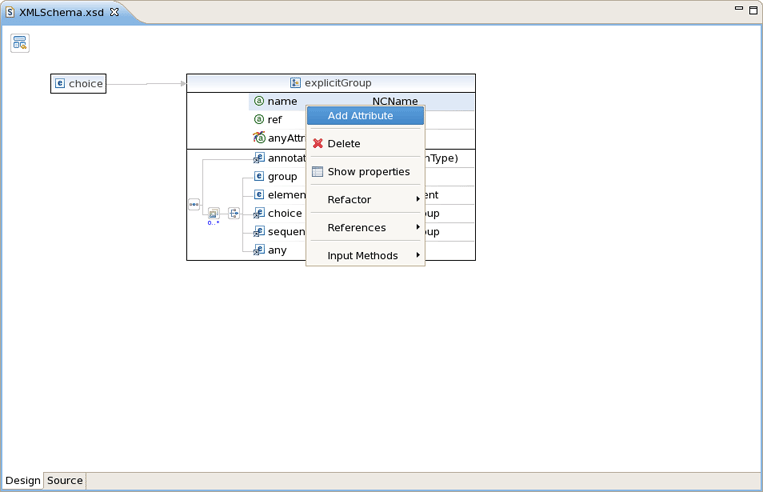
Various edit options are available when you right-click an element in the diagram:
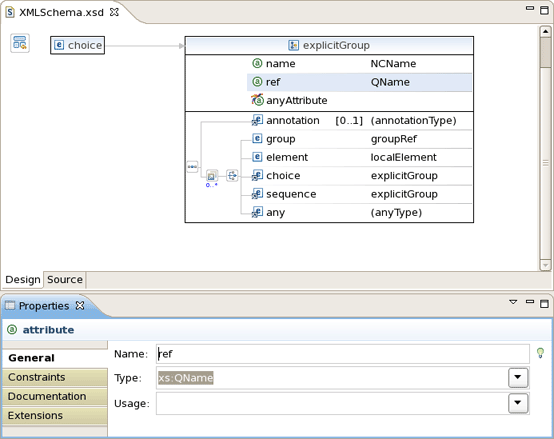
You can also use the Properties view to edit a selected element:
You can also use a Source viewer for the file. In this viewer, along with direct editing of the source code, you can also edit the file by using the Properties view on the right:
This chapter will introduce you to the functionality provided by JBoss Tools Palette. The Palette allows you to quickly and easily create your JSP or JSF pages. Now you can do it more faster without additional knowledge.
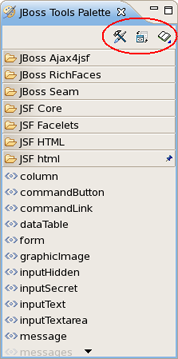
The JBoss Tools Palette allows you to:
Insert tags into a JSP or JSF page with one click
Add custom and 3rd party tags
The JBoss Tools Palette contains a developer's project tag libraries and provides possibility to add any tag libraries to it. Also you can choose a necessary one from the list of already existed tag libraries:
HTML
JBoss
JSF
JSTL
MyFaces
Oracle ADF Faces
Struts
XHTML
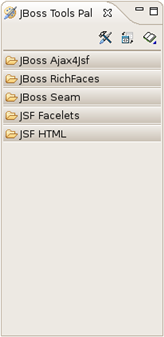
By default JBoss Tools Palette is not displayed. If you want to use it select Window > Show View Other... > JBoss Tools Web > JBoss Tools Palette from the menu bar.
The standard Eclipse Palette is displayed by default in both Web Development and Seam perspectives. Now, the standard Eclipse Palette is featured with all JBoss Tools Palette options and capabilities.
To open the standard Eclipse Palette navigate to Window->Show View->Others->General->Palette.
The differences between the two palettes are as follows:
The standard Eclipse Palette is blank by default; the content of the palette is available only if Visual Page Editor is open and active, while JBoss Tools Palette always contains a predefined set of components.
The Expanded/Collapsed state of components in the standard Eclipse Palette is not global as in JBoss Tools Palette: the state is associated with an instance of Visual Page Editor. It means that the state can be different for various files, and each new file opened in Visual Page Editor will have the default state of Palette with all components collapsed.
To facilitate your work, you can configure the Palette in your own way, by selecting the corresponding icon on the Palette toolbar.
There is a possibility to configure the JBoss Tools Palette:
to edit the palette content by adding, removing or changing the palette elements
to show/hide groups, subgroups
to import groups, subgroups
JBoss Tools Palette contains existing libraries of tags, thus the Palette editor is intended to work with them or create your new one, as well.
To open the editor, click on the
Palette Editor
icon( ).
).
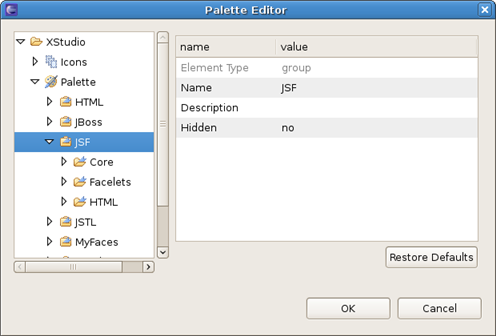
The window has two parts. There is a reflected grouped list of components on the left side of the palette editor. Each group is divided into multiple groups, every of which is a tag library. The right side of the palette editor is an editing window where it's possible to change values of group or tag library attributes that you've chosen on the left part of the window.
It can also be done by right click and using Edit… option.
For example, JSF group consists of Core, Facelets, HTML tag libraries and the attributes as name, description and hidden which are available for editing:
The Palette Editor provides the following possibilities when working with existing tags or icons:
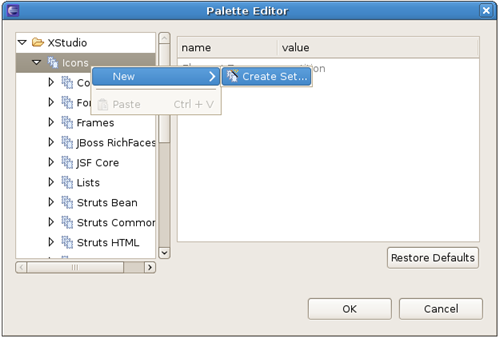
to work with a set of icons
Icons is the root folder for the icon sets. The first step is creating the icon set. Right click on the Icons folder and select Create > Create Set...
Set the value of the name in the Add Icons window and click Finish button. A new element will appear in the list.
Also you can delete the set. Right click on the set of icons that you wish to remove and chose the Delete Set option from the pop-up menu or click the Delete keyboard button.
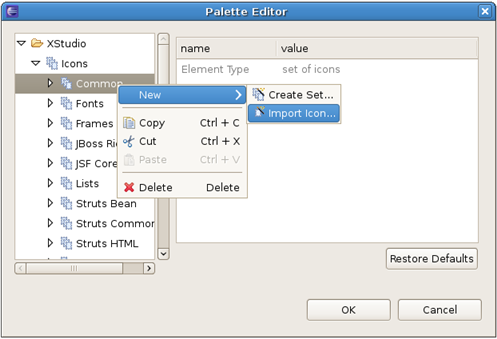
to edit icons in the chosen set
When the set of icons is created, new icons can be imported to it. Choose the required set and select the option Create > Import Icon... from the pop-up menu that appears after you right-click on a folder.
Set the name of the icon and the path and click Finish button.
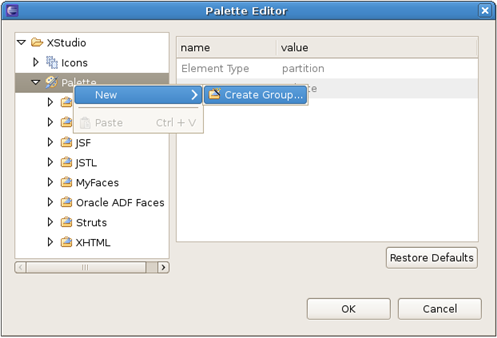
to work with a group of tag libraries
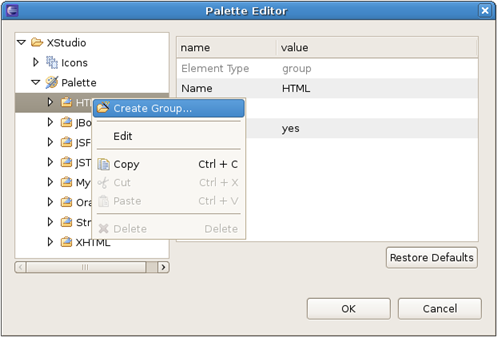
The first step in work with the editor is creating a group of libraries. It's very easy to do, right mouse button click on the Palette folder and select Create > Create Group…
Set a name of a group in the Create Group window and click OK button. A new element will appear at the end of the list.
You are allowed to edit or delete a group, as well. If you'd like to change attributes of a group, use the right editing window of the palette editor or the Edit... option, like it was mentioned before. In order to remove the group, right click on the group that you wish to remove and choose the Delete option or click the Delete keyboard button.
Important:
The removal option is enabled only for custom folders.
to work with a tag library
The group maintains a list of tag libraries. If you'd like to create your own library, click right mouse button on the group and choose Create Group… option.
After setting the attribute name and the path of the icon, click Ok button.
Note:
If you do not choose an icon the default one will be assigned.
You are allowed to edit or delete the tag library, as well. If you'd like to change attributes of the library or choose another icon, use the right editing window of the palette editor or the Edit... option. In order to remove the tag library, right click on the library that you wish to remove and chose the Delete option or click the Delete keyboard button.
Important:
The removal option is enabled only for custom tag libraries.
to work with a tag element
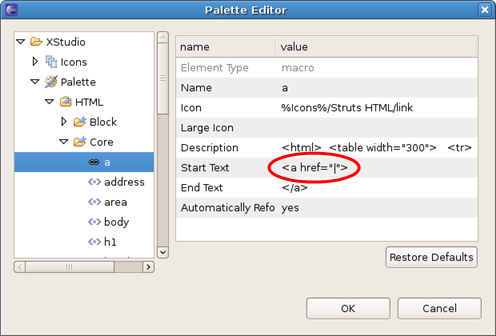
When the library folder is created, new tags can be added to it. Choose the required library and select the option Create > Create Macro… from the pop-up menu that appears after you right-click on a folder.
In the Add Palette Macro window, you can configure the tag element. Attribute Name is mandatory to fill and it will be the name of the tag element. Other settings are optional. You can choose the icon and set the Start Text and the End Text for your tag element. If your tag text is too long, use the Change... button to see it all. For start text and end text there is a possibility to control the cursor position by using "|" symbol.
After all the attributes are set, click Finish button.
Note:
If you do not choose an icon the default one will be assigned.
You are also allowed to edit or delete the tag. If you'd like to change the attributes of the tag or choose another icon for it, use the right editing window of the palette editor or the Edit... option from the pop-up menu. In order to remove the tag, right click on the tag that you wish to remove and chose the Delete option or click the Delete keyboard button.
Important:
The removal option is enabled only for custom tags. JBoss Palette tags can not be removed but can be modified.

If you have changed any abject in the tree view and you don't like the final result you can always use the Restore Defaults button. Click on it will restore defaults for the object selected and for its children elements. Please remember that the button will only restore data for objects defined in the default palette. If selected object is created by you, the button will be disabled. Child objects added by you will not be removed.
When updating JBoss Tools the palette content is not updated.
Show/Hide is a very useful feature that allows you to control the number of tag groups that are shown on the palette.
Click Show/Hide button(
 ), at the top right side of the JBoss Tools Palette.
In the dialog Show/Hide Drawers check the groups the libraries of which you want to be shown on the palette:
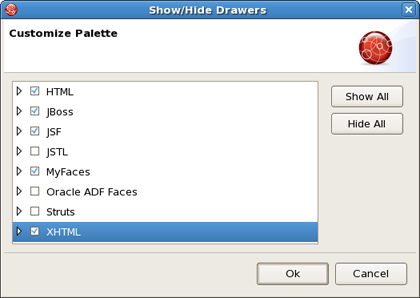
If libraries are not displayed in the palette, check whether they are selected. Click the plus sign to expand the libraries of the group and make sure that a tick is put next to the wanted libraries.
Click OK. The new groups will now be shown on the palette:
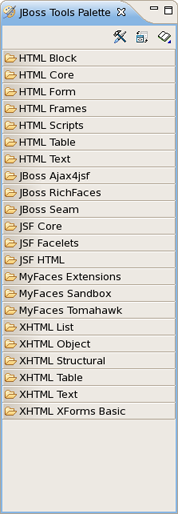
The names of the elements are compound. The first part is the group name and the second is the library name.
The Import button lets you add a custom or 3rd party tag library to JBoss Tools Palette. Find out more information on how to add particular tags see the Adding Custom JSF Tags section.
A new tag can be added into any text file including jsp, htm, html and xhtml.
Let's do it. Open your JSP file and place the cursor in a place where you'd like to add a tag and then click that tag in the palette. In the Insert Tag window, that appears, you can set the value of general and advanced attributes of the tag that you chose.

In the example below, the commandButton tag has been inserted.
Tip:
if you place the cursor over any tag, a balloon hint is shown with all the "tag" attributes.
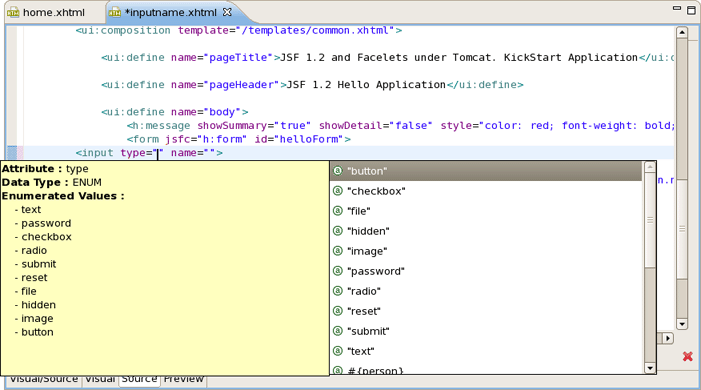
The cursor position after adding a tag into a file is specified by "|" symbol in the tag template on the right in the Palette Editor window.
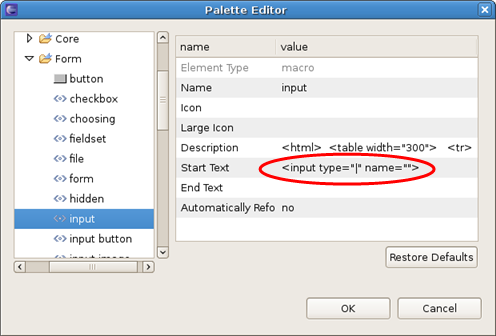
Above you can see where the cursor position for HTML > Form > input is set. Thus, after adding this tag into your file the cursor will be in the attribute "type". Then, you can straight use the combination of buttons Ctrl + Space to inquire about a prompting.
There are two ways to add any custom (including custom Facelets libraries) or 3rd party tag library to the JBoss Tools Palette:
Drag-and-drop from the Web Projects view
The Import button on the JBoss Tools Palette
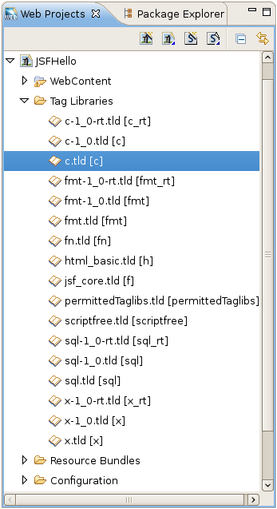
Before you add your custom component library, you need to make sure it is included in your project. You need to either place the ".tld" file or the ".jar" that includes your tag library under the lib folder in your project. Or you can just add ".tld" or ".jar" file to the classpath , and the library will be added to the Tag Library List in Web Projects View.
Switch to the Web Projects view and expand the Tag Libraries folder. If the view is not active, select Window > Show View > Web Projects from the menu bar.
Also make sure that the JBoss Tools Palette is open. Select the tag library that you want to add and simply drag-and-drop it on to the JBoss Tools Palette.
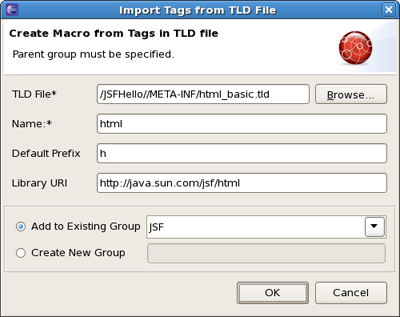
You will see the following dialog window. As you can see JBoss Developer Studio takes care of all the details. Chosen TLD file , name and prefix of the library and Library URL are detected, thus just need to set the Group name to which you wish to place this tag library. You can either add this tag library to an existing Group or just create a new one.
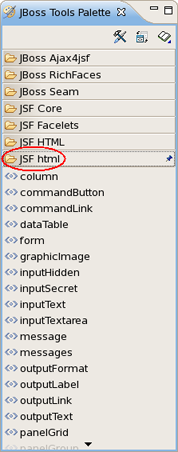
Once you are finished, you will see the new tag library added to the JBoss Tools Palette.
The same you can do with
Import
button( ).You can see this button at the top right side of the JBoss Tools Palette.
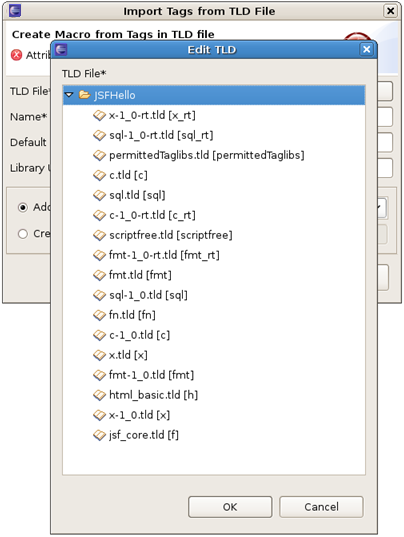
By clicking on the Import button you will see the Import Tag window a similar like in the Drag-and-Drop method. Set the name and prefix of the library and Library URL. Also you need to set the Group name to which you'd like to add your tag library. And like in the previous method you can add it to an existing Group or create a new one. On this Import Tag form you can use Browse... button to locate the tag library that you want to add:
In this chapter we will discuss CSS Editing Perspective views, more information about style sheets can be found in Page Styling section of Editor chapter
The CSS Editing Perspective combines a set of views which allow you to see the structure of your css files,edit them and see the results. To use this perspective you need to choose Window >Open Perspective> CSS Editing .All of the views are fully synchronized with each other:the changes being made in one view are reflected in othes at once.
As you know, there are three ways of inserting a style sheet:
External style sheet (.css file)
Internal style sheet (using the <style> tag in the head section of an HTML/XHTML/JSP page)
Inline style (using style attribute)
Using CSS Editing Perspective you can change your style sheet, inserted in any of the possible places described before, in three ways:
directly in your Editor
using CSS Properties view
using Properties view
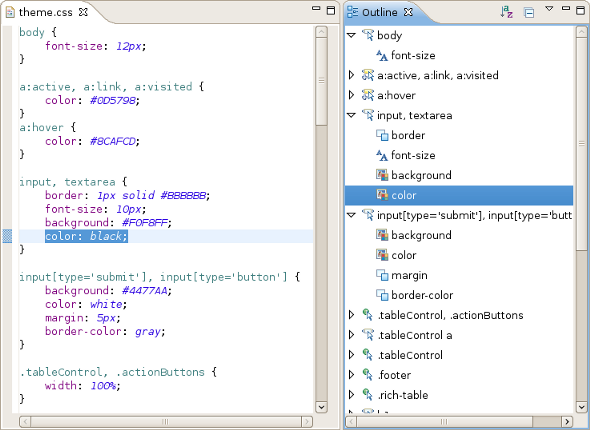
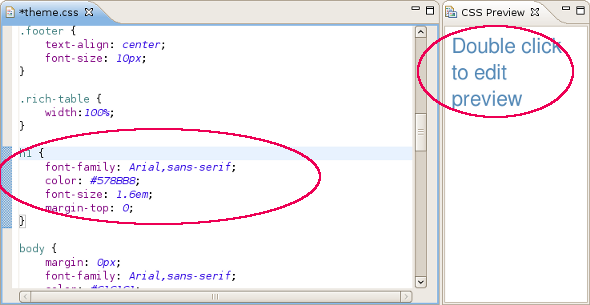
Using this view you can easily skip between the selectors described in the source files, see the list of properties in any selector just by clicking the triangle near it.

You can use the Source viewer with the Outline view to navigate around the file. To do this you should just left click the selector or property you want and it will be automatically highlighted in the source code:
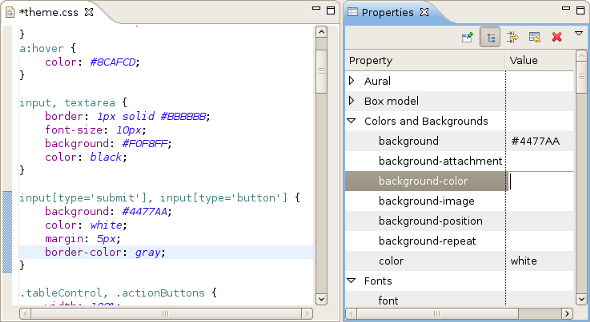
Properties view provides a full list of properties of a chosen selector. The properties are divided into logic groups for better navigation.

With the help of Properties view you have also the possibility to edit the css file by adding/editing/removing properties in the selector. Left click the "Value" field near the property you want to edit and write the changes in the text field.
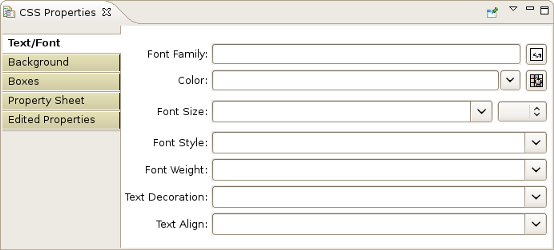
CSS Properties view has five tabs:
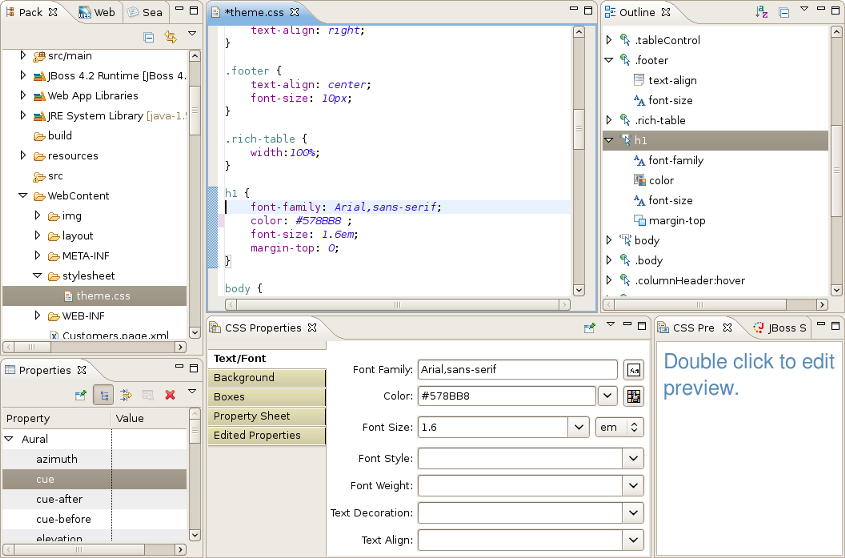
CSS Text/Font properties define the appearance of text,its font family, boldness, size, and the style.
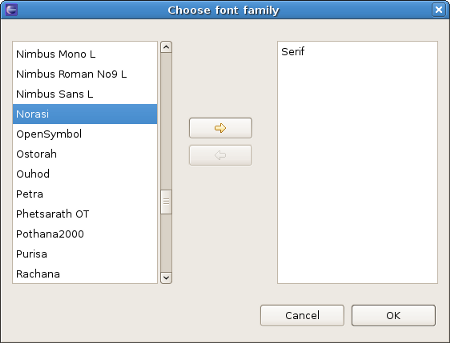
For example, to define the "font-family" property you should click Choose font family button(
 ) near Font Family text field
and select the fonts you want to use from the list.
) near Font Family text field
and select the fonts you want to use from the list.When you click Ok the chosen fonts should appear in Font Family text field and in the sourse css file. To define other properties in CSS Text/Font tab you should just click button near the corresponding field you want and select the appropriate option in the list. Or if you are absolutely sure of the property's value to use you can just write it in the text field.
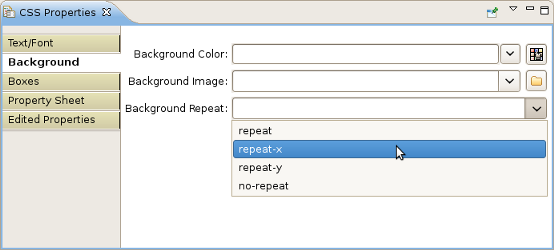
You should use CSS background properties and Background tab to define the background effects of an element.
Boxes tab is used to define CSS border properties and the box model. The CSS border properties allow you to specify the style and color of an element's border.
As well as in Text/Font tab, it's also possible to define the property in two ways:
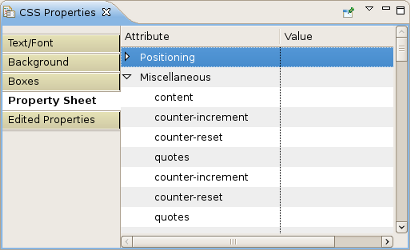
Property Sheet tab contains the categorized list of properties. Like in Properties view it's possible to edit the properties values.
Edited Properties tab contains only the properties,defined in the selector.
It's also possible to edit the properties in the tab.


JBoss Developer Studio comes with a tight integration with RichFaces component framework.
Note:
RichFaces 3.3.X is fully supported in the current version of JBoss Developer Studio (i. e. 2.1.0.GA) and JBoss Tools 3.0.1.GA.
The following features are implemented and fully supported for the current version of the RichFaces components:
All you have to do is to download and install RichFaces libraries into your project, i. e. just put richfaces-*.jar files into the /lib project folder. Also how to get started with RichFaces you can find in RichFaces documentation.
JBDS/JBoss Tools indeed provide code completion for RichFaces framework components.
Tip:
RichFaces 3.3.X is now fully supported in code completion.
Working with .jsp/.xhtml pages in VPE you can also take the advantage of OpenOn feature for the RichFaces components.
For example, Richfaces tags
<rich:insert>
and
<a4j:include>>
has OpenOn support.


OpenOn is also supported in "ForID"-like attributes (the attributes, where the value should be ID or the list of IDs) in RichFaces.
RichFaces and JBoss Tools Palette.
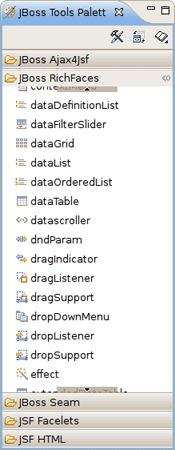
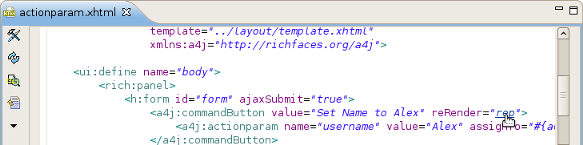
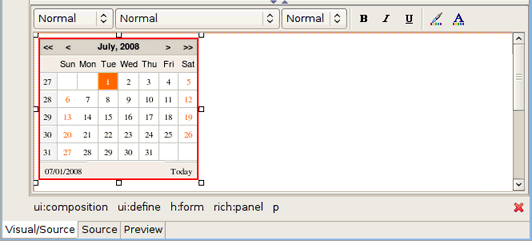
To insert a RichFaces component on a page:
expand JBoss RichFaces group on the palette
click on some component
put the needed attributes in the Insert Tag dialog and click Finish button
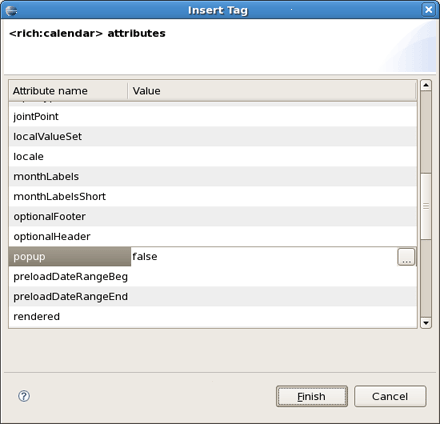
The RichFaces component will be inserted on your page and displayed in source and visual modes:
To get more in-depth information on RichFaces framework refer to RichFaces Developer Guide.
It may be also helpful for you to look through the movies where there are ones that demonstrate the usage of RichFaces components.
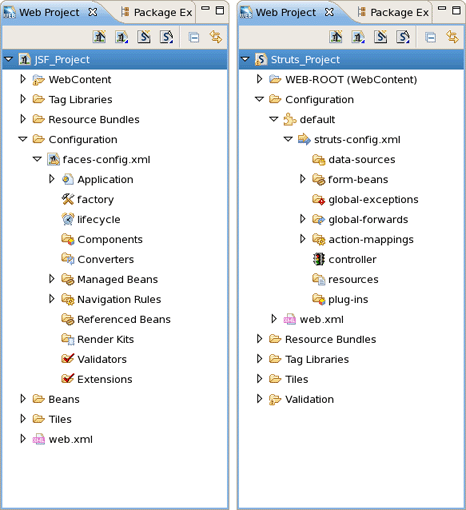
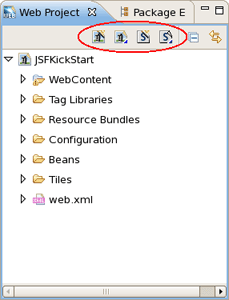
Web Projects is a special view that comes with JBoss Developer Studio.
If the Web Projects view's tab is not visible next to the Package Explorer tab, select Window > Show View > Other > JBoss Tools Web > Web Projects from the menu bar.
With the Web Projects view, you can:
Visualize the project better because the project artifacts for JSF, Struts and Seam projects are organized and displayed by function.
Select these kinds of items to drag and drop into JSP pages:
JSF managed bean attributes
JSF navigation rules outcomes
Property file values
Tag library files
Tags from tag libraries
JSP page links
Use context menus to develop the application (all create and edit functions are available)
Use icon shortcuts to create and import JSF and Struts projects
Expand and inspect tag library files
Select custom and third-party tag libraries to drag and drop onto the JBoss Tools Palette
The Web Projects view organizes your project in a different way. The physical structure of course stays the same. The new organization combines common project artifacts together which makes it simpler to locate what you are looking for and develop.
The screen shot below shows a JSF project and a Struts project in Web Projects view.
Web Projects View has a drag and drop option that can be used for property, managed bean attributes, navigation rules, tag library file declaration and JSP Pages.
Expand the Resources Bundles folder that holds all the Property files in your project. Select the file from which you want to add the property and then select the property.
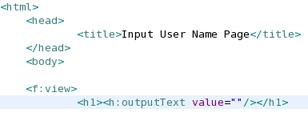
We will be dragging and dropping a property file value inside the outputText tag for the "value" attribute.
Select the property:
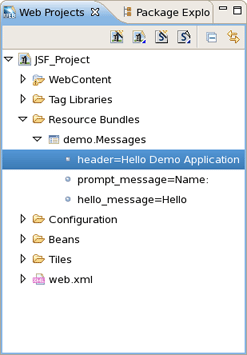
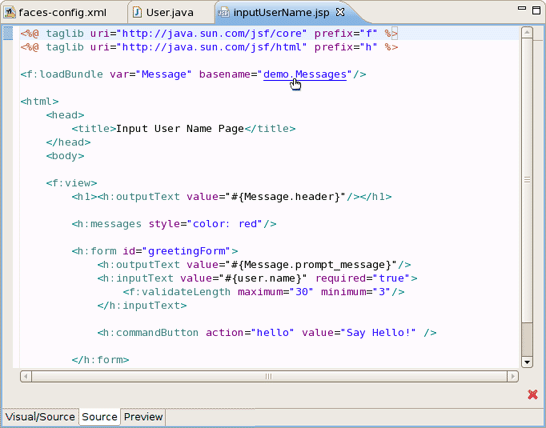
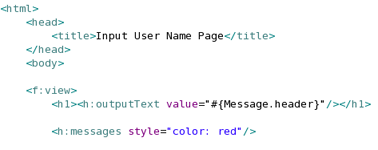
Drag the property and drop it between the quotes for the value attribute in the JSP file. Notice that JBoss Developer Studio added the correctly formatted expression for referring to the property value #{Message.header} automatically.
You can actually place the tag anywhere in the page, not just inside an existing tag. In this case,
JBoss Developer Studio will place the complete tag <h:outputText value="#{Message.header}"/> in the page.
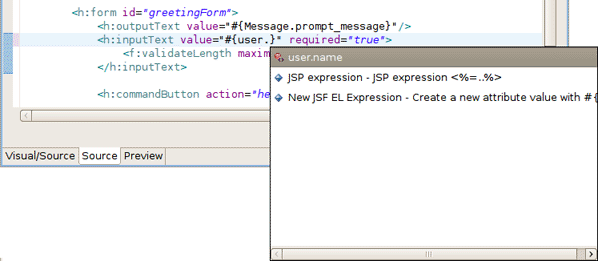
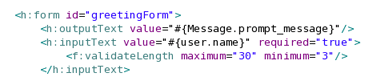
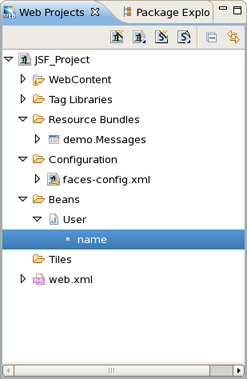
Select a "managed bean" attribute and then drag and drop it onto the JSP page. We are going to place it inside the "value" attribute of the inputText tag.

Once again, JBoss Developer Studio adds the correct expression, #{user.name}.
Select the navigation rule under Configuration > faces-config.xml > Navigation Rules:
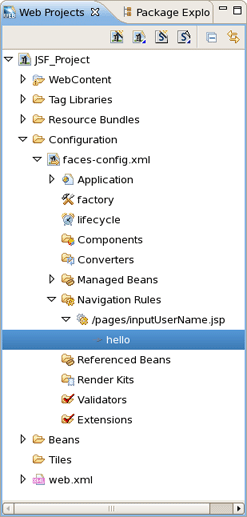
Drag and drop it inside the commandButton tag:
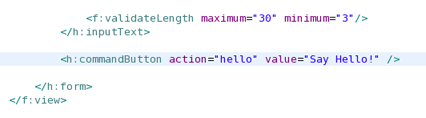
You could do the same if the navigation rule was defined inside an action method:
Here is how it would look after drag and drop:
Select a TLD file:
Then drag and drop it onto the JSP page to add a declaration at the top of the page:

It is also possible to develop your application right from the Web Projects view. Simply right-click any node in the tree and select an appropriate action from the context menu. For instance, this screen capture shows creating a new navigation rule.

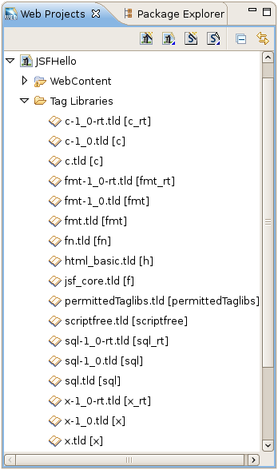
You can easily expand any TLD file in the project. Browse to the Tag Libraries folder. Right-click a TLD file and select Expand:
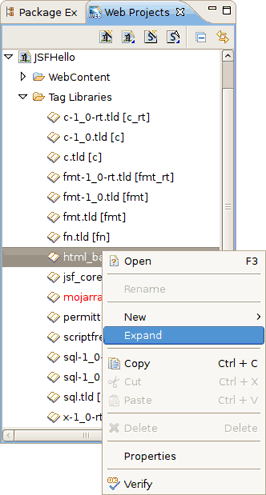
The TLD file will now be expanded:
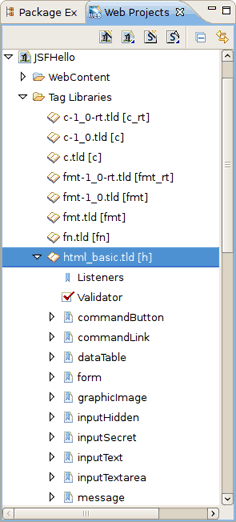
You can then select any tag and drag it onto a JSP page.
Read Adding Tag Libraries to learn about this.
- 8.1. Packaging Archives
- 8.2. Editors
- 8.3. Visual Page Editor
- 8.4. El Variables
- 8.5. JSF
- 8.6. JSF Pages
- 8.7. JSF Project
- 8.8. JSF Validator
- 8.9. JSF Flow Diagram
- 8.10. Label Decorations
- 8.11. Seam
- 8.12. Seam Validator
- 8.13. Seam Pages Diagram
- 8.14. Struts
- 8.15. Struts Automation
- 8.16. Plug-in Insets
- 8.17. Resource Insets
- 8.18. Struts Customization
- 8.19. Struts Project
- 8.20. Struts Support
- 8.21. Struts Pages
- 8.22. Struts Flow Diagram
- 8.23. Tiles Diagram
- 8.24. Verification
- 8.25. Server Preferences
- 8.26. XDoclet
Configuring the various JBoss Developer Studio features is done via the Preferences screen by selecting Window > Preferences > JBoss Tools from the menu bar.

From this screen, you can select these more specific sets of JBoss Tools preferences:
The Preferences dialog ( Window > Preferences) also allows to adjust settings for JBoss Server and XDoclet module.
Fallow to JBoss Tools > Packaging Archives to open the page for changing Packaging Archives preferences.
Here you can determine settings for Project Packages view and core preferences.

The next table lists all available preferences for Packaging Archives and their description.
Table 8.1. Packaging Archives Preferences
| Option | Description | Default |
|---|---|---|
| Enable incremental builder | Uncheck this option if you don't want to enable incremental builder for your resources | On |
| Show full output path next to packages | This option allows you to show or hide an output path next to packages . | On |
| Show the full root directory of filesets | If on, the full root directory is displayed next to filesets. Otherwise, it's hidden . | On |
| Show project at the root | This option allows you to choose whether to display a project name at the root of the packages or not. When checked, 'Show all projects that contain packages' is enabled . | On |
| Show all projects that contain packages | Selecting this setting enables the Projects Archiving view to show or hide all projects that contain packages. The option is available when the previous one is checked. | Off |
To adjust settings common for all editors supplied with JBoss Developer Studio you should select JBoss Tools > Web > Editors.
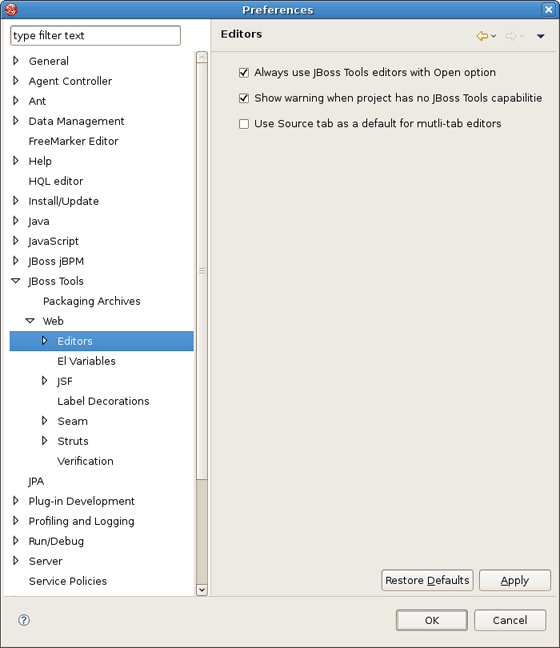
On the Editors page the following preferences are available:
Table 8.2. Editors Preferences
| Option | Description | Default |
|---|---|---|
| Always use JBoss Tools editors with Open option | On | |
| Show warning when project has no JBoss Tools capabilities | Check this option to be sure that any JBoss Tools editor fully available for a particular type of file. If no, you'll be warned about this. | On |
| Use Source tab as a default for multi-tab editors | If on, an editor will open the files in the Source view by default | Off |
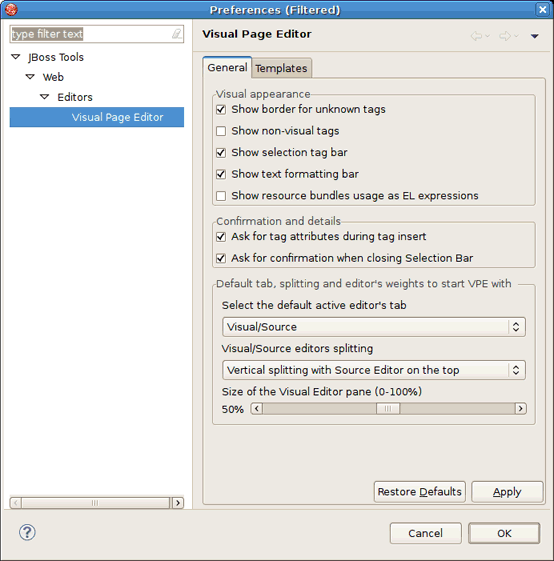
JBoss Tools > Web > Editors > Visual Page Editor screen allows you to control some aspects of the behavior of the Visual Page Editor (VPE) for JSF/HTML files.

The next table lists the possible settings that you can adjust on the General tab of the VPE Preferences page.
Table 8.3. VPE Preferences
| Option | Description | Default |
|---|---|---|
| Show border for unknown tags | The option allows to place the border around unknown tags or undo this | On |
| Show non-visual tags | Check this box, if you want the editor shows non-visual elements on the page you're editing | Off |
| Show selection tag bar | The option allows to show/hide the Selection Bar | On |
| Show text formatting bar | Check this box in order to show/hide the Text Formatting bar | On |
| Show resource bundles usage as EL expressions | If the option is checked, the editor will show EL expressions instead of the resource values | Off |
| Ask for tag attributes during tag insert | Having this option off, the dialog with possible attributes for inserting tag won't appear if all its attributes are optional | On |
| Ask for confirmation when closing the Selection Bar | Check this box if you don't want the confirmation window appears when closing the Selection Bar | On |
| Select the default active editor's tab | The option provides possibility to choose one of the following views - Visual/Source, Source or Preview, as default when opening the editor | Visual/Source |
| Visual/Source editors splitting | The option allows to choose one of the following Visual,Source layouts - Vertical Source on top, Vertical Visual on top,Horizontal Source to the left or Horizontal Visual to the left, as a default one when opening the Visual/Source view | Vertical splitting with Source Editor on the top |
| Size of the Visual Editor pane (0 – 100%) | With the help of this scroll bar you can adjust the percentage rating between the Source and Visual modes of the Visual/Source view | 50% |
On the Templates tab you can edit or remove VPE templates.
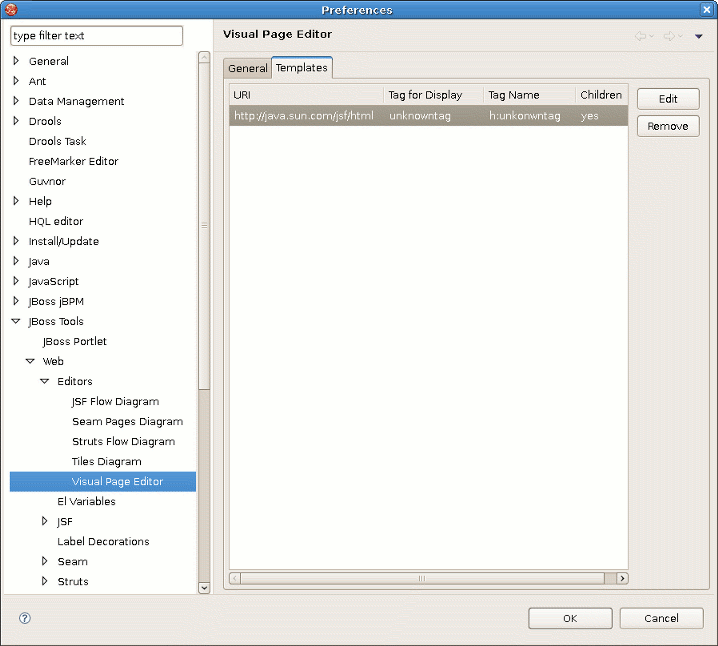
Select a template for editing from the available list and press Edit button. It will pick up the Template dialog where you can adjust new settings.
To specify necessary EL variables globally, i. e. for all projects and resources in your workspace, you should go to JBoss Tools > Web > El Variables.

Click Add... to set value for a new EL variable. In the appeared wizard you should specify the global values and press Finish .
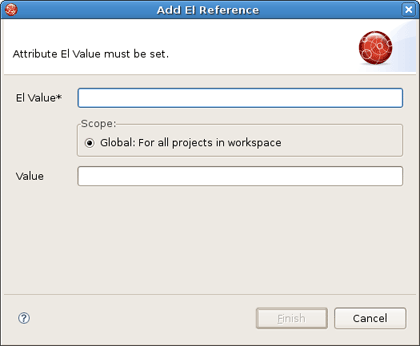
Tip:
If you specify an equal variable in Substitute EL expressions dialog and in Preference EL dialog, variable from preference dialog will have priority.
Select JBoss Tools > Web > JSF to get to the JSF Project specific preferences.

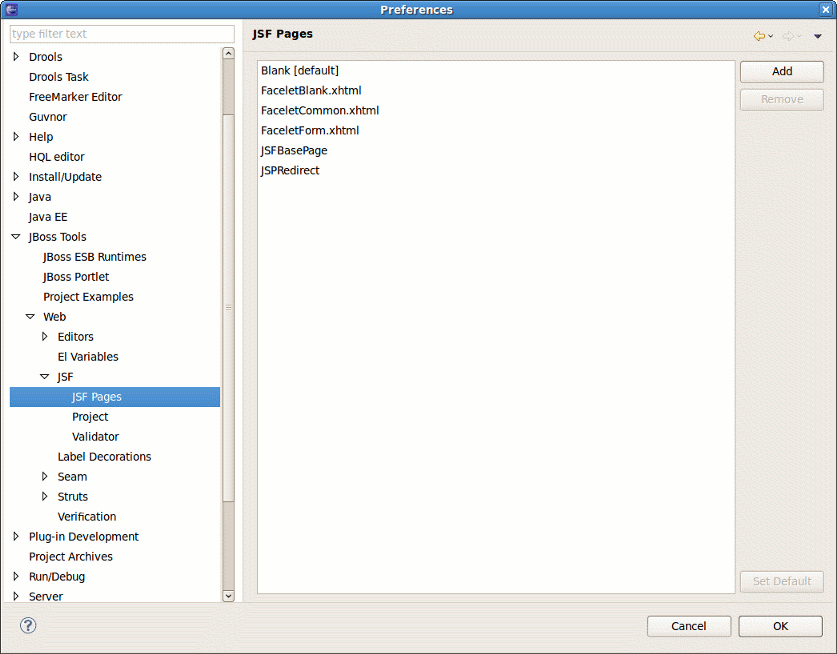
By selecting JBoss Tools > Web > JSF > JSF Pages you can add jsf pages or remove existing ones.
Select JBoss Tools > Web > JSF > Project to see JSF Project preferences page.
On the New Project tab you can set default values for New JSF Project wizard:
Version for setting the default JSF Environment
Project Template so as New JSF Project wizard shows this template as default for the chosen JSF Environment
Project Root for specifying default location for a new JSF project
If you check Use Default Path here, this box will be also checked in the New JSF Project wizard.
Servlet Version for setting the default Servlet version of a new JSF project
Here it's also possible to define whether to register Web Context in server.xml while organizing a new project or not. Check the proper box in order to do that.
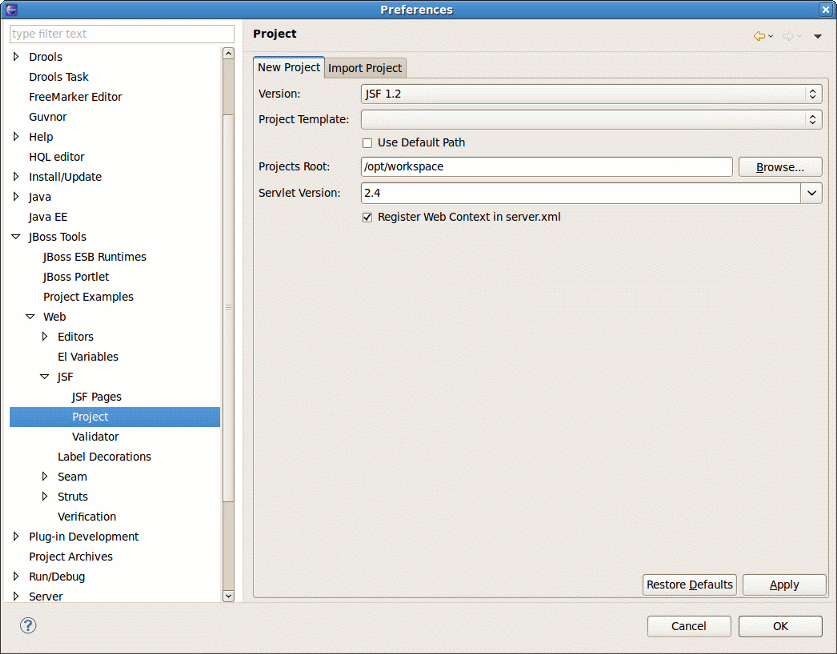
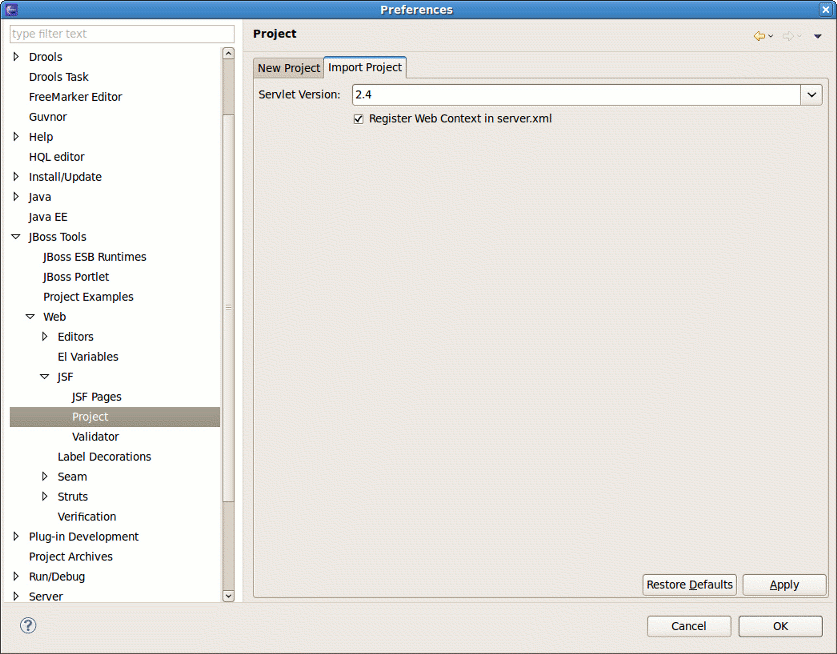
On the Import Project tab in the JSF Project screen you can determine the default Servlet version for the Import JSF Project wizard and also whether to register Web Context in server.xml or not.
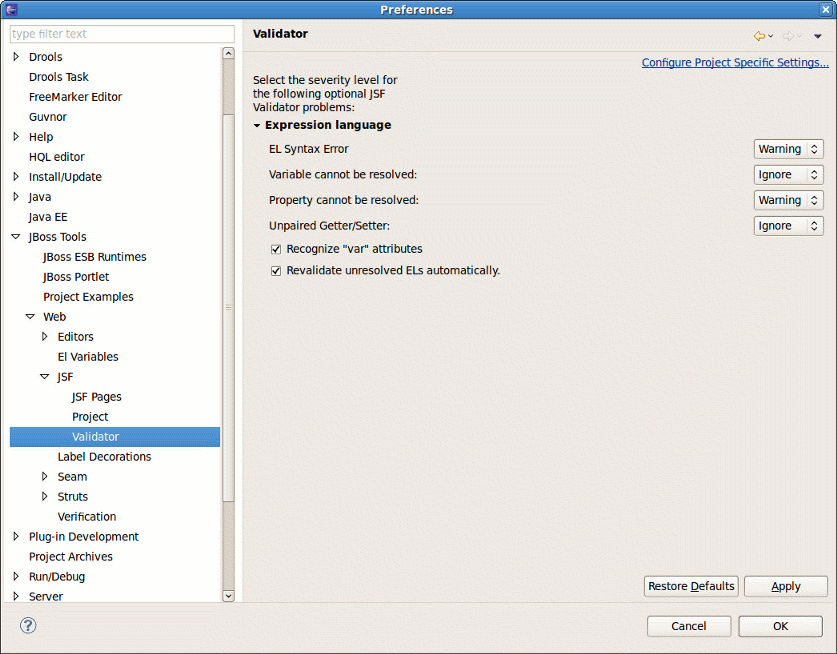
Select JBoss Tools > Web > JSF > Validator page to configure the validator behavior. On this page you can change the severity level for different jsf problems which are controlled by validator.
Selecting JBoss Tools > Web > Editors > JSF Flow Diagram allows you to specify some aspects of the Diagram mode of the JSF configuration file editor.
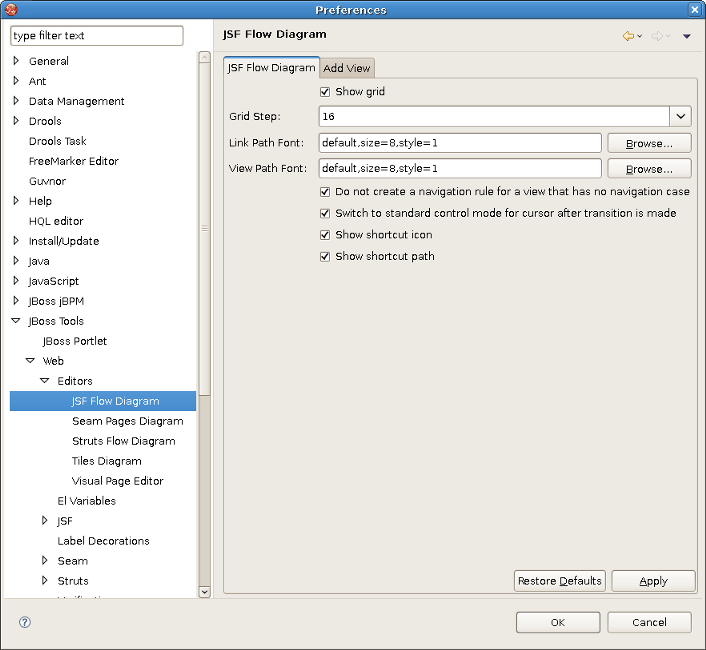
The first two items control the background grid for the diagram. The next two items allow you to control the appearance of the labels for views (pages) and the transitions between views. For these two items, clicking the Change... button allows you to assign a font with a dialog box.
The first check box determines whether a view in the diagram that doesn't have a transition connecting it to another view yet should be written to the source code as a partial navigation rule. The next check box determines whether the diagram cursor reverts immediately to the standard selection mode after it's used in the transition-drawing mode to draw a transition. Finally, the last two check boxes concern shortcuts. A shortcut is a transition that is there but isn't actually displayed in the diagram as going all the way to the target view it's connected to, in order to make the diagram clearer. With the check boxes, you can decide whether to display a small shortcut icon as part of the shortcut and also whether to display the target view as a label or not.
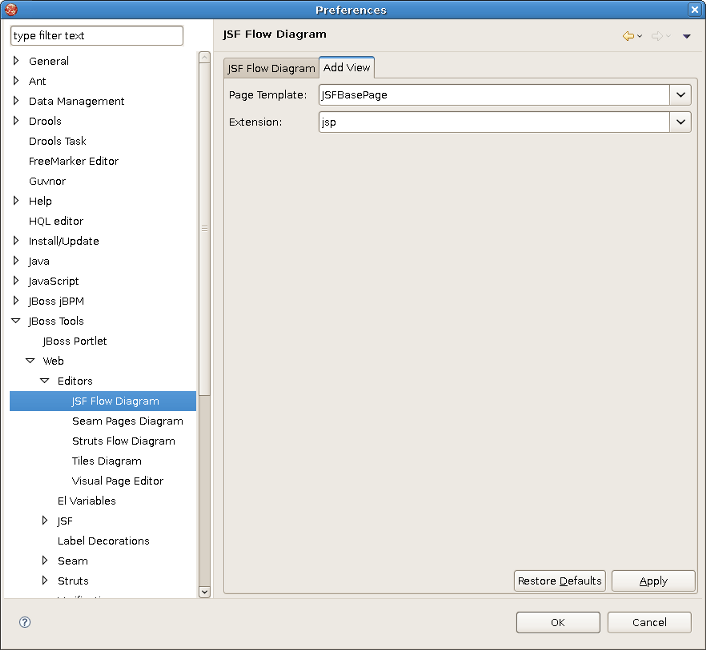
Selecting the Add Page tab in the JSF Flow Diagram screen allows you to determine the default template and file extension for views (pages) you add directly into the diagram using a context menu or the view-adding mode of the diagram cursor.
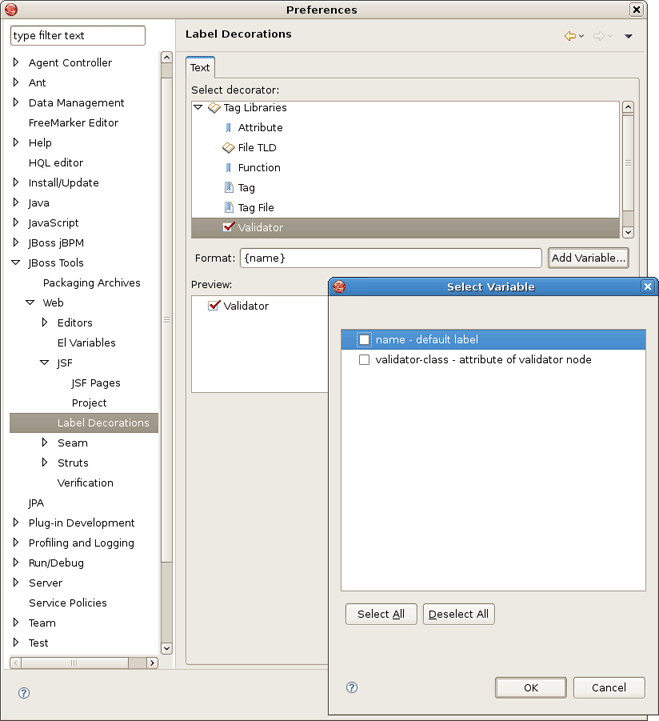
The Label Decorations page is opened from JBoss Tools > Web > Label Decorations.
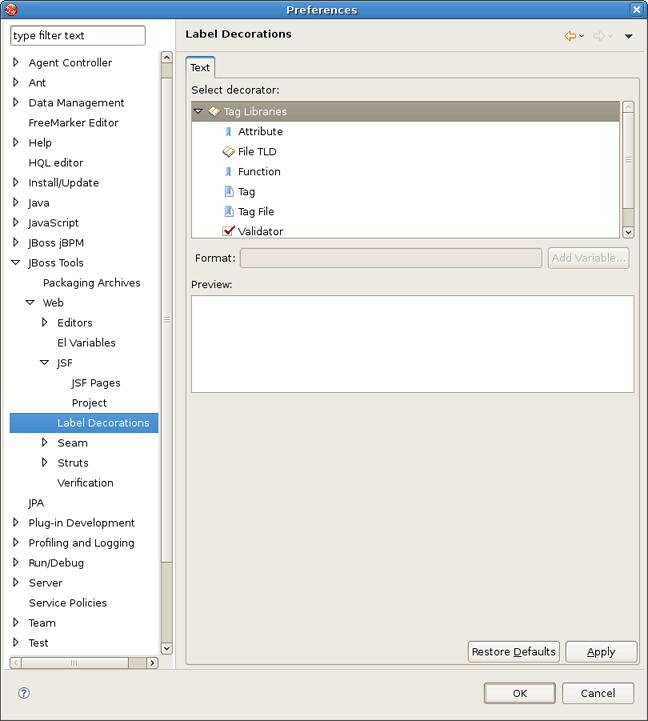
On this page you can determine the format for a text output near the decoration label for different Web resources. To change the value for selected element, click Add Variable... button next to Format field. Appeared wizard will prompt you to select one from the available list.
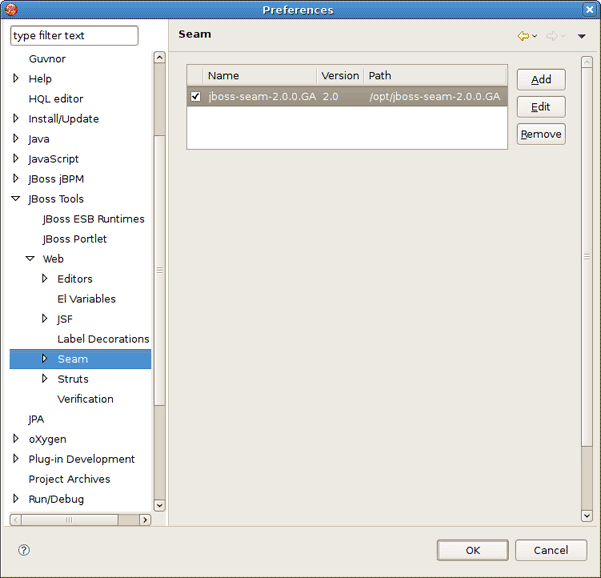
The following preferences can be changed on the JBoss Tools > Web > Seam page.
On Seam screen you can add and remove Seam runtimes.
Here is what Seam preference page looks like:
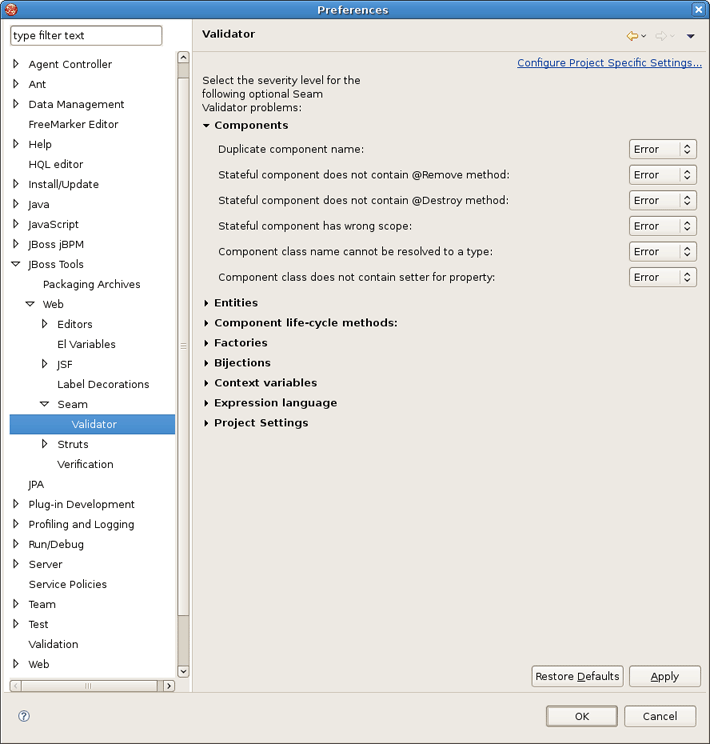
The following preferences can be changed on the JBoss Tools > Web > Seam > Validator page.
In Validator panel you configure seam problems that will be processed by validator.
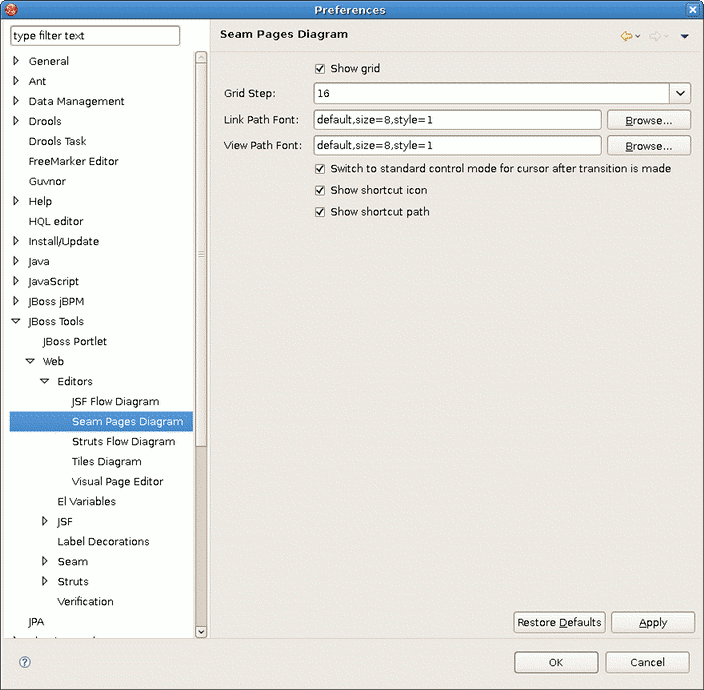
In order to customize the layout of the Diagram used for editing and composing page.xml file in Graphical mode of Seam Pages Editor you can go to Window > Preferences > JBoss Tools > Web > Seam > Editors > Seam Pages Diagram.
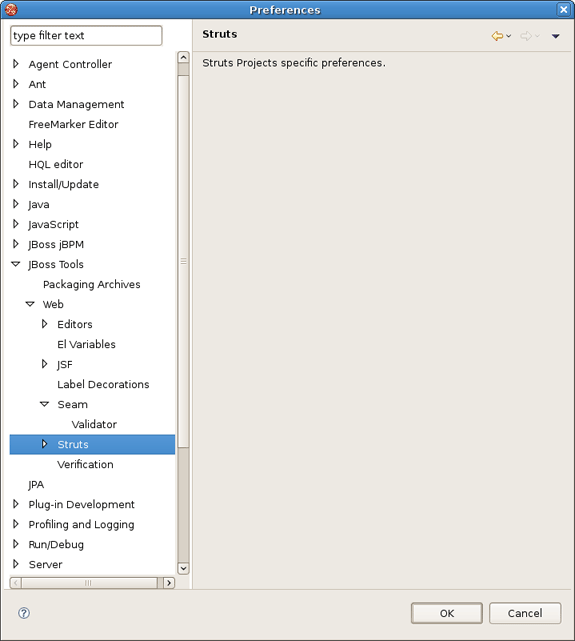
By selecting JBoss Tools > Web > Struts you can configure Struts projects specific preferences.
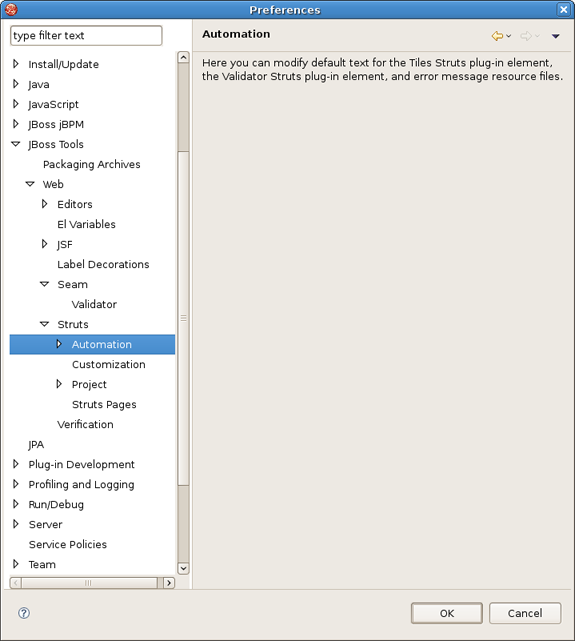
On Automation panel you can modify default text for the Title Struts plug-in element, the Validator Struts plug-in element, and error message resource files.
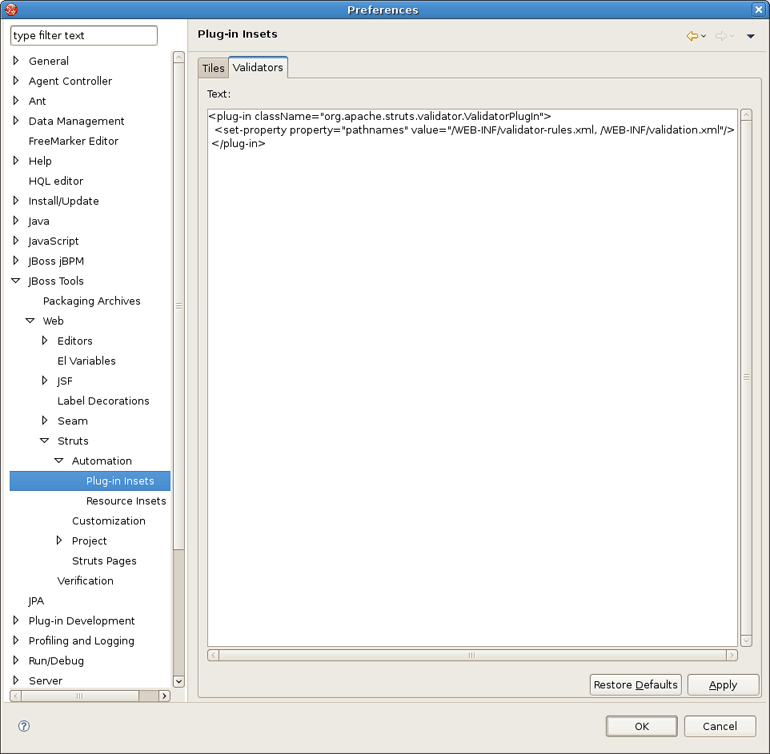
By selecting Web > Struts > Automation > Plug-in Insets on tab Tiles you can define a default text for tiles plugin.
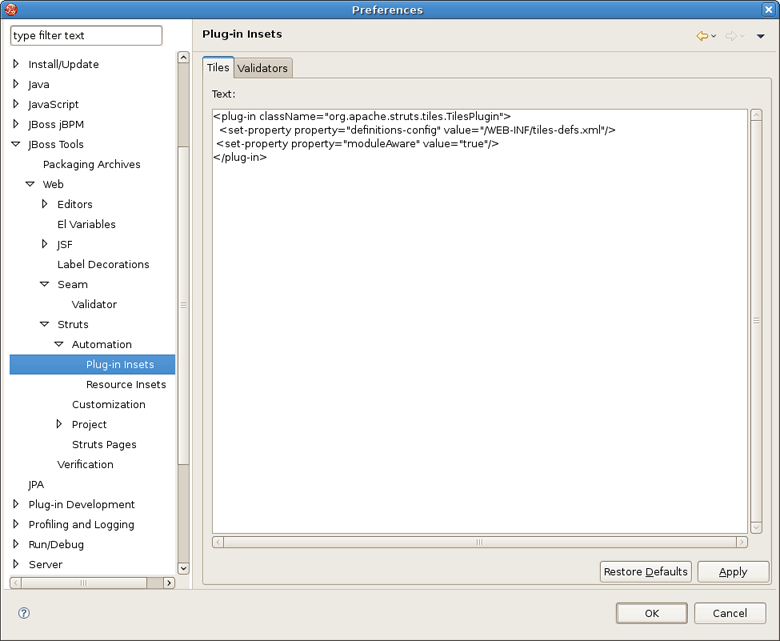
The same is done but for validator plugin on the tab Validators.
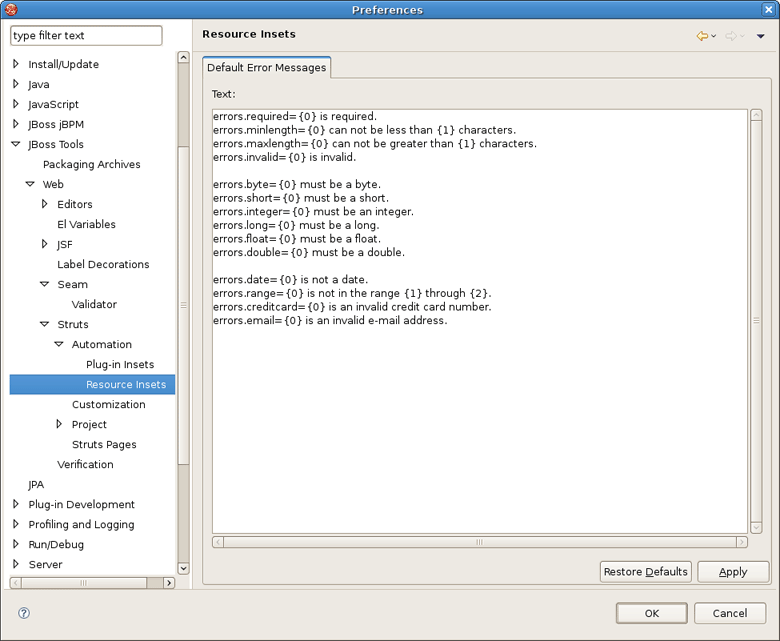
To see Resource Insets preference page select JBoss Tools > Web > Strats > Automation > Resource Insets .
On Resource Insets panel you determine default error messages for error resource files.
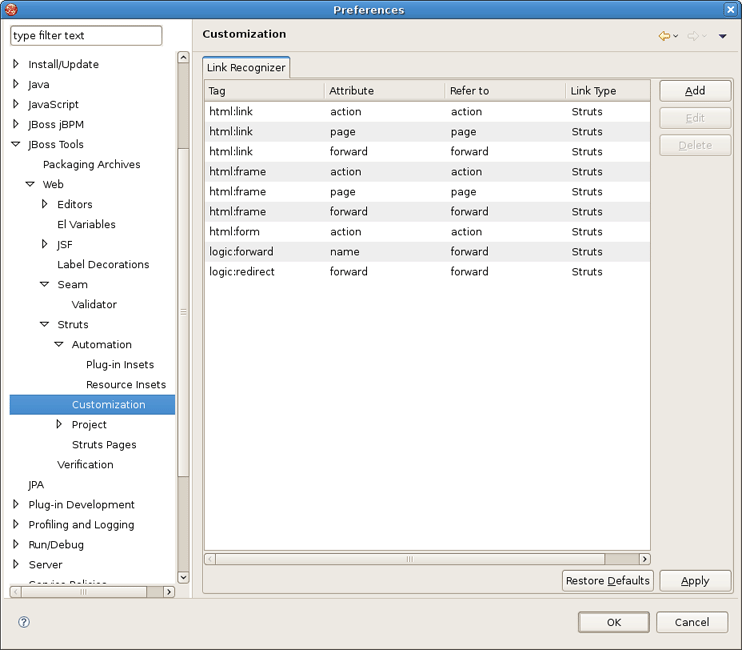
The following preferences can be changed on the JBoss Tools > Web > Struts > Customization page.
In the Customization screen you configure Link Recognizer for Struts tags.
You can change the following preferences on the JBoss Tools > Web > Struts > Project preference page:
On Project panel you define a template for a new Struts created project: servlet version, page template and so on.
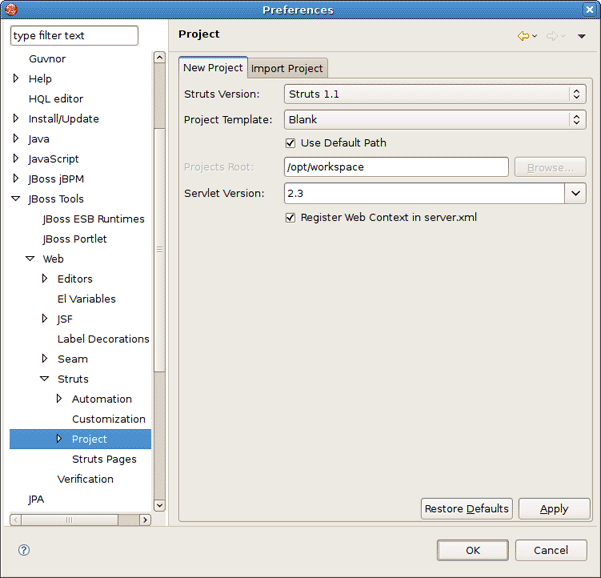
Selecting the Import Project tab in the Struts Project screen allows you to determine the default servlet version and whether to register Web Context in server.xml.

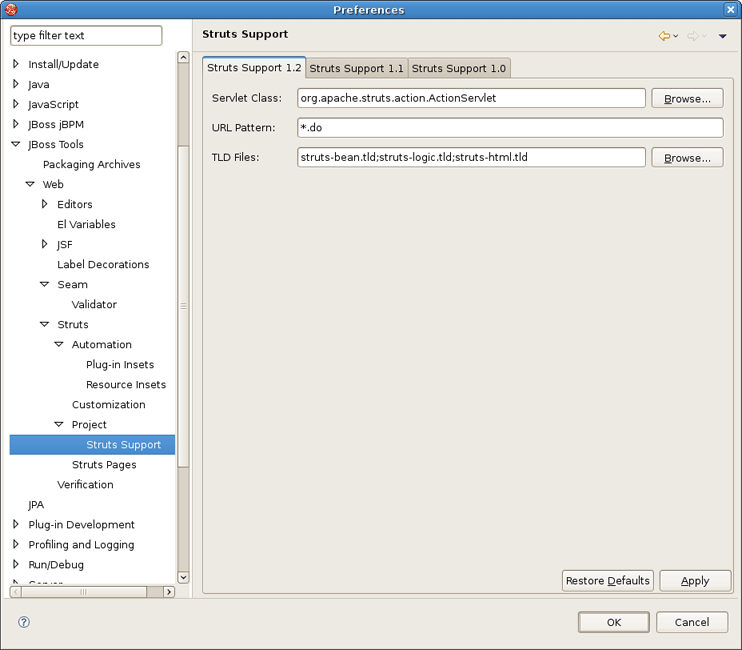
The following preferences can be changed on the JBoss Tools > Web > Struts > Project > Struts Support page.
Select Struts Support screen if you want to configure Struts versions support settings.
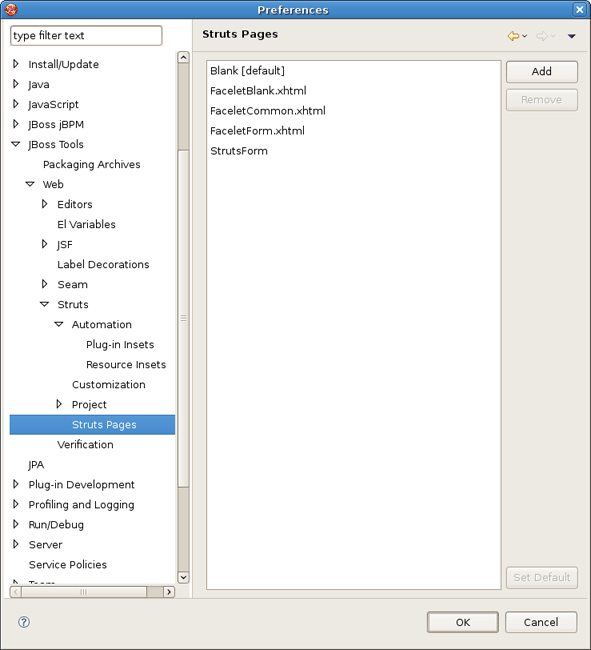
You can change the following preferences on the JBoss Tools > Web > Struts > Struts Pages preference page.
On Struts Pages panel you can add or remove Struts pages.
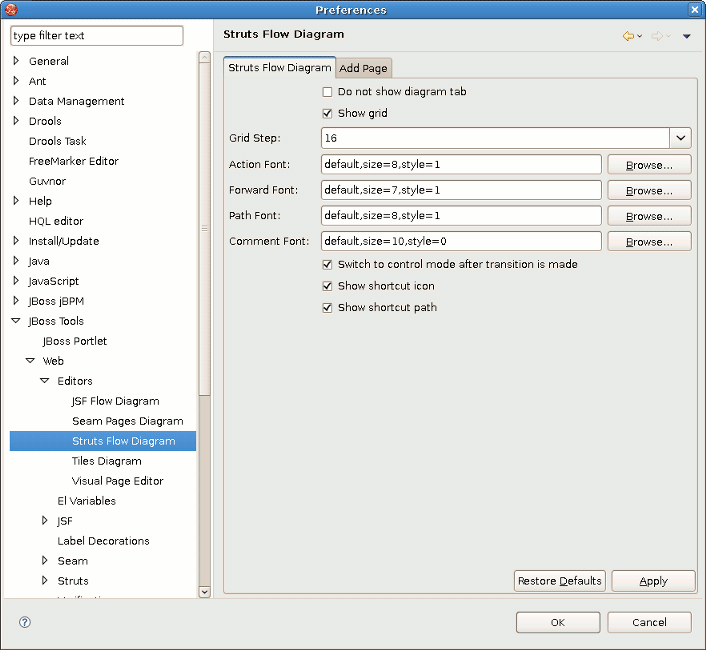
Similarly to the JSF Flow Diagram screen, selecting JBoss Tools > Web > Editor > Struts Flow Diagram page allows you to specify aspects of the Diagram mode of the Struts configuration file editor. The Struts Flow Diagram screen adds an option to hide the Diagram tab and labeling settings for additional artifacts.
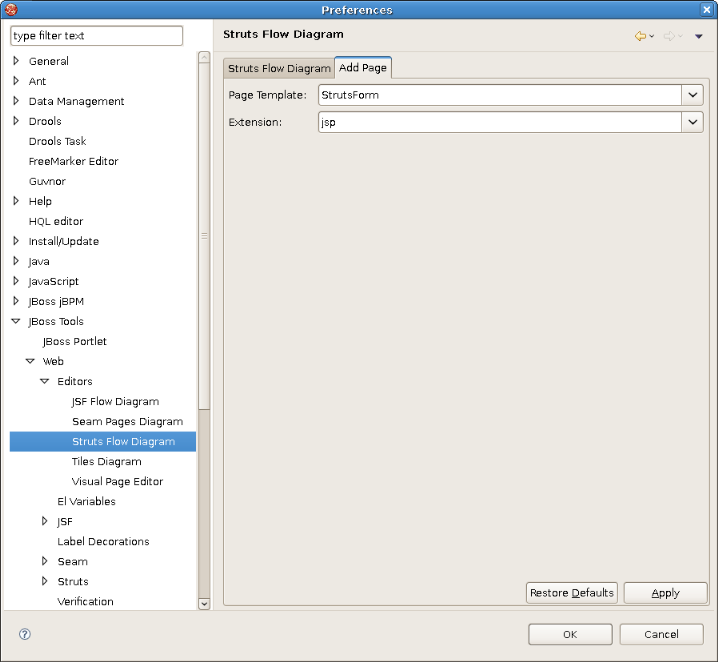
Selecting the Add Page tab in the Struts Flow Diagram screen allows you to determine the default template and file extension for views (pages) you add directly into the diagram using a context menu or the view-adding mode of the diagram cursor.
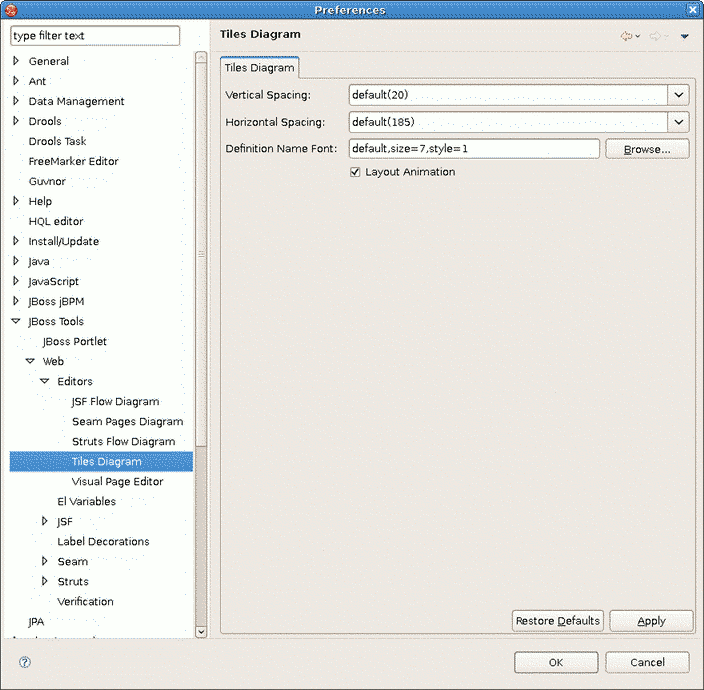
JBoss Tools > Web > Editors > Title Diagram screen allows you control some settings for the placement of Tiles definitions in the Diagram mode of the JBoss Tools Tiles editor.
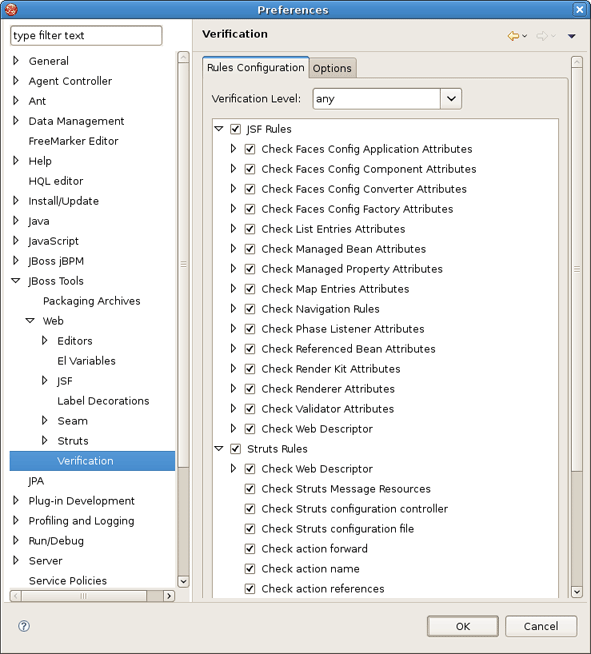
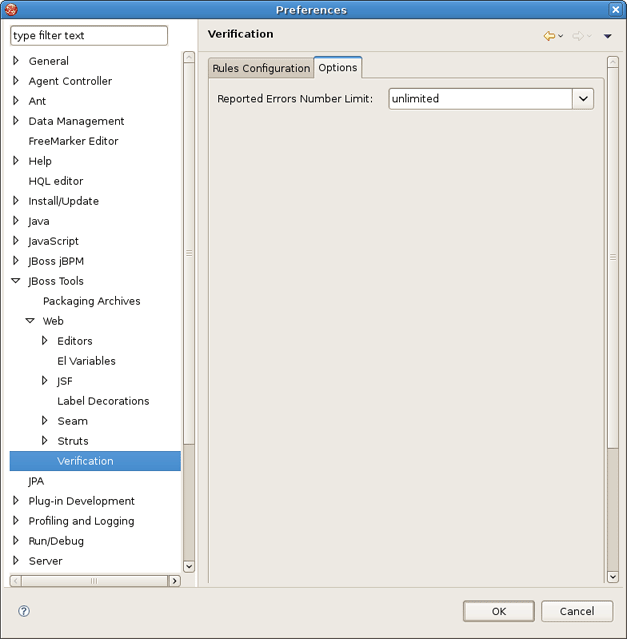
The following preferences can be changed on the JBoss Tools > Web > Verification page.
On Rules Configuration tab of Verification panel you can determine JSF and Struts rules.
On Options tab you can define a limit for the reported errors number.
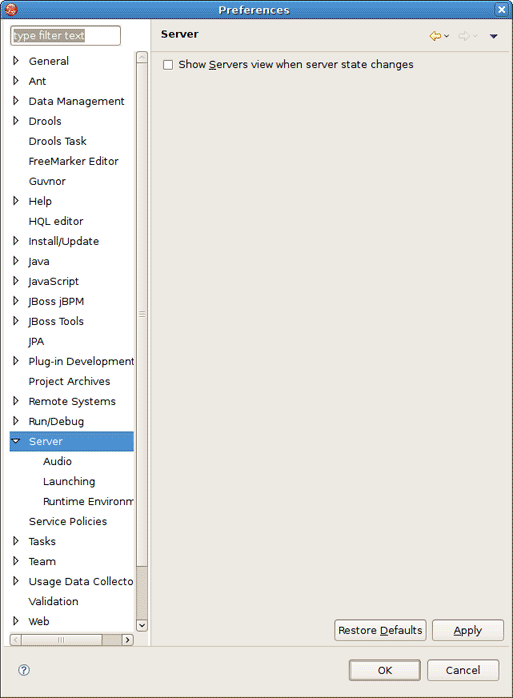
Preferences for JBoss Server and other servers can be changed on the Server page.
On the Server > Runtime Environments page you can add new or modify already defined Server Runtime.

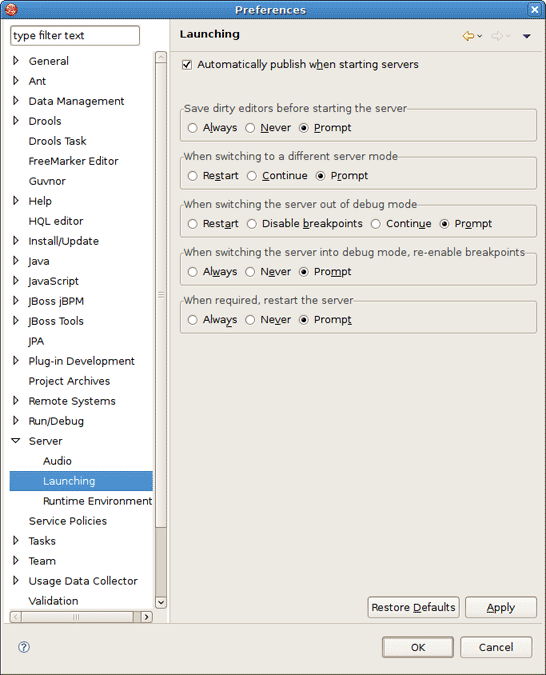
Server Launching preferences can be configured on the Server > Launching page.
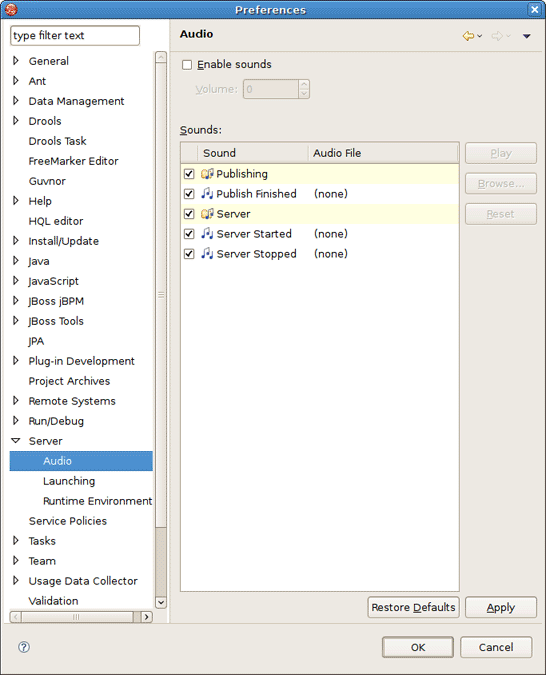
Going to Server > Audio you can enable/disable the sound notification for different Server states and actions and set the sound volume as well.
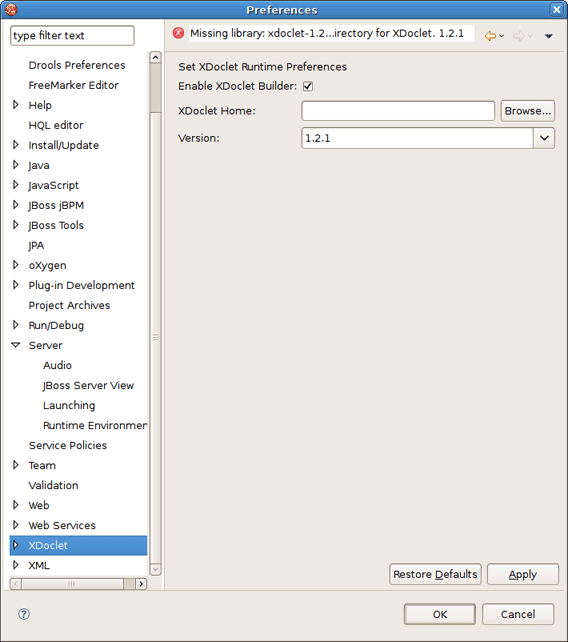
The preferences for XDoclet can be changed if you click XDoclet on the left navigation bar.
On the XDoclet screen it's possible to enable/disable XDoclet builder by checking proper box, specify XDoclet home and determine XDoclet module version as well.
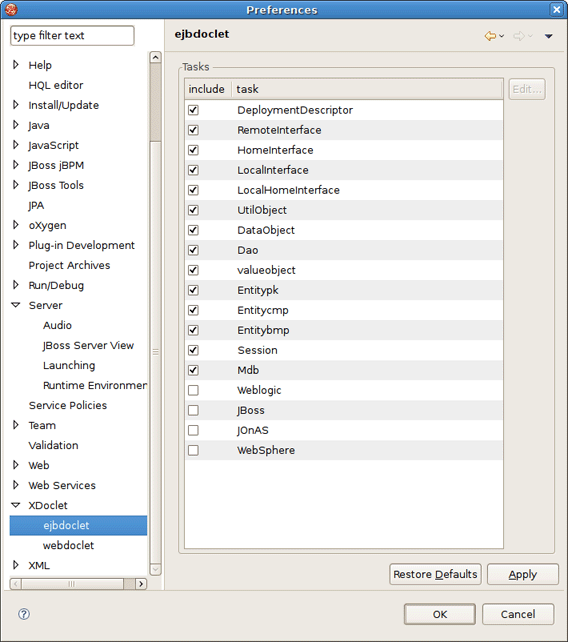
Switch to XDoclet > ejbdoclet page in order to adjust settings for EJB-specific sub-tasks.
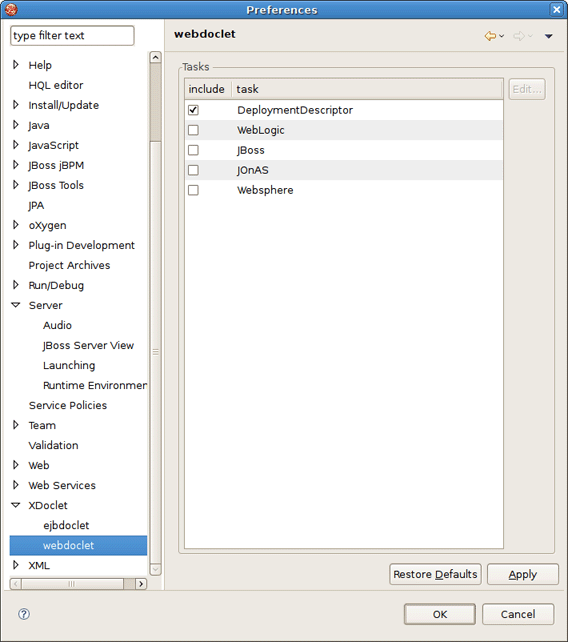
To configure settings for various web-specific XDoclet sub-tasks, follow to XDoclet > webdoclet page.
To adjust the project specific preferences, you should bring the context menu for your project and select the Preferences option. More details on what adjustments you can perform in the Preferences screen, see in the "JBoss Tools Preferences" chapter.
Under the JBoss Tools option in the context menu there are also several actions provided by JBDS:
Add/Remove Struts Capabilities
Add/Remove JSF Capabilities
Add Custom Capabilities
Please, for details refer to the Struts Tools Reference Guide.
Please, for details refer to the JSF Tools Reference Guide.
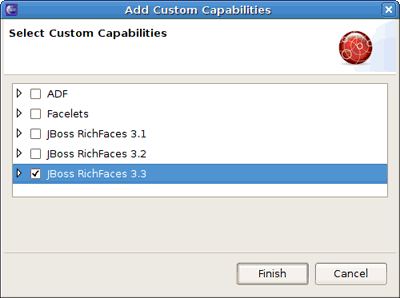
You can add custom capabilities to any JSF, Struts or Seam project made within JBDS, i.e. add a support of additional frameworks built on top of JSF, such as
ADF
Facelets
JBoss Rich Faces (versions 3.1, 3.2, 3.3)
When the option is selected, the Add Custom Capabilities dialog appears. You should check the needed modules and press Finish.
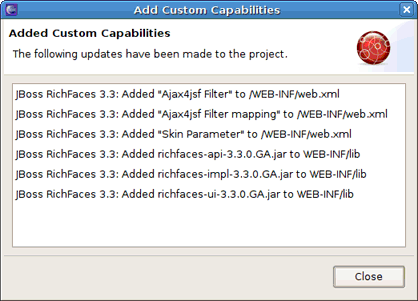
The next page displays all the updates that have been made to the project.
The Visual Page Editor requires the library libstdc++.so.5. This library is contained in the compat-libstdc++-33.i386 package.
To install this package on Fedora Core or Red Hat Enterprise Linux run the following command:
yum install compat-libstdc++-33.i386
On any other rpm based distributions download libstdc++.so.5 and run the following command:
rpm -Uvh compat-libstdc++-33.i386
On Debian based distributives run the following command:
apt-get install compat-libstdc++-33.i386
In case you have the library installed and you still have issue with starting the Visual Page Editor then close all browser views/editors and leave one Visual Page Editor open and restart eclipse. This should force a load of the right XULRunner viewer.
If it doesn't help and you use Fedora Core Linux and Eclipse Version: 3.4.1,the issue can be produced because libswt-xulrunner-gtk-3449.so file doesn't present in eclipse-swt-3.4.1-5.fc10.x86_64.rpm/eclipse/plugins/org.eclipse.swt.gtk.linux.x86_64_3.4.1.v3449c.jar.To add this file to eclipse you should:
Decompress eclipse/plugins/org.eclipse.swt.gtk.linux.x86_3.4.1.v3449c.jar form eclipse-SDK-3.4.1-linux-gtk-x86_64.tar.gz
Copy libswt-xulrunner-gtk-3449.so file to your Fedora Eclipse location.
Open the file eclipse.ini,which can be found in your Fedora Eclipse location and add the following line:
-Dswt.library.path=/usr/lib/eclipse
,where
/usr/lib/eclipseis the path to your eclipse folder.
JBoss HTML/JSP editor uses basic eclipse HTML formatter to format files. So if you want to change preferences of formatter for the Visual Page Editor, you should change it for eclipse html editor (open Window > Preferences, then choose Web > HTML Files > Editor ).
On the whole, this document should guide you to those parts of JBoss Tools which you specifically need to develop Web Applications. It covers different aspects of visual components such as editors, views, etc. for browsing, representing and editing web resources you are working with.
If there's anything we didn't cover or you can't figure out, please feel free to visit our JBoss Developer Studio Users Forum or JBoss Tools Users Forum to ask questions. There we are also looking for your suggestions and comments.