Create new JBoss Tools Documentation Jira issue

This will launch the RichFaces Jira page - to complete your feedback please login if needed, and submit the Jira.
JBoss.orgCommunity Documentation
This "Quick Start" will show how to use the Smooks tools to create/edit the Smooks configuration file for Java2Java data transformation.
This chapter gives you a brief understanding of the Smooks tools.
Visit here to download the "java-to-java" example project.
The example project is based on Maven, we suggest you to create a new eclipse Java project, copy the example code and .jar files from the example project and paste them into the eclipse Java project.
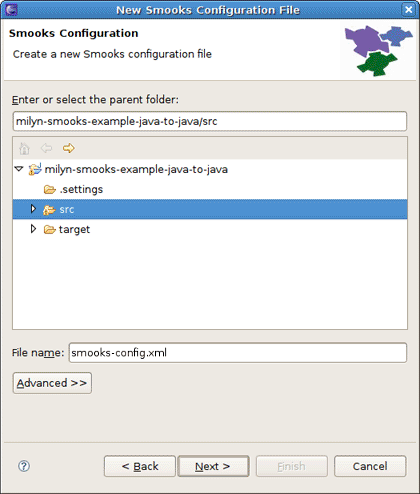
Select the Smooks Java-to-Java example project that you created and right-click, select the menu New > Other, then find Smooks > Smooks Configuration File. Click the Next button.
The first wizard page is a file path creation page. Select the src folder to be the files container, and input the name smooks-config.xml. Click Next.
The second wizard page is a Smooks configuration file version choose page.Select appropriate one and click Finish.
When all the wizard steps are passed, a new Smooks Configuration file is created and the Smooks Configuration Editor will be opened automatically:
To choose the transform data you should click Add button in the Input Data section.
After clicking the button the Data Type Selection wizard is opened, and there are two data types in the list: Java and XML.
There will become more and more data types on the list as the development goes on.
Select the Java data type and click Next, you will see the JavaBean class selection page:
Let's select the Order class from the example project as the source JavaBean class and the ListOrder class as the target JavaBean class.When you selected the necessary java classes, click Finish and you should see all added java classes displayed in the Input Data Section .
How to map the java class just added?
First, you should know what to transform:
Bind the "customerName" property of the Order#header to the "customerName" property of LineOrder.
Bind the "customerNumber" property of the Order#header to the "customerId" property of LineOrder.
Bind the "price" property of the OrderItem to the "unitPrice" property of LineItem.
Bind the "productId" property of the OrderItem to the "productCode" property of LineItem.
Bind the "quantity" property of the OrderItem to the "unitQuantity" property of LineItem.
Make sense? You should right click Resource List , select Add Smooks Resource>Java Binding>Bindings.
First of all, you should bind Order to LineOrder. To do this one Bindings Item should be added to the Resource List.
Click on it and you should see Bindings Section to the right of Message Filtering Resources.Write lineOrder in the Bean id field.
Select example.trgmodel.LineOrder in the Class field and example.srcmodel.Order in the Name field.Your Smooks Configuration Editor should look like this:
Now you should bind two values "customerNumber" property of the Order#header to the "customerId" property of LineOrder.To do this right click your just created Bindings Item >Add Smooks Resource>Value .
Please, remember that the root nodes of the source data and target data *MUST* be connected.
This rule is not only for Java-to-Java, but also is relevant for XML-to-Java
Do the same operation with the other properties in this and other classes.
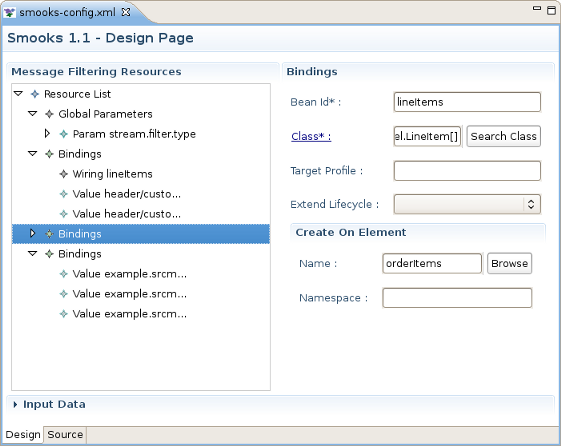
It's also necessary to bind orderItems property of the Order to lineItems property of LineOrder.The difference from the previous steps is that the orderItems is presented by the list of Order and lineItems is the massive of LineItem .To do the binding,you should use Wiring Item.First you should create a new Binding item. This is a configuration that allows you to construct an object graph .Select example.trgmodel.LineItem[] in the Class field and orderItems in the Name field,in bean Id write lineItems. Your Smooks Configuration Editor should look like this:
Then you should right click lineOrder binding item >Add Smooks Resource>Wiring.Select lineItem in Bean id Ref.
The final step is to add new Wiring item to lineOrder Binding.In the Bean id Ref select lineItems and in Property select lineItems.
Now, you should save the file and the Smooks tools generate the correct configuration file content.
OK, let run the test class: example.Main. (Please, make sure that the Smooks engine loads the correct configuration file).
Success!