- 7.1. Overview of BrowserSim
- 7.2. Features of BrowserSim
- 7.2.1. Features Overview
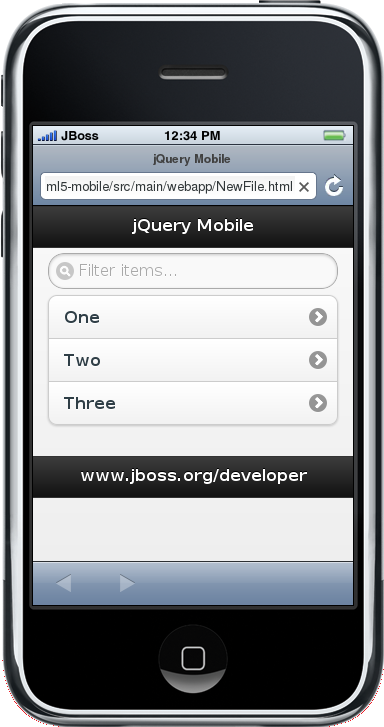
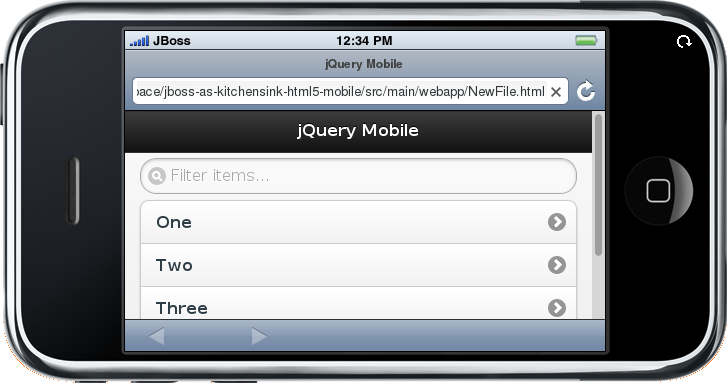
- 7.2.2. View a Web Application on BrowserSim
- 7.2.3. Manage Web Applications on BrowserSim
- 7.2.4. Change the Appearance of a Simulated Device
- 7.2.5. View a Web Page in Different Browsers and Simulated Devices
- 7.2.6. Generate a Screen Capture of a Simulated Device
- 7.2.7. Activate LiveReload for BrowserSim
- 7.2.8. View the Source of a Web Page
- 7.3. Customizing BrowserSim
- 7.3.1. Customizing Overview
- 7.3.2. Make BrowserSim the Default Browser
- 7.3.3. Add BrowserSim to the Global Toolbar
- 7.3.4. Set a Shortcut for the Run BrowserSim Action
- 7.3.5. Add or Modify Devices in BrowserSim
- 7.3.6. Change the Default Behavior when a Device does not Fit the Display
- 7.3.7. Change the Default LiveReload Port
- 7.3.8. Change the Default Location for Saved Screen Captures
- 7.3.9. Change the Default Settings for Weinre
BrowserSim is a mobile web browser simulator. It enables you to view and interact with web pages as they would appear on mobile devices.
BrowserSim consists of an external web browser window. This browser window is different from standard browsers in that it can be transformed to simulate browsers on a variety of mobile devices. The browser window can also be rotated to demonstrate the changes that would occur to a web application as a result of rotating a mobile device. Additionally, BrowserSim provides access to tools for inspecting and editing the source of web pages.
The overall system requirements of JBoss Tools are applicable for BrowserSim and can be viewed at https://community.jboss.org/wiki/MatrixOfSupportedPlatformsRuntimesAndTechnologiesInJBossToolsJBDS on the JBoss Tools website. But, as reiterated below, there are additional system requirements and restrictions when using BrowserSim on Microsoft Windows operating systems.
BrowserSim depends on WebKit and, consequently, requires Apple Safari to be installed on Microsoft Windows operating systems. Only a 32-bit version of Apple Safari is available for Microsoft Windows operating systems. To work around this restriction for 64-bit Microsoft Windows operating systems, you must set BrowserSim to use a 32-bit JVM when running in 64-bit versions of Eclipse. Note that 32-bit JVM choice is limited to Oracle 32-bit JRE 1.6, JDK 1.6, or JDK 1.7 on Microsoft Windows operating systems because Oracle 32-bit JRE 1.7 is incompatible with Apple Safari.
To set BrowserSim to use a 32-bit JVM, click →. Expand JBoss Tools and select BrowserSim/CordovaSim. Under Select JRE to run BrowserSim, click Select and from the list select a 32-bit JRE or Java developer kit. Click and click to close the window.
The aim of this section is to guide you in using BrowserSim:
View local and remote web applications in BrowserSim
Change the appearance of simulated devices, by rotating them and changing or removing their skins
Check the look and functionality of web pages in different browsers, such as the default browser or additional synchronized simulated devices
Generate screen captures of simulated devices and their web pages
View the page source of web pages with editors, Firebug Lite and Weinre
You can use BrowserSim to view web applications on local file systems or deployed on runtime servers.
- To view web applications in local file systems
In the Project Explorer tab, select a
.htmlfile and click the icon . Alternatively, right-click a
 .htmlfile and click →.- To view deployed web applications
In the Servers tab, expand the server on which the application is deployed. Right-click the application and click →. Alternatively, select the application and click the icon. If BrowserSim is the IDE browser preferences, you can also right-click the application and click →.
BrowserSim employs intelligent loading when selecting which web page to open in the browser window. If a web page is already open in a standard browser window, this is the web page that is loaded in BrowserSim.
BrowserSim provides actions to assist with viewing web applications on its simulated devices.
- Open a web link
In the browser window, click the web link. The link opens in the browser windows of the simulated device.
- Show or hide the address bar
Click the notification bar, where the connectivity, time and battery are displayed, to show or hide the address bar.
- Reload a web page
Click the Reload icon
 at the end of the address bar.
- Stop loading a web page
Click the Stop icon
 at the end of the address bar.
- Close BrowserSim
Right-click the simulated device and click . Open BrowserSim windows automatically close when the IDE closes.
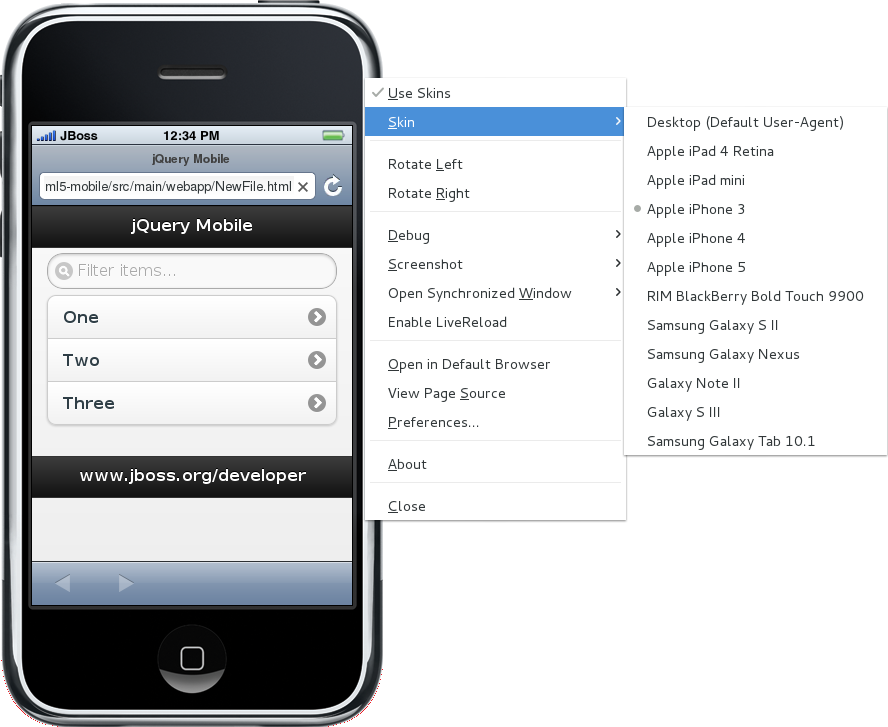
BrowserSim provides a number of ways to change the appearance of simulated devices. Changes made to the appearance of simulated devices are retained by BrowserSim and they are automatically applied when it starts in future.
- Rotate the view between portrait and landscape modes
Click any corner of the simulated device. Alternatively, right-click the simulated device and click or .
- Change the simulated device
Right-click the simulated device, click and select from the listed devices.
- Remove or use skins
To view a plain browser window without the mobile device skin, right-click the simulated device and clear the Use Skins check box. To reapply the skin, click and select the Use Skins check box.
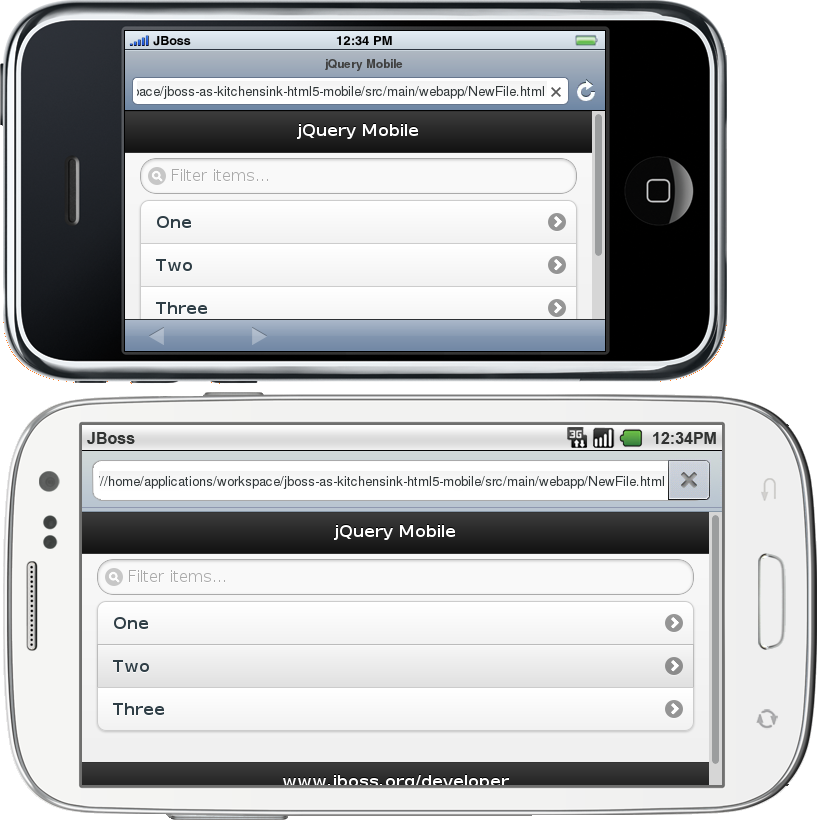
From within BrowserSim, web pages can be viewed in different browsers and simulated devices.
- View in the default browser of the system
Right-click the simulated device and click . An external browser window opens and displays the web page.
- View simultaneously on synchronized simulated devices
Right-click the simulated device and click . Select from the list of available skins for the additional simulated device. An additional simulated device opens and displays the same web page as that of the synchronized simulated device. Opening a web page in one synchronized simulated device results in the web page opening in all the synchronized simulated devices.
BrowserSim provides the ability to generate screen captures of a simulated device and the web pages it shows.
To generate a screen capture of a simulated device, right-click the simulated device and click .
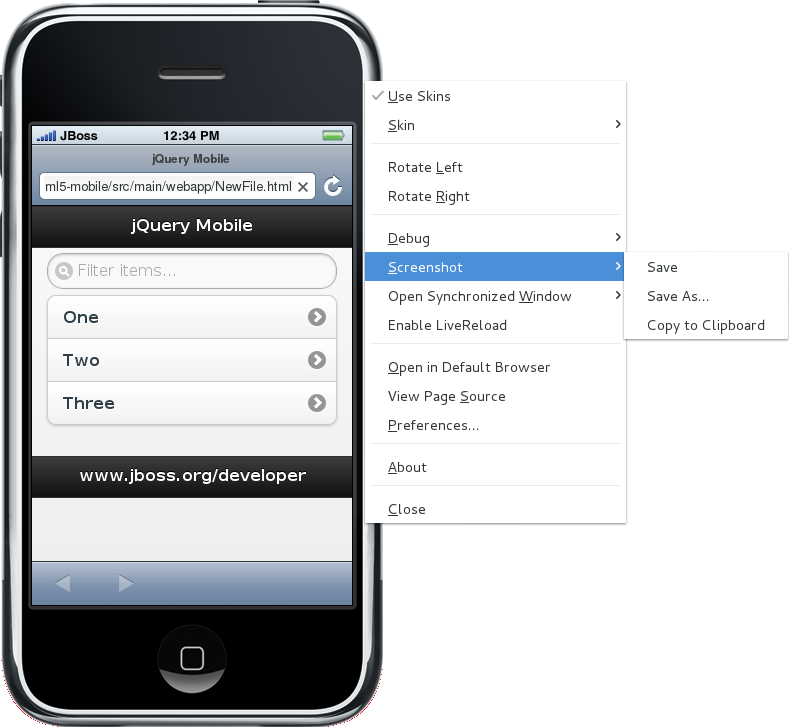
Select the output for the screen capture from the list of options:
to save as a
.pngfile in the default location. The default location is your home directory.to save as a
.pngfile in a location you specify.to copy the graphic for immediate use.
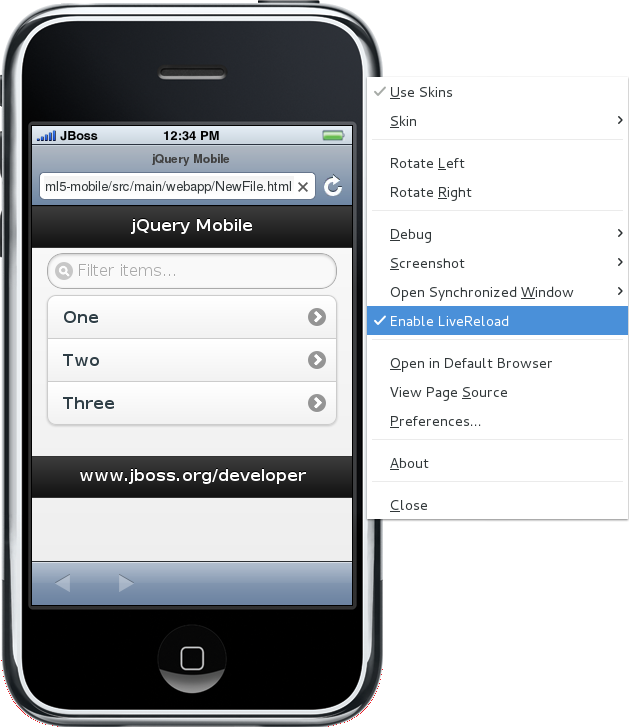
LiveReload for BrowserSim refreshes web pages open in simulated device browser windows as the source is edited. A LiveReload server sends notifications as resources are changed in the IDE and BrowserSim inserts the JavaScript code, which invokes the simulated device browser window to refresh. The procedures below outline how to create a LiveReload server and how to enable LiveReload in BrowserSim for workspace and deployed resources.
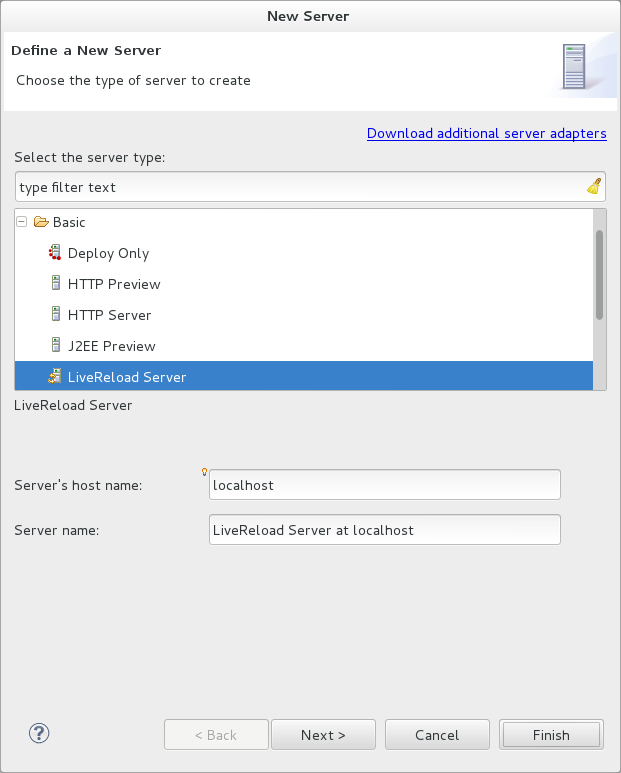
Procedure 7.1. Create a LiveReload Server
In the Servers tab, click create a new server or right-click an existing server and click →.
From the list of server types, expand Basic and select LiveReload Server.
The Server's host name and Server name fields are automatically populated. The
localhostvalue in the Server's host name field indicates that the server is to be run on the local system and the value in the Server name field is the name by which the LiveReload server is identified in the Servers tab. You can edit these values as appropriate by typing in the fields.Click to close the window. The LiveReload server is listed in the Servers tab.

Procedure 7.2. Activate LiveReload for BrowserSim
Ensure the LiveReload server is started. If it is not started, in the Servers tab right-click the LiveReload server and click .
Complete the appropriate step depending on the location of your resources:
For workspace resources, in the Project Explorer tab right-click the
.htmlfile and click →BrowserSim.For deployed resources, in the Servers tab right-click the application and click →BrowserSim.
Important
Ensure the server and application of the deployed resources are started before attempting to view the resources in LiveReload-enabled BrowserSim. To start the server and the application, in the Servers tab right-click each and click .
Right-click the simulated device and ensure the Enable LiveReload check box is selected.
Important
The Enable LiveReload check box has no effect when the LiveReload server is set to insert the JavaScript code and the web resource is viewed in BrowserSim via the LiveReload server port URL. LiveReload is always enabled in this case.
From within BrowserSim, the source of web pages can be viewed with a variety of applications.
- Open the page source in an editor
Right-click the simulated device and click . The file containing the page source opens in an editor tab.
- Inspect the page source with Firebug Lite
Right-click the simulated device and click →. The Firebug Lite application is displayed in an external window.
- Inspect and edit the page source with Weinre
Right-click the simulated device and click →. The Weinre Inspector is displayed in an external window. Weinre supports remote debugging, enabling you to debug an application running on a mobile device from your desktop browser.
The aim of this section is to guide you in customizing BrowserSim:
Make BrowserSim more prominent to use by making it the default browser, by adding its icon to the global toolbar and creating a shortcut key for launching it
Extend the functionality of BrowserSim by adding or modify the simulated devices it provides
Customize the default settings of BrowserSim for large simulated devices, for LiveReload, for screen captures and for Weinre
You can set BrowserSim to be the default browser used in actions such as → and .
To set BrowserSim as the default browser, click → and click .
Alternatively, click →, expand General and select Web Browser. Select the BrowserSim check box. Click and click to close the Preferences window.
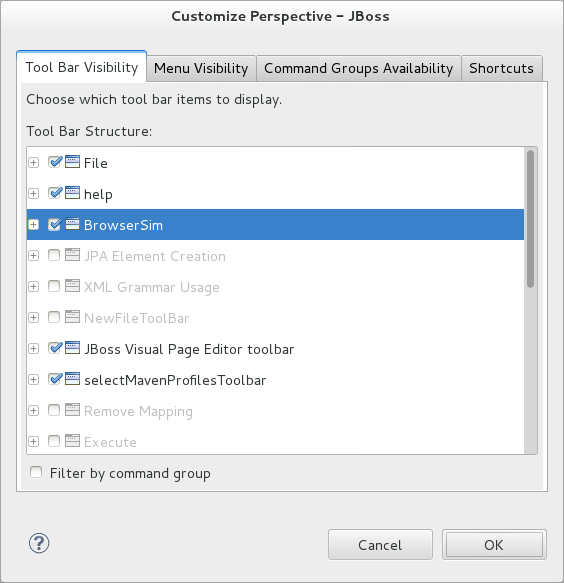
The BrowserSim icon is part of the BrowserSim toolbar and, by default, this toolbar is included in the global toolbar of the JBoss perspective. But the BrowserSim icon might not be visible in other perspectives because the icons in the global toolbar change depending on the perspective you are using. As detailed in the procedure below, you can add the BrowserSim toolbar to other perspectives.
Procedure 7.3. Add BrowserSim to the Global Toolbar in the Current Perspective
Ensure you are using the perspective in which you would like to add the BrowserSim toolbar. If you need to change the perspective, click →→ and search for the appropriate perspective.
Click →.
On the Command Groups Availability tab, select the BrowserSim check box to add this command group to the current perspective.
On the Tool Bar Visibility tab, ensure the BrowserSim check box is selected as this makes the BrowserSim toolbar visible.
Click to close the window. The icon
is now visible in the global toolbar of the perspective.
If you use BrowserSim frequently but do not want to set it as the default browser, you can set a shortcut for the action, as described in the procedure below.
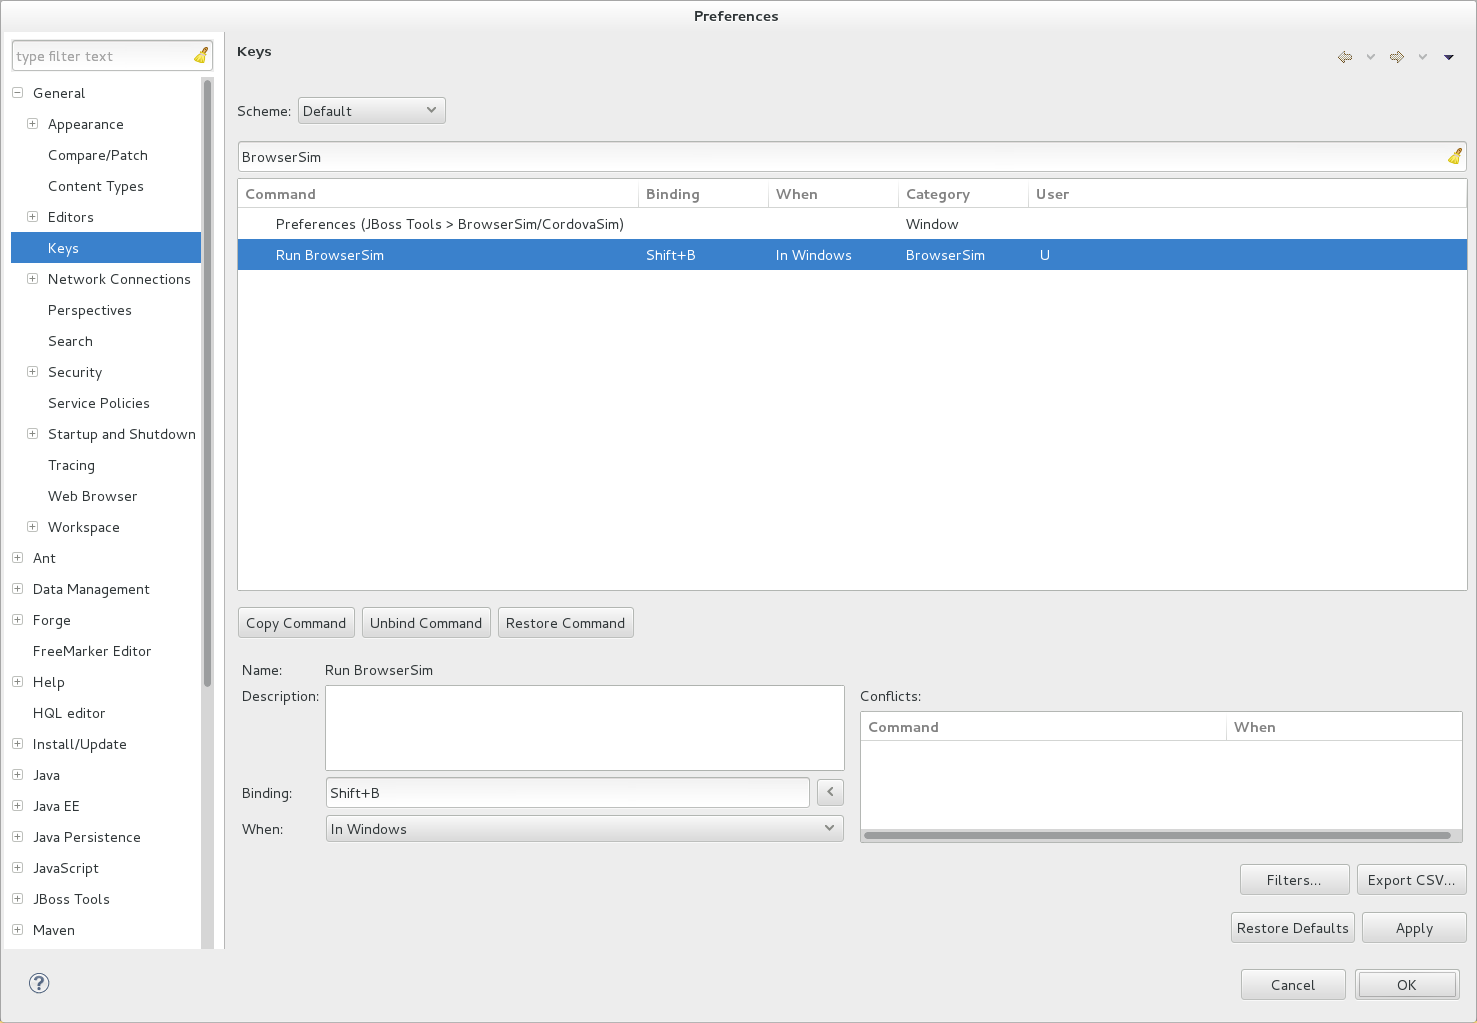
Procedure 7.4. Set a Shortcut for BrowserSim
Click →, expand General and select Keys.
To find the Run BrowserSim action, in the type filter text field enter
BrowserSim.In the table, select Run BrowserSim.
In the Binding field, type the key combination you want to use as a shortcut. Check the Conflicts table to ensure the key binding you have chosen does not conflict with existing shortcuts.
Once a unique key binding is selected, click and click to close the Preferences window.
You may wish to preview a web application on a simulated mobile device that is not predefined in BrowserSim. You can add more devices to BrowserSim and modify the existing devices, as detailed below.
Procedure 7.5. Add Devices to BrowserSim
Right-click the simulated device and click .
In the Devices section of the Devices tab, click .
In the Name field, type the name you want to give the device.
In the Width and Height fields, type the dimensions of the device window in pixels.
In the Pixel Ratio field, type a value for the ratio of CSS pixels to device pixels.
In the User Agent field, type the User Agent string of your device. Clearing the User Agent check box results in the default User Agent for the BrowserSim browser being used.
Note
User Agent is a string denoting the device, operating system and browser combination. This string may be used by websites to provide content tailored for devices, operating systems and browsers. Information is widely available on the Internet to assist you in identifying the User Agent associated with a particular device.
From the Skin list, select the skin to be used or select None.
Click to add the new device and click to close the Devices window.

To modify existing devices in BrowserSim, right-click the simulated device and click . In the Devices table, select a device and click . Once you have finished editing the fields, click . Click to close the Devices window.
By default, when a device window is too large to fit the display of the system, you are prompted about which action should be taken. Rather than prompting, the default behavior can be set to always truncate or never truncate.
To change the default behavior, right-click the simulated device and click . In the Truncate the device window when it does not fit display section of the Devices tab, click Always truncate or Never truncate to change the behavior as appropriate and click to close the window.

The LiveReload server uses a port to communicate resource changes to BrowserSim. The default port can be changed.
To change the default LiveReload port, right-click the simulated device and click . In the LiveReload options section of the Settings tab, in the LiveReload Port field type the port number you want to use. Click to close the window.

Note
You must enable LiveReload for BrowserSim in order to specify the LiveReload port. To enable LiveReload, right-click the simulated device and ensure the Enable LiveReload check box is selected. Alternatively, right-click the simulated device and click . In the LiveReload options section of the Settings tab, select the Enable LiveReload check box and click to close the window.
The option for screen captures saves graphics files to a set location. The default location can be changed.
To change the default location, right-click the simulated device and click . In the Screenshots section of the Settings tab, in the Location field type the location where you want graphics files to be saved or click to navigate to the desired location. Click to close the window.

By default, the option for viewing the source of a web page uses the Weiner server provided by PhoneGap. If you have a different Weiner server available, the default Weinre settings can be changed.
To change the default settings for Weinre, right-click the simulated device and click . In the Weinre section of the Settings tab, in the Script URL field type the address of the .js file provided by the Weinre server and in the Client URL field type the address of the web page showing the Weinre Inspector interface. Click to close the window.
