It's time to pull the covers back and dive into the internals of Weld example applications. Let's start with the
simpler of the two examples, weld-numberguess.
In the numberguess application you get 10 attempts to guess a number between 1 and 100. After each attempt, you're told whether your guess was too high or too low.
The numberguess example is comprised of a number of beans, configuration files and Facelets (JSF) views, packaged as a war module. Let's start by examining the configuration files.
All the configuration files for this example are located in WEB-INF/, which can be found in
the src/main/webapp directory of the example. First, we have the JSF 2.0 version of
faces-config.xml. A standardized version of Facelets is the default view handler in JSF
2.0, so there's really nothing that we have to configure. Thus, the configuration consists of only the root
element.
<faces-config version="2.0"

   xmlns="http://java.sun.com/xml/ns/javaee"

   xmlns:xsi="http://www.w3.org/2001/XMLSchema-instance"

   xsi:schemaLocation="

      http://java.sun.com/xml/ns/javaee

      http://java.sun.com/xml/ns/javaee/web-facesconfig_2_0.xsd">

</faces-config>
There's also an empty beans.xml file, which tells the container to look for beans in this
application and to activate the CDI services.
Finally, there's the familiar web.xml:
<web-app version="2.5"

   xmlns="http://java.sun.com/xml/ns/javaee"

   xmlns:xsi="http://www.w3.org/2001/XMLSchema-instance"

   xsi:schemaLocation="

      http://java.sun.com/xml/ns/javaee

      http://java.sun.com/xml/ns/javaee/web-app_2_5.xsd">


   <display-name>weld-jsf-numberguess-war</display-name>

ml_plain">   <description>Weld JSF numberguess example (war)</description>


   <servlet>

      <servlet-name>Faces Servlet</servlet-name>

      <servlet-class>javax.faces.webapp.FacesServlet</servlet-class>

      <load-on-startup>1</load-on-startup>

ml_plain">   </servlet>


   <servlet-mapping>

      <servlet-name>Faces Servlet</servlet-name>

      <url-pattern>*.jsf</url-pattern>

ml_plain">   </servlet-mapping>


   <context-param>

      <param-name>javax.faces.DEFAULT_SUFFIX</param-name>

      <param-value>.xhtml</param-value>

ml_plain">   </context-param>


   <session-config>

      <session-timeout>10</session-timeout>

   </session-config>


</web-app>
| Enable and initialize the JSF servlet |
|
Configure requests for URLs ending in |
|
Tell JSF that we will be giving our JSF views (Facelets templates) an
extension of |
| Configure a session timeout of 10 minutes |
Note
This demo uses JSF 2 as the view framework, but you can use Weld with any servlet-based web framework, such as JSF 1.2 or Wicket.
Let's take a look at the main JSF view, src/main/webapp/home.xhtml.
<!DOCTYPE html PUBLIC "-//W3C//DTD XHTML 1.0 Transitional//EN"
"http://www.w3.org/TR/xhtml1/DTD/xhtml1-transitional.dtd">
<html xmlns="http://www.w3.org/1999/xhtml"
xmlns:ui="http://java.sun.com/jsf/facelets"
xmlns:h="http://java.sun.com/jsf/html"
xmlns:f="http://java.sun.com/jsf/core">
<ui:composition template="/template.xhtml">
<ui:define name="content">
<h1>Guess a number...</h1>
<div style="color: red">
<h:messages id="messages" globalOnly="false"/>
<h:outputText id="Higher" value="Higher!"
rendered="#{game.number gt game.guess and game.guess ne 0}"/>
<h:outputText id="Lower" value="Lower!"
rendered="#{game.number lt game.guess and game.guess ne 0}"/>
</div>
<div>
I'm thinking of a number between #{game.smallest} and #{game.biggest}.
You have #{game.remainingGuesses} guesses remaining.
</div>
<div>
<h:inputText id="inputGuess" value="#{game.guess}"
ml_plain"> size="3" required="true" disabled="#{game.number eq game.guess}"
ml_plain"> validator="#{game.validateNumberRange}"/>
<h:commandButton id="guessButton" value="Guess"
action="#{game.check}" disabled="#{game.number eq game.guess}"/>
</div>
<div>
<h:commandButton id="restartButton" value="Reset" action="#{game.reset}" immediate="true"/>
</div>
</h:form>
</ui:define>
</ui:composition>
</html>
| Facelets is the built-in templating language for JSF. Here we are wrapping our page in a template which defines the layout. |
| There are a number of messages which can be sent to the user, "Higher!", "Lower!" and "Correct!" |
| As the user guesses, the range of numbers they can guess gets smaller - this sentence changes to make sure they know the number range of a valid guess. |
| This input field is bound to a bean property using a value expression. |
| A validator binding is used to make sure the user doesn't accidentally input a number outside of the range in which they can guess - if the validator wasn't here, the user might use up a guess on an out of bounds number. |
| And, of course, there must be a way for the user to send their guess to the server. Here we bind to an action method on the bean. |
The example exists of 4 classes, the first two of which are qualifiers. First, there is the
@Random qualifier, used for injecting a random number:
@Qualifier

@Target( { TYPE, METHOD, PARAMETER, FIELD })

@Retention(RUNTIME)

public @interface Random {}
There is also the @MaxNumber qualifier, used for
injecting the maximum number that can be injected:
@Qualifier

@Target( { TYPE, METHOD, PARAMETER, FIELD })

@Retention(RUNTIME)

public @interface MaxNumber {}
The application-scoped Generator class is responsible for creating the random number, via a
producer method. It also exposes the maximum possible number via a producer method:
@ApplicationScoped

public class Generator implements Serializable {


   private java.util.Random random = new java.util.Random(System.currentTimeMillis());


   private int maxNumber = 100;


   java.util.Random getRandom() {

      return random;

   }


   @Produces @Random int next() {

      return getRandom().nextInt(maxNumber);

   }


   @Produces @MaxNumber int getMaxNumber() {

      return maxNumber;

   }


}
The Generator is application scoped, so we don't get a different random each time.
Note
The package declaration and imports have been excluded from these listings. The complete listing is available in the example source code.
The final bean in the application is the session-scoped Game class. This is the primary
entry point of the application. It's responsible for setting up or resetting the game, capturing and validating
the user's guess and providing feedback to the user with a FacesMessage. We've used the
post-construct lifecycle method to initialize the game by retrieving a random number from the @Random
Instance<Integer> bean.
You'll notice that we've also added the @Named annotation to this class. This annotation is
only required when you want to make the bean accessible to a JSF view via EL (i.e., #{game}).
@Named

@SessionScoped

public class Game implements Serializable {


   private int number;

   private int guess;

   private int smallest;

   private int biggest;

   private int remainingGuesses;


   @Inject @MaxNumber private int maxNumber;

   @Inject @Random Instance<Integer> randomNumber;


   public Game() {}


   public void check() {

      if (guess > number) {

         biggest = guess - 1;

      }

      else if (guess < number) {

         smallest = guess + 1;

      }

      else if (guess == number) {

         FacesContext.getCurrentInstance().addMessage(null, new FacesMessage("Correct!"));

      }

      remainingGuesses--;

   }


   @PostConstruct

   public void reset() {

      this.smallest = 0;

      this.guess = 0;

      this.remainingGuesses = 10;

      this.biggest = maxNumber;

      this.number = randomNumber.get();

   }


   public void validateNumberRange(FacesContext context,  UIComponent toValidate, Object value) {

      if (remainingGuesses <= 0) {

         FacesMessage message = new FacesMessage("No guesses left!");

         context.addMessage(toValidate.getClientId(context), message);

         ((UIInput) toValidate).setValid(false);

         return;

      }

      int input = (Integer) value;


      if (input < smallest || input > biggest) {

         ((UIInput) toValidate).setValid(false);


         FacesMessage message = new FacesMessage("Invalid guess");

         context.addMessage(toValidate.getClientId(context), message);

      }

   }


   public int getNumber() {

      return number;

   }


   public int getGuess() {

      return guess;

   }


   public void setGuess(int guess) {

      this.guess = guess;

   }


   public int getSmallest() {

      return smallest;

   }


   public int getBiggest() {

      return biggest;

   }


   public int getRemainingGuesses() {

      return remainingGuesses;

   }


}
A couple of modifications must be made to the numberguess artifact in order to deploy it to Tomcat or Jetty.
First, Weld must be deployed as a Web Application library under WEB-INF/lib since the
servlet container does not provide the CDI services. For your convenience we provide a single jar suitable
for running Weld in any servlet container (including Jetty), weld-servlet.jar.
Tip
You must also include the jars for JSF, EL, and the common annotations
(jsr250-api.jar), all of which are provided by the Java EE platform (a Java EE
application server). Are you starting to appreciate why a Java EE platform is worth using?
Second, we need to explicitly specify the servlet listener in web.xml, again because the
container isn't doing this stuff for you. The servlet listener boots Weld and controls it's interaction with
requests.
<listener>

   <listener-class>org.jboss.weld.environment.servlet.Listener</listener-class>

</listener>
When Weld boots, it places the javax.enterprise.inject.spi.BeanManager, the portable SPI
for obtaining bean instances, in the ServletContext under a variable name equal to the fully-qualified
interface name. You generally don't need to access this interface, but Weld makes use of it.
Weld includes a number of portable extensions for JSR-299, including an extension for Wicket, which allows you to inject beans into Wicket components and leverage the conversation context. In this section, we'll walk you through the Wicket version of the numberguess example.
Tip
You may want to review the Wicket documentation at http://wicket.apache.org/ before reading this section, if you aren't already familiar with the framework.
Wicket is another environment that relies on the Weld servlet extension. The use of Jetty is common in the Wicket community, and is thus chosen here as the runtime container. You've seen already that Jetty is perfectly capable of running CDI applications with Weld add-ons, and this environment is no different.
Note
We'll also be using the Eclipse IDE in these examples. Instructions are provided later for running the example from the command line, but since you'll likely need to do more than just deploy examples, we'll get setup in this full development environment.
To use the Wicket example in Eclipse, you have one of two choices. You can either use a Maven plugin to generate a regular Eclipse Web project, or you can open the example natively using the m2eclipse plugin. Since the Weld source code relies so heavily on Maven, we encourage you to bite the bullet and adopt the m2eclipse plugin. Both approaches are described here for your convenience..
If you have m2eclipse installed, you can open any Maven project directly. From within Eclipse, select File -> Import... -> Maven Projects. Then, browse to the location of the Wicket numberguess example. You should see that Eclipse recognizes the existence of a Maven project.
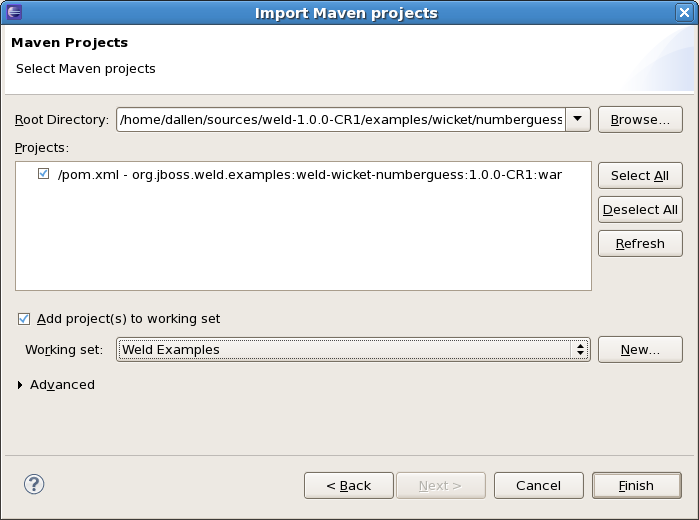
This will create a project in your workspace called weld-wicket-numberguess.
You'll notice after importing, the project has a build error. That's because we need to enable a Maven
profile. Right-click on the project and select Properties, then select the
Maven tab in the window that appears. In the form field labeled "Active Maven
Profiles (comma separated):", type jetty. That will enable some extra dependencies
that allow the project to compile. Additionally, uncheck the box labeled "Skip Maven
compile plugin when processing resources (recommended)". That solves an incompatiblity between the
m2eclipse plugin and the Maven enforcer plugin that we use for the Weld project. Now, you're ready to
develop!
Note
Be sure to uncheck the box "Skip Maven compile plugin when processing resources (recommended)" in the Maven properties screen or else the example might not run in Eclipse because beans.xml will be missing from the classpath! See the MNGECLIPSE-768 issue report for details.
If you are not using the m2eclipse plugin, you have to follow different steps to import the project. First, switch into the Wicket numberguess example, then execute the Maven Eclipse plugin with the jetty profile activated, as follows:
$> cd examples/wicket/numberguess
mvn -Pjetty eclipse:eclipse
Then, from Eclipse, choose File -> Import... -> General -> Existing Projects into
Workspace, select the root directory of the numberguess example, and click Finish. This will
create a project in your workspace called weld-wicket-numberguess.

It's time to get the example running!
This project follows the wicket-quickstart approach of creating an instance of Jetty
in the Start class. So running the example is as simple as right-clicking on that
Start class in src/test/java in the Package Explorer and choosing
Run as Java Application. You should see console output related to Jetty starting up;
then visit able http://localhost:9090 to view the app. To debug
choose Debug as Java Application instead.
This example can also be deployed from the command line in a (similar to the other examples). Assuming
you have set up the local.build.properties file in the examples
directory to specify the location of JBoss AS or Tomcat, as previously described, you can run:
$> ant deploy
to deploy the example to JBoss AS, and:
$> ant tomcat.deploy
to deploy the example to Tomcat. You can then access application at http://localhost:8080/weld-numberguess-wicket.
Alternatively, you can run the application in place on an embedded Jetty container using the following Maven command:
$> mvn jetty:run -Pjetty
Enough toying with deployment, let's dive into the code.
The code in the wicket numberguess example is very similar to the JSF-based numberguess example. The business layer is identical! Where things differ is in view binding. JSF uses Unified EL expressions to bind XML-based view layer components in JSF views to beans. In contrast, Wicket defines its components in Java. These Java-based view components have a one-to-one mapping with HTML elements in an adjacent (pure) HTML file. All view logic, including binding of components to models and controlling the response of view actions, is handled in Java.
The integration of Weld with Wicket takes advantage of the same qualifier annotations used in your
business layer to provide injection into your WebPage subclass (or into other custom
Wicket component subclasses).
Here's where things differ from the JSF numberguess example:
Each wicket application must have a
WeldApplicationsubclass. In our case, our application class isNumberGuessApplication:public class NumberGuessApplication extends WeldApplication {
@Override public Class getHomePage() {
return HomePage.class;
}
}This class specifies which page Wicket should treat as our home page, in our case,
HomePage.classIn
HomePage, we see typical Wicket code to set up page elements. The bit that is interesting is the injection of theGamebean:@Inject Game game;
The
Gamebean is can then be used, for example, by the code for submitting a guess:final Component guessButton = new AjaxButton("GuessButton") {
protected void onSubmit(AjaxRequestTarget target, Form form) {
if (game.check()) {
info("Correct!");
setVisible(false);
prompt.setVisible(false);
guessLabel.setVisible(false);
inputGuess.setVisible(false);
}
else if (game.getRemainingGuesses() == 0) {
info("Sorry, the answer was " + game.getNumber());
setVisible(false);
guessLabel.setVisible(false);
inputGuess.setVisible(false);
}
else if (game.getNumber() > game.getGuess()) {
info("Higher!");
}
else if (game.getNumber() < game.getGuess()) {
info("Lower");
}
target.addComponent(form);
}
};Note
All injections may be serialized; actual storage of the bean is managed by JSR-299. Note that Wicket components, like the
HomePageand it subcomponents, are not JSR-299 beans.Wicket components allow injection, but they cannot use interceptors, decorators or lifecycle callbacks such as
@PostConstructor methods. The components would need to delegate to actual beans to leverage these features.The example uses AJAX for processing of button events, and dynamically hides buttons that are no longer relevant, for example when the user has won the game.
In order to activate Wicket for this webapp, the Wicket filter is added to
web.xml, and our application class is specified inweb.xml:<filter>
<filter-name>Wicket Filter</filter-name>
<filter-class>org.apache.wicket.protocol.http.WicketFilter</filter-class>
<init-param>
<param-name>applicationClassName</param-name>
<param-value>org.jboss.weld.examples.wicket.NumberGuessApplication</param-value>
</init-param>
</filter>
<filter-mapping>
<filter-name>Wicket Filter</filter-name>
<url-pattern>/*</url-pattern>
</filter-mapping>
The servlet listener is still required, as in the Tomcat example, to bootstrap CDI when Jetty starts and to hook CDI into the Jetty servlet request and session lifecycles. However, rather than putting it into the web.xml, it is placed into an override file,
src/main/webapp/WEB-INF/jetty-additions-to-web.xml, that is passed to Jetty as an extra descriptor to be appended to theweb.xmlconfiguration.<web-app version="2.4" ...>
<listener>
<listener-class>org.jboss.weld.environment.servlet.Listener</listener-class>
</listener>
</web-app>
This example shows how to use the Weld SE extension to in a
Java SE based Swing application with no EJB or servlet dependencies.
This example can be found in the examples/se/numberguess
folder of the Weld distribution.
To run the example:
Ensure that Maven 2 (version 2.0.10+) is installed and in your PATH
Ensure that the
JAVA_HOMEenvironment variable is pointing to your JDK installationOpen a command line or terminal window in the
examples/se/numberguessdirectoryExecute the following command
mvn -Drun
Let's have a look at the significant code and configuration files that make up this example.
As usual, there is an empty beans.xml file in the root
package (src/main/resources/beans.xml), which
marks this application as a CDI application.
The game's main logic is located in Game.java.
Here is the code for that class, highlighting the ways in which this
differs from the web application version:
{
public static final int MAX_NUM_GUESSES = 10;
private Integer number;
private int guess = 0;
private int smallest = 0;
@Inject
@MaxNumber
private int maxNumber;
private int biggest;
private int remainingGuesses = MAX_NUM_GUESSES;
private boolean validNumberRange = true;
@Inject
Generator rndGenerator;
public Game()
{
}
public boolean isValidNumberRange()
{
return validNumberRange;
}
public boolean isGameWon()
{
return guess == number;
}
public boolean isGameLost()
{
return guess != number && remainingGuesses <= 0;
public boolean check()
{
boolean result = false;
if (checkNewNumberRangeIsValid())
{
if (guess > number)
{
biggest = guess - 1;
}
if (guess < number)
{
smallest = guess + 1;
}
if (guess == number)
{
result = true;
}
remainingGuesses--;
}
return result;
}
private boolean checkNewNumberRangeIsValid()
{
return validNumberRange = ((guess >= smallest) && (guess <= biggest));
@PostConstruct
public void reset()
{
this.smallest = 0;
this.guess = 0;
this.remainingGuesses = 10;
this.biggest = maxNumber;
this.number = rndGenerator.next();
}
}
| The bean is application scoped rather than session scoped, since an instance of a Swing application typically represents a single 'session'. |
| Notice that the bean is not named, since it doesn't need to be accessed via EL. |
|
In Java SE there is no JSF
This allows the Swing UI to query the state of the game,
which it does indirectly via a class called
|
|
Since there is no dedicated validation phase, validation of
user input is performed during the |
|
The |
The MessageGenerator class depends on the
current instance of Game and queries its
state in order to determine the appropriate messages to provide
as the prompt for the user's next guess and the response to the
previous guess. The code for MessageGenerator
is as follows:
public class MessageGenerator
{
private Game game;
{
StringBuilder challengeMsg = new StringBuilder("I'm thinking of a number between ");
challengeMsg.append(game.getSmallest());
challengeMsg.append(" and ");
challengeMsg.append(game.getBiggest());
challengeMsg.append(". Can you guess what it is?");
return challengeMsg.toString();
}
{
if (game.isGameWon())
{
return "You guessed it! The number was " + game.getNumber();
}
else if (game.isGameLost())
{
return "You are fail! The number was " + game.getNumber();
}
else if (!game.isValidNumberRange())
{
return "Invalid number range!";
}
else if (game.getRemainingGuesses() == Game.MAX_NUM_GUESSES)
{
return "What is your first guess?";
}
else
{
String direction = null;
if (game.getGuess() < game.getNumber())
{
direction = "Higher";
}
else
{
direction = "Lower";
}
return direction + "! You have " + game.getRemainingGuesses() + " guesses left.";
}
}
}
|
The instance of |
|
The |
| ... and again to determine whether to congratulate, console or encourage the user to continue. |
Finally we come to the NumberGuessFrame class
which provides the Swing front end to our guessing game.
public class NumberGuessFrame extends javax.swing.JFrame
{
private Game game;
private MessageGenerator msgGenerator;
{
java.awt.EventQueue.invokeLater(new Runnable()
{
public void run()
{
initComponents();
setVisible(true);
}
});
}
{
buttonPanel = new javax.swing.JPanel();
mainMsgPanel = new javax.swing.JPanel();
mainLabel = new javax.swing.JLabel();
messageLabel = new javax.swing.JLabel();
guessText = new javax.swing.JTextField();
...
mainLabel.setText(msgGenerator.getChallengeMessage());
mainMsgPanel.add(mainLabel);
messageLabel.setText(msgGenerator.getResultMessage());
mainMsgPanel.add(messageLabel);
...
}
{
int guess = Integer.parseInt(guessText.getText());
game.setGuess( guess );
game.check();
refreshUI();
}
private void replayBtnActionPerformed(java.awt.event.ActionEvent evt)
{
refreshUI();
}
private void refreshUI() {
mainLabel.setText( msgGenerator.getChallengeMessage() );
messageLabel.setText( msgGenerator.getResultMessage() );
guessText.setText( "" );
guessesLeftBar.setValue( game.getRemainingGuesses() );
guessText.requestFocus();
}
// swing components
private javax.swing.JPanel borderPanel;
...
private javax.swing.JButton replayBtn;
}
| The injected instance of the game (logic and state). |
| The injected message generator for UI messages. |
|
This application is started in the prescribed Weld SE way,
by observing the |
|
This method initializes all of the Swing components. Note
the use of the |
|
|
|
|
The translator example will take any sentences you enter, and translate them to Latin. (Well, not really, but the stub is there for you to implement, at least. Good luck!)
The translator example is built as an ear and contains EJBs. As a result, it's structure is more complex than the numberguess example.
Note
Java EE 6, which bundles EJB 3.1, allows you to package EJBs in a war, which will make this structure much simpler! Still, there are other advantages of using an ear.
First, let's take a look at the ear aggregator, which is located in the example's ear directory. Maven
automatically generates the application.xml for us from this plugin configuration:
<plugin>

   <groupId>org.apache.maven.plugins</groupId>

   <artifactId>maven-ear-plugin</artifactId>

   <configuration>

      <modules>

         <webModule>

            <groupId>org.jboss.weld.examples.jsf.translator</groupId>

            <artifactId>weld-jsf-translator-war</artifactId>

            <contextRoot>/weld-translator</contextRoot>

         </webModule>

      </modules>

   </configuration>

</plugin>
This configuration overrides the web context path, resulting in this application URL: http://localhost:8080/weld-translator.
Tip
If you weren't using Maven to generate these files, you would need
META-INF/application.xml:
<application version="5"

   xmlns="http://java.sun.com/xml/ns/javaee"

   xmlns:xsi="http://www.w3.org/2001/XMLSchema-instance"

   xsi:schemaLocation="

      http://java.sun.com/xml/ns/javaee

      http://java.sun.com/xml/ns/javaee/application_5.xsd">


  <display-name>weld-jsf-translator-ear</display-name>

  <description>The Weld JSF translator example (ear)</description>


  <module>

    <web>

      <web-uri>weld-translator.war</web-uri>

      <context-root>/weld-translator</context-root>

    </web>

  </module>

  <module>

    <ejb>weld-translator.jar</ejb>

  </module>

</application>
Next, lets look at the war, which is located in the example's war directory. Just as in the
numberguess example, we have a faces-config.xml for JSF 2.0 and a web.xml
(to activate JSF) under WEB-INF, both sourced from src/main/webapp/WEB-INF.
More interesting is the JSF view used to translate text. Just as in the numberguess example we have a template, which surrounds the form (ommitted here for brevity):
<h:form id="translator">


   <table>

      <tr align="center" style="font-weight: bold">

         <td>

            Your text

         </td>

         <td>

            Translation

         </td>

      </tr>

      <tr>

         <td>

            <h:inputTextarea id="text" value="#{translator.text}" required="true" rows="5" cols="80"/>

         </td>

         <td>

            <h:outputText value="#{translator.translatedText}"/>

         </td>

      </tr>

   </table>

   <div>

      <h:commandButton id="button" value="Translate" action="#{translator.translate}"/>

   </div>


</h:form>
The user can enter some text in the left-hand textarea, and hit the translate button to see the result to the right.
Finally, let's look at the EJB module, which is located in the example's ejb directory. In
src/main/resources/META-INF there is just an empty beans.xml, used to
mark the archive as containing beans.
We've saved the most interesting bit to last, the code! The project has two simple beans,
SentenceParser and TextTranslator and two session beans,
TranslatorControllerBean and SentenceTranslator. You should be getting
quite familiar with what a bean looks like by now, so we'll just highlight the most interesting bits here.
Both SentenceParser and TextTranslator are dependent beans, and
TextTranslator uses constructor injection:
public class TextTranslator implements Serializable {


   private SentenceParser sentenceParser;


   @EJB private Translator translator;


   @Inject public TextTranslator(SentenceParser sentenceParser) {

      this.sentenceParser = sentenceParser;

   }


   public String translate(String text) {

      StringBuilder sb = new StringBuilder();

      for (String sentence: sentenceParser.parse(text)) {

         sb.append(translator.translate(sentence)).append(". ");

      }

      return sb.toString().trim();

   }


}
TextTranslator uses the simple bean (really just a plain Java class!)
SentenceParser to parse the sentence and then calls on the stateless bean with the local
business interface Translator to perform the translation. That's where the magic happens.
Of course, we couldn't develop a full translator, but it's convincing enough to anyone who doesn't understand
Latin!
@Stateless

public class SentenceTranslator implements Translator {


   public String translate(String sentence) {

      return "Lorem ipsum dolor sit amet";

   }


}
Finally, there is UI orientated controller. This is a request scoped, named, stateful session bean, which injects the translator. It collects the text from the user and dispatches it to the translator. The bean also has getters and setters for all the fields on the page.
@Stateful

@RequestScoped

@Named("translator")

public class TranslatorControllerBean implements TranslatorController {


   @Inject private TextTranslator translator;


   private String inputText;


   private String translatedText;


   public void translate() {

      translatedText = translator.translate(inputText);

   }


   public String getText() {

      return inputText;

   }


   public void setText(String text) {

      this.inputText = text;

   }


   public String getTranslatedText() {

      return translatedText;

   }


   @Remove public void remove() {}


}
That concludes our short tour of the Weld starter examples. For more information on Weld, please visit http://www.seamframework.org/Weld.