- 3.1. Skinning the portal
- 3.2. Portal Lifecycle
- 3.3. Default Portal Configuration
- 3.4. Portal Default Permission Configuration
- 3.5. Portal Navigation Configuration
- 3.6. Internationalization Configuration
- 3.7. Pluggable Locale Policy
- 3.8. RTL (Right To Left) Framework
- 3.9. XML Resources Bundles
- 3.10. JavaScript Inter Application Communication
- 3.11. Upload Component
- 3.12. Deactivation of the Ajax Loading Mask Layer
- 3.13. Javascript Configuration
GateIn 3.2 provides robust skinning support for the entire portal User Interface (UI). This includes support for skinning all of the common portal elements as well as being able to provide custom skins and window decoration for individual portlets. All of this designed with common graphic resource reuse and ease of development in mind.
The complete skinning of a page can be decomposed into three main parts:
- Portal Skin
The portal skin contains the css styles for the portal and its various UI components. This should include all the UI components except for the window decorators and portlet specific styles.
- Window Styles
The CSS styles associated with the porlet window decorators. The window decorators contain the control buttons and boarders surrounding each portlet. Individual portlets can have their own window decorator selected, or be rendered without one.
- Portlet Skins
The portlet skins effect how portlets are rendered on the page. There are two main ways this can be affected:
- Portlet Specification CSS Classes
The portlet specification defines a set of css classes that should be available to portlets. GateIn 3.2 provides these classes as part of the portal skin. This allows each portal skin to define its own look and feel for these default values.
- Portlet Skins
GateIn 3.2 provides a means for portlet css files to be loaded based on the current portal skin. This allows a portlet to provide different css styles to better match the current portal look and feel. Portlet skins provide a much more customizable css experience than just using the portlet specification css classes.
Note
The window decorators and the default portlet specification css classes should be considered separate types of skinning components, but they need to be included as part of the overall portal skin. The portal skin must include these component´s css classes or they will not be displayed correctly.
A portlet skin doesn't need to be included as part of the portal skin and can be included within the portlets web application.
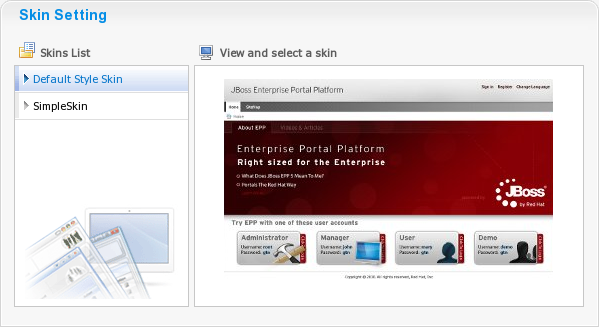
There are a few means in which a skin can be selected to be displayed to the user. The easiest way to change the skin is select it through the user interface. An admin can change the default skin for the portal, or a logged in user can select which skin they would prefer to be displayed.
Please see the User Guide for information on how to change the skin using the user interface.
The default skin can also be configured through the portal configuration files if using the admin user interface is not desired. This will allow for the portal to have the new default skin ready when GateIn 3.2 is first started.
The default skin of the portal is called
Default. To change this value add a
skin tag in the
02portal.war/WEB-INF/conf/portal/portal/classic/portal.xml
configuration file.
To change the skin to
MySkin
you would make the following changes:
<portal-config>

                <portal-name>classic</portal-name>

                <locale>en</locale>

                <access-permissions>Everyone</access-permissions>

                <edit-permission>*:/platform/administrators</edit-permission>

                <skin>MySkin</skin>

                ...
A GateIn 3.2
skin contains css styles for the portal's components but
also shares components that may be reused in portlets. When GateIn 3.2
generates a portal page markup, it inserts stylesheet links in the page's
head tag.
There are two main types of css links that will appear in the
head tag: a link to the portal skin css file and a link
to the portlet skin css files.
- Portal Skin
The portal skin will appear as a single link to a css file. This link will contain contents from all the portal skin classes merged into one file. This allow for the portal skin to be transfered more quickly as a single file instead of many multiple smaller files. Included with every page render.
- Portlet Skin
Each portlet on a page may contribute its own style. The link to the portlet skin will only appear on the page if that portlet is loaded on the current page. A page may contain many portlet skin css links or none.
In the code fragment below you can see the two types of links:
<head>

...

<!-- The portal skin -->

<link id="CoreSkin" rel="stylesheet" type="text/css" href="/eXoResources/skin/Stylesheet.css" />


<!-- The portlet skins -->

<link id="web_FooterPortlet" rel="stylesheet" type="text/css" href= "/web/skin/portal/webui/component/UIFooterPortlet/DefaultStylesheet.css" />

<link id="web_NavigationPortlet" rel="stylesheet" type="text/css" href= "/web/skin/portal/webui/component/UINavigationPortlet/DefaultStylesheet.css" />

<link id="web_HomePagePortlet" rel="stylesheet" type="text/css" href= "/portal/templates/skin/webui/component/UIHomePagePortlet/DefaultStylesheet.css" />

<link id="web_BannerPortlet" rel="stylesheet" type="text/css" href= "/web/skin/portal/webui/component/UIBannerPortlet/DefaultStylesheet.css" />

...

</head>
Note
Window styles and the portlet specification CSS classes are included within the portal skin.
The skin service is a GateIn 3.2 service which manages the various types of skins. It is reponsible for discovering and deploying the skins into the portal.
GateIn 3.2 automatically discovers web archives that contain a
file descriptor for skins (WEB-INF/gatein-resources.xml). This file is
reponsible for specifying the portal, portlet and window decorators to be deployed into the
skin service.
The full schema can be found in lib directory:
exo.portal.component.portal.jar/gatein_resources_1_0.xsdHere is an example where we define a skin (MySkin) with its CSS location, and specify a few window decorator skins:
<gatein-resources>

  <portal-skin>

    <skin-name>MySkin</skin-name>

    <css-path>/skin/myskin.css</css-path>

    <overwrite>false</overwrite>

  </portal-skin>

</gatein-resources>


  <!-- window style -->

  <window-style>

    <style-name>MyThemeCategory</style-name>

    <style-theme>

      <theme-name>MyThemeBlue</theme-name>

    </style-theme>

    <style-theme>

      <theme-name>MyThemeRed</theme-name>

    </style-theme>

    ...
Because of the Right-To-Left support all CSS files need to be retrieved through a Servlet filter and the web application needs to be configured to activate this filter. This is already done for 01eXoResources.war web application which contains the default skin.
Any new web applications containing skinning css files will
need to have the following added to their
web.xml
:
<filter>

      <filter-name>ResourceRequestFilter</filter-name>

      <filter-class>org.exoplatform.portal.application.ResourceRequestFilter</filter-class>

      </filter>


      <filter-mapping>

      <filter-name>ResourceRequestFilter</filter-name>

      <url-pattern>*.css</url-pattern>

      </filter-mapping>
Note
The display-name element will also need to
be specified in the web.xml for the skinning service to work properly
with the web application.
The default skin for GateIn 3.2 is located as part of the 01eXoResource.war.
The main files associated with the skin is show below:
WEB-INF/gatein-resources.xml WEB-INF/web.xm
l skin/Styleshee
t.css
| gatein-resources.xml: defines the skin setup to use |
| web.xml: contains the resource filer and has the display-name set |
| Stylesheet.css: contains the CSS class definitions for this skin. |
- gatein-resources.xml
For the default portal skin, this file contains definitions for the portal skin, the window decorations that this skin provides and well as defining some javascript resources which are not related to the skin. The default portal skin doesn't directly define portlet skins, these should be provided by the portlets themeselves.
- web.xml
For the default portal skin, the web.xml of the eXoResources.war will contains a lot of information which is mostly irrelevant to the portal skining. The areas of interest in this file is the resourcerequestfilter and the fact that the display-name is set.
- Stylesheet.css
The main portal skin stylesheet. The file is the main entry point to the css class definitions for the skin. Below is shown the contents of this file:
@import url(De
faultSkin/portal/webui/component/UIPortalApplicationSkin.css);
@import url(DefaultSkin/webui/component/Stylesheet.css);
@import url(PortletThemes/Stylesheet.css);
@import url(Po rtlet/Stylesheet.css);
Skin for the main portal page.
Skins for various portal components.
Window decoration skins.
The portlet specificiation css classes.
Instead of defining all the CSS classes in this one file we are instead importing other css stylesheet files, some of which may also import other CSS stylesheets. The css classes are split up between multiple files to make it easier for new skins to reuse parts of the default skin.
To reuse a CSS stylesheet from the default portal skin you would need to reference the default skin from eXoResources. For example, to include the window decorators from the default skin within a new portal skin you would need to use this import:
@import url(/eXoResources/skin/Portlet/Stylesheet.css);
Note
When the portal skin is added to the page, it merge all the css stylesheets into a single file.
A new portal will need to be added to the portal through the skin service. As such the web application which contains the skin will need to be properly configured for the skin service to discover them. This means properly configuring the ResourceRequestFilter and gatein-resources.xml.
The gatein-resources.xml will need to specify the new portal skin. This will include specifying the name of the new skin, where to locate its css stylesheet file and whether to overwrite an existing portal theme with the same name.
<gatein-resources>

  <portal-skin>

    <skin-name>MySkin</skin-name>

    <css-path>/skin/myskin.css</css-path>

    <overwrite>false</overwrite>

  </portal-skin>

</gatein-resources>
The default portal skin and window styles are defined in
01eXoResources.war/WEB-INF/gatein-resources.xml.
Note
The css for the portal skin needs to contain the css for all the window decorations and the portlet specification css classes.
When selecting a skin it is possible to see a preview of what the skin will look like. The current skin needs to know about the skin icons for all the available skins, otherwise it will not be able to show the previews. When creating a new portal it is recommended to include the preview icons of the other skins and to update the other skins with your new portal skin preview.
The portal skin preview icon is specified through the CSS of the portal skin. In order for the current portal skin to be able to display the preview it must specify a specific CSS class and set the icon as the background.
For a portal named MySkin in must define the following CSS class:
.UIChangeSkinForm .UIItemSelector .TemplateContainer .MySkinImageIn order for the default skin to know about the skin icon for a new portal skin, the preview screenshot needs to be place in:
01eXoResources.war:/skin/DefaultSkin/portal/webui/component/customization/UIChangeSkinForm/backgroundThe CSS stylesheet for the default portal needs to have the following updated with the preview icon css class. For a skin named MySkin then the following needs to be updated:
01eXoResources.war:/skin/DefaultSkin/portal/webui/component/customization/UIChangeSkinForm/Stylesheet.css.UIChangeSkinForm .UIItemSelector .TemplateContainer .MySkinImage {
margin: auto;
width: 329px; height:204px;
background: url('background/MySkin.jpg') no-repeat top;
cursor: pointer ;
}Window styles are the CSS applied to window decoration. When an administrator choose a new application to add on a page he can decide which style of decoration would go around the window if any.
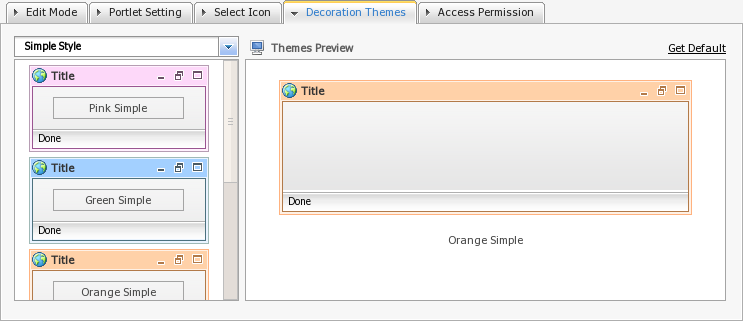
Window Styles are defined within a gatein-resources.xml file which is used by the skin service to deploy the window style into the portal. Window styles can belong in with a window style category, this category and the window styles will need to be specified in resources file.
The following gatein-resource.xml fragment will add MyThemeBlue and MyThemeRed to the MyTheme category.
<window-style>

  <style-name>MyTheme</style-name>

  <style-theme>

    <theme-name>MyThemeBlue</theme-name>

  </style-theme>

  <style-theme>

    <theme-name>MyThemeRed</theme-name>

  </style-theme>

</window-style>
The windows style configuration for the default skin is configured in:
01eXoResources.war/WEB-INF/gatein-resources.xmlNote
When a window style is defined in gatein-resources.xml file, it will be available to all portlets regardless if the current portal skin support the window decorator or not. It is recommended that when a new window decorator is added that it is added to all portal skins or that portal skins share a common stylesheet for window decorators.
In order for the skin service to display the window decorators, it must have CSS classes with specific naming in relation to the window style name. The service will try and display css based on this naming. The css class must be included as part of the current portal skin for the window decorators to be displayed.
The location of the window decorator css classes for the default portal theme is located at:
01eXoResources.war/skin/PortletThemes/Stylesheet.cssCreate the CSS file:
/*---- MyTheme ----*/
.MyTheme .WindowBarCenter .WindowPortletInfo {
  margin-right: 80px; /* orientation=lt */
  margin-left: 80px; /* orientation=rt */
}
.MyTheme .WindowBarCenter .ControlIcon {
  float: right;/* orientation=lt */
  float: left;/* orientation=rt */
  width: 24px;
  height: 17px;
  cursor: pointer;
  background-image: url('background/MyTheme.png');
}
.MyTheme .ArrowDownIcon {
  background-position: center 20px;
}
.MyTheme .OverArrowDownIcon {
  background-position: center 116px;
}
.MyTheme .MinimizedIcon {
  background-position: center 44px;
}
.MyTheme .OverMinimizedIcon {
  background-position: center 140px;
}
.MyTheme .MaximizedIcon {
  background-position: center 68px;
}
.MyTheme .OverMaximizedIcon {
  background-position: center 164px;
}
.MyTheme .RestoreIcon {
  background-position: center 92px;
}
.MyTheme .OverRestoreIcon {
  background-position: center 188px;
}
.MyTheme .NormalIcon {
  background-position: center 92px;
}
.MyTheme .OverNormalIcon {
  background-position: center 188px;
}
.UIPageDesktop .MyTheme .ResizeArea {
  float: right;/* orientation=lt */
  float: left;/* orientation=rt */
  width: 18px; height: 18px;
  cursor: nw-resize;
  background: url('background/ResizeArea18x18.gif') no-repeat left top; /* orientation=lt */
  background: url('background/ResizeArea18x18-rt.gif') no-repeat right top; /* orientation=rt */
}
.MyTheme .Information {
  height: 18px; line-height: 18px;
  vertical-align: middle; font-size: 10px;
  padding-left: 5px;/* orientation=lt */
  padding-right: 5px;/* orientation=rt */
  margin-right: 18px;/* orientation=lt */
  margin-left: 18px;/* orientation=rt */
}
.MyTheme .WindowBarCenter .WindowPortletIcon {
  background-position: left top; /* orientation=lt */
  background-position: right top; /* orientation=rt */
  padding-left: 20px; /* orientation=lt */
  padding-right: 20px; /* orientation=rt */
  height: 16px;
  line-height: 16px;
}
.MyTheme .WindowBarCenter .PortletName {
  font-weight: bold;
  color: #333333;
  overflow: hidden;
  white-space: nowrap;
  width: 100%;
}
.MyTheme .WindowBarLeft {
  padding-left: 12px;
  background-image: url('background/MyTheme.png');
  background-repeat: no-repeat;
  background-position: left -148px;
}
.MyTheme .WindowBarRight {
  padding-right: 11px;
  background-image: url('background/MyTheme.png');
  background-repeat: no-repeat;
  background-position: right -119px;
}
.MyTheme .WindowBarCenter {
  background-image: url('background/MyTheme.png');
  background-repeat: repeat-x;
  background-position: left -90px;
}
.MyTheme .WindowBarCenter .FixHeight {
  height: 21px;
  padding-top: 8px;
}
.MyTheme .MiddleDecoratorLeft {
  padding-left: 12px;
  background: url('background/MyTheme.png') repeat-y left;
}
.MyTheme .MiddleDecoratorRight {
  padding-right: 11px;
  background: url('background/MyTheme.png') repeat-y right;
}
.MyTheme .MiddleDecoratorCenter {
  background: #ffffff;
}
.MyTheme .BottomDecoratorLeft {
  MyTheme: 12px;
  background-image: url('background/MyTheme.png');
  background-repeat: no-repeat;
  background-position: left -60px;
}
.MyTheme .BottomDecoratorRight {
  padding-right: 11px;
  background-image: url('background/MyTheme.png');
  background-repeat: no-repeat;
  background-position: right -30px;
}
.MyTheme .BottomDecoratorCenter {
  background-image: url('background/MyTheme.png');
  background-repeat: repeat-x;
  background-position: left top;
}
.MyTheme .BottomDecoratorCenter .FixHeight {
  height: 30px;
}
Portlets often require additional styles that may not be defined by
the portal skin. GateIn 3.2 allows portlets to define additional
stylesheets for each portlet and will append the corresponding
link tags to the head.
The link ID will be of the form
{portletAppName}{PortletName}. For example:
ContentPortlet in content.war, will
give
id="contentContentPortlet"
To define a new CSS file to include whenever a portlet is available on a portal page, the following fragment needs to be added in gatein-resources.xml
<portlet-skin>
  <application-name>portletAppName</application-name>
  <portlet-name>PortletName</portlet-name>
  <skin-name>Default</skin-name>
  <css-path>/skin/DefaultStylesheet.css</css-path>
</portlet-skin>

<portlet-skin>
  <application-name>portletAppName</application-name>
  <portlet-name>PortletName</portlet-name>
  <skin-name>OtherSkin</skin-name>
  <css-path>/skin/OtherSkinStylesheet.css</css-path>
</portlet-skin>
This will load the DefaultStylesheet.css when the Default skin is used and the OtherSkinStylesheet.css when the OtherSkin is used.
Note
If the current portal skin is not defined as part of the supported skins, then the portlet css class will not be loaded. It is recommended to update portlet skins whenever a new portal skin is created.
Each portlet can be represented by an unique icon that you can see in the portlet registry or page editor. This icon can be changed by adding an image to the directory of the portlet webapplication:
skin/DefaultSkin/portletIcons/.icon_name.png
To be used correctly the icon must be named after the portlet.
For example, the icon for an account portlet named AccountPortlet would be located at:
skin/DefaultSkin/portletIcons/AccountPortlet.png
Note
You must use skin/DefaultSkin/portletIcons/ for the directory to store the
portlet icon regardless of what skin is going to be used.
The portlet specification defines a set of default css classes that should be available for portlets. These classes are included as part of the portal skin. Please see the portlet specification for a list of the default classes that should be available.
For the default portal skin, the portlet specification CSS classes are defined in :
eXoResources.war/skin/Portlet/Stylesheet.cssBy default, CSS files are cached and their imports are merged into a single CSS file at the server side. This reduces the number of HTTP requests from the browser to the server.
The optimization code is quite simple as all the CSS files are
parsed at the server startup time and all the @import and url(...)
references are rewritten to support a single flat file. The result is
stored in a cache directly used from the
ResourceRequestFilter.
Although the optimization is useful for a production environments,
it may be easier to deactivate this optimization while debugging
stylesheets. To do so, set the java system property
exo.product.developing to
true.
For example, the property can be passed as a JVM parameter with
-D option when running GateIn.
sh $JBOSS_HOME/bin/run.sh -Dexo.product.developing=true
warning("This option may cause display bugs with certain browsers like Internet Explorer")
It is recommended that users have some experience with CSS before studying GateIn 3.2 CSS.
GateIn 3.2 relies heavily on CSS to create the layout and effects for the UI. Some common techniques for customizing GateIn 3.2 CSS are explained below.
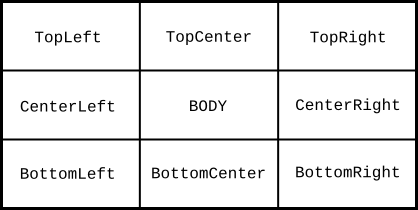
The decorator is a pattern to create a contour or a curve around an area. In order to achieve this effect you need to create 9 cells. The BODY is the central area that you want to decorate. The other 8 cells are distributed around the BODY cell. You can use the width, height and background image properties to achieve any decoration effect that you want.
<div class="Parent">
  <div class="TopLeft">
    <div class="TopRight">
      <div class="TopCenter"><span></span></div>
    </div>
  </div>
  <div class="CenterLeft">
    <div class="CenterRight">
      <div class="CenterCenter">BODY</div>
    </div>
  </div>
  <div class="BottomLeft">
    <div class="BottomRight">
      <div class="BottomCenter"><span></span></div>
    </div>
  <div>
</div>
Left margin left pattern is a technique to create 2 blocks side by side. The left block will have a fixed size and the right block will take the rest of the available space. When the user resizes the browser the added or removed space will be taken from the right block.

<div class="Parent">
  <div style="float: left; width: 100px">
  </div>
  <div style="margin-left: 105px;">
  <div>
  <div style="clear: left"><span></span></div>
</div>
This chapter describes the portal lifecycle from the application server start to its stop as well as how requests are handled.
A portal instance is simply a web application deployed as a WAR in an application server. Portlets are also part of an enhanced WAR called a portlet application.
GateIn 3.2 doesn't require any particular setup for your portlet in most common scenarios and the web.xml file can remain without any GateIn 3.2 specific configuration.
During deployment, GateIn 3.2 will automatically and transparently inject a servlet into the portlet application to be able to interact with it. This feature is dependent on the underlying servlet container but will work out of the box on the proposed bundles.
The servlet is the main entry point for incoming requests, it also includes some init code when the portal is launched. This servlet (org.gatein.wci.command.CommandServlet) is automatically added during deployment and mapped to /tomcatgateinservlet.
This is equivalent to adding the following into web.xml.
Note
As the servlet is already configured this example is for information only.
<servlet>

  <servlet-name>TomcatGateInServlet</servlet-name>

  <servlet-class>org.gatein.wci.command.CommandServlet</servlet-class>

  <load-on-startup>0</load-on-startup>

</servlet>


<servlet-mapping>

  <servlet-name>TomcatGateInServlet</servlet-name>

  <url-pattern>/tomcatgateinservlet</url-pattern>

</servlet-mapping>
It is possible to filter on the CommandServlet by filtering the URL pattern used by the Servlet mapping.
The example below would create a servlet filter that calculates the time of execution of a portlet request.
The filter class:
package org.example;


import java.io.IOException;


import javax.servlet.FilterChain;

import javax.servlet.FilterConfig;

import javax.servlet.ServletException;

import javax.servlet.ServletRequest;

import javax.servlet.ServletResponse;


public class MyFilter implements javax.servlet.Filter {


  public void doFilter(ServletRequest request, ServletResponse response,

      FilterChain chain) throws IOException, ServletException

  {

    long beforeTime = System.currentTimeMillis();

    chain.doFilter(request, response);

    long afterTime = System.currentTimeMillis();

    System.out.println("Time to execute the portlet request (in ms): " + (afterTime - beforeTime));

  }


  public void init(FilterConfig config) throws ServletException

  {

  }


  public void destroy()

  {

  }


}
The Java EE web application configuration file (web.xml) of the portlet on which we want to know the time to serve a portlet request. As mentioned above nothing specific to GateIn 3.2 needs to be included, only the URL pattern to set has to be known.
<?xml version="1.0"?>

<web-app xmlns:xsi="http://www.w3.org/2001/XMLSchema-instance"

    xsi:schemaLocation="http://java.sun.com/xml/ns/j2ee http://java.sun.com/xml/ns/j2ee/web-app_2_4.xsd"

    version="2.5">


  <filter>

    <filter-name>MyFilter</filter-name>

    <filter-class>org.example.MyFilter</filter-class>

  </filter>


  <filter-mapping>

    <filter-name>MyFilter</filter-name>

    <url-pattern>/tomcatgateinservlet</url-pattern>

    <dispatcher>INCLUDE</dispatcher>

  </filter-mapping>


</web-app>
INCLUDE dispatcher
It is important to set INCLUDE as dispatcher as the portal will always hit the CommandServlet through a request dispatcher. Without this, the filter will not be triggered, unless direct access to a resource (such as an image).
GateIn 3.2 default home page URL is http://{hostname}:{port}/portal/.
There may be multiple independent portals deployed in parallel at any given time, each of which has its root
context (i.e.: http://{hostname}:{port}/sample-portal/).
Each portal is internally composed of one or more, what we again call 'portals'. There needs to be at least
one such portal - the default one is called 'classic'. When accessing GateIn 3.2 default home page URL, you
are automatically redirected to 'classic' portal.
The default portal performs another important task. When starting up GateIn 3.2 for the first time, its
JCR database will be empty (that's where portals keep their runtime-configurable settings).
It's the default portal that's used to detect this, and to trigger automatic data initialization.
The following example configuration can be found at: "02portal.war:/WEB-INF/conf/portal/portal-configuration.xml".
<component>

    <key>org.exoplatform.portal.config.UserPortalConfigService</key>

    <type>org.exoplatform.portal.config.UserPortalConfigService</type>

    <component-plugins>

     <component-plugin>

       <name>new.portal.config.user.listener</name>

       <set-method>initListener</set-method>

       <type>org.exoplatform.portal.config.NewPortalConfigListener</type>

       <description>this listener init the portal configuration</description>

       <init-params>

         <value-param>

           <name>default.portal</name>

           <description>The default portal for checking db is empty or not</description>

           <value>classic</value>

         </value-param>

         ...

       </init-params>

     </component-plugin>

    </component-plugins>

  </component>
In this example the classic portal has been set as the default.
Note
Components, component-plugins, and init-params are explained in Foundations chapter. For now just note how
NewPortalConfigListener component-plugin is used to add configuration to
UserPortalConfigService, which is designed in this way to allow other components
to add configuration to it.
The default permission configuration for the portal is defined through org.exoplatform.portal.config.UserACL
component configuration in the file 02portal.war:/WEB-INF/conf/portal/portal-configuration.xml.
It defines 8 permissions types:
- super.user
The super user has all the rights on the platform, this user is referred to as root.
- portal.administrator.groups
Any member of those groups are considered administrators. Default value is
/platform/administrators.- portal.administrator.mstype
Any user with that membership type would be considered administrator or the associated group. Default value is
manager.- portal.creator.groups
This list defines all groups that will be able to manage the different portals. Members of this group also have the permission to create new portals. The format is
membership:/group/subgroup.- navigation.creator.membership.type
Defines the membership type of group managers. The group managers have the permission to create and edit group pages and they can modify the group navigation.
- guests.group
Any anonymous user automatically becomes a member of this group when they enter the public pages.
- mandatory.groups
Groups that can't be deleted.
- mandatory.mstypes
Membership types that can't be deleted.
<component>

  <key>org.exoplatform.portal.config.UserACL</key>

  <type>org.exoplatform.portal.config.UserACL</type>

  <init-params>

    <value-param>

      <name>super.user</name>

      <description>administrator</description>

      <value>root</value>

    </value-param>


    <value-param>

      <name>portal.creator.groups</name>

      <description>groups with membership type have permission to manage portal</description>

      <value>*:/platform/administrators,*:/organization/management/executive-board</value>

    </value-param>


    <value-param>

      <name>navigation.creator.membership.type</name>

      <description>specific membership type have full permission with group navigation</description>

      <value>manager</value>

    </value-param>

    <value-param>

      <name>guests.group</name>

      <description>guests group</description>

      <value>/platform/guests</value>

    </value-param>

    <value-param>

      <name>access.control.workspace</name>

      <description>groups with memberships that have the right to access the User Control Workspace</description>

      <value>*:/platform/administrators,*:/organization/management/executive-board</value>

    </value-param>

  </init-params>

</component>
When creating custom portals and portal extensions it's possible to override the default configuration by
using org.exoplatform.portal.config.PortalACLPlugin, configuring it as an external-plugin of
org.exoplatform.portal.config.UserACL service:
<external-component-plugins>

    <target-component>org.exoplatform.portal.config.UserACL</target-component>

    <component-plugin>

      <name>addPortalACLPlugin</name>

      <set-method>addPortalACLPlugin</set-method>

      <type>org.exoplatform.portal.config.PortalACLPlugin</type>

      <description>setting some permission for portal</description>

      <init-params>

        <values-param>

          <name>access.control.workspace.roles</name>

          <value>*:/platform/administrators</value>

          <value>*:/organization/management/executive-board</value>

        </values-param>

        <values-param>

          <name>portal.creation.roles</name>

          <value>*:/platform/administrators</value>

          <value>*:/organization/management/executive-board</value>

        </values-param>

      </init-params>

    </component-plugin>

  </external-component-plugins>
There are three types of navigation available to portal users:
These navigations are configured using standard XML syntax in the file; "02portal.war:/WEB-INF/conf/portal/portal-configuration.xml".
<component>

  <key>org.exoplatform.portal.config.UserPortalConfigService</key>

  <type>org.exoplatform.portal.config.UserPortalConfigService</type>

  <component-plugins>

   <component-plugin>

     <name>new.portal.config.user.listener</name>

     <set-method>initListener</set-method>

     <type>org.exoplatform.portal.config.NewPortalConfigListener</type>

     <description>this listener init the portal configuration</description>

     <init-params>

       <value-param>

         <name>default.portal</name>

         <description>The default portal for checking db is empty or not</description>

         <value>classic</value>

       </value-param>

       <object-param>

         <name>portal.configuration</name>

         <description>description</description>

         <object type="org.exoplatform.portal.config.NewPortalConfig">

           <field  name="predefinedOwner">

             <collection type="java.util.HashSet">

               <value><string>classic</string></value>

               <value><string>webos</string></value>

             </collection>

           </field>

           <field  name="ownerType"><string>portal</string></field>

           <field  name="templateLocation"><string>war:/conf/portal</string></field>

         </object>

       </object-param>

       <object-param>

         <name>group.configuration</name>

         <description>description</description>

         <object type="org.exoplatform.portal.config.NewPortalConfig">

           <field  name="predefinedOwner">

             <collection type="java.util.HashSet">

              <value><string>platform/administrators</string></value>

              <value><string>platform/users</string></value>

              <value><string>platform/guests</string></value>

              <value><string>organization/management/executive-board</string></value>

             </collection>

           </field>

           <field  name="ownerType"><string>group</string></field>

           <field  name="templateLocation"><string>war:/conf/portal</string></field>

         </object>

       </object-param>

       <object-param>

         <name>user.configuration</name>

         <description>description</description>

         <object type="org.exoplatform.portal.config.NewPortalConfig">

           <field  name="predefinedOwner">

             <collection type="java.util.HashSet">

               <value><string>root</string></value>

               <value><string>john</string></value>

               <value><string>mary</string></value>

               <value><string>demo</string></value>

             </collection>

           </field>

           <field  name="ownerType"><string>user</string></field>

           <field  name="templateLocation"><string>war:/conf/portal</string></field>

         </object>

       </object-param>

     </init-params>

   </component-plugin>

</component-plugins>
This XML configuration defines where in the portal's war to look for configuration, and what portals, groups, and user specific views to include in portal/group/user navigation. Those files will be used to create an initial navigation, the first time the portal is launched. That information will then be stored in JCR content repository, and can then be modified, and managed from the portal UI.
The portal navigation incorporates the pages that can be accessed even when a user is not logged in (assuming the applicable permissions allow public access). For example; several portal navigations are used when a company owns multiple trademarks, and sets up a web site for each of them.
The classic portal is configured by four XML files in 02portal.war:/WEB-INF/conf/portal/portal/classic directory:
- portal.xml
This file describes the layout and portlets that will be shown on all pages. Usually the layout contains the banner, footer, menu and breadcrumbs portlets. GateIn 3.2 is extremely configurable as every view element (even the banner and footer) is a portlet.
<?xml version="1.0" encoding="ISO-8859-1"?>

<portal-config>

  <portal-name>classic</portal-name>

  <locale>en</locale>

  <factory-id>office</factory-id>

  <access-permissions>Everyone</access-permissions>

  <edit-permission>*:/platform/administrators</edit-permission>

  <creator>root</creator>


  <portal-layout>

  <application>

     <instance-id>portal#classic:/web/BannerPortlet/banner</instance-id>

     <show-info-bar>false</show-info-bar>

   </application>

   <application>

    <instance-id>portal#classic:/web/NavigationPortlet/toolbar</instance-id>

     <show-info-bar>false</show-info-bar>

   </application>


   <application>

     <instance-id>portal#classic:/web/BreadcumbsPortlet/breadcumbs</instance-id>

     <show-info-bar>false</show-info-bar>

   </application>


   <page-body> </page-body>


   <application>

     <instance-id>portal#classic:/web/FooterPortlet/footer</instance-id>

     <show-info-bar>false</show-info-bar>

   </application>

  </portal-layout>


</portal-config>
It is also possible to apply a nested container that can also contain portlets. Row, column or tab containers are then responsible for the layout of their child portlets.
Each application references a portlet using the id
portal#{portalName}:/{portletWarName}/{portletName}/{uniqueId}Use the
page-bodytag to define where GateIn 3.2 should render the current page.The defined classic portal is accessible to "Everyone" (at
/portal/public/classic) but only members of the group/platform/administratorscan edit it.- navigation.xml
This file defines all the navigation nodes the portal will have. The syntax is simple, using nested node tags. Each node references a page defined in pages.xml file (explained next).
When
#{...}syntax is used, the enclosed property name serves as a key that is automatically passed to internationalization mechanism so the literal property name is replaced by a localized value taken from the associated properties file matching the current locale.
<?xml version="1.0" encoding="ISO-8859-1"?>

<node-navigation

    xmlns:xsi="http://www.w3.org/2001/XMLSchema-instance"

    xsi:schemaLocation="http://www.gatein.org/xml/ns/gatein_objects_1_0 http://www.gatein.org/xml/ns/gatein_objects_1_0"

    xmlns="http://www.gatein.org/xml/ns/gatein_objects_1_0">

  <priority>1</priority>

  <page-nodes>

     <node>

        <uri>home</uri>

        <name>home</name>

        <label>#{portal.classic.home}</label>

        <page-reference>portal::classic::homepage</page-reference>

     </node>

     <node>

        <uri>sitemap</uri>

        <name>sitemap</name>

        <label>#{portal.classic.sitemap}</label>

        <visibility>DISPLAYED</visibility>

        <page-reference>portal::classic::sitemap</page-reference>

    </node>

  </page-nodes>

</node-navigation>
This navigation tree can have multiple views inside portlets (such as the breadcrumbs portlet) that render the current view node, the site map or the menu portlets.
Warning
For top nodes, the uri and the name of your navigation nodes must have the same value. For other nodes the uri is a relative path. For example,
contentmanagement/fileexplorerwhere 'contentmanagement' is the name of the parent node and 'fileexplorer' is the name of the node ( <name>fileexplorer</name> ).- pages.xml
This configuration file structure is very similar to
portal.xmland it can also contain container tags. Each application can decide whether to render the portlet border, the window state, the icons or portlet's mode.
<?xml version="1.0" encoding="ISO-8859-1"?>

<page-set

    xmlns:xsi="http://www.w3.org/2001/XMLSchema-instance"

    xsi:schemaLocation="http://www.gatein.org/xml/ns/gatein_objects_1_0 http://www.gatein.org/xml/ns/gatein_objects_1_0"

    xmlns="http://www.gatein.org/xml/ns/gatein_objects_1_0">


  <page>

    <name>homepage</name>

    <title>Home Page</title>

      <access-permissions>Everyone</access-permissions>

      <edit-permission>*:/platform/administrators</edit-permission>

    <portlet-application>

      <portlet>

        <application-ref>web</application-ref>

        <portlet-ref>HomePagePortlet</portlet-ref>

        <preferences>

          <preference>

            <name>template</name>

            <value>system:/templates/groovy/webui/component/UIHomePagePortlet.gtmpl</value>

            <read-only>false</read-only>

          </preference>

        </preferences>

      </portlet>

      <title>Home Page portlet</title>

      <access-permissions>Everyone</access-permissions>

      <show-info-bar>false</show-info-bar>

      <show-application-state>false</show-application-state>

      <show-application-mode>false</show-application-mode>

    </portlet-application>

  </page>

  <page>

    <name>sitemap</name>

    <title>Site Map</title>

      <access-permissions>Everyone</access-permissions>

      <edit-permission>*:/platform/administrators</edit-permission>

    <portlet-application>

      <portlet>

        <application-ref>web</application-ref>

        <portlet-ref>SiteMapPortlet</portlet-ref>

      </portlet>

      <title>SiteMap</title>

      <access-permissions>Everyone</access-permissions>

      <show-info-bar>false</show-info-bar>

    </portlet-application>

  </page>

</page-set>
- portlet-preferences.xml
Porlet instances can be associated with
portlet-preferencesthat override the ones defined inportlet.xmlof the portlet applicationwar(TODO: clarify which file in which war).<?xml version="1.0" encoding="ISO-8859-1"?>
<portlet-preferences-set>
<portlet-preferences>
<owner-type>portal</owner-type>
<owner-id>classic</owner-id>
<window-id>portal#classic:/web/BannerPortlet/banner</window-id>
<preference>
<name>template</name>
<value>par:/groovy/groovy/webui/component/UIBannerPortlet.gtmpl</value>
<read-only>false</read-only>
</preference>
</portlet-preferences>
<portlet-preferences>
<owner-type>portal</owner-type>
<owner-id>classic</owner-id>
<window-id>portal#classic:/web/NavigationPortlet/toolbar</window-id>
<preference>
<name>useAJAX</name>
<value>true</value>
<read-only>false</read-only>
</preference>
</portlet-preferences>
<portlet-preferences>
<owner-type>portal</owner-type>
<owner-id>classic</owner-id>
<window-id>portal#classic:/web/FooterPortlet/footer</window-id>
<preference>
<name>template</name>
<value>par:/groovy/groovy/webui/component/UIFooterPortlet.gtmpl</value>
<read-only>false</read-only>
</preference>
</portlet-preferences>
<portlet-preferences>
<owner-type>portal</owner-type>
<owner-id>classic</owner-id>
<window-id>portal#classic:/web/GroovyPortlet/groovyportlet</window-id>
<preference>
<name>template</name>
<value>par:/groovy/groovy/webui/component/UIGroovyPortlet.gtmpl</value>
<read-only>false</read-only>
</preference>
</portlet-preferences>
</portlet-preferences-set>
Group navigations are dynamically added to the user navigation at login. This allows users to see in the menu all the pages assigned to any groups they belong to.
The group navigation menu is configured by three XML files (navigation.xml, pages.xml and portlet-preferences.xml). The syntax used in these files is the same as those covered in Section 3.5.2, “Portal Navigation”.
They are located in portal.war/WEB-INF/conf/portal/group directory (For example; /group-name-path/portal.war/WEB-INF/conf/portal/group/platform/administrators/).
User navigation is the set of nodes and pages that are owned by a user. They are part of the user's dashboard.
Three files configure the user navigation (navigation.xml, pages.xml and portlet-preferences.xml). They are located in the directory "portal.war/WEB-INF/conf/portal/users/{userName}".
This directory also contains a gadgets.xml file (formerly called widgets.xml). This file defines the gadgets located in the user's workspace.
The user's workspace is located at the left hand side of the page and access is restricted to some privileged users, see Section 6.1, “Predefined User Configuration”
<?xml version="1.0" encoding="ISO-8859-1"?>

<widgets>

  <owner-type>user</owner-type>

  <owner-id>root</owner-id>


  <container id="Information">

    <name>Information</name>

    <description>Information's Description</description>

    <application>

      <instance-id>user#root:/GateInWidgetWeb/WelcomeWidget/WelcomeWidget1</instance-id>

      <application-type>GateInWidget</application-type>

    </application>


    <application>

      <instance-id>user#root:/GateInWidgetWeb/StickerWidget/StickerWidget</instance-id>

      <application-type>GateInWidget</application-type>

    </application>


    <application>

      <instance-id>user#root:/GateInWidgetWeb/InfoWidget/InfoWidget1</instance-id>

      <application-type>GateInWidget</application-type>

    </application>

  </container>


  <container id="Calendar">

    <name>Calendar</name>

    <description>Calendar's Description</description>

    <application>

      <instance-id>user#root:/GateInWidgetWeb/CalendarWidget/CalendarWidget</instance-id>

      <application-type>GateInWidget</application-type>

    </application>

  </container>


</widgets>
If you wish to add a link to a URL outside the portal you first have to define a "page" that will only serve as a navigation placeholder for external redirect - it will not be used for any portlets. Then add the URL to the navigation. (TODO: check for correctness)
- pages.xml
<page>
  <owner-type>portal</owner-type>
  <owner-id>website</owner-id>
  <name>documentation</name>
  <title>Documentation</title>
  <access-permissions>Everyone</access-permissions>
  <edit-permission>*:/platform/administrators</edit-permission>
</page>
- navigation.xml
<node>
  <uri>http://wiki.exoplatform.com/xwiki/bin/view/Main/WebHome</uri>
  <name>documentation</name>
  <label>#{portal.classic.documentation}</label>
  <page-reference>portal::website::documentation</page-reference>
</node>
Direct external links were not a design goal
Currently you cannot modify the URL using the portal interface, you must change it in the configuration files or modify the underlying database table.
Assumed Knowledge
GateIn 3.2 is fully configurable for internationalization, however users should have a general knowledge of Internationalization in Java products before attempting these configurations.
Sun Java hosts a comprehensive guide to internationalizing java products at http://java.sun.com/docs/books/tutorial/i18n/TOC.html.
All GateIn 3.2 applications contain property files for various languages. They are packaged with the portlets applications in a WEB-INF/classes/locale/ directory.
These files are located in the classes folder of the WEB-INF directory, so as to be loaded by the ClassLoader.
All resource files are in a subfolder named locale.
For instance; the translations for the NavigationPortlet are located in web.war/WEB-INF/classes/locale/portlet/portal
NavigationPortlet_de.properties
NavigationPortlet_en.properties
NavigationPortlet_es.properties
NavigationPortlet_fr.properties
NavigationPortlet_nl.properties
NavigationPortlet_ru.properties
NavigationPortlet_uk.properties
NavigationPortlet_ar.xml
Inside those file are typical key=value Java EE properties. For example the French one:
javax.portlet.title=Portlet Navigation
There are also properties files in the portal itself. They form the portal resource bundle.
From a portlet you can then access translations from the portlet itself or shared at the portal level, both are aggregated when you need them.
Translation in XML format
It is also possible to use a proprietary XML format to define translations. This is a more convenient way to translate a document for some languages such as Japanese, Arabic or Russian. Property files have te be ASCII encoded, while the XML file can define its encoding. As a result it's easier for a human being to read (and fix) a translation in XML instead of having to decode and encode the property file.
For more information refer to: Section 3.9, “XML Resources Bundles”
Various languages are available in the portal package. The configuration below will define which languages are shown in the "Change Language" section and made available to users.
The 02portal.war:/WEB-INF/conf/common/common-configuration.xml file of your installation contains the following section:
<component>

  <key>org.exoplatform.services.resources.LocaleConfigService</key>

  <type>org.exoplatform.services.resources.impl.LocaleConfigServiceImpl</type>

  <init-params>

    <value-param>

      <name>locale.config.file</name>

      <value>war:/conf/common/locales-config.xml</value>

    </value-param>

  </init-params>

</component>
This configuration points to the locale configuration file.
The locale configuration file (02portal.war:/WEB-INF/conf/common/locales-config.xml) contains the following code:
<?xml version="1.0" encoding="UTF-8"?>
<locales-config>
<locale-config>
<locale>en</locale>
<output-encoding>UTF-8</output-encoding>
<input-encoding>UTF-8</input-encoding>
<description>Default configuration for english locale</description>
</locale-config>
<locale-config>
<locale>fr</locale>
<output-encoding>UTF-8</output-encoding>
<input-encoding>UTF-8</input-encoding>
<description>Default configuration for the french locale</description>
</locale-config>
<locale-config>
<locale>ar</locale>
<output-encoding>UTF-8</output-encoding>
<input-encoding>UTF-8</input-encoding>
<description>Default configuration for the arabic locale</description>
<orientati on>rt</orientation>
</locale-config>
</locales-config>
on>rt</orientation>
</locale-config>
</locales-config>
| locale The locale has to be defined such as defined here http://ftp.ics.uci.edu-pub-ietf-http-related-iso639.txt. In this example "ar" is Arabic. |
| output-encoding deals with character encoding. It is recommended that UTF-8 be used. |
| input-encoding In the java implementation, the encoding parameters will be used for the request response stream. The input-encoding parameter will be used for request setCharacterEncoding(..). |
| description Description for the language |
| orientation The default orientation of text and images is Left-To-Right. GateIn 3.2 supports Right-To-Left orientation. Modifying text orientation is explained in Section 3.8, “RTL (Right To Left) Framework”. |
The resource bundle service is configured in: 02portal.war:/WEB-INF/conf/common/common-configuration.xml:
<component>
  <key>org.exoplatform.services.resources.ResourceBundleService</key>
  <type>org.exoplatform.services.resources.impl.SimpleResourceBundleService</type>
  <init-params>
    <values-param>
      <name>classpath.resources</name>
      <description>The resources  that start with the following package name should be load from file system</description>
      <value>locale.portlet</value>
    </values-param>
    <values-param>
      <name>init.resources</name>
      <description>Initiate the following resources during the first launch</description>
      <value>locale.portal.expression</value>
      <value>locale.portal.services</value>
      <value>locale.portal.webui</value>
      <value>locale.portal.custom</value>
      <value>locale.navigation.portal.classic</value>
      <value>locale.navigation.group.platform.administrators</value>
      <value>locale.navigation.group.platform.users</value>
      <value>locale.navigation.group.platform.guests</value>
      <value>locale.navigation.group.organization.management.executive-board</value>
    </values-param>
    <values-param>
      <name>portal.resource.names</name>
      <description>The properties files of  the portal ,  those file will be merged
        into one ResoruceBundle properties </description>
      <value>locale.portal.expression</value>
      <value>locale.portal.services</value>
      <value>locale.portal.webui</value>
      <value>locale.portal.custom</value>
    </values-param>
  </init-params>
</component>
| classpath.resources are discussed in a later section. |
| init.resources TODO |
| portal.resource.names Defines all resources that belong to the Portal Resource Bundle. These resources are merged to a single resource bundle which is accessible from anywhere in GateIn 3.2. All these keys are located in the same bundle, which is separated from the navigation resource bundles. |
There is a resource bundle for each navigation. A navigation can exist for user, groups, and portal.
The previous example shows bundle definitions for the navigation of the classic portal and of four different groups. Each of these resource bundles occupies a different sphere, they are independent of each other and they are not included in the portal.resource.names parameter.
The properties for a group must be in the WEB-INF/classes/locale/navigation/group/ folder. /WEB-INF/classes/locale/navigation/group/organization/management/executive-board_en.properties, for example.
The folder and file names must correspond to the group hierarchy. The group name "executive-board" is followed by the iso 639 code.
For each language defined in LocalesConfig must have a resource file defined. If the name of a group is changed the name of the folder and/or files of the correspondent navigation resource bundles must also be changed.
Content of executive-board_en.properties:
organization.title=Organization
organization.newstaff=New Staff
organization.management=Management
This resource bundle is only accessible for the navigation of the organization.management.executive-board group.
Portlets are independent applications and deliver their own resource files.
All shipped portlet resources are located in the locale/portlet subfolder. The ResourceBundleService parameter classpath.resources defines this subfolder.
Procedure 3.1. Example
To add a Spanish translation to the
GadgetPortlet.Create the file
GadgetPortlet_es.propertiesin:WEB-INF/classes/locale/portlet/gadget/GadgetPortlet.In
portlet.xml, addSpanishas a supported-locale ('es' is the 2 letters code for Spanish), the resource-bundle is already declared and is the same for all languages :<supported-locale>en</supported-locale>
<supported-locale>es</supported-locale>
<resource-bundle>locale.portlet.gadget.GadgetPortlet</resource-bundle>
See the portlet specification for more details about portlet internationalization.
The portlet specifications defines three standard keys: Title, Short Title and Keywords. Keywords is formatted as a comma-separated list of tags.
 javax.portlet.title=Breadcrumbs Portlet
 javax.portlet.short-title=Breadcrumbs
 javax.portlet.keywords=Breadcrumbs, Breadcrumb
When translating an application it can sometimes be difficult to find the right key for a given property.
Execute the portal in debug mode and select, from the available languages, select the special language; Magic locale.
This feature translates a key to the same key value.
For example, the translated value for the key "organization.title" is simply the value "organization.title". Selecting that language allows use of the portal and its applications with all the keys visible. This makes it easier to find out the correct key for a given label in the portal page.
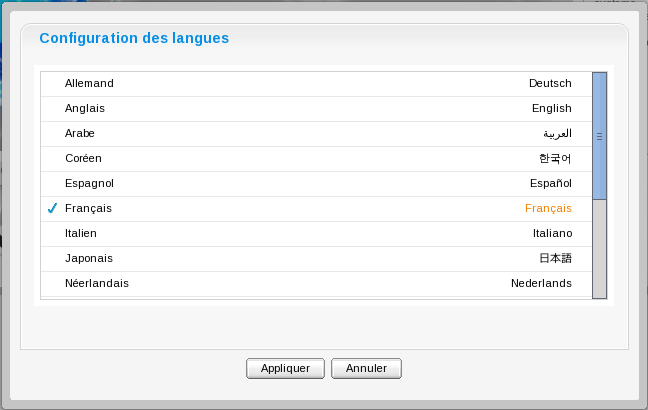
When choosing a language as on the screenshot above, the user is presented with a list of languages on the left side in the current chosen language
and on the right side, the same language translated into its own language.
Those texts are obtained from the JDK API java.util.Locale.getDisplayedLanguage() and java.util.Locale.getDisplayedCountry() (if needed) and all languages may not be translated and can also depend on the JVM currently used.
It is still possible to override those values by editing the locale.portal.webui resource bundle, to do so edit the file gatein.ear/02portal.war/WEB-INF/classes/locale/portal/webui_xx_yy.properties where xx_yy
represents the country code of the language in which you want to translate a particular language.
In that file, add or modify a key such as Locale.xx_yy with the value being the translated string.
Example 3.1. Changing the displayed text for Traditional Chinese in French
First edit gatein.ear/02portal.war/WEB-INF/classes/locale/portal/webui_fr.properties where ne is the country code for French, and add
the following key into it:
Locale.zh_TW=Chinois traditionnel
After a restart the language will be updated in the user interface when a user is trying to change the current language.
Every request processed by every portlet is invoked within a context of current Locale.
Current Locale can be retrieved by calling getLocale() method of
javax.portlet.PortletRequest interface.
The exact algorithm for determining the current Locale is not specified by Portlet Specification,
and is left to portlet containers to implement the way they deem most appropriate.
In GateIn 3.2 each portal instance has a default language which can be used to present content for new users. Another option is to use each user’s browser language preference, provided it matches one of the available localizations that GateIn 3.2 supports, and only fallback to portal default language if no match is found. Every user, while visiting a portal, has an option to change the language of the user interface by using a Language chooser. The choice can be remembered for the duration of the session, or it can be remembered for a longer period using a browser cookie, or - for registered and logged-in users - it can be saved into user’s profile.
So, we can see that there is more than one way to determine the Locale to be used for displaying a portal page
to the user. For this reason the mechanism for determining the current Locale of the request
is pluggable in GateIn 3.2, so the exact algorithm can be customized.
Customization is achieved by using LocalePolicy API, which is a simple API consisting of one interface, and one class:
org.exoplatform.services.resources.LocalePolicyinterfaceorg.exoplatform.services.resources.LocaleContextInfoclass
LocalePolicy interface defines a single method that’s invoked on the installed
LocalePolicy service implementation:
public interface LocalePolicy
{
   public Locale determineLocale(LocaleContextInfo localeContext);
}
Locale returned by determineLocale() method is the Locale
that will be returned to portlets when they call javax.portlet.PortletRequest.getLocale() method.
The returned Locale has to be one of the locales supported by portal,
otherwise it will fallback to portal-default Locale.
The supported locales are listed in gatein.ear/02portal.war/WEB-INF/conf/common/locales-config.xml file
as described in Section 3.6.2, “Locales configuration” .
The determineLocale() method takes a parameter of type LocaleContextInfo,
which represents a compilation of preferred locales from different sources - user’s profile, portal default,
browser language settings, current session, browser cookie … All these different sources of Locale
configuration or preference are used as input to LocalePolicy implementation
that decides which Locale should be used.
By default, org.exoplatform.portal.application.localization.DefaultLocalePolicyService - an implementation
of LocalePolicy - is installed to provide the default behaviour.
This, however, can easily be extended and overriden. A completely new implementation can also be written from scratch.
DefaultLocalePolicyService treats logged-in users slightly differently than anonymous users.
Logged-in users have a profile that can contain language preference, while anonymous users don't.
Here is an algorithm used for anonymous users.
Procedure 3.2. An algorithm for anonymous users
Iterate over
LocaleContextInfoproperties in the following order:cookieLocalessessionLocalebrowserLocalesportalLocale
Get each property's value - if it's a collection, get the first value.
If value is one of the supported locales return it as a result.
If value is not in the supported locales set, try to remove country information, and check if a language matching locale is in the list of supported locales. If so, return it as a result.
Otherwise, continue with the next property.
If no supported locale is found the return locale eventually defaults to portalLocale.
The algorithm for logged-in users is virtually the same except that the first Locale
source checked is user's profile.
The easiest way to customize the LocalePolicy is to extend DefaultLocalePolicyService.
The study of its source code will be required. There is ample JavaDoc that provides thorough information.
Most customizations will involve simply overriding one or more of its protected methods.
An example of a customization is an already provided NoBrowserLocalePolicyService.
By overriding just one method, it skips any use of browser language preference.
public class NoBrowserLocalePolicyService extends DefaultLocalePolicyService
{
   /**
    * Override super method with no-op.
    *
    * @param context locale context info available to implementations in order to determine appropriate Locale
    * @return null
    */
   @Override
   protected Locale getLocaleConfigFromBrowser(LocaleContextInfo context)
   {
      return null;
   }
}
The LocalePolicy framework is enabled for portlets by configuring LocalizationLifecycle class in portal's webui configuration file:
gatein.ear/02portal.war/WEB-INF/webui-configuration.xml:
    <application-lifecycle-listeners>

      ...

      <listener>org.exoplatform.portal.application.localization.LocalizationLifecycle</listener>

    </application-lifecycle-listeners>
The default LocalePolicy implementation is installed as GateIn Kernel portal service via
gatein.ear/lib/exo.portal.webui.portal-VERSION.jar/conf/portal/configuration.xml.
The following fragment is responsible for installing the service:
    <component>

       <key>org.exoplatform.services.resources.LocalePolicy</key>

       <type>org.exoplatform.portal.application.localization.DefaultLocalePolicyService</type>

   </component>
Besides implementing LocalePolicy, the service class also needs to implement
org.picocontainer.Startable interface in order to get installed.
This configuration file should not be changed. The configuration in it can be overriden by placing it into portal's .war file:
gatein.ear/02portal.war/WEB-INF/conf/configuration.xml (usually as another file included into this one).
In portals all the resources that are not portlets themselves but are accessed through portlets - reading
data through PortletRequest, and writing to PortletResponse - are
referred to as 'bridged'. Any resources that are accessed directly, bypassing portal filters and servlets,
are referred to as 'non-bridged'.
Non-bridged servlets, and .jsps have no access to PortalRequest. They don't use
PortletRequest.getLocale() to determine current Locale.
Instead, they use ServletRequest.getLocale() which is subject to precise semantics
defined by Servlet specification - it reflects browser's language preference.
In other words, non-bridged resources don't have a notion of current Locale
in the same sense that portlets do. The result is that when mixing portlets and non-bridged resources there
may be a localization mismatch - an inconsistency in the language used by different resources composing your portal
page.
This problem is addressed by LocalizationFilter. This is a filter that changes the behaviour
of ServletRequest.getLocale() method so that it behaves the same way as
PortletRequest.getLocale(). That way even localization of servlets, and .jsps
accessed in a non-bridged manner can stay in sync with portlet localization.
LocalizationFilter is installed through portal's web.xml file: gatein.ear/02portal.war/WEB-INF/web.xml
   <filter>

        <filter-name>LocalizationFilter</filter-name>

        <filter-class>org.exoplatform.portal.application.localization.LocalizationFilter</filter-class>

    </filter>


    ...


    <filter-mapping>

       <filter-name>LocalizationFilter</filter-name>

       <url-pattern>*.jsp</url-pattern>

       <dispatcher>INCLUDE</dispatcher>

       <dispatcher>FORWARD</dispatcher>

       <dispatcher>REQUEST</dispatcher>

       <dispatcher>ERROR</dispatcher>

   </filter-mapping>
There is a tiny limitation with this mechanism in that it is unable to determine the current portal,
and consequently its default language. As a result the portalLocale defaults to English, but can be configured
to something else by using filter's PortalLocale init param. For example:
   <filter>

        <filter-name>LocalizationFilter</filter-name>

        <filter-class>org.exoplatform.portal.application.localization.LocalizationFilter</filter-class>

        <init-param>

           <param-name>PortalLocale</param-name>

           <param-value>fr_FR</param-value>

        </init-param>

    </filter>
By default, LocalizationFilter is applied to *.jsp, which is considered the minimum
required by GateIn 3.2 to properly keep its non-bridged resources in sync with the rest of the portal.
Additionally deployed portlets, and portal applications, may need broader mapping to cover their non-bridged
resources.
Avoid using /*, /public/*, /private/*,
and similar broad mappings as LocalizationFilter sometimes adversely interacts with the
processing of portlet requests. Use multiple filter-mappings instead to specifically target non-bridged resources.
Keeping the mapping limited to only non-bridged resources will minimize any impact on performance as well.
The text orientation depends on the current locale setting. The orientation is a Java 5 enum that provides a set of functionalities:
   LT, // Western Europe
   RT, // Middle East (Arabic, Hebrew)
   TL, // Japanese, Chinese, Korean
   TR; // Mongolian
   public boolean isLT() { ... }
   public boolean isRT() { ... }
   public boolean isTL() { ... }
   public boolean isTR() { ... }
The object defining the Orientation for the current request is the UIPortalApplication. However it should be accessed at runtime using the RequestContext that delegates to the UIPortalApplication.
In the case of a PortalRequestContext it is a direct delegate as the PortalRequestContext has a reference to the current UIPortalApplication.
In the case of a different context such as the PortletRequestContext, it delegates to the parent context given the fact that the root RequestContext is always a PortalRequestContext.
Orientation is defined by implicit variables in the groovy binding context:
- Orientation
The current orientation as an Orientation
- isLT
The value of orientation.isLT()
- isRT
The value of orientation.isRT()
- dir
The string 'ltr' if the orientation is LT or the string 'rtl' if the orientation is RT.
The skin service handles stylesheet rewriting to accommodate the orientation. It works by appending -lt or -rt to the stylesheet name.
For instance: /web/skin/portal/webui/component/UIFooterPortlet/DefaultStylesheet-rt.css will return the same stylesheet as /web/skin/portal/webui/component/UIFooterPortlet/DefaultStylesheet.css but processed for the RT orientation. The -lt suffix is optional.
Stylesheet authors can annotate their stylesheet to create content that depends on the orientation.
Example 1
In the example we need to use the orientation to modify the float attribute that will make the horizontal tabs either float on left or on right:
float: left; /* orientation=lt */
float: right; /* orientation=rt */
font-weight: bold;
text-align: center;
white-space: nowrap;
The LT produced output will be:
float: left; /* orientation=lt */
font-weight: bold;
text-align: center;
white-space: nowrap;
The RT produced output will be:
float: right; /* orientation=rt */
font-weight: bold;
text-align: center;
white-space: nowrap;
Example 2
In this example we need to modify the padding according to the orientation:
color: white;
line-height: 24px;
padding: 0px 5px 0px 0px; /* orientation=lt */
padding: 0px 0px 0px 5px; /* >orientation=rt */
The LT produced output will be:
color: white;
line-height: 24px;
padding: 0px 5px 0px 0px; /* orientation=lt */
The RT produced output will be:
color: white;
line-height: 24px;
padding: 0px 0px 0px 5px; /* orientation=rt */
Sometimes it is necessary to create an RT version of an image that will be used from a template or from a stylesheet. However symmetric images can be automatically generated avoiding the necessity to create a mirrored version of an image and furthermore avoiding maintenance cost.
The web resource filter uses the same naming pattern as the skin service. When an image ends with the -rt suffix the portal will attempt to locate the original image and create a mirror of it.
For instance: requesting the image /GateInResources/skin/DefaultSkin/webui/component/UITabSystem/UITabs/background/NormalTabStyle-rt.gif returns a mirror of the image /GateInResources/skin/DefaultSkin/webui/component/UITabSystem/UITabs/background/NormalTabStyle.gif.
Note
It is important to consider whether the image to be mirrored is symmetrical as this will impact it's final appearance.
Here is an example combining stylesheet and images:
line-height: 24px;
background: url('background/NavigationTab.gif') no-repeat right top; /* orientation=lt */
background: url('background/NavigationTab-rt.gif') no-repeat left top; /* orientation=rt */
padding-right: 2px; /* orientation=lt */
padding-left: 2px; /* orientation=rt */
Resource bundles are usually stored in property files. However, as property files are plain files, issues with the encoding of the file may arise. The XML resource bundle format has been developed to provide an alternative to property files.
The XML format declares the encoding of the file. This avoids use of the native2ascii program which can interfere with encoding.
Property files generally use ISO 8859-1 character encoding which does not cover the full unicode charset. As a result, languages such as Arabic would not be natively supported.
Tooling for XML files is better supported than the tooling for Java property files and thus the XML editor copes well with the file encoding.
The XML format is very simple and has been developed based on the DRY (Don't Repeat Yourself) principle. Usually resource bundle keys are hierarchically defined and we can leverage the hierarchic nature of the XML for that purpose. Here is an example of turning a property file into an XML resource bundle file:
UIAccountForm.tab.label.AccountInputSet = ...
UIAccountForm.tab.label.UIUserProfileInputSet = ...
UIAccountForm.label.Profile = ...
UIAccountForm.label.HomeInfo= ...
UIAccountForm.label.BusinessInfo= ...
UIAccountForm.label.password= ...
UIAccountForm.label.Confirmpassword= ...
UIAccountForm.label.email= ...
UIAccountForm.action.Reset= ...
<?xml version="1.0" encoding="UTF-8"?>

<bundle>

  <UIAccountForm>

    <tab>

      <label>

        <AccountInputSet>...</AccountInputSet>

        <UIUserProfileInputSet>...</UIUserProfileInputSet>

      </label>

    </tab>

    <label>

      <Profile>...</Profile>

      <HomeInfo>...</HomeInfo>

      <BusinessInfo>...</BusinessInfo>

      <password>...</password>

      <Confirmpassword>...</Confirmpassword>

      <email>...</email>

    </label>

    <action>

      <Reset>...</Reset>

    </action>

  </UIAccountForm>

</bundle>
In order to be loaded by the portal at runtime (actually the resource bundle service), the name of the file must be the same as a property file and it must use the .xml suffix.
For example; for the Account Portlet to be displayed in Arabic, the resource bundle would be AccountPortlet_ar.xml rather than AccountPortlet_ar.properties.
JavaScript Inter Application Communication is designed to allow applications within a page to exchange data. This library is made for broadcasting messages on topic.
It is based on 3 functions:
Subscribe.
Publish.
Unsubscribe.
A subscription to a topic will receive any subtopic messages. For example; An application subscribed to "/eXo/application" will receive messages sent on the "/eXo/application/map" topic. A message sent on "/eXo", however, would not be received.
The Inter Application Communication library is found in 01eXoResources.war:/javascript/eXo/core/Topic.js
/**
 * publish is used to publish an event to the other subscribers to the given channels
 * @param {Object} senderId is a string that identify the sender
 * @param {String} topic is the topic that the message will be published
 * @param {Object} message is the message that's going to be delivered to the subscribers to the topic
 */
Topic.prototype.publish = function(/*Object*/ senderId, /*String*/ topicName, /*Object*/ message ) { ... }

/**
 * isSubscribed is used to check if a function receive the events from a topic
 * @param {String} topic The topic.
 * @param {Function} func is the name of the function of obj to call when a message is received on the topic
 */
Topic.prototype.isSubscribed = function(/*String*/ topic, /*Function*/ func) { ... }

/**
 * subscribe is used to subscribe a callback to a topic
 * @param {String} topic is the topic that will be listened
 * @param {Function} func is the name of the function of obj to call when a message is received on the topic
 *
 * func is a function that take a Object in parameter. the event received have this format:
 * {senderId:senderId, message:message, topic: topic}
 *
 */
Topic.prototype.subscribe = function(/*String*/ topic, /*Function*/ func) { ... }

/**
 * unsubscribe is used to unsubscribe a callback to a topic
 * @param {String} topic is the topic
 * @param {Object} id is the id of the listener we want to unsubscribe
 */
Topic.prototype.unsubscribe = function(/*String*/ topic, /*Object*/ id) { ... }

Topic.prototype.initCometdBridge = function() { ... }
The three messaging functions require particular objects and definitions in their syntax:
- Subscribe
The
subscribefunction is used to subscribe a callback to a topic. It uses the following parameters:- topic
The topic that will be listened for.
- func
The name of the object function to call when a message is received on the topic. It has to be a function that takes an Object parameter. The event received will have this format:
{
  senderId:senderId,
  message:message,
  topic: topic
}
- Publish
The
publishfunction is used to publish an event to the other subscribered applications through the given channels. Its parameters are:- senderId
This is a string that identifies the sender.
- topicName
The topic that the message will be published.
- message
This is the message body to be delivered to the subscribers to the topic.
- Unsubscribe
The
unsubscribefunction is used to unsubscribe a callback to a topic. The required parameters are:- topic
The topic that will is to be unsubscribed from.
- id
This is the context object.
<%@ taglib uri="http://java.sun.com/portlet" prefix="portlet" %>
<portlet:defineObjects/>
<div>
  <p>
    Received messages:
    <div id="received_<portlet:namespace/>">

    </div>
  </p>

  <p>
    Send message:
    <input type="text" id="msg_<portlet:namespace/>"/> <a href="#" onclick="send_<portlet:namespace/>();">send</a>
  </p>
</div>

<script type="text/javascript">

  Function.prototype.bind = function(object) {
    var method = this;
      return function() {
      method.apply(object, arguments);
    }
  }

  function send_<portlet:namespace/>() {
    var msg = document.getElementById("msg_<portlet:namespace/>").value;
    eXo.core.Topic.publish("<portlet:namespace/>", "/demo", msg);
  }

  function Listener_<portlet:namespace/>(){

  }

  Listener_<portlet:namespace/>.prototype.receiveMsg = function(event) {
    document.getElementById("received_<portlet:namespace/>").innerHTML =
      document.getElementById("received_<portlet:namespace/>").innerHTML + "<br />* " +
      event.senderId + ": " + event.message;
  }

  function init_<portlet:namespace/>() {
    var listener_<portlet:namespace/> = new Listener_<portlet:namespace/>();
    eXo.core.Topic.subscribe("/demo", listener_<portlet:namespace/>.receiveMsg.bind(listener_<portlet:namespace/>));
  }

  init_<portlet:namespace/>();
</script>
The service is defined by the class: org.exoplatform.upload.UploadService;
This can be configured with the following xml code:
<component>

   <type>org.exoplatform.upload.UploadService</type>

     <init-params>

       <value-param>

        <name>upload.limit.size</name>

        <description>Maximum size of the file to upload in MB</description>

        <value>10</value>

      </value-param>

    </init-params>

  </component>
This code allows for a default upload size limit for the service to be configured. The value unit is in MegaBytes.
This limit will be used by default by all applications if no application-specific limit is set. Setting a different limit for applications is discussed in a later section.
If the value is set at 0 the upload size is unlimited.
Procedure 3.4. How to use the upload component
Create an object type
org.exoplatform.webui.form.UIFormUploadInput.Two constructors are available for this:
public UIFormUploadInput(String name, String bindingExpression)
or:
public UIFormUploadInput(String name, String bindingExpression, int limit)
This is an example using the second form :
PortletRequestContext pcontext = (PortletRequestContext)WebuiRequestContext.getCurrentInstance();

PortletPreferences portletPref = pcontext.getRequest().getPreferences();

int limitMB = Integer.parseInt(portletPref.getValue("uploadFileSizeLimitMB", "").trim());

UIFormUploadInput uiInput = new UIFormUploadInput("upload", "upload", limitMB);
To obtain the limit from the
xmlconfiguration, this piece of code can be added to the eitherportlet.xmlorportlet-preferences.xml:<preference>
<name>uploadFileSizeLimitMB</name>
<value>30</value>
<read-only>false</read-only>
</preference>
Again, a
0value means an unlimited upload size, and the value unit is set in MegaBytes.Use the
getUploadDataAsStream()method to get the uploaded data:UIFormUploadInput input = (UIFormUploadInput)uiForm.getUIInput("upload");
InputStream inputStream = input.getUploadDataAsStream();
...
jcrData.setValue(inputStream);The upload service stores a temporary file on the filesystem during the upload process. When the upload is finished, the service must be cleaned in order to:
Delete the temporary file.
Delete the classes used for the upload.
Use the
removeUpload()method defined in the upload service to purge the file:UploadService uploadService = uiForm.getApplicationComponent(UploadService.class) ;
UIFormUploadInput uiChild = uiForm.getChild(UIFormUploadInput.class) ;
uploadService.removeUpload(uiChild.getUploadId()) ;Saving the uploaded file
Ensure the file is saved before the service is cleaned.
The loading mask layer is deployed after an ajax-call. Its purpose is to block the GUI in order to prevent further user actions until the the ajax-request has been completed.
However, the mask layer may need to be deactivated in instances where the portal requires user instructions before previous instructions have been carried out.
Procedure 3.5. How to deactivate the ajax-loading mask
Generate a script to make an asynchronous ajax-call. Use the
uicomponent.doAsync()method rather than theuicomponent.event()method.For example:
<a href="<%=uicomponent.doAsync(action, beanId, params)%>" alt="">Asynchronous</a>
The
doAsync()method automatically adds the following new parameter into the parameters list;asyncparam = new Parameter(AJAX ASYNC,"true"); (AJAX ASYNC == "ajax async")This request is asynchronous and the ajax-loading mask will not deployed.
Note
An asynchronous request can still be made using the
uicomponent.event(). When using this method, however, the asyncparam must be added manually.
The GUI will be blocked to ensure a user can only request one action at a time and while the request seems to be synchronous, all ajax requests are, in fact always asynchronous. For further information refer to Section 3.12.2, “Synchronous issue”.
Most web browsers support ajax requests in two modes: Synchronous and Asynchronous. This mode is specified with a boolean bAsync parameter.
var bAsync = false; // Synchronous
request.open(instance.method, instance.url, bAsync);
However, in order to work with browsers that do not support Synchronous requests, bAsync is set to always be true (Ajax request will always be asynchronous).
// Asynchronous request
request.open(instance.method, instance.url, true);
Managing Javascript scripts in an application like GateIn 3.2 is a critical part of the configuration work. Configuring the scripts correctly will result in a faster response time from the portal.
Every portlet can have its own javscript code but in many cases it is more convenient to reuse some existing shared libraries. For that reason, GateIn 3.2 has a mechanism to easily register the libraries that will be loaded when the first page will be rendered.
To do so, every WAR deployed in GateIn 3.2 can register the .js files with the groovy script
WEB-INF/conf/script/groovy/JavascriptScript.groovy. (TODO: this file doesn't seem to exist)
The example file below is found in the 01eXoResources.war
JavascriptService.addJavascript("eXo", "/javascript/eXo.js", ServletContext);

/* Animation Javascripts */

JavascriptService.addJavascript("eXo.animation.ImplodeExplode", "/javascript/eXo/animation/ImplodeExplode.js", ServletContext);

/* Application descriptor */

JavascriptService.addJavascript("eXo.application.ApplicationDescriptor", "/javascript/eXo/application/ApplicationDescriptor.js", ServletContext);

/* CORE Javascripts */

JavascriptService.addJavascript("eXo.core.Utils", "/javascript/eXo/core/Util.js", ServletContext);

JavascriptService.addJavascript("eXo.core.DOMUtil", "/javascript/eXo/core/DOMUtil.js", ServletContext);

JavascriptService.addJavascript("eXo.core.Browser", "/javascript/eXo/core/Browser.js", ServletContext);

JavascriptService.addJavascript("eXo.core.MouseEventManager", "/javascript/eXo/core/MouseEventManager.js", ServletContext);

JavascriptService.addJavascript("eXo.core.UIMaskLayer", "/javascript/eXo/core/UIMaskLayer.js", ServletContext);

JavascriptService.addJavascript("eXo.core.Skin", "/javascript/eXo/core/Skin.js", ServletContext);

JavascriptService.addJavascript("eXo.core.DragDrop", "/javascript/eXo/core/DragDrop.js", ServletContext);

JavascriptService.addJavascript("eXo.core.TemplateEngine", "/javascript/eXo/core/TemplateEngine.js", ServletContext);

/* Widget Javascripts */

JavascriptService.addJavascript("eXo.widget.UIWidget", "/javascript/eXo/widget/UIWidget.js", ServletContext);

JavascriptService.addJavascript("eXo.widget.UIAddWidget", "/javascript/eXo/widget/UIAddWidget.js", ServletContext);

JavascriptService.addJavascript("eXo.widget.UIExoWidget", "/javascript/eXo/widget/UIExoWidget.js", ServletContext);

/* Desktop Javascripts */

JavascriptService.addJavascript("eXo.desktop.UIDockbar", "/javascript/eXo/desktop/UIDockbar.js", ServletContext);

JavascriptService.addJavascript("eXo.desktop.UIDesktop", "/javascript/eXo/desktop/UIDesktop.js", ServletContext);

/* WebUI Javascripts */

JavascriptService.addJavascript("eXo.webui.UIItemSelector", "/javascript/eXo/webui/UIItemSelector.js", ServletContext);

JavascriptService.addJavascript("eXo.webui.UIForm", "/javascript/eXo/webui/UIForm.js", ServletContext);

JavascriptService.addJavascript("eXo.webui.UIPopup", "/javascript/eXo/webui/UIPopup.js", ServletContext);

JavascriptService.addJavascript("eXo.webui.UIPopupSelectCategory", "/javascript/eXo/webui/UIPopupSelectCategory.js", ServletContext);

JavascriptService.addJavascript("eXo.webui.UIPopupWindow", "/javascript/eXo/webui/UIPopupWindow.js", ServletContext);

JavascriptService.addJavascript("eXo.webui.UIVerticalScroller", "/javascript/eXo/webui/UIVerticalScroller.js", ServletContext);

JavascriptService.addJavascript("eXo.webui.UIHorizontalTabs", "/javascript/eXo/webui/UIHorizontalTabs.js", ServletContext);

JavascriptService.addJavascript("eXo.webui.UIPopupMenu", "/javascript/eXo/webui/UIPopupMenu.js", ServletContext);

JavascriptService.addJavascript("eXo.webui.UIDropDownControl", "/javascript/eXo/webui/UIDropDownControl.js", ServletContext);

/* Portal Javascripts */

JavascriptService.addJavascript("eXo.portal.PortalHttpRequest", "/javascript/eXo/portal/PortalHttpRequest.js", ServletContext);

JavascriptService.addJavascript("eXo.portal.UIPortal", "/javascript/eXo/portal/UIPortal.js", ServletContext);

JavascriptService.addJavascript("eXo.portal.UIWorkspace", "/javascript/eXo/portal/UIWorkspace.js", ServletContext);

JavascriptService.addJavascript("eXo.portal.UIPortalControl", "/javascript/eXo/portal/UIPortalControl.js", ServletContext);

JavascriptService.addJavascript("eXo.portal.PortalDragDrop", "/javascript/eXo/portal/PortalDragDrop.js", ServletContext);

JavascriptService.addJavascript("eXo.portal.UIPortalNavigation", "/javascript/eXo/portal/UIPortalNavigation.js", ServletContext);

JavascriptService.addJavascript("eXo.portal.UIMaskWorkspace", "/javascript/eXo/portal/UIMaskWorkspace.js", ServletContext);

JavascriptService.addJavascript("eXo.portal.UIExoStartMenu", "/javascript/eXo/portal/UIExoStartMenu.js", ServletContext);

/* Desktop Javascripts 2 */

JavascriptService.addJavascript("eXo.desktop.UIWindow", "/javascript/eXo/desktop/UIWindow.js", ServletContext);
Note that even registered dedicated javascripts will be merged into a single merged.js file when the server loads. This reduces the number of HTTP calls as seen in the home page source code:
<script type="text/javascript" src="/portal/javascript/merged.js"></script>
Although this optimization is useful for a production environment, it may be easier to deactivate this optimization while debugging javascript problems.
To do this, set the java system property exo.product.developing to true.
To see or use the merged file set this property to false.
The property can be passed as a JVM parameter with the -D option in your GateIn.sh or GateIn.bat startup script.
Every javascript file is associated with a module name which acts as a namespace. The module name is passed as a first parameter to JavascriptService.addJavascript() function as in the following example:
JavascriptService.addJavascript("eXo.core.DragDrop",

      "/javascript/eXo/core/DragDrop.js", ServletContext);
Inside the associated javascript files, functions are exposed as global javascript function variables using the module name.
For example:
eXo.core.DragDrop = new DragDrop();
It is also possible to use eXo.require() javascript method to lazy load and evaluate some javascript code.
This is quite useful for the portlet or widget applications that will use this javascript only once. Otherwise,
if the library is reusable in several places it is better to reference it in the groovy file.