With a detailed event, you can:
Save time by creating a recurring event rather than entering each instance separately.
Create a reminder for upcoming events with your own notification settings.
Add a detailed event
1. Open the
Quick Add Event
form, then click  to open the Add/Edit Event form.
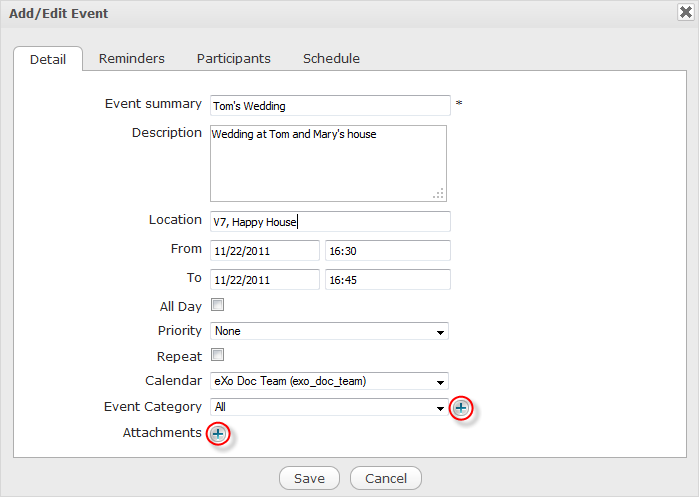
2. Give details of your event in fields of tabs.
i. In the Detail tab, you can:
Follow similar steps as stated in the Quick Add Event section.
Also,
Enter the location name where the event will take place in the Location field.
Select the priority level of this event, including None, Normal, High and Low, in the Priority field.
Tick the Repeat checkbox if you want to create a recurring event. For more details, see the Create a recurring event section.
Click
 to open the Attach Files form if you want to attach any files, such as map, or invitation card, with your event.
ii. In the Reminders tab, you can create a reminder for your event. For more details, see the Create a reminder for upcoming events section.
iii. In the Participants tab, you can add participants to your event by selecting the system users or contacts from your Address Book. For more details, see the Add participants to an event section.
iv. In the Schedule tab, you can view the availability time of users, or change date and time for your event and apply them into the Details tab. For more details, see the View the availability time of participants section.
3. Click Save to finish creating your detailed event.
There will be a confirmation message. Click Save and Send to save and send the invitation, or Save to only save.
You will see the event updated in your Activity Stream of your Space or Group Space.
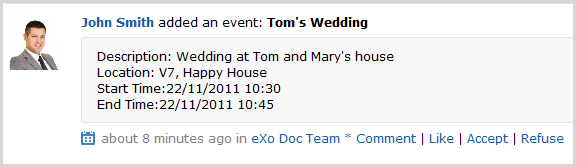
The event will be updated in your Activity Stream with its brief information, such as description, location, start time and end time. You can even deny or accept participating in this event directly in Activity Stream without going to the Calendar application.
In the Detail tab, tick the Repeat checkbox to open the Repeating event form.
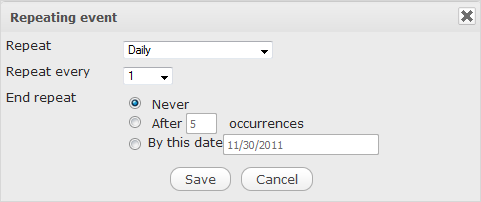
Here, you can define the repeating time for your event as follows:
1. Select the type for your repeating event from the Repeat option.
Daily: The event will be repeated every day.
Weekly: The event will be repeated every week.
Monthly: The event will be repeated every month.
Yearly: The event will be repeated every year.
2. Select the frequency for repeating your event in the Repeat Every option. The selected frequency will work on the Repeat value. For example, if you set Weekly in the Repeat option and 5 in the Repeat every option, the event will be repeated 5 times in each week.
3. Select the option for ending your repeating event by ticking the relevant checkbox.
Never: Your repeating event will never end.
After [X] occurrences: Your repeating event will end after X occurrences.
By this date: Your repeating event will end before your specified date. Point your cursor over the textbox and select the date from the drop-down calendar.
Create a reminder for upcoming events
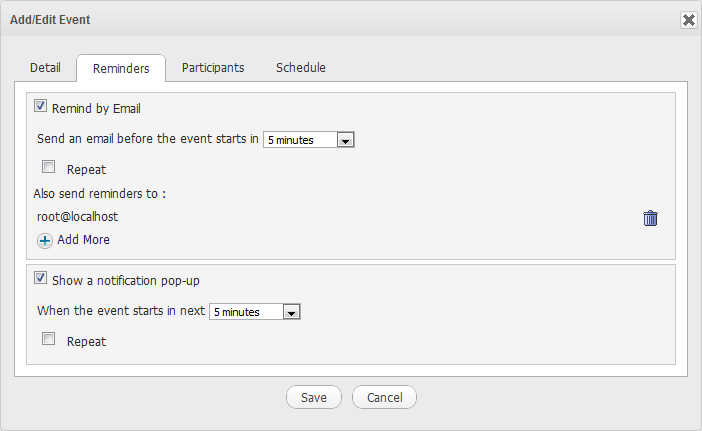
The Calendar application provides 2 options for reminding users who will take part in events. A reminder includes the summary information of the event, such as title, time and location. To use this feature, go to the Reminders tab.
Details:
Remind by Email: This option is to remind users of upcoming events via emails. This option is set default. If you do not use this option, simply untick the checkbox.
| Field | Description |
|---|---|
| Send an mail before the event starts in | The interval time that the reminder will be repeated before an event starts. |
| Repeat | Tick the checkbox to set the frequency for sending the email reminder before the event takes place. |
| Also send reminders to | The list of email addresses to which the reminder will be sent. The default value is the email address of the event creator. Click  to add more email addresses. To delete an email address, simply click to add more email addresses. To delete an email address, simply click |
Show a notification pop-up: This option is to remind users of upcoming events via pop-up messages.
| Field | Description |
|---|---|
| When the event starts in next | The interval time that the pop-up reminder will be repeated before the event starts. |
| Repeat | Tick the checkbox to set the frequency for sending the pop-up message before the event takes place. |
Add more emails
1. Click to open the Select an Email form.
2. Tick checkboxes corresponding to email addresses you want to select;
Or, use the Search function to search for your expected email addresses. Also, to narrow your search results, select the address book where you want to perform your search from the Address Books drop-down menu.
3. Click the Add button to add your selected emails, or click the Replace button to replace existing emails with your selected emails.
The list of your selected email addresses are displayed right below the Also send reminders to field of the Reminders tab.
If you want to invite people to attend an event, go to the Participants tab. This tab contains options to add participants and to send invitation mails.
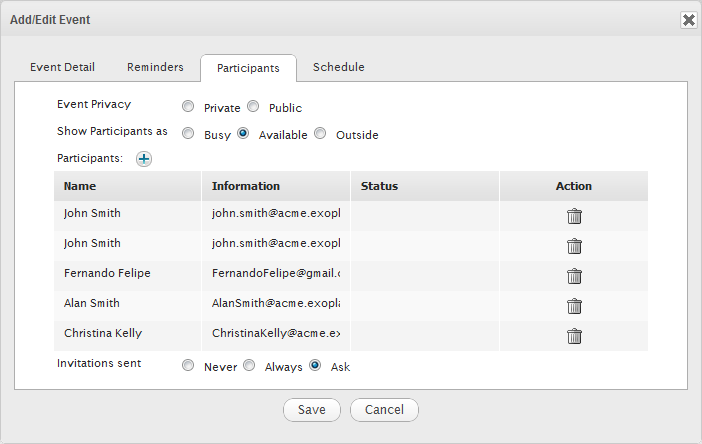
1. Select the privacy of your event by ticking the Private or Public checkbox. At present, public or private has informative meaning only.
2. Set the status of participants during the time when your event takes place.
If Busy or Outside is ticked, the time when the participants take part in the event/task will be in red when viewing the event/task schedule.
If Available is ticked, the time when the participants take part in the event/task will be in white.
3. Select participants who will take part in the event by clicking ![]() to open the Invitations form.
to open the Invitations form.
Here, you can select contacts from your Address Book or users who have registered in the system as follows:
i. Click ![]() or
or ![]() respectively.
respectively.
ii. Select your desired contacts/users by ticking the checkboxes, or do the Search function to find out your contacts/users quickly. Then, click Add to add your selected contacts/users to the Participants pane.
iii. Enter your invitation message into the Invitation Message pane.
iv. Click Save to add your selected contacts/users to the Participants table.
If the Invitation Sent checkbox is ticked, participants will receive invitations via emails. Your selected participants will be updated in the the Participant table. Their statuses, which may be Yes, No or Pending, are listed in the Status column. These statuses depend on the participants' confirmation when they receive invitations: Yes, No or Not sure.
If the participants answer Yes, their statuses will be Yes. It means that the participants accept to join the event.
If the participants answer No, their statuses will be No. It means that the participants will not join the event.
If the participants answer Not sure, their statuses will be Pending. It means that the participants have not decided to take part in the event or not yet.
Click
 in the Action bar to remove one participant from the Participants list.
4. Tick one checkbox corresponding to your desired option of sending invitations to participants in the Invitations sent. This option is loaded by default with the value defined in the Calendar Settings.
Never: Never send the invitation to any participants.
Always: Automatically send the invitation to the participants.
Asked: There will be a confirmation message for you to select.
The participants will receive an invitation mail, for example with the following content, which allows you to import the event directly into their calendars.
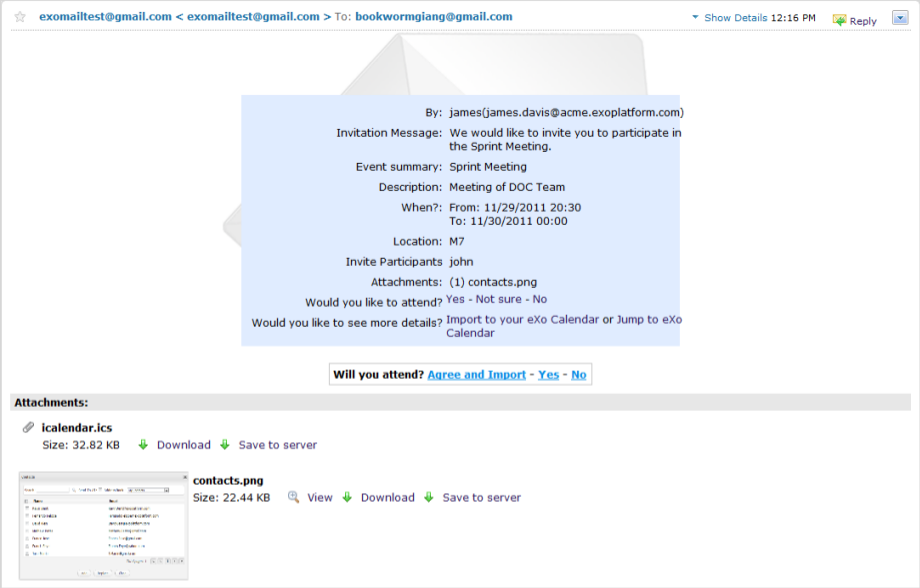
Agree and Import: Accept attending at the event in the invitation mail and importing it into the calendars to remind them of this event.
Yes: Accept attending at the event without importing it into the calendar.
No: Refuse to attend at the event.
View the availability time of participants
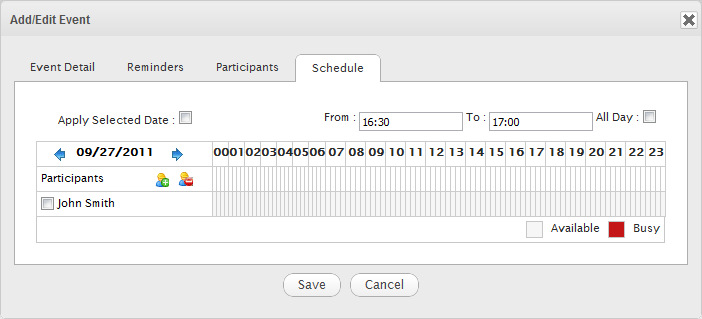
Go to the Schedule tab to check the availability of the participants in a defined slot time. By default, it is the start and end time of the event which you define in the Detail tab. You can easily detect the schedule conflicts to manage the alternate meeting time that works best for all participants.
Note
This function is only for checking the availability of participants, who are the system users. It means that you cannot see the availability of participants who are selected from your Address Book.
Add participants
Click ![]() in the left pane to select users from the Select Users form.
in the left pane to select users from the Select Users form.
Delete participants
Tick the checkboxes corresponding to users in the Participants list, then click ![]() . The deleted users will be removed from the participants list of both Schedule and Participants tabs.
. The deleted users will be removed from the participants list of both Schedule and Participants tabs.
Apply selected date
Note
It is required to have at least 1 user in the Participants list.
1. Enter the time manually into the From and To fields;
Or, tick the All Day checkbox if your event will be hold for all day;
Or, hover your cursor over the time pane to visually select the available time of users. The selected period will become green and the corresponding time will be automatically updated into the From and To fields.
Note
If you do not see any available time for your selected date in the time pane, you can switch to another dates by clicking
![]() /
/
![]() to check another time availability of users.
to check another time availability of users.
2. Click the Apply Selected Date checkbox to accept applying the selected date and time into the Detail tab.