This chapter explains how to configure HornetQ within EAP with live backup-groups. Currently in this version HornetQ only supports shared store for backup nodes so we assume that in the rest of this chapter.
There are 2 main ways to configure HornetQ servers to have a backup server:
Colocated. This is when an EAP instance has both a live and backup(s) running.
Dedicated. This is when an EAP instance has either a live or backup running but never both.
The colocated symmetrical topology will be the most widely used topology, this is where an EAP instance has a live node running plus 1 or more backup node. Each backup node will belong to a live node on another EAP instance. In a simple cluster of 2 EAP instances this would mean that each EAP instance would have a live server and 1 backup server as in diagram1.
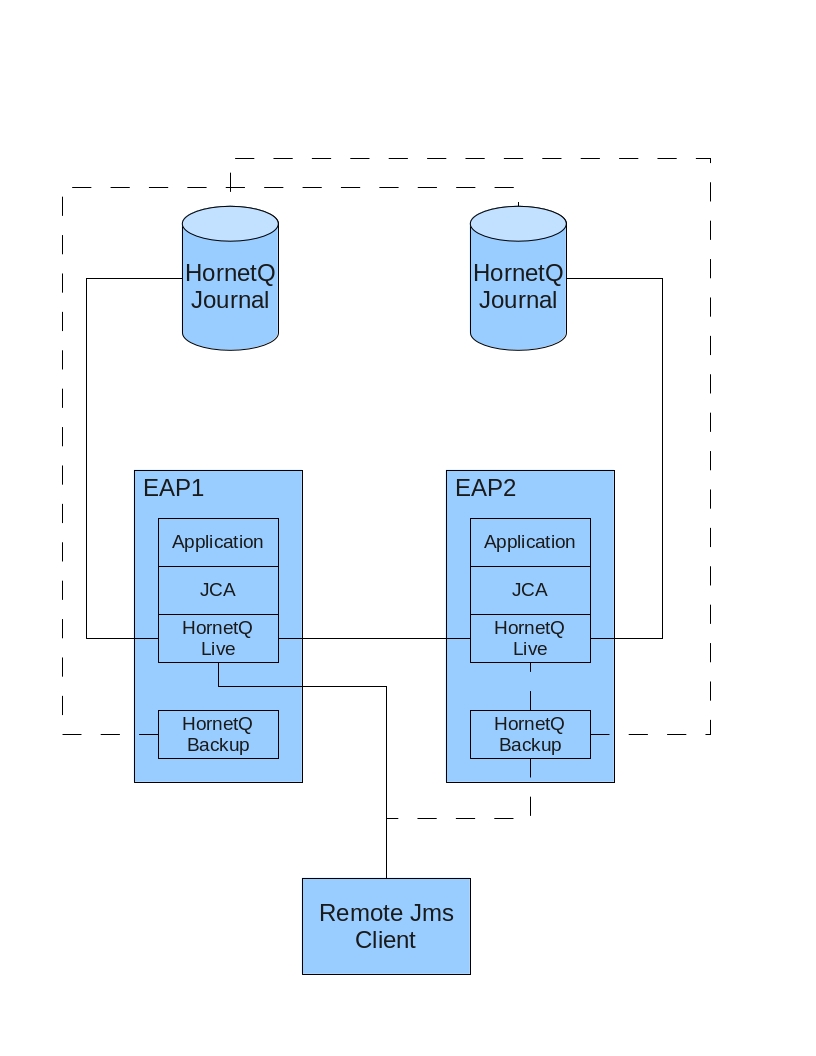
Here the continuous lines show before failover and the dotted lines show the state of the cluster after failover has occurred. To start with the 2 live servers are connected forming a cluster with each live server connected to its local applications (via JCA). Also remote clients are connected to the live servers. After failover the backup connects to the still available live server (which happens to be in the same vm) and takes over as the live server in the cluster. Any remote clients also failover.
One thing to mention is that in that depending on what consumers/producers and MDB's etc are available messages will be distributed between the nodes to make sure that all clients are satisfied from a JMS perspective. That is if a producer is sending messages to a queue on a backup server that has no consumers, the messages will be distributed to a live node elsewhere.
The following diagram is slightly more complex but shows the same configuration with 3 servers. Note that the cluster connections ave been removed to make the configuration clearer but in reality all live servers will form a cluster.
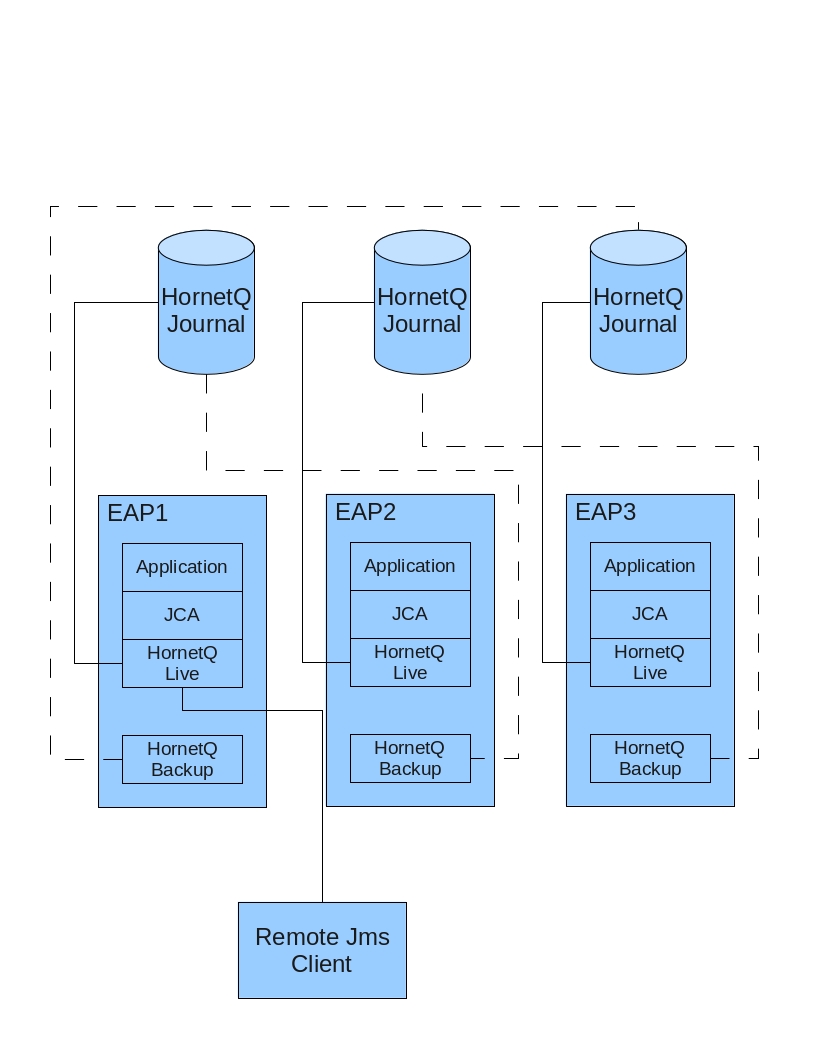
With more than 2 servers it is up to the user as to how many backups per live server are configured, you can have as many backups as required but usually 1 would suffice. In 3 node topology you may have each EAP instance configured with 2 backups in a 4 node 3 backups and so on. The following diagram demonstrates this.

First lets start with the configuration of the live server, we will use the EAP 'all' configuration as
our starting point. Since this version only supports shared store for failover we need to configure
this in the
hornetq-configuration.xml
file like so:
<shared-store>true</shared-store>
Obviously this means that the location of the journal files etc will have to be configured to be some
where
where
this lives backup can access. You may change the lives configuration in
hornetq-configuration.xml
to
something like:
   <large-messages-directory>/media/shared/data/large-messages</large-messages-directory>
   <bindings-directory>/media/shared/data/bindings</bindings-directory>
   <journal-directory>/media/shared/data/journal</journal-directory>
   <paging-directory>/media/shared/data/paging</paging-directory>
How these paths are configured will of course depend on your network settings or file system.
Now we need to configure how remote JMS clients will behave if the server is shutdown in a normal fashion. By default Clients will not failover if the live server is shutdown. Depending on there connection factory settings they will either fail or try to reconnect to the live server.
If you want clients to failover on a normal server shutdown the you must configure the
failover-on-shutdown
flag to true in the
hornetq-configuration.xml
file like so:
<failover-on-shutdown>false</failover-on-shutdown>
Don't worry if you have this set to false (which is the default) but still want failover to occur,
simply
kill
the
server process directly or call
forceFailover
via jmx or the admin console on the core server object.
We also need to configure the connection factories used by the client to be HA. This is done by
adding
certain attributes to the connection factories inhornetq-jms.xml. Lets look at an
example:
   <connection-factory name="NettyConnectionFactory">
      <xa>true</xa>
      <connectors>
         <connector-ref connector-name="netty"/>
      </connectors>
      <entries>
         <entry name="/ConnectionFactory"/>
         <entry name="/XAConnectionFactory"/>
      </entries>

      <ha>true</ha>
      <!-- Pause 1 second between connect attempts -->
      <retry-interval>1000</retry-interval>

      <!-- Multiply subsequent reconnect pauses by this multiplier. This can be used to
      implement an exponential back-off. For our purposes we just set to 1.0 so each reconnect
      pause is the same length -->
      <retry-interval-multiplier>1.0</retry-interval-multiplier>

      <!-- Try reconnecting an unlimited number of times (-1 means "unlimited") -->
      <reconnect-attempts>-1</reconnect-attempts>
   </connection-factory>
We have added the following attributes to the connection factory used by the client:
ha- This tells the client it support HA and must always be true for failover to occurretry-interval- this is how long the client will wait after each unsuccessful reconnect to the serverretry-interval-multiplier- is used to configure an exponential back off for reconnect attemptsreconnect-attempts- how many reconnect attempts should a client make before failing, -1 means unlimited.
Now lets look at how to create and configure a backup server on the same eap instance. This is running on the same eap instance as the live server from the previous chapter but is configured as the backup for a live server running on a different eap instance.
The first thing to mention is that the backup only needs a hornetq-jboss-beans.xml
and a hornetq-configuration.xml configuration file. This is because any JMS components
are created from the Journal when the backup server becomes live.
Firstly we need to define a new HornetQ Server that EAP will deploy. We do this by creating a new
hornetq-jboss-beans.xml
configuration. We will place this under a new directory
hornetq-backup1
which will need creating
in the
deploy
directory but in reality it doesn't matter where this is put. This will look like:
   <?xml version="1.0" encoding="UTF-8"?>

   <deployment xmlns="urn:jboss:bean-deployer:2.0">

      <!-- The core configuration -->
      <bean name="BackupConfiguration" class="org.hornetq.core.config.impl.FileConfiguration">
         <property
            name="configurationUrl">${jboss.server.home.url}/deploy/hornetq-backup1/hornetq-configuration.xml</property>
      </bean>


      <!-- The core server -->
      <bean name="BackupHornetQServer" class="org.hornetq.core.server.impl.HornetQServerImpl">
         <constructor>
            <parameter>
               <inject bean="BackupConfiguration"/>
            </parameter>
            <parameter>
               <inject bean="MBeanServer"/>
            </parameter>
            <parameter>
               <inject bean="HornetQSecurityManager"/>
            </parameter>
         </constructor>
         <start ignored="true"/>
         <stop ignored="true"/>
      </bean>

      <!-- The JMS server -->
      <bean name="BackupJMSServerManager" class="org.hornetq.jms.server.impl.JMSServerManagerImpl">
         <constructor>
            <parameter>
               <inject bean="BackupHornetQServer"/>
            </parameter>
         </constructor>
      </bean>

   </deployment>
The first thing to notice is the BackupConfiguration bean. This is configured to pick up the configuration for the server which we will place in the same directory.
After that we just configure a new HornetQ Server and JMS server.
Note
Notice that the names of the beans have been changed from that of the live servers configuration. This is so there is no clash. Obviously if you add more backup servers you will need to rename those as well, backup1, backup2 etc.
Now lets add the server configuration in
hornetq-configuration.xml
and add it to the same directory
deploy/hornetq-backup1
and configure it like so:
   <configuration xmlns="urn:hornetq"
   xmlns:xsi="http://www.w3.org/2001/XMLSchema-instance"
   xsi:schemaLocation="urn:hornetq /schema/hornetq-configuration.xsd">

      <jmx-domain>org.hornetq.backup1</jmx-domain>

      <clustered>true</clustered>

      <backup>true</backup>

      <shared-store>true</shared-store>

      <allow-failback>true</allow-failback>

      <log-delegate-factory-class-name>org.hornetq.integration.logging.Log4jLogDelegateFactory</log-delegate-factory-class-name>

      <bindings-directory>/media/shared/data/hornetq-backup/bindings</bindings-directory>

      <journal-directory>/media/shared/data/hornetq-backup/journal</journal-directory>

      <journal-min-files>10</journal-min-files>

      <large-messages-directory>/media/shared/data/hornetq-backup/largemessages</large-messages-directory>

      <paging-directory>/media/shared/data/hornetq-backup/paging</paging-directory>

      <connectors>
         <connector name="netty-connector">
            <factory-class>org.hornetq.core.remoting.impl.netty.NettyConnectorFactory</factory-class>
            <param key="host" value="${jboss.bind.address:localhost}"/>
            <param key="port" value="${hornetq.remoting.backup.netty.port:5446}"/>
         </connector>

         <connector name="in-vm">
            <factory-class>org.hornetq.core.remoting.impl.invm.InVMConnectorFactory</factory-class>
            <param key="server-id" value="${hornetq.server-id:0}"/>
         </connector>

      </connectors>

      <acceptors>
         <acceptor name="netty">
            <factory-class>org.hornetq.core.remoting.impl.netty.NettyAcceptorFactory</factory-class>
            <param key="host" value="${jboss.bind.address:localhost}"/>
            <param key="port" value="${hornetq.remoting.backup.netty.port:5446}"/>
         </acceptor>
      </acceptors>

      <broadcast-groups>
         <broadcast-group name="bg-group1">
            <group-address>231.7.7.7</group-address>
            <group-port>9876</group-port>
            <broadcast-period>1000</broadcast-period>
            <connector-ref>netty-connector</connector-ref>
         </broadcast-group>
      </broadcast-groups>

      <discovery-groups>
         <discovery-group name="dg-group1">
            <group-address>231.7.7.7</group-address>
            <group-port>9876</group-port>
            <refresh-timeout>60000</refresh-timeout>
            </discovery-group>
      </discovery-groups>

      <cluster-connections>
         <cluster-connection name="my-cluster">
            <address>jms</address>
            <connector-ref>netty-connector</connector-ref>
            <discovery-group-ref discovery-group-name="dg-group1"/>
            <!--max hops defines how messages are redistributed, the default is 1 meaning only distribute to directly
            connected nodes, to disable set to 0-->
            <!--<max-hops>0</max-hops>-->
         </cluster-connection>
      </cluster-connections>

      <security-settings>
         <security-setting match="#">
            <permission type="createNonDurableQueue" roles="guest"/>
            <permission type="deleteNonDurableQueue" roles="guest"/>
            <permission type="consume" roles="guest"/>
            <permission type="send" roles="guest"/>
         </security-setting>
      </security-settings>

      <address-settings>
         <!--default for catch all-->
         <address-setting match="#">
            <dead-letter-address>jms.queue.DLQ</dead-letter-address>
            <expiry-address>jms.queue.ExpiryQueue</expiry-address>
            <redelivery-delay>0</redelivery-delay>
            <max-size-bytes>10485760</max-size-bytes>
            <message-counter-history-day-limit>10</message-counter-history-day-limit>
            <address-full-policy>BLOCK</address-full-policy>
         </address-setting>
      </address-settings>

   </configuration>
The second thing you can see is we have added a
jmx-domain
attribute, this is used when
adding objects, such as the HornetQ server and JMS server to jmx, we change this from the default
org.hornetq
to avoid naming clashes with the live server
The first important part of the configuration is to make sure that this server starts as a backup
server not
a live server, via the
backup
attribute.
After that we have the same cluster configuration as live, that is
clustered
is true and
shared-store
is true. However you can see we have added a new configuration element
allow-failback. When this is set to true then this backup server will automatically
stop
and fall back into backup node if failover occurs and the live server has become available. If false
then
the user will have to stop the server manually.
Next we can see the configuration for the journal location, as in the live configuration this must point to the same directory as this backup's live server.
Now we see the connectors configuration, we have 3 defined which are needed for the following
netty-connector.This is the connector used to connect to this backup server once live.
After that you will see the acceptors defined, This is the acceptor where clients will reconnect.
The Broadcast groups, Discovery group and cluster configurations are as per normal, details of these can be found in the HornetQ user manual.
Note
notice the commented out max-hops in the cluster connection, set this to 0 if
you want to disable server side load balancing.
When the backup becomes it will be not be servicing any JEE components on this eap instance. Instead any existing messages will be redistributed around the cluster and new messages forwarded to and from the backup to service any remote clients it has (if it has any).
In this instance we have assumed that there are only 2 nodes where each node has a backup for the other node. However you may want to configure a server too have multiple backup nodes. For example you may want 3 nodes where each node has 2 backups, one for each of the other 2 live servers. For this you would simply copy the backup configuration and make sure you do the following:
Make sure that you give all the beans in the
hornetq-jboss-beans.xmlconfiguration file a unique name, i.e.
In reality the configuration for this is exactly the same as the backup server in the previous section, the only difference is that a backup will reside on an eap instance of its own rather than colocated with another live server. Of course this means that the eap instance is passive and not used until the backup comes live and is only really useful for pure JMS applications.
The following diagram shows a possible configuration for this:
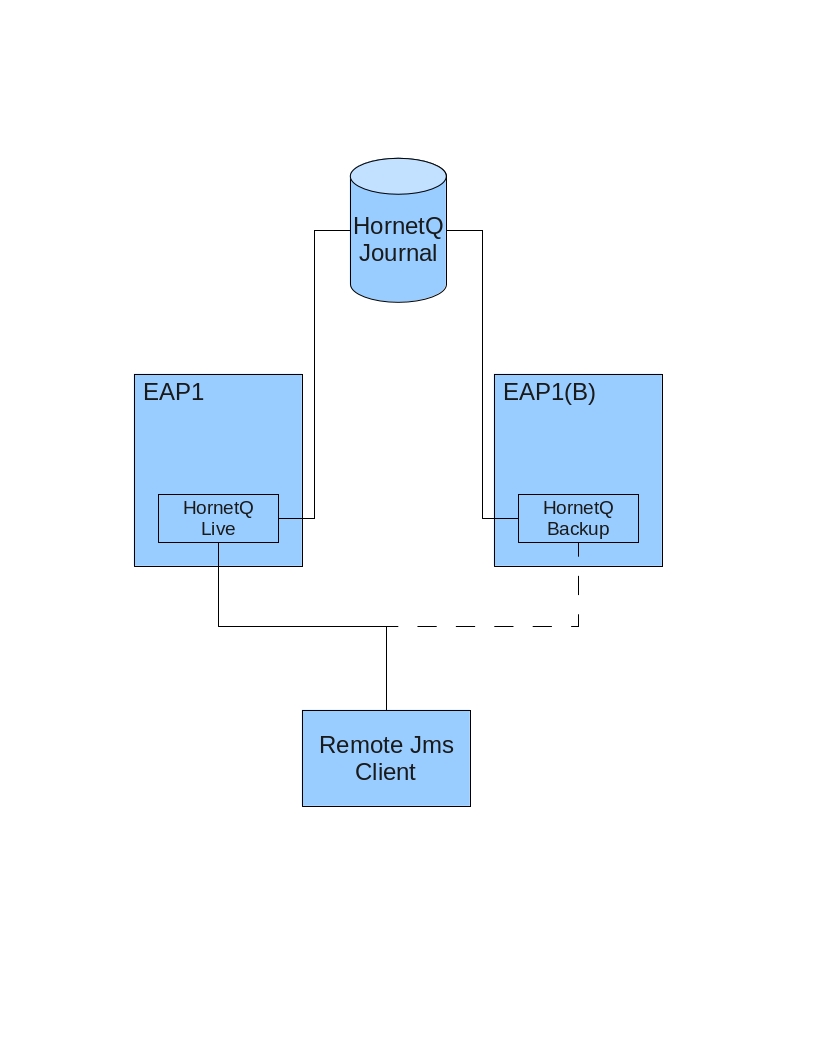
Here you can see how this works with remote JMS clients. Once failover occurs the HornetQ backup Server takes running within another eap instance takes over as live.
This is fine with applications that are pure JMS and have no JMS components such as MDB's. If you are using JMS components then there are 2 ways that this can be done. The first is shown in the following diagram:
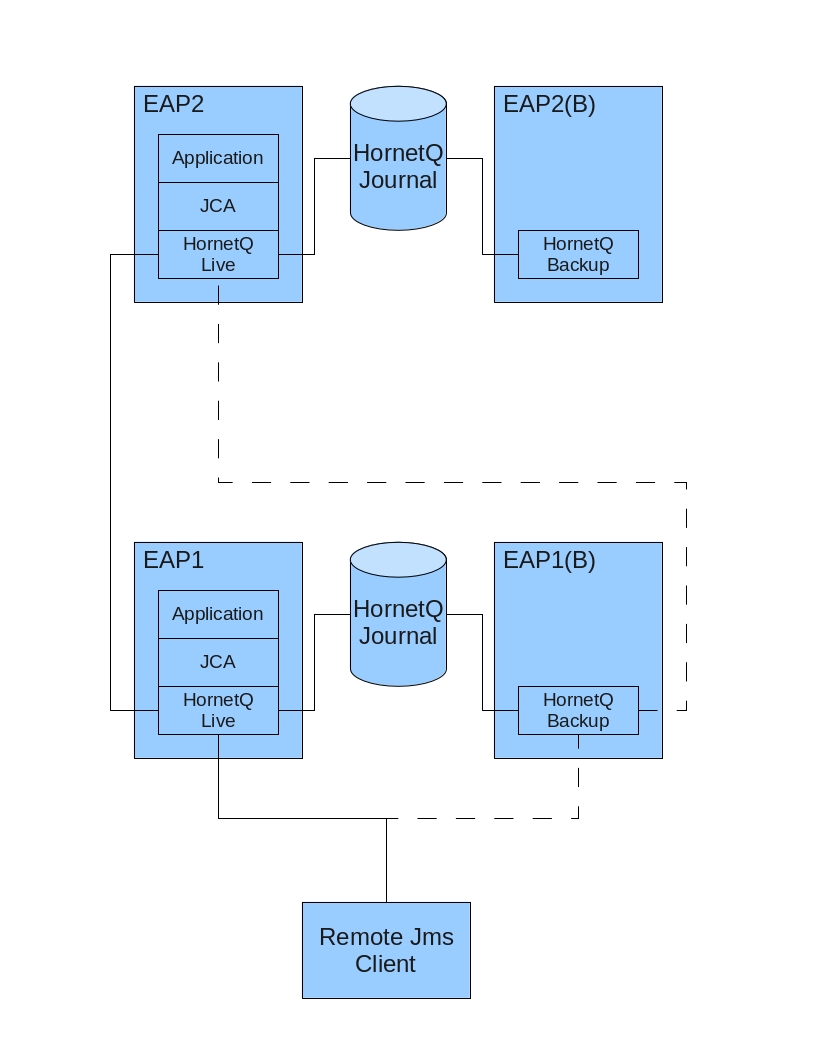
Because there is no live hornetq server running by default in the eap instance running the backup server it makes no sense to host any applications in it. However you can host applications on the server running the live hornetq server. If failure occurs to an live hornetq server then remote jms clients will failover as previously explained however what happens to any messages meant for or sent from JEE components. Well when the backup comes live, messages will be distributed to and from the backup server over HornetQ cluster connections and handled appropriately.
The second way to do this is to have both live and backup server remote form the eap instance as shown in the following diagram.
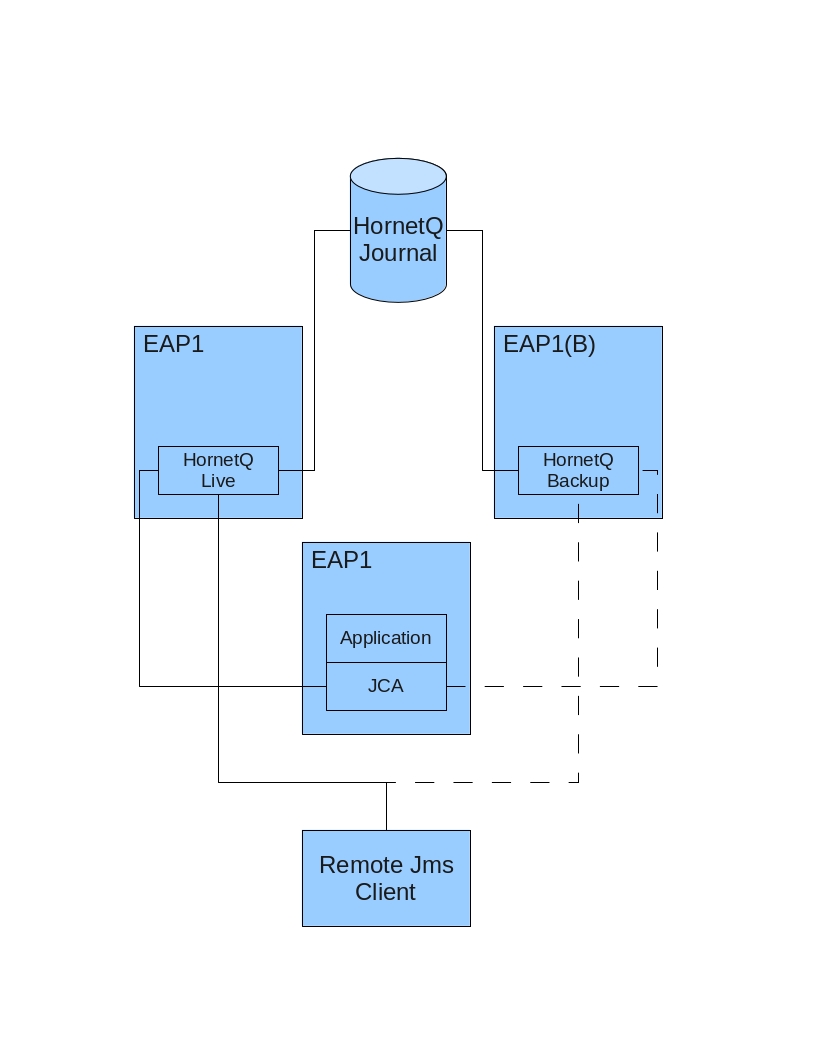
Here you can see that all the Application (via JCA) will be serviced by a HornetQ server in its own eap instance.
The live server configuration is exactly the same as in the previous example. The only difference of course is that there is no backup in the eap instance.
For the backup server the hornetq-configuration.xml is unchanged, however since there is
no live server we need to make sure that the hornetq-jboss-beans.xml instantiates all
the beans needed. For this simply use the same configuration as in the live server changing only the
location of the hornetq-configuration.xml parameter for the Configuration
bean.
As before there will be no hornetq-jms.xml or jms-ds.xml configuration.
If you want both hornetq servers to be in there own dedicated server where they are remote to applications,
as in the last diagram. Then simply edit the jms-ds.xml and change the following lines to
   <config-property name="ConnectorClassName" type="java.lang.String">org.hornetq.core.remoting.impl.netty.NettyConnectorFactory</config-property>
   <config-property name="ConnectionParameters" type="java.lang.String">host=127.0.0.1;port=5446</config-property>
This will change the outbound JCA connector, to configure the inbound connector for MDB's edit the
ra.xml config file and change the following parameters.
   <config-property>
      <description>The transport type</description>
      <config-property-name>ConnectorClassName</config-property-name>
      <config-property-type>java.lang.String</config-property-type>
      <config-property-value>org.hornetq.core.remoting.impl.netty.NettyConnectorFactory</config-property-value>
   </config-property>
   <config-property>
      <description>The transport configuration. These values must be in the form of key=val;key=val;</description>
      <config-property-name>ConnectionParameters</config-property-name>
      <config-property-type>java.lang.String</config-property-type>
      <config-property-value>host=127.0.0.1;port=5446</config-property-value>
   </config-property>
In both cases the host and port should match your live server. If you are using Discovery then set the
appropriate parameters for DiscoveryAddress and DiscoveryPort to match
your configured broadcast groups.