One of the goals of jBPM is to allow users to extend the default process constructs with domain-specific extensions that simplify development in a particular application domain. This tutorial describes how to take your first steps towards domain-specific processes. Note that you don't need to be a jBPM expert to define your own domain-specific nodes, this should be considered integration code that a normal developer with some experience in jBPM can do himself.
Most process languages offer some generic action (node) construct that allows plugging in custom user actions. However, these actions are usually low-level, where the user is required to write custom code to implement the work that should be incorporated in the process. The code is also closely linked to a specific target environment, making it difficult to reuse the process in different contexts.
Domain-specific languages are targeted to one particular application domain and therefore can offer constructs that are closely related to the problem the user is trying to solve. This makes the processes and easier to understand and self-documenting. We will show you how to define domain-specific work items (also called service nodes), which represent atomic units of work that need to be executed. These service nodes specify the work that should be executed in the context of a process in a declarative manner, i.e. specifying what should be executed (and not how) on a higher level (no code) and hiding implementation details.
So we want service nodes that are:
domain-specific
declarative (what, not how)
high-level (no code)
customizable to the context
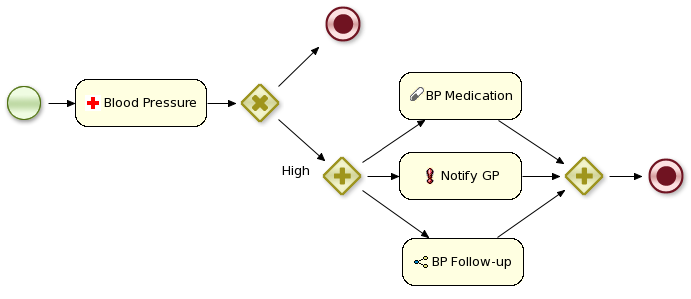
Users can easily define their own set of domain-specific service nodes and integrate them in our process language. For example, the next figure shows an example of a process in a healthcare context. The process includes domain-specific service nodes for ordering nursing tasks (e.g. measuring blood pressure), prescribing medication and notifying care providers.
Let's start by showing you how to include a simple work item for sending notifications. A work item represent an atomic unit of work in a declarative way. It is defined by a unique name and additional parameters that can be used to describe the work in more detail. Work items can also return information after they have been executed, specified as results. Our notification work item could thus be defined using a work definition with four parameters and no results:
  Name: "Notification"
  Parameters
  From [String]
  To [String]
  Message [String]
  Priority [String]
All work definitions must be specified in one or more configuration files in the project classpath, where all the properties are specified as name-value pairs. Parameters and results are maps where each parameter name is also mapped to the expected data type. Note that this configuration file also includes some additional user interface information, like the icon and the display name of the work item.
In our example we will use MVEL for reading in the configuration file, which allows us to do more advanced configuration files. This file must be placed in the project classpath in a directory called META-INF. Our MyWorkDefinitions.wid file looks like this:
import org.drools.process.core.datatype.impl.type.StringDataType;
[
  // the Notification work item
  [
    "name" : "Notification",
    "parameters" : [
      "Message" : new StringDataType(),
      "From" : new StringDataType(),
      "To" : new StringDataType(),
      "Priority" : new StringDataType(),
    ],
    "displayName" : "Notification",
    "icon" : "icons/notification.gif"
  ]

]
The project directory structure could then look something like this:
project/src/main/resources/META-INF/MyWorkDefinitions.wid
You might now want to create your own icons to go along with your new work definition. To add these you will need .gif or .png images with a pixel size of 16x16. Place them in a directory outside of the META-INF directory, for example as follows:
project/src/main/resources/icons/notification.gif
The configuration API can be used to register work definition files for your project using the drools.workDefinitions property, which represents a list of files containing work definitions (separated usings spaces). For example, include a drools.rulebase.conf file in the META-INF directory of your project and add the following line:
drools.workDefinitions = MyWorkDefinitions.wid
This will replace the default domain specific node types EMAIL and LOG with the newly defined NOTIFICATION node in the process editor. Should you wish to just add a newly created node definition to the existing palette nodes, adjust the drools.workDefinitions property as follows including the default set configuration file:
drools.workDefinitions = MyWorkDefinitions.wid WorkDefinitions.conf
It is recommended to use extension .wid for your own definitions of domain specific nodes. Do not be confused with extension .conf, it is used only for backward compatibility.
Once our work definition has been created and registered, we can start using it in our processes. The process editor contains a separate section in the palette where the different service nodes that have been defined for the project appear.
Using drag and drop, a notification node can be created inside your process. The properties can be filled in using the properties view.
Apart from the properties defined by this work item, all work items also have these three properties:
Parameter Mapping: Allows you to map the value of a variable in the process to a parameter of the work item. This allows you to customize the work item based on the current state of the actual process instance (for example, the priority of the notification could be dependent of some process-specific information).
Result Mapping: Allows you to map a result (returned once a work item has been executed) to a variable of the process. This allows you to use results in the remainder of the process.
Wait for completion: By default, the process waits until the requested work item has been completed before continuing with the process. It is also possible to continue immediately after the work item has been requested (and not waiting for the results) by setting "wait for completion" to false.
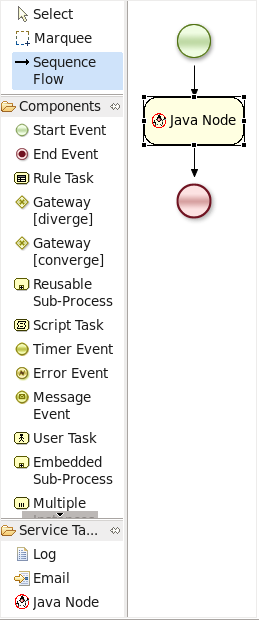
Here is an example that creates a domain specific node to execute Java, asking for the class and method parameters. It includes a custom java.gif icon and consists of the following files and resulting screenshot:
import org.drools.process.core.datatype.impl.type.StringDataType;
[
  // the Java Node work item located in:
  // project/src/main/resources/META-INF/JavaNodeDefinition.conf
  [
    "name" : "JavaNode",
    "parameters" : [
      "class" : new StringDataType(),
      "method" : new StringDataType(),
    ],
    "displayName" : "Java Node",
    "icon" : "icons/java.gif"
  ]

]
// located in: project/src/main/resources/META-INF/drools.rulebase.conf
//
  drools.workDefinitions = JavaNodeDefinition.conf WorkDefinitions.conf

// icon for java.gif located in:
// project/src/main/resources/icons/java.gif
The jBPM engine contains a WorkItemManager that is responsible for executing work items whenever necessary. The WorkItemManager is responsible for delegating the work items to WorkItemHandlers that execute the work item and notify the WorkItemManager when the work item has been completed. For executing notification work items, a NotificationWorkItemHandler should be created (implementing the WorkItemHandler interface):
package com.sample;


import org.drools.runtime.process.WorkItem;

import org.drools.runtime.process.WorkItemHandler;

import org.drools.runtime.process.WorkItemManager;


public class NotificationWorkItemHandler implements WorkItemHandler {


  public void executeWorkItem(WorkItem workItem, WorkItemManager manager) {

    // extract parameters

    String from = (String) workItem.getParameter("From");

    String to = (String) workItem.getParameter("To");

    String message = (String) workItem.getParameter("Message");

    String priority = (String) workItem.getParameter("Priority");

    // send email

    EmailService service = ServiceRegistry.getInstance().getEmailService();

    service.sendEmail(from, to, "Notification", message);

    // notify manager that work item has been completed

    manager.completeWorkItem(workItem.getId(), null);

  }


  public void abortWorkItem(WorkItem workItem, WorkItemManager manager) {

    // Do nothing, notifications cannot be aborted

  }


}
This WorkItemHandler sends a notification as an email and then immediately notifies the WorkItemManager that the work item has been completed. Note that not all work items can be completed directly. In cases where executing a work item takes some time, execution can continue asynchronously and the work item manager can be notified later. In these situations, it might also be possible that a work item is being aborted before it has been completed. The abort method can be used to specify how to abort such work items.
WorkItemHandlers should be registered at the WorkItemManager, using the following API:
ksession.getWorkItemManager().registerWorkItemHandler(

    "Notification", new NotificationWorkItemHandler());
Decoupling the execution of work items from the process itself has the following advantages:
The process is more declarative, specifying what should be executed, not how.
Changes to the environment can be implemented by adapting the work item handler. The process itself should not be changed. It is also possible to use the same process in different environments, where the work item handler is responsible for integrating with the right services.
It is easy to share work item handlers across processes and projects (which would be more difficult if the code would be embedded in the process itself).
Different work item handlers could be used depending on the context. For example, during testing or simulation, it might not be necessary to actually execute the work items. In this case specialized dummy work item handlers could be used during testing.
A lot of these domain-specific services are generic, and can be reused by a lot of different users. Think for example about integration with Twitter, doing file system operations or sending email. Once such a domain-specific service has been created, you might want to make it available to other users so they can easily import and start using it.
A service repository allows you to import services by browsing the repository looking for services you might need and importing these services into your workspace. These will then automatically be added to your palette and you can start using them in your processes. You can also import additional artefacts like for example an icon, any dependencies you might need, a default handler that will be used to execute the service (although you're always free to override the default, for example for testing), etc.
To browse the repository, open the wizard to import services, point it to the right location (this could be to a directory in your file system but also a public or private URL) and select the services you would like to import. For example, in Eclipse, right-click your project that contains your processes and select "Configure ... -> Import jBPM services ...". This will open up a repository browser. In the URL field, fill in the URL of your repository (see below for the URL of the public jBPM repository that hosts some common service implementations out-of-the-box), or use the "..." button to browse to a folder on your file system. Click the Get button to retrieve the contents of that repository.
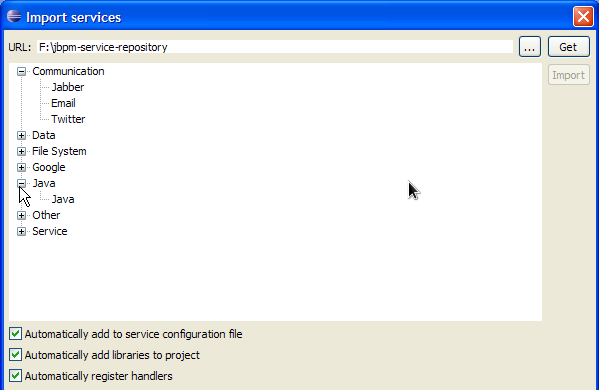
Select the service you would like to import and then click the Import button. Note that the Eclipse wizard allows you to define whether you would like to automatically configure the service (so it shows up in the palette of your processes), whether you would also like to download any dependencies that might be needed for executing the service and/or whether you would like to automatically register the default handler, so make sure to mark the right checkboxes before importing your service (if you are unsure what to do, leaving all check boxes marked is probably best).
After importing your service, (re)open your process diagram and the new service should show up in your palette and you can start using it in your process. Note that most services also include documentation on how to use them (e.g. what the different input and output parameters are) when you select them browsing the service repository.
Click on the image below to see a screencast where we import the twitter service in a new jBPM project and create a simple process with it that sends an actual tweet. Note that you need the necessary twitter keys and secrets to be able to programatically send tweets to your twitter account. How to create these is explained here, but once you have these, you can just drop them in your project using a simple configuration file.
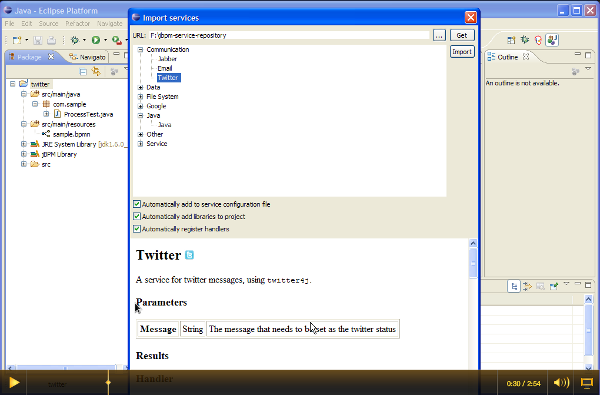
Figure 14.1.
We are building a public service repository that contains predefined services that people can use out-of-the-box if they want to:
http://people.redhat.com/kverlaen/repository
This repository contains some integrations for common services like Twitter integration or file system operations that you can import. Simply point the import wizard to this URL to start browsing the repository.
If you have an implementation of a common service that you would like to contribute to the community, do not hesitate to contact someone from the development team. We are always looking for contributions to extend our repository.
You can set up your own service repository and add your own services by creating a configuration file that contains the necessary information (this is an extended version of the normal work definition configuration file as described earlier in this chapter) and putting the necessary files (like an icon, dependencies, documentation, etc.) in the right folders.
The extended configuration file contains the normal properties (like name, parameters, results and icon), with some additional ones. For example, the following extended configuration file describes the Twitter integration service (as shown in the screencast above):
import org.drools.process.core.datatype.impl.type.StringDataType;
[
  [
    "name" : "Twitter",
    "description" : "Send a twitter message",
    "parameters" : [
    	"Message" : new StringDataType()
    ],
    "displayName" : "Twitter",
    "eclipse:customEditor" : "org.drools.eclipse.flow.common.editor.editpart.work.SampleCustomEditor",
    "icon" : "twitter.gif",
    "category" : "Communication",
    "defaultHandler" : "org.jbpm.process.workitem.twitter.TwitterHandler",
    "documentation" : "index.html",
    "dependencies" : [
      "file:./lib/jbpm-twitter.jar",
      "file:./lib/twitter4j-core-2.2.2.jar"
    ]
  ]
]
- The icon property should refer to a file with the given file name in the same folder as the extended configuration file (so it can be downloaded by the import wizard and used in the process diagrams). Icons should be 16x16 GIF files.
- The category property defines the category this service should be placed under when browsing the repository.
- The defaultHandler property defines the default handler implementation (i.e. the Java
class that implements the
WorkItemHandlerinterface and can be used to execute the service). This can automatically be registered as the handler for that service when importing the service from the repository. - The documentation property defines a documentation file that describes what the service does and how it works. This property should refer to a HTML file with the given name in the same folder as the extended configuration file (so it can be shown by the import wizard when browsing the repository).
- The dependencies property defines additional dependencies that are necessary to execute this service. This usually includes the handler implementation jar, but could also include additional external dependencies. These dependencies should also be located on the repository on the given location (relative to the folder where the extended configuration file is located), so they can be downloaded by the import wizard when importing the service.
The root of your repository should also contain an index.conf file that
references all the folders that should be processed when searching for services on the repository.
Each of those folders should then contain:
- An extended configuration file with the same name as the folder (e.g.
Twitter.conf) - The icon as references in the configuration file
- The documentation as references in the configuration file
- The dependencies as references in the configuration file (for example in a lib folder)
You can create your own hierarchical structure, because if one of those folders also contains an
index.conf file, that will be used to scan additional sub-folders. Note that the
hierarchical structure of the repository is not shown when browsing the repository using the import
wizard, as the category property in the configuration file is used for that.