Depending on your needs, there are several different methods to install JBoss
Portal. Pre-configured clustered versions (
JBoss Portal Binary (Clustered)
) are available from the
JBoss Portal Downloads
page. Clustered versions of JBoss Portal must be deployed in the
JBOSS_INSTALLATION_DIRECTORY/server/all/deploy/
directory. All JBoss AS instances must reference the same datasource. Refer to
Section 2.3.2.2, “Operating System Environment Settings”
for details on how to configure JBoss Portal for clustering.
An environment variable,
JBOSS_HOME
, is configured in
Section 2.3.2.2, “Operating System Environment Settings”
. References to
$JBOSS_HOME
assume this to be your
JBOSS_INSTALLATION_DIRECTORY
.
This is the easiest and fastest way to get JBoss Portal installed and running. The JBoss Portal and JBoss AS bundle contains JBoss AS, JBoss Portal, and the embedded Hypersonic SQL database. To install the JBoss Portal and JBoss AS bundle:
Get the bundle: the bundle is available from the JBoss Portal Downloads page. Bundles use the
JBoss Portal + JBoss ASnaming convention.Extract the bundle: extract the ZIP archive. It does not matter which directory is used. On Windows, the recommended directory is
C:\jboss-.version-numberStart the server: change into the
JBOSS_PORTAL_INSTALLATION_DIRECTORY/bin/directory. On Windows, executerun.bat. On Linux, run thesh run.shcommand. To specify a configuration to use, for example, the default configuration, append the-c defaultoption to therun.batorsh run.shcommands.Log in to JBoss Portal: using a Web browser, navigate to http://localhost:8080/portal to open the JBoss Portal homepage. Log in using one of the two default accounts: username user , password user , or username admin , password admin :
SQL Errors
Tables are automatically created the first time JBoss Portal starts. When deployed for the first time, JBoss Portal checks for the existence of the initial tables, which have not been created yet. This causes errors such as the following, which can safely be ignored:
WARN  [JDBCExceptionReporter] SQL Error: -22, SQLState: S0002
ERROR [JDBCExceptionReporter] Table not found in statement ...
WARN  [JDBCExceptionReporter] SQL Error: 1146, SQLState: 42S02
ERROR [JDBCExceptionReporter] Table 'jbossportal.jbp_cms_repositoryentry' doesn't exist
WARN  [JDBCExceptionReporter] SQL Error: 1146, SQLState: 42S02
ERROR [JDBCExceptionReporter] Table 'jbossportal.jbp_cms_version_refs' doesn't exist
The binary package typically consists of the
jboss-portal.sar/
directory, documentation such as the JBoss Portal User Guide and the JBoss Portal
Reference Guide, and a set of pre-configured Datasource descriptors that allow
JBoss Portal to communicate with an external database. This installation method
is recommended for users who already have JBoss EAP or JBoss AS installed, or
those who need to install JBoss Portal in a clustered environment.
The binary download is available from the
JBoss Portal Downloads
page. Look for the
JBoss Portal Binary
package. Once the binary ZIP file has been downloaded and extracted, the
folder hierarchy will look similar to the following:
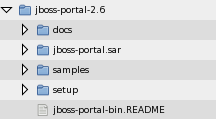
Files contained in this download are used in later sections. Download and extract the JBoss Portal binary ZIP file before proceeding.
Before deploying JBoss Portal, make sure you have JBoss EAP or JBoss AS installed. Customers who have access to the JBoss Customer Support Portal (CSP) are advised to download and install JBoss EAP 4.3. Customers who do not have access to the JBoss CSP are advised to use JBoss AS . For JBoss AS installation instructions, please refer to the JBoss AS Installation Guide .
Use the JBoss EAP and JBoss AS ZIP file
Only use the JBoss EAP and JBoss AS ZIP file versions. DO NOT ATTEMPT to deploy JBoss Portal on the installer version of JBoss EAP or JBoss AS.
For JBoss EAP, JBoss AS, and build targets to work, you must configure a
JBOSS_HOME
environment variable. This environment variable must point to the root
directory of the JBoss EAP or JBoss AS installation directory, which is the
directory where the JBoss EAP or JBoss AS files were extracted to.
On Windows, this is accomplished by going to
Start > Settings > Control Panel > System > Advanced > Environment
Variables
. Under the
System Variables
section, click
New
. Set the
JBOSS_HOME
environment variable to the location of your JBoss EAP or JBoss AS
installation directory:
To configure the
JBOSS_HOME
environment variable on Linux:
Add the following line to the
~/.bashrcfile. Note: this must be configured while logged in as the user who runs JBoss EAP or JBoss AS:export JBOSS_HOME=/path/to/jboss/installation/Run the following command to enable the
JBOSS_HOMEenvironment variable:source ~/.bashrc
JBoss EAP
JBOSS_HOME
Environment Variable
If you are running JBoss EAP, configure the
JBOSS_HOME
environment variable to point to the
/path/to/jboss-eap-
directory.
version
/jboss-as/
A database is required for JBoss Portal to run. JBoss EAP and JBoss AS include an embedded Hypersonic SQL database that JBoss Portal can use; however, this is only recommended for developer use. The following databases are recommended for production use, and have had test suites run against them: MySQL® 4 and 5, Microsoft® SQL Server® , PostgreSQL 8, and Oracle® Database 9 and 10. JBoss Portal can use any database that is supported by Hibernate.
To configure a database to use with JBoss Portal:
Create a new database: this guide assumes that the new database is called jbossportal .
Grant access rights for a user to the jbossportal database: JBoss Portal needs to create tables and modify table data. Grant access rights to a desired user to the jbossportal database. Configure the same username and password in the Datasource descriptor.
Deploy an RDBMS JDBC™ connector: an RDBMS JDBC connector is required for JBoss Portal to communicate with a database. Copy the connector into the
$JBOSS_HOME/server/default/lib/directory. For example, an RDBMS JDBC connector for MySQL can be download from http://www.mysql.com/products/connector/j/ . For the correct RDMBS JDBC connector, please refer to the database documentation.
The JBoss Portal binary download that was extracted in
Section 2.2.1.1, “Getting the Binary”
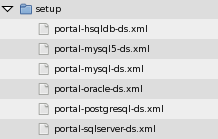
, contains pre-configured Datasource descriptors for the more popular
databases. Datasource descriptors are provided for the MySQL 4 and 5,
PostgreSQL, Microsoft SQL Server, and Oracle databases, and can be found in
the
setup
subdirectory where the JBoss Portal binary was extracted to:
Copy the Datasource descriptor that matches your database into the
$JBOSS_HOME/server/
directory, where
configuration
/deploy/
configuration
is either all, default, minimal or production. The production configuration
only exists on JBoss EAP, and not JBoss AS. For example, if you are using
the all configuration, copy the Datasource descriptor into the
$JBOSS_HOME/server/all/deploy/
directory.
After the Datasource descriptor has been copied into the
deploy
directory, make sure the
user-name
,
password
,
connection-url
, and
driver-class
, are correct for your chosen database. Datasource descriptor files can be
deployed to test before being used in production. The following is an
example Datasource descriptor for a PostgreSQL database:
               <?xml version="1.0" encoding="UTF-8"?>

<datasources>

  <local-tx-datasource>

    <jndi-name>PortalDS</jndi-name>

    <connection-url>jdbc:postgresql:jbossportal</connection-url>

    <driver-class>org.postgresql.Driver</driver-class>

    <user-name>portal</user-name>

    <password>portalpassword</password>

  </local-tx-datasource>

</datasources>
For further details about Datasource descriptors, please refer to the JBoss JDBC Datasource Wiki page .
To start JBoss EAP or JBoss AS and deploy JBoss Portal:
Datasource descriptor: if you have not done so already, change into the
setupsubdirectory where the JBoss Portal binary was extracted to. Copy the correct Datasource descriptor file (*-ds.xml) you modified in the previous steps into the$JBOSS_HOME/server/directory.configuration/deploy/Start the server: change into the
$JBOSS_HOME/bin/directory. On Windows, executerun.bat. On Linux, run thesh run.shcommand. To specify a configuration to use, for example, the default configuration, append the-c defaultoption to therun.batorsh run.shcommands.Log in to JBoss Portal: using a Web browser, navigate to http://localhost:8080/portal to open the JBoss Portal homepage. Log in using one of the two default accounts: username user , password user , or username admin , password admin .
SQL Errors
Tables are automatically created the first time JBoss Portal starts. When deployed for the first time, JBoss Portal checks for the existence of the initial tables, which have not been created yet. This causes errors such as the following, which can safely be ignored:
WARN  [JDBCExceptionReporter] SQL Error: -22, SQLState: S0002
ERROR [JDBCExceptionReporter] Table not found in statement ...
WARN  [JDBCExceptionReporter] SQL Error: 1146, SQLState: 42S02
ERROR [JDBCExceptionReporter] Table 'jbossportal.jbp_cms_repositoryentry' doesn't exist
WARN  [JDBCExceptionReporter] SQL Error: 1146, SQLState: 42S02
ERROR [JDBCExceptionReporter] Table 'jbossportal.jbp_cms_version_refs' doesn't exist
The JBoss Portal source files can be obtained from the
JBoss Portal Downloads
page. The source files download uses a
JBoss Portal Source Code
naming convention. As well, the sources can be obtained from SVN. The latest
sources for the 2.7.
x
versions are located at
http://anonsvn.jboss.org/repos/portal/branches/JBoss_Portal_Branch_2_7
.
Several modules have been extracted from the JBoss Portal SVN repository. These modules have a different lifecycle and a different version scheme. The following is a list of modules used in JBoss Portal 2.7.0, and the locations of their source code:
JBoss Portal Common 1.2.1: http://anonsvn.jboss.org/repos/portal/modules/common/tags/JBP_COMMON_1_2_1
JBoss Portal Web 1.2.1: http://anonsvn.jboss.org/repos/portal/modules/web/tags/JBP_WEB_1_2_1
JBoss Portal Test 1.0.3: http://anonsvn.jboss.org/repos/portal/modules/test/tags/JBP_TEST_1_0_3
JBoss Portal Portlet 2.0.2: http://anonsvn.jboss.org/repos/portal/modules/portlet/tags/JBP_PORTLET_2_0_2
JBoss Portal Identity 1.0.4: http://anonsvn.jboss.org/repos/portal/modules/identity/tags/JBP_IDENTITY_1_0_4
After checking out the source from SVN, or after extracting the
JBoss Portal Source Code
ZIP file, a directory structure similar to the following will be created:
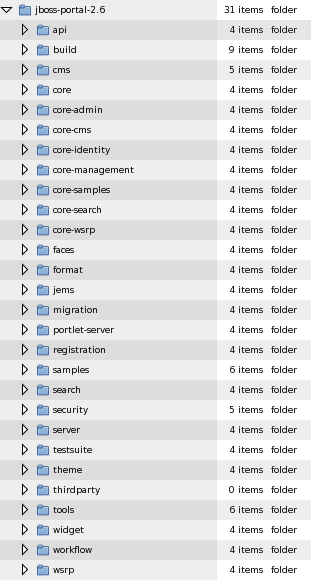
If the source files were obtained from SVN, change into the
trunk/src/
directory to see the directories from the above image. As well, there is an
empty
thirdparty
directory. This directory contains files after building the JBoss Portal
source code (refer to
Section 2.3.3, “Building and Deploying from the Sources”
). For more information about the JBoss Portal SVN repository, and accessing
different versions of the JBoss Portal codebase, refer to the
JBoss Portal SVN Repo
page on the JBoss Wiki.
Before deploying JBoss Portal, make sure you have JBoss EAP or JBoss AS installed. Customers who have access to the JBoss Customer Support Portal (CSP) are advised to download and install JBoss EAP 4.3. Customers who do not have access to the JBoss CSP are advised to use JBoss AS . For JBoss AS installation instructions, please refer to the JBoss AS Installation Guide .
Use the JBoss EAP and JBoss AS ZIP file
Only use the JBoss EAP and JBoss AS ZIP file versions. DO NOT ATTEMPT to deploy JBoss Portal on the installer version of JBoss EAP or JBoss AS. We are currently working on aligning the Application installer with JBoss Portal.
For JBoss EAP, JBoss AS, and build targets to work, you must configure a
JBOSS_HOME
environment variable. This environment variable must point to the root
directory of the JBoss EAP or JBoss AS installation directory, which is the
directory where the JBoss EAP or JBoss AS files were extracted to.
On Windows, this is accomplished by going to
Start > Settings > Control Panel > System > Advanced > Environment
Variables
. Under the
System Variables
section, click
New
. Set the
JBOSS_HOME
environment variable to the location of your JBoss EAP or JBoss AS
installation directory:
To configure the
JBOSS_HOME
environment variable on Linux:
Add the following line to the
~/.bashrcfile. Note: this must be configured while logged in as the user who runs JBoss EAP or JBoss AS:export JBOSS_HOME=/path/to/jboss/installation/Run the following command to enable the
JBOSS_HOMEenvironment variable:source ~/.bashrc
JBoss EAP
JBOSS_HOME
Environment Variable
If you are running JBoss EAP, configure the
JBOSS_HOME
environment variable to point to the
/path/to/jboss-eap-
directory.
version
/jboss-as/
During the first build, third-party libraries are obtained from an online
repository, so you must be connected to the Internet, and if you are behind a
proxy server, you need to define your proxy server address and proxy server
port number. To define a proxy server, add the following line to the
$JBOSS_HOME/bin/run.conf
file:
JAVA_OPTS=-Dhttp.proxyHost=<proxy-hostname> -Dhttp.proxyPort=<proxy-port>
Replace
proxy-hostname
with the proxy server's hostname, and
proxy-port
with the correct proxy server port number.
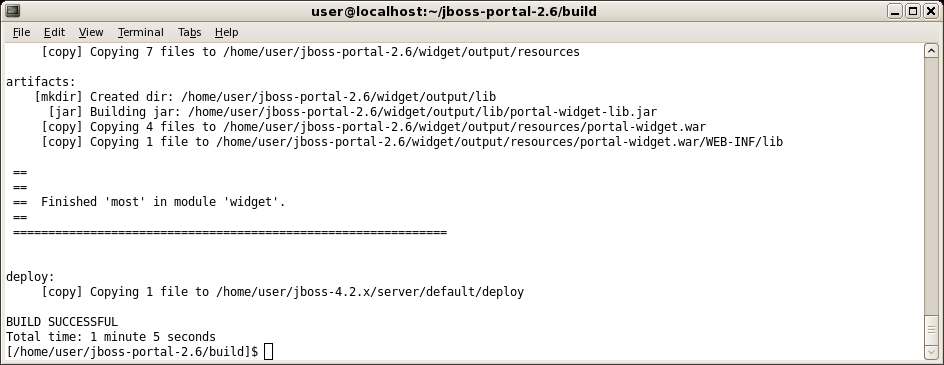
To build and deploy JBoss Portal from the sources, change into the
JBOSS_PORTAL_SOURCE_DIRECTORY/build/
directory, where
JBOSS_PORTAL_SOURCE_DIRECTORY
is the directory where the JBoss Portal source code was downloaded to. Then,
Windows users need to run the
build.bat deploy
command, and Linux users need to run the
sh build.sh deploy
command.
At the end of the build process, the
jboss-portal.sar
file is copied into the
$JBOSS_HOME/server/default/deploy/
directory:
Portal Modules
The previous steps install a bare version of JBoss Portal. In previous
versions, several additional modules were deployed as well, but this has
since been modularized to provide greater flexibility. To deploy
additional modules, refer to the
Portal's module list
for more information. To deploy all modules at once, change into the
build
directory. If you are running Linux, run the
sh build.sh deploy-all
command. On Windows, run the
build.bat deploy-all
command.
To build the clustered version on Linux operating systems:
Change into the
JBOSS_PORTAL_SOURCE_DIRECTORY/build/directory, and run the following command:sh build.sh main
Change into the
JBOSS_PORTAL_SOURCE_DIRECTORY/core/directory, and run the following command:sh build.sh deploy-ha
After the
sh build.sh deploy-hacommand completes, thejboss-portal-ha.sarfile is copied into the$JBOSS_HOME/server/all/deploy/directory.
To build the clustered version on Windows, repeat the previous steps,
replacing
sh build.sh
with
build.bat
.
A database is required for JBoss Portal to run. JBoss EAP and JBoss AS include an embedded Hypersonic SQL database that JBoss Portal can use; however, this is only recommended for developer use. The following databases are recommended for production use, and have had test suites run against them: MySQL 4 and 5, Microsoft SQL Server, PostgreSQL 8, and Oracle Database 9 and 10. JBoss Portal can use any database that is supported by Hibernate.
To configure a database to use with JBoss Portal:
Create a new database: this guide assumes that the new database is called jbossportal .
Grant access rights for a user to the jbossportal database: JBoss Portal needs to create tables and modify table data. Grant access rights to a desired user to the jbossportal database. Configure the same username and password in the Datasource descriptor.
Deploy an RDBMS JDBC connector: an RDBMS JDBC connector is required for JBoss Portal to communicate with a database. Copy the connector into the
$JBOSS_HOME/server/default/lib/directory. For example, an RDBMS JDBC connector for MySQL can be download from http://www.mysql.com/products/connector/j/ . For the correct RDMBS JDBC connector, please refer to the database documentation.
The JBoss Portal binary download that was extracted in
Section 2.2.1.1, “Getting the Binary”
, contains pre-configured Datasource descriptors for the more popular
databases. Datasource descriptors are provided for the MySQL 4 and 5,
PostgreSQL, Microsoft SQL Server, and Oracle databases, and can be found in
the
setup
subdirectory where the JBoss Portal binary was extracted to:
Copy the Datasource descriptor that matches your database into the
$JBOSS_HOME/server/
directory, where
configuration
/deploy/
configuration
is either all, default, minimal, or production. For example, if you are using
the production configuration, copy the Datasource descriptor into the
$JBOSS_HOME/server/production/deploy/
directory. The production configuration only exists on JBoss EAP
installations, and not JBoss AS.
After the Datasource descriptor has been copied into the
deploy
directory, make sure the
user-name
,
password
,
connection-url
, and
driver-class
, are correct for your chosen database. Datasource descriptor files can be
deployed to test before being used in production. The following is an example
Datasource descriptor for a PostgreSQL database:
<?xml version="1.0" encoding="UTF-8"?>

<datasources>

  <local-tx-datasource>

    <jndi-name>PortalDS</jndi-name>

    <connection-url>jdbc:postgresql:jbossportal</connection-url>

    <driver-class>org.postgresql.Driver</driver-class>

    <user-name>portal</user-name>

    <password>portalpassword</password>

  </local-tx-datasource>

</datasources>
For further details about Datasource descriptors, please refer to the JBoss JDBC Datasource Wiki page .
To start JBoss EAP or JBoss AS and deploy JBoss Portal:
Datasource descriptor: if you have not done so already, change into the
setupsubdirectory where the JBoss Portal binary was extracted to. Copy the correct Datasource descriptor file (*-ds.xml) you modified in the previous steps into the$JBOSS_HOME/server/directory.configuration/deploy/Start the server: change into the
$JBOSS_HOME/bin/directory. On Windows, executerun.bat. On Linux, run thesh run.shcommand. To specify a configuration to use, for example, the default configuration, append the-c defaultoption to therun.batorsh run.shcommands.Log in to JBoss Portal: using a Web browser, navigate to http://localhost:8080/portal to open the JBoss Portal homepage. Log in using one of the two default accounts: username user , password user , or username admin , password admin .
SQL Errors
Tables are automatically created the first time JBoss Portal starts. When deployed for the first time, JBoss Portal checks for the existence of the initial tables, which have not been created yet. This causes errors such as the following, which can safely be ignored:
WARN  [JDBCExceptionReporter] SQL Error: -22, SQLState: S0002
ERROR [JDBCExceptionReporter] Table not found in statement ...
WARN  [JDBCExceptionReporter] SQL Error: 1146, SQLState: 42S02
ERROR [JDBCExceptionReporter] Table 'jbossportal.jbp_cms_repositoryentry' doesn't exist
WARN  [JDBCExceptionReporter] SQL Error: 1146, SQLState: 42S02
ERROR [JDBCExceptionReporter] Table 'jbossportal.jbp_cms_version_refs' doesn't exist