The Portlet Specifications aims at defining portlets that can be used by any JSR-168 (Portlet 1.0) or JSR-286 (Portlet 2.0) portlet container. Most Java EE portals include one, it is obviously the case for JBoss Portal which includes the JBoss Portlet container supporting the two versions. This chapter gives a brief overview of the Portlet Specifications but portlet developers are strongly encouraged to read the JSR-286 Portlet Specification .
JBoss Portal is fully JSR-286 compliant, which means any JSR-168 or JSR-286 portlet behaves as it is mandated by the respective specifications inside the portal.
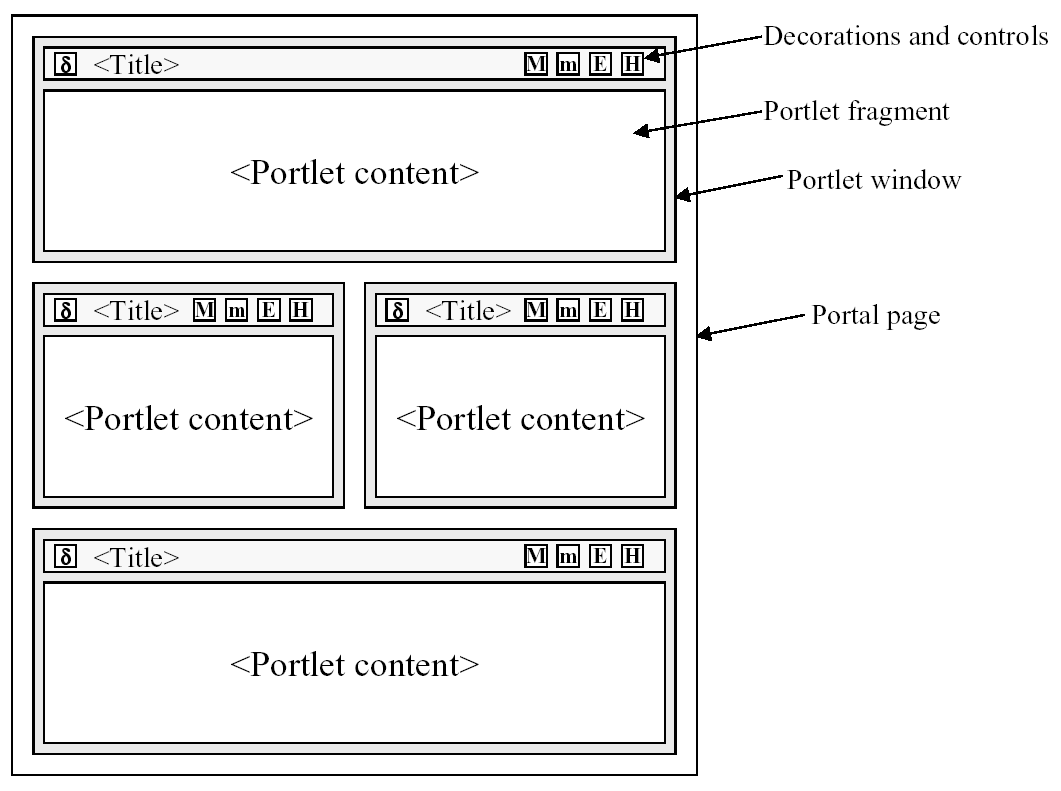
A portal can be seen as pages with different areas, and inside areas, different windows, and each window having one portlet:
A portlet can have different view modes. Three modes are defined by the JSR-288 specification:
view - generates markup reflecting the current state of the portlet.
edit - allows a user to customize the behavior of the portlet.
help - provides information to the user as to how to use the portlet.
Window states are an indicator of how much page real-estate a portlet consumes on any given page. The three states defined by the JSR-168 specification are:
normal - a portlet shares this page with other portlets.
minimized -a portlet may show very little information, or none at all.
maximized - a portlet may be the only portlet displayed on this page.
The tutorials contained in this chapter are targeted toward portlet developers. Although they are a good starting and reference point, it is highly recommend that portlet developers read and understand the JSR-286 Portlet Specification . Feel free to use the JBoss Portal User Forums for user-to-user help.
This section describes how to deploy a portlet in JBoss Portal. You will
find the
SimplestHelloWorld
portlet in the
examples
directory at the root of your JBoss Portal binary package.
This example is using Maven to compile and build the web archive. If you don't have Maven already installed, you will find a version for your operating system here
To compile and package the application, go to the SimplestHelloWorld
directory and type
mvn package
.
Once successfully packaged, the result should be available in:
SimplestHelloWorld/target/SimplestHelloWorld-0.0.1.war
. Simply copy that file into
JBOSS_HOME/server/default/deploy
, then start JBoss Application Server if it was not already started.
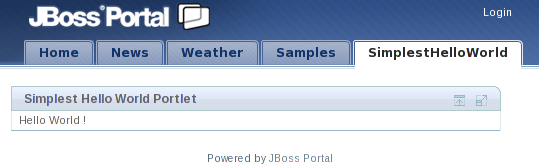
You should now see a new page called
SimplestHelloWorld
, with a window inside containing the portlet instance we have created, as
seen below.
Now that we have seen how to deploy an existing web application, let's have a look inside.
Like other Java Platform, Enterprise Edition (Java EE) applications, portlets are packaged in WAR files. A typical portlet WAR file can include servlets, resource bundles, images, HTML, JavaServer™ Pages ( JSP™ ), and other static or dynamic files. The following is an example of the directory structure of the HelloWorldPortlet portlet:
|-- SimplestHelloWorld-0.0.1.war | `-- WEB-INF | |-- classes | | `-- org | | `-- jboss | | `-- portal | | `-- portlet | | `-- samples | |`-- SimplestHelloWorldPortlet.class | |-- de
fault-object.xml | |-- po
rtlet-instances.xml | |-- po
rtlet.xml | `-- we
b.xml
| The compiled Java class implementing javax.portlet.Portlet (through javax.portlet.GenericPortlet ) |
| default-object.xml is an optional file, it is used to define the layout of the portal. It can be used to define the different portals, pages and windows. The same result can be obtained through the administration portal. Note that the definition of the layout is stored in database, this file is then used to populate the database during deployment which can be very useful during development. |
| portlet-instances.xml is also optional, it allows to create a portlet instance from the SimpleHelloWorld portlet definition. Creating instances can also be done through the administration portal. Note that the definition of instances is stored in database, this file is then used to populate the database during deployment which can be very useful during development. Having portlet-instances.xml and default-object.xml included in this package ensures that the portlet will appear directly on the portal by just deploying the web application. |
| This is the mandatory descriptor files for portlets. It is used during deployment.. |
| This is the mandatory descriptor for web applications. |
Let's study the Java class in detail.
The following file is the
SimplestHelloWorldPortlet/src/main/java/org/jboss/portal/portlet/samples/SimplestHelloWorldPortlet.java
Java source.
package org.jboss.portal.portlet.samples;
import java.io.IOException;
import java.io.PrintWriter;
import javax.portlet.GenericPortlet;
import javax.portlet.RenderRequest;
import javax.portlet.RenderResponse;
{
public void doView(RenderRequest request,
{
}
}
|
All portlets must implement the
|
|
As we extend from
|
| Use the RenderResponse to obtain a writer to be used to produce content. |
| Write the markup to display. |
| Closing the writer. |
Markup Fragments
Portlets are responsible for generating markup fragments, as they are
included on a page and are surrounded by other portlets. In
particular, this means that a portlet outputting HTML must not output
any markup that cannot be found in a
<body>
element.
JBoss Portal requires certain descriptors to be included in a portlet WAR file. Some of these descriptors are defined by the Portlet Specification, and others are specific to JBoss Portal.
The following is an example of the
SimplestHelloWorldPortlet/WEB-INF/portlet.xml
file. This file must adhere to its definition in the JSR-286 Portlet
Specification. You may define more than one portlet application in this
file:
<portlet-app xmlns="http://java.sun.com/xml/ns/portlet/portlet-app_2_0.xsd"
   xmlns:xsi="http://www.w3.org/2001/XMLSchema-instance"
   xsi:schemaLocation="http://java.sun.com/xml/ns/portlet/portlet-app_2_0.xsd
                                         http://java.sun.com/xml/ns/portlet/portlet-app_2_0.xsd"
   version="2.0">
   <portlet>
      <portlet-name>SimplestHelloWorldPortlet</portlet-name>
      <portlet-class>
         org.jboss.portal.portlet.samples.SimplestHelloWorldPortlet
      </portlet-class>
      <supports>
        <mime-type>text/html</mime-type>
      </supports>
      <portlet-info>
          <title>Simplest Hello World Portlet</title>
      </portlet-info>
   </portlet>
</portlet-app>
| Define the portlet name. It does not have to be the class name. |
| The Fully Qualified Name (FQN) of your portlet class must be declared here. |
|
The
|
|
When rendered, the portlet's title is displayed as the header in
the portlet window, unless it is overridden programmatically. In
this example, the title would be
|
The
SimplestHelloWorldPortlet/WEB-INF/portlet-instances.xml
file is a JBoss Portal specific descriptor, that allows you to create
instances of portlets. The
<portlet-ref>
value must match the
<portlet-name>
value given in the
SimplestHelloWorldPortlet/WEB-INF/portlet.xml
file. The
<instance-id>
value can be named anything, but it must match the
<instance-ref>
value given in the
*-object.xml
file, which in this example, would be the
SimplestHelloWorldPortlet/WEB-INF/default-object.xml
file.
The following is an example of the
SimplestHelloWorldPortlet/WEB-INF/portlet-instances.xml
file:
<?xml version="1.0" standalone="yes"?>

<!DOCTYPE deployments PUBLIC

   "-//JBoss Portal//DTD Portlet Instances 2.6//EN"

   "http://www.jboss.org/portlet/dtd/portlet-instances_2_6.dtd">

<deployments>

   <deployment>

      <instance>

         <instance-id>SimplestHelloWorldInstance</instance-id>

         <portlet-ref>SimplestHelloWorldPortlet</portlet-ref>

      </instance>

   </deployment>

</deployments>
The
*-object.xml
file is a JBoss Portal specific descriptor that allow users to define the
structure of their portal instances, and create and configure their windows
and pages. In the following example:
a portlet window is created.
specifies that the window displays the markup generated by the
SimplestHelloWorldInstanceportlet instance.the window is assigned to the page that we are creating and called
SimplestHelloWorldpage.the
<region>element specifies where the window appears on the page.
The following is an example
SimplestHelloWorldPortlet/WEB-INF/default-object.xml
file:
<?xml version="1.0" encoding="UTF-8"?>
<!DOCTYPE deployments PUBLIC
"-//JBoss Portal//DTD Portal Object 2.6//EN"
"http://www.jboss.org/portal/dtd/portal-object_2_6.dtd">
<deployments>
<deployment>
<parent-ref>default</parent-ref>
<if-exists>overwrite</if-exists>
<page>
<page-name>SimplestHelloWorld</page-name>
<window>
<window-name>SimplestHelloWorldWindow</window-name>
<instance-ref>SimplestHelloWorldInstance</instance-ref>
<r egion>center</region>
<h
egion>center</region>
<h eight>0</height>
</window>
</page>
</deployment>
</deployments>
eight>0</height>
</window>
</page>
</deployment>
</deployments>
|
Tells the portal where this portlet appears. In this case,
|
|
Instructs the portal to overwrite or keep this object if it
already exists. Accepted values are
|
| Here we are creating a new page to put the new window on. We give that new page a name that will be by default used on the tab of the default theme. |
| A unique name given to the portlet window. This can be named anything. |
|
The value of
|
| Specifies where the window appears within the page layout. |
| Specifies where the window appears within the page layout. |
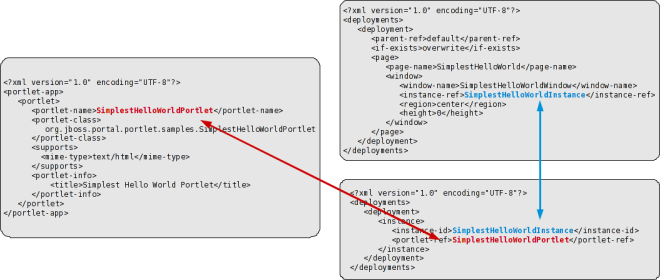
The following diagram illustrates the relationship between the
portlet.xml
,
portlet-instances.xml
, and
default-object.xml
descriptors:
JBoss Portal 2.6 introduced the notion of
content-type
, which is a generic mechanism to specify what content displayed by a given
portlet window. The
window
section of the previous example,
SimplestHelloWorldPortlet/WEB-INF/default-object.xml
, can be re-written to take advantage of the new content framework. The
following is an example deployment descriptor that uses the new content
framework:
<?xml version="1.0" encoding="UTF-8"?>

<!DOCTYPE deployments PUBLIC

   "-//JBoss Portal//DTD Portal Object 2.6//EN"

   "http://www.jboss.org/portal/dtd/portal-object_2_6.dtd">

<deployments>

   <deployment>

      <parent-ref>default.default</parent-ref>

      <if-exists>overwrite</if-exists>

      <window>

         <window-name>SimplestHelloWorldWindow</window-name>

         <content>

            <content-type>portlet</content-type>

            <content-uri>SimplestHelloWorldInstance</content-uri>

         </content>

         <region>center</region>

         <height>1</height>

      </window>

   </deployment>

</deployments>
This declaration is equivalent to the previous
SimplestHelloWorldPortlet/WEB-INF/default-object.xml
example. Use
<content-type>
to specify the content to display. In this example, the content being
displayed by the
SimplestHelloWorldWindow
is a
portlet
. The
<content-uri>
element specifies which content to display, which in this example, is the
SimplestHelloWorldInstance
:
<content>

   <content-type>portlet</content-type>

   <content-uri>SimplestHelloWorldInstance</content-uri>

</content>
To display certain content or a file, use the
cms
content-type, with the
<content-uri>
element being the path to the file in the CMS. This behavior is pluggable:
you can plug in almost any type of content.
Beware of context-path change
If the context-path change the portal may not be able to find a
reference on your portlets anymore. For that reason it's recommended to
add the following descriptor
WEB-INF/jboss-portlet.xml
which is not mandatory:
<!DOCTYPE portlet-app PUBLIC

 "-//JBoss Portal//DTD JBoss Portlet 2.6//EN"

 "http://www.jboss.org/portal/dtd/jboss-portlet_2_6.dtd">


<portlet-app>

   <app-id>SimplestHelloWorld</app-id>

</portlet-app>
Now we will add more features to the previous example and also use a JSP
page to render the markup. We will use the portlet tag library to generate
links to our portlet in different ways and use the other standard portlet
modes. This example can be found in the directory
JSPHelloUser.
Use mvn package then copy JSPHelloUser/target/JSPHelloUser-0.0.1.war
in the deploy directory of JBoss Application Server.
Point your brwoser to , you should see the following:
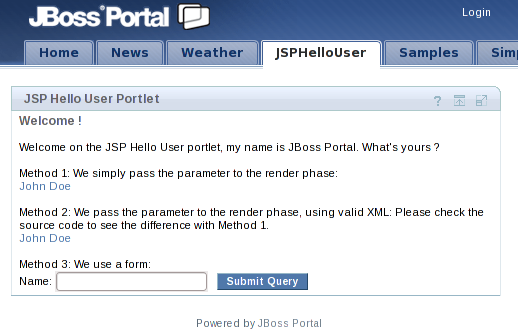
Note
The EDIT button only appears with logged-in users, which is not the case
on the screenshot
The structure doesn't change much at the exception of adding some JSP files detailed later.
The JSPHelloUser portlet contains the traditional portlet and JBoss Portal specific application descriptors. The following is an example of the directory structure of the JSPHelloUser portlet:
JSPHelloUser-0.0.1.war
    |-- META-INF
    |   |-- MANIFEST.MF
    |   `-- maven
    |       `-- org.jboss.portal.example
    |           `-- JSPHelloUser
    |               |-- pom.properties
    |               `-- pom.xml
    |-- WEB-INF
    |   |-- classes
    |   |   `-- org
    |   |       `-- jboss
    |   |           `-- portal
    |   |               `-- portlet
    |   |                   `-- samples
    |   |                       `-- JSPHelloUserPortlet.class
    |   |-- default-object.xml
    |   |-- jboss-portlet.xml
    |   |-- portlet-instances.xml
    |   |-- portlet.xml
    |   `-- web.xml
    `-- jsp
        |-- edit.jsp
        |-- hello.jsp
        |-- help.jsp
        `-- welcome.jsp
Let's study the Java class in detail.
The following file is the
JSPHelloUser/src/main/java/org/jboss/portal/portlet/samples/JSPHelloUserPortlet.java
Java source. It is split in different pieces.
package org.jboss.portal.portlet.samples;
package org.jboss.portal.portlet.samples;
import java.io.IOException;
import javax.portlet.ActionRequest;
import javax.portlet.ActionResponse;
import javax.portlet.GenericPortlet;
import javax.portlet.PortletException;
import javax.portlet.PortletRequestDispatcher;
import javax.portlet.RenderRequest;
import javax.portlet.RenderResponse;
import javax.portlet.UnavailableException;
public class JSPHelloUserPortlet extends GenericPortlet
{
throws PortletException, IOException
{
if (sYourName != null)
{
request.setAttribute("yourname", sYourName);
prd.include(request, response);
}
else
{
PortletRequestDispatcher prd = getPortletContext().getRequestDispatcher("/jsp/welcome.jsp");
prd.include(request, response);
}
}
...
| As in the first portlet, we override the doView method. |
|
Here we try to obtain the value of the render parameter names
|
| Very similar to the Servlet way, we get a request dispatcher on a file located within the web archive. |
| The last step is to perform the inclusion of the markup obtained from the JSP. |
We have seen the
VIEW
portlet mode, the spec defines two other modes that can be used called
EDIT
and
HELP
. In order to enable those modes, they will need to be defined in the
portlet.xml
descriptor as we will see later. Having those modes defined will enable the
corresponding buttons on the portlet's window.
The generic portlet that is inherited dispatches the different views to
methods named:
doView
,
doHelp
and
doEdit
. Let's watch the code for those two last portlet modes.
...

   protected void doHelp(RenderRequest rRequest, RenderResponse rResponse) throws PortletException, IOException,

         UnavailableException

   {

      rResponse.setContentType("text/html");

      PortletRequestDispatcher prd = getPortletContext().getRequestDispatcher("/jsp/help.jsp");

      prd.include(rRequest, rResponse);

   }


   protected void doEdit(RenderRequest rRequest, RenderResponse rResponse) throws PortletException, IOException,

         UnavailableException

   {

      rResponse.setContentType("text/html");

      PortletRequestDispatcher prd = getPortletContext().getRequestDispatcher("/jsp/edit.jsp");

      prd.include(rRequest, rResponse);

   }

...
If you have read the portlet specification carefully you should have notice that portlet calls happen in one or two phases. One when the portlet is just rendered, two when the portlet is actionned then rendered. An action phase is a phase where some state change. The render phase will have access to render parameters that will be passed each time the portlet is refreshed (with the exception of caching capabilities).
The code to be executed during an action has to be implemented in the processAction method of the portlet.
...
UnavailableException
{
}
...
|
|
| Here we retrieve the parameter obtained through an action URL . |
|
Here we need to keep the value of
|
Let's have a look inside the JSP pages.
The
help.jsp
and
edit.jsp
files are very simple, they simply display some text. Note that we used CSS
styles as defined in the portlet specification. It ensures that the portlet
will look "good" within the theme and accross portal vendors.
<div class="portlet-section-header">Help mode</div>

<div class="portlet-section-body">This is the help mode, a convenient place to give the user some help information.</div>
<div class="portlet-section-header">Edit mode</div>

<div class="portlet-section-body">This is the edit mode, a convenient place to let the user change his portlet preferences.</div>
Now let's have a look at the landing page, it contains the links and form to call our portlet:
<%@ taglib uri
| Since we will use the portlet taglib, we first need to declare it. |
|
The first method showed here is the simplest one,
|
|
In this method instead of having a tag within another tag, which
is not XML valid, we use the
|
|
The variable
|
| The third method mixes form submission and action request. Like in the second method, we used a temporary variable to put the created URL into. |
| The action URL is used in the HTML form. |
On the third method, first the action phase is triggered then later in the request, the render phase is triggered, which output some content back to the web browser based on the available render parameters.